

Campaigns
Where Armorama group builds can be discussed, organized, and updates posted.
Where Armorama group builds can be discussed, organized, and updates posted.
Hosted by Darren Baker, Richard S.
Matchbox AFV Nostalgia Campaign

panzerman1

Joined: September 30, 2010
KitMaker: 430 posts
Armorama: 291 posts
Posted: Wednesday, December 19, 2012 - 09:45 AM UTC
Stefan, that's Cool...the SAS kit is one of my favorites from the Matchbox range....multiple figures and lots of extras(weapons & gear). Is that kit one of the ones where the base is too small for the vehicles??? The Priest, M-40, and the tank transporter all have bases too small for its display. In my case , I will add Miliput additions to get the room I need. Have FUN. Bill.
panzerman1
Joined: September 30, 2010
KitMaker: 430 posts
Armorama: 291 posts
Posted: Sunday, December 23, 2012 - 05:47 AM UTC
Happy Holidays to All my Armor Brethren. Update....Made a transition unit-belt drive for the winch. Also detailed out the Rogers Trailer. Photos..................


Comments are welcomed. Thanks for viewing. Bill
Comments are welcomed. Thanks for viewing. Bill

SgtRam

#197

Joined: March 06, 2011
KitMaker: 3,971 posts
Armorama: 2,859 posts

Posted: Sunday, December 23, 2012 - 09:02 AM UTC
Bill
That is looking great, thanks for the update.
Kevin
That is looking great, thanks for the update.
Kevin
panzerman1
Joined: September 30, 2010
KitMaker: 430 posts
Armorama: 291 posts
Posted: Wednesday, December 26, 2012 - 12:15 PM UTC
Thanks Kevin. Everything is at the paint stage and decaling
process. The Original decals are a bear, but I'm making them work(with lots of help from Micro-set & sol). 40 year old decals that are still Useable....Pretty Cool. Will have photo update soon. Bill.
process. The Original decals are a bear, but I'm making them work(with lots of help from Micro-set & sol). 40 year old decals that are still Useable....Pretty Cool. Will have photo update soon. Bill.
ChaosXVI

Joined: October 24, 2009
KitMaker: 128 posts
Armorama: 126 posts

Posted: Wednesday, December 26, 2012 - 03:25 PM UTC
Merry Christmas friends! 

Sorry for the delay in uploading photos. After painting the Pz. II late October, I accidentally lost one of the road wheels. I made a copy as a replacement. So by Late November, this was how he looked like:

I used Vallejo Model Air paint German Light Brown as the base color. I was told that the DAK tanks used brown paint to cover the Panzer Grey. I then proceeded to add every kind of pigment I thought would be appropriate for a tank that saw action in North Africa. So now this is how it looks:

I've also painted the base with Buff and Yellow Sand and given a Brown wash and some filtering...


Just need to paint the two figures and I'm done
Sorry for the delay in uploading photos. After painting the Pz. II late October, I accidentally lost one of the road wheels. I made a copy as a replacement. So by Late November, this was how he looked like:
I used Vallejo Model Air paint German Light Brown as the base color. I was told that the DAK tanks used brown paint to cover the Panzer Grey. I then proceeded to add every kind of pigment I thought would be appropriate for a tank that saw action in North Africa. So now this is how it looks:
I've also painted the base with Buff and Yellow Sand and given a Brown wash and some filtering...
Just need to paint the two figures and I'm done

tatbaqui

#040
Joined: May 06, 2007
KitMaker: 2,713 posts
Armorama: 2,451 posts

Posted: Wednesday, December 26, 2012 - 04:09 PM UTC
Toby (@ChaosXVI), losing / breaking parts is a pain (especially when its already built). But its good to hear that you were able to re-cast one.
Bill (@panzerman1) -- hats off to you on the level of detail you're putting in at such a scale!
The Sherman that I have for the campaign has already been primed a couple of days back -- but just this morning I noticed one of the tracks broke. Maybe its because of its age. Anyways I will need to figure out a way to fix it.

Cheers,
Tat
Bill (@panzerman1) -- hats off to you on the level of detail you're putting in at such a scale!
The Sherman that I have for the campaign has already been primed a couple of days back -- but just this morning I noticed one of the tracks broke. Maybe its because of its age. Anyways I will need to figure out a way to fix it.
Cheers,
Tat

tinbanger
Joined: February 04, 2008
KitMaker: 2,507 posts
Armorama: 88 posts

Posted: Thursday, December 27, 2012 - 12:32 PM UTC
Hi
Here is my entry.


Here is my entry.

SgtRam
#197
Joined: March 06, 2011
KitMaker: 3,971 posts
Armorama: 2,859 posts
Posted: Thursday, December 27, 2012 - 12:37 PM UTC
Toby - great recovery, looks great.
Tat - Firefly coming along.
Tat - Firefly coming along.

firstcircle


Joined: November 19, 2008
KitMaker: 2,249 posts
Armorama: 2,007 posts
Posted: Saturday, December 29, 2012 - 12:01 PM UTC
Greetings fellow Matchbox kit nostalgia fans. Apologies for not contributing to this campaign for such a long time, various other Armorama activities having taking precendence, although I have been keepting an eye on the calendar, and still feel I can complete this one.
Since my last outing back on page 5, I now have something to report. A certain braille fanatic's remark regarding my Priest has been playing on my mind...
...and I know there was a in there somewhere too...
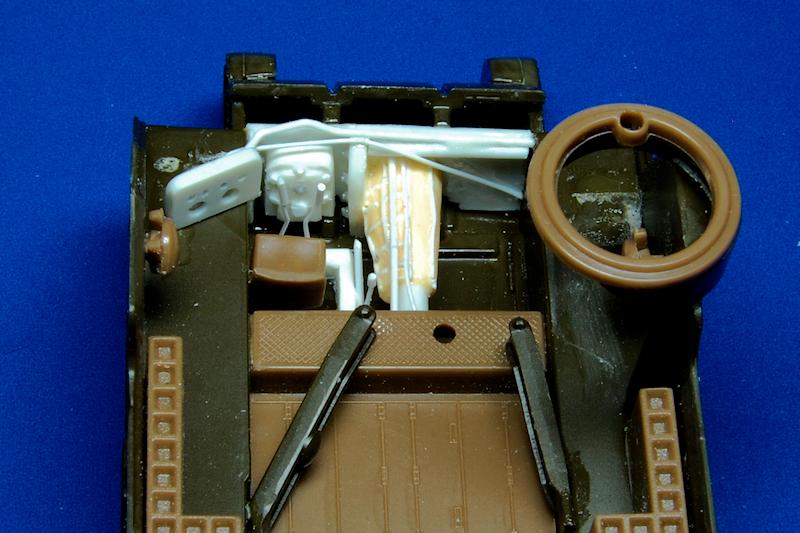
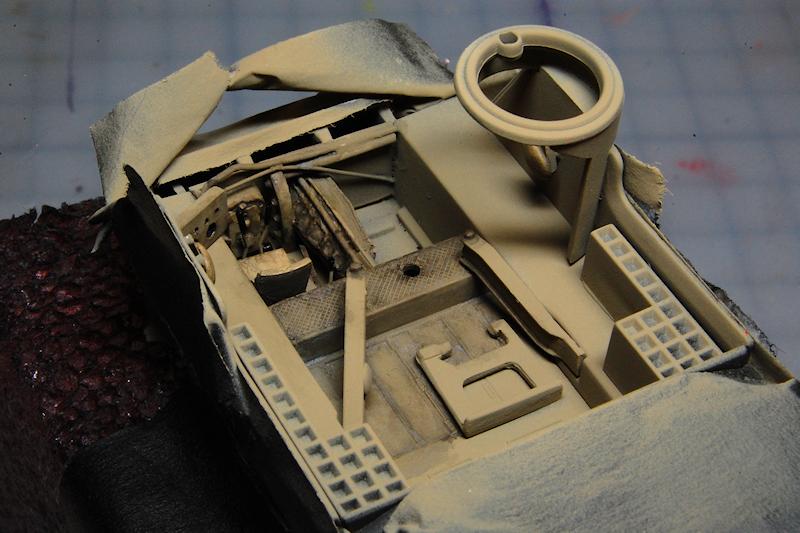
So, this evening I have created the transmission housing, steering and various other driver's levers, various bits of cabling, pipework, and bolted bulkheads, and not forgetting the small instrument panel to the left of the driver.
Fitting the instrument panel required the removal and dumping of part 69, which seemed to be a couple of non-descript storage boxes and were in the way of the correct location point, plus the rejection of the kit-supplied instrument panel, part 68, which is shown as attaching underneath the driver's vision port. I hope this is all acceptably within the spirit of the campaign; I did use a few bits of rod and card for this, does that count as "aftermarket"? Really needs a vertical bulkhead to separate the driver from the slot that the gun pokes through.
Anyway, a couple of pics
Since my last outing back on page 5, I now have something to report. A certain braille fanatic's remark regarding my Priest has been playing on my mind...
Quoted Text
It wouldn't be too difficult to add a simple transmission housing up front as well as steering levers and a bit of storage to the right of the driver. ... Let's mot forget a small instrument panel to the left of the driver.
...and I know there was a
in there somewhere too...So, this evening I have created the transmission housing, steering and various other driver's levers, various bits of cabling, pipework, and bolted bulkheads, and not forgetting the small instrument panel to the left of the driver.
Fitting the instrument panel required the removal and dumping of part 69, which seemed to be a couple of non-descript storage boxes and were in the way of the correct location point, plus the rejection of the kit-supplied instrument panel, part 68, which is shown as attaching underneath the driver's vision port. I hope this is all acceptably within the spirit of the campaign; I did use a few bits of rod and card for this, does that count as "aftermarket"? Really needs a vertical bulkhead to separate the driver from the slot that the gun pokes through.
Anyway, a couple of pics
firstcircle
Joined: November 19, 2008
KitMaker: 2,249 posts
Armorama: 2,007 posts
Posted: Saturday, December 29, 2012 - 12:06 PM UTC
Having looked at Bill's very nice Diamond T - "Made a transition unit-belt drive for the winch" - I'm now feeling comfortable my mods will be legal.

naimbrain

Joined: March 15, 2010
KitMaker: 123 posts
Armorama: 118 posts
Posted: Sunday, December 30, 2012 - 09:17 AM UTC
There's certainly been a lot of great work being done for this campaign...
Panzerman: Fantastic work on the Diamond T and trailer, the extra detail is really bringing this old and rather basic kit to life. I've got a (now broken) example that was built many a year back, at the time I was fairly pleased with my out-of the-box results at the time, I can only imagine that yours is going to look amazing!!
Chaos XVI: Nice paint job on the Pz II, my in progress photos of the same kit are below. You obviously did better research than me, I thought the cut-outs in the storage boxes were poor fitting parts and filled them accordingly, but looking at yours the originals would obviously have needed the cut-outs to fit over the fender supports - hey ho!
firstcircle: Lovely work on the added detail, as with Panzerman's Diamond T I can only guess that this will look stunning when completed.
So here's my much delayed entry:

A 'before' shot from 22nd November

Current shots with the initial coat of paint applied, as always the camera pulls out all the spots with no paint on yet. Bizarrely the base and tank are exactly the same shade at the moment, but look very different in the photos.. go figure!?

Look at those carefully filled cut-outs in the storage boxes (durr!!)

I thinned the 'fenders' (probably the wrong terminology here), and I decided to remove the spare wheel mounting moldings and hang on to the spare wheel in case I lose one (I don't have Panzerman's skill in fabricating replacement parts).
Tracks are still lose at the moment, but will eventually be super-glued in place, I've just noticed that Panzerman 'lost' the track joins above the wheels, I think this looks better than my current configuration so I'll shamelessy copy him.
I'm quite encouraged by my efforts so far, I think it's a nice little kit to work on, and I'm additionally encouraged by seeing how nicely Panzerman's has turned out. Next job is to clean up and paint the figures, then on with the detailing/weathering.
Cheers,
John
Panzerman: Fantastic work on the Diamond T and trailer, the extra detail is really bringing this old and rather basic kit to life. I've got a (now broken) example that was built many a year back, at the time I was fairly pleased with my out-of the-box results at the time, I can only imagine that yours is going to look amazing!!
Chaos XVI: Nice paint job on the Pz II, my in progress photos of the same kit are below. You obviously did better research than me, I thought the cut-outs in the storage boxes were poor fitting parts and filled them accordingly, but looking at yours the originals would obviously have needed the cut-outs to fit over the fender supports - hey ho!
firstcircle: Lovely work on the added detail, as with Panzerman's Diamond T I can only guess that this will look stunning when completed.
So here's my much delayed entry:

A 'before' shot from 22nd November
Current shots with the initial coat of paint applied, as always the camera pulls out all the spots with no paint on yet. Bizarrely the base and tank are exactly the same shade at the moment, but look very different in the photos.. go figure!?
Look at those carefully filled cut-outs in the storage boxes (durr!!)
I thinned the 'fenders' (probably the wrong terminology here), and I decided to remove the spare wheel mounting moldings and hang on to the spare wheel in case I lose one (I don't have Panzerman's skill in fabricating replacement parts).
Tracks are still lose at the moment, but will eventually be super-glued in place, I've just noticed that Panzerman 'lost' the track joins above the wheels, I think this looks better than my current configuration so I'll shamelessy copy him.
I'm quite encouraged by my efforts so far, I think it's a nice little kit to work on, and I'm additionally encouraged by seeing how nicely Panzerman's has turned out. Next job is to clean up and paint the figures, then on with the detailing/weathering.
Cheers,
John
tatbaqui
#040
Joined: May 06, 2007
KitMaker: 2,713 posts
Armorama: 2,451 posts
Posted: Sunday, December 30, 2012 - 04:11 PM UTC
Thanks Kevin.
Re: broken track, the options I had in mind was to either 1) put in a plastic card or 2) open up the hull and cut a piece of upper track run, since its practically hidden from view. Luckily I found a piece of the actual track in a cup where I keep trimmings from builds -- good thing I have not emptied it as yet. Now I remember that I originally shortened the track to get a good fit -- but I guess it got so stretched that it broke after some time.
So I've trimmed, jammed it in, put in a bit of super glue to get it fixed. I know I shouldn't be complaining as the real tank crew would need to do more than what I did to get a broken track fixed. Here it is so far:

Am crossing my fingers that its a permanent fix. While there's option 2 in case Murphy comes calling, I sure wouldn't want to go through it once the build, paint, and all have been completed.
Happy New Year to All!
Tat
Re: broken track, the options I had in mind was to either 1) put in a plastic card or 2) open up the hull and cut a piece of upper track run, since its practically hidden from view. Luckily I found a piece of the actual track in a cup where I keep trimmings from builds -- good thing I have not emptied it as yet. Now I remember that I originally shortened the track to get a good fit -- but I guess it got so stretched that it broke after some time.
So I've trimmed, jammed it in, put in a bit of super glue to get it fixed. I know I shouldn't be complaining as the real tank crew would need to do more than what I did to get a broken track fixed. Here it is so far:
Am crossing my fingers that its a permanent fix. While there's option 2 in case Murphy comes calling, I sure wouldn't want to go through it once the build, paint, and all have been completed.
Happy New Year to All!
Tat
panzerman1
Joined: September 30, 2010
KitMaker: 430 posts
Armorama: 291 posts
Posted: Sunday, December 30, 2012 - 05:52 PM UTC
Wow, guys, the activity on the thread has been hot and heavy. Some great work going on with these builds.
@Toby, great Pz.2, and nice save with the replacement road wheel.
@Richard, great kit and Good Luck with the build. The LRDG kit is the Holy Grail on my wanted list.
@Matthew, the additions to the Priest's interior look Fantastic.
@John, the Pz.2 is coming along nicely...another favorite of mine.
@Tat, wonderful save with the Firefly's track, and Thanks for the comment....I appreciate it.
Take care Guys, and have a Happy New Year. Bill
panzerman1
Joined: September 30, 2010
KitMaker: 430 posts
Armorama: 291 posts
Posted: Monday, December 31, 2012 - 08:31 AM UTC
End of the year update. Some pics....

Added bumper cut-out for winch, tow wire, 2 air valve units
and hose, and 2 black-out lights.

Added more missing details to the trailer.

Original base added to a new length of styrene.

Miliput additions added to the base. Had to lengthen the base to accomodate the size of truck & trailer.
Thanks for viewing. Comments welcomed. Happy New Year. Bill
Added bumper cut-out for winch, tow wire, 2 air valve units
and hose, and 2 black-out lights.
Added more missing details to the trailer.
Original base added to a new length of styrene.
Miliput additions added to the base. Had to lengthen the base to accomodate the size of truck & trailer.
Thanks for viewing. Comments welcomed. Happy New Year. Bill
Dangeroo
#023

Joined: March 13, 2009
KitMaker: 2,058 posts
Armorama: 1,656 posts

Posted: Tuesday, January 01, 2013 - 01:59 AM UTC
Really impressive scratch mods in here! Bill, first I thought "why did he only paint the ends khaki?" until I read that it was an extension... Says something about the quality of you addition.
Here's my current state of affairs:
Vehicles and wheels primed:
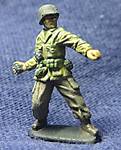
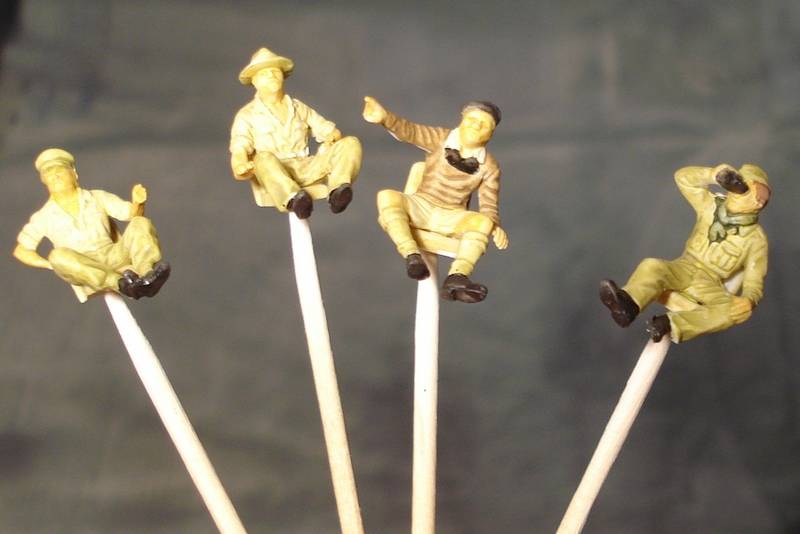
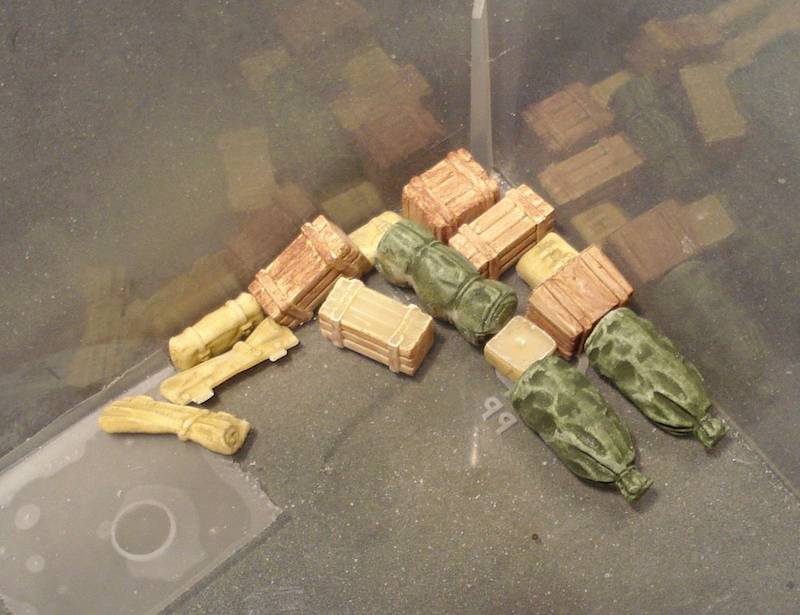
Figures and stowage painted:
Cheers!
Stefan
Here's my current state of affairs:
Vehicles and wheels primed:
Figures and stowage painted:
Cheers!
Stefan
firstcircle
Joined: November 19, 2008
KitMaker: 2,249 posts
Armorama: 2,007 posts
Posted: Tuesday, January 01, 2013 - 12:15 PM UTC
Bill, base extension is excellent. Stef, nice painting of the figures - these are the originals, right?
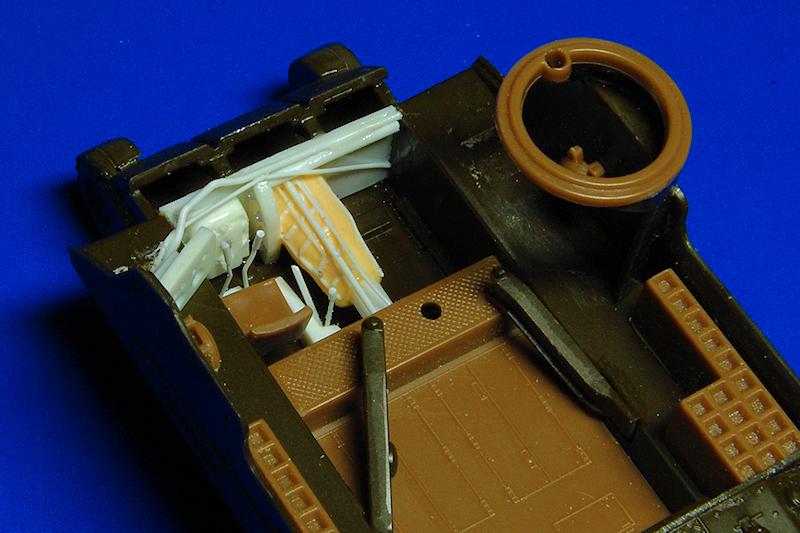
Quick update, interior has paint to represent the base of the British camo scheme for Italy as per the instructions. After "extensive" research (20 mins) I found advice that the colour should be a kind of greyish dirty sand colour, a bit like the German dark yellow, but greyer. The instructions call it Mid Stone, but it seems it was perhaps more like Light Mud. Someone recommended a Tamiya mix of 4 x Buff plus 2 x Khaki with a touch of grey and it gave me this.
Kit instructions specify choccy brown blotches over it, but again, advice seemed to be that it should be more like dark grey (Tamiya NATO Black they said). If anyone has any thoughts on that, they'd be welcome...
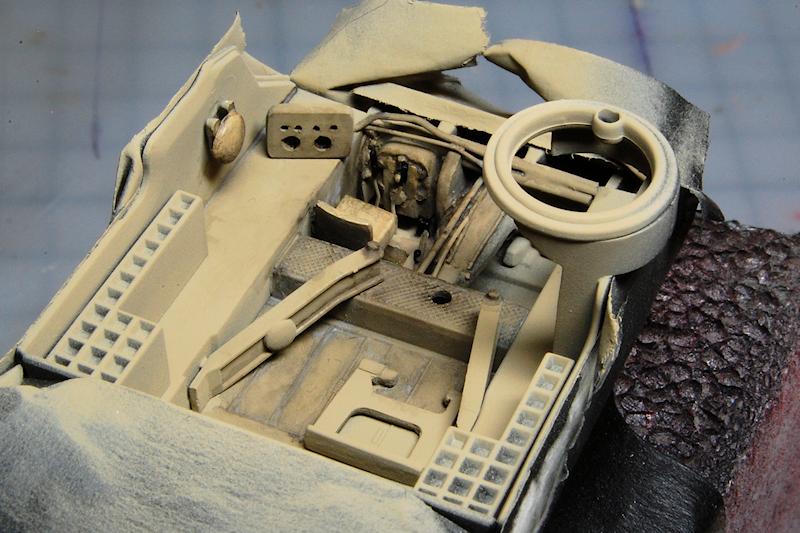
tatbaqui
#040
Joined: May 06, 2007
KitMaker: 2,713 posts
Armorama: 2,451 posts
Posted: Tuesday, January 01, 2013 - 02:08 PM UTC
Happy New Year Matthew -- nice to see a familiar name in the campaign! Love the detail you've put in. Just like Bill's, hats off to you on the effort put on such a small scale.
ChaosXVI
Joined: October 24, 2009
KitMaker: 128 posts
Armorama: 126 posts
Posted: Tuesday, January 01, 2013 - 03:18 PM UTC
@ John
Quoted Text
Chaos XVI: Nice paint job on the Pz II, my in progress photos of the same kit are below. You obviously did better research than me, I thought the cut-outs in the storage boxes were poor fitting parts and filled them accordingly, but looking at yours the originals would obviously have needed the cut-outs to fit over the fender supports - hey ho!
You have a cleaner build. I see no notches where the boxes and fenders meet on both sides of your Pz II. I never really bothered to fix mine because I said to myself that since this is a Matchbox kit, why improve it?

I love Matchbox kits with all their imperfections. But after seeing what you've done with yours, I wish I had done the same...
Btw, Happy new year everyone
panzerman1
Joined: September 30, 2010
KitMaker: 430 posts
Armorama: 291 posts
Posted: Thursday, January 03, 2013 - 02:55 PM UTC
It's now 2013 and the group build presses onward.Getting near the end with my entry, will post an update with photos soon.
@stefan, the figures and stowage looks great.
@matthew, the interior paint job is fantastic looking.
**I may finish my entry in enough time to add something on the trailer...What sort of vehicle do you all think I should place on it???**** Bill
@stefan, the figures and stowage looks great.
@matthew, the interior paint job is fantastic looking.
**I may finish my entry in enough time to add something on the trailer...What sort of vehicle do you all think I should place on it???**** Bill
tatbaqui
#040
Joined: May 06, 2007
KitMaker: 2,713 posts
Armorama: 2,451 posts
Posted: Thursday, January 03, 2013 - 03:08 PM UTC
Now that the track issue has been solved, I've moved on to the first pass of paintwork.

I planned this to be a beutepanzer, so I've not much use for the supplied decals. However, I got curious as its not something I've seen in a Matchbox kit before. To my surprise, its of a dry-transfer type:

Anyways, back to work. Hope to complete the build before the month ends.
Cheers,
Tat
I planned this to be a beutepanzer, so I've not much use for the supplied decals. However, I got curious as its not something I've seen in a Matchbox kit before. To my surprise, its of a dry-transfer type:
Anyways, back to work. Hope to complete the build before the month ends.
Cheers,
Tat
SGTJKJ
#041

Joined: July 20, 2006
KitMaker: 10,069 posts
Armorama: 4,677 posts

Posted: Friday, January 04, 2013 - 06:34 AM UTC
Cool detail additions to your Priest, Matthew. Looking forward to see more.
Tat, that is some funky decals. I have never seen dry transfers in a Matchbox kit.
Tat, that is some funky decals. I have never seen dry transfers in a Matchbox kit.

SgtRam
#197
Joined: March 06, 2011
KitMaker: 3,971 posts
Armorama: 2,859 posts
Posted: Friday, January 04, 2013 - 07:05 AM UTC
Some great looking work people, we are in the home stretch, just a reminder to include your images in the Campaign Gallery to ensure you get credit for your campaign time.
naimbrain
Joined: March 15, 2010
KitMaker: 123 posts
Armorama: 118 posts
Posted: Sunday, January 06, 2013 - 12:54 PM UTC
Those who frequented the Braille Battlefield campaign may remember that my enthusiasm for starting new kits sometimes gets the better of me. "Oh not again!!" I hear you cry, well um....

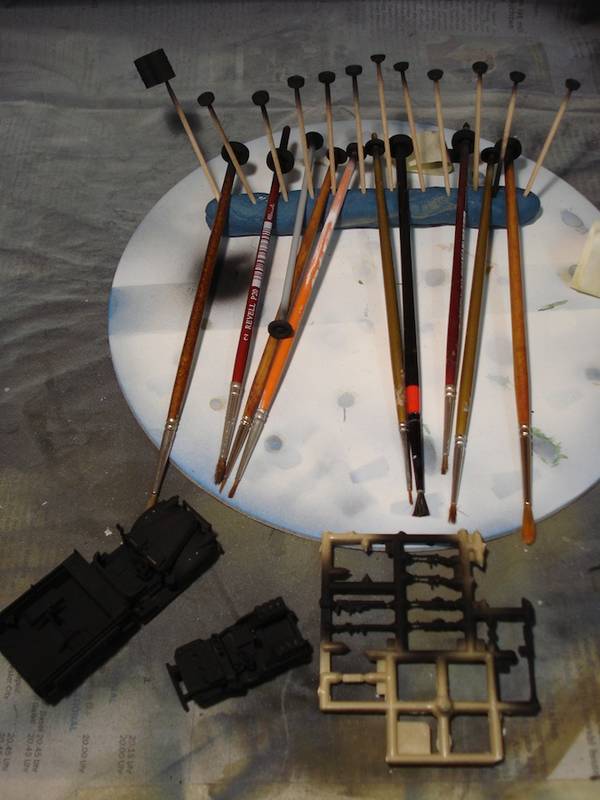
Oops, how did that M16 get on my workbench? I can't claim a 'full build' for this one as some of the parts had already been removed from the sprues, but it was pretty much unstarted, this photo is from early this evening after three previous nights spent cleaning up parts and assembling some of the running gear.

Another 'before-ish shot.

Already a bit more progress by the end of the evening.

There's quite a big gap at the back of the body, I haven't glued the rear plate on yet, I'll probably try to build out the body with some thin plastic sheet, and then file it to a better fit. Has anyone else hit similar issues with this M16 kit, or is it just me.
Cheers all,
John
Oops, how did that M16 get on my workbench? I can't claim a 'full build' for this one as some of the parts had already been removed from the sprues, but it was pretty much unstarted, this photo is from early this evening after three previous nights spent cleaning up parts and assembling some of the running gear.
Another 'before-ish shot.
Already a bit more progress by the end of the evening.
There's quite a big gap at the back of the body, I haven't glued the rear plate on yet, I'll probably try to build out the body with some thin plastic sheet, and then file it to a better fit. Has anyone else hit similar issues with this M16 kit, or is it just me.
Cheers all,
John
tatbaqui
#040
Joined: May 06, 2007
KitMaker: 2,713 posts
Armorama: 2,451 posts
Posted: Tuesday, January 08, 2013 - 12:39 AM UTC
The past couple of days:

Basework -- always the challenging part for me. By now I'm fairly comfortable doing brick / stone walls, but ground-related stuff? Still need to work on the technique.
Couldn't wait to get this beute project going so I went on to decal mode. I've put on the kit supplied decals to provide reference points, then put some paint over it -- and finally the balkenkreuzes:

The spares box was the source for these. At 1/35, it won't fit so I've cut them into "L" shapes and mounted them piece by piece.
Disaster came calling as some of the decals turned white after a dab of decal solution. In a mad rush, I scraped it off, which just added to the list of things to do:

I had to re-paint the affected areas and go through cutting / mounting the "L" shapes again. The one on the turret bin had to go -- it already seemed too much.

This Firefly is saying "...make no mistake lads, I'm a beute!".
Cheers,
Tat
Basework -- always the challenging part for me. By now I'm fairly comfortable doing brick / stone walls, but ground-related stuff? Still need to work on the technique.
Couldn't wait to get this beute project going so I went on to decal mode. I've put on the kit supplied decals to provide reference points, then put some paint over it -- and finally the balkenkreuzes:
The spares box was the source for these. At 1/35, it won't fit so I've cut them into "L" shapes and mounted them piece by piece.
Disaster came calling as some of the decals turned white after a dab of decal solution. In a mad rush, I scraped it off, which just added to the list of things to do:
I had to re-paint the affected areas and go through cutting / mounting the "L" shapes again. The one on the turret bin had to go -- it already seemed too much.
This Firefly is saying "...make no mistake lads, I'm a beute!".
Cheers,
Tat
tread_geek
Joined: March 23, 2008
KitMaker: 2,847 posts
Armorama: 2,667 posts
Posted: Tuesday, January 08, 2013 - 04:58 AM UTC
Greetings all!
I've been trying to drop in and follow all your progress and I must say that there are some extremely impressive builds and progress in this campaign. Particularly interesting to me is the Diamond 'T' and the LRDG set that were the only two kits that did not see completion during the first Matchbox Nostalgia Campaign.
I apologize for not being more active in this venture but between real life developments and other commitments it's not been possible. I have one original Matchbox (Morris C8 w/ 17 Pdr) and one Revell re-pop (M7) in my stash but have been keeping my eye out for the Char 'B' and Renault FT-17. With still about a month and a half to go I'll see if I can't squeeze in a quick build.
That observation must have been made by some truly enlightened individual! Bravo, Matthew, it's truly amazing what can be accomplished with a few stray bits of plastic and some imagination. Your Priest is coming along fabulously and with the initial paint is more than enough to have me shy away from building my copy in so short a time.
On a different matter, I see that my small scale nemesis John Hadaway (naimbrain) is back to his normal tricks and "modi operandi" of biting off far more than he can chew. Keep a wary eye on that fellow, Kevin! John, I don't recall the rear plate on my M16, nor the one built for the first campaign having this gap issue. Perhaps the moulds are starting to feel their age. Your solution to build out the floor to fill the gap seems like the most appropriate solution.
Cheers,
Jan
I've been trying to drop in and follow all your progress and I must say that there are some extremely impressive builds and progress in this campaign. Particularly interesting to me is the Diamond 'T' and the LRDG set that were the only two kits that did not see completion during the first Matchbox Nostalgia Campaign.
I apologize for not being more active in this venture but between real life developments and other commitments it's not been possible. I have one original Matchbox (Morris C8 w/ 17 Pdr) and one Revell re-pop (M7) in my stash but have been keeping my eye out for the Char 'B' and Renault FT-17. With still about a month and a half to go I'll see if I can't squeeze in a quick build.
Quoted Text
... A certain braille fanatic's remark regarding my Priest has been playing on my mind...
Quoted TextIt wouldn't be too difficult to add a simple transmission housing up front as well as steering levers and a bit of storage to the right of the driver. ... Let's mot forget a small instrument panel to the left of the driver.
...and I know there was a
So, this evening I have created the transmission housing, steering...
That observation must have been made by some truly enlightened individual!
Bravo, Matthew, it's truly amazing what can be accomplished with a few stray bits of plastic and some imagination. Your Priest is coming along fabulously and with the initial paint is more than enough to have me shy away from building my copy in so short a time. On a different matter, I see that my small scale nemesis John Hadaway (naimbrain) is back to his normal tricks and "modi operandi" of biting off far more than he can chew.
Keep a wary eye on that fellow, Kevin! John, I don't recall the rear plate on my M16, nor the one built for the first campaign having this gap issue. Perhaps the moulds are starting to feel their age. Your solution to build out the floor to fill the gap seems like the most appropriate solution. Cheers,
Jan
 |

WEB HOSTING BY


Copyright ©2021 Armorama and Kitmaker Network, a subsidiary of Silver Star Enterprises
All Rights Reserved. Please read our Conditions of Use and Privacy Policy.
All Rights Reserved. Please read our Conditions of Use and Privacy Policy.