Hopefully you didn't glue the idler mounts on yet. The little offset axle piece that holds the idler wheel. You'll want that loose so you can properly tension the tracks once you get to that stage.
Armor/AFV
For discussions on tanks, artillery, jeeps, etc.
For discussions on tanks, artillery, jeeps, etc.
Hosted by Darren Baker, Mario Matijasic
Sherman firefly 1c hybrid hull
pseudorealityx

Joined: January 31, 2010
KitMaker: 2,191 posts
Armorama: 1,814 posts

Posted: Friday, May 04, 2012 - 06:22 AM UTC

asmodeuss

Joined: November 19, 2011
KitMaker: 1,389 posts
Armorama: 1,388 posts

Posted: Friday, May 04, 2012 - 06:34 AM UTC
Hmmmm, I think I was wrong with those four ties... Any intel on thoses?
Phil
Phil

asmodeuss

Joined: November 19, 2011
KitMaker: 1,389 posts
Armorama: 1,388 posts

Posted: Friday, May 04, 2012 - 06:40 AM UTC
Quoted Text
Hopefully you didn't glue the idler mounts on yet. The little offset axle piece that holds the idler wheel. You'll want that loose so you can properly tension the tracks once you get to that stage.
POOP! yep done that
 And they were such a pain to aling nothing to hold them strait. hoooooo boy...this will rebound, i'm sure, right in my face hehe. Anyway they are one piece, the whole thing... no real way to adjust
  .
.Thanks again mate! I'll do a dry fit of the tracks prior to paint to see the damages.
Phil
pseudorealityx

Joined: January 31, 2010
KitMaker: 2,191 posts
Armorama: 1,814 posts

Posted: Friday, May 04, 2012 - 08:04 AM UTC
Quoted Text
Quoted TextHopefully you didn't glue the idler mounts on yet. The little offset axle piece that holds the idler wheel. You'll want that loose so you can properly tension the tracks once you get to that stage.
POOP! yep done thatAnd they were such a pain to aling nothing to hold them strait. hoooooo boy...this will rebound, i'm sure, right in my face hehe. Anyway they are one piece, the whole thing... no real way to adjust
.
Thanks again mate! I'll do a dry fit of the tracks prior to paint to see the damages.
Phil
Phil, I think you can ignore my comment. I've only built the newer Dragon Shermans, and they're a little different. Here's a page from the instructions of a newer Dragon sherman...
http://www.1999.co.jp/eng/image/10107421z/70/1
Parts C10/C11 are "offset" allowing you to rotate them to adjust track tension.

asmodeuss

Joined: November 19, 2011
KitMaker: 1,389 posts
Armorama: 1,388 posts

Posted: Friday, May 04, 2012 - 10:13 AM UTC
I must admit this would have been welcomed! But no...the olde kit i've got.
Thanks again Jesse!
Phil
Thanks again Jesse!
Phil

Totalize

Joined: February 04, 2009
KitMaker: 743 posts
Armorama: 549 posts

Posted: Friday, May 04, 2012 - 11:12 AM UTC
Phil,
If you have Tamiya Lacquer thinner and used the Tamiya extra thin cement try drenching the affected area in the Lacquer thinner. You might have to make a few attempts but I have used it in the past to remove glued on parts and it has worked quite well.
If you have Tamiya Lacquer thinner and used the Tamiya extra thin cement try drenching the affected area in the Lacquer thinner. You might have to make a few attempts but I have used it in the past to remove glued on parts and it has worked quite well.
imatanker

Joined: February 11, 2011
KitMaker: 1,654 posts
Armorama: 1,565 posts

Posted: Friday, May 04, 2012 - 12:50 PM UTC
Phil... Nice work so far.Did the kit come with "rubber band" tracks or indy-links? Model on,Jeff T.

BBD468

Joined: March 08, 2010
KitMaker: 2,465 posts
Armorama: 2,383 posts

Posted: Friday, May 04, 2012 - 12:57 PM UTC
Hey Phil - Nice job bro! What is it you think you went wrong on the ties? they look good from what i can see. Keep it coming man! 
Gary

Gary


asmodeuss

Joined: November 19, 2011
KitMaker: 1,389 posts
Armorama: 1,388 posts

Posted: Saturday, May 05, 2012 - 06:47 AM UTC
Quoted Text
Phil... Nice work so far.Did the kit come with "rubber band" tracks or indy-links? Model on,Jeff T.
Hi Jeff T!
The kit come with some pretty decent ds traks so I'll be using them. And sherman's no sag tracks should be relatively well represented by those ds tracks.
Thanks Phil.


asmodeuss

Joined: November 19, 2011
KitMaker: 1,389 posts
Armorama: 1,388 posts

Posted: Saturday, May 05, 2012 - 06:49 AM UTC
Quoted Text
Hey Phil - Nice job bro! What is it you think you went wrong on the ties? they look good from what i can see. Keep it coming man!
Gary
Hey Mace!
I was wondering if there where 4 ties on each of the air cleaner...It seems logical that way but my logic doesn't always apply

Thanks bro.
Phil.

asmodeuss

Joined: November 19, 2011
KitMaker: 1,389 posts
Armorama: 1,388 posts

Posted: Saturday, May 05, 2012 - 06:51 AM UTC
Quoted Text
Phil,
If you have Tamiya Lacquer thinner and used the Tamiya extra thin cement try drenching the affected area in the Lacquer thinner. You might have to make a few attempts but I have used it in the past to remove glued on parts and it has worked quite well.
Thanks for the advice Dave. I'll try this if the problem should arrise. Lets hope not hehe.
Phil.

asmodeuss

Joined: November 19, 2011
KitMaker: 1,389 posts
Armorama: 1,388 posts

Posted: Saturday, May 05, 2012 - 07:42 AM UTC
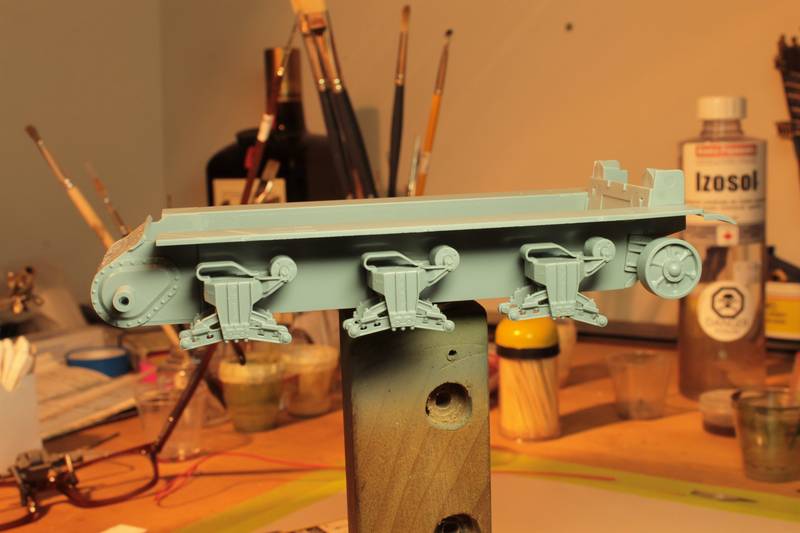
Here is some progres and some issues.
I admit i had some fun tempering the photos...
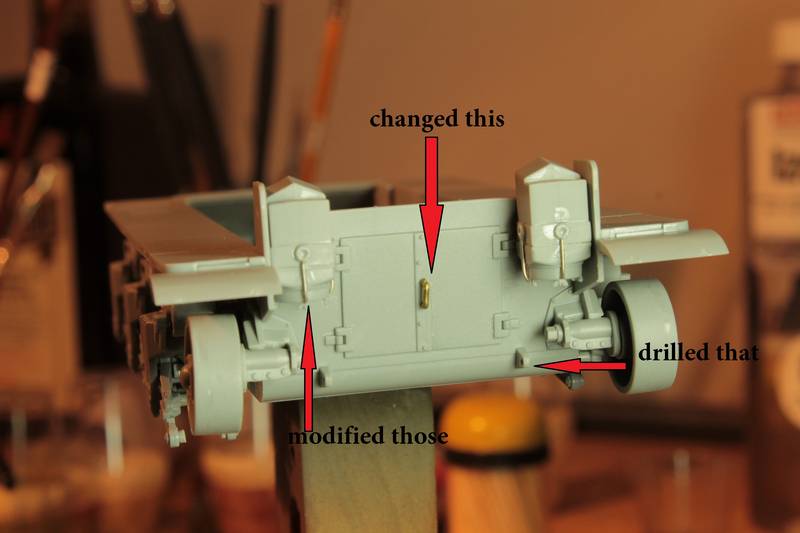
since the tugs eyelet are not pierced and it is quite difficult to have a good angle with a drill bit, i think i might scratch some U shaped hooks... but cant find info on those. Was it ever any?
Thanks guys.
Phil.
I admit i had some fun tempering the photos...


since the tugs eyelet are not pierced and it is quite difficult to have a good angle with a drill bit, i think i might scratch some U shaped hooks... but cant find info on those. Was it ever any?

Thanks guys.
Phil.


BBD468

Joined: March 08, 2010
KitMaker: 2,465 posts
Armorama: 2,383 posts

Posted: Saturday, May 05, 2012 - 12:01 PM UTC
Hey Phil,
Looks great so far man. Wish i had some info for you on the tow hooks or shackels. Man you got that picture editing down! Thats a great tool for explaining things. You need to teach my PC illiterate arse how to do that stuff. Model on my brother!
Gary
Looks great so far man. Wish i had some info for you on the tow hooks or shackels. Man you got that picture editing down!
 Thats a great tool for explaining things. You need to teach my PC illiterate arse how to do that stuff. Model on my brother!
Gary

asmodeuss

Joined: November 19, 2011
KitMaker: 1,389 posts
Armorama: 1,388 posts

Posted: Sunday, May 06, 2012 - 06:47 AM UTC
Hi, here is an update with the hooks and shackles sorted out.
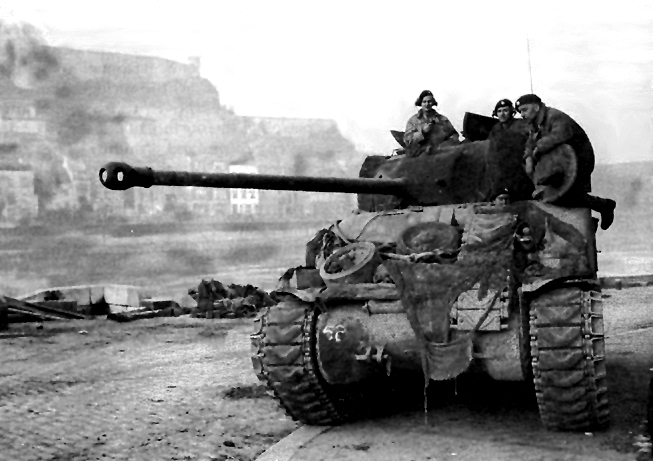
I've modified the tug hooks a little to look like this image.
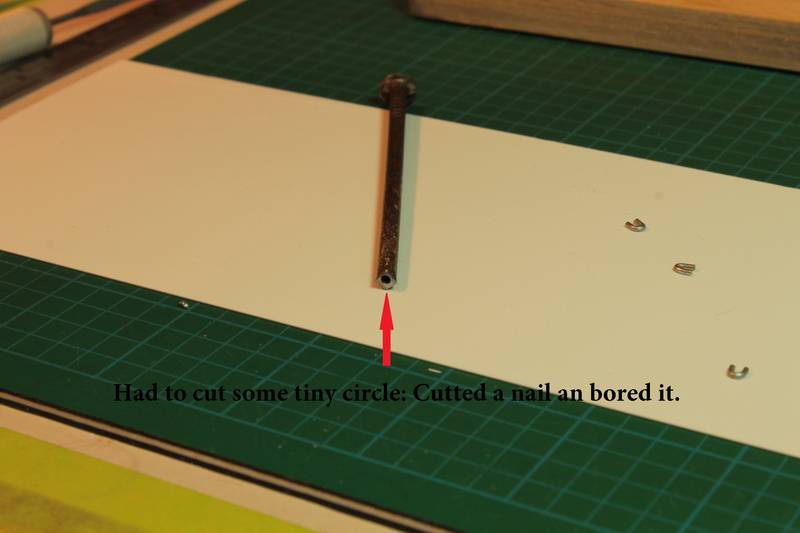
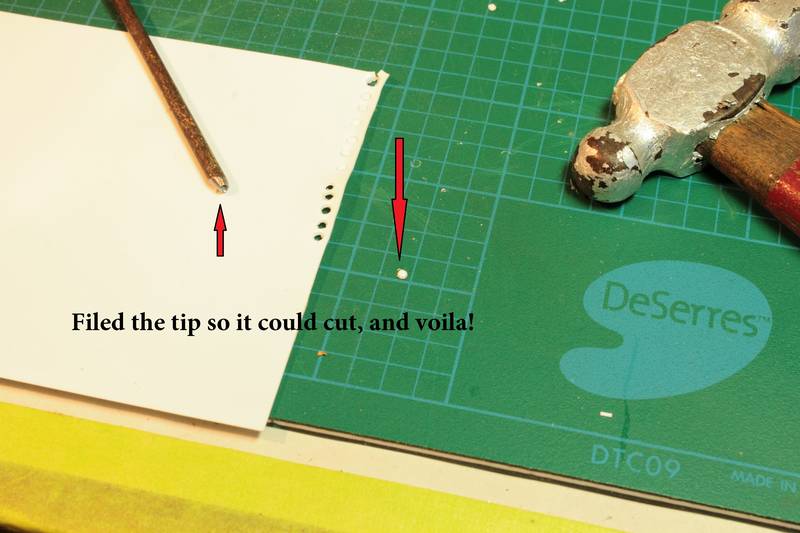
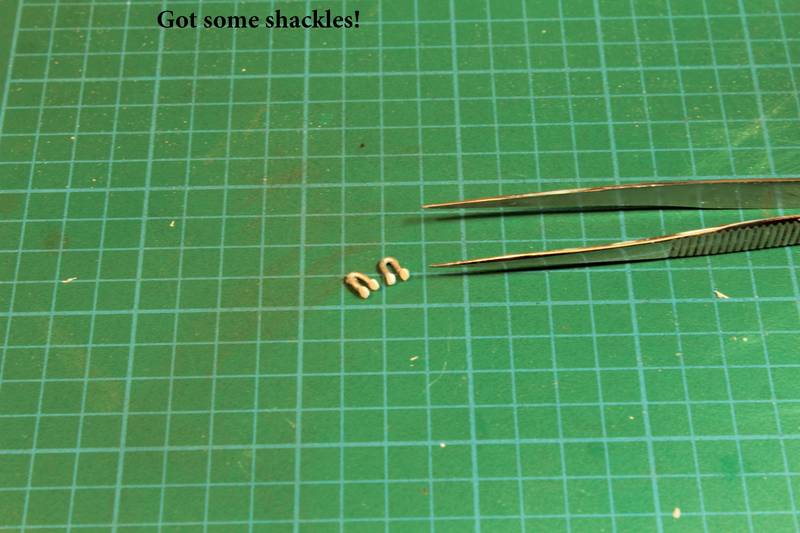
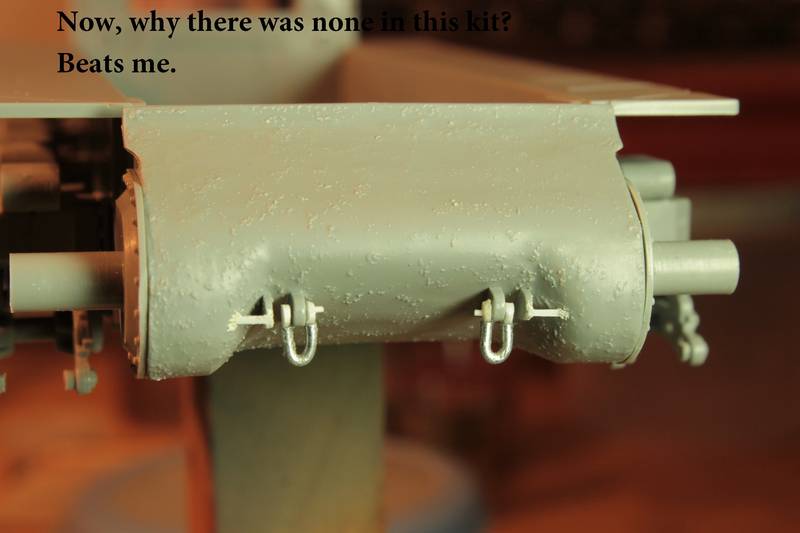
And I've built some shackles since there are none in the kit... For this I had to build myself a tool for punchin small circle of styrene. I know I should get a good punch, but the need was immediate! hehe. there will be a vertical rod handle on the shackle pins, waiting for the cement to cure.
There is the progres made.
Thanks for watching. Comments? I'm all ears.
Phil.
I've modified the tug hooks a little to look like this image.

And I've built some shackles since there are none in the kit... For this I had to build myself a tool for punchin small circle of styrene. I know I should get a good punch, but the need was immediate! hehe. there will be a vertical rod handle on the shackle pins, waiting for the cement to cure.
There is the progres made.


Thanks for watching. Comments? I'm all ears.
Phil.

Posted: Sunday, May 06, 2012 - 11:47 AM UTC
@asmodeuss – Phil,
Took me some time but managed to get enough time to read through the entire posting. New Dragon kit, old Dragon kit, Cyber-Hobby kit, so which kit do you have? What’s the item No.? Looks like you’ve made some improvements to the kit already. I like the towing shackles that you created, especially the custom-made disk punch.
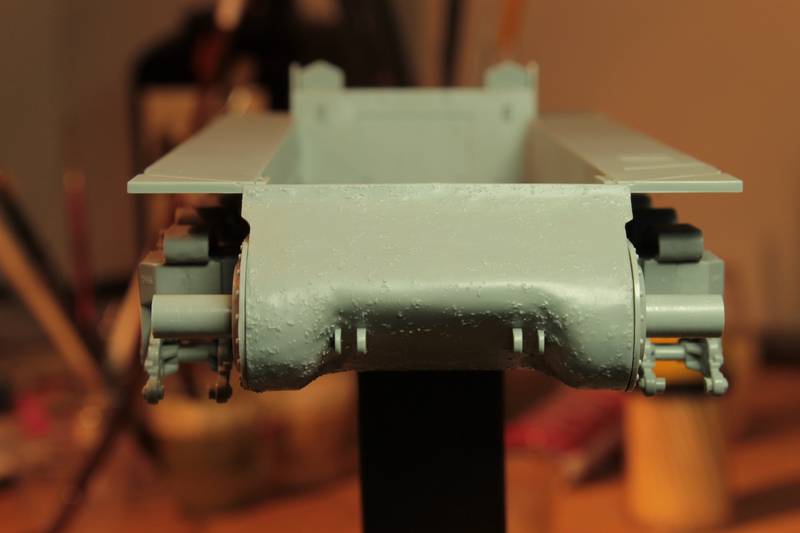
I don’t know really anything about these vehicles so this will be an enjoyable and educational build log for me to follow. Phil, the cast armor transmission housing looks like it could use a little Scotch Brite to tone down the texturing a bit or is it suppose to look this way?
~ Eddy
Took me some time but managed to get enough time to read through the entire posting. New Dragon kit, old Dragon kit, Cyber-Hobby kit, so which kit do you have? What’s the item No.? Looks like you’ve made some improvements to the kit already. I like the towing shackles that you created, especially the custom-made disk punch.
I don’t know really anything about these vehicles so this will be an enjoyable and educational build log for me to follow. Phil, the cast armor transmission housing looks like it could use a little Scotch Brite to tone down the texturing a bit or is it suppose to look this way?

~ Eddy


asmodeuss

Joined: November 19, 2011
KitMaker: 1,389 posts
Armorama: 1,388 posts

Posted: Sunday, May 06, 2012 - 01:24 PM UTC
Hi Eddy,
it is the dragon kit# 9104.
scotch bright? That I would like to know! what is that trick?
Thanks for the good words mate.
Phil.
it is the dragon kit# 9104.
scotch bright? That I would like to know! what is that trick?
Thanks for the good words mate.
Phil.
pseudorealityx

Joined: January 31, 2010
KitMaker: 2,191 posts
Armorama: 1,814 posts

Posted: Sunday, May 06, 2012 - 02:38 PM UTC
Hi Phil,
I think he's saying that the transmission texture is a bit too grainy. Looks like you've got some sand stuck to it or something. Scotch Bright can be used to sand it down.
BTW, I posted a few pictures of my halftrack. Stop by and comment. I need input on what to do next!!!
http://armorama.com/forums/192289&page=1

asmodeuss

Joined: November 19, 2011
KitMaker: 1,389 posts
Armorama: 1,388 posts

Posted: Monday, May 07, 2012 - 01:12 AM UTC
It looks strange indeed! very grainy. Are you guys refering to a abrasive pad? Any way i'm going to tone it down. Thanks for the heads up! 
@Jesse I'm checking out your half track right now mate.
Phil.

@Jesse I'm checking out your half track right now mate.
Phil.

BBD468

Joined: March 08, 2010
KitMaker: 2,465 posts
Armorama: 2,383 posts

Posted: Monday, May 07, 2012 - 03:27 AM UTC
Hey Phil,
Impressive tool makeing. How did you manage to drill the end of the nail? That couldnt have been easy. Looks like it paid off too. Nice job on the shackles. The one to the left looks just a bit out of equal shape to the other. Just a heads up bro. I need to build me a punch like yours. I could use more advise on that. Thanks for sharing with us Phil. Looking forward to the next installment.
Gary
Impressive tool makeing. How did you manage to drill the end of the nail? That couldnt have been easy. Looks like it paid off too. Nice job on the shackles. The one to the left looks just a bit out of equal shape to the other. Just a heads up bro. I need to build me a punch like yours. I could use more advise on that. Thanks for sharing with us Phil.
 Looking forward to the next installment.
Gary

asmodeuss

Joined: November 19, 2011
KitMaker: 1,389 posts
Armorama: 1,388 posts

Posted: Monday, May 07, 2012 - 01:09 PM UTC
Hi guys,
My cpu just crashed bad... won't start anymore
I'll try to fix this as soon as i can...or my wallet can!
Anyway, Gary the left shackle may be taken of to be replace by a pin like in the pic i've posted earlier. I'll be taking photo of progress so this thread won't suffer from my cpu crash. Only retarded.
Thanks guys.
Phil
My cpu just crashed bad... won't start anymore

I'll try to fix this as soon as i can...or my wallet can!
Anyway, Gary the left shackle may be taken of to be replace by a pin like in the pic i've posted earlier. I'll be taking photo of progress so this thread won't suffer from my cpu crash. Only retarded.
Thanks guys.
Phil

asmodeuss

Joined: November 19, 2011
KitMaker: 1,389 posts
Armorama: 1,388 posts

Posted: Saturday, May 12, 2012 - 06:15 AM UTC
Hi guys! My laptop is up and running. I faced a little chalenge on the build lately. There was some missing pieces in the kit take a look:
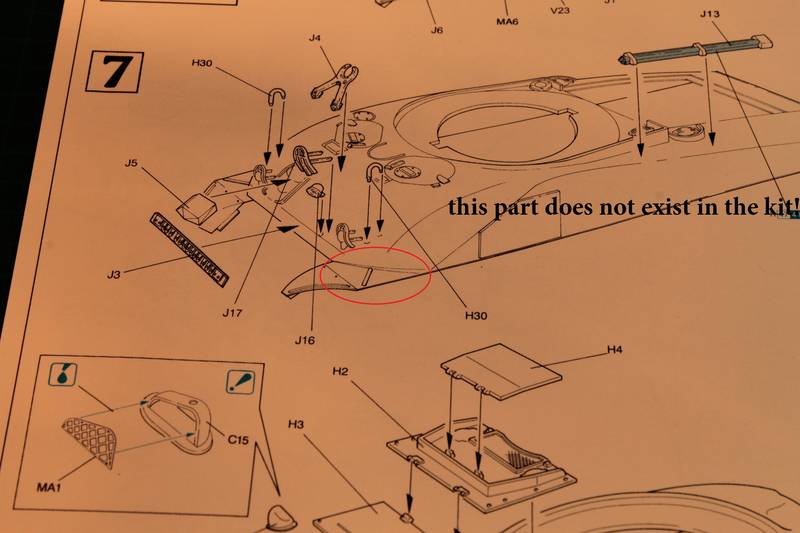
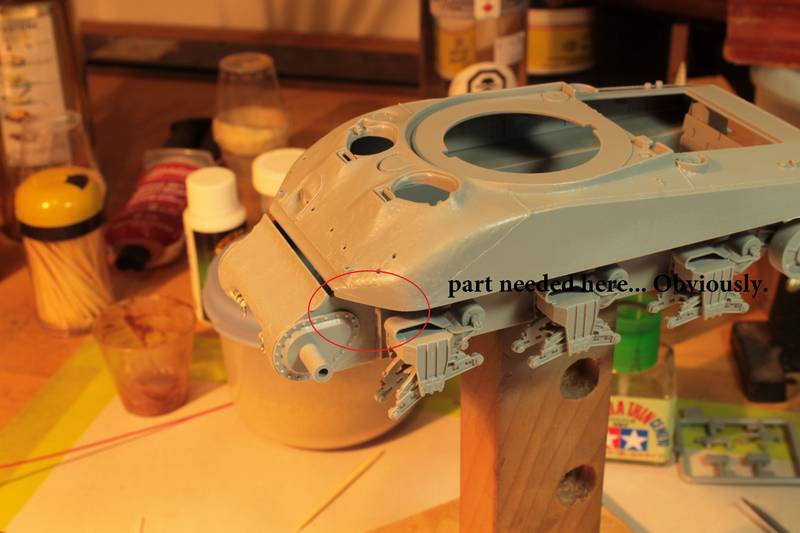
So I had to scratch it. it is where i'm at right now.
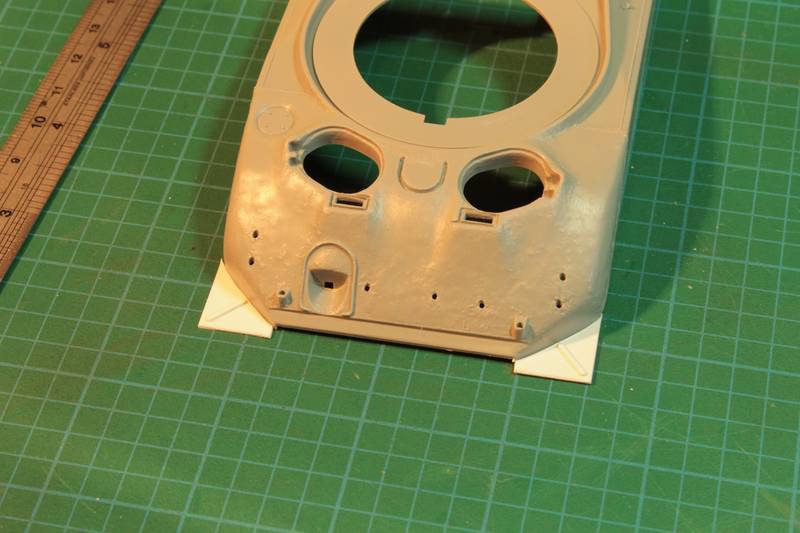
I'll be sanding down the angle bracket so they don't rise as much.
Thanks for watching, more to come.
Phil


So I had to scratch it. it is where i'm at right now.

I'll be sanding down the angle bracket so they don't rise as much.
Thanks for watching, more to come.
Phil


asmodeuss

Joined: November 19, 2011
KitMaker: 1,389 posts
Armorama: 1,388 posts

Posted: Saturday, May 12, 2012 - 07:12 AM UTC
here is a little update for today.
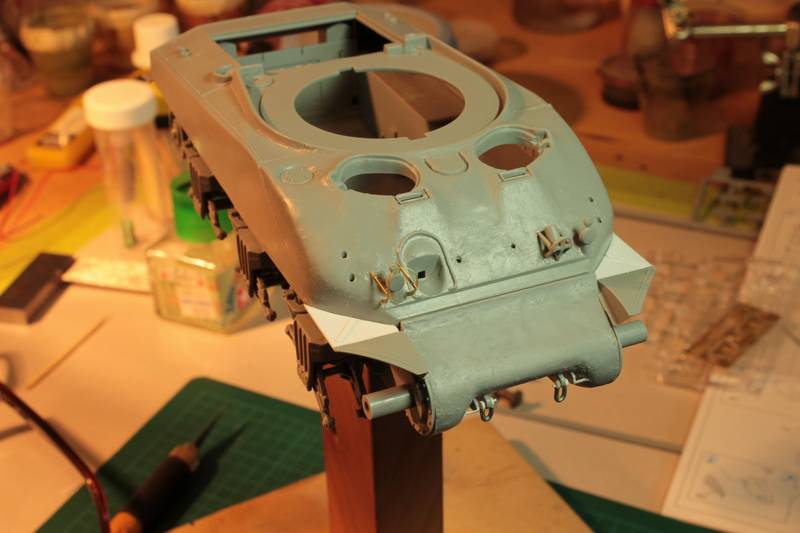
There is no indication on the plan about what should go in the periscope holes in front of the front hatches... Another surprise.
Anyway, any comments? suggestions?
Phil.

There is no indication on the plan about what should go in the periscope holes in front of the front hatches... Another surprise.
Anyway, any comments? suggestions?
Phil.


BBD468

Joined: March 08, 2010
KitMaker: 2,465 posts
Armorama: 2,383 posts

Posted: Saturday, May 12, 2012 - 07:26 AM UTC
Hey Phil,
Bravo!!! Now that wasnt so tuff! Looks great bro. What, another missing piece? What tha frig! There isnt at least a cover? There isnt any clear plastic periscopes? Hope you can sort that out man. Model on Phil!
Gary
Bravo!!! Now that wasnt so tuff!
 Looks great bro. What, another missing piece? What tha frig! There isnt at least a cover? There isnt any clear plastic periscopes? Hope you can sort that out man. Model on Phil!
Gary

Totalize

Joined: February 04, 2009
KitMaker: 743 posts
Armorama: 549 posts

Posted: Saturday, May 12, 2012 - 07:50 AM UTC
Nice Progress Phil. Good job on the scratched fender mounts.
As for that transmission cover this was a poor attempt on Dragon's part to replicate texture. I have the same final drive on my Sherman III kit which was offered as an option but luckily I don't have to use it as the particular Sherman III in the kit had the 3 piece bolted final drive.
Looking forward to seeing more.

asmodeuss

Joined: November 19, 2011
KitMaker: 1,389 posts
Armorama: 1,388 posts

Posted: Saturday, May 12, 2012 - 10:29 AM UTC
Gary, I'm pretty sure got some periscope for those holes. But there is no indication of those on the plan.Thanks Mate.
Dave, thanks for the kind word, i've sanded down the strange texture of the transmission... maybe i'll tone it down even more with cement... will see
Phil
Dave, thanks for the kind word, i've sanded down the strange texture of the transmission... maybe i'll tone it down even more with cement... will see
Phil

 |


