

I won't be making any progress, for some time. I thought I had pulled a muscle, in my right hand last week. However, it has only been getting worse. Even hydrocodone only relieves the pain, for an hour.
There seem to be a lot of M109"x"'s. I have to tear mine back down, due to a misplacement of the glacis.
Campaigns
Where Armorama group builds can be discussed, organized, and updates posted.
Where Armorama group builds can be discussed, organized, and updates posted.
Hosted by Darren Baker, Richard S.
Big Guns Campaign

retiredyank

Joined: June 29, 2009
KitMaker: 11,610 posts
Armorama: 7,843 posts
Posted: Friday, October 18, 2013 - 07:06 AM UTC

DeskJockey
Joined: July 17, 2006
KitMaker: 1,558 posts
Armorama: 1,159 posts
Posted: Saturday, October 19, 2013 - 12:10 AM UTC
Here are some pictures of the issues I've had with the gun and cradle of my AFV Club M109A2.
In this pic, you can see how part D4 (which goes parallel to the gun barrel and is on top of it in the picture) is slightly crooked and not parallel with the gun tube because its mounting point on part D1 (which is perpendicular to the gun) is too far to the side. As a result, it also misses its corresponding mounting point on the gun mantle (if I had made it align properly with that mounting point, it would be even more crooked)
In this pic, you can see how much of the turret ring I had to dig out to accommodate part D7 and make sure it could swing free. Otherwise, the cradle would not stay glued down.
In this pic, you can see the damage done when I tried to force-glue the cradle without first carving the turret ring. The left side of the cradle just popped right back out after I had glued it down with super glue and clamped it for 20 minutes. I then re-glued it with regular Tamiya Extra-thin after the adjustments and this is what it looks like now. It's an ugly scar.
The other side looks better, but is still a bit scarred from the stress.
The turret shell was warped badly (it bowed out to the sides), so I put it in very hot water for a few seconds and straightened it out. Now it fits like a glove.
retiredyank
Joined: June 29, 2009
KitMaker: 11,610 posts
Armorama: 7,843 posts
Posted: Saturday, October 19, 2013 - 12:58 AM UTC
Digging back into my build, I find that I have lost a few important pieces. So, I will be changing my entry to an sfh 18.
retiredyank
Joined: June 29, 2009
KitMaker: 11,610 posts
Armorama: 7,843 posts
Posted: Thursday, October 24, 2013 - 07:14 AM UTC
I found the missing parts. They were neatly stored away. lol I'm done with the build, except for the racks, running gear and tracks. I will be purchasing a set of am tracks, as the ones included are unusable. There were no clear pieces included in my kit. I'll be making some periscopes out of acetate.


Nito74

Joined: March 04, 2008
KitMaker: 5,386 posts
Armorama: 4,727 posts
Posted: Thursday, October 31, 2013 - 04:55 AM UTC
Getting the details on the Hummel's rear ready:


Hope to work more on this beast soon !!

Hope to work more on this beast soon !!
retiredyank
Joined: June 29, 2009
KitMaker: 11,610 posts
Armorama: 7,843 posts
Posted: Thursday, October 31, 2013 - 10:12 AM UTC
John: The Hummel is coming along nicely.
Depending on the weather and how my shoulder feels, I'll try applying the anti-slip coating tomorrow. As is, I managed to get some black primer laid down. After the anti-slip, I'll begin pre-shading. I would really like to have it wrapped up, by the end of next week. From what I've seen, I'll be giving the AFV Club offering a go at some point.
Depending on the weather and how my shoulder feels, I'll try applying the anti-slip coating tomorrow. As is, I managed to get some black primer laid down. After the anti-slip, I'll begin pre-shading. I would really like to have it wrapped up, by the end of next week. From what I've seen, I'll be giving the AFV Club offering a go at some point.

1721Lancers

Joined: March 21, 2012
KitMaker: 1,673 posts
Armorama: 1,640 posts
Posted: Friday, November 01, 2013 - 07:26 AM UTC
Matt, sounds like your feeling better dude, just don't over do it  . Shoulder problems can be a real set back so take it easy. I'm also glad you've found the missing parts, it would be a shame for to have dropped the build. She's looking fine though now
Lucas C, your M109A2 is also looking good, don't worry too about the misalignment on the main gun there, you probably won't notice it later
John, you crazy multi campaigner The Hummel is going great . But you must swap the parts N14/13 (rear tow hooks), they're on upside down. Here's a pic from a russian site:

Edit
Here's another from a reference book I have:

Well here's my progress, I'm done with the build it's off to the paint shop tomorrow:


AFV Clubs M109Ax tracks, great looking and hopefully they'll stay workable after painting. It's just a bit tricky sticking
black pins into black holes on the end connectors

 They're easier to mount if you keep one side of end connectors on the sprue and the other side you can add after
pushing the track links into these. Just cut the second side off the sprue and use the attachment point as a handle, which can be easily cut off later:


Stick in there lads there are some cool builds going on in here and it would be a shame not to see them completed 

Paul
. Shoulder problems can be a real set back so take it easy. I'm also glad you've found the missing parts, it would be a shame for to have dropped the build. She's looking fine though now Lucas C, your M109A2 is also looking good, don't worry too about the misalignment on the main gun there, you probably won't notice it later
John, you crazy multi campaigner
The Hummel is going great . But you must swap the parts N14/13 (rear tow hooks), they're on upside down. Here's a pic from a russian site:
Edit
Here's another from a reference book I have:

Well here's my progress, I'm done with the build it's off to the paint shop tomorrow:
AFV Clubs M109Ax tracks, great looking and hopefully they'll stay workable after painting. It's just a bit tricky sticking
black pins into black holes on the end connectors
They're easier to mount if you keep one side of end connectors on the sprue and the other side you can add after pushing the track links into these. Just cut the second side off the sprue and use the attachment point as a handle, which can be easily cut off later:
Stick in there lads
there are some cool builds going on in here and it would be a shame not to see them completed Paul

retiredyank
Joined: June 29, 2009
KitMaker: 11,610 posts
Armorama: 7,843 posts
Posted: Friday, November 01, 2013 - 12:24 PM UTC
My shoulder didn't bother me, as life threw me a curve. My dad spent my check, for the month. Don't even ask why or on what. I'm pretty pissed. That was the check that was supposed to buy Christmas, for my family. My daughter especially. Now, I have to borrow money from my dad to try and catch up on my bills. Unfortunately, with all this drama I was a pretty day trying to calm down. I just didn't feel comfortable cutting masking, while I was upset. He is gone for the weekend and I fully plan on drinking the rest of his beer. Can't afford my own and I would dare him to remark on it.
Nito74
Joined: March 04, 2008
KitMaker: 5,386 posts
Armorama: 4,727 posts
Posted: Friday, November 01, 2013 - 01:38 PM UTC
@Paul
You're right. I'll have to fix that.
You're right. I'll have to fix that.
Nito74
Joined: March 04, 2008
KitMaker: 5,386 posts
Armorama: 4,727 posts
Posted: Saturday, November 02, 2013 - 12:52 AM UTC
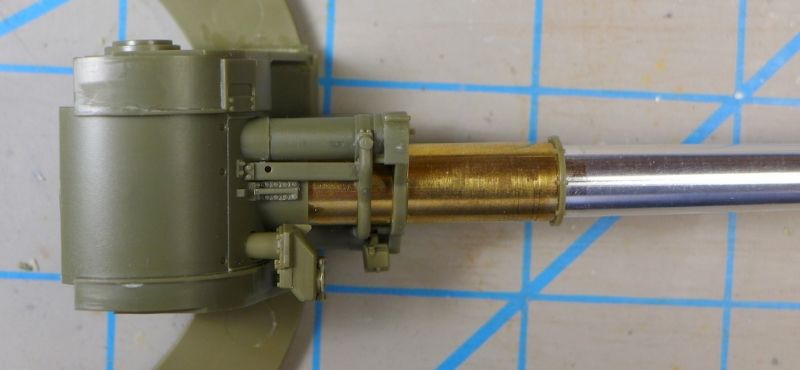
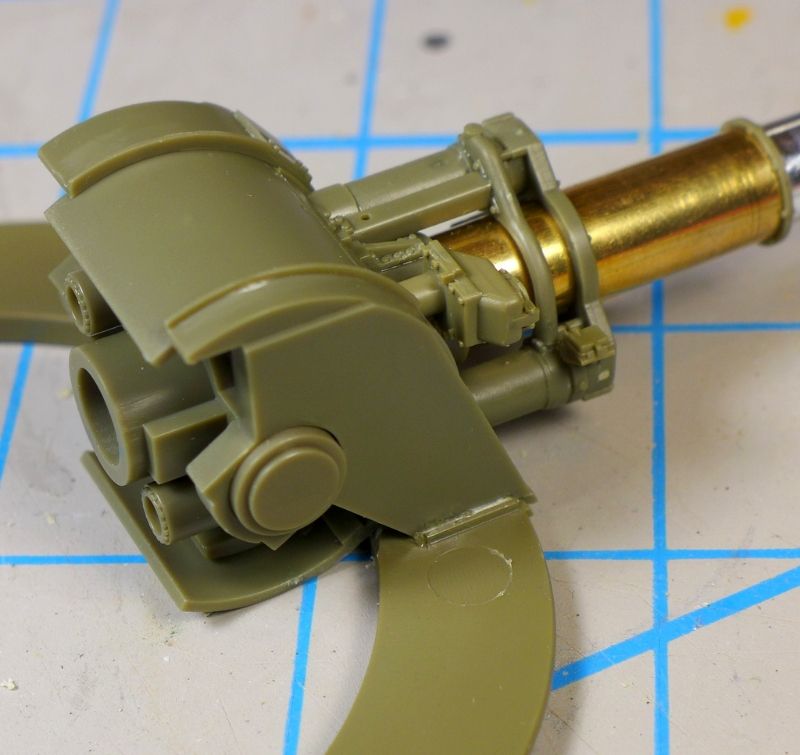
After getting the right reference photo, I changed the hooks. Thanks Paul !!

Then started working on the Gun.
I'm also using LionRoar Metal Gun barrel


Then started working on the Gun.
I'm also using LionRoar Metal Gun barrel
Nito74
Joined: March 04, 2008
KitMaker: 5,386 posts
Armorama: 4,727 posts
Posted: Tuesday, November 05, 2013 - 06:17 AM UTC
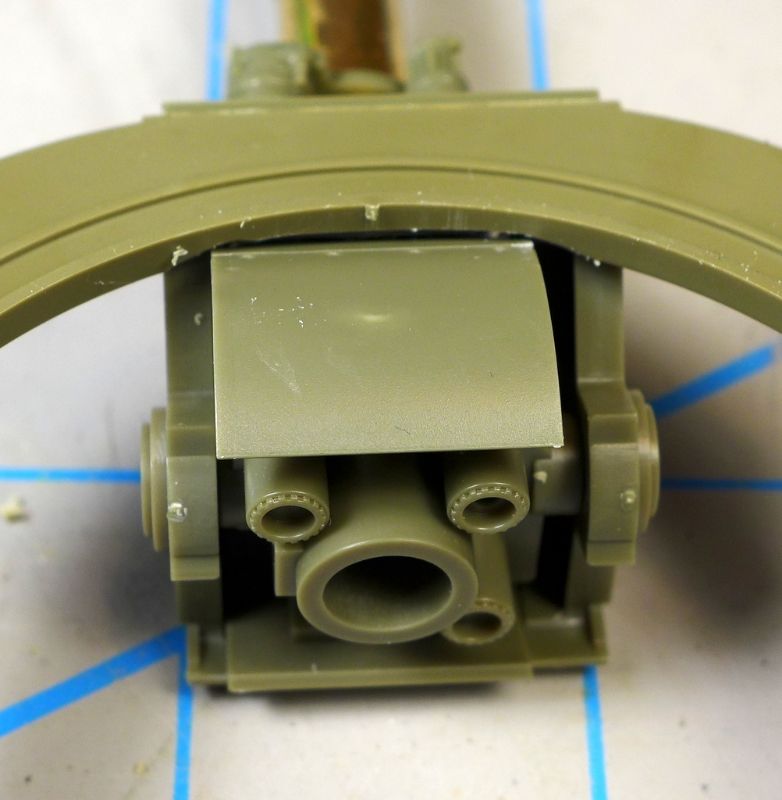
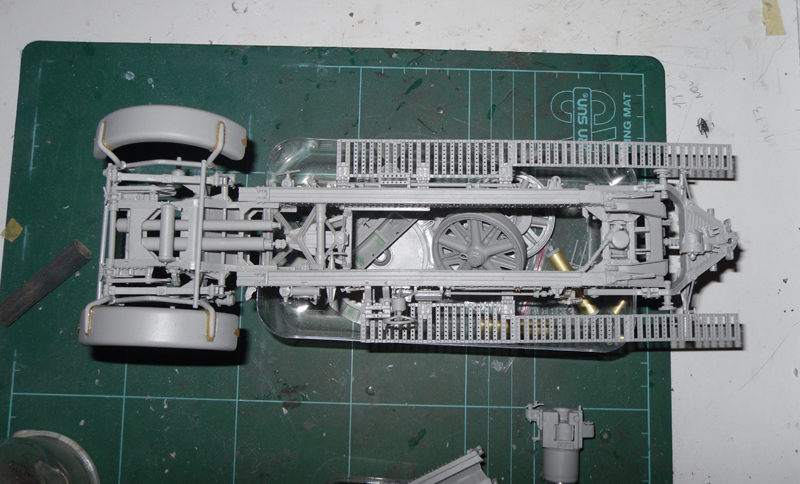
Some progress on the gun:


ChiefGunner
Joined: July 24, 2010
KitMaker: 205 posts
Armorama: 203 posts

Posted: Friday, November 08, 2013 - 10:16 AM UTC
German 21cm Morser 18 - WIP

Regards,
Chiefgunner
Regards,
Chiefgunner
retiredyank
Joined: June 29, 2009
KitMaker: 11,610 posts
Armorama: 7,843 posts
Posted: Friday, November 08, 2013 - 11:31 AM UTC
Seeing some great builds.
Would a "what if" camo pattern be acceptable? I'm just not feeling the NATO and desert camo patterns. I want to do it in either a b/w or tri-tone tan digital camo.
Would a "what if" camo pattern be acceptable? I'm just not feeling the NATO and desert camo patterns. I want to do it in either a b/w or tri-tone tan digital camo.
Nito74
Joined: March 04, 2008
KitMaker: 5,386 posts
Armorama: 4,727 posts
Posted: Friday, November 08, 2013 - 01:15 PM UTC
Ok, another update.
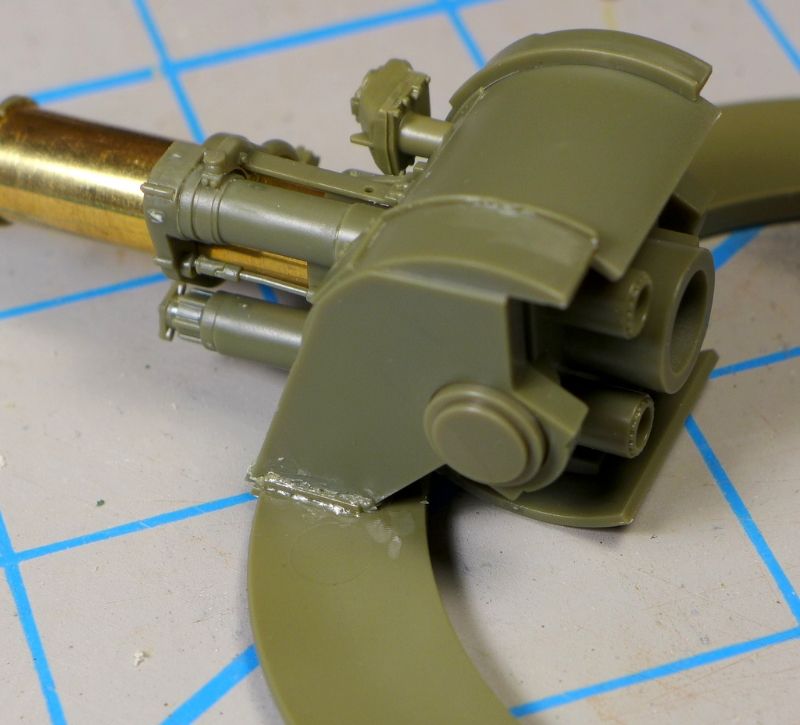
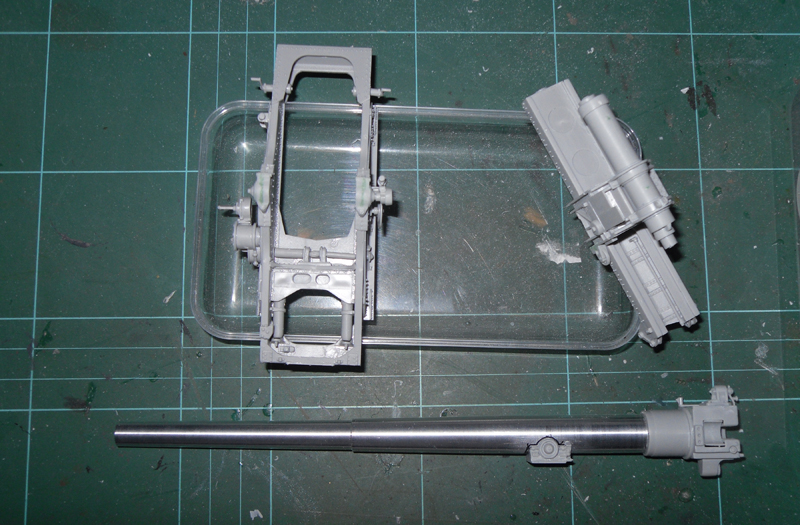
Gun is finished, still fresh some filler needed on some seams, but no major problems yet.

Dry fit on the hull.

Next I'll work on the interior, hatches and side armour.
Gun is finished, still fresh some filler needed on some seams, but no major problems yet.
Dry fit on the hull.
Next I'll work on the interior, hatches and side armour.
1721Lancers
Joined: March 21, 2012
KitMaker: 1,673 posts
Armorama: 1,640 posts
Posted: Saturday, November 09, 2013 - 04:13 AM UTC
John, looking good as always
Chiefgunner: nice piece of heavy arty there it reminds me
of the Grille 2 I built
Matt, nice to see your still at it . As far as I'm concerned you can go for the "what if" camo.  The campaign rules do not forbid this either
Well he the update, Paint part 1. The base sand coat is a mix of Tamiya desert yellow XF59, Buff XF57 and deck tan XF55.
The tracks are base coated in Revell light stone enamel.

Paul
Chiefgunner: nice piece of heavy arty there
it reminds me of the Grille 2 I built
Matt, nice to see your still at it
. As far as I'm concerned you can go for the "what if" camo. The campaign rules do not forbid this either Well he the update, Paint part 1. The base sand coat is a mix of Tamiya desert yellow XF59, Buff XF57 and deck tan XF55.
The tracks are base coated in Revell light stone enamel.
Paul
ChiefGunner
Joined: July 24, 2010
KitMaker: 205 posts
Armorama: 203 posts
Posted: Saturday, November 09, 2013 - 05:09 AM UTC
Thanks Paul.
Its nice piece of heavy arty, there is no doubt, but is a "old" Trumpeter kit, with many problems.
Regards,
Its nice piece of heavy arty, there is no doubt, but is a "old" Trumpeter kit, with many problems.
Regards,

ltb073
Joined: March 08, 2010
KitMaker: 3,662 posts
Armorama: 3,078 posts
Posted: Saturday, November 09, 2013 - 01:40 PM UTC
Some nice progress by everyone here
I am getting closer to starting my build so I figured I would post my start up photo

Box say it has an interior but i didnt see much other than an engine on the instructions
I am getting closer to starting my build so I figured I would post my start up photo

Box say it has an interior but i didnt see much other than an engine on the instructions

1721Lancers
Joined: March 21, 2012
KitMaker: 1,673 posts
Armorama: 1,640 posts
Posted: Sunday, November 10, 2013 - 03:47 AM UTC
Hi Sal, cool choice you bring with you there . That thing is a real monster  As to the interior well, there wasn't much in there. The ammo racks and breech took up most the casematt and there was only the drivers and hull MG/ radio operator seats at the front. Here a few pics of the real deal in
the Munster Tank museum:
Breech mechanism:

Drivers seat and transmission:

Radio op:

Ammo:

Rear deck and exhaust flame killers:

Crane mount:

Running gear:

Pistol port:

Front end:

The business:

Hope they are of use, naturally for anyone on here doing this
Todays update, I did the the tracks with graphite and paint the treads with Tam Nato black. These where then added to the vehicle  . They fell apart at every opportunity, they certainly look better than the Italeri things but, next time round I'll use Friuls. After they where finally in place I hit the end connectors with thin liquid cement from Mr Hobby.
The next paint is also on, it's a lightened version of the base coat from yesterday:


I'm leaving the tyres in the colour they are, yesterday I hit them with Tam Nato black, today they got an over spray as in real life with the lightened base coat.
Tomorrow will be gloss and decals.
Paul
. That thing is a real monster As to the interior well, there wasn't much in there. The ammo racks and breech took up most the casematt and there was only the drivers and hull MG/ radio operator seats at the front. Here a few pics of the real deal in the Munster Tank museum:
Breech mechanism:

Drivers seat and transmission:

Radio op:

Ammo:

Rear deck and exhaust flame killers:

Crane mount:

Running gear:

Pistol port:

Front end:

The business:

Hope they are of use, naturally for anyone on here doing this
Todays update, I did the the tracks with graphite and paint the treads with Tam Nato black. These where then added to the vehicle
. They fell apart at every opportunity, they certainly look better than the Italeri things but, next time round I'll use Friuls. After they where finally in place I hit the end connectors with thin liquid cement from Mr Hobby.The next paint is also on, it's a lightened version of the base coat from yesterday:


I'm leaving the tyres in the colour they are, yesterday I hit them with Tam Nato black, today they got an over spray as in real life with the lightened base coat.
Tomorrow will be gloss and decals.
Paul
Tailor

Joined: May 26, 2008
KitMaker: 1,168 posts
Armorama: 256 posts

Posted: Sunday, November 10, 2013 - 05:14 AM UTC
Nice work, guys!
Nito74
Joined: March 04, 2008
KitMaker: 5,386 posts
Armorama: 4,727 posts
Posted: Sunday, November 10, 2013 - 06:41 AM UTC
As planned, I started working on the interior & side armour plates.
Terrible sink marks from Dragon ...

Interior details so far,

Stay tuned !!
Terrible sink marks from Dragon ...
Interior details so far,
Stay tuned !!
ChiefGunner
Joined: July 24, 2010
KitMaker: 205 posts
Armorama: 203 posts
Posted: Tuesday, November 19, 2013 - 09:39 AM UTC
Hi,
My proposal.

Regards
My proposal.

Regards
ltb073
Joined: March 08, 2010
KitMaker: 3,662 posts
Armorama: 3,078 posts
Posted: Tuesday, November 19, 2013 - 10:11 AM UTC
Hey Paul thanks for the pictures they will help for sure sorry I didn't get back to ya sooner must be old age or all the nice looking build by the way not my era but it still looks good
I have made a little progress on the hull photos soon
Chief ribbon looks good but have we seen that somewhere before
nice looking build by the way not my era but it still looks good I have made a little progress on the hull photos soon
Chief ribbon looks good but have we seen that somewhere before

IronOwl
Joined: January 07, 2013
KitMaker: 572 posts
Armorama: 302 posts

Posted: Tuesday, November 19, 2013 - 10:19 AM UTC
that's cool I like it
sascha(ironowl)
sascha(ironowl)
ChiefGunner
Joined: July 24, 2010
KitMaker: 205 posts
Armorama: 203 posts
Posted: Tuesday, November 19, 2013 - 10:51 AM UTC
Hi Sal,
[/quote]Chief ribbon looks good but have we seen that somewhere before [/quote]
Yes... made by me.
Look at page 1, of this topic
[/quote]Chief ribbon looks good but have we seen that somewhere before [/quote]
Yes... made by me.
Look at page 1, of this topic
ltb073
Joined: March 08, 2010
KitMaker: 3,662 posts
Armorama: 3,078 posts
Posted: Tuesday, November 19, 2013 - 02:49 PM UTC
Quoted Text
Hi Sal,
Yes... made by me.
Look at page 1, of this topic
I knew I wasnt going crazy

Slow progress wheels are dry fit I like the molded in Zimm

 |

WEB HOSTING BY


Copyright ©2021 Armorama and Kitmaker Network, a subsidiary of Silver Star Enterprises
All Rights Reserved. Please read our Conditions of Use and Privacy Policy.
All Rights Reserved. Please read our Conditions of Use and Privacy Policy.