Pennsylvania, United States
Joined: April 10, 2011
KitMaker: 7,941 posts
Armorama: 7,934 posts
Posted: Wednesday, June 05, 2013 - 08:07 AM UTC
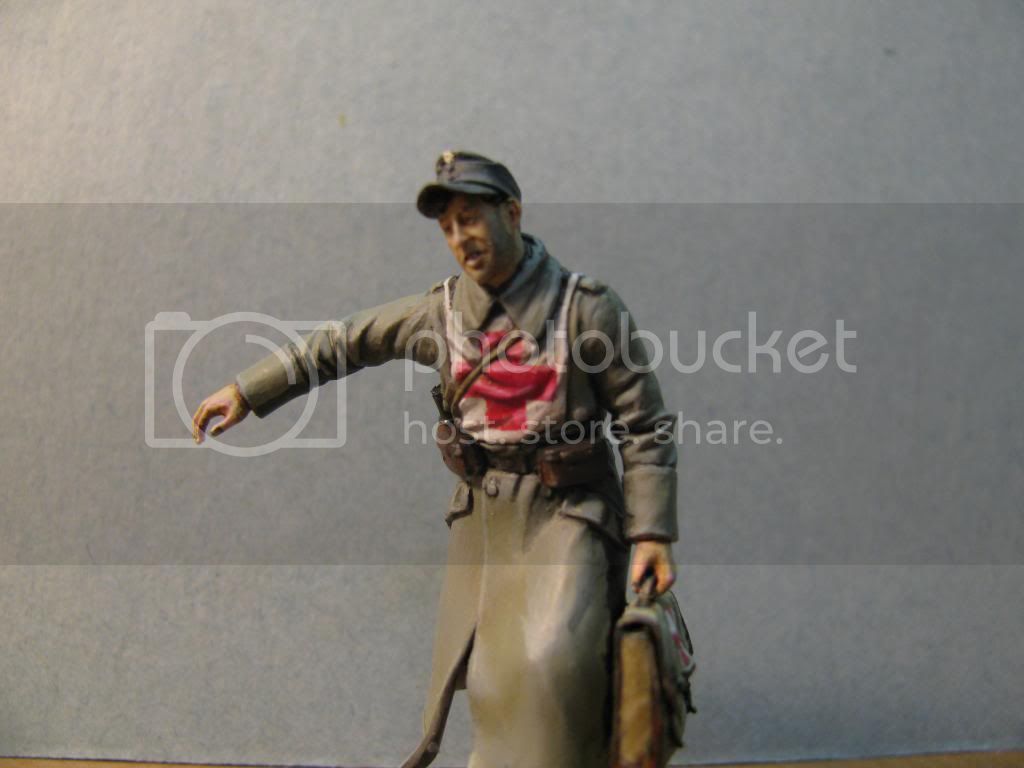
Found some time to do a little painting. My eyes are feeling a little better so I should use the chance!
I love Hornet heads,as you should know by now,but this one is one of their very very best IMHO.
I tried to go for a cold,tired look. The weathering as fas as mud and dirt goes,will wait until I choose the color that goes on the groundwork. I need to use google earth and check out the Stoumont area again for the color of the dirt.
I used the colors for the satchel from an Osprey book on German kit.

Oh well,I think I'm improving a little,any way.
J
Massachusetts, United States
Joined: February 08, 2012
KitMaker: 1,271 posts
Armorama: 1,253 posts
Posted: Wednesday, June 05, 2013 - 08:44 AM UTC
Well done, sir. The Hornet head really adds a lot of character to him and his posing is perfect. I gotta get myself another set of replacement heads actually...
Looking forward to the rest!
-Conor
I'm doin' stuff. Lotta stuff.
Wien, Austria
Joined: May 20, 2011
KitMaker: 1,744 posts
Armorama: 1,727 posts
Posted: Wednesday, June 05, 2013 - 09:23 PM UTC
Do you know you are a great figure painter Sir!
Congratulations on that one Jerry!!!!
The Terrain in the Ardennes does not contain much iron, so the colour is not reddish.
Impatient to see more!!
Cheers
Romain
un pour tous et tous pour un!

#284
Northern Ireland, United Kingdom
Joined: October 04, 2006
KitMaker: 3,094 posts
Armorama: 2,942 posts
Posted: Wednesday, June 05, 2013 - 10:23 PM UTC
Lovely paint work on this fig Jerry- the red cross really adds a nice splash of color among the drab German uniform colors- you've got the look of him carrying the heavy satchel perfectly from his strained face to the bulges in the satchel itself which are nicely painted. Great work mate, I can't wait to see what you get up to for the rest of the figs in this scene!
On The Bench:
Ethiopian BMP-1 (Trumpeter 1/35)
AMX-13/75 (Takom 1/35)
South Carolina, United States
Joined: May 07, 2010
KitMaker: 2,238 posts
Armorama: 2,158 posts
Posted: Thursday, June 06, 2013 - 01:30 AM UTC
Looking really good, Jer!
As always, I'm anxious to see how the completed work will come out.
Thanks for keeping us in the loop as you progress.
Mike Roof
AMPS #1632
Chapter Contact
AMPS Central SC
Visit us at http://www.ampscentralsouthcarolina.org
Pennsylvania, United States
Joined: April 10, 2011
KitMaker: 7,941 posts
Armorama: 7,934 posts
Posted: Thursday, June 06, 2013 - 02:01 AM UTC
Quoted Text
Well done, sir. The Hornet head really adds a lot of character to him and his posing is perfect. I gotta get myself another set of replacement heads actually...
Looking forward to the rest!
-Conor
Yeah little brother,I just stocked up on heads at the MFCA show last month in Valley Forge. I found a better one for my Hauptschar. figure and am debating wether to change out the head or not.
J
Pennsylvania, United States
Joined: April 10, 2011
KitMaker: 7,941 posts
Armorama: 7,934 posts
Posted: Thursday, June 06, 2013 - 02:05 AM UTC
Quoted Text
Do you know you are a great figure painter Sir!
Congratulations on that one Jerry!!!!
The Terrain in the Ardennes does not contain much iron, so the colour is not reddish.
Impatient to see more!!
Cheers
Romain
Thank you my friend! I am my own worst enemy. This is for sure.
I drove through the Ardenne using the exact route that Gepanzerte gruppe Peiper took and it was actually misty and raining for half of the day but I don't remember the mud color. I drove by a creek ford but didn't go through as my VW Rabbit woould have gotten stuck. I think the mud was dark dark brown,almost black? You are correct though as I don't recall any red.
J
Pennsylvania, United States
Joined: April 10, 2011
KitMaker: 7,941 posts
Armorama: 7,934 posts
Posted: Thursday, June 06, 2013 - 02:07 AM UTC
Quoted Text
Lovely paint work on this fig Jerry- the red cross really adds a nice splash of color among the drab German uniform colors- you've got the look of him carrying the heavy satchel perfectly from his strained face to the bulges in the satchel itself which are nicely painted. Great work mate, I can't wait to see what you get up to for the rest of the figs in this scene!
Thanks Karl,always nice when you hear from your peers. I am pretty satisfied with the satchel but if I were to re-make it I think the folds and creases could be better as far as showing the weight falling from the hand grip. As it were,I suppose I could say that there is a large flat item in the back of the bag that is keeping it straight?
J
Pennsylvania, United States
Joined: April 10, 2011
KitMaker: 7,941 posts
Armorama: 7,934 posts
Posted: Thursday, June 06, 2013 - 02:09 AM UTC
Quoted Text
Looking really good, Jer!
As always, I'm anxious to see how the completed work will come out.
Thanks for keeping us in the loop as you progress.
Well thanks "smadge",
I am,after all,just playing catch up with you! Your figgies are now awesome and I remember when you were afraid to paint them!
#003
Donegal, Ireland
Joined: May 14, 2002
KitMaker: 9,763 posts
Armorama: 7,444 posts
Posted: Thursday, June 06, 2013 - 02:39 AM UTC
Great job on the figures so far Jerry. Looking forward to seeing how they contribute to the scene.

IPMS Stockholm
"The problem with common sense, is that it is not that common"
Pennsylvania, United States
Joined: April 10, 2011
KitMaker: 7,941 posts
Armorama: 7,934 posts
Posted: Thursday, June 06, 2013 - 02:44 AM UTC
Quoted Text
Great job on the figures so far Jerry. Looking forward to seeing how they contribute to the scene.
Always nice to hear from the "One that Battles Plastic"!
J
Pennsylvania, United States
Joined: April 10, 2011
KitMaker: 7,941 posts
Armorama: 7,934 posts
Posted: Wednesday, June 12, 2013 - 04:03 AM UTC
Got another junge almost ready. He still needs the dirt and mud but once again I must wait for the color I finally choose.
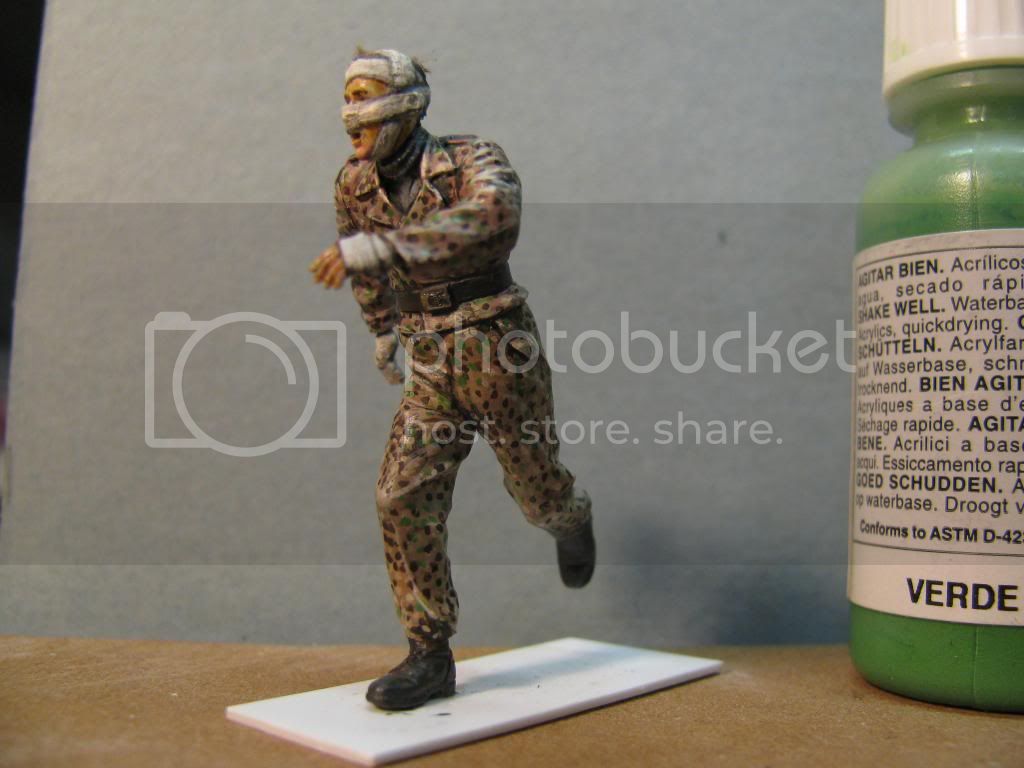
I see I will also have to tone down the shiny parts a little. I am still learning how to use the Vallejo colors.
J
#284
Northern Ireland, United Kingdom
Joined: October 04, 2006
KitMaker: 3,094 posts
Armorama: 2,942 posts
Posted: Wednesday, June 12, 2013 - 10:17 PM UTC
Jerry- that is some awesome dot pea pattern camo, a very fine example of how to do it. For some reason the pose and idea of movement in this figure is heightened by the painting- the painting just compliments the pose so well.
On The Bench:
Ethiopian BMP-1 (Trumpeter 1/35)
AMX-13/75 (Takom 1/35)
Pennsylvania, United States
Joined: April 10, 2011
KitMaker: 7,941 posts
Armorama: 7,934 posts
Posted: Thursday, June 13, 2013 - 02:00 AM UTC
Quoted Text
Jerry- that is some awesome dot pea pattern camo, a very fine example of how to do it. For some reason the pose and idea of movement in this figure is heightened by the painting- the painting just compliments the pose so well.
Thanks man,
I look forward to the kind words in your posts. I am still learning how to paint the peas. I would like to make them smaller and therefor more to scale but I am afraid my eyes are at their limit already.
In my defense though,you can see from the paint bottle next to the figgy that this guy is not too big anyway. I still like to post pics here as I can see mistakes that need to be cleaned up as they become glaringly apparent on the puter screen,
J
#284
Northern Ireland, United Kingdom
Joined: October 04, 2006
KitMaker: 3,094 posts
Armorama: 2,942 posts
Posted: Thursday, June 13, 2013 - 03:26 AM UTC
I have the same problem with getting the peas right- its a frustrating job- like trying to get the edges on the Oak Leaf pattern to look 'just right'- you get to the point where you have work on it tiny bit more and...its ruined

!
I wonder if you could help me with something Jerry- I'm working on some franken figures at the minute cobbled together with body parts from different kits and I've been using a Mission Models micro-chisel to do the under-cutting for various details (seams, pockets etc)- is this what you use? I only ask because I've blunted it and can't get another head for it right away.
On The Bench:
Ethiopian BMP-1 (Trumpeter 1/35)
AMX-13/75 (Takom 1/35)
Pennsylvania, United States
Joined: April 10, 2011
KitMaker: 7,941 posts
Armorama: 7,934 posts
Posted: Thursday, June 13, 2013 - 03:46 AM UTC
Quoted Text
I have the same problem with getting the peas right- its a frustrating job- like trying to get the edges on the Oak Leaf pattern to look 'just right'- you get to the point where you have work on it tiny bit more and...its ruined !
I wonder if you could help me with something Jerry- I'm working on some franken figures at the minute cobbled together with body parts from different kits and I've been using a Mission Models micro-chisel to do the under-cutting for various details (seams, pockets etc)- is this what you use? I only ask because I've blunted it and can't get another head for it right away.
I can't comment on the micro chisel as I never had one. I have always used #11 exacto blades for undercutting. In my old,very poor army days I would just keep sharpening them with a wet stone. I now bite the bullet and but them by the box full. I carefully use a new sharp blade to begin cutting. For example if I am doing a pocket flap I start with the sharp edge pointed towards the body of the fig. After I have a groove going I switch the sharp edge to point away from the body of the fig. You should use an old fig to practice on and be aware every company seems to have a different softness to their plastic. I notice the new Dragon figs are really soft,not like the weapons grade hardness of the old Tamiya figs from the 70s.
I am always happy to help buddy,never hesitate. I just don't know if I am the best modeler to get an opinion from as there are some steller players on this site.
J
#284
Northern Ireland, United Kingdom
Joined: October 04, 2006
KitMaker: 3,094 posts
Armorama: 2,942 posts
Posted: Thursday, June 13, 2013 - 03:51 AM UTC
I use a Swann Morton so I'll see if I can get going with that, at the minute I'm just using the blade to get any plastic debris from the grooves I make. I also noticed the Dragon plastic- I am working on one of their new figs and one of their old ones- new one is nice and soft, old one is bulletproof and has made me slip and stab myself with the chisel several times!
On The Bench:
Ethiopian BMP-1 (Trumpeter 1/35)
AMX-13/75 (Takom 1/35)
Pennsylvania, United States
Joined: April 10, 2011
KitMaker: 7,941 posts
Armorama: 7,934 posts
Posted: Thursday, June 13, 2013 - 06:35 AM UTC
Quoted Text
I use a Swann Morton so I'll see if I can get going with that, at the minute I'm just using the blade to get any plastic debris from the grooves I make. I also noticed the Dragon plastic- I am working on one of their new figs and one of their old ones- new one is nice and soft, old one is bulletproof and has made me slip and stab myself with the chisel several times!
Yes,well,my fingers are pretty tough from all of the super glue I have applied over the years to close up knife cuts so I feel your pain brother,
J
Massachusetts, United States
Joined: February 08, 2012
KitMaker: 1,271 posts
Armorama: 1,253 posts
Posted: Thursday, June 13, 2013 - 04:00 PM UTC
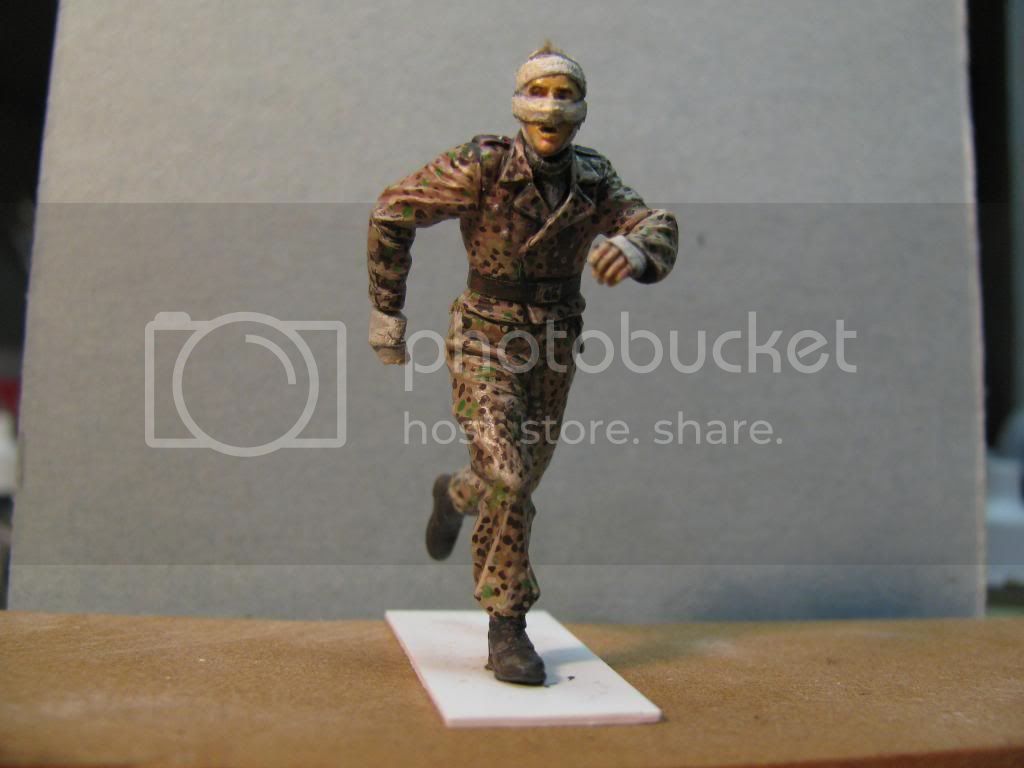
Don't know how I didn't catch this update earlier. Love the Pea dot camo, perfect colors. I've found that the very tip of my xacto blades makes for a good way to apply that sort of camo... except for that it takes forever and ever. I wouldn't worry about it on him though, it really is impressive. I really like the facial expression on him too. Even though it's half wrapped up it still has just as much expression. And a good one too. I might try something like that on a figure, once Dragon re-releases their Medical Troops kit.
-Conor
I'm doin' stuff. Lotta stuff.
Oost-Vlaanderen, Belgium
Joined: May 14, 2006
KitMaker: 3,829 posts
Armorama: 881 posts
Posted: Thursday, June 13, 2013 - 07:14 PM UTC
only words commin' to mind about your figures are
AWESOME
UNIQUE
damn I wished I could do that so good with them figs!
envy envy

Rest in peace my dearest of friends, Mike I 'll miss ya a lot
fastest way to get killed,
messing with the man with a gun.
modelling is life, anything before or after is waiting...
Pennsylvania, United States
Joined: April 10, 2011
KitMaker: 7,941 posts
Armorama: 7,934 posts
Posted: Friday, June 14, 2013 - 01:52 AM UTC
Quoted Text
Don't know how I didn't catch this update earlier. Love the Pea dot camo, perfect colors. I've found that the very tip of my xacto blades makes for a good way to apply that sort of camo... except for that it takes forever and ever. I wouldn't worry about it on him though, it really is impressive. I really like the facial expression on him too. Even though it's half wrapped up it still has just as much expression. And a good one too. I might try something like that on a figure, once Dragon re-releases their Medical Troops kit.
-Conor
Yeah little brother,I also wish they would re release the medical troop set as well as the Hohenstaufen set!! Hehee But there are other sets of wounded guys out there if you don't want to wait. I think minicraft,zvezda,icm and masterbox all have them? Dragon as well I think they have two sets right now that have them. The Arnhem set and the Aachen set.
Go for it dude,
J
Pennsylvania, United States
Joined: April 10, 2011
KitMaker: 7,941 posts
Armorama: 7,934 posts
Posted: Friday, June 14, 2013 - 01:53 AM UTC
Quoted Text
only words commin' to mind about your figures are
AWESOME
UNIQUE
damn I wished I could do that so good with them figs!
Thanks Man,that was very nice of you to say,
J
envy envy
Pennsylvania, United States
Joined: April 10, 2011
KitMaker: 7,941 posts
Armorama: 7,934 posts
Posted: Friday, July 19, 2013 - 09:47 AM UTC
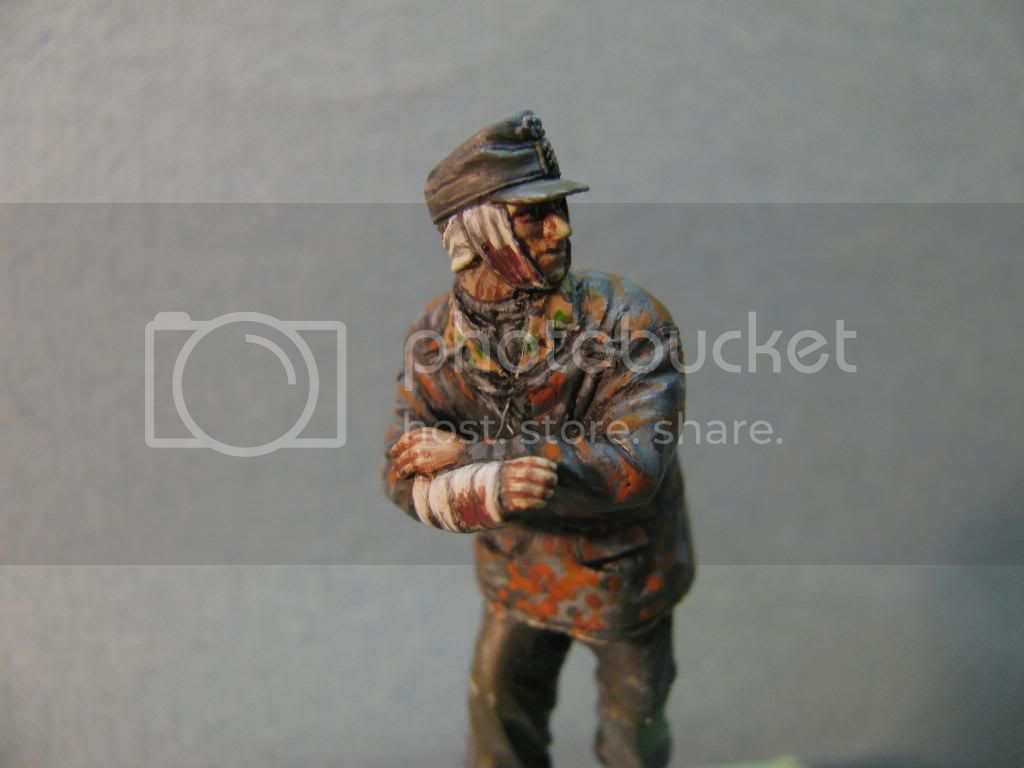
Tried a few things with this guy. I based him off a guy pictured in Stoumont that had a smock over a 44 pattern jacket over top a wool jacket. I have never seen a pic of LSSAH guys in the Ardennes with winter parkas. Too much blood here or? He is leaning on the inside wall of the track.
Massachusetts, United States
Joined: February 08, 2012
KitMaker: 1,271 posts
Armorama: 1,253 posts
Posted: Friday, July 19, 2013 - 09:51 AM UTC
Very cool outcome on him, the skin tone gives him a chilly look. Is the bandage just made from putty? Look so lifelike. IMO the blood looks perfect...I had a bandage kinda like that once and it looks similar hahaha
-Conor
I'm doin' stuff. Lotta stuff.
Pennsylvania, United States
Joined: April 10, 2011
KitMaker: 7,941 posts
Armorama: 7,934 posts
Posted: Friday, July 19, 2013 - 12:11 PM UTC
Quoted Text
Very cool outcome on him, the skin tone gives him a chilly look. Is the bandage just made from putty? Look so lifelike. IMO the blood looks perfect...I had a bandage kinda like that once and it looks similar hahaha
-Conor
Actualy this head was from a old bag o heads I had from Warriers(I think). I don't like to use this kind of head because the hat is molded on and makes it hard to paint the face.The bandage was molded on the head. I did the torso with putty though and the arm bandage as well.
J


