James,
You're figure is top notch !
I love the dust effect, and the global body position and his facial expression are great.
Keep them coming !
Julien
Hosted by Richard S.
Vietnam: Trouble in Southeast Asia! II
Kinggeorges

Joined: August 31, 2005
KitMaker: 1,380 posts
Armorama: 845 posts

Posted: Wednesday, April 09, 2014 - 06:31 PM UTC
Posted: Monday, April 21, 2014 - 06:12 PM UTC
I believe I have found what I will do with my M113  I will make an M132 out of it.
Cheers Rob.
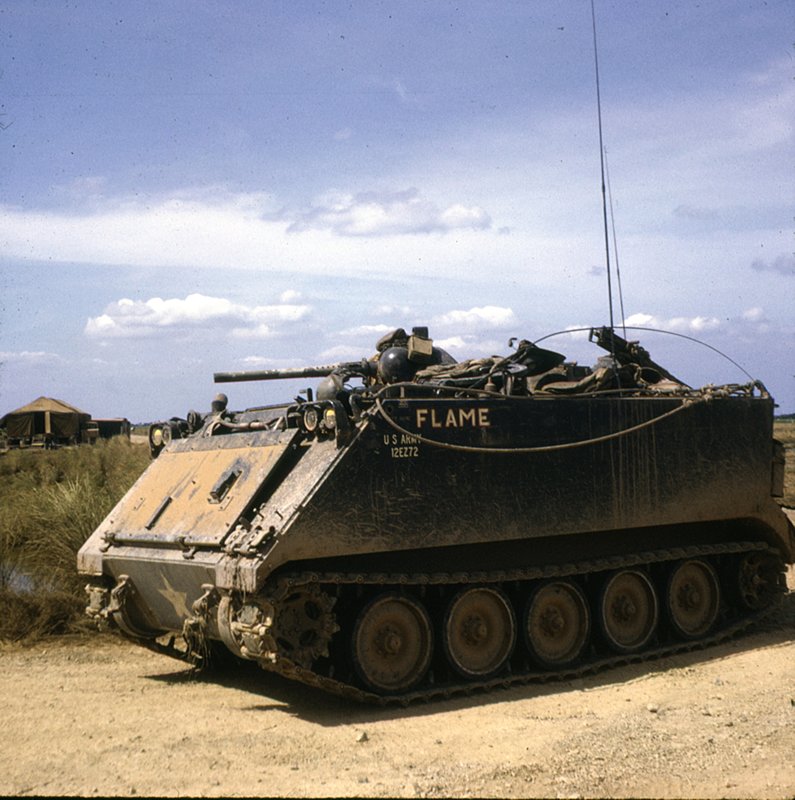
 I will make an M132 out of it.
Cheers Rob.

ReconTL3-1

Joined: June 07, 2006
KitMaker: 726 posts
Armorama: 687 posts

Posted: Monday, May 05, 2014 - 11:25 AM UTC
Hello All,
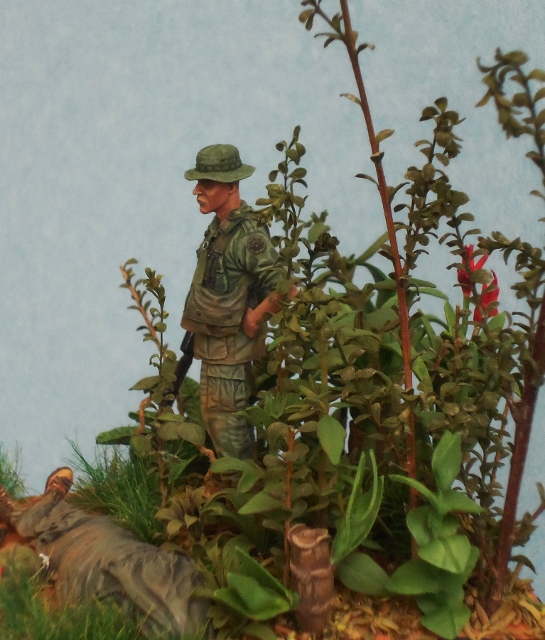
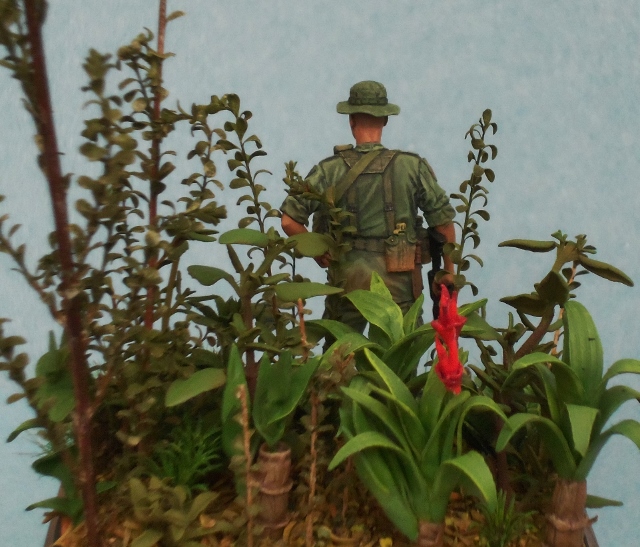
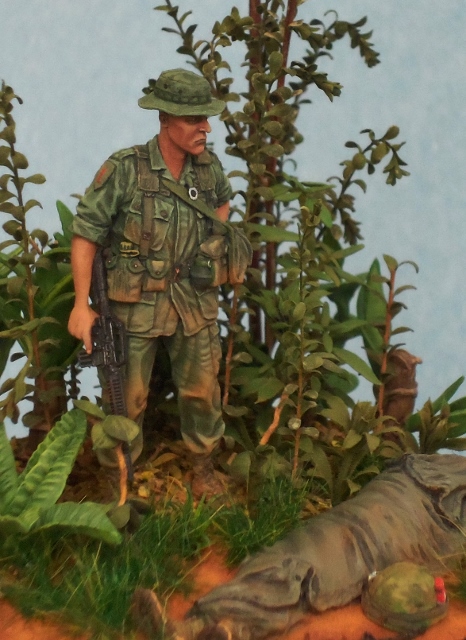
It's been a while since I have completed any projects. The Tulsa Figure Show is coming up and I wanted to have something new to display, so this is what evolved from several ideas and several figures I had started over the last few months. The vignette depicts a senior NCO from 2d Battalion 47th Infantry (Mechanized) 9th Infantry Division in Long An Province, Republic of Vietnam in October 1967 awaiting the evacuation of a Soldier who was killed in action and contemplating the loss. He is wearing a first pattern Jungle Fatigue shirt with his nametape, US Army tape, and CIB on his chest along with a 1st Infantry Division patch indicating a previous tour of duty in Vietnam and a 9th Infantry Division patch signifying his current assignment. He is not wearing the large chevrons on his sleeves as he learned during his first tour that they attracted the attention of enemy snipers so the shirts he wears in the field are without them. The main figure is a conversion of several Bravo 6 pieces. The torso is from the Green Beret Colonel, the legs from the officer of the Field Briefing kit, right forearm from the Dog Handler kit, boonie hat from that kit, canteens from the canteen kit, and then the head is from Hornet and the ammo pouch is from Verlinden's LAW gunner. The Soldier wrapped in the poncho is from CMK's Marines in Vietnam kit. I scraped off the excess wrinkles in the poncho to make it look more realistic. The senior NCO was painted with acrylics as was the Soldier wrapped in the poncho. I used a semi-gloss color for the rubber sheen of the poncho.
The plants are a mixture of dried plants from craft stores, clay dollhouse plants that I bought off of e-bay when I was in Afghanistan, and some plants that I preserved myself in glycerine.
I hope you enjoy the pictures. If you have any questions or comments, please give them.


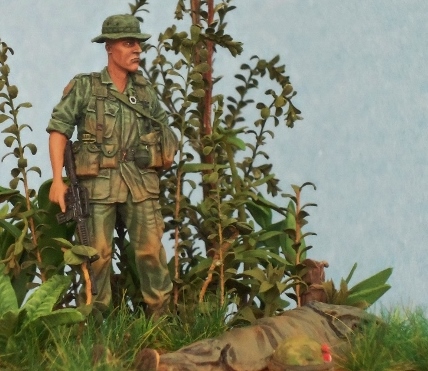
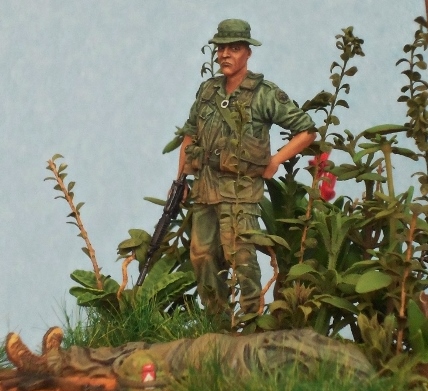

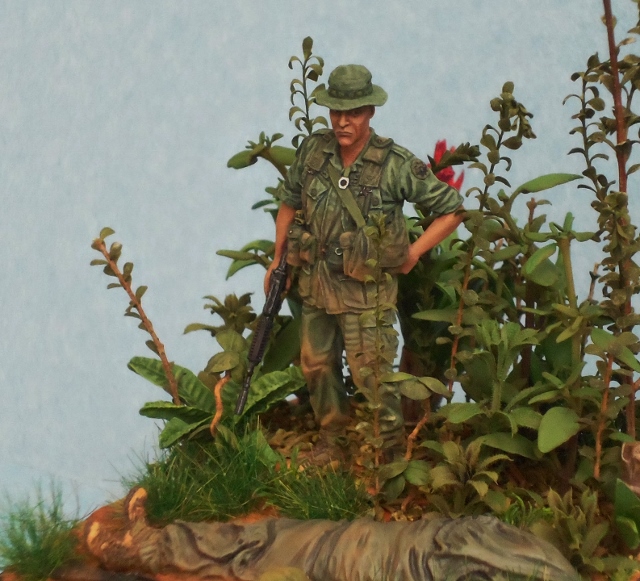




Thanks for looking.
Cheers,
James
It's been a while since I have completed any projects. The Tulsa Figure Show is coming up and I wanted to have something new to display, so this is what evolved from several ideas and several figures I had started over the last few months. The vignette depicts a senior NCO from 2d Battalion 47th Infantry (Mechanized) 9th Infantry Division in Long An Province, Republic of Vietnam in October 1967 awaiting the evacuation of a Soldier who was killed in action and contemplating the loss. He is wearing a first pattern Jungle Fatigue shirt with his nametape, US Army tape, and CIB on his chest along with a 1st Infantry Division patch indicating a previous tour of duty in Vietnam and a 9th Infantry Division patch signifying his current assignment. He is not wearing the large chevrons on his sleeves as he learned during his first tour that they attracted the attention of enemy snipers so the shirts he wears in the field are without them. The main figure is a conversion of several Bravo 6 pieces. The torso is from the Green Beret Colonel, the legs from the officer of the Field Briefing kit, right forearm from the Dog Handler kit, boonie hat from that kit, canteens from the canteen kit, and then the head is from Hornet and the ammo pouch is from Verlinden's LAW gunner. The Soldier wrapped in the poncho is from CMK's Marines in Vietnam kit. I scraped off the excess wrinkles in the poncho to make it look more realistic. The senior NCO was painted with acrylics as was the Soldier wrapped in the poncho. I used a semi-gloss color for the rubber sheen of the poncho.
The plants are a mixture of dried plants from craft stores, clay dollhouse plants that I bought off of e-bay when I was in Afghanistan, and some plants that I preserved myself in glycerine.
I hope you enjoy the pictures. If you have any questions or comments, please give them.


Thanks for looking.
Cheers,
James
ReconTL3-1

Joined: June 07, 2006
KitMaker: 726 posts
Armorama: 687 posts

Posted: Monday, May 05, 2014 - 02:21 PM UTC
Quoted Text
James,
You're figure is top notch !
I love the dust effect, and the global body position and his facial expression are great.
Keep them coming !
Julien
Thanks, Julien.
I finally got the figure into a vignette and hopefully those qualities that you commented on will help make the piece effective.
Cheers!
James
Lonewolf7usa

Joined: March 24, 2009
KitMaker: 312 posts
Armorama: 296 posts

Posted: Monday, May 05, 2014 - 04:08 PM UTC
Awesome job on the vignette! Great layout and presentation! My father served 3 tours in Vietnam, and when I showed him the pics, he replied "that's how it was! Again, great job!!
ReconTL3-1

Joined: June 07, 2006
KitMaker: 726 posts
Armorama: 687 posts

Posted: Thursday, May 08, 2014 - 11:19 AM UTC
Quoted Text
Awesome job on the vignette! Great layout and presentation! My father served 3 tours in Vietnam, and when I showed him the pics, he replied "that's how it was! Again, great job!!
Thanks for the positive comments about my work. My father served 2 tours in Vietnam and I'll hit my 26th year of service in June. Please pass on to your father my thanks for his service in Vietnam.
Cheers,
James
ReconTL3-1

Joined: June 07, 2006
KitMaker: 726 posts
Armorama: 687 posts

Posted: Friday, May 09, 2014 - 10:51 AM UTC
Hello All,
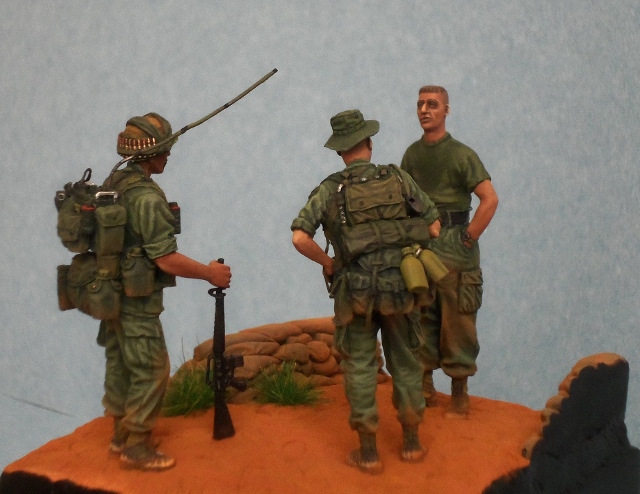
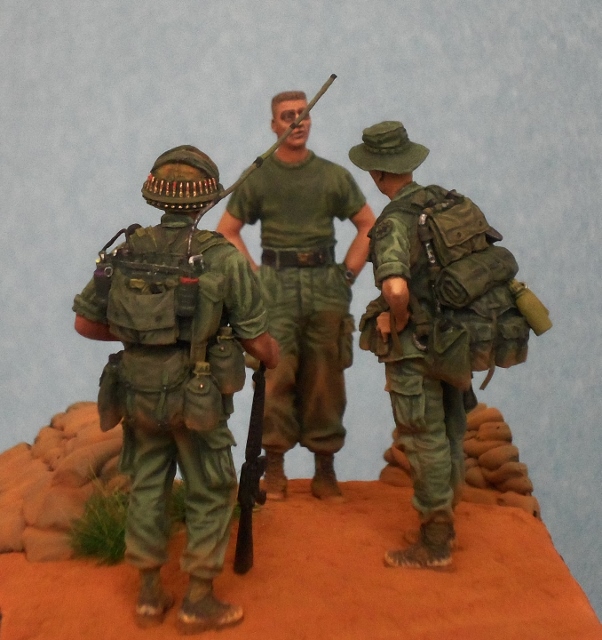
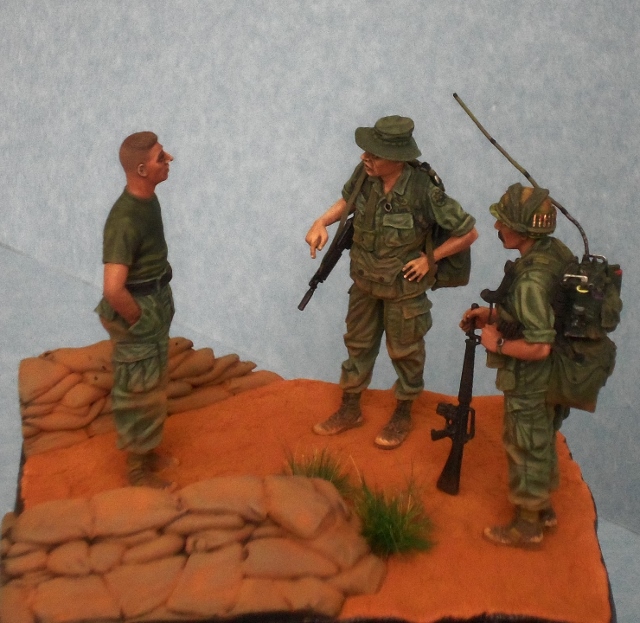
After getting the "All Gave Some...Some Gave All" vignette completed, I sat down to work on an M16 halftrack that I am working on for the Air Defense Artillery Museum here at Fort Sill, OK when I happened to look to the side of my workbench and saw some sandbags from a Hobby Fan LVTP-5 Crew kit and it gave me an idea for another vignette. This one is called "The NVA sketch we found marked this spot as a CP" which depicts a platoon leader and his RTO reporting in to his company commander (who is standing near the entrance of the CP) what his platoon had found on their way into the patrol base. The Soldiers are from 4th Battalion 39th Infantry of the 9th Infantry Division who were OPCON to the 4th Infantry Division for Operation MacArthur in Darlac Province from 21 November through 11 December 1967. The platoon leader figure is a conversion of one of the figures from the Bravo 6 "Take 5" kit. The right forearm is from the officer from the Bravo 6 Field Briefing kit. The head is from Hornet with a Bravo 6 boonie hat. The claymore bag slung over his shoulder is made of magic sculpt putty with a paper strap. The compass pouch is from Bravo 6 as is the rucksack and accessories. The watch through his button hole is from Eduard's M274 MULE set. The RTO is from Bravo 6 with extra canteens and accessories from Hobby Fan and Bravo 6. The company commander is a converted British Soldier from Accurate Armour with a Hornet head and Vietnam details sculpted in with Magic Sculpt.
Here are some pictures:
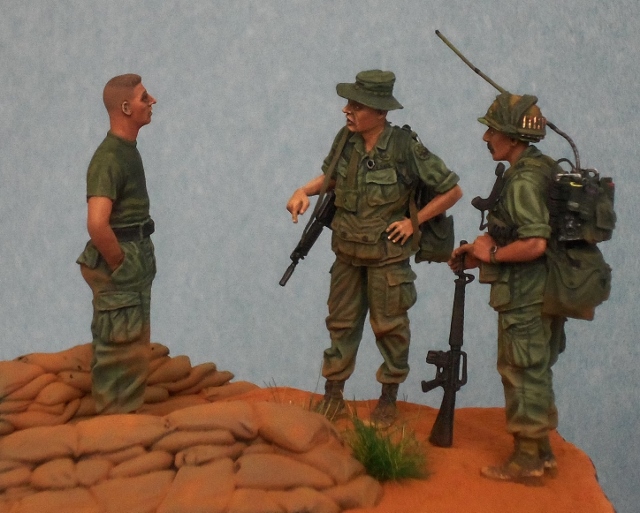
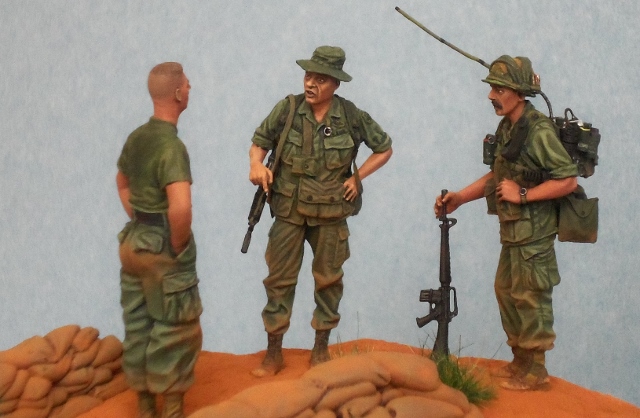

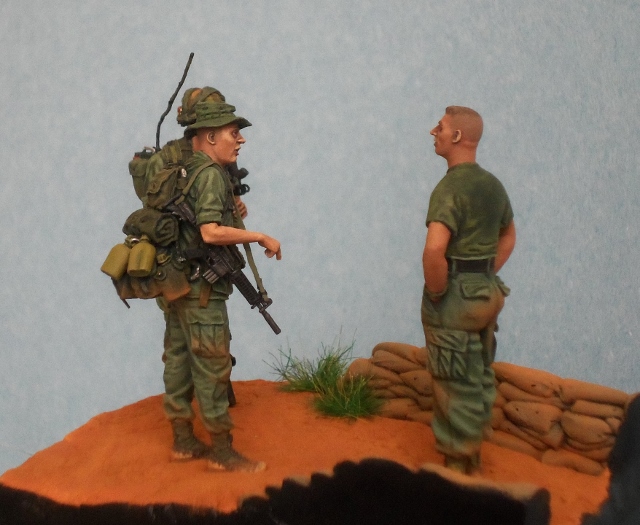
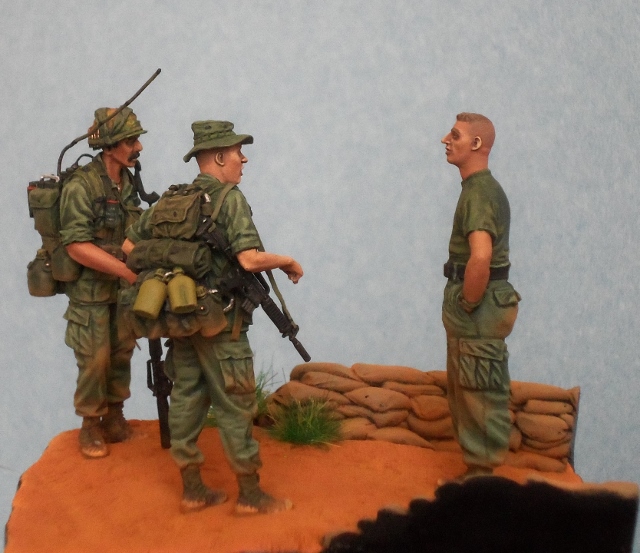
Thanks for looking. If you have any questions about anything that I did, please ask and I will do my best to answer them.
Cheers,
James
After getting the "All Gave Some...Some Gave All" vignette completed, I sat down to work on an M16 halftrack that I am working on for the Air Defense Artillery Museum here at Fort Sill, OK when I happened to look to the side of my workbench and saw some sandbags from a Hobby Fan LVTP-5 Crew kit and it gave me an idea for another vignette. This one is called "The NVA sketch we found marked this spot as a CP" which depicts a platoon leader and his RTO reporting in to his company commander (who is standing near the entrance of the CP) what his platoon had found on their way into the patrol base. The Soldiers are from 4th Battalion 39th Infantry of the 9th Infantry Division who were OPCON to the 4th Infantry Division for Operation MacArthur in Darlac Province from 21 November through 11 December 1967. The platoon leader figure is a conversion of one of the figures from the Bravo 6 "Take 5" kit. The right forearm is from the officer from the Bravo 6 Field Briefing kit. The head is from Hornet with a Bravo 6 boonie hat. The claymore bag slung over his shoulder is made of magic sculpt putty with a paper strap. The compass pouch is from Bravo 6 as is the rucksack and accessories. The watch through his button hole is from Eduard's M274 MULE set. The RTO is from Bravo 6 with extra canteens and accessories from Hobby Fan and Bravo 6. The company commander is a converted British Soldier from Accurate Armour with a Hornet head and Vietnam details sculpted in with Magic Sculpt.
Here are some pictures:


Thanks for looking. If you have any questions about anything that I did, please ask and I will do my best to answer them.
Cheers,
James

vonHengest

Joined: June 29, 2010
KitMaker: 5,854 posts
Armorama: 4,817 posts

Posted: Friday, May 16, 2014 - 06:46 AM UTC
Figures! One of the best parts of this campaign!

Bluestab

Joined: December 03, 2009
KitMaker: 2,160 posts
Armorama: 1,906 posts

Posted: Wednesday, May 21, 2014 - 06:32 AM UTC
I got the Ontos its base coat of OD.

Wrapped up basic assembly by adding the jerry can and pioneer tools (nice vague placement on those in the instructions). Added the .30 cal Browning for the commander. Base painted the targeting MGs on the launch tubes black. I'll drybrush them gray and metallic gray later.

Decals on and basically assembled done. It still needs some finishing paint, touch-ups, and the expected washes and drybrushings.

Another view with better light.

A bit off-topic and what-if-ish. During assembly I played with the idea of mounting the recoilless launcher on a M113. But what to do with the Ontos chassis? I figured maybe a TOW launcher. I had a loose Humvee mount and tried it...it fit. It's a standard MG mount but if it fit then a Humvee TOW mount should fit as well. The next time I find the Ontos and a M113 on sale, I know what I'm going to be doing.


Wrapped up basic assembly by adding the jerry can and pioneer tools (nice vague placement on those in the instructions). Added the .30 cal Browning for the commander. Base painted the targeting MGs on the launch tubes black. I'll drybrush them gray and metallic gray later.

Decals on and basically assembled done. It still needs some finishing paint, touch-ups, and the expected washes and drybrushings.

Another view with better light.

A bit off-topic and what-if-ish. During assembly I played with the idea of mounting the recoilless launcher on a M113. But what to do with the Ontos chassis? I figured maybe a TOW launcher. I had a loose Humvee mount and tried it...it fit. It's a standard MG mount but if it fit then a Humvee TOW mount should fit as well. The next time I find the Ontos and a M113 on sale, I know what I'm going to be doing.

ReconTL3-1

Joined: June 07, 2006
KitMaker: 726 posts
Armorama: 687 posts

Posted: Wednesday, May 21, 2014 - 10:31 AM UTC
Your Ontos is coming along nicely. Can't wait to see the finished model.
That is an interesting what-if with the Ontos with the HUMVEE ring mount attached. What would be the what-if purpose of the vehicle? A scout vehicle?
Cheers,
James
That is an interesting what-if with the Ontos with the HUMVEE ring mount attached. What would be the what-if purpose of the vehicle? A scout vehicle?
Cheers,
James
andromeda673

Joined: July 30, 2013
KitMaker: 584 posts
Armorama: 525 posts

Posted: Wednesday, May 21, 2014 - 02:44 PM UTC
Hey guys, here is my entry for this group build, I'm going to be building a 1/32 A4F Skyhawk. Here are some pictures of progress made so far. I got a good amount of aftermarket goodies for this one, steel beach intake plugs, eduard photo etch and mask kit, and some remove before flight hang tags.
I'm also going to be wiring the instrument panel and adding wiring to the wheel wells and bays


I'm also going to be wiring the instrument panel and adding wiring to the wheel wells and bays


Bluestab

Joined: December 03, 2009
KitMaker: 2,160 posts
Armorama: 1,906 posts

Posted: Wednesday, May 21, 2014 - 03:53 PM UTC
Thanks James.
For the what-if, the Ontos was in service until 1969 with the Marines. Some of the remaining examples were handed over to Army light infantry units. TOW missiles went in to service around the same time so I figure mounting them to the Ontos chassis could be seen as an armored TOW launch vehicle in a similar role as the TOW Mutts. That could have justified extending their service life. I probably would use the Humvee ring as a base to make an older looking weapons mounts for the TOW launcher and control box. Maybe add a shield with a MG for the commander/operator.
For the what-if, the Ontos was in service until 1969 with the Marines. Some of the remaining examples were handed over to Army light infantry units. TOW missiles went in to service around the same time so I figure mounting them to the Ontos chassis could be seen as an armored TOW launch vehicle in a similar role as the TOW Mutts. That could have justified extending their service life. I probably would use the Humvee ring as a base to make an older looking weapons mounts for the TOW launcher and control box. Maybe add a shield with a MG for the commander/operator.
Posted: Thursday, May 22, 2014 - 01:40 AM UTC
Hi James,
Two excellent figure builds, the first one is very moving and the workmanship in both excellent. Way to go Sir.
Al


Two excellent figure builds, the first one is very moving and the workmanship in both excellent. Way to go Sir.
Al


andromeda673

Joined: July 30, 2013
KitMaker: 584 posts
Armorama: 525 posts

Posted: Thursday, May 22, 2014 - 12:14 PM UTC

PrickleHead

Joined: December 31, 2013
KitMaker: 338 posts
Armorama: 121 posts

Posted: Thursday, May 22, 2014 - 08:24 PM UTC
Hi All
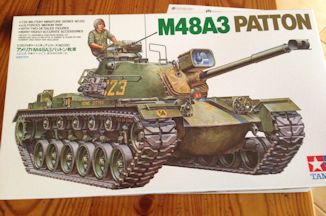
I am in with Tamiya's Patton
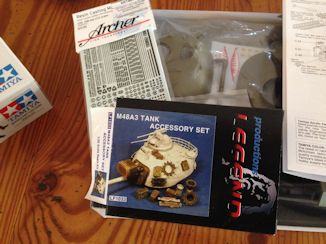
Cheers Stephen
I am in with Tamiya's Patton


Cheers Stephen

Bluestab

Joined: December 03, 2009
KitMaker: 2,160 posts
Armorama: 1,906 posts

Posted: Friday, May 23, 2014 - 05:58 AM UTC
I added two washes and drybrushing and am calling this one done.


And some shots while out in the bush.


It was a fun...though at times annoying build. It's a neat looking little vehicle though. And I'm enjoying watching the other builds. I'll try to upload a couple of pictures in to the Gallery some time today.


And some shots while out in the bush.


It was a fun...though at times annoying build. It's a neat looking little vehicle though. And I'm enjoying watching the other builds. I'll try to upload a couple of pictures in to the Gallery some time today.
Scoutmaster

Joined: March 05, 2010
KitMaker: 81 posts
Armorama: 79 posts

Posted: Friday, May 23, 2014 - 05:21 PM UTC
2ndWorcesters

Joined: March 15, 2014
KitMaker: 80 posts
Armorama: 80 posts

Posted: Sunday, May 25, 2014 - 01:48 AM UTC
James, the figures are just stunning mate, awesome stuff!
Alex, the Ontos looks the business mate.
Alex, the Ontos looks the business mate.
andromeda673

Joined: July 30, 2013
KitMaker: 584 posts
Armorama: 525 posts

Posted: Sunday, May 25, 2014 - 03:25 AM UTC
andromeda673

Joined: July 30, 2013
KitMaker: 584 posts
Armorama: 525 posts

Posted: Tuesday, May 27, 2014 - 12:09 PM UTC
andromeda673

Joined: July 30, 2013
KitMaker: 584 posts
Armorama: 525 posts

Posted: Wednesday, May 28, 2014 - 12:22 PM UTC
andromeda673

Joined: July 30, 2013
KitMaker: 584 posts
Armorama: 525 posts

Posted: Saturday, May 31, 2014 - 09:57 AM UTC
andromeda673

Joined: July 30, 2013
KitMaker: 584 posts
Armorama: 525 posts

Posted: Sunday, June 01, 2014 - 08:30 AM UTC
Posted: Sunday, June 01, 2014 - 02:30 PM UTC
Well done! 
Cheers Rob.

Cheers Rob.
andromeda673

Joined: July 30, 2013
KitMaker: 584 posts
Armorama: 525 posts

Posted: Tuesday, June 03, 2014 - 01:46 PM UTC
 |


