


Hosted by Richard S.
Vietnam: Trouble in Southeast Asia! II
Graywolf


Joined: December 01, 2001
KitMaker: 6,405 posts
Armorama: 1,850 posts
Posted: Wednesday, February 12, 2014 - 01:57 AM UTC
Great painting James. I will keep my eyes open for your progress.


ReconTL3-1

Joined: June 07, 2006
KitMaker: 726 posts
Armorama: 687 posts
Posted: Thursday, February 13, 2014 - 10:52 AM UTC
Thanks for the positive comments Walley and Engin. I will post additional figures as I complete them.
Cheers,
James
Cheers,
James
1stjaeger

Joined: May 20, 2011
KitMaker: 1,744 posts
Armorama: 1,727 posts

Posted: Thursday, February 13, 2014 - 11:41 AM UTC
Superb painting on those figures James!!
That short haircut on the company commander...simply fantastic!!!
Congratulations Sir!!
Cheers
Romain
Kinggeorges

Joined: August 31, 2005
KitMaker: 1,380 posts
Armorama: 845 posts

Posted: Saturday, February 15, 2014 - 02:08 AM UTC
hello guyq,
I finished mister Jean Réno. A really nice and complex figure I really enjoyed painting. The last bit missing is the base.
More pics on my blog.
Jérémy, yes it would be cool to make a painting tuto. I'll do that with the next 1/35 figures I'll paint?
All the best,
Julien


I finished mister Jean Réno. A really nice and complex figure I really enjoyed painting. The last bit missing is the base.
More pics on my blog.
Jérémy, yes it would be cool to make a painting tuto. I'll do that with the next 1/35 figures I'll paint?
All the best,
Julien
noddy927

Joined: February 15, 2013
KitMaker: 1,273 posts
Armorama: 568 posts
Posted: Sunday, February 16, 2014 - 09:41 AM UTC
Superb detail on your French Para Julien.
My offering is complete, it looks totally different from my 1st pics. I had no legs for these figures so I thought water feature, and pretty pleased with the outcome.


[URL=http://s1280.photobucket.com/user/noddy927/media/Trouble%20in%20south%20east%20asia%20campaign/WP_001812_zpsd040e151.jpg.html]

So it's done.
Pete
A few from earlier in on the build.


Pete
My offering is complete, it looks totally different from my 1st pics. I had no legs for these figures so I thought water feature, and pretty pleased with the outcome.


[URL=http://s1280.photobucket.com/user/noddy927/media/Trouble%20in%20south%20east%20asia%20campaign/WP_001812_zpsd040e151.jpg.html]


So it's done.
Pete
A few from earlier in on the build.


Pete
ReconTL3-1
Joined: June 07, 2006
KitMaker: 726 posts
Armorama: 687 posts
Posted: Sunday, February 16, 2014 - 11:03 AM UTC
Excellent job on the paratrooper, Julien. The camo pattern is outstanding and the boots look well done. I think this is one of your better Vietnam figures.
Peter, nice diorama. I've always wanted to venture into having guys in the water but never have although I have prepared a few figures for it. What did you use for the water and how did you get it to look muddy? These guys look like they might be from a circa 1969 9th Infantry Division element.
Romaine, glad you liked the short haircut. With the CO being a regular Army officer, he would look like he'd adhere to regulations a bit more than the average Soldier. Luckily, Hornet's set of heads of guys with short haircuts was released and the CO has one of those heads. First I painted the thicker part of his hair a dark brown, then I mixed up the base skin color with that same dark brown for the sides and back where the hair is just starting to grow back. I use the same mix when I paint 5 o'clock shadow on figures. I used that same color to drybrush highlights into the guy's hair and I think it turned out OK.
Hopefully I will get back to painting some figures I just completed posing in the next couple of days. They are primed and just begging for some paint:)
Cheers,
James
Stefan1580

Joined: November 20, 2006
KitMaker: 360 posts
Armorama: 354 posts

Posted: Sunday, February 16, 2014 - 09:03 PM UTC
Hi Julien,
you finished french para looks great. I like your paintjob a lot like on your other Figures. The Camo on these french Uniforms is not so easy and you have done an fantastic job on them. Lovely Figure.
@James: These are great Figure conversions and the paintjob is really good. I like the highlighting a lot. The hornet head for the CO is a good choice with typical army haircut. I have this one too but had no good idea how to use this one. Perhaps i will give him an bush hat. The claymore bag looks very good and i think it is made by yourself? The CAR-15 looks like the one from Trumpeter. I like the rifles from Trumpeter a lot for their Detail. Great work.
@ Peter: Very nice dio idea. The good old Verlinden Figures are always nice to see. Your water is really great done. Reminds me on that movie "Rules of Engagement" with Tommy Lee Jones were the Patrol moves through the swamp and being ambushed. Very nice dio.
Greetings
Stefan
Graywolf
Joined: December 01, 2001
KitMaker: 6,405 posts
Armorama: 1,850 posts
Posted: Sunday, February 16, 2014 - 09:58 PM UTC
Julien - Great final my friend. Colors and painting look perfect.
Peter - very nice diorama.congrats
Peter - very nice diorama.congrats
noddy927
Joined: February 15, 2013
KitMaker: 1,273 posts
Armorama: 568 posts
Posted: Monday, February 17, 2014 - 12:14 AM UTC
Thanks guys.
James the water is woodland scenics realistic water.
I painted the base dark earth, then added a 2-3mm layer of realistic water. After it dried I added another layer with dark yellow and dark earth mixed into it, it take alot longer to dry, this I found out as I was waiting for ages to get the figures in without them falling over. I then stuck tin foil all over the top of the realistic water once the figs were in place, and left it to dry. A day and a half later, I took the foil off, it wasn't fully dry but this helped to rough the water a bit. I then added a last clear layer of realistic water but only very thin, just enough to cover the layer below. This gave a perfectly flat layer, but the ripples below show through giving the effect of water being disturbed.
I had these figures sitting in a spares box and thought I would never use them, but the idea just popped in when I spied the realistic water sitting on my bench. 1st time for me James, but try it I really enjoyed it.
Pete

Bluestab
Joined: December 03, 2009
KitMaker: 2,160 posts
Armorama: 1,906 posts
Posted: Monday, February 17, 2014 - 06:14 AM UTC
I'm afraid I might be pulling out of this one. I've lost all interest in the Ontos and there's some personal issues as well. There's still a lot of time left on this one so I might dust it off before the deadline.

SpeedyJ

Joined: September 17, 2013
KitMaker: 1,617 posts
Armorama: 1,150 posts
Posted: Monday, February 17, 2014 - 08:23 AM UTC
Hi Pete.
This is really amazing. Love the composition.
Regards,
Robert Jan
This is really amazing. Love the composition.
Regards,
Robert Jan
noddy927
Joined: February 15, 2013
KitMaker: 1,273 posts
Armorama: 568 posts
Posted: Monday, February 17, 2014 - 10:16 AM UTC
Thanks Robert ...I hope to get started on my rusty now mate.
Alex sorry you are dropping out, hope it is temporary. Look forward to seeing the Ontos finished.
Pete
Alex sorry you are dropping out, hope it is temporary. Look forward to seeing the Ontos finished.
Pete
Bluestab
Joined: December 03, 2009
KitMaker: 2,160 posts
Armorama: 1,906 posts
Posted: Monday, February 17, 2014 - 01:11 PM UTC
Thanks Pete. I've got enough progress made on the Ontos that I might be able to jump back on it. I'm looking at it as being on hold for now. I just need to see how the next couple of months go. Workbench time is going to be limited for a bit.
BTW nice work on your patrol diorama. I can almost hear the buzzing of the mosquitoes.
BTW nice work on your patrol diorama. I can almost hear the buzzing of the mosquitoes.

phantom_phanatic309

#372

Joined: March 10, 2010
KitMaker: 2,568 posts
Armorama: 423 posts

Posted: Tuesday, February 18, 2014 - 08:30 AM UTC
Some awesome builds going on.
Pete, brilliant use of spare figures! Did you use the woodland scenics meltable water pellets or the stuff that's in the bottle?
I made a small start on my build tonight. I'll build the RAC M113 first off as its a fairly quick build.

A little work on the turret to start things off. I added the front and rear plates and the internal shelf that the commander figure is fixed to. There was not much to hold this part up, just a small bracket on the turret wall. To add some support I built up some reinforcement under it with some off cuts of sprue. Result, a much stronger piece that will not bend in if I'm ham fisted when glueing him in.
There was also a slight problem with the front transmission and axle parts. As they are, they fit into holes on the hull sides, and the axles fall in. There's nothing to hold them in place. I think the intention is to fit the drive wheels to the sub-assembly and then fit the thing to the hull. I find it easier to paint the wheels, fit them on and then the tracks last of all before weathering. To stop them falling into the vehicle I glued on some strips of scrap plastic. When that's hardened up I'll trim them and fit them to the hull. Its a silly thing, but annoying and breaks my usual build sequence.


familiar

Joined: December 10, 2009
KitMaker: 55 posts
Armorama: 54 posts
Posted: Tuesday, February 18, 2014 - 03:10 PM UTC
hi all,after finish to assemble it,i continue paiting so i use olive drab vallejo and make it with light modulation.When i'm attaching decal,i have a problem,because this is old kit,decals are broken in water,this is an acident.I use decal from other kits.After attaching decal,i use olicolor for fitting and make streak


I think I'll buy other kit and assemble it again
I think I'll buy other kit and assemble it again

Kinggeorges
Joined: August 31, 2005
KitMaker: 1,380 posts
Armorama: 845 posts
Posted: Tuesday, February 18, 2014 - 07:22 PM UTC
Thanks guys for your nice word. I think it's the best 1/35 figure I've made until now. He still needs a base. I'll make a tarmac as base.
Great jobs coming along in the vehicule section too !
Very nice to see some Vietnamese friend entering the competition. We've got something truly international here !
Pete, very nice idea and rendering. But how come could you have half figures in your spare box that are not tankmen ???


Stefan and James, I'm eager to see your promising works !
Best,
Julien
Great jobs coming along in the vehicule section too !
Very nice to see some Vietnamese friend entering the competition. We've got something truly international here !
Pete, very nice idea and rendering. But how come could you have half figures in your spare box that are not tankmen ???
Stefan and James, I'm eager to see your promising works !
Best,
Julien
1stjaeger
Joined: May 20, 2011
KitMaker: 1,744 posts
Armorama: 1,727 posts
Posted: Tuesday, February 18, 2014 - 09:03 PM UTC
Quoted Text
hi all,after finish to assemble it,i continue paiting so i use olive drab vallejo and make it with light modulation.When i'm attaching decal,i have a problem,because this is old kit,decals are broken in water,this is an acident.I use decal from other kits.After attaching decal,i use olicolor for fitting and make streak
I think I'll buy other kit and assemble it again
From what I can say given the distance, your weathering is just fine!! Great job!!
decals may have suffered, but lettering can also suffer on the real thing!
I wouldn't throw the nice model away!

Congratulations for the paintjob!!
Cheers
Romain
noddy927
Joined: February 15, 2013
KitMaker: 1,273 posts
Armorama: 568 posts
Posted: Wednesday, February 19, 2014 - 01:09 AM UTC
Stephen: It's from the bottle buddy, and it's really easy to work with.
Julien: Thanks I enjoyed building it, and the reason I had many figures with no legs is I robbed them for other figures over a period of time, I never thought I would use the bodies, but I never throw anything away......good job really.
Cheers Pete
Julien: Thanks I enjoyed building it, and the reason I had many figures with no legs is I robbed them for other figures over a period of time, I never thought I would use the bodies, but I never throw anything away......good job really.
Cheers Pete
Stefan1580
Joined: November 20, 2006
KitMaker: 360 posts
Armorama: 354 posts
Posted: Wednesday, February 19, 2014 - 03:10 AM UTC
Quoted Text
hi all,after finish to assemble it,i continue paiting so i use olive drab vallejo and make it with light modulation.When i'm attaching decal,i have a problem,because this is old kit,decals are broken in water,this is an acident.I use decal from other kits.After attaching decal,i use olicolor for fitting and make streak
I think I'll buy other kit and assemble it again
@Loc nguyen
Hi,
your Model looks really great with awsome weathering. If you need new Decals have a look at MecModels
decals various vehicles no. 1
decals various vehicles no. 2
Hope this helps
Greetings
Stefan
familiar
Joined: December 10, 2009
KitMaker: 55 posts
Armorama: 54 posts
Posted: Wednesday, February 19, 2014 - 05:15 PM UTC
Many thanks Romain and Stefan.I think I'll find and order new decal for my Lvtp5,I'll regret if i throw it
WARLORD

Joined: April 23, 2003
KitMaker: 1,923 posts
Armorama: 868 posts

Posted: Thursday, February 20, 2014 - 01:53 AM UTC
Italeri's 1/48 A-4F Skyhawk


familiar
Joined: December 10, 2009
KitMaker: 55 posts
Armorama: 54 posts
Posted: Thursday, February 20, 2014 - 02:15 PM UTC
Finally,I finish LVTP5,and I'll find accessories for it


And I'll buil M41a3 skybow to join this campain
And I'll buil M41a3 skybow to join this campain
Kinggeorges
Joined: August 31, 2005
KitMaker: 1,380 posts
Armorama: 845 posts
Posted: Thursday, February 20, 2014 - 08:01 PM UTC
Loc, very nice beast. I don't like the shapes of this vehicule, but the rendering you've made is great.
Cool to see you here Marcin !
Best,
Julien
Cool to see you here Marcin !
Best,
Julien

Lonewolf7usa
Joined: March 24, 2009
KitMaker: 312 posts
Armorama: 296 posts

Posted: Friday, February 21, 2014 - 03:25 AM UTC
Sorry I've been out of touch but life gets in the way sometimes! Here are some pictures of my Ontos so far! Again, All comments welcome!!


Stefan1580
Joined: November 20, 2006
KitMaker: 360 posts
Armorama: 354 posts
Posted: Monday, February 24, 2014 - 09:29 PM UTC
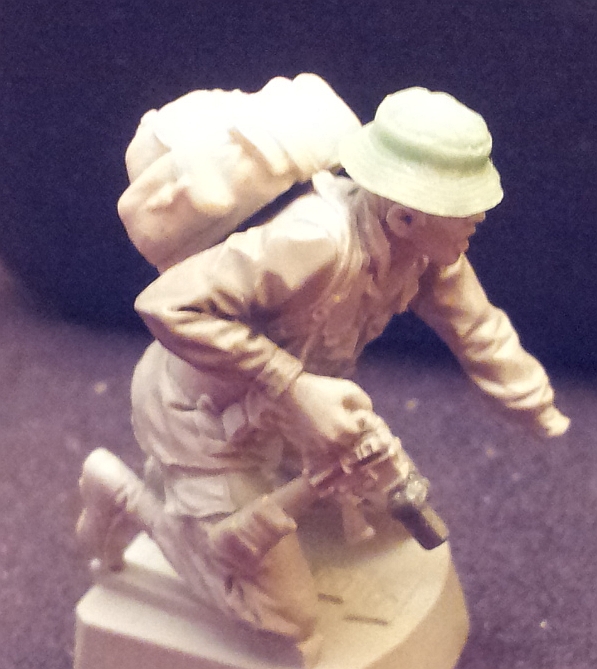
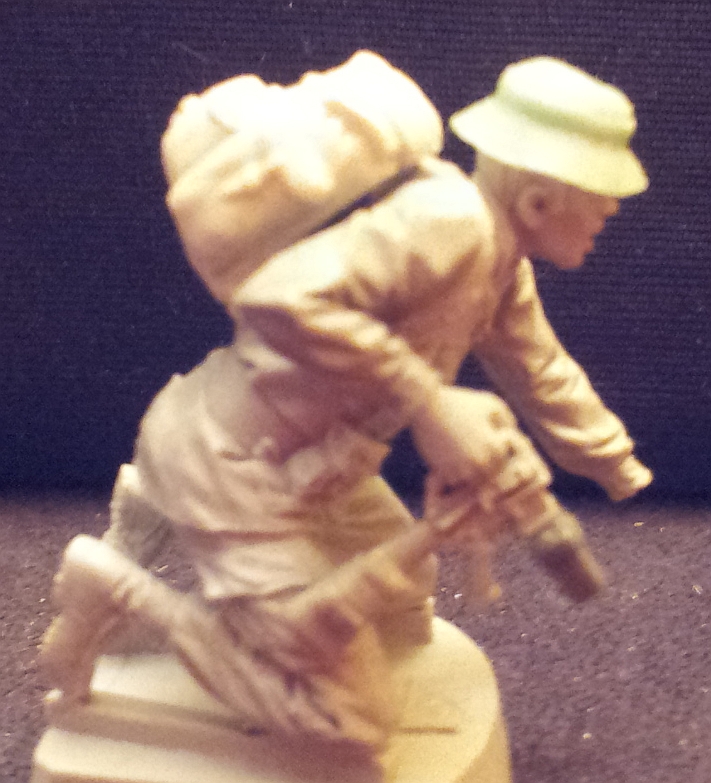
Here are some more Troopers for my SASR Team.
All are Bravo-6 Figures with some conversions. I have to add some ammo pouches for the rifles and 40mm grenades. All will be modified in special SAS tradition. It´s my main work in the Moment with these twin ammo pouches and this special 40mm grenade pouches added to the harness. The kneeling guy has an Bergen rucksack on his back and will have an XM-148 added. He is in an moving Position to stand up and break contact with the enemy. Another guy will touch his back to give him the signal to leave.
After this the painting will start. The ERDl cammo will be hard to realize. Juliens work on his Navy Seal will be an Inspiration for me.
I will add better pictures with my DigiCam later.

Have a nice day
Stefan
All are Bravo-6 Figures with some conversions. I have to add some ammo pouches for the rifles and 40mm grenades. All will be modified in special SAS tradition. It´s my main work in the Moment with these twin ammo pouches and this special 40mm grenade pouches added to the harness. The kneeling guy has an Bergen rucksack on his back and will have an XM-148 added. He is in an moving Position to stand up and break contact with the enemy. Another guy will touch his back to give him the signal to leave.
After this the painting will start. The ERDl cammo will be hard to realize. Juliens work on his Navy Seal will be an Inspiration for me.
I will add better pictures with my DigiCam later.
Have a nice day
Stefan
 |

WEB HOSTING BY


Copyright ©2021 Armorama and Kitmaker Network, a subsidiary of Silver Star Enterprises
All Rights Reserved. Please read our Conditions of Use and Privacy Policy.
All Rights Reserved. Please read our Conditions of Use and Privacy Policy.