

Alex,
Everytime you participate to the VTSA campaign, you bring a lot of originality in it. I love very much your vignette, it brings something funny, I don't know what.
Excellent setting ! How did you make the floor ? I suppose you sculpted the stair dragon ?
Very nice entry
Julien
Hosted by Richard S.
Vietnam: Trouble in Southeast Asia! II
Kinggeorges

Joined: August 31, 2005
KitMaker: 1,380 posts
Armorama: 845 posts

Posted: Sunday, March 16, 2014 - 04:53 AM UTC

oldjoker

Joined: February 14, 2012
KitMaker: 45 posts
Armorama: 44 posts
Posted: Sunday, March 16, 2014 - 06:31 AM UTC
Thank you, friends!
More photos you can see ---> http://armorama.kitmaker.net/forums/219872&page=1
Julien, I made steps and deck from plaster and then scratched with a knife.
Dragon is a souvenir from Vietnam

More photos you can see ---> http://armorama.kitmaker.net/forums/219872&page=1
Julien, I made steps and deck from plaster and then scratched with a knife.
Dragon is a souvenir from Vietnam
Kinggeorges
Joined: August 31, 2005
KitMaker: 1,380 posts
Armorama: 845 posts
Posted: Sunday, March 16, 2014 - 07:05 AM UTC
really nice work Alex, I love it a lot.
For the M60 gunner, does the ammo belt was part of the figure, or did you use some afermarket ammo belt ? I always had a lot of difficulties withe the ammo belt of dragon because they are not flexible at all for me..
Julien
For the M60 gunner, does the ammo belt was part of the figure, or did you use some afermarket ammo belt ? I always had a lot of difficulties withe the ammo belt of dragon because they are not flexible at all for me..
Julien
oldjoker
Joined: February 14, 2012
KitMaker: 45 posts
Armorama: 44 posts
Posted: Sunday, March 16, 2014 - 07:29 AM UTC
Julien, no I didn't. Belt (machine-gun tape) was part of the Hobby Fan's figure.

vonHengest

Joined: June 29, 2010
KitMaker: 5,854 posts
Armorama: 4,817 posts

Posted: Wednesday, March 19, 2014 - 05:26 PM UTC
MS Corley: That's good enough for me! Thanks for your contribution to the campaign, and let us know when you put that vignette together.
Alex: That almost looks comical, I'd hate to have to drive one of those around! I'm sure they got the job done regardless. Excellent presentation by the way
Alan: Welcome to the campaign, an M113 is always a great choice here!
Alex: That almost looks comical, I'd hate to have to drive one of those around! I'm sure they got the job done regardless. Excellent presentation by the way
Alan: Welcome to the campaign, an M113 is always a great choice here!
frank153
Joined: February 19, 2014
KitMaker: 27 posts
Armorama: 10 posts
Posted: Wednesday, March 19, 2014 - 05:37 PM UTC
I would like to join this campaign . I have a previously built M48, M113 and an NVA T54. Can I display them or enter them? If not I have a Tamiya M48 with a sandbagged turret or a V100 armored car. What do you think?

2ndWorcesters

Joined: March 15, 2014
KitMaker: 80 posts
Armorama: 80 posts
Posted: Friday, March 21, 2014 - 12:10 AM UTC
Quoted Text
Alan: Welcome to the campaign, an M113 is always a great choice here!
Thanks Jeremy.
ReconTL3-1
Joined: June 07, 2006
KitMaker: 726 posts
Armorama: 687 posts
Posted: Wednesday, March 26, 2014 - 05:02 AM UTC
There is a lot of excellent work being done by the participants of this campaign as well as some good creativity in regards to the dioramas being created.
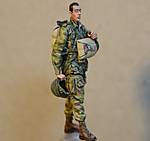
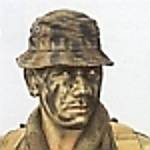
My work has been coming along slowly due to a recent surgery, but I am back in the game and here is my latest figure. He is a conversion of Bravo 6 figure pieces. The torso and left arm are from the Green Beret Colonel, the legs are from the officer from the Field Briefing set, the right forearm is from the dog handler, boonie hat from the boonie hat kit, and the head is a Hornet Head. This figure depicts an experienced NCO who has more than one tour in Vietnam under his belt. He is a member of B Company, 2d Battalion, 47th Infantry (Mechanized) of the 9th Infantry Division during Operation Akron III hence his web gear being on the sparce side (being around the tracks one can wear less gear because your resupply in nearby.) I am going to be using this figure in a diorama depicting events taking place between 8-10 October 1967 where CO B 2-47 IN (MECH) discovered a series of weapon and ammo caches in Long Thanh District, Bien Hoa Provice as part of Operation Akron III. Elements from 4th Battalion, 39th Infantry took over the exploitation of the caches and VC bases. This guy does not seem happy about having to turn over the caches to another unit.
Anyway, here are some pictures of the figure. They may not be a clear as I would have liked, but it gives you an idea of how things are turning out.


Now, on to the next figure for the diorama:)
Cheers,
James
My work has been coming along slowly due to a recent surgery, but I am back in the game and here is my latest figure. He is a conversion of Bravo 6 figure pieces. The torso and left arm are from the Green Beret Colonel, the legs are from the officer from the Field Briefing set, the right forearm is from the dog handler, boonie hat from the boonie hat kit, and the head is a Hornet Head. This figure depicts an experienced NCO who has more than one tour in Vietnam under his belt. He is a member of B Company, 2d Battalion, 47th Infantry (Mechanized) of the 9th Infantry Division during Operation Akron III hence his web gear being on the sparce side (being around the tracks one can wear less gear because your resupply in nearby.) I am going to be using this figure in a diorama depicting events taking place between 8-10 October 1967 where CO B 2-47 IN (MECH) discovered a series of weapon and ammo caches in Long Thanh District, Bien Hoa Provice as part of Operation Akron III. Elements from 4th Battalion, 39th Infantry took over the exploitation of the caches and VC bases. This guy does not seem happy about having to turn over the caches to another unit.
Anyway, here are some pictures of the figure. They may not be a clear as I would have liked, but it gives you an idea of how things are turning out.
Now, on to the next figure for the diorama:)
Cheers,
James
2ndWorcesters
Joined: March 15, 2014
KitMaker: 80 posts
Armorama: 80 posts
Posted: Wednesday, March 26, 2014 - 08:58 AM UTC
An absolutely stunning figure James.
Well done sir.
Well done sir.
2ndWorcesters
Joined: March 15, 2014
KitMaker: 80 posts
Armorama: 80 posts
Posted: Wednesday, March 26, 2014 - 08:59 AM UTC
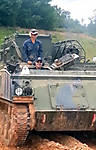
Here is my 1:72 M113 finished.

Unfortunately even though the decals were applied to a gloss surface, were treated with a setting solution and sealed with varnish, they still silvered. :shrug:
The photo doesn't show the weathering too good either.
Thanks for looking.

Unfortunately even though the decals were applied to a gloss surface, were treated with a setting solution and sealed with varnish, they still silvered. :shrug:
The photo doesn't show the weathering too good either.
Thanks for looking.
ReconTL3-1
Joined: June 07, 2006
KitMaker: 726 posts
Armorama: 687 posts
Posted: Wednesday, March 26, 2014 - 09:51 AM UTC
Thanks for the positive comment, Alan.
Welcome to the build. I like your 1/72 scale M113 ACAV. I have a few of these kits sitting on the shelf waiting to be built. Did it go together well? I am just starting to work on vehicles (haven't finished any yet:) )and plan on making a small scale diorama of a platoon of tracks.
As far as the silvering of the decals, since I don't have much experience with vehicles I can't offer much advice about using them. However, on my M151A1 I used some Archer Dry Transfers with some success and used some Woodland Scenics letters and numbers for the registration and bumper numbers and codes.
Look forward to seeing some more of your builds.
Cheers,
James
vonHengest
Joined: June 29, 2010
KitMaker: 5,854 posts
Armorama: 4,817 posts
Posted: Wednesday, March 26, 2014 - 04:16 PM UTC
Quoted Text
I would like to join this campaign . I have a previously built M48, M113 and an NVA T54. Can I display them or enter them? If not I have a Tamiya M48 with a sandbagged turret or a V100 armored car. What do you think?
pm sent

vonHengest
Joined: June 29, 2010
KitMaker: 5,854 posts
Armorama: 4,817 posts
Posted: Wednesday, March 26, 2014 - 04:20 PM UTC
James: I hope everything is going well. Your figure is looking great, let me know how things are going.
Alan: That's a fun little kit, bummer about the decals. Sometimes they get a little ridiculous, and my guess is they are probably a little on the thick side. Which setting solution did you use?
Alan: That's a fun little kit, bummer about the decals. Sometimes they get a little ridiculous, and my guess is they are probably a little on the thick side. Which setting solution did you use?
2ndWorcesters
Joined: March 15, 2014
KitMaker: 80 posts
Armorama: 80 posts
Posted: Wednesday, March 26, 2014 - 07:16 PM UTC
Quoted Text
James: I hope everything is going well. Your figure is looking great, let me know how things are going.
Alan: That's a fun little kit, bummer about the decals. Sometimes they get a little ridiculous, and my guess is they are probably a little on the thick side. Which setting solution did you use?
Humbrol Decal-Fix mate.
Stefan1580

Joined: November 20, 2006
KitMaker: 360 posts
Armorama: 354 posts

Posted: Thursday, March 27, 2014 - 08:28 PM UTC
Hi james,
i missed this one. Really great conversion and good paint job. The facial expression of the hornet head fits perfect. Looks like one solid Figure. Sounds very good with that dio with weapons cache. Also the head looks very naturel painted. Good job on that Figure. Very inspiring and detailed.
Greetings
Stefan
ReconTL3-1
Joined: June 07, 2006
KitMaker: 726 posts
Armorama: 687 posts
Posted: Friday, March 28, 2014 - 06:49 AM UTC
Hello Stefan,
Thanks for the positive comments. I am pretty pleased with how he turned out. After finding a pretty cool figure base from Black Dog of a façade of a hut with sandbags around it, I might change the scene a bit.
I had been wanting to use this particular Hornet head for a while, but I hadn't had a figure for it that went with scenes I had been planning. Finally I got inspired to do this figure conversion and the head finally got to be used. Now I wish I could remember which head set he came from so I can get another.
Take care and have a great day.
James
ReconTL3-1
Joined: June 07, 2006
KitMaker: 726 posts
Armorama: 687 posts
Posted: Friday, March 28, 2014 - 06:51 AM UTC
Quoted Text
James: I hope everything is going well. Your figure is looking great, let me know how things are going.
Alan: That's a fun little kit, bummer about the decals. Sometimes they get a little ridiculous, and my guess is they are probably a little on the thick side. Which setting solution did you use?
Thanks Jeremy.
My surgery went well and I've been doing well in physical therapy. I thought I would get more modeling done during my convalescent leave, but it just didn't happen. However, I think that this figure turned out really well and is probably the best that I have done so far, so I think that worked out better than having a bunch of stuff done that didn't turn out as well.
Take care and have a great day.
James
mariointer

Joined: April 01, 2012
KitMaker: 65 posts
Armorama: 57 posts
Posted: Friday, March 28, 2014 - 10:09 AM UTC
hI JAMES, YOUR LAST FIGURE IS VERY FINE INDEED.....congratulation for the painting too...i love so much the way in which you paint the shoes....very used effect on them!! I like too the claymore bag...do you realize it with putty??And in which way you realized his sling??'
Interesting the watches that you put on it...carving it from another Bravo6 figure..isnt it??This figure will be in a scene with the other figures you showed us( the three figures with Accurate armour british soldier that you trasformed in us?) grunt!!!1
Many congratuletions...i am ,really ,a fan of your work indeed!!!!
Mario from Italy.
ReconTL3-1
Joined: June 07, 2006
KitMaker: 726 posts
Armorama: 687 posts
Posted: Saturday, March 29, 2014 - 03:17 AM UTC
Hello Mario,
Thanks for the positive comments. The watch is a photoetched piece from the Eduard M274 MULE set. I used the same part for the figure wearing the rucksack and pointing downward in conversation.
This figure may be used in a diorama with the rucksack guy and RTO or I might now use him in another diorama where he is being introduced to his new LT. The problem with my projects is that I might come up with a diorama idea but in the course of working on the project, my idea changes or new figures come out that I want to include with some of the figures I am currently working on. Who knows how this project will turn our:)
The claymore bag is one that I had cut off of a Bravo 6 figure. The strap was made of paper.
Take care and have a great day.
James
vonHengest
Joined: June 29, 2010
KitMaker: 5,854 posts
Armorama: 4,817 posts
Posted: Monday, March 31, 2014 - 11:29 AM UTC
James: Well said, and great attitude 
Alan: It sounds like you may need to try something a little hotter. Solvaset or Testor's decal setting solution may work for you in such situations, should you come across them again.
Alan: It sounds like you may need to try something a little hotter. Solvaset or Testor's decal setting solution may work for you in such situations, should you come across them again.
Dragon164

#226

Joined: February 20, 2012
KitMaker: 1,909 posts
Armorama: 1,066 posts

Posted: Wednesday, April 02, 2014 - 05:37 PM UTC
Here is my kit for the campaign.
Cheers Rob.

Cheers Rob.

frank153
Joined: February 19, 2014
KitMaker: 27 posts
Armorama: 10 posts
Posted: Friday, April 04, 2014 - 07:51 AM UTC
OK, here's what I want to build.

2ndWorcesters
Joined: March 15, 2014
KitMaker: 80 posts
Armorama: 80 posts
Posted: Tuesday, April 08, 2014 - 06:50 AM UTC
Quoted Text
Alan: It sounds like you may need to try something a little hotter. Solvaset or Testor's decal setting solution may work for you in such situations, should you come across them again.
Thanks Jeremy.
2ndWorcesters
Joined: March 15, 2014
KitMaker: 80 posts
Armorama: 80 posts
Posted: Tuesday, April 08, 2014 - 06:52 AM UTC
Inspired by the dioramas on here I thought i would have a go myself to finish off this build.


Bluestab
Joined: December 03, 2009
KitMaker: 2,160 posts
Armorama: 1,906 posts
Posted: Tuesday, April 08, 2014 - 07:15 AM UTC
I managed to clear up a few things on my workbench and finish a few others. So I guess I'm back in. I'm actually further in to the build than I had thought.
Back to the launcher. The bottom two launch tubes were added first. Since their mounts were keyed, I figured/hoped they would be the best tubes to use to line the others up with.

Added the rest. Right off there were problems. The way the launcher and tubes are made...well they are made in many pieces. And each joint has a little wiggle room. By the time it's assembled, the tubes are misaligned.

I used a pair of tongue depressors and some hobby vises to try to square things up. I really was very close to putting the kit back up on the shelf at this point.

Not perfect but I assembly is basically done. Wouldn't that launcher look sweet on the top of a M113?

She's basically assembled and ready for paint.

The kit went together okay. The worst part was the entire launcher and tube assembly. A one piece metal tube for each would have been awesome.
Back to the launcher. The bottom two launch tubes were added first. Since their mounts were keyed, I figured/hoped they would be the best tubes to use to line the others up with.
Added the rest. Right off there were problems. The way the launcher and tubes are made...well they are made in many pieces. And each joint has a little wiggle room. By the time it's assembled, the tubes are misaligned.
I used a pair of tongue depressors and some hobby vises to try to square things up. I really was very close to putting the kit back up on the shelf at this point.
Not perfect but I assembly is basically done. Wouldn't that launcher look sweet on the top of a M113?
She's basically assembled and ready for paint.
The kit went together okay. The worst part was the entire launcher and tube assembly. A one piece metal tube for each would have been awesome.
 |

WEB HOSTING BY


Copyright ©2021 Armorama and Kitmaker Network, a subsidiary of Silver Star Enterprises
All Rights Reserved. Please read our Conditions of Use and Privacy Policy.
All Rights Reserved. Please read our Conditions of Use and Privacy Policy.