Quoted Text
Been a good weekend of activity.
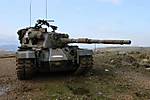
Painted the tracks, washed, and some initial weathering started. These are now assembled onto the model.
Re-did the wash on the tank body and it came out a lot better, sealed with matt varnish. Once dry I put on the decals and sealed with another layer of varnish. Started the weathering process on the main tank, but haven't got very far on that yet.


Hi Benjamin,
Definitely I like very much the washing effect. Very well done.