@ Michael: Thanks for checking in. Hope you continue to find the build interesting.
@ Keith: Oh great... now I need a bookshelf full of horticultural references!
 @ Jerry:
 All I can remember from my engineer cross-training is that "P" stands for "Plenty"!
@ Naseby: Hopefully the engine and interior will show well enough in person, although they're both a bit difficult to photograph. Thanks for checking-in, too. Stay tuned...
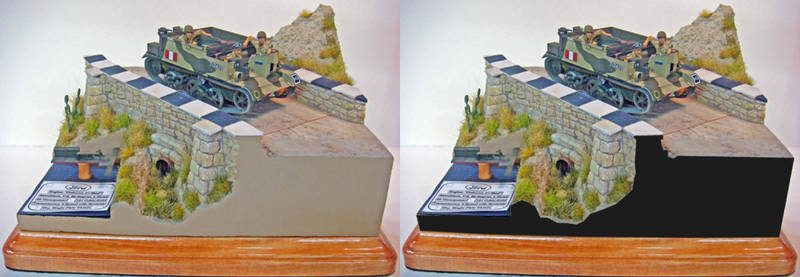
So, over the last few days, I've painted the terrain module and added the vegetation. I've also finished the decorative plaque and will be ready now to mount the terrain to the plaque at any convenient time.
For painting the terrain, I used a series of stains or washes made up from various inexpensive craft acrylic paints. These are the ones that you can find by the great-whopping big rack-fulls in most big craft stores. I find that these are a good value and are easy to work with. They also come in a huge number of colors, and I've been able to easily find matches for most of the model colors that I use for weathering.
I thin these craft paints out with ordinary tap water and add a few drops of acrylic flow enhancer. The first few coats are very thin and soak right into the plaster acting like stains rather than paint. However, after the first coats dry, subsequent coats can be manipulated like any other acrylic wash. I layered the various colors over each other allowing the natural white of the plaster to create the highlights through the colors.
I used Celluclay tinted with the same types of craft paints for the various areas of soil and earth between the exposed rock and stone. Over some of the Celluclay, I added a little bit of sand and some small stones, but I kept this to a minimum since I already had lots of exposed rock and stone. These texture materials were glued in place with Woodland Scenics Scenic Cement.
Once the Celluclay was fairly dry, I added the vegetation starting with a mix of Woodland Scenics "Burnt Grass" and "Dry Grass" fine texture ground foams. I daubed straight white glue (PVA) onto the earth areas and sprinkled the ground foam onto that. I turned the terrain up-side down and allowed the excess to fall away onto newspaper to recover it.
On top of the fine ground foam, I added a mix of Noch and Woodland Scenics static grass. This was mixed to achieve a semi-dry grass look with some green but mostly brown static grass. I used tweezers to put the static grass only on the ground foam / earth areas and fixed it in place with Woodland Scenics Scenic Cement applied with an eyedropper (medicine dropper).
While this was still wet, I stuck down clumps of various long grasses from Fredericus Rex (Green Line), Noch, and Mini-Nature. I added a few long bits of grass from some old Hudson & Allen long grass (dyed fur) material. The prickly pear cactus came from Pegasus Hobbies.
I also used various artist dry pigments mixed up to match the soil and rock tones that I wanted. These pigments were applied at different times depending on how I felt things looked at the moment.
The alternating white-black cap stones were painted with more craft paints. These were based on various references of black-white safety markings painted on roadways for the blackout (and presumably because it just made seeing the edges of the roadway easier both day and night).
After some thought, I decided not to use the aerosol faux stone texture paints on the sides and just went with my usual finishing method - craft paint over smooth plaster. This is quick and easy, doesn't require any masking (I brush paint it), and allows for easy touch ups when I inevitably get a drop or two of the ground colors running down the sides.


After all the glues and paints had dried, I over sprayed the terrain with Testors Dull Coat and then added a little Future floor wax in the bottom of the culvert pipe to give it a damp look.
The decorative wooden base is a pre-cut plaque from Hobby Lobby. (I actually used the top measurements for the dimensions of the terrain module so that would fit later.) I lightly sanded the plaque and stained it. I allowed the stain to dry over night, then gave it another light sanding followed by light coat of rattle-can gloss clear lacquer. Over the next few days, I sanded and then buffed the plaque with 4x0 steel wool between additional coats of lacquer. This sounds like a lot of work, but I probably didn't spend more than 10 minutes a day on it - all total less than an hour's work.
I applied white glue (PVA) to the bottom of the plaque, and then glued it to a piece of black felt. After allowing the glue to dry, I trimmed the excess felt off with scissors - all done.

When I'm ready, I'll use two-part epoxy mixed directly on the top of the wooden plaque to glue the terrain module to it. A couple of "blobs" of glue is all that's needed.
And, before I close this up-date, here's a final shot of the major components dry-fitted together - the carrier, the terrain module, and the wooden plaque. I'm still using my paper mock-up of the engine data plate, but when finished, it and the title plate will be engraved.

Happy modeling!