Armor/AFV: Canadian Armor
Discuss all types of Canadian Armor of all eras.
Hosted by Darren Baker
Riich Models RV35011
SdAufKla
Visit this Community
South Carolina, United States
Joined: May 07, 2010
KitMaker: 2,238 posts
Armorama: 2,158 posts
Posted: Wednesday, August 07, 2013 - 12:56 PM UTC
@ Jerry: Sorry for the confusion, old friend. Just a bit of tongue-in-cheek that misfired, I guess. Chalk it up to a guy who's usually too literal attempting something better left to others...

As I said above, my definitions of "OOTB" and "simple" are not quite the commonly understood ones!

Oh the burdens of being a misunderstood artist (who's fortunately not green anymore...)

@ Jesse: Oh yea, I know that post-build depression only too well...

I usually do pick up something off the shelf that I feel I can build and finish without a ton of library work or feeling the need to re-build the entire kit to satisfy my AMS. This time, though, I had a hard time getting going. I actually started another project, but it soon got too complicated for a nice, relaxing "decompression" build, so it's back in the box now.

The Universal Carrier was a target of opportunity - I got the kit just as I was looking for some motivation, and it was a good fit. It seems to be pretty accurate, it's very detailed, it has its own figures (which are not so nice...) and I could build it in Canadian markings with little trouble. All point to a little project that fit's my own OOTB definition.

While I'm working on the carrier, though, I am decisively engaged in research for another, more "expansive" project that I'll start after the carrier. So, while I'm not doing a lot of research on the carrier, I am still cracking the books

So this is usually my "battle rhythm" for building - A complicated marathon project which usually leaves me feeling worn out. So I follow that with a simple build that I can pretty much sit at the workbench and just clean-up and glue parts and finish. While I'm decompressing with my "OOTB" build, I usually start the research and collecting materials, etc, for my next "big" build.

Yea, I only finish one or two projects a year, but for me, it's all about the process of the research and build and not about putting some particular subject on the shelf and building up a collection of finished kits.

@ All: BTW - no progress on the carrier today. I was crossing a couple of items off my bucket-list (changing tractor tires and harvesting peanuts...). I do feel cheated, though, and wish I had put some better and more "funner" things on that list!

Maybe some Universal Carrier progress tomorrow...

Later mates,

(Those are frosty cold adult beverages necessary to celebrate after crossing these kinds of items off your bucket-list in the hot Southern sun... I think the way to get peanuts is out of a can you buy in the grocery store!)
SdAufKla
Visit this Community
South Carolina, United States
Joined: May 07, 2010
KitMaker: 2,238 posts
Armorama: 2,158 posts
Posted: Saturday, August 10, 2013 - 11:23 AM UTC
Well, I'm finally back at the workbench and making some small progress.

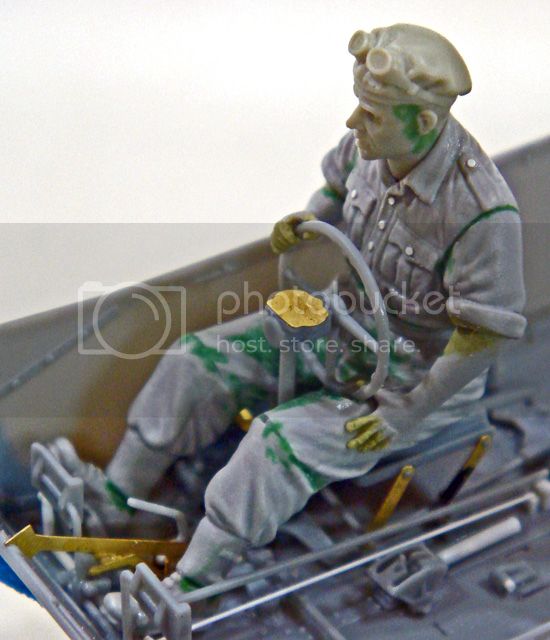
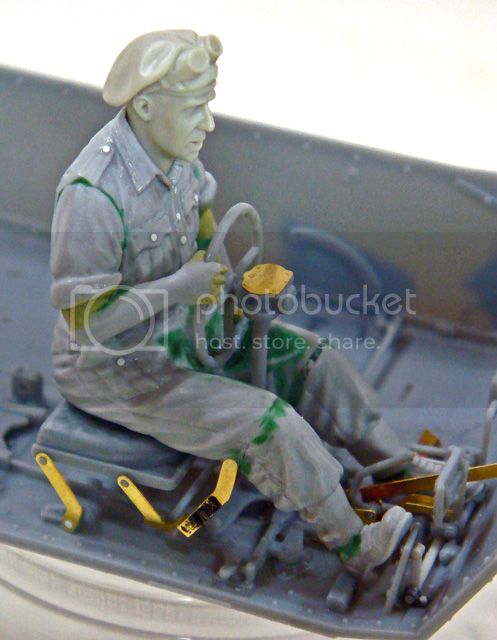
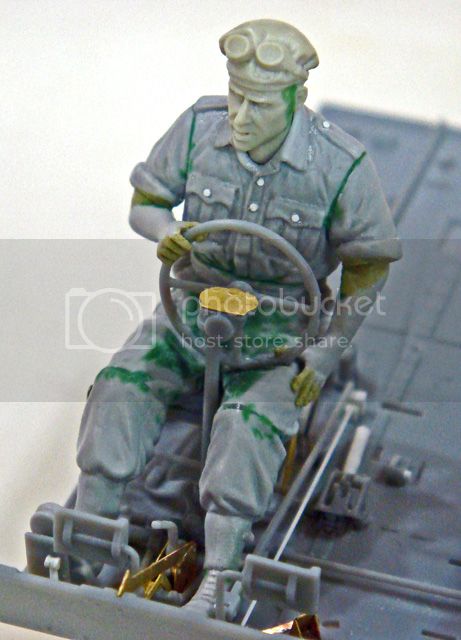
I had to re-pose the driver figure's arms and hands. I turns out that I didn't have the steering wheel back far enough into his lap, and the gear box at the top of the steering column wouldn't fit into the boxed-out portion of the glacis.

Note that the steering column MUST be as close to vertical and plumb as possible when assembled to the floor. There is a box that's built out in the glacis that the top of the steering column must fit into. It must fit fore and aft as well as sided to side, and there's very little room for error.

I had thought that I had the wheel and column right, but after the earlier pose glue joints between the palms and steering wheel dried, another test fit showed some problems. I had to move the steering wheel even further back toward the driver. This in turn would have pushed his elbows far to the rear past his rolled up sleeves.

If you compare the below photos with the earlier ones on page one of this thread, you'll note that the forearms and hands have been repositioned. It doesn't look like much, but it's actually quite different. Because the difference was so great, I decided pose the left arm in a more relaxed position.

An alternative would have been to re-cut the shoulder joints and move the upper arms to angle to the rear giving more elbow room (literally!). However, if only one forearm and hand were repositioned on the steering wheel, I could avoid this.

I've sculpted new hands and fingers on both hands as well as the elbow joints with Milliput epoxy. The arms and steering wheel are now glued to the main body and I'll just have to paint around them.

Since these photos, I have smoothed the epoxy putty work a bit more and used some thinned Testor's polyester putty to smooth over some of the rough spots you can see.

After this dries overnight, I'll give him one more light buffing with 4x0 steel wool, a good wash in warm soapy water, and he'll be ready to prime.


I've also readied a lot of the interior parts and sub-assemblies for painting, so hopefully the next posts will show some progress in that area.

Happy modeling!
Keef1648
Visit this Community
South Carolina, United States
Joined: January 23, 2008
KitMaker: 1,240 posts
Armorama: 1,192 posts
Posted: Sunday, August 11, 2013 - 12:48 AM UTC
Mike, the crews must have been contortionists or something akin to Houdini to worm there way into these small beasts... I know first hand how tight some AFV's drivers compartments can be. This one at least is open topped and a little easier to get in and out of.

First class work on the sculpting, you couldn't have done /found better at the 'second hand' shop..

I wonder if perhaps any of the crew from one of the Tamiya later Bren carriers might have fitted....

Looking good and I am looking forward to seeing it Wednesday evening..


Keith.
AlanL
Visit this Community
England - East Anglia, United Kingdom
Joined: August 12, 2005
KitMaker: 14,499 posts
Armorama: 11,675 posts
Posted: Sunday, August 11, 2013 - 01:00 AM UTC
Hi Mike,

Excellent work, very impressive.

Al
M4A1Sherman
Visit this Community
New York, United States
Joined: May 02, 2013
KitMaker: 4,403 posts
Armorama: 4,078 posts
Posted: Sunday, August 11, 2013 - 03:21 AM UTC

Quoted Text

Very impressive Mike. I'm currently suffering my own period of burn-out and haven't sat at the bench for about a month. This is inspiring though. Keep it up.


Hi, All! GREAT JOB, MIKE!!! Jesse- I know the "burn-out" feeling well- it happens to me every couple of years, especially after having been immersed in this hobby for the last 56 years. I've just moved into a new place, so now I've got all my hobby stuff to un-pack and organize in my new workshop. It's a daunting task, to say the least!!!
thebear
Visit this Community
Quebec, Canada
Joined: November 15, 2002
KitMaker: 3,960 posts
Armorama: 3,579 posts
Posted: Sunday, August 11, 2013 - 03:56 AM UTC
Hi Mike ...Really great blog you've got going ... This kit scares me!! 600 pieces for a UC ..Yikes! but following along it seems not so over the top.. It still might be too much for my fat fingers but I'm following along ...You might just change my mind. Keep up the great work.

Rick
SdAufKla
Visit this Community
South Carolina, United States
Joined: May 07, 2010
KitMaker: 2,238 posts
Armorama: 2,158 posts
Posted: Sunday, August 11, 2013 - 12:17 PM UTC
@ Keith: Thanks for the kind words. Hopefully by Wednesday's meeting I'll have more than a little recycled fruit cup full of tiny gray plastic parts to show off!

In regards to the driver's Houdini impression, I couldn't agree more. I've never really understood why the Universal Carrier was laid out the way it was. It's always seemed to me that the rear of the crew compartment could have been extended over the exterior stowage shelf and the glacis in front of the driver could have been extended forward to match the gunner's barbettte. I can see that the barbette gives the gunner some slight amount of vision to the right front, but the trade off in ergonomics just doesn't seem justified.

Oh well, I don't design 'em. I just build models of 'em!

@ Alan: Thanks. Hopefully the extra work will be worth it.

@ Dennis: Also thanks. Hey, we gotta keep Jessie motivated!

I can appreciate the moving day grind, too. I was in the US Army for over 26 years and moved just about every 3-4 years for the entire time. One thing, though, I always looked at it as an opportunity. Using each previous experience, I was able to improve my modeling area with each move. I started out on the kitchen table, and by the time we retired, I had my own dedicated modeling room! It can be done!

About all I can say is hang in there and see if you can squeeze some improvements over your last work space. There's sure to be something that you really wanted in your last space that you can have now. Good luck!

@ Richard: The kit isn't as intimidating as all that, really.

Now that I'm into it, I'm beginning to think that at least 100 (maybe 200) of the parts are not going to be used. There are lots of duplicated and spare parts (extra hex nuts, extra fuel tank mounts, etc, etc) as well as the optional parts to build the bogies using either brass rods and PE or plastic parts. Also, there are two complete radios - a No. 11 AND a No. 19 set (with corresponding PE parts), but only the No. 11 is shown in the instructions (and the kit could be accurately built without either). You could also omit the entire engine (except the radiator which shows from the front). Finally, the figure parts are totally optional along with several extra weapons, etc.

So, the actual parts count for the bits used for the build is probably down in the sub-400 range. Certainly, that's enough, but knocking a third of the parts right off the top should put the kit into better perspective. Still a lot of parts and details, but perfectly doable.

In regards to "fumble fingers." I have to confess that my Optivisor and tweezers are my best friends. A good pair of tweezers makes handling the small bits much easier.

One tip that might help: When cleaning up very small parts, I actually leave them attached to the sprue by cutting out the part AND the section of sprue. The sprue section gives me something to hold onto as I clean up the small part, and the attachment point is the last thing that I clean up. This lets me hold the part with just a single bit that needs cleaning rather than having to manipulate the part 360 degrees to get to all of the parting seams, etc.

Thanks again, guys!

Happy modeling!
Big-John
Visit this Community
Ohio, United States
Joined: August 12, 2010
KitMaker: 731 posts
Armorama: 711 posts
Posted: Sunday, August 11, 2013 - 01:04 PM UTC
Hey mike,

Man, I havn't been to armorama much lately. I almost missed the party.

I always enjoy following your builds and wondered what you were up to,

Gotta go back and read it all now.

John
thebear
Visit this Community
Quebec, Canada
Joined: November 15, 2002
KitMaker: 3,960 posts
Armorama: 3,579 posts
Posted: Sunday, August 11, 2013 - 01:12 PM UTC
Hi Mike ..Thanks for that .. Yep ! an optivor and a good pair of tweezers really do help and I to have started cleaning up parts while still on the sprue ..It really does help a lot ... I just might have to pick this kit up now... It does have Canadian markings ..now how can I not buy it!!!

Rick
Big-John
Visit this Community
Ohio, United States
Joined: August 12, 2010
KitMaker: 731 posts
Armorama: 711 posts
Posted: Sunday, August 11, 2013 - 01:20 PM UTC

Quoted Text

Hi Mike ..Thanks for that .. Yep ! an optivor and a good pair of tweezers really do help and I to have started cleaning up parts while still on the sprue ..It really does help a lot ... I just might have to pick this kit up now... It does have Canadian markings ..now how can I not buy it!!!

Rick


I also find it helpfull to clean some of the really small parts after glueing them to the model.
jrutman
Visit this Community
Pennsylvania, United States
Joined: April 10, 2011
KitMaker: 7,941 posts
Armorama: 7,934 posts
Posted: Monday, August 12, 2013 - 02:16 AM UTC
It is so nice to see a driver figure that actually looks like he fits and is driving the vehicle he's in. Great job brother.
Also nice to see a thread that has a lot of participation.
J
SdAufKla
Visit this Community
South Carolina, United States
Joined: May 07, 2010
KitMaker: 2,238 posts
Armorama: 2,158 posts
Posted: Monday, August 12, 2013 - 02:54 PM UTC

Quoted Text

It is so nice to see a driver figure that actually looks like he fits and is driving the vehicle he's in. Great job brother.
Also nice to see a thread that has a lot of participation.
J


Thanks, Jer.

Like that painter guy, Bob Ross, used to say, "We don't make mistakes, just happy little accidents!"

I actually like it better the way the pose came out the second time around. He looks a bit more relaxed and candid. Hopefully the paint job will do him justice.
SdAufKla
Visit this Community
South Carolina, United States
Joined: May 07, 2010
KitMaker: 2,238 posts
Armorama: 2,158 posts
Posted: Tuesday, August 13, 2013 - 12:25 PM UTC
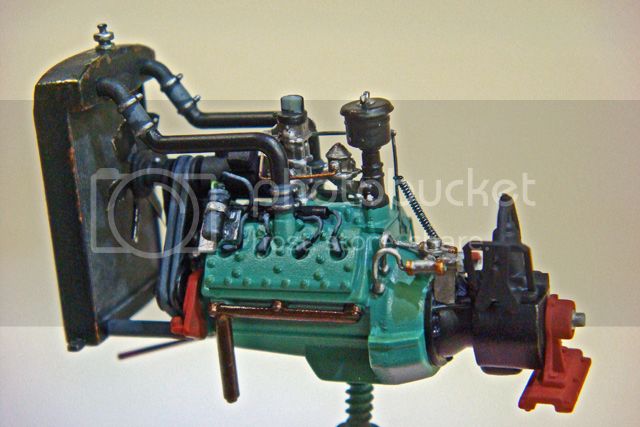
After some priming and detail painting, I new have the engine and engine compartment ready for weathering. Final assembly of the engine and its compartment will follow that.

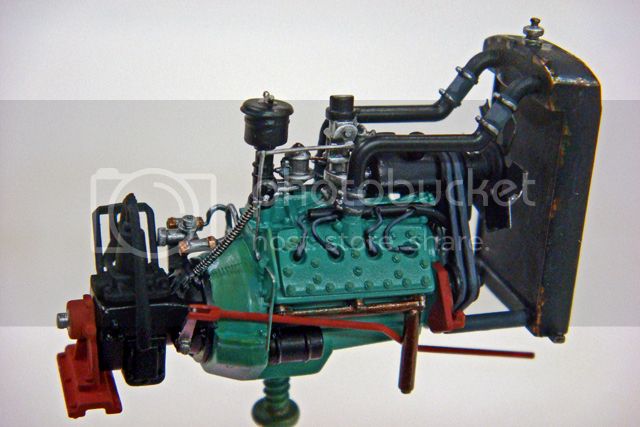
Here's the engine detail painted and with some basic highlights added to things like wiring, hoses and the bare metal parts.

These highlights along with the "garish" color contrasts will tone down and blend together with the weathering.

The basic engine color is a much lightened shade of the Ford color (taken from photos of restored Flat Head V8's). This color will darken up with the washes and weathering, so I started off very light in hopes that it will still be visible once the engine compartment has been completed.


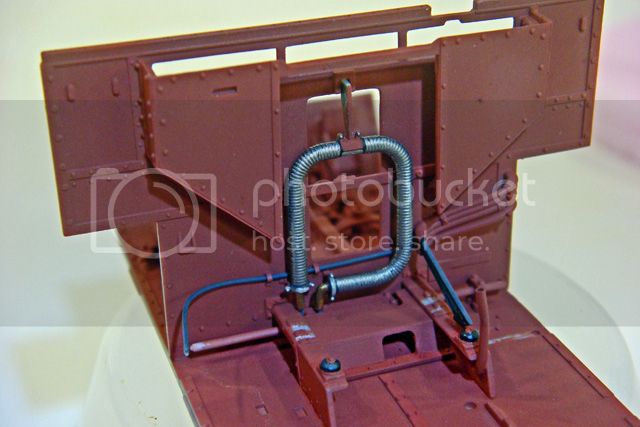
This is a shot of the firewall and oil cooler. I still have to touch up a couple of the primer red spots, but the firewall needs to go in along with the oil cooler before the engine so that it can be weathered along with the compartment floor under the engine. The oil cooler and firewall will be inaccessible once the engine and radiator are installed.

The wire running behind the oil cooler is the positive cable that will be connected to the batteries later. The batteries are located on the floor on the left side of the carrier outside of the engine compartment. The wiring has to go in now, though.


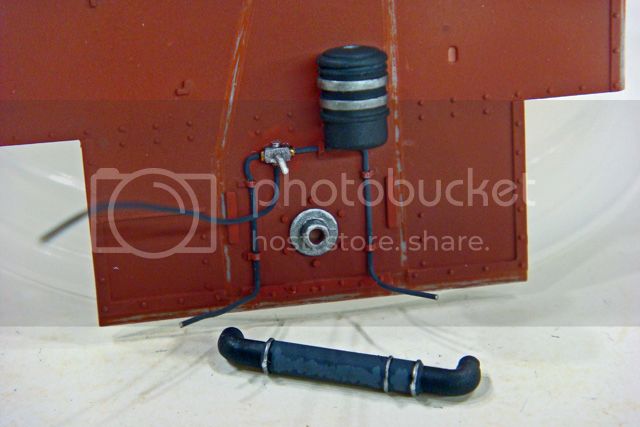
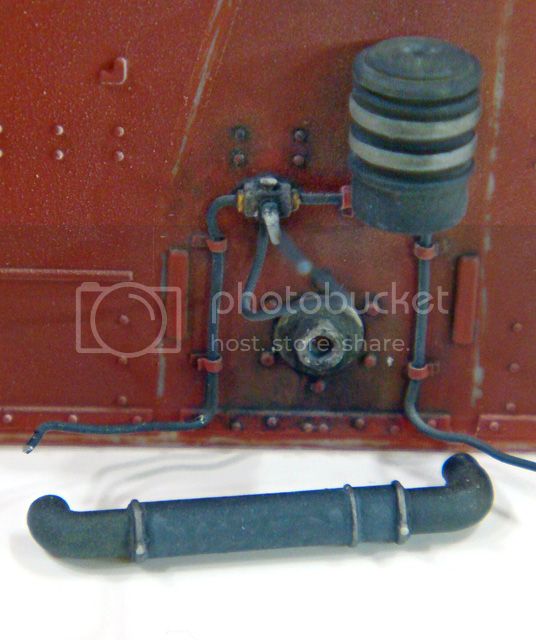
Here's the rear hull wall ready for weathering and assembly after the engine gets installed. The hoses to the left and right go to the fuel tanks and the center small hose will be connected to the fuel pump on the engine (located between the oil filler / crankcase breather and the carburetor).

These fuel lines and the little manifold / cut-off valve are just styrene bits and .015 solder wire.

Also, as you can see, the air filter is located on the rear hull and is attached to the engine by the thick hose in the foreground of the picture.

For continuity, I wanted the rear hull ready to weather at the same time as the firewall and the engine compartment floor.


I'm not 100% sure about the primer red for the interior of the engine compartment, but it seemed reasonable given all that I've read about paint shortages and other problems at the time. I will paint the interior of the sheet metal side doors to the engine compartment the same color as the base exterior of the carrier (G4 Dark Green).

While I was spraying the primer red, I went ahead and painted the floor of the driver's compartment the same color. This will be over sprayed with the later G4 Dark Green, but in case I miss any small spots, they will be primer red instead of bare plastic.

The next steps after weathering the engine and compartment interior will be to install and finish wiring the engine. I'll then install the side panels of the engine compartment (after their insides are weathered). After that, I'm expecting a balancing act of painting the rest of the interior G4 and weathering it while sequentially installing the lower hull sides and fenders.

Happy modeling!
SdAufKla
Visit this Community
South Carolina, United States
Joined: May 07, 2010
KitMaker: 2,238 posts
Armorama: 2,158 posts
Posted: Wednesday, August 14, 2013 - 07:40 AM UTC
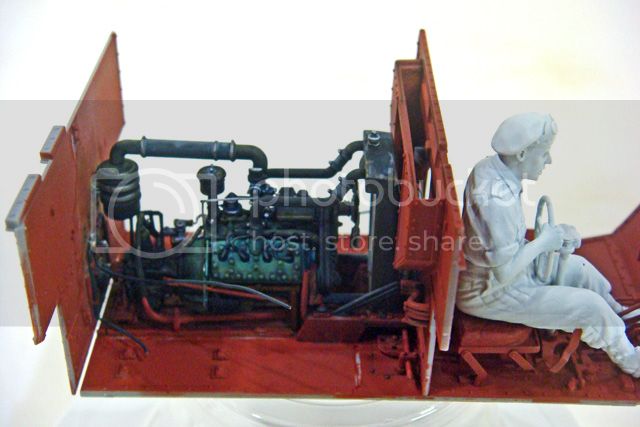
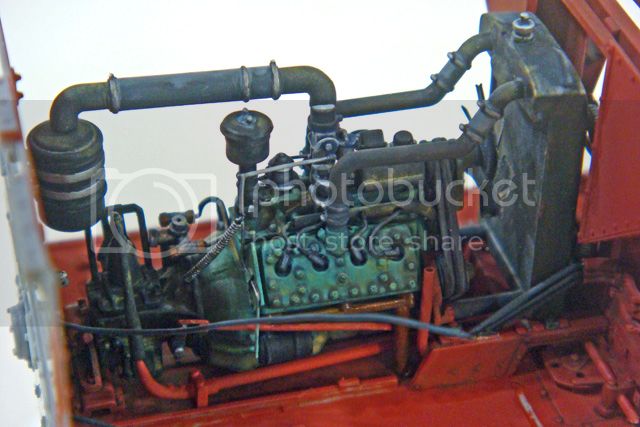
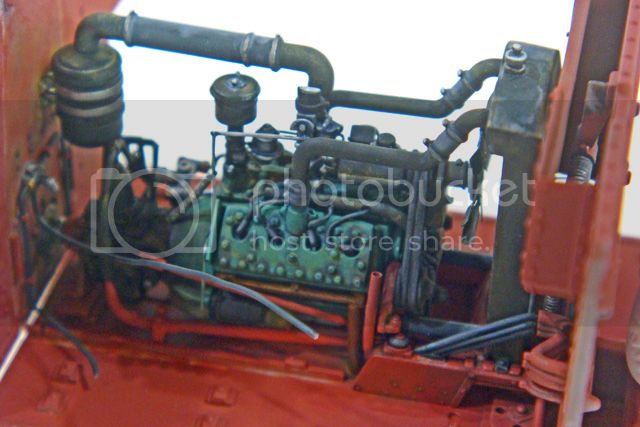
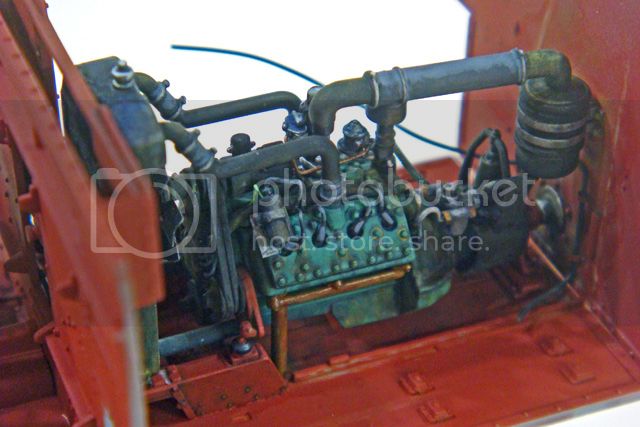
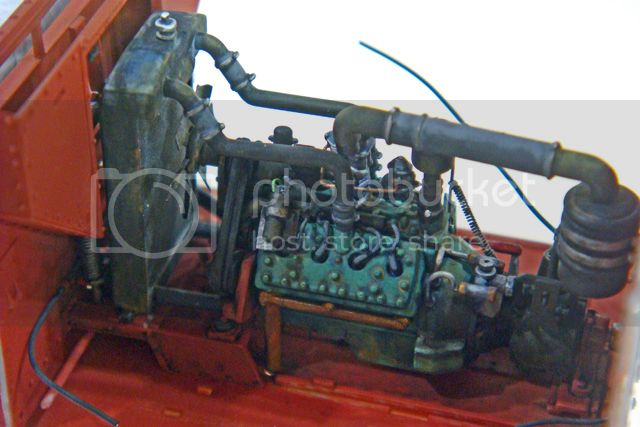
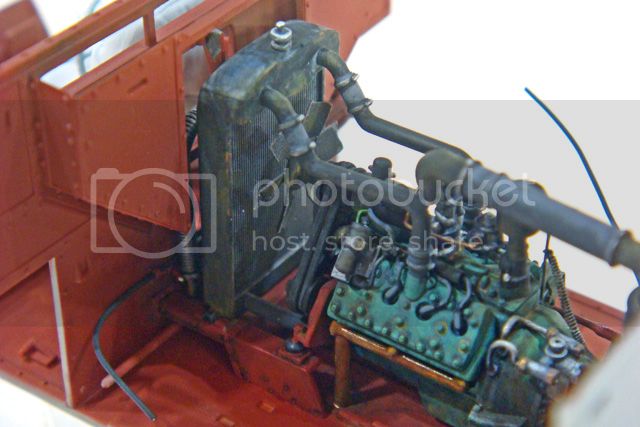
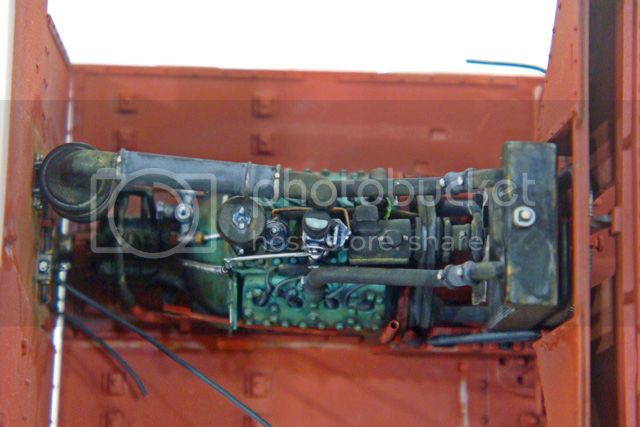
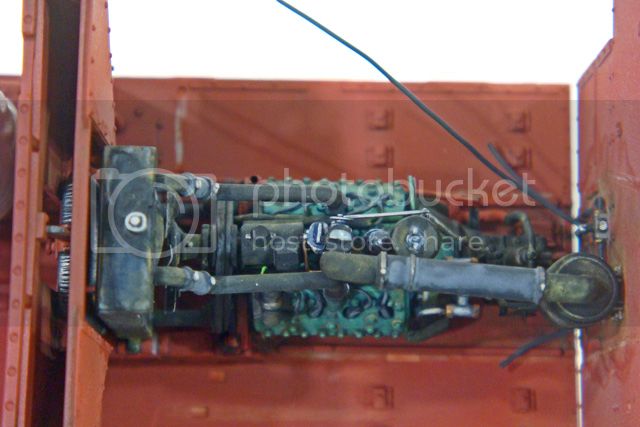
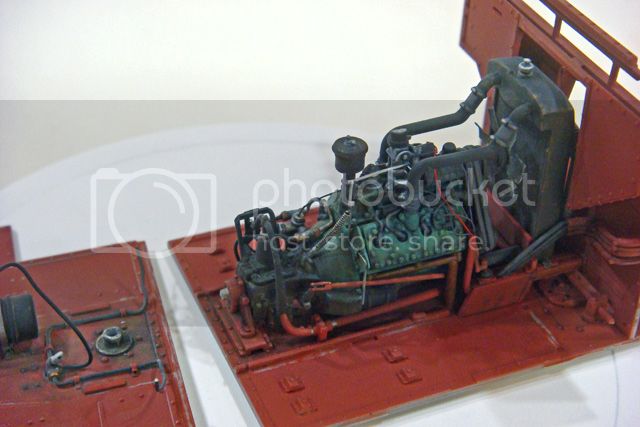
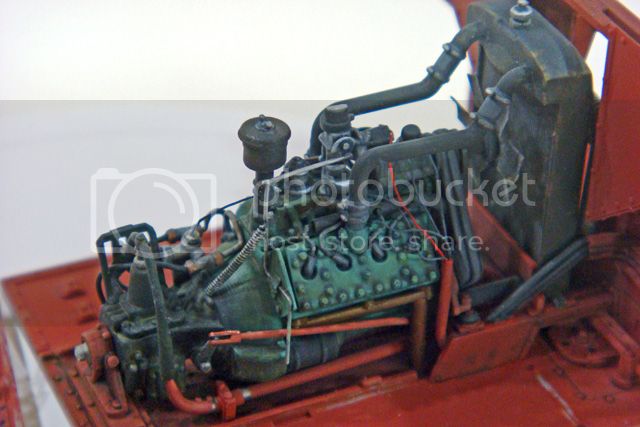
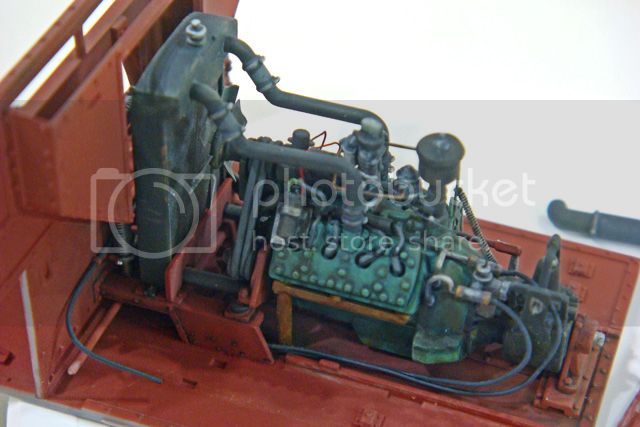
Our AMPS chapter has a meeting tonight, so after reaching a natural stopping point during the engine weathering, I decided to dry-fit what I had, take a few "happy snaps" and take the Universal Carrier to the meeting.

Since the last post, all I've really done is give the engine a coat of Testor's Dull Coat and then add some washes made from artist oil paints and ordinary mineral spirits. The colors used, in not particular order, were indigo, Payne's gray, ivory black, yellow ocher, raw umber, and raw and burnt sienna.

I didn't notice that the air cleaner hose had slipped off the carburetor in the last could of photos, but it's just dry fit, so no worries. Still more weathering to do.


Happy modeling!
Dannyd
Visit this Community
England - North West, United Kingdom
Joined: March 27, 2007
KitMaker: 803 posts
Armorama: 793 posts
Posted: Wednesday, August 14, 2013 - 07:52 AM UTC
Wow.. That has to be one of the best detailed/painted engines I've seen in a long time, you have my attention
pseudorealityx
Visit this Community
Georgia, United States
Joined: January 31, 2010
KitMaker: 2,191 posts
Armorama: 1,814 posts
Posted: Wednesday, August 14, 2013 - 08:18 AM UTC

Quoted Text


I didn't notice that the air cleaner hose had slipped off the carburetor in the last could of photos, but it's just dry fit, so no worries. Still more weathering to do.


Be careful Mike. You'll ruin that carb!
AlanL
Visit this Community
England - East Anglia, United Kingdom
Joined: August 12, 2005
KitMaker: 14,499 posts
Armorama: 11,675 posts
Posted: Wednesday, August 14, 2013 - 09:42 AM UTC
Outstanding work Mike.

Al
Keef1648
Visit this Community
South Carolina, United States
Joined: January 23, 2008
KitMaker: 1,240 posts
Armorama: 1,192 posts
Posted: Thursday, August 15, 2013 - 12:13 AM UTC
Mike, your photo's are great but still do not do the model justice.
To see it in front of me at last nights AMPS meeting was nothing short of amazing.

The colors of the engine and the detail you have added really makes it a stunning piece and worth the time and effort you are putting into this project.

The kit of course is in a different league than any of the Tamiya offerings and can justify the higher price, perhaps a little to high when found in a retail outlet....

Your rework of the figure is brilliant and dare I say the hand on the wheel is better than the one cast on the kit figure. I agree when you say the figure could not have been placed in the driving location without the major, ankle, knee, stomach and hand surgery that you undertook, what were they thinking, or not.

Well done and I look forward to further updates.


Keith.
SdAufKla
Visit this Community
South Carolina, United States
Joined: May 07, 2010
KitMaker: 2,238 posts
Armorama: 2,158 posts
Posted: Thursday, August 15, 2013 - 02:28 AM UTC
@ Dan: Thanks, it's nice to be noticed. Hope you stay tuned for the rest of the build.

@ Jesse: Fortunately it was a dry-fit-dry-run, so I wasn't turning the engine over at the time. However, if it had been a full-start test run... Well, let's just say I shudder to think about what might have happened!

@ Alan: Cheers!

@ Keith: As always, thanks for the kind words.

BTW: We all enjoyed your presentation on resin kits and conversions last night. it was very enlightening, and I hope it'll motivate some of the other guys to take the plunge and expand their horizons. Well done, sir!

In regards to the Riich Universal Carrier:

I don't know what the regular retail price on this kit is since I got it at a very nice discount from a dealer at a model show, but if the retail price point is comparable to the latest offerings from, say, Bronco or AFV Club, then I'd say it would be well worth it. It appears to be very accurate and it doesn't require any AM up-grades or up-dates which can often double a project's cost.

I'm not sure how the tracks will build up, yet. But the rest of the kit is an absolute jewel (figures not counted). It's not a build for the faint-hearted, and I certainly wouldn't recommend it to a basic skill-level or beginning modeler. Although I think that the instruction assembly sequence could be improved, now that I've been working on it for a few weeks, I can see that there is a certain "assembly logic" to the recommended sequence. It just doesn't allow for finish and weathering of the interior in a rational manner, but I do believe that the kit could be built according to the instructions if a high-degree of finish on the interior wasn't a worry or concern.

Assembly can also be simplified by omitting the engine and closing its compartment and leaving out either of the radios (most carriers don't appear in photos equipped with radios). The builder could also use the injection molded bogie spring rods vice the PE and brass rod optional parts. In the end, the assembly difficulty of this kit is really not much different than the Bronco Archer. The challenges are very similar as is the overall level of detail and the need to handle PE parts.

I wouldn't be too surprised if Riich comes out with a Mk II carrier, but this kit could easily be converted into the Mk II - the majority of the changes are minor cosmetics. With the new Riich Commonwealth Weapons sets, you could even create the 3" mortar or Vickers MG carriers without too much extra work.

In short, if someone likes detail and enjoys a respectable challenge, this kit is worthy of your time and effort.

Happy modeling!
majjanelson
Visit this Community
South Carolina, United States
Joined: December 14, 2006
KitMaker: 1,355 posts
Armorama: 979 posts
Posted: Thursday, August 15, 2013 - 03:58 AM UTC
Excellent work, Mike.

I had missed this build so far, but I'll be paying attention to it now.

After seeing your progress at last night's club meeting, all I can say/write is "WOW!?!?!?!". The kit parts and your added details are, as usual, superb, but your reworking of the driver figure is incredible. You should cast him up for sale, as I'm sure many modelers who get this kit would love to use your version as a replacement. I highly doubt there are many modelers who could match, let alone surpass how natural your figure looks without actually resorting to a complete sculpting of a replacement figure.

Keep up your masterful work, SGM!
SdAufKla
Visit this Community
South Carolina, United States
Joined: May 07, 2010
KitMaker: 2,238 posts
Armorama: 2,158 posts
Posted: Thursday, August 15, 2013 - 01:28 PM UTC
@ Jeff: Glad you found the blog.

Thanks for the props on the figure. I'm not so sure that casting and selling copies of this guys would be legal. The basic sculpting on the figure is the work of Riich, and of course, the head is a Hornet replacement, and that's definitely not cool. Roger Saunders has enough problems with copyright infringements without me adding to them.

Still, high praise, my friend - thanks!

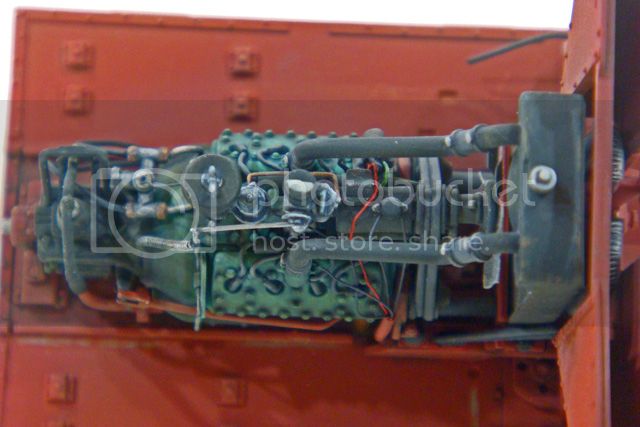
So, the latest progress:

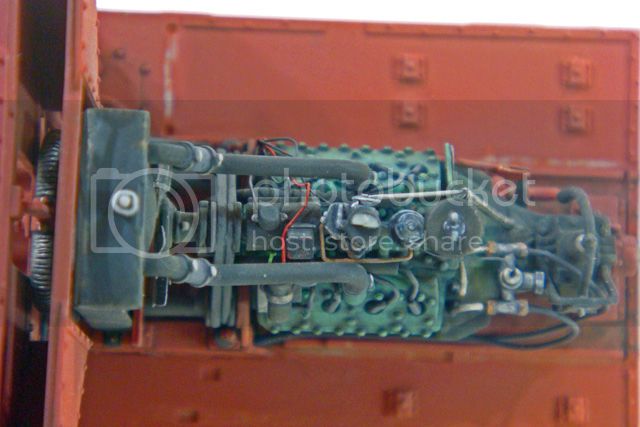
I've finished the engine and its compartment (minus the side walls).

The weathering was finished after touching up a few details. I gave the engine and compartment a "dust glaze" to create consistency and tie all the various components and colors together.

The glaze was mixed up with 75% thinners, 20% Tamiya X-22 Clear Gloss and 5% Tamiya XF-55 Buff. This creates a transparent mixture that was airbrushed on in thin layers. After the glaze dries (the clear adds a slight egg-shell sheen), I airbrushed Testor's Dull Coat thinned with ordinary lacquer thinner.

I then installed the engine, radiator, the bracket part below the rear of the radiator and the shifter linkage on the compartment floor. After these components were permanently installed, I finished the wiring and plumbing.

I added another wire from the coil to the ignition; two wires from the voltage regulator on the generator and one wire each from the oil pressure and water temp senders. All of these electrical wires were routed into the vertical conduit to the right front of the engine (added earlier from brass tubing).

On the prototype, this conduit is attached to the side wall by way of a bracket, but doing this was simply not possible with the thickness of the injection molded side wall. Also, I don't think I could have routed the wiring into it after the side wall was installed.

I also added the two hoses from the oil cooler to the oil cooler manifold on the bell housing.

I had intended to install the rear hull (also finished), but another dry fit showed that the side walls cannot be added after the rear hull. They have to go on followed by the rear hull. Also note that I will have to section the tube from the air cleaner to the carburetor. Mine is too long by about 1.5 mm. I'm pretty sure I have the kit assembled correctly, so this part might simply be made too long. (Terry Ashley also had problems with the fit of the air cleaner to the engine.) The prototype tube appears to have been able to telescope longer and shorter to allow for servicing the air cleaner, so removing the excess shouldn't be too far off base.

So next up is to finish the side walls, install them and rear hull. After that, the air cleaner hose will be fitted and installed. This will finish up the engine and its compartment.


If someone else decides to undertake their carrier build in this general sequence (from the inside out, finishing as you go), be aware that the fit on the kit parts is so precise that even a layer of paint will throw things off.

Dry-fit, dry-fit, dry-fit as you go and all should be good.

'Til next time. Happy modeling!
ivanhoe6
Visit this Community
Wisconsin, United States
Joined: April 05, 2007
KitMaker: 2,023 posts
Armorama: 1,234 posts
Posted: Thursday, August 15, 2013 - 03:20 PM UTC
Thank You Mike ! I have this kit and am stumped how to do it. All these things that may never be seen. I have even toyed with the idea of making one wall clear. So I am on board to see how you end up showing all the hidden goodies.
Great work on the driver ! I wish that you would or could release your version of the bloke. And thank you for the idea of a mortar version or weapons carrier. Variety as they say is the spice of life ! Thank you for sharing and writing such in depth build info for us followers. That is valuable bench time ! Keep up the good work. You've got me hooked !
Tom
vonHengest
Visit this Community
Texas, United States
Joined: June 29, 2010
KitMaker: 5,854 posts
Armorama: 4,817 posts
Posted: Thursday, August 15, 2013 - 04:25 PM UTC
I've been liking your build since the beginning, but holy smokes your flathead is one of the most nicely detailed engines I've seen in this scale!
SdAufKla
Visit this Community
South Carolina, United States
Joined: May 07, 2010
KitMaker: 2,238 posts
Armorama: 2,158 posts
Posted: Friday, August 16, 2013 - 03:10 AM UTC
@ Ivanhoe: You're welcome. I'm glad you're finding the blog useful.

I have an idea for showing off some of the engine, but will hold off discussing that for now. In regards to making one side of the engine compartment clear, that's an interesting idea.

I do believe that with just some modest scratch-building, the engine compartment could be rebuilt and displayed with the inspection and maintenance side doors removed. I have also seen a photo of a Universal Carrier in Normandy having its engine being removed. In the photo, the engine is partially suspended above the carrier by crane on a wrecker and several parts (like the air cleaner) are laying about on the glacis.

Last night at our local IPMS / USA meeting, one of my club mates said he thought that displaying the carrier partially destroyed on a roadside with some of the hull panels sprung outwards would be how he'd model the little beastie.

Of course, he's a wingy-thingy modeler, so to him, tanks are banana shaped things that hang under airplane wings...

Thanks for the kind words about the figure. I think that reposing this guys is within the range of the average modeler. The techniques used were pretty much old school cutting apart and re-positioning along with a little putty work.

Making new hands out of two part epoxy putty is a good first sculpting project. Kneed up a small ball of putty. Flatten it out using a roller (like the handle of an X-acto knife) and talcum powder as a release agent. Cut a small bit out that's shaped like the finger part of a mitten. Apply that to the hand where the fingers used to be. On the steering wheel, wrap it around, on the leg, apply it flat.

Once it's in place, use a toothpick trimmed to a wedge-shape, moistened with water, to sculpt the individual fingers. As the putty sets, continue to refine the shapes (the putty is easier in some respects to sculpt as it gets firmer). Finishing up is just the standard construction techniques that you'd use to clean up any parts.

I use a small ball-shaped cutter on my moto-tool to grind out a hole in the neck area of the torso. Stick a Hornet head in, and... voila!

The hard part with this guy was getting the driver's compartment and seat dry-fitted first since that determines the figure's final pose. When modifying any plastic or resin figure to fit a particular vehicle, dry-fit and dry-fit some more and be patient. The basic techniques are the same for reposing any figure, though. Nothing too special here.

@ Jeremy: I confess that I was fascinated by the Ford Flathead V-8 engine being used in the Universal Carrier, and as I researched the engine to find details to add, I just became even more interested in it. Because of the Hot Rod culture, it was also one of the easiest obscure mechanical bits that I've researched lately. There's simply a ton of information available on it.

At any rate, the engine will hopefully take a leading role in the final display (if everything works out like I'm planning.) Still, only a portion of it will be visible, but I do want everything that will be visible to be finished to the same standards of the rest of the kit and figures.

Sometimes you simply can't know what will be visible until final assembly, and I'd rather ere on the side of doing a little too much than find out at the very end of a project that I missed something and have left some glaring oversight.

Happy modeling!
Keef1648
Visit this Community
South Carolina, United States
Joined: January 23, 2008
KitMaker: 1,240 posts
Armorama: 1,192 posts
Posted: Friday, August 16, 2013 - 11:51 PM UTC

Quoted Text


Sometimes you simply can't know what will be visible until final assembly, and I'd rather ere on the side of doing a little too much than find out at the very end of a project that I missed something and have left some glaring oversight.

Happy modeling!


I agree Mike, especially when those AMPS field judges come armed to the teeth with high powered LED flashlights and intent on finding the teeny tiniest mistake or flaw.

If they are following along with this build, they will know ahead of time where NOT to bother looking.

I am looking forward to seeing more, especially the suspension and tracks.


Keith.