Armor/AFV: Canadian Armor
Discuss all types of Canadian Armor of all eras.
Hosted by Darren Baker
Riich Models RV35011
SdAufKla
Visit this Community
South Carolina, United States
Joined: May 07, 2010
KitMaker: 2,238 posts
Armorama: 2,158 posts
Posted: Saturday, September 28, 2013 - 02:52 PM UTC
@ Tom: Hope to see some picture of your CMP build here on Armorama sometime.

Riich has released a figure set for the Universal Carrier that are dressed in NWE uniforms that might be good for your Aldershot build (the RHLI kit markings?).

@ Keith: Badda bing badda bang!

@ Jerry: Yep, you just gotta love those Hornet figures.

Which brings me to the first up-date tonight...

Well, I got a pleasant surprise when I got the radio operator and radio into the compartment for a test fit. I had anticipated a lot of work on his right hip area, but when I tested the figure and radio together, I found that by just moving the figure slightly to the rear (about 2 mm), I wuld be able to avoid most of the resculpting.

Here's a picture that shows how the protective cage on the radio face bumps into the operator's upper right thigh.


With the slight move, only the rearmost two of the bars on the cage needed creases cut into the figure, and the move did not affect the fitting of the left arm... Whew!

Here's a view from the rear that shows how the radio mounts need to come down some to fit. The interference between the cage bars and the figures upper thigh is the problem.


With just two creases cut into the figure's leg, the radio will now sit properly. With that done so quickly, I was able to move on the operator's right arm. His right elbow will just rest on top of the radio and the microphone will be held in front of his mouth.

In this photo, you can see the radio now in it's correct position with the cage bars fitting into the creases on the figure's thigh. You can also see the initial fit of the right upper arm.


I also hollowed out the figure's neck area in preparation for the Hornet head. If you look closely, you can also just see the creases for the two radio cage bars.


Here is the head that I'm going to use with the radio operator. He's from Hornet set HBH14, head #1 (WW2 Style British Berets). I've ground away the beret, hair and ears. he helmet is an Ultracast Commonwealth AFV Crewman Helmet hollowed out to fit the Hornet head. I'm adding a headset, so the ears had to go, too.


He looks a little strange here without any ears, but he'll come together by and by.

In the next post, I'll up-date the work on the suspension that I've been doing while waiting on the figure work to dry or set.
SdAufKla
Visit this Community
South Carolina, United States
Joined: May 07, 2010
KitMaker: 2,238 posts
Armorama: 2,158 posts
Posted: Saturday, September 28, 2013 - 03:33 PM UTC
Ok, just a quick up-date here.

While waiting on the figure work (putty, glue, etc) to dry or set up, I've also been cleaning up all the parts for the suspension.

I won't bore you with a photo and description of all the parts. You can check out Terry Ashley's PMMS review (link on page one of this thread) or Bill Cross' build review here on Armorama to get all the statistical details. Suffice it to say that there are a lot of parts (as you would expect)...

Here's a quick picture of the suspension bogies for the left / port side of the carrier (step 7, sub-assemblies B and E from step 5).


Once the parts were cleaned up, these went together pretty quickly and without any problems. Just pay attention to the instructions and be deliberate.

The rear bogies are one of the few areas of the Riich kit that I've found it necessary to use any putty to fill seams.


Most of this area is hidden by the front bogie, but still, the seams were pretty significant, and adding a little putty was quick.

Note also in this photo the single mounting hole where the rear bogie attaches to the hull. This single alignment hole and pin do not fix the bogie into the correct, level attitude on the hull. More about this potential below.

There's been a lot of internet "buzz" about the brass rods and PE disks that Riich provides as alternatives to the injection molded coil spring guide rods. I confess that I was intrigued at first by these, too, and really thought that I would be using them myself.

However, while reviewing the reference photos taken by Stephen Tegner I noticed that the prototype spring guide rods actually look just like the injection molded kit parts.


As I played around test fitting the springs and other parts, I also noticed that the injection molded kit rods help a lot in keeping the metal coil springs aligned when assembling the bogies. Finally, the molded guild rods have "stops" on them that "fix" the length of the spring assemblies. This is significant because the bogie parts move and articulate (until glued) like the prototype. With the link-n-length tracks, it's necessary to build the suspension as close to the way the kit designer planned it. If not, the track length may not work out correctly.

So, with these things in mind, it was an easy call to go with the injection molded spring rod guides (parts B9). I suppose that the brass rods and PE disk alternates could be used if a set of link-to-link track was used so that the suspension could be articulated. However this would really require the length of the springs to be manipulated too, so I'm not too sure about that either...

Happily, the injection molded guide rods work perfectly and are more accurate in profile.

One potential issue with the suspension is that the rear bogies do not have a positive, locking attachment point to the hull sides (step 7, sub-assemblies D and E from step 5).

This is significant because while the front bogies pivot at their hull attachment points (as well as each wheel being sprung), the rear bogie hull attachment (kit parts D4/5 and D36/37) does not move on the prototype. Only the rear wheel and its yoke move.

It's therefore quite easy to accidentally build the carrier with a nose-up or nose-down attitude instead of level. The lack of a positive, locking attachment point for the rear bogies is one of he very few poor kit design issues that I've noticed. (Not counting the instructions or figures. Just talking about the actual kit parts and their fit.)

In order to build the suspension square and level, I will be using a simple assembly jig.

Here's a picture of the jig being assembled.


This is a very simple arrangement and I use similar ones on most models that have injection molded tracks that must be glued together (DML Magic Tracks, for example).

It's a thick piece of styrene sheet with alignment guides made from styrene strip.

The first step was to glue the first alignment strip along one edge of the sheet. Next was to use a section of the kit track (cleaned up) as a measuring tool for the second alignment strip glued parallel to the first.

In order to space the alignment strips to match the kit, I used the universal carrier's final drive and drive sprockets as a measuring tool. In the photo you can see the final drive engaged in the tracks held between the first two alignment strips. The other end is engaged in another section of kit track (also cleaned up).

The third alignment strip is glued down inside this second piece of track. The distance is measured along the entire length by sliding the track and final drive from one end to the other.

Finally, I'll glue the fourth alignment strip using the track as a tool to measure the distance between the third and fourth strips.

When I get ready to glue the bogies onto the hull, I'll place track sections in both sets of alignment strips and use them to keep the bogies perfectly straight. I'll also be able to measure the height of the hull bottom at the front and rear and adjust this the keep the hull level as the bogies dry. The jig will also make it easy to handle the hull and bogies to check the vertical alignment of the wheels.

I'll also use this same jig to glue up the tracks, keeping them perfectly straight as they're assembled and then to hold them in alignment with the model as they dry.

I'll illustrate the use in later up-dates.

Happy modeling!
jrutman
Visit this Community
Pennsylvania, United States
Joined: April 10, 2011
KitMaker: 7,941 posts
Armorama: 7,934 posts
Posted: Sunday, September 29, 2013 - 12:32 AM UTC
Another Bren up date so another good day is about to begin!! Thanks buddy!
All looks great but I am most impressed by the commo gear. It seems to be a theme that carried over from your Stug build.
J
dvarettoni
Visit this Community
South Carolina, United States
Joined: September 28, 2005
KitMaker: 778 posts
Armorama: 763 posts
Posted: Sunday, September 29, 2013 - 01:36 AM UTC
hay mike this must be getting serious you breaking out the jig's !!!!!!
dave lol lol
ivanhoe6
Visit this Community
Wisconsin, United States
Joined: April 05, 2007
KitMaker: 2,023 posts
Armorama: 1,234 posts
Posted: Sunday, September 29, 2013 - 04:57 AM UTC
Great idea Mike with the parallel track jig. Thanks so much for all you patience, advice and in depth responses to everybody's questions. Your hard work/labor of love on this tiny little gem will make my attempt and anybody elses much easier.

Tom
SdAufKla
Visit this Community
South Carolina, United States
Joined: May 07, 2010
KitMaker: 2,238 posts
Armorama: 2,158 posts
Posted: Sunday, September 29, 2013 - 10:52 AM UTC
@ Jerry: As long as you don't start accusing me of being an Eighteen Echo!

Really, though, some kit features are just too nice to hide away. That StuG IV project took on a life of its own, though. But you're right... I got carried away starting with the radios!

@ Dave: Hey, you know there's a jig for that!

@ Tom: I'm happy to share what ever I can. If you're interested in another application of the same kind of suspension alignment jig, check out the StuG IV Build that Jerry referenced, above:

Armorama::DML #6520 StuG IV Early to Late Conversion

So, for today, my main goal was to glue up the suspension bogies to the hull.

I did use the alignment jig for this:


I have to say that this was one of the most aggravating model-building jobs that I've done in a long time. The glue points that Riich provided are simply inadequate.

I had intended to use rubber bands to hold the carrier down to the jig while the bogie-hull attachment points dried, but because there is not positive keying to hold the bogies in alignment either vertically or horizontally, and all four bogies are simply loose until the glue dries, the rubber bands pulled the entire suspension out of alignment - to one side as well as "racking" the hull-suspension alignment.

Without any support, the model quickly settled down on its rear as the rear bogies simply could not bear the weight and the front bogies followed suit.

Argh!

So, after gluing the bogies to the hull, I spent the next hour carefully pushing here, pulling there, twisting this, and turning that. In the end, I made four wooden wedges, one for each corner of the model, and measured and adjusted the hull height, front to rear, and side to side using the wooden wedges to hold things level.

Once I had the wedges under the model, things literally started to settle into place correctly.

I used the depth gauge portion of my dial calipers to measure the hull height at each of the four corners - chasing the bubble until I got the hull level:


Then I concentrated on getting the hull and suspension parallel with no racking. I did this by using a small square to ensure each corner of the hull was vertically over the corners of the suspension:


I also used the "Mark 1 Eyeball" to sight along the suspension to adjust side to side and vertical alignment of the wheels and bogies:


BTW: In this photo you'll notice that the drive sprocket is not vertical. This is because the stub-axles that Riich uses don't hold the sprocket tight to the brake drum. This misalignment should straighten out when the tracks are installed.

So, back and forth, side to side, front to rear, again and again each time getting things a little closer to plumb, level and square until all was good.

Finally, you'll notice the white styrene strips wedged between the road wheels and the track guide teeth. This was done to eliminate the play between the track and wheels and hold the wheels in alignment front to rear.

If I build another one of these, I will seriously consider replacing kit part A36, the front bogie axle with a piece of hard brass rod. Drill out hull side parts A28 and A29 and the front bogie assemblies C and B (step 7) and use the brass rod to attach the front bogies the hull. This should hold the front bogies in vertical alignment (so they won't tilt side to side) and eliminate two of the four axis of possible movement in the current set up.

(Right now the bogies can tilt side to side, twist around the vertical axis, and tilt up and down.)

I suppose that the kit could be assembled by just eye-balling the bogie-hull glue up, but if you're not very careful, you'll wind up with something (maybe several somethings) misaligned.

Anyways, after all this dries over night, I will reinforce the front bogie attachments with some CA (all that's there now are styrene pins about .040 in dia.) The bogie itself does not sit tight against the hull as per the prototype. This would be OK if you wanted to show the carrier steering around a corner using the track-warping mechanism, but it makes for a very weak plastic model assembly.

Riich would have been much better off forgetting the brass rods and PE disks for the spring guide rods and giving us a brass rod front bogie axle.

Next up-date will show today's work on the radio operator...
SdAufKla
Visit this Community
South Carolina, United States
Joined: May 07, 2010
KitMaker: 2,238 posts
Armorama: 2,158 posts
Posted: Sunday, September 29, 2013 - 11:07 AM UTC
So after struggling with the bogie-hull attachment, I took a breather and did a little work on the radio operator.

First up was to get a start on his head phones:


(BTW: The helmet is dry-fitted in this picture.)

I used very small "blobs" of epoxy putty to form the cushion parts of the ear phones with a disk of styrene sheet glued on to the still soft putty with CA. I'll finish the head phones with styrene rod and lead foil as well as add some hair and a chin strap from more putty, but this part has to set up first.

Next I added a short portion of the upper right arm to the kit elbow. I drilled a hole, inserted a piece of brass wire anchored with CA, and then formed the upper arm and elbow joint from epoxy putty. The kit arm and had were quite nice after some clean up.


Finally, I made a small hollow in the right sleeve and drilled a hole for the wire to hold his right arm. I also did the basic putty work on his shoulder-sleeve joint. After setting up, I'll scribe the seams for the sleeve-shoulder area and clean up the new folds, etc.


After working on the figure, I spent the rest of today's bench time cleaning up the kit tracks. But, I'll save the track stuff for later.

Happy modeling!
MadModeler
Visit this Community
Nova Scotia, Canada
Joined: July 26, 2012
KitMaker: 454 posts
Armorama: 281 posts
Posted: Monday, September 30, 2013 - 01:20 AM UTC
Hey just so you know, The Canadians uniform were a different color than what the British had. The key is mixing Vallejo English Uniform (70921) and Brown Violet (70887). 1:1 ratio is perfect for Canadian Troops during that time.

As for the cold weather crew, I have 3 boxes of them for sale on my online hobby shop. They look pretty sweet. But I'll just be using the figures provide with the kit. Can't be building all my inventory. I got to make money somehow. Hehehe.

Cheers,
Tom
jrutman
Visit this Community
Pennsylvania, United States
Joined: April 10, 2011
KitMaker: 7,941 posts
Armorama: 7,934 posts
Posted: Monday, September 30, 2013 - 01:40 AM UTC
A real PIA to assemble the suspension. I think what we see here is the trade off between accuracy and teeny tiny parts on the one hand and easier build,sturdier parts that are not as in scale on the other hand.
I know which one I would choose but it's nice to have this build log as a guide for anyone contemplating this little kit.
Ah yes 18echo,the echo stands for excessive weight carried in rucksack.
J
Keef1648
Visit this Community
South Carolina, United States
Joined: January 23, 2008
KitMaker: 1,240 posts
Armorama: 1,192 posts
Posted: Monday, September 30, 2013 - 11:42 AM UTC

Quoted Text

@ Jerry: As long as you don't start accusing me of being an Eighteen Echo!

Really, though, some kit features are just too nice to hide away. That StuG IV project took on a life of its own, though. But you're right... I got carried away starting with the radios!

@ Dave: Hey, you know there's a jig for that!

@ Tom: I'm happy to share what ever I can. If you're interested in another application of the same kind of suspension alignment jig, check out the StuG IV Build that Jerry referenced, above:

Armorama::DML #6520 StuG IV Early to Late Conversion

So, for today, my main goal was to glue up the suspension bogies to the hull.

I did use the alignment jig for this:


I have to say that this was one of the most aggravating model-building jobs that I've done in a long time. The glue points that Riich provided are simply inadequate.

I had intended to use rubber bands to hold the carrier down to the jig while the bogie-hull attachment points dried, but because there is not positive keying to hold the bogies in alignment either vertically or horizontally, and all four bogies are simply loose until the glue dries, the rubber bands pulled the entire suspension out of alignment - to one side as well as "racking" the hull-suspension alignment.

Without any support, the model quickly settled down on its rear as the rear bogies simply could not bear the weight and the front bogies followed suit.

Argh!

So, after gluing the bogies to the hull, I spent the next hour carefully pushing here, pulling there, twisting this, and turning that. In the end, I made four wooden wedges, one for each corner of the model, and measured and adjusted the hull height, front to rear, and side to side using the wooden wedges to hold things level.

Once I had the wedges under the model, things literally started to settle into place correctly.

I used the depth gauge portion of my dial calipers to measure the hull height at each of the four corners - chasing the bubble until I got the hull level:


Then I concentrated on getting the hull and suspension parallel with no racking. I did this by using a small square to ensure each corner of the hull was vertically over the corners of the suspension:


I also used the "Mark 1 Eyeball" to sight along the suspension to adjust side to side and vertical alignment of the wheels and bogies:


BTW: In this photo you'll notice that the drive sprocket is not vertical. This is because the stub-axles that Riich uses don't hold the sprocket tight to the brake drum. This misalignment should straighten out when the tracks are installed.

So, back and forth, side to side, front to rear, again and again each time getting things a little closer to plumb, level and square until all was good.

Finally, you'll notice the white styrene strips wedged between the road wheels and the track guide teeth. This was done to eliminate the play between the track and wheels and hold the wheels in alignment front to rear.

If I build another one of these, I will seriously consider replacing kit part A36, the front bogie axle with a piece of hard brass rod. Drill out hull side parts A28 and A29 and the front bogie assemblies C and B (step 7) and use the brass rod to attach the front bogies the hull. This should hold the front bogies in vertical alignment (so they won't tilt side to side) and eliminate two of the four axis of possible movement in the current set up.

(Right now the bogies can tilt side to side, twist around the vertical axis, and tilt up and down.)

I suppose that the kit could be assembled by just eye-balling the bogie-hull glue up, but if you're not very careful, you'll wind up with something (maybe several somethings) misaligned.

Anyways, after all this dries over night, I will reinforce the front bogie attachments with some CA (all that's there now are styrene pins about .040 in dia.) The bogie itself does not sit tight against the hull as per the prototype. This would be OK if you wanted to show the carrier steering around a corner using the track-warping mechanism, but it makes for a very weak plastic model assembly.

Riich would have been much better off forgetting the brass rods and PE disks for the spring guide rods and giving us a brass rod front bogie axle.

Next up-date will show today's work on the radio operator...


Brilliant Mike and as usual great photos of your amazing work.

I do have a question however, may I ask if I detect a minor flaw in your construction of the 'bogie's or as you like to call them (boogies)

I offer the picture below for reference and it seems to me the suspension bogie on your 'wee beastie' has been attached to the 'wrong side'... It could of course be my age or old eyes but something (as we like to say) "ain't quite right".... If I am correct then the same could be said for the other side, making this a twofer...


Please accept my apologies if I am wrong or this has upset your sprocket... er I mean evening...

Happy modeling...


Keith.
SdAufKla
Visit this Community
South Carolina, United States
Joined: May 07, 2010
KitMaker: 2,238 posts
Armorama: 2,158 posts
Posted: Monday, September 30, 2013 - 12:51 PM UTC
@ Keith: Oh, you rotten man!

That'll teach me to whisper secrets in your ear!

(Great photo, BTW!)

So, everyone compare that photo with the photos in the post above and play "One of these things is not like the other..."

More on this in a moment...

@ Tom: Thanks, I'll give that Vallejo mix a try.

@ Jerry: Yep, it was so aggravating that I screwed it up royally! That's what happens when your model-building Zen is out of balance...

Oh yea, this morning I had one of those "oops!" moments, as in, "Opps!? Oops is not good..."


So, I glued the front suspension bogies onto the wrong sides.

Nothing to do but fix it. Fortunately, the kit attachment points are so weak, that breaking the bogies off was about as easy as it could be. Out with the pin vise, a .032 dia bit, and some half-hard .032 brass rod.

Clean up the broken attachment points, drill matching holes in the bogies and the hull sides (right where the kit attachment pins used to be). Glue in short sections of brass rod, then glue the bogies on THE CORRECT SIDES this time, Mike.

The photo above shows the correction. It took longer for the epoxy to set up than it did to make the fix.

Now I know that if I ever build another of these Riich Universal Carriers, I will replace the front bogie cross axle with a brass rod and use that to attach the front bogies.

It wouldn't have kept me from screwing up, but it would have made the fix just that much easier...

Yum, yum... a nice slice of humble pie...

OK, enough of that, on to the good stuff!
majjanelson
Visit this Community
South Carolina, United States
Joined: December 14, 2006
KitMaker: 1,355 posts
Armorama: 979 posts
Posted: Monday, September 30, 2013 - 01:34 PM UTC
Mike,

You were going for looks and symmetry, not functionality and ride comfort.

Great catch, Keith! Your peep-holes work just fine. Imagine how much and how hard Mike would have been kicking himself if this error had not been found until after painting and weathering.
SdAufKla
Visit this Community
South Carolina, United States
Joined: May 07, 2010
KitMaker: 2,238 posts
Armorama: 2,158 posts
Posted: Monday, September 30, 2013 - 01:47 PM UTC
Wow, I'm still laughing at myself...

Oh well, on to the tracks.

There's been some criticism of the Riich Universal Carrier tracks because of the way the sprue attachment points obscure the track pin head detail. This is a pretty fair observation, in my book.


Unfortunately, there're not a lot of options to replace the kit tracks. Model Kasten made a set of link-to-link, injection molded Universal Carrier tracks, but those are, AFAIK, out of production (though they can be found from time to time on eBay, etc). I think there are a couple of resin options, but I've never personally handled any to see the fidelity of detail, etc.

Fortunately, the Riich tracks will clean up nicely with a little work.

The first problem is how to get the tracks off of the sprues. For the double-link sections, I just used a pair of nippers. There's enough room between the sprue and parts. However, the longer sections are a bit more problematic.

I used a fine saw to cut my tracks off the sprues.


I deliberately left as much of the sprue at each attachment point to make it easier to get a good cut on them with my high-tech, super-fine, flush-cut nippers (i.e. finger nail clippers!)


I used the adjacent track pin heads to gauge the depth of these cuts, and on many of the sprue points, I could see the "ghost" of the underlying track pin heads, as well.

Next I used my sanding block to "gang" sand the sprue attachment points until I was just touching the adjacent track pin heads, removing their fine mold seams at the same time.


After the sanding block, I used my Flexi-file with a 600 grit tape to clean up sprue attachment points between the track links.


Finally, I gave the ends of the track links a couple of passes with 4x0 steel wool.


For assembling the tracks, I studied the kit parts very closely. I had hoped that the double-link track sections were all identical, but this is not the case.

By looking very carefully at how close the track guide horns were together on each pair, I identified at least three different configurations.

NOTE that I'm making a major deviation from the kit instructions here. I suggest that anyone building this kit make their own observations and decide for themselves the best sequence to assemble the tracks.

So, I identified "narrow,' "medium" and "wide" track link pairs.

The "narrow" pairs mostly go around the idler wheel and drive sprocket. Here are the kit parts that I grouped together as "narrow" = 7, 8, 11, 13, 15, and 16, for a total of 38 "narrow" link pairs for both tracks.

The "medium" pairs are two transition links that terminate or begin a track run between wheels. I identified parts 9 and 17 as "medium" pairs, and there are a total of four, two on each side.

The "wide" pairs are the three double links over the return roller on each side, for a total of six "wide" pairs on both tracks. Their numbers are 2, 3, and 4.

So, as I assembled my tracks, I made no distinctions between the kit part numbers, just whether the track link pair was "narrow," "medium," or "wide."

This exercise made cutting these little links off the sprues and cleaning them up much easier, since I only had three groups of parts rather than 11 different groups.

I used the alignment jig described earlier to hold the tracks nice and straight as I glued them together. The longer sections must go where the kit instructions indicate. If the instructions are followed for these longer sections, there should be no issues with track direction. Both sides are identical and will assemble only one way.

I used tweezers to handle the small track link pairs and Testors liquid cement. After I glued the last links together, I allowed about another 10 minutes for the glue to set before I installed the tracks around the suspension.

I made a "cold" (un-glued) joint on the drive sprocket and trimmed the inside four track guide horns on the three links over the return roller so that the track will slip between the top of the roller and the bottom of the fender.

My tracks are assembled in single runs and will slip on and off for painting. The drive sprockets are not glued on the model yet. They must be trapped into the track before it's put onto the rest of the suspension, but with the cold-joint, the track can be opened and the drive sprocket removed for painting.


In these photos, the piece of blue tape is over the cold-joint holding the drive sprocket trapped in the track. The red "dots" on some of the track links are simply colored marker applied so that I could easily tell the ends of the various track sections for alignment on the suspension and wheels.

Here's a picture of the track removed from the left side.


Now, I have noticed the same thing that Terry Ashley remarked on in his review build - The tracks seem to be about one link too long. I have learned that styrene tracks do shrink a little along their length as they dry, so maybe by tomorrow, they will have tightened up a little.

If not, I will remove one link from one of the link-pairs around the idler wheels as that's where the slack appears on my build - around the idlers.

Frankly, I was dreading the tracks since I was anticipating a poor outcome when cleaning up the sprue attachment points. I was even prepared to sand all of the track pin head details off and replace them with .005 disks punched with a punch and die. However, now that I've cleaned them up, they're nicer than a lot of tracks, AM and kit, that I've used in the past.

They're not as nice and sharp as, say, DML's Magic Tracks, but they're at least as nice as the Spade Ace tracks I just used on my M13/40 build.

I'll make a quick up-date on the radio operator next.
SdAufKla
Visit this Community
South Carolina, United States
Joined: May 07, 2010
KitMaker: 2,238 posts
Armorama: 2,158 posts
Posted: Monday, September 30, 2013 - 02:07 PM UTC
@ Jeff: Hey, you know you can't put one over on Keith!

I'll be putting something in next month's newsletter, but as a little "teaser," try guessing how long Keith's been building models...

(Wait a minute - no cheating, Jeff. He sent you that email too, didn't he?)

Seriously, I am so glad that I found out about this today and not, like you said, about a week after I finished the build!

Anyways, on to the radio operator.

Today, I finished his headphones and added his chinstrap. I used the centers of the kit headphones, parts Zc3, for those details.


His head is finished here except for a hole in each earphone for the wire.

BTW: the chin straps for the AFV crewman's version of this helmet were made with elasticized cord inside a fabric sleeve, so that's why there's a "crinkled" look to the figure's chinstrap.

Here's his right arm and sleeve finished. His right arm is removable for painting and to make installing the figure and radio easier later.


I still need to add new buttons and drill a hole in the microphone for its wire, but other than that, this figure is about done.

So, that's it for today.

Happy modeling!
majjanelson
Visit this Community
South Carolina, United States
Joined: December 14, 2006
KitMaker: 1,355 posts
Armorama: 979 posts
Posted: Monday, September 30, 2013 - 03:04 PM UTC
Mike,

I thought I found otherwise, but apparently the tracks were installed to run in either direction (other images from web search).


I'm sure you're on top of this already.
SdAufKla
Visit this Community
South Carolina, United States
Joined: May 07, 2010
KitMaker: 2,238 posts
Armorama: 2,158 posts
Posted: Monday, September 30, 2013 - 03:35 PM UTC
@ Jeff: Thanks for the photos. Those are some nice ones!

Yea, the tracks could be installed in either direction on the prototype (although I'd guess there was a "by the book" correct method).

The Riich Models instructions, however, make a big deal about it with a warning in step 8: *Caution: please note the Track direction.

However, the instruction illustration requires a danged magnifying glass to actually see the recommended direction.

But even ignoring the warning, if the long sections are assembled in the sequence that's shown in the instruction, then "track direction" is a moot point. There's only one way that the kit tracks can be installed.

(Unlike the front bogies! )

Front Idler Wheel Mounting Issue

One thing I did forget to mention is that the right front idler wheel mount (kit part D24, step 7) will not fit on the alignment ridges molded on the right front hull side (kit part A15). Terry Ashley also notes this same issue in his review build.

The left side idler and mount will install correctly, though.

So, I installed the left side, and carved away most of the right side's alignment ridges until I could mount the right side to match the left.

It's an easy work around if you know to expect it.

Thanks again for the reference photos, Jeff!
Keef1648
Visit this Community
South Carolina, United States
Joined: January 23, 2008
KitMaker: 1,240 posts
Armorama: 1,192 posts
Posted: Monday, September 30, 2013 - 11:38 PM UTC
Mike.

You mention the amount of slack in the models track and perhaps removing a link to make it look right?

What is right!

Take a look at the tracks in the following three pictures from your update and then see if you really need to make life harder by tightening up the loop on your build.

I would much prefer to believe your beastie has endured a good run and the older track has 'stretched' some what.... Just as they do in reality..

Slack track, almost touching the top of the rear wheel.


Tight and possibly newer track (clean uniforms, note the unhelmeted MP)..


Again, slack track.


Yours left 'as is' would fit well within the realms of reality, even if not within a judges personal LED Ott light perspective.


Keith.
SdAufKla
Visit this Community
South Carolina, United States
Joined: May 07, 2010
KitMaker: 2,238 posts
Armorama: 2,158 posts
Posted: Tuesday, October 01, 2013 - 01:57 AM UTC

Quoted Text

Mike.

You mention the amount of slack in the models track and perhaps removing a link to make it look right?

What is right!

...

Yours left 'as is' would fit well within the realms of reality, even if not within a judges personal LED Ott light perspective.


Keith.


@ Keith: Thanks for the vote of confidence.

I don't think I described the problem clearly. Using the word "slack" was confusing to describe the issue. I should have perhaps said "excess"(?).

The issue is not the amount of sag across the top of the track, but the excess of track around the front idlers. This excess "floats" around the circumference of the idler wheel. That is, the track is not tight to the wheel and there is a visible gap between the track the wheel.

During construction, it might have been possible to head off the problem by eliminating one of the three track link pairs over the return roller (either one C2,3, or 4) or perhaps leaving off one of the link pairs around the idler wheel (parts C16).

However, I'm now committed to the track over the return roller (since I've modified that to slip between the roller and fender). This leaves me with working with the track around the idler wheel, where the problem has actually manifested itself.

For my build at this point, what is necessary is to eliminate the amount of excess track around the idlers so that that portion of the track does not "float" around that one wheel. I believe that this requires the removal of one (or possibly two) track links (kit parts C16, step eight) from the idler wheel portion of the track.

(The track fits quite well everywhere else.)

If one link will do the trick, then one track-link pair part C16 will have to be cut in two. If two links will not be too "tight" around the wheel, then leaving off one entire part C16 from the front of the track will be very simple.

I will experiment with the left side track today (the track already assembled above) and apply the fix to the right side track when I assemble it later.

Thanks again for the suggestions, and sorry for any confusion about the nature of the problem. Terry Ashley points it out in his build review, but I chose to ignore him and take a "wait and see approach" and will now just have to deal with it. Fortunately, building just one side at a time will allow me to apply the fix while assembling the second track run.

Cheers!
SdAufKla
Visit this Community
South Carolina, United States
Joined: May 07, 2010
KitMaker: 2,238 posts
Armorama: 2,158 posts
Posted: Tuesday, October 01, 2013 - 08:35 AM UTC
Ok, so there seems to be some misunderstanding and miscommunication about this little track problem.

I could have explained or described the issue better, but Terry Ashley has already done so on his build review, so I was really just acknowledging his previous findings. The kit tracks are just a little too long.

Anyways, here's a picture of the problem.


To understand what's happening, note the red marked track teeth. The run from the bottom of the front road wheel to the bottom of the idler wheel is a single kit piece of track - fixed in length with no sag.

The run from the return roller to the top of the idler is also a single kit piece that's fixed in length and the sag is molded in.

My thumb is holding the track against the bottom of the idler wheel, but note how as the track curves up and around the wheel, it gets further and further away from it. If the track is squeezed on the top and bottom of the idler, both of the long kit pieces touch the idler at the points marked in red, but the track around the idler bows forward and away from the wheel.

Since this excess cannot be taken up by inducing additional sag in either of the two long kit track parts, it's the track around the idler wheel that must be adjusted.

After some "exploratory surgery" on the left side track, assembled yesterday, I found that removing a single link of track will solve the problem.

On the left side, I carefully cut the assembled track apart at about the 11 o'clock position (see the four black "dotted" tracks in the photo) over the idler wheel at the joint between two of the kit parts C16. On one side, I carved away a single link and made some slight adjustments on the curvature of the track. I re-glued the track together and set it aside to dry.

For the right side, the fix was much easier. I just took one of the usassembled kit parts C16 and carved away one link. I then glued the remaining single link to another C16 to make a triple-link. I set this aside for the glue to set as I assembled the rest of the right side track.


Note how these kit parts are molded to pre-curve as they are assembled.

Once the right side track was assembled, I then re-fit the left side track back onto the carrier.

Here're a few pics of the finished kit tracks, right and left sides.


So, this finishes up the kit tracks. I think they're pretty nice. Riich could have molded them differently to make them easier to remove from the sprues and to preserve the track pin head details, but with care and proper preparation the kit tracks are perfectly "buildable."

The tracks are also ever so slightly long, but the fix is possible with basic modeling skills. Carving down one of the C16 twin-links into a single link can be done with just an X-acto knife and a little care. Do this before assembling the tracks, and the fix is not particularly hard at all.

An alternative might be to eliminate one of the three twin-link pairs over the return roller, but someone else will have to try that and report the results. If that works, obviously, it would be even easier than the "single link" solution above.

Happy modeling!
jrutman
Visit this Community
Pennsylvania, United States
Joined: April 10, 2011
KitMaker: 7,941 posts
Armorama: 7,934 posts
Posted: Tuesday, October 01, 2013 - 08:39 AM UTC
After all of your machinations the end result is that those tracks have just the right sag. Very convincing and so freekin small!
J
Keef1648
Visit this Community
South Carolina, United States
Joined: January 23, 2008
KitMaker: 1,240 posts
Armorama: 1,192 posts
Posted: Tuesday, October 01, 2013 - 11:40 PM UTC
Good job Mike has some fingers, I am all thumbs and would have torn my hair out trying to fix the problem with such a small set of tracks....

Looks just about perfect to me but then again, all of his work, including out of the box stuff like this make me drool and envious


Keith.
SdAufKla
Visit this Community
South Carolina, United States
Joined: May 07, 2010
KitMaker: 2,238 posts
Armorama: 2,158 posts
Posted: Thursday, October 03, 2013 - 01:40 PM UTC
@ Jerry: Yea, this thing is tiny, alright.

Riich Models deserves all the credit for the track sag, though. It's pre-molded into the link-and-length parts, and except for the minor issues noted, the track is very nice when finished.

@ Keith: Thank you, my friend, but I'm sure your hair would remain intact!

So, over the last couple of days, I've just been plugging away at the Riich kit. I've been skipping around the instructions catching up with partially completed steps here and there.

One of the first things I've done since finishing the tracks is to install the mud scrapers (left over from step 7). Riich gives you two options: parts A2 and A3 or A4 and A5.

However, apparently taking a page from DML, Riich give no explanation of the differences or vehicles they are used on - just the "which-which" double arrows on the instructions. Interestingly enough, the main diagram in step 7 shows parts A4 and A5 being installed, but all of the painting and decaling diagrams show parts A2 and A3. Go figure...

Turning to Stephen Tegner's photo album, the carrier he photographed has the A2 and A3 style mud scraper, so that's what I went with too.


I encountered no fit or interference issues with the PE parts and the final drives and sprockets. The parts all fit perfectly.

Moving on to the final drives, exhausts, and external brake parts, I installed the PE exhaust guards on the hull bottoms (step 3, parts Pb7 x 2 and Pb 44 x 2).

Another kit design feature that Riich deserves credit for is the way many of the PE parts are made with small holes that fit over rivets or bolts that are molded on the plastic parts. The exhaust guards fit perfectly over these and the holes index the parts in place and make gluing them quite easy.

In step 15, Riich has you assemble the external linkages and cranks that operated the brakes on the final drives. These parts are very small and tedious to assemble, but they do match the prototype details very well. I assembled the plastic parts (sub-assemblies G1 and G2) and set them aside for the glue to start setting while I formed the PE skid plates, parts Pb 24 and Pb25. Pay careful attention to the diagrams and photos of the prototype when forming the skid plates. The have a small "jog" bend on their bottoms that will enable them to fit the plastic parts better.

I glued the PE skid plates onto my model and then added the plastic sub-assemblies. The glue on the plastic parts was still slightly soft, so I was able to wiggle and wriggle them into place and straighten any deformations back.

After getting these parts installed, I dry-fit the exhaust pipes and mufflers to check that I could still put them on later during the finishing stages.

Here's a picture of the prototype brake and exhaust details.


Here are the Riich Models details.


Riich does a very good job of getting all of this correct. There's simply no comparison to the old Tamiya kit.

In the next post, I'll move on to the rear hull and "luggage shelf," and in the end, it's quite surprising just how much of this detail remains visible.
SdAufKla
Visit this Community
South Carolina, United States
Joined: May 07, 2010
KitMaker: 2,238 posts
Armorama: 2,158 posts
Posted: Thursday, October 03, 2013 - 02:00 PM UTC
From step 15, I jumped forward to steps 39, 40 and 41.

In these steps, the rear hull and "luggage shelf" are constructed. (I don't know what this actual area on the prototype was officially called, but it has all the tools and other vehicle stowage on it.)

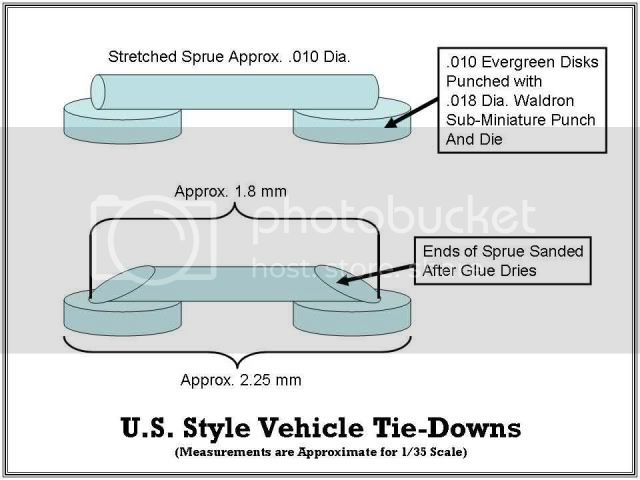
After cleaning up the two main parts, E15 and E16, I replaced all of the kit's molded on footman loops. This is a pretty "standard" fix for me, and here's a diagram I did several years ago that shows how I make these parts. The technique, itself, is one that I first read about in one of Shep Paine's books. It's "old school," but effective, and later I'll be able to install actual straps and buckles through these.


I pretty much just ground my way through these steps as Riich shows them. The footman loops are the only real deviation. However, the rear hull assembly is not glued on right now so that I can paint under it later. The same with the box on the right rear fender and the "bottle" jack - They're both still unattached in the photos.

Forming the exhaust pipe guards, Pa1 and Pa3, is an easy job. Riich gives us nice measurements - the curve has a 2.6 mm radius. I used a 2.5 mm dia drill bit and a soft surface made of a couple of wide rubber bands to "roll" the curve into the parts. I did anneal them using my butane soldering torch first.


I sanded the sides of the small tool holder, F63, to make the sides a little thinner and more "in scale" looking.

The only assembly issue that I encountered was with the crew steps, PE parts Pb19 and Pb30. I did have to ream out their mounting holes slightly in order to get them to sit level side to side.

Here are a couple of pics showing the results.


If you're very sharp-eyed and compare the kit to Stephen Tegner's photos, you'll note that Riich did not model their exhaust pipes to curve up into the oval holes on the rear shelf, part E15.

So, I think next up is step 42.

Happy modeling!
Keef1648
Visit this Community
South Carolina, United States
Joined: January 23, 2008
KitMaker: 1,240 posts
Armorama: 1,192 posts
Posted: Thursday, October 03, 2013 - 11:25 PM UTC

Quoted Text


One of the first things I've done since finishing the tracks is to install the mud scrappers (left over from step 7). Riich gives you two options: parts A2 and A3 or A4 and A5.


Thank's for the update Mike, things are really looking exceptionally good, wonderful detail.

I do like the mud *SCRAPPERS* they fit in well with your Boogies.... Yeah I know, you meant scrapers but I just had to point it out...

Keep up the great work and updates, see you next week at the meeting.

Keith.
SdAufKla
Visit this Community
South Carolina, United States
Joined: May 07, 2010
KitMaker: 2,238 posts
Armorama: 2,158 posts
Posted: Friday, October 04, 2013 - 01:16 AM UTC

Quoted Text

... I do like the mud *SCRAPPERS* they fit in well with your Boogies.... Yeah I know, you meant scrapers but I just had to point it out...

Keith.


@ Keith: Thanks for keeping me straight. All better now. (I had to fix an incorrect part number on the photo, as well.)

I should start sending you all this for proofreading before I post it up!

Happy modeling!