
Hosted by Richard S.
Operation Fall Gelb 1940 Campaign
27-1025

Joined: September 16, 2004
KitMaker: 1,281 posts
Armorama: 1,222 posts

Posted: Monday, June 23, 2014 - 03:28 AM UTC
Very nice job on the 231! 

Posted: Tuesday, June 24, 2014 - 11:02 AM UTC
Here is my startup photo for the Fall Gelb 1940 Campaign.
It is the Heller Homua S35 French Tank.
Tom
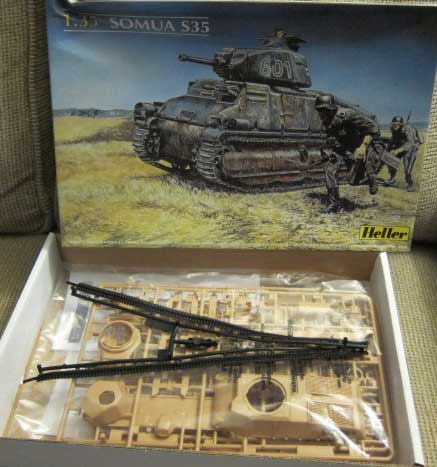
It is the Heller Homua S35 French Tank.
Tom

27-1025

Joined: September 16, 2004
KitMaker: 1,281 posts
Armorama: 1,222 posts

Posted: Sunday, July 06, 2014 - 06:20 AM UTC
27-1025

Joined: September 16, 2004
KitMaker: 1,281 posts
Armorama: 1,222 posts

Posted: Wednesday, July 09, 2014 - 04:20 PM UTC
ZAPanzer

Joined: September 12, 2012
KitMaker: 88 posts
Armorama: 49 posts

Posted: Monday, July 14, 2014 - 02:05 AM UTC
27-1025

Joined: September 16, 2004
KitMaker: 1,281 posts
Armorama: 1,222 posts

Posted: Friday, July 18, 2014 - 05:42 PM UTC
This thing is taking on a life of its own. I decided that since it was Fall Gelb then something French would be needed for my scene. 
So here we go:


Although I'm happy that someone decided to kit this tank, it will fight you every step of the way. Not an easy build at all. Highly recommend the PMMS build review to anyone trying the to tackle this thing.

So here we go:


Although I'm happy that someone decided to kit this tank, it will fight you every step of the way.
 Not an easy build at all. Highly recommend the PMMS build review to anyone trying the to tackle this thing.
panzerbob01

Joined: March 06, 2010
KitMaker: 3,128 posts
Armorama: 2,959 posts

Posted: Saturday, July 19, 2014 - 11:21 AM UTC
Chris;
Yeah - I looked in on the PMMS review and build... seems that this one is no cake-walk or shake-n-bake! In fact, looks like a guy could get his time and modeling "pleasure" while obtaining what appears to be a very good-looking build of this tiny mite...
But have you ever "visited" with that old Heller version of this thing? Bow wow! This HB version is way better in all sorts of important ways - tracks and complicated running gear look much better, and that interior is huge! I did the Heller thing... Bow wow. Whine. Grrrrrr! I am so going to get this new item, and be pleased all the way through the ensuing "prize match", I think!
But see the great "walk-around" pics posted HERE:
http://www.primeportal.net/tanks/david_lueck/renault_r35/index.php?Page=1 There are, I think, 5 pp of great shots.
Per the running gear; seems T. Ashley found the PE bits therein to be trouble and not worth the fuss. But I looked up the real thing all over the web... the styrene "fix" does not well-catch the real mud-shield bits in those bogies, while the PE, fussy as it may be, MAY indeed do better, IMHO. And neither the kit bits nor Terry's fixes appear to address the inner bogie shield pieces correctly (see pic below). These shields appeared on some tanks, but were missing on others, and similarly so on museum specimens - so this may be a matter of what you want... do pay attention to the way they attached - some inside between bogie "walls", others bolted onto the flanges and NOT inside...
This is the r-35 from APG - most "outside" mud-shields missing, but the inner small ones in place, as fixed by T.A and provided by HB in PE... note that there is a clear fold-in slot at either side of the shield - the bend part called for in HB parts and in the real thing to bolt it inside between the bogie "walls"...

And here is the r-35 exhibited in, I believe, Israel - has all of those small and larger "outer" mud-shields (note the curved items inside the curve of each pair-bogie, and the bend in same, and the pointed "spats" bolted over the wheels outside each bogie). These appeared on many but not all r-35, so...

The above pics collected from public web sites and posted HERE for discussion purposes only.
And, for whatever little it is worth, here's my Heller, still wrestling the Friul tracks... I scratched in all of the mud-shields modeled after that Israeli r-35.
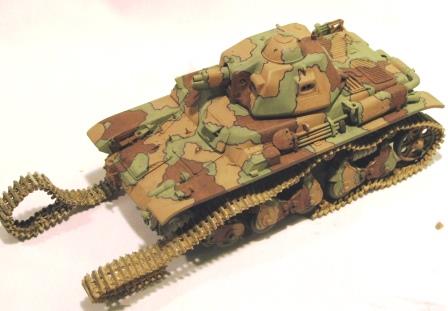
Just some thoughts as you wrestle forward on this troublesome-but-enticing gem!
Bob
Yeah - I looked in on the PMMS review and build... seems that this one is no cake-walk or shake-n-bake! In fact, looks like a guy could get his time and modeling "pleasure" while obtaining what appears to be a very good-looking build of this tiny mite...

But have you ever "visited" with that old Heller version of this thing? Bow wow!
 This HB version is way better in all sorts of important ways - tracks and complicated running gear look much better, and that interior is huge! I did the Heller thing... Bow wow. Whine. Grrrrrr! I am so going to get this new item, and be pleased all the way through the ensuing "prize match", I think!
But see the great "walk-around" pics posted HERE:
http://www.primeportal.net/tanks/david_lueck/renault_r35/index.php?Page=1 There are, I think, 5 pp of great shots.
Per the running gear; seems T. Ashley found the PE bits therein to be trouble and not worth the fuss. But I looked up the real thing all over the web... the styrene "fix" does not well-catch the real mud-shield bits in those bogies, while the PE, fussy as it may be, MAY indeed do better, IMHO. And neither the kit bits nor Terry's fixes appear to address the inner bogie shield pieces correctly (see pic below). These shields appeared on some tanks, but were missing on others, and similarly so on museum specimens - so this may be a matter of what you want... do pay attention to the way they attached - some inside between bogie "walls", others bolted onto the flanges and NOT inside...
This is the r-35 from APG - most "outside" mud-shields missing, but the inner small ones in place, as fixed by T.A and provided by HB in PE... note that there is a clear fold-in slot at either side of the shield - the bend part called for in HB parts and in the real thing to bolt it inside between the bogie "walls"...

And here is the r-35 exhibited in, I believe, Israel - has all of those small and larger "outer" mud-shields (note the curved items inside the curve of each pair-bogie, and the bend in same, and the pointed "spats" bolted over the wheels outside each bogie). These appeared on many but not all r-35, so...

The above pics collected from public web sites and posted HERE for discussion purposes only.
And, for whatever little it is worth, here's my Heller, still wrestling the Friul tracks... I scratched in all of the mud-shields modeled after that Israeli r-35.

Just some thoughts as you wrestle forward on this troublesome-but-enticing gem!

Bob

27-1025

Joined: September 16, 2004
KitMaker: 1,281 posts
Armorama: 1,222 posts

Posted: Saturday, July 19, 2014 - 12:04 PM UTC
Bob, nice work on your R35. Love that camo scheme. I'm sure the Heller route was infinitely tougher than my newer Hobby Boss.
Not sure of where I found this but it has lots of period references for French armor. It's all in French but I'm just there for the pictures
http://www.chars-francais.net/new/index.php?option=com_content&task=view&id=106&Itemid=36
Not sure of where I found this but it has lots of period references for French armor. It's all in French but I'm just there for the pictures

http://www.chars-francais.net/new/index.php?option=com_content&task=view&id=106&Itemid=36
27-1025

Joined: September 16, 2004
KitMaker: 1,281 posts
Armorama: 1,222 posts

Posted: Wednesday, July 23, 2014 - 03:34 PM UTC
IronOwl

Joined: January 07, 2013
KitMaker: 572 posts
Armorama: 302 posts

Posted: Saturday, July 26, 2014 - 08:42 AM UTC

Sascha(Ironowl)

IronOwl

Joined: January 07, 2013
KitMaker: 572 posts
Armorama: 302 posts

Posted: Saturday, July 26, 2014 - 08:43 AM UTC

IronOwl

Joined: January 07, 2013
KitMaker: 572 posts
Armorama: 302 posts

Posted: Saturday, July 26, 2014 - 08:44 AM UTC

panzerbob01

Joined: March 06, 2010
KitMaker: 3,128 posts
Armorama: 2,959 posts

Posted: Saturday, July 26, 2014 - 10:03 AM UTC
Sasha;
I KNOW it's some sort of Pz II with the twin turret hatches, but...
Your pics are seriously blurry and I doubt anyone can see much to help you on or offer constructive comment to!
PLEASE set your camera (I'm assuming that you are using a digital auto-focus "point-and-shoot" camera, and not a cell-phone or such ) to its "macro" setting (usually a small icon looks like a flower)! This will enable your camera to "see" and focus where you really want it to - on your tank, and not off in the distance.
Bob
I KNOW it's some sort of Pz II with the twin turret hatches, but...
Your pics are seriously blurry and I doubt anyone can see much to help you on or offer constructive comment to!

PLEASE set your camera (I'm assuming that you are using a digital auto-focus "point-and-shoot" camera, and not a cell-phone or such
 ) to its "macro" setting (usually a small icon looks like a flower)! This will enable your camera to "see" and focus where you really want it to - on your tank, and not off in the distance.
Bob

IronOwl

Joined: January 07, 2013
KitMaker: 572 posts
Armorama: 302 posts

Posted: Sunday, July 27, 2014 - 12:52 AM UTC
ah sorry about the pics will try to post some better ones and one thing I forgot was to turn off my work station light will try to post some better ones later today.
Sascha(ironowl)
Sascha(ironowl)


Vista85

Joined: January 03, 2014
KitMaker: 118 posts
Armorama: 112 posts

Posted: Sunday, July 27, 2014 - 03:09 AM UTC
After a lot of time i finished the hull of my Pz II.
I used PE from Voyager set and some Legend extra stowage parts.
Next step will be add Friulmodel tracks and start with turret building


I used PE from Voyager set and some Legend extra stowage parts.
Next step will be add Friulmodel tracks and start with turret building
27-1025

Joined: September 16, 2004
KitMaker: 1,281 posts
Armorama: 1,222 posts

Posted: Sunday, July 27, 2014 - 10:09 AM UTC
Great work with the Photo-etch and the stowage looks good too.
27-1025

Joined: September 16, 2004
KitMaker: 1,281 posts
Armorama: 1,222 posts

Posted: Monday, July 28, 2014 - 02:12 AM UTC
Posted: Tuesday, July 29, 2014 - 04:57 AM UTC
Some excellent work going on here folks.
Cheers
Al
Cheers
Al


PrickleHead

Joined: December 31, 2013
KitMaker: 338 posts
Armorama: 121 posts

Posted: Sunday, August 10, 2014 - 01:53 PM UTC
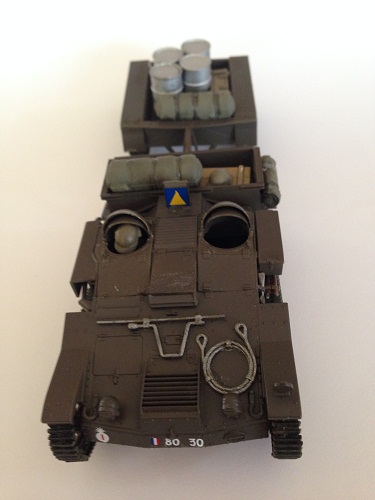
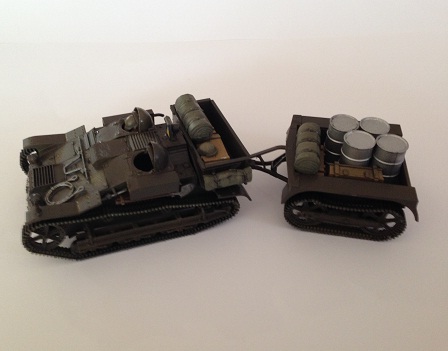
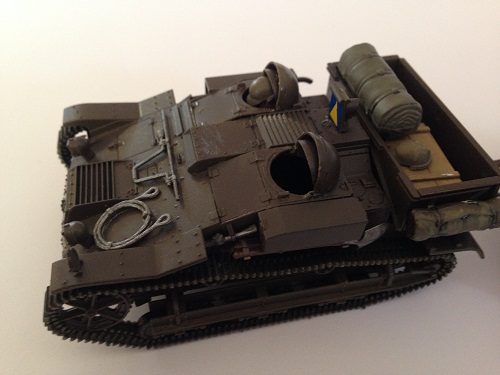
My completed UE


27-1025

Joined: September 16, 2004
KitMaker: 1,281 posts
Armorama: 1,222 posts

Posted: Sunday, August 10, 2014 - 03:27 PM UTC
Nicely done Sir!!! Looks real good. 

Posted: Sunday, August 10, 2014 - 08:42 PM UTC
Nice! 
I tried a new product I have to do the rust on the exhaust, it's called Magic Metallic and comes in two parts the steel metallic paint that has real metal in it(the bottle is quite heavy) and the rapid rust solution. I painted the exhaust with the steel using three coats and the next day when I read the bottle of rapid rust it says that I should have used it when the last coat was still wet oh well... I applied it anyways to the dry steel and got a reasonable rusted exhaust.
Cheers Rob.
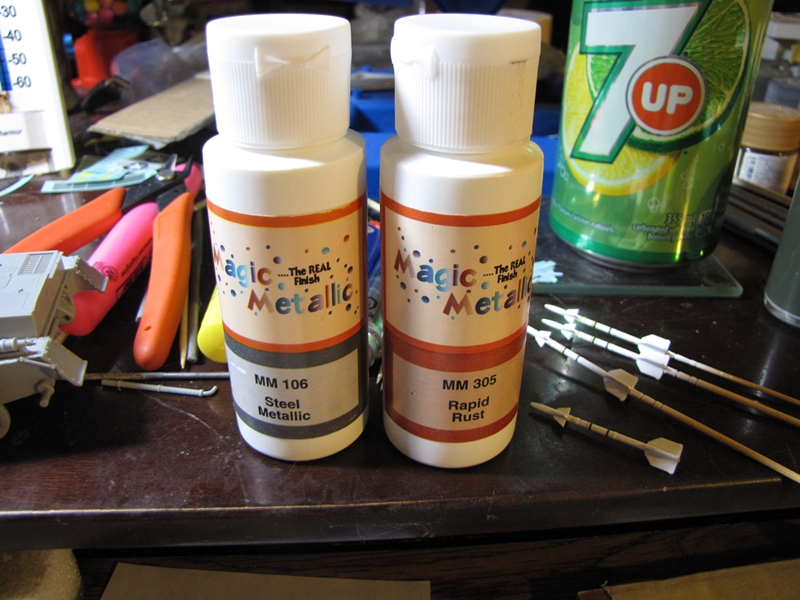
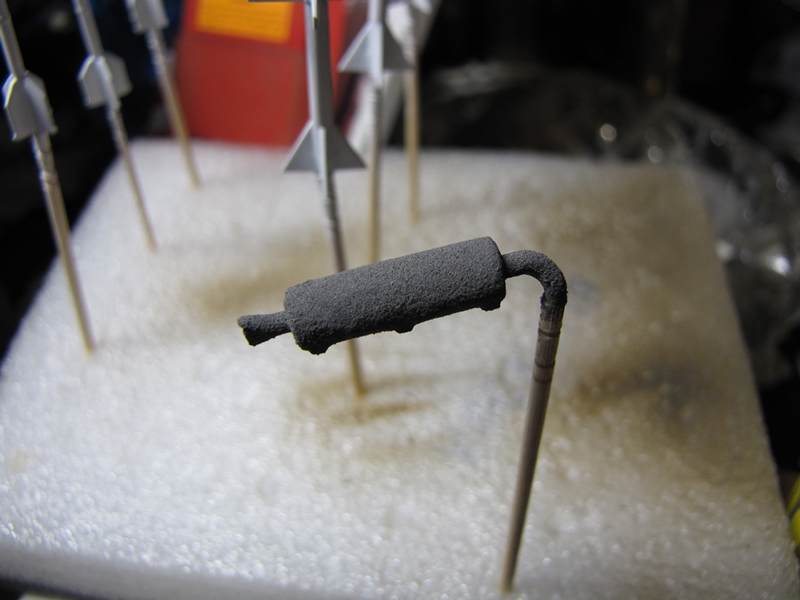
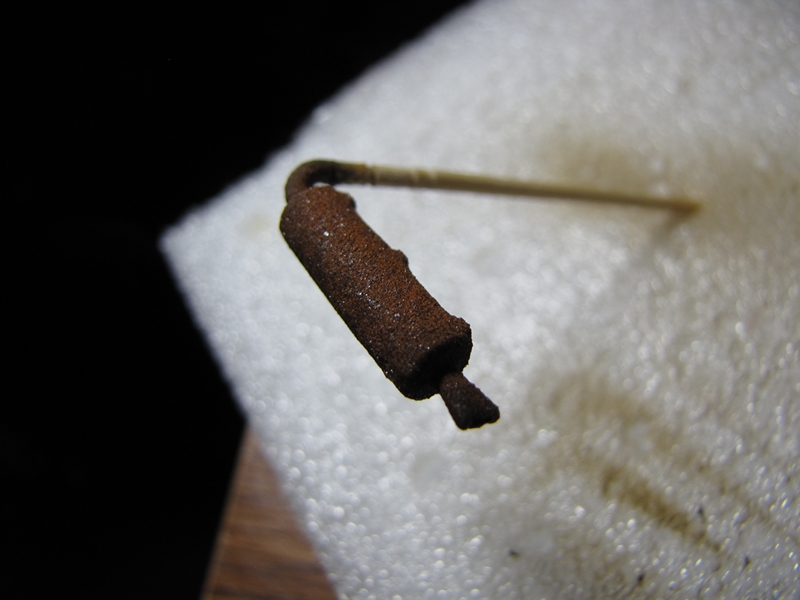

I tried a new product I have to do the rust on the exhaust, it's called Magic Metallic and comes in two parts the steel metallic paint that has real metal in it(the bottle is quite heavy) and the rapid rust solution. I painted the exhaust with the steel using three coats and the next day when I read the bottle of rapid rust it says that I should have used it when the last coat was still wet
 oh well... I applied it anyways to the dry steel and got a reasonable rusted exhaust.
Cheers Rob.


Posted: Monday, August 11, 2014 - 10:25 PM UTC
Well,
The flat coat I used as a sealer lightened the rust up quite a bit, I think I should try an oil based sealer next time.
Cheers Rob.
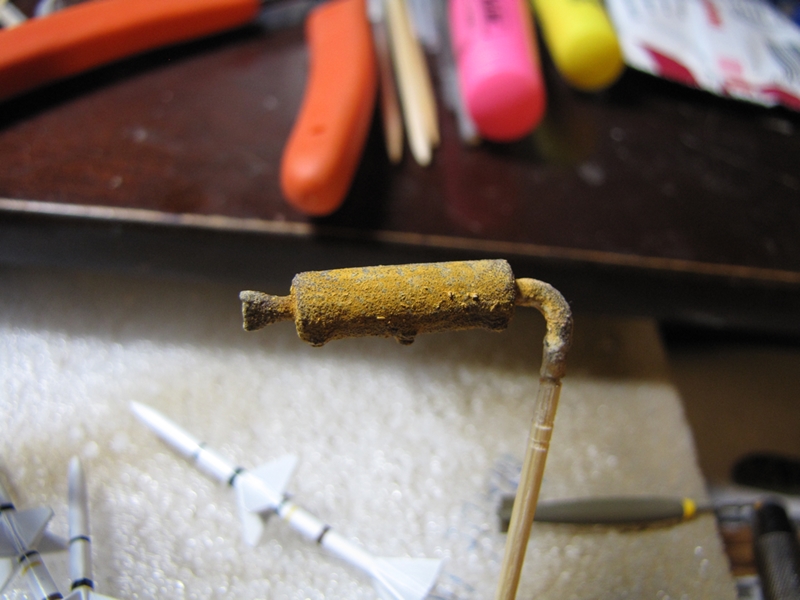
The flat coat I used as a sealer lightened the rust up quite a bit, I think I should try an oil based sealer next time.

Cheers Rob.

steph2102

Joined: April 23, 2011
KitMaker: 735 posts
Armorama: 606 posts

Posted: Tuesday, August 12, 2014 - 02:12 AM UTC
2ndWorcesters

Joined: March 15, 2014
KitMaker: 80 posts
Armorama: 80 posts

Posted: Thursday, August 14, 2014 - 06:57 AM UTC
I like the French carrier so it's great to see one here.
Well done PrickleHead.
Well done PrickleHead.
27-1025

Joined: September 16, 2004
KitMaker: 1,281 posts
Armorama: 1,222 posts

Posted: Friday, August 15, 2014 - 04:54 PM UTC
Quoted Text
Hello there!
27-1025, the inside of your R35 is superb
PrickleHead, I like your UE , beautiful finish.
here is my progress, I just added a few small details .il I still have to do the dash that I lost.
steph
Looks great. You also got in the internal ammunition storage bins right - I missed that until after I sealed mine up. Saw a Zaloga build of the Brach Models R35 after I sealed mine up

Look forward to seeing yours painted up.
 |


