South Carolina, United States
Joined: December 03, 2009
KitMaker: 2,160 posts
Armorama: 1,906 posts
Posted: Thursday, August 28, 2014 - 07:27 AM UTC
Arkansas, United States
Joined: June 29, 2009
KitMaker: 11,610 posts
Armorama: 7,843 posts
Posted: Thursday, August 28, 2014 - 08:53 AM UTC
I like it. I think you could really do it justice, with some super detailing. Don't forget to post a photo in the campaign gallery.
Ideals are peaceful. History is violent.
Queensland, Australia
Joined: December 19, 2012
KitMaker: 74 posts
Armorama: 68 posts
Posted: Thursday, August 28, 2014 - 03:23 PM UTC
This is my T34/76. Not happy with the finished result but lost all motivation after the acrylic wash failed. Let me tell you what happened...
1. Assemble kit
2. Camo with rattle can. Would normally use the AB but wet/humid weather persuaded me to use the can.
3. Decals
4. Clear coat
5. Acrylic/thinner pin wash. Thought I could remove the unwanted wash but it 'stained'. The last model i built had a similar problem but I used acrylic/water for the wash and it also 'stained'. Not sure why it happened but it took all my motivation away.
6. Tried to brush on a coat of Tamiya Flat Clear but it didn't work very well. You can see some brush marks on the finished model.
7. I decided to try a few different things since I no longer cared for this tank. Different chipping, pastels(new for me), Tamiya powders, etc.
All in all a good experience as I learned quite a bit. There is definitely more to this modeling caper that meets the eye! I may use the SA-9 Gaskin as well if I have the time. And well done to all who have posted their work, some really great tanks on here!


"Allow me to be the first to offer Dr. Johnson my most sincere contrafibularities! I am anaspeptic, frasmotic, even compunctuous to have caused him such pericombobulation." - BlackAdder
Colorado, United States
Joined: February 24, 2014
KitMaker: 3,033 posts
Armorama: 2,492 posts
Posted: Thursday, August 28, 2014 - 04:00 PM UTC
Quoted Text
This is my T34/76. Not happy with the finished result but lost all motivation after the acrylic wash failed. Let me tell you what happened...
Hi Luke,
I don't think the finish is as bad as you think. I kind of like it! However, you should attack the tracks; I think that would really improve the overall appearance. IMHO.
Hope you get your mojo back!

mike
South Carolina, United States
Joined: December 03, 2009
KitMaker: 2,160 posts
Armorama: 1,906 posts
Posted: Friday, August 29, 2014 - 04:40 AM UTC
Luke,
I tend to agree with Mike that it doesn't look bad. I think the finish works well with the period and the war situation. You could always overpaint it white for a winter vehicle. I also agree about hitting those tracks. Even a simple drybrushing of rust followed by a light brushing of steel should make them pop.
Queensland, Australia
Joined: December 19, 2012
KitMaker: 74 posts
Armorama: 68 posts
Posted: Friday, August 29, 2014 - 05:48 PM UTC
Thanks for the replies fellas. Your comments do indeed lift my spirits. I won't go back to the tank now, I prefer to move on to something else and try to a better job there. If I get time I will tackle this kit, Dragon SA-9 Gaskin. Wish me luck.

"Allow me to be the first to offer Dr. Johnson my most sincere contrafibularities! I am anaspeptic, frasmotic, even compunctuous to have caused him such pericombobulation." - BlackAdder
Arkansas, United States
Joined: June 29, 2009
KitMaker: 11,610 posts
Armorama: 7,843 posts
Posted: Saturday, August 30, 2014 - 12:26 AM UTC
I look foward to the Gaskin, but I agree that the T34 looks good. I think that with a white wash and retouch of the tracks it could be one you would be proud to display.
Ideals are peaceful. History is violent.
tatbaqui
 News Writer
#040
Metro Manila, Philippines
Joined: May 06, 2007
KitMaker: 2,713 posts
Armorama: 2,451 posts
Posted: Saturday, August 30, 2014 - 01:22 AM UTC
Hello -- I've just signed up. Will go with this:

Cheers,
Tat
Bergamo, Italy
Joined: January 03, 2014
KitMaker: 118 posts
Armorama: 112 posts
Posted: Saturday, August 30, 2014 - 02:28 AM UTC
I'm assembling hull quickly because all parts fit very well.


There are some options like most part of Dragon kits and you can chose between plastic or metal parts like engine grills, mudguards and various handles.

However there is a problem with Magic Tracks because in the inner surface of each link there are two casting marks pins to be removed....

Arkansas, United States
Joined: June 29, 2009
KitMaker: 11,610 posts
Armorama: 7,843 posts
Posted: Saturday, August 30, 2014 - 02:40 AM UTC
Dario I use a small chisel to remove the ejector pin marks.
Ideals are peaceful. History is violent.
Bergamo, Italy
Joined: January 03, 2014
KitMaker: 118 posts
Armorama: 112 posts
Posted: Saturday, August 30, 2014 - 04:29 AM UTC
Thanks Matt
it's a boring job but necessary

Arkansas, United States
Joined: June 29, 2009
KitMaker: 11,610 posts
Armorama: 7,843 posts
Posted: Saturday, August 30, 2014 - 06:05 AM UTC
Quoted Text
Thanks Matt
it's a boring job but necessary
It took me the better part of nine hours to clean up the panzer tracks.
Ideals are peaceful. History is violent.
Lisboa, Portugal
Joined: March 04, 2008
KitMaker: 5,386 posts
Armorama: 4,727 posts
Posted: Sunday, August 31, 2014 - 05:01 AM UTC
Active Builds: 0
Active Campaigns: 0
Bayern, Germany
Joined: October 22, 2013
KitMaker: 380 posts
Armorama: 376 posts
Posted: Sunday, September 14, 2014 - 03:27 AM UTC
Here is my entry:

nice kit from what I´ve seen, first progress will folllow tonight
Impossible only means that you haven't found the solution yet.
Connecticut, United States
Joined: November 02, 2003
KitMaker: 984 posts
Armorama: 846 posts
Posted: Sunday, September 14, 2014 - 04:03 AM UTC
I've been doing a little here and there, but nothing photo worthy
Tokyo-to, Japan / 日本
Joined: August 14, 2005
KitMaker: 44 posts
Armorama: 48 posts
Posted: Sunday, September 14, 2014 - 04:35 AM UTC
Hello guys
Can I join you with this ancient kit?

Bayern, Germany
Joined: October 22, 2013
KitMaker: 380 posts
Armorama: 376 posts
Posted: Sunday, September 14, 2014 - 10:57 AM UTC
alright... already discovered some issueswith the kit...
The PE cover for the drivers periscopes can in no way be bend to match the plastic part... and the vosion block for the driver isn´t marked in the instructions, but ther is actually a part on the sprues which should fit in...


Impossible only means that you haven't found the solution yet.
Arkansas, United States
Joined: June 29, 2009
KitMaker: 11,610 posts
Armorama: 7,843 posts
Posted: Sunday, September 14, 2014 - 01:49 PM UTC
Tadakatsu: That kit fits in. Welcome aboard.
Looks like I won't be able to get back to my build, before the 20th.
Ideals are peaceful. History is violent.
Arkansas, United States
Joined: June 29, 2009
KitMaker: 11,610 posts
Armorama: 7,843 posts
Posted: Monday, September 15, 2014 - 01:11 AM UTC
Just to make sure that everyone knows, the link to the campaign gallery is here:
https://gallery.kitmaker.net/showgallery.php/cat/29148Ideals are peaceful. History is violent.
United Kingdom
Joined: September 17, 2012
KitMaker: 462 posts
Armorama: 417 posts
Posted: Friday, September 19, 2014 - 01:29 AM UTC
United Kingdom
Joined: September 17, 2012
KitMaker: 462 posts
Armorama: 417 posts
Posted: Sunday, September 21, 2014 - 08:29 AM UTC
So the colour modulation was all a bit pointless because I covered it under a winter whitewash. I then added a pin wash with some burnt umber oil diluted in white spirit. Still lots to do, but getting there...


Cheers
Matthew
Puerto Rico
Joined: December 05, 2013
KitMaker: 314 posts
Armorama: 253 posts
Posted: Tuesday, September 23, 2014 - 02:08 AM UTC
Visit our site and learn more about our Club:
www.ipmsborinqueneers.com
Namabiiru
Associate Editor #399
Rhode Island, United States
Joined: March 05, 2014
KitMaker: 2,888 posts
Armorama: 1,920 posts
Posted: Thursday, September 25, 2014 - 10:34 AM UTC
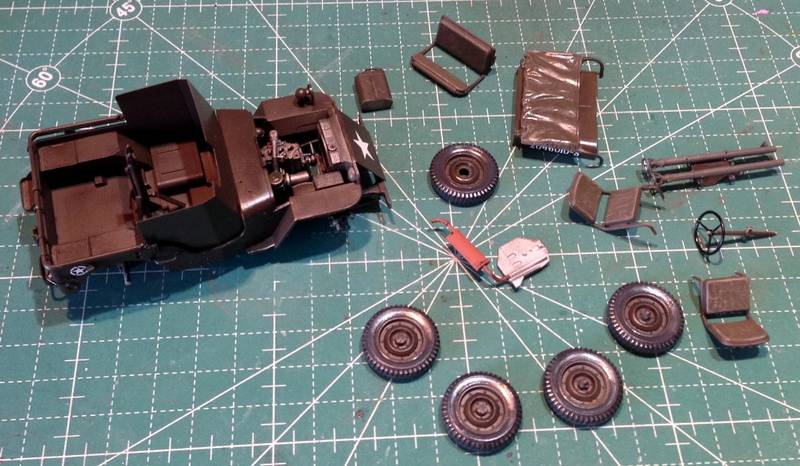
Well, haven't had a spot of bench time in well over a month, but may actually make some progress in the near future. Managed to get the decals on before I had to walk away for a while. Have decided to solve the problem of the bazooka hold-downs by not using any for now. They draw less attention in their absence than they do by being wrong (Thanks DML!) so I'll leave them off and add some proper ones after the campaign has wrapped up. Here's a shot of all the major subassemblies ready for filters, washes, and weathering.

New York, United States
Joined: March 08, 2010
KitMaker: 3,662 posts
Armorama: 3,078 posts
Posted: Thursday, September 25, 2014 - 11:10 AM UTC
Active Campaigns on the bench:
Operation Fall Gelb - Pz.Kpfw. IV Ausf. C
Engineering the Future - M-26 Recovery Vehicle
115 Campaigns completed
California, United States
Joined: August 10, 2012
KitMaker: 1,510 posts
Armorama: 1,443 posts
Posted: Thursday, September 25, 2014 - 11:20 AM UTC
I have DML Shanghai's; yeah my kit's that old, M270 MLRS coming from Poland. Twenty dollars and free shipping, can't beat that.

What cheek! Let them have it!