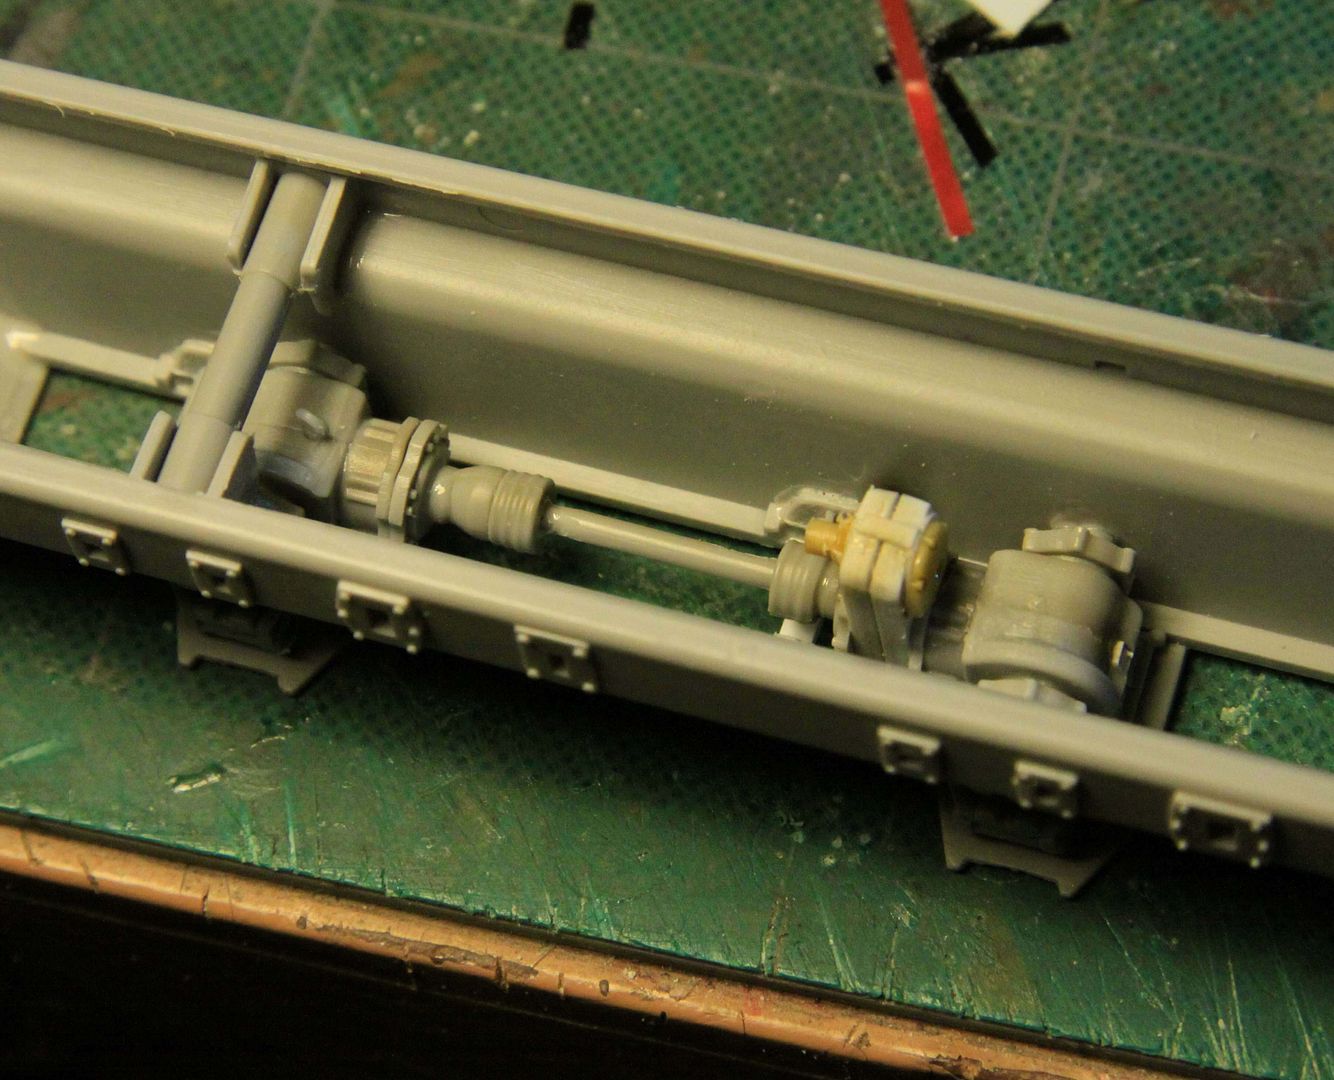
Moving ahead on the MAZ 537 Pusher Tractor.
Here are the semi-scratch built forward final drive unit and the #1 and #2 differentials.
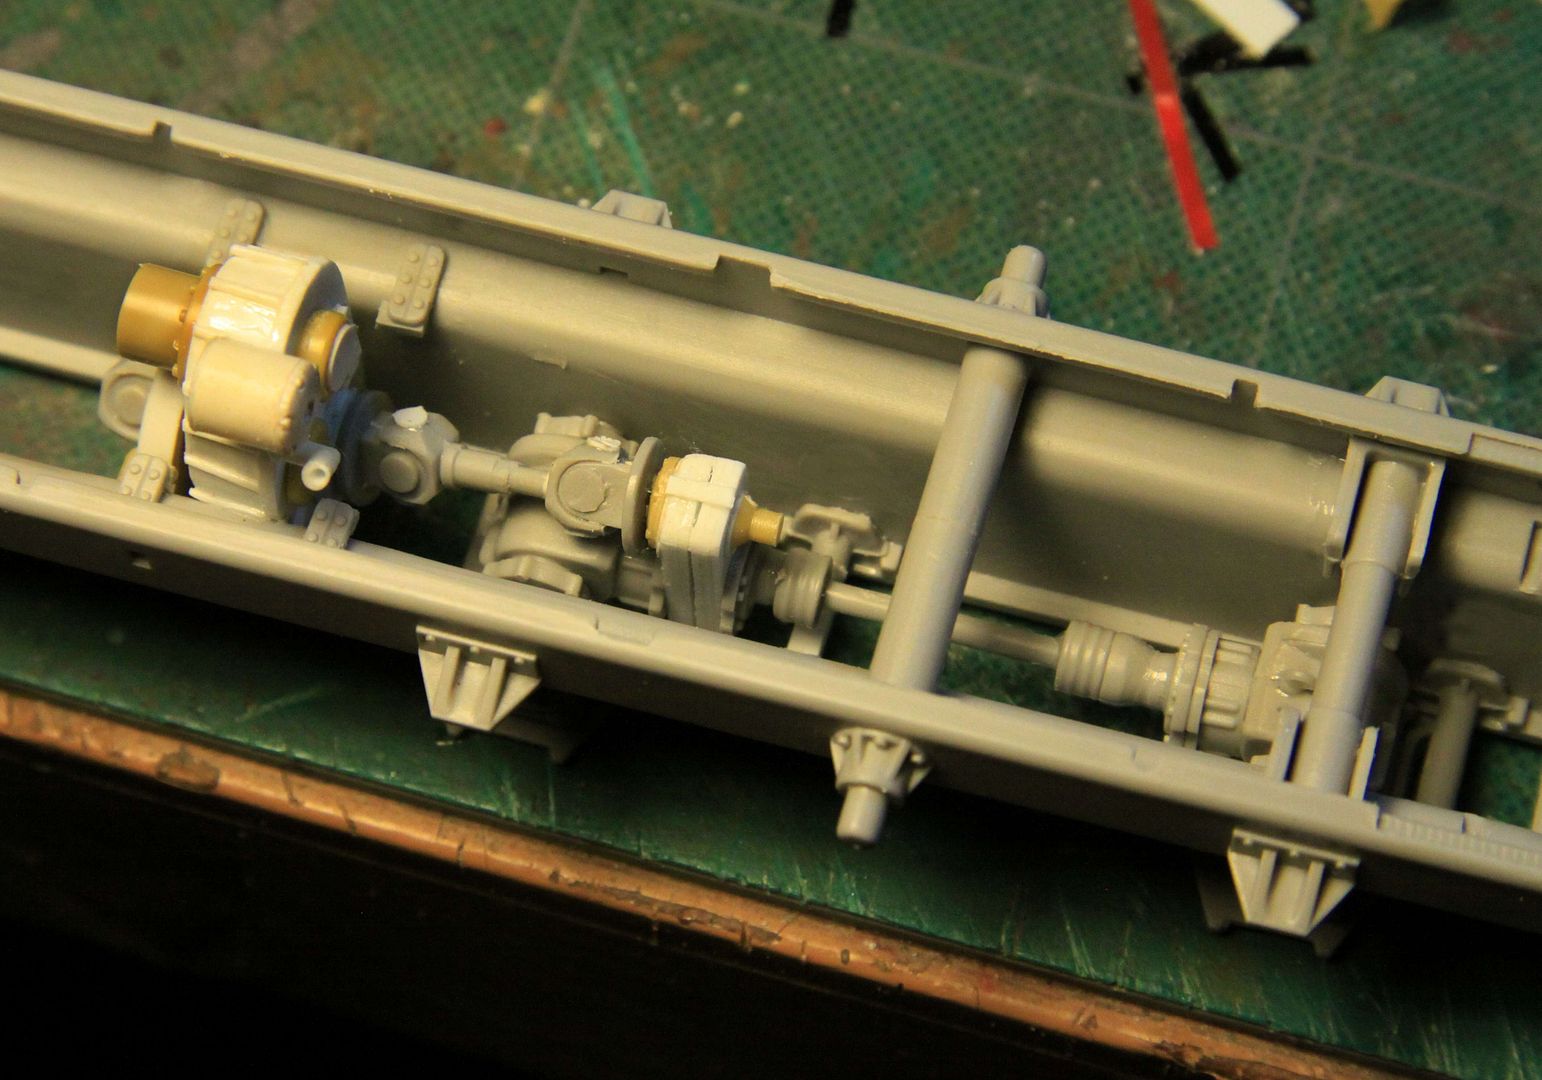
The #3 and #4 rear differentials with their final drive unit as well as the scratch built transfer case.
Hosted by Richard S.
8x8 Campaign
Posted: Wednesday, December 10, 2014 - 10:20 AM UTC
Dukie99
Aargau, Switzerland
Joined: March 10, 2014
KitMaker: 9 posts
Armorama: 9 posts
Joined: March 10, 2014
KitMaker: 9 posts
Armorama: 9 posts
Posted: Wednesday, December 10, 2014 - 09:44 PM UTC
Hi there this is my entry in my very first GB: a BTR-7 with a couple extras and some grunts enjoying the ride.
Bluestab
South Carolina, United States
Joined: December 03, 2009
KitMaker: 2,160 posts
Armorama: 1,906 posts
Joined: December 03, 2009
KitMaker: 2,160 posts
Armorama: 1,906 posts
Posted: Thursday, December 11, 2014 - 11:47 PM UTC
A quick update.
I started on the upper hull. I added some of the hatches. Given the number of small and delicate pieces, I decided to stop and combine the upper and lower hulls. I put those aside to dry.
I decided to jump ahead to the crane. The crane is the key feature of this kit. Exploded view of the parts...sorry for the blur.
Sub-assemblies together. It was a bit testy getting the rods and hinges to all come together at once.
I added a couple of shots of the crane to show the range of movement. The crane can be used for other projects as well. The kit has it posed in stowed position but you should be able to pose it in use. Neat how the color changes on that blue grid background.
The piston rod for the main elevation cylinder #1 is too short. You can only raise the boom a bit before the piston rod pops out of the hydraulic tube housing. It will lift high enough to be posed as if in use.
The upper section #2 will not depress, but it will "hyper-extend".
The end assembly will slide freely. Trumpy included a metal piston rod. Glue it to the head and the metal should slide freely in the tube.
And fitted on the LAV. The crane is pretty limp so if one was to pose it in use...even empty...you'd have to add some sort of adhesive to the main lift cylinder #1.
Trumpeter also includes wire for hydraulic lines. I'll add those later.
And that's where I am at right now. I's a nice little kit.
mvaiano
Sao Paulo, Brazil
Joined: January 24, 2012
KitMaker: 1,054 posts
Armorama: 1,050 posts
Joined: January 24, 2012
KitMaker: 1,054 posts
Armorama: 1,050 posts
Posted: Thursday, December 11, 2014 - 11:51 PM UTC
Nice work Alex!
Cheers!
Marco
Cheers!
Marco
1Modernarmourer
Ontario, Canada
Joined: November 17, 2014
KitMaker: 5 posts
Armorama: 5 posts
Joined: November 17, 2014
KitMaker: 5 posts
Armorama: 5 posts
Posted: Saturday, December 13, 2014 - 08:55 PM UTC
PantherF
Indiana, United States
Joined: June 10, 2005
KitMaker: 6,188 posts
Armorama: 5,960 posts
Joined: June 10, 2005
KitMaker: 6,188 posts
Armorama: 5,960 posts
Posted: Saturday, December 13, 2014 - 08:58 PM UTC
TEN Strykers?!!!!
Jeff
Jeff
1Modernarmourer
Ontario, Canada
Joined: November 17, 2014
KitMaker: 5 posts
Armorama: 5 posts
Joined: November 17, 2014
KitMaker: 5 posts
Armorama: 5 posts
Posted: Saturday, December 13, 2014 - 09:03 PM UTC
Quoted Text
TEN Strykers?!!!!
Jeff
from M1126-M1135 all variant mostly oob
Nito74
Lisboa, Portugal
Joined: March 04, 2008
KitMaker: 5,386 posts
Armorama: 4,727 posts
Joined: March 04, 2008
KitMaker: 5,386 posts
Armorama: 4,727 posts
Posted: Saturday, December 13, 2014 - 09:19 PM UTC
@David
Welcome aboard !!
@Alex
Nice job so far, looking very good !!
@Bon
I have 9 in stash to build, but I'd never work on them at the same time... I'd loose parts and my sanity too ..
Not that I have much left either...
So far it's looking great !! How do you keep track on which build ??
Welcome aboard !!
@Alex
Nice job so far, looking very good !!
@Bon
I have 9 in stash to build, but I'd never work on them at the same time... I'd loose parts and my sanity too ..
Not that I have much left either...
So far it's looking great !! How do you keep track on which build ??
PantherF
Indiana, United States
Joined: June 10, 2005
KitMaker: 6,188 posts
Armorama: 5,960 posts
Joined: June 10, 2005
KitMaker: 6,188 posts
Armorama: 5,960 posts
Posted: Saturday, December 13, 2014 - 09:36 PM UTC
Quoted Text
Quoted TextTEN Strykers?!!!!
Jeff
from M1126-M1135 all variant mostly oob
You're my hero!
Jeff
Giovanni1508
Napoli, Italy
Joined: April 17, 2014
KitMaker: 652 posts
Armorama: 600 posts
Joined: April 17, 2014
KitMaker: 652 posts
Armorama: 600 posts
Posted: Saturday, December 13, 2014 - 09:39 PM UTC
Quoted Text
here is the other strykers I'm building, all 10 models
here is the tops for some comparison
Hi Bon,
This is amazing: ten strikers under construction all together ?
Maybe you've purchased online but clicked ''10'' instead of ''1'' by mistake ?
1Modernarmourer
Ontario, Canada
Joined: November 17, 2014
KitMaker: 5 posts
Armorama: 5 posts
Joined: November 17, 2014
KitMaker: 5 posts
Armorama: 5 posts
Posted: Saturday, December 13, 2014 - 10:49 PM UTC
@ Jeff
thanks Jeff
@Giovani
My LHS gave me a good deal when i bought the stryker line up
@ John
Each Stryker has an individual shelve and plastic boxes for small parts and memo pad stick on to each with checklist on what is done but the hard work will be ahead as suspension wise they are the same(trumpeter) and i also have 4 AFV club
brand M1126,M1128,M1130,M1134 this will be next.
keep in mind i only inlisted the M1127 for the campaign but i will try to finish as much as i can with the line up.
Thanks again guys
Nito74
Lisboa, Portugal
Joined: March 04, 2008
KitMaker: 5,386 posts
Armorama: 4,727 posts
Joined: March 04, 2008
KitMaker: 5,386 posts
Armorama: 4,727 posts
Posted: Sunday, December 14, 2014 - 06:23 AM UTC
Quoted Text
@ John
Each Stryker has an individual shelve and plastic boxes for small parts and memo pad stick on to each with checklist on what is done but the hard work will be ahead as suspension wise they are the same(trumpeter) and i also have 4 AFV club
brand M1126,M1128,M1130,M1134 this will be next.
keep in mind i only inlisted the M1127 for the campaign but i will try to finish as much as i can with the line up.
Thanks again guys
I'll follow that closely.. have the M1128,1130 and 1134 from AFV and the rest of the family from Trumpeter's in stash.
Keep track of things.. it would be quite easy to get lost in all that plastic, misplacing or loosing something.
I'm looking forward to see that production line
mvaiano
Sao Paulo, Brazil
Joined: January 24, 2012
KitMaker: 1,054 posts
Armorama: 1,050 posts
Joined: January 24, 2012
KitMaker: 1,054 posts
Armorama: 1,050 posts
Posted: Sunday, December 14, 2014 - 03:23 PM UTC
Hi guys!
I'm out!
I'll build just one Stryker!
Good luck Bon! I have two Strykers. This M1132 will be my third one.
Cheers!
Marco
I'm out!
I'll build just one Stryker!
Good luck Bon! I have two Strykers. This M1132 will be my third one.
Cheers!
Marco
TankSGT
New Jersey, United States
Joined: July 25, 2006
KitMaker: 1,139 posts
Armorama: 946 posts
Joined: July 25, 2006
KitMaker: 1,139 posts
Armorama: 946 posts
Posted: Wednesday, December 17, 2014 - 01:28 AM UTC
panzerbob01
Louisiana, United States
Joined: March 06, 2010
KitMaker: 3,128 posts
Armorama: 2,959 posts
Joined: March 06, 2010
KitMaker: 3,128 posts
Armorama: 2,959 posts
Posted: Wednesday, December 17, 2014 - 03:14 AM UTC
Tom;
That's a great kit of a cool AC indeed! Go (Geaux), SdKfz 234! And yes, there IS quite a bit of interior included in that box (which, as you noted, would hardly be visible... although one could add a little light inside so that when you peeked down through those tiny turret hatches... only an OCD type would go there, I think! )...
Just skip that inside stuff, which is probably somewhat inaccurate anyway, given the lack of interior detail info available on this rare beast, and button her up! The outside is plenty of good stuff to work on!
I think I'll also take up one of these Dragon 234/x kits for this campaign... but probably will fall on the sword and do one of the open types... They all look so cool and the kits really are full of "modeling pleasure"! But no, I'll not put any tiny lights in to show off my interior bloopers!
Bob
That's a great kit of a cool AC indeed! Go (Geaux), SdKfz 234! And yes, there IS quite a bit of interior included in that box (which, as you noted, would hardly be visible... although one could add a little light inside so that when you peeked down through those tiny turret hatches... only an OCD type would go there, I think! )...
Just skip that inside stuff, which is probably somewhat inaccurate anyway, given the lack of interior detail info available on this rare beast, and button her up! The outside is plenty of good stuff to work on!
I think I'll also take up one of these Dragon 234/x kits for this campaign... but probably will fall on the sword and do one of the open types... They all look so cool and the kits really are full of "modeling pleasure"! But no, I'll not put any tiny lights in to show off my interior bloopers!
Bob
Yeti01012001
England - North West, United Kingdom
Joined: July 28, 2005
KitMaker: 360 posts
Armorama: 334 posts
Joined: July 28, 2005
KitMaker: 360 posts
Armorama: 334 posts
Posted: Wednesday, December 17, 2014 - 03:51 AM UTC
Posted: Wednesday, December 17, 2014 - 09:34 PM UTC
TankSGT
New Jersey, United States
Joined: July 25, 2006
KitMaker: 1,139 posts
Armorama: 946 posts
Joined: July 25, 2006
KitMaker: 1,139 posts
Armorama: 946 posts
Posted: Thursday, December 18, 2014 - 01:46 AM UTC
Quoted Text
Tom;
That's a great kit of a cool AC indeed! Go (Geaux), SdKfz 234! And yes, there IS quite a bit of interior included in that box (which, as you noted, would hardly be visible... although one could add a little light inside so that when you peeked down through those tiny turret hatches... only an OCD type would go there, I think! )...
Just skip that inside stuff, which is probably somewhat inaccurate anyway, given the lack of interior detail info available on this rare beast, and button her up! The outside is plenty of good stuff to work on!
I think I'll also take up one of these Dragon 234/x kits for this campaign... but probably will fall on the sword and do one of the open types... They all look so cool and the kits really are full of "modeling pleasure"! But no, I'll not put any tiny lights in to show off my interior bloopers!
Bob
Bob it does look like a very nice kit the suspension looks to be very detailed. I haven't built German in a long time so I figured this would be a nice way to get back into it. I might leave some vision blocks open but the hull interior is for the spares box.
Tom
Posted: Thursday, December 18, 2014 - 02:53 AM UTC
A build log on the MAZ-537 Pusher Tractor starts at:
http://armorama.com/forums/196250&page=3#1934214
Posted: Thursday, December 18, 2014 - 09:01 PM UTC
Removed by original poster on 12/20/14 - 04:14:16 (GMT).
TankSGT
New Jersey, United States
Joined: July 25, 2006
KitMaker: 1,139 posts
Armorama: 946 posts
Joined: July 25, 2006
KitMaker: 1,139 posts
Armorama: 946 posts
Posted: Sunday, December 21, 2014 - 05:16 AM UTC
Well I started the 234 and immediately after I have ran into trouble. The drive shafts are too short. If the drive knuckles fit into the wheel mounts the dust boots hang in the middle of the shaft. Pictures will follow. So Black Label isn't the only messed up kits
Tom
Tom
panzerbob01
Louisiana, United States
Joined: March 06, 2010
KitMaker: 3,128 posts
Armorama: 2,959 posts
Joined: March 06, 2010
KitMaker: 3,128 posts
Armorama: 2,959 posts
Posted: Sunday, December 21, 2014 - 09:38 AM UTC
Quoted Text
Well I started the 234 and immediately after I have ran into trouble. The drive shafts are too short. If the drive knuckles fit into the wheel mounts the dust boots hang in the middle of the shaft. Pictures will follow. So Black Label isn't the only messed up kits
Tom
Tom;
Uh oh.
Sounds bad!
I don't know at this point what has gone wrong in your build, but something sounds definitely and surprisingly awry, as Dragon has several kits out all sharing the same suspension, and no review nor build that I have seen to-date has said that this suspension does not go together! And a lot of these of all variants have been built and posted...
The complaints I've seen concerning these kits and their suspension are about the lack of being able to set it up turned - one has to do surgery on various linkage bits to get the wheels other than straight-ahead.
I'll hope that you'll find out what went wrong and that the problem will be some specific missed thing (no shame, there, friend, we all get into these messes from time to time...) - I have all of these Dragon 234/x kits and really, really hope that there is no generic short-coming in the suspensions!
Bob
panzerbob01
Louisiana, United States
Joined: March 06, 2010
KitMaker: 3,128 posts
Armorama: 2,959 posts
Joined: March 06, 2010
KitMaker: 3,128 posts
Armorama: 2,959 posts
Posted: Sunday, December 21, 2014 - 09:53 AM UTC
Tom;
Maybe take a look at Henk Meerdink's build article on the Dragon 234/2 on Armorama, 2014?
Look at: https://armorama.kitmaker.net//features/1178&page=2
He posted some explicit pics of that suspension - take a look and see if that is how your bits went together. His apparently worked "as planned" - compare your parts and geometry with his stuff?
Bob
TankSGT
New Jersey, United States
Joined: July 25, 2006
KitMaker: 1,139 posts
Armorama: 946 posts
Joined: July 25, 2006
KitMaker: 1,139 posts
Armorama: 946 posts
Posted: Sunday, December 21, 2014 - 03:45 PM UTC
Well my bad I missed a step. Good old Dragon instructions. Thanks for the link it didn't show the part I missed. Its all good.
Tom
Tom