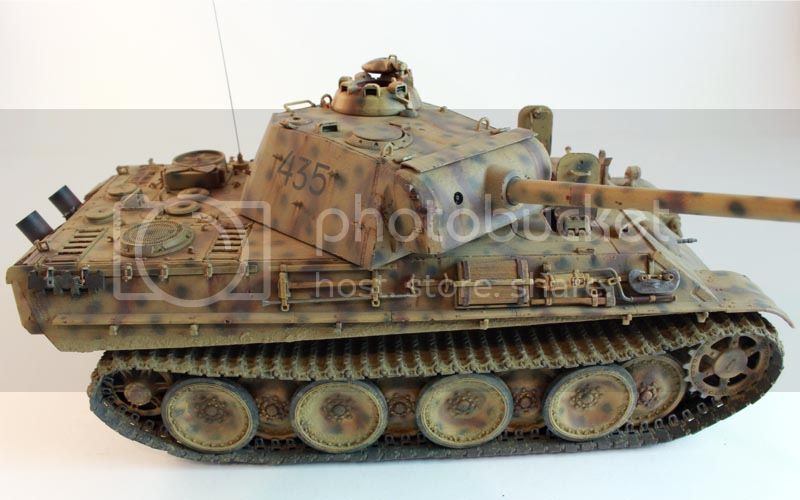
Got the green on. Made it a little 'spikier' than the example in the instructions, but I kinda like it. There will be larger amounts of brown added next to and in between the green. Thoughts, ideas, opinions?:
Keith
Hosted by Richard S.
WWII Panther Tanks!
woltersk
Utah, United States
Joined: May 27, 2003
KitMaker: 1,026 posts
Armorama: 654 posts
Joined: May 27, 2003
KitMaker: 1,026 posts
Armorama: 654 posts
Posted: Friday, December 05, 2014 - 10:05 AM UTC
Motives
Stockholm, Sweden
Joined: October 15, 2013
KitMaker: 444 posts
Armorama: 428 posts
Joined: October 15, 2013
KitMaker: 444 posts
Armorama: 428 posts
Posted: Friday, December 05, 2014 - 10:40 PM UTC
Twins #2
gishman32
Kentucky, United States
Joined: August 10, 2008
KitMaker: 21 posts
Armorama: 19 posts
Joined: August 10, 2008
KitMaker: 21 posts
Armorama: 19 posts
Posted: Saturday, December 06, 2014 - 01:29 AM UTC
Johan & Kevin. Paint job(s) are lookin good on the twins.
Kevin, I dig the "spikiness" of the green. Once the brown goes on, I think that will tone it down a bit if you are worried about spikes.
Motives
Stockholm, Sweden
Joined: October 15, 2013
KitMaker: 444 posts
Armorama: 428 posts
Joined: October 15, 2013
KitMaker: 444 posts
Armorama: 428 posts
Posted: Sunday, December 07, 2014 - 12:02 AM UTC
I have a question regarding the color schemes, hopefully someone knows to answer: I am about to finish my tank in a two-tone scheme, yellow/green, but got unsure if that is a proper finish for a panther D from 1943?
woltersk
Utah, United States
Joined: May 27, 2003
KitMaker: 1,026 posts
Armorama: 654 posts
Joined: May 27, 2003
KitMaker: 1,026 posts
Armorama: 654 posts
Posted: Sunday, December 07, 2014 - 07:07 AM UTC
@Johan--the twin is looking good! I refer to yours as "My Pantha's brutha from anotha builda." (That may be to much of an American colloquialism for non-US readers to find the humor in)
I'm not much on Panther history, but I know at some point during the war all Panthers were delivered to the field in overall Dunkelgelb (desert yellow). It was up to the units to decide on a camo scheme, and up to each tank crew to apply it. Usually the paint was applied using the paint sprayer which came with each vehicle.
@Greg--thanks! I think the brown does improve the look. The Future Floor Wax and oil washes should also help tone things down.
I painted the backside of each armor skirt panel primer red/brown. They are reversible to appear as new panels that have not been painted yet. I may add some 'chalk' factory markings later:
I'm debating adding some color modulation. I plan on leaving the vehicle fairly new looking--not much weathering, undented panels and fenders, etc. Maybe just some water streaks and rust on the tracks.
Keith
IronOwl
Georgia, United States
Joined: January 07, 2013
KitMaker: 572 posts
Armorama: 302 posts
Joined: January 07, 2013
KitMaker: 572 posts
Armorama: 302 posts
Posted: Sunday, December 07, 2014 - 07:36 AM UTC
update photos
Sascha(Ironowl)
Sascha(Ironowl)
IronOwl
Georgia, United States
Joined: January 07, 2013
KitMaker: 572 posts
Armorama: 302 posts
Joined: January 07, 2013
KitMaker: 572 posts
Armorama: 302 posts
Posted: Sunday, December 07, 2014 - 07:38 AM UTC
2nd update photo
should have step 5 finished later tonite
Sascha(Ironowl)
should have step 5 finished later tonite
Sascha(Ironowl)
IronOwl
Georgia, United States
Joined: January 07, 2013
KitMaker: 572 posts
Armorama: 302 posts
Joined: January 07, 2013
KitMaker: 572 posts
Armorama: 302 posts
Posted: Sunday, December 07, 2014 - 07:39 AM UTC
sorry the pics are a little wonky dropped my camera this morning and it hasn't been quite right since .
sascha(Ironowl)
sascha(Ironowl)
gishman32
Kentucky, United States
Joined: August 10, 2008
KitMaker: 21 posts
Armorama: 19 posts
Joined: August 10, 2008
KitMaker: 21 posts
Armorama: 19 posts
Posted: Sunday, December 07, 2014 - 08:33 AM UTC
@keith. The camo is looking awesome.
Motives
Stockholm, Sweden
Joined: October 15, 2013
KitMaker: 444 posts
Armorama: 428 posts
Joined: October 15, 2013
KitMaker: 444 posts
Armorama: 428 posts
Posted: Sunday, December 07, 2014 - 07:16 PM UTC
Quoted Text
@Johan--the twin is looking good! I refer to yours as "My Pantha's brutha from anotha builda." (That may be to much of an American colloquialism for non-US readers to find the humor in)
I'm not much on Panther history, but I know at some point during the war all Panthers were delivered to the field in overall Dunkelgelb (desert yellow). It was up to the units to decide on a camo scheme, and up to each tank crew to apply it. Usually the paint was applied using the paint sprayer which came with each vehicle.
Haha, as a huge consumer of American popular culture I am pretty versed in colloquialisms (although i had to google that word )
Cheers for the painting info, I'll leave it as it is and blame the german tank crew if anyone has anything against it
Nito74
Lisboa, Portugal
Joined: March 04, 2008
KitMaker: 5,386 posts
Armorama: 4,727 posts
Joined: March 04, 2008
KitMaker: 5,386 posts
Armorama: 4,727 posts
Posted: Monday, December 08, 2014 - 02:22 AM UTC
More links to clean..
But one side is done..
Motives
Stockholm, Sweden
Joined: October 15, 2013
KitMaker: 444 posts
Armorama: 428 posts
Joined: October 15, 2013
KitMaker: 444 posts
Armorama: 428 posts
Posted: Tuesday, December 09, 2014 - 05:21 AM UTC
Uh, that's a lot of tracks...
Here's where I'm at:
Got the decals on (still wet from Microsol in pic)
I tried to scratch the skirts with the hair spray method but it turned out a bit heavy handed I think... The color just came off in really big chunks. Hell, even the primer coat lifted in some areas so definitely more work needed there!
Next I will start weathering the tracks and the lower hull
Here's where I'm at:
Got the decals on (still wet from Microsol in pic)
I tried to scratch the skirts with the hair spray method but it turned out a bit heavy handed I think... The color just came off in really big chunks. Hell, even the primer coat lifted in some areas so definitely more work needed there!
Next I will start weathering the tracks and the lower hull
woltersk
Utah, United States
Joined: May 27, 2003
KitMaker: 1,026 posts
Armorama: 654 posts
Joined: May 27, 2003
KitMaker: 1,026 posts
Armorama: 654 posts
Posted: Wednesday, December 10, 2014 - 08:32 AM UTC
gishman32
Kentucky, United States
Joined: August 10, 2008
KitMaker: 21 posts
Armorama: 19 posts
Joined: August 10, 2008
KitMaker: 21 posts
Armorama: 19 posts
Posted: Wednesday, December 10, 2014 - 10:12 AM UTC
Greetings all. Made more progress on kitty #2.
As I am building a IR panther, figured it needed one of those armored boxes to store the viewers. So out came the styrene. The box is bigger than the references I found on the interwebs but I figured there is going to be three on the tank, so needed a bigger box.
Also was able to move on to painting. I am going with a splinter scheme. Unfortunately I didn't get a pic of all the tape!! The results are below.
I'll be adding brown to the camo scheme once my eyes feel better.
bulivyf
Vendor
Praha, Czech Republic
Joined: April 03, 2006
KitMaker: 2,450 posts
Armorama: 2,409 posts
Joined: April 03, 2006
KitMaker: 2,450 posts
Armorama: 2,409 posts
Posted: Wednesday, December 10, 2014 - 03:27 PM UTC
Bonaparte84
Hessen, Germany
Joined: July 17, 2013
KitMaker: 338 posts
Armorama: 331 posts
Joined: July 17, 2013
KitMaker: 338 posts
Armorama: 331 posts
Posted: Wednesday, December 10, 2014 - 04:31 PM UTC
Hey all,
what I see going on here is lovely!
@ Greg, love that splinter camo look. Will use these pics as inspiration for some what if 1946 work...
The resin tracks from OKB Grigorov I ordered and paid on Novembre 25th finally arrived today... The delivery was delayed due to Bulgarian customs opening and checking the package... I wonder what they thought, when they saw these ABSOLUTELY AWESOME PANTHER TRACKS!!!!
See for yourself:
OKB is in grey, the tan track is a DS sample from Dragon, for comparison. I have never seen anything as perfect as those OKB tracks in Braille sacle so far!
There is very little flash in some of the holes where the sprockets enter, but it's ultra thin and removed very easily.
I wouldn't call that "cleaning", really...
Some more flash can be found in the guiding teeth, which are - in principle - hollowed out. Again, no real clean-up necessary, as you can just punch through the flash with a fine drill.
Removing the tracks from the pouring block is very easy as well, you just cut along the side of the tracks with a sharp scalpel, no further cleaning needed.
The tracks have absolute crisp detail, there is no warping whatsoever, and they bend nicely and very naturally. I'm not even sure one needs to use heat or anything to fit them around the sprocket wheel, but I will check that out.
By now you will have understood that I'm very happy with these tracks, they are worth every Cent! Can't wait to work with them!
Keep up the good work!
Cheers
Nicolas
PantherF
Indiana, United States
Joined: June 10, 2005
KitMaker: 6,188 posts
Armorama: 5,960 posts
Joined: June 10, 2005
KitMaker: 6,188 posts
Armorama: 5,960 posts
Posted: Wednesday, December 10, 2014 - 07:36 PM UTC
Whew! Awesome work guys! I need to catch up now!
Welcome Miloslav! That is a nice choice there.
Jeff
Welcome Miloslav! That is a nice choice there.
Jeff
suikmoto
Tartu, Estonia
Joined: June 30, 2014
KitMaker: 152 posts
Armorama: 92 posts
Joined: June 30, 2014
KitMaker: 152 posts
Armorama: 92 posts
Posted: Wednesday, December 10, 2014 - 07:43 PM UTC
I just built 1/72 panther d late and 5.5cm flakpz based on panther hull in mid november.
Btw all builds here are wery nice.
Karl
P.S flakpz skirts are removable.
Btw all builds here are wery nice.
Karl
P.S flakpz skirts are removable.
ColinEdm
Associate Editor
Alberta, Canada
Joined: October 15, 2013
KitMaker: 1,355 posts
Armorama: 1,229 posts
Joined: October 15, 2013
KitMaker: 1,355 posts
Armorama: 1,229 posts
Posted: Wednesday, December 10, 2014 - 08:27 PM UTC
Wow, some beautiful work happening here, love the splinter camo Greg, and lots of us doing the DML Panther G! I will have to post my finished pics up soon.
Motives
Stockholm, Sweden
Joined: October 15, 2013
KitMaker: 444 posts
Armorama: 428 posts
Joined: October 15, 2013
KitMaker: 444 posts
Armorama: 428 posts
Posted: Friday, December 12, 2014 - 03:31 AM UTC
Wow, nice job everyone!
Greg: very nice job on your modifications, It looks very modern all of a sudden with the added electronics and splinter cammo
I started my weathering sequence (which means do everyone thing in a random order and see what happens )
Upper hull and turret got a pinwash of burnt umber. Lower hull has got pinwash + pigments. Hopefully I have time to finish the wheels up tomorrow to the point where I can assemble the tracks.
spacewolfdad
England - West Midlands, United Kingdom
Joined: May 23, 2010
KitMaker: 642 posts
Armorama: 593 posts
Joined: May 23, 2010
KitMaker: 642 posts
Armorama: 593 posts
Posted: Friday, December 12, 2014 - 06:57 AM UTC
Quoted Text
Hey all,
what I see going on here is lovely!
@ Greg, love that splinter camo look. Will use these pics as inspiration for some what if 1946 work...
The resin tracks from OKB Grigorov I ordered and paid on Novembre 25th finally arrived today... The delivery was delayed due to Bulgarian customs opening and checking the package... I wonder what they thought, when they saw these ABSOLUTELY AWESOME PANTHER TRACKS!!!!
See for yourself:
OKB is in grey, the tan track is a DS sample from Dragon, for comparison. I have never seen anything as perfect as those OKB tracks in Braille sacle so far!
There is very little flash in some of the holes where the sprockets enter, but it's ultra thin and removed very easily.
I wouldn't call that "cleaning", really...
Some more flash can be found in the guiding teeth, which are - in principle - hollowed out. Again, no real clean-up necessary, as you can just punch through the flash with a fine drill.
Removing the tracks from the pouring block is very easy as well, you just cut along the side of the tracks with a sharp scalpel, no further cleaning needed.
The tracks have absolute crisp detail, there is no warping whatsoever, and they bend nicely and very naturally. I'm not even sure one needs to use heat or anything to fit them around the sprocket wheel, but I will check that out.
By now you will have understood that I'm very happy with these tracks, they are worth every Cent! Can't wait to work with them!
Keep up the good work!
Cheers
Nicolas
Hi Nicolas,
I have used OKB tracks recently and can concur with your assessment, they really are that good. To bend them around sprockets and idlers is not a problem, but I found a little heat applied with a hairdryer on low setting will soften them enough to get a good fit.
OKB Winterketten for PzIV showing fit around sprocket and idler...
And for those who wonder what the fuss is about here is a picture of 1/35 Fruil Panther track next to the OKB-Grigorov Resin track...
Look forward to seeing your build Nicolas, I will be doing a Mid A with the OKB tracks.
All the best,
Paul
ColinEdm
Associate Editor
Alberta, Canada
Joined: October 15, 2013
KitMaker: 1,355 posts
Armorama: 1,229 posts
Joined: October 15, 2013
KitMaker: 1,355 posts
Armorama: 1,229 posts
Posted: Friday, December 12, 2014 - 09:48 AM UTC
My Balaton G late is all done! Think I'll figure out a diorama and some figures later. Still figuring out my new camera so pics aren't the best.
Motives
Stockholm, Sweden
Joined: October 15, 2013
KitMaker: 444 posts
Armorama: 428 posts
Joined: October 15, 2013
KitMaker: 444 posts
Armorama: 428 posts
Posted: Saturday, December 13, 2014 - 03:36 AM UTC
nice job Colin! Looks like your Panther saw it's share of combat Congrats on finishing
wedgetail53
Queensland, Australia
Joined: October 02, 2008
KitMaker: 658 posts
Armorama: 629 posts
Joined: October 02, 2008
KitMaker: 658 posts
Armorama: 629 posts
Posted: Saturday, December 13, 2014 - 05:16 AM UTC
Colin
Looks really good - like the shell scrapes. It's interesting, and I'm not for one moment criticising your creation, but almost all of us at one time or another put shell strikes on our tanks.
What we seem to forget, however, is that bullets and shrapnel leave marks as well, as illustrated by this Canadian M4A3E8 in Vancouver:
Almost every surface of this vehicle had similar marks.
Regards
Rob
ColinEdm
Associate Editor
Alberta, Canada
Joined: October 15, 2013
KitMaker: 1,355 posts
Armorama: 1,229 posts
Joined: October 15, 2013
KitMaker: 1,355 posts
Armorama: 1,229 posts
Posted: Saturday, December 13, 2014 - 08:13 AM UTC
Thanks Johan!
Thanks Rob, I guess those ones don't normally show up too well on the wartime photos, whereas the bigger strikes are much more common, but good point!