Finally signed up, looks like I should be able to squeeze something in. No clue as to what though.
Kimmo
Hosted by Richard S.
Campaign :: Improve your figures!
Thudius

Joined: October 22, 2012
KitMaker: 1,194 posts
Armorama: 1,077 posts

Posted: Thursday, March 05, 2015 - 06:47 PM UTC
BravoTwoZero

Joined: June 11, 2009
KitMaker: 461 posts
Armorama: 370 posts

Posted: Thursday, March 05, 2015 - 10:28 PM UTC
Face painting - The reveal!
Here is my first few attempts at face painting using Vallejo's Face Painting Set, item VJ70119.
Here are pictures of the Knight:


And here are pictures of the German:


Using the various references I have such as books, DVDs and Youtube, I employed the wet pallete technique. Although the eyebrows leave much to be desired, I am quite happy with the results. To date, these are one of the better ones I have painted. I guess I'll just keep practicing to get even more better.
Here is my first few attempts at face painting using Vallejo's Face Painting Set, item VJ70119.
Here are pictures of the Knight:


And here are pictures of the German:


Using the various references I have such as books, DVDs and Youtube, I employed the wet pallete technique. Although the eyebrows leave much to be desired, I am quite happy with the results. To date, these are one of the better ones I have painted. I guess I'll just keep practicing to get even more better.
erichvon

Joined: January 17, 2006
KitMaker: 1,694 posts
Armorama: 1,584 posts

Posted: Friday, March 06, 2015 - 01:56 AM UTC
Joseph...Only one word. ...Awesome! That is incredible work. Not only on the faces but the armour actually looks like metal. Top work Joseph!

justsendit

Joined: February 24, 2014
KitMaker: 3,033 posts
Armorama: 2,492 posts

Posted: Friday, March 06, 2015 - 03:33 AM UTC
Joseph, Nice! Perfect five-oclock shadow on the German Soldier!
So you're blending acrylics only ... no oils?
So you're blending acrylics only ... no oils?
Mar-74

Joined: May 04, 2003
KitMaker: 679 posts
Armorama: 409 posts

Posted: Friday, March 06, 2015 - 08:16 AM UTC
Excellent work Joseph!

Mar-74

Joined: May 04, 2003
KitMaker: 679 posts
Armorama: 409 posts

Posted: Friday, March 06, 2015 - 04:07 PM UTC
The build of my first figure is coming along nicely, theres a fair bit of a gap though in the great coat, so after reading about that green stuff on here I ordered some and will try for the first time to improve my figure with it later.
heres where im at so far,


heres where im at so far,

justsendit

Joined: February 24, 2014
KitMaker: 3,033 posts
Armorama: 2,492 posts

Posted: Friday, March 06, 2015 - 08:05 PM UTC
Hi Martin, I'm new to 'The Green Stuff' as well and have only done small experiments thus far. One thing I have learned is, don't mix a ratio of 1:1 — didn't like that at all! It was difficult to mix and apply, the result was grainy and it stuck to my tools to the point where it was nearly impossible to clean them! Since then, I've been trying out a mix with a very small portion of the 'Blue' (hardener) which seems very promising.
—mike
—mike
Panzerace

Joined: November 30, 2004
KitMaker: 459 posts
Armorama: 109 posts

Posted: Friday, March 06, 2015 - 08:50 PM UTC
JackG

Joined: May 28, 2006
KitMaker: 172 posts
Armorama: 122 posts

Posted: Friday, March 06, 2015 - 09:52 PM UTC
Green Stuff - some things I've learned or read about this putty over the past few years:
- adding less blue part lengthens drying time. New to me is that it is less grainy this way, really haven't noticed. Maybe because it is softer and easier to smooth out?
- can dip tools, (and finger tips) into water to cut down the stickiness. Some also use vaseline, or talc powder. These latter two will inhibit it's adhesive property if you are creating a shape to be attached later.
- when fully cured, it still has some rubber like quality, which isn't the best for sanding
- for the above reason, it has been suggested to mix 50/50 (or more) with another sculpting medium, such as Apoxie Sculpt
regards,
Jack
-

justsendit

Joined: February 24, 2014
KitMaker: 3,033 posts
Armorama: 2,492 posts

Posted: Friday, March 06, 2015 - 10:15 PM UTC
Thanks to both Gary and Jack for the 'Green Stuff' information. I'm not the brightest bulb in the Chemistry Lab but with your help, I think I'm beginning to understand now. 
—mike

—mike

Mar-74

Joined: May 04, 2003
KitMaker: 679 posts
Armorama: 409 posts

Posted: Saturday, March 07, 2015 - 05:11 PM UTC
Thanks All!, Been playing with green stuff all afternoon, tricky stuff at first but I worked around it by keeping everything involved with it wet. Will be playing around tomorrow again so will definitely be trying less Blue!!
Thanks again.
Thanks again.
erichvon

Joined: January 17, 2006
KitMaker: 1,694 posts
Armorama: 1,584 posts

Posted: Sunday, March 08, 2015 - 04:16 PM UTC
Martin the green stuff I use is the Squadron green putty that comes in a tube like filler and is a similar consistency, maybe a little thicker. As it is fast drying it is really easy to use and work onto the figure. I tried Milliput a few years ago but didn't like mixing the two parts and made a right mess of my desk..lol
Neo

Joined: January 20, 2005
KitMaker: 916 posts
Armorama: 758 posts

Posted: Sunday, March 08, 2015 - 06:40 PM UTC
Joseph - The German head is outstanding.
Almost finished w/ my figure's head.
Lucky no painting but making the gas mask was pain in the butt...


Should look similar to this when done (photo for discussion only). I have to blend the head / hood to body.

Almost finished w/ my figure's head.
Lucky no painting but making the gas mask was pain in the butt...


Should look similar to this when done (photo for discussion only). I have to blend the head / hood to body.


BravoTwoZero

Joined: June 11, 2009
KitMaker: 461 posts
Armorama: 370 posts

Posted: Sunday, March 08, 2015 - 08:26 PM UTC
Quoted Text
Joseph, Nice! Perfect five-oclock shadow on the German Soldier!
So you're blending acrylics only ... no oils?
Thanks very much Karl, Mike and Martin. And the answer to your question Mike, is yes, I blended using acrylics only. Actually, it was more glazing that blending. I still haven't figured it out that well, but at least my initial attempts looked like the different shades got blended.
jasperck

Joined: December 14, 2010
KitMaker: 79 posts
Armorama: 79 posts

Posted: Monday, March 09, 2015 - 02:35 AM UTC
Stellar work, everyone.
Joseph – great faces. I've noticed that the Vallejo skin tones require either a lot more or a lot less thinner than other colors from their range... It could just be my set.
I've spent the past week finishing up faces and shirts (and starting a KV-1). In the past I've done what I call a "comic book effect" for black uniforms that involves lots of light drybrushing with shades of blue, red, etc. to make black uniforms look more interesting. I don't want to do that on these figures because I want them to look a little more realistic... Does anyone have any tips on how to make black uniforms look a little more lively?

Thudius

Joined: October 22, 2012
KitMaker: 1,194 posts
Armorama: 1,077 posts

Posted: Monday, March 09, 2015 - 02:48 AM UTC
Quoted Text
Stellar work, everyone.
Joseph – great faces. I've noticed that the Vallejo skin tones require either a lot more or a lot less thinner than other colors from their range... It could just be my set.
I've spent the past week finishing up faces and shirts (and starting a KV-1). In the past I've done what I call a "comic book effect" for black uniforms that involves lots of light drybrushing with shades of blue, red, etc. to make black uniforms look more interesting. I don't want to do that on these figures because I want them to look a little more realistic... Does anyone have any tips on how to make black uniforms look a little more lively?
Most Vallejos seem to need different amounts of thinner, mostly depending on shade and application. Game Colors require more. As to livening up black, mix in touches of browns, blues or purples and apply as a glaze. They'll give you some added depth and variance.
Kimmo

jasperck

Joined: December 14, 2010
KitMaker: 79 posts
Armorama: 79 posts

Posted: Monday, March 09, 2015 - 04:48 AM UTC
Thanks! I'll post more pictures soon... I've never spent this long on shadows and highlights before. After all, the point of this campaign is to improve, and I think I have.

justsendit

Joined: February 24, 2014
KitMaker: 3,033 posts
Armorama: 2,492 posts

Posted: Monday, March 09, 2015 - 06:37 AM UTC
Tom, Cool gas mask! — can't wait to see the filtration can added! 
—mike

—mike

justsendit

Joined: February 24, 2014
KitMaker: 3,033 posts
Armorama: 2,492 posts

Posted: Monday, March 09, 2015 - 07:29 AM UTC
Hi guys & gals! 
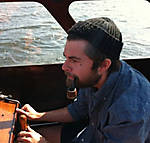
 Here's another figure installment for my out of control diorama!
The other night, MB’s ’Women of WWII’ figures poured out onto my workbench. After sorting through the sprues, here’s what I came up with: Angry Birds! One lady openly voices her disgust with Soviet occupation, while another woman consoles her two daughters who’ve been upset by the escalating event.
Evergreen "wedgies" inserted to alter original supermodel look. Arms were rotated, heads lowered and turned, etc.


MB back panel box art.

Since Hornet only produces five female heads (none of them very angry), I decided to test the improvement waters by reshaping one of the male heads into a female one. I began by shaving/sanding/buffing the neck, chin, jaw, cheekbone, eyebrow and nose features — went too far, broke the nose and turned her into a sphinx! … Then she (or he?) was really pissed at me!
  However, I recovered by repairing the nose with a tiny dab of CA and all is good with us … I hope!


I hope this will all make sense in the end. Comments welcome.
—mike

 Here's another figure installment for my out of control diorama!
The other night, MB’s ’Women of WWII’ figures poured out onto my workbench. After sorting through the sprues, here’s what I came up with: Angry Birds! One lady openly voices her disgust with Soviet occupation, while another woman consoles her two daughters who’ve been upset by the escalating event.
Evergreen "wedgies" inserted to alter original supermodel look. Arms were rotated, heads lowered and turned, etc.


MB back panel box art.

Since Hornet only produces five female heads (none of them very angry), I decided to test the improvement waters by reshaping one of the male heads into a female one. I began by shaving/sanding/buffing the neck, chin, jaw, cheekbone, eyebrow and nose features — went too far, broke the nose and turned her into a sphinx!
 … Then she (or he?) was really pissed at me!
  However, I recovered by repairing the nose with a tiny dab of CA and all is good with us … I hope!

I hope this will all make sense in the end. Comments welcome.
—mike
Motives

Joined: October 15, 2013
KitMaker: 444 posts
Armorama: 428 posts

Posted: Monday, March 09, 2015 - 12:44 PM UTC
Really inspiring to check this thread!
Mike, love how you with very small changes create new and varied expressions in the stock figgies.
Tiny update from me. As previously mentioned my bench time is severely limited atm and what time I have I've poured into this beast:

Trying to finish for 08-Open. Modelling show here in Stockholm!
Here is one of the two tommies up and about (actually have his buddy almost done too but no pics):

Hopefully next week i get more time to devote to modelling madness
Mike, love how you with very small changes create new and varied expressions in the stock figgies.
Tiny update from me. As previously mentioned my bench time is severely limited atm and what time I have I've poured into this beast:

Trying to finish for 08-Open. Modelling show here in Stockholm!
Here is one of the two tommies up and about (actually have his buddy almost done too but no pics):

Hopefully next week i get more time to devote to modelling madness

ironelf

Joined: January 27, 2010
KitMaker: 235 posts
Armorama: 174 posts

Posted: Monday, March 09, 2015 - 06:08 PM UTC
I'm a fan of Adam Savage's "One Day Build" videos on Youtube. He makes very cool stuff which is usually some movie prop or other from Harrison Ford's various weapons in Star Wars and Blade Runner to a full size Terminator. This one is about building and painting a resin figure - http://youtu.be/CBHQ7lQGOf0 He works fast, too fast I think. On the other hand, he does get a lot accomplished and the results range from amazing to good. The video is long, but at the very end you see Norm's rendition of the figure as a statue which is pretty impressive.
I enjoyed it even if I don't plan on going that fast!
Cheers!
Chris
I enjoyed it even if I don't plan on going that fast!
Cheers!
Chris
AnalogKid

Joined: December 20, 2014
KitMaker: 46 posts
Armorama: 42 posts

Posted: Tuesday, March 10, 2015 - 06:31 AM UTC
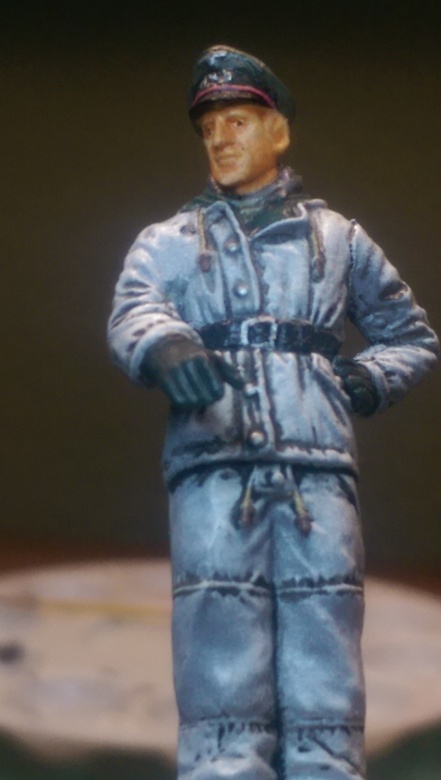
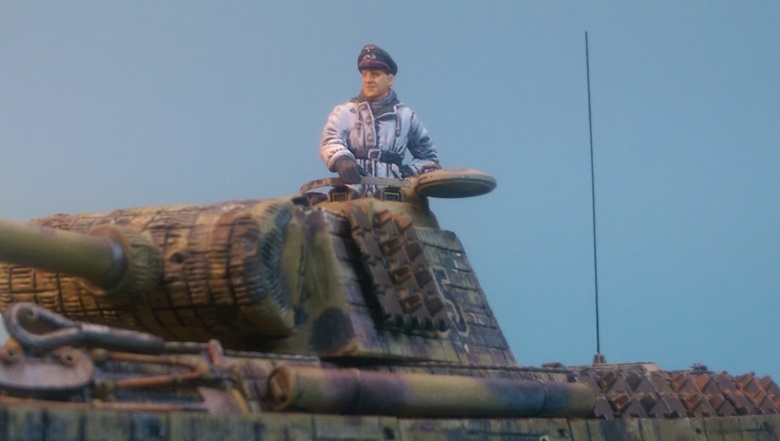
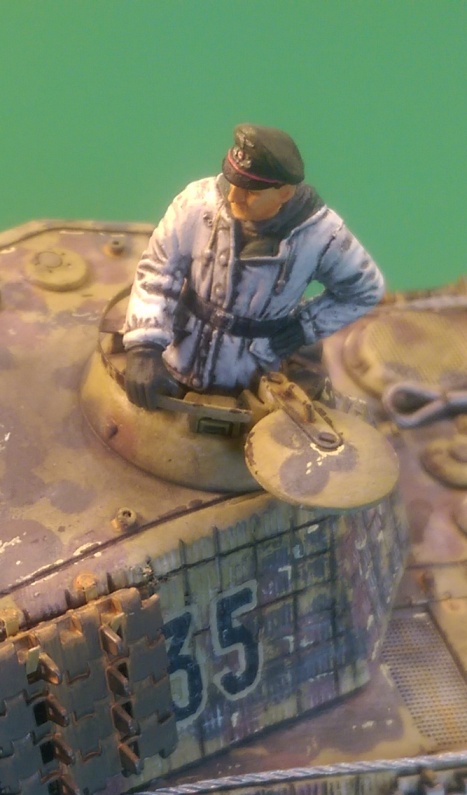
Hello everyone...this my final post for this forum/campaign...pics of my finished figure. I have enjoyed everyone's contributions...some fantastic work going on here.
Updates from my last post is the addition of an oil wash followed with some shading on the face. I did the face in Vallejo acrylics, much like the rest of the figure. I also did some dry-brushing with white acrylic over the top but that is hard to pick up in these photos. The only non-acrylic used was the oil wash to bring out the recessed details. My Panther G now has a commander!
While I like the white winter coat the color really messed with my camera. I am using my smartphone camera and while adequate (and easy!) it is not quite up to the job as my DSLR. I need to stop being lazy and bust it out to use for my model shots!
-Len


27-1025

Joined: September 16, 2004
KitMaker: 1,281 posts
Armorama: 1,222 posts

Posted: Tuesday, March 10, 2015 - 08:42 AM UTC
Since I don't have a 'technique' of my own I will give credit for copying the author in the latest issue of MMIR.


I started with the head and primed it with Tamiya Primer and once that dried gave it couple of thinned coats of Vallejo Beige Brown with an airbrush. Will let that dry for a couple of days before going to the brushes and palate.


Next I worked on attaching the arms. There will be the need for some putty work for some seams and minor pinholes. The figures is depicted leaping across an obstacle of some sort. Not sure if I'll use the provided base or come up with something a little more elaborate.


I started with the head and primed it with Tamiya Primer and once that dried gave it couple of thinned coats of Vallejo Beige Brown with an airbrush. Will let that dry for a couple of days before going to the brushes and palate.


Next I worked on attaching the arms. There will be the need for some putty work for some seams and minor pinholes. The figures is depicted leaping across an obstacle of some sort. Not sure if I'll use the provided base or come up with something a little more elaborate.


Thudius

Joined: October 22, 2012
KitMaker: 1,194 posts
Armorama: 1,077 posts

Posted: Tuesday, March 10, 2015 - 09:57 PM UTC
Finally settled on a couple of figures. I was going to do the General that was in the Dragon Pz IV E kit, but I can't find the blasted thing. I wanted to try a leather coat to get some practice in for my next project. Oh well. You guys will have to suffer through an airborne trooper and a medic from Dragon's 101st Bastogne and Advance to the Rhine sets. I'll try to use heads from Legend and replace the straps and buckles on both these guys. The heads in the kits aren't bad, and rather surprisingly, some of the Legend heads are just so-so in terms of molding quality. Fortunately I have quite a few sets to choose from. I have an Aber set of buckles and straps that might do the job, if not, wire and stretched sprue will suffice.
Obligatory date stamp shot

And after initial clean up and blu tack.


The poses are good, just enough movement on the trooper and the medic has a nice shifted stance. The fit is pretty good, considering the complexity of the greatcoat in particular. Now I can go in and do undercuts and a proper cleaning of seams and then replacing details.
Kimmo
Obligatory date stamp shot

And after initial clean up and blu tack.


The poses are good, just enough movement on the trooper and the medic has a nice shifted stance. The fit is pretty good, considering the complexity of the greatcoat in particular. Now I can go in and do undercuts and a proper cleaning of seams and then replacing details.
Kimmo
erichvon

Joined: January 17, 2006
KitMaker: 1,694 posts
Armorama: 1,584 posts

Posted: Tuesday, March 10, 2015 - 11:10 PM UTC
Finished the two surgically modified dead SS troops. Did quite a bit of messing about with the Pea pattern which I'm reasonably happy with now.
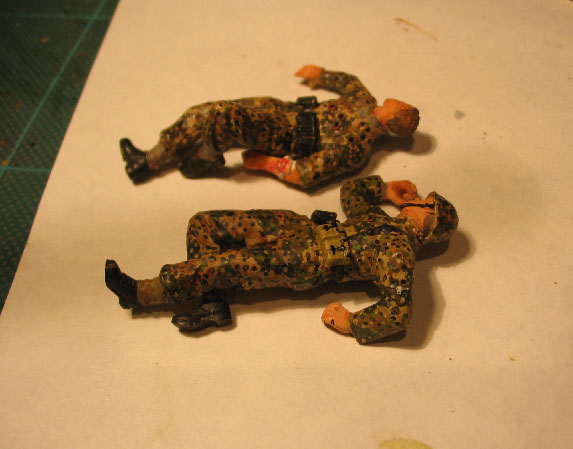
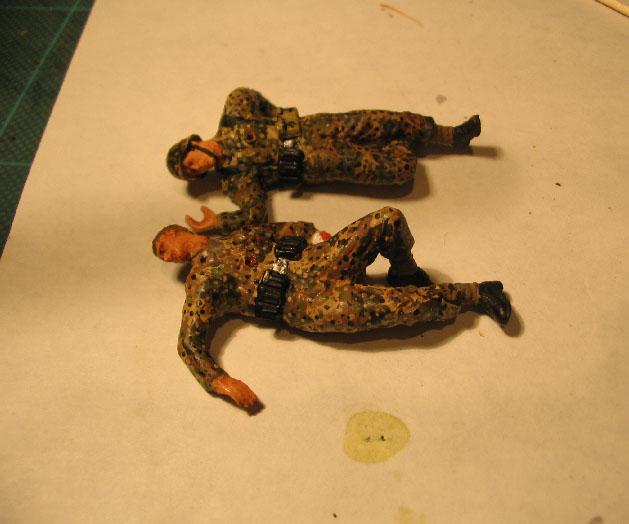
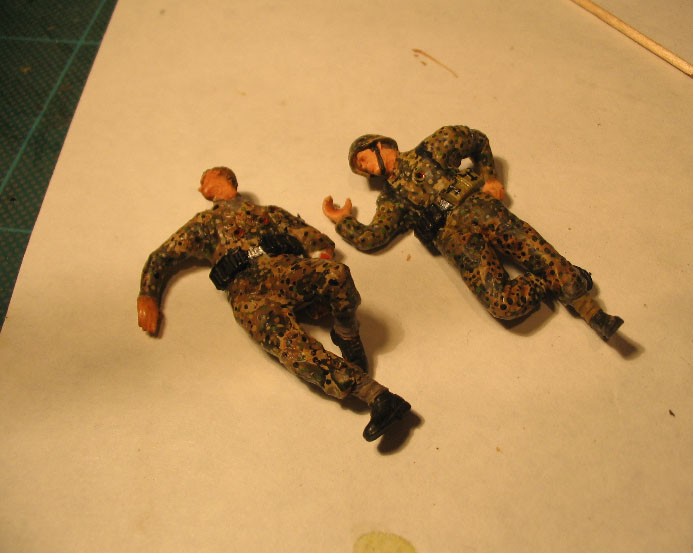
They'll be lying next to knocked out Sdkfz 250/3 in my Arnhem dio. I still need to build a few more though so hopefully by the time I've finished I should have sorted my Pea Pattern technique.


They'll be lying next to knocked out Sdkfz 250/3 in my Arnhem dio. I still need to build a few more though so hopefully by the time I've finished I should have sorted my Pea Pattern technique.
 |


