

Hosted by Richard S.
Campaign :: Improve your figures!
Motives

Joined: October 15, 2013
KitMaker: 444 posts
Armorama: 428 posts
Posted: Monday, February 23, 2015 - 06:12 PM UTC
Nice to see some 1/16 Joseph! nice work sofar
Kinggeorges

Joined: August 31, 2005
KitMaker: 1,380 posts
Armorama: 845 posts

Posted: Tuesday, February 24, 2015 - 03:26 PM UTC
Nice works all around. Keep them coming !
Gary, excellent setting. I second Johan on the straps: looks like they are made of lead foils, ie scratchbuilt !
Mike, common, only 15 figures left to modify and paint !
I made good progress on my running (helpless half sukken guy) guy. I'll try to post something tonight.
Julien
Gary, excellent setting. I second Johan on the straps: looks like they are made of lead foils, ie scratchbuilt !
Mike, common, only 15 figures left to modify and paint !
I made good progress on my running (helpless half sukken guy) guy. I'll try to post something tonight.
Julien

yolk24

Joined: November 07, 2007
KitMaker: 40 posts
Armorama: 30 posts
Posted: Tuesday, February 24, 2015 - 09:49 PM UTC
Hello,
My little updates,
Cleaning and dry fitting...


Next step will be washing and priming...
Ty.
My little updates,
Cleaning and dry fitting...


Next step will be washing and priming...
Ty.

BravoTwoZero

Joined: June 11, 2009
KitMaker: 461 posts
Armorama: 370 posts
Posted: Tuesday, February 24, 2015 - 11:19 PM UTC
Thanks Johan, the Miniart figure did have a lot of flash and took longer to assemble but it looks great. I am pretty psyched to try out painting them.
Hi there Jessie, that Verlinden figure is new to me. Looks great! Are you going for a white smock like the box art? Or are you going to make it camo pattern?
Mike, I like how the figures to your vignette are turning out. Just with the WIP pictures you are posting, you are already capturing the essence of your reference photo.

27-1025
Joined: September 16, 2004
KitMaker: 1,281 posts
Armorama: 1,222 posts
Posted: Wednesday, February 25, 2015 - 12:00 AM UTC
Hi all. Will give this a try. It's a Jeff Shiu 120mm figure I've had in the pile for a while now.


Motives
Joined: October 15, 2013
KitMaker: 444 posts
Armorama: 428 posts
Posted: Wednesday, February 25, 2015 - 02:27 AM UTC
Quoted Text
Hi all. Will give this a try. It's a Jeff Shiu 120mm figure I've had in the pile for a while now.
Oh, wow. He looks great!
Kinggeorges
Joined: August 31, 2005
KitMaker: 1,380 posts
Armorama: 845 posts
Posted: Wednesday, February 25, 2015 - 03:36 AM UTC
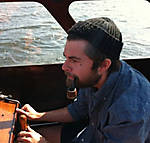
bonsoir,
Here are some pics of the running man.
I decided to make him as a french unit, Commando de France, Brigade de Choc. The head comes from the Dragon german cossack set. I told to myself that the mustache would make it even more French
As you can see the front pocket are gone after some xacto work. I drilled the holes for his neck and right hand, adding some volume. I drilled also two holes in the right hand for a better fit with the ammunition box handle. In the back I made the two seewing lines characteristic of the M41 jacket. Beret as been done with Andrea milliput which I love for its smoothness. Believe me, finding the correct shape for a beret is a nightmare.
Next step: the accessoire such as Bar ammunitions belt, ammunition bandoliers etc..


by the way, Johan, where is your project ?????
Julien
Here are some pics of the running man.
I decided to make him as a french unit, Commando de France, Brigade de Choc. The head comes from the Dragon german cossack set. I told to myself that the mustache would make it even more French
As you can see the front pocket are gone after some xacto work. I drilled the holes for his neck and right hand, adding some volume. I drilled also two holes in the right hand for a better fit with the ammunition box handle. In the back I made the two seewing lines characteristic of the M41 jacket. Beret as been done with Andrea milliput which I love for its smoothness. Believe me, finding the correct shape for a beret is a nightmare.
Next step: the accessoire such as Bar ammunitions belt, ammunition bandoliers etc..
by the way, Johan, where is your project ?????
Julien

justsendit
Joined: February 24, 2014
KitMaker: 3,033 posts
Armorama: 2,492 posts
Posted: Wednesday, February 25, 2015 - 04:48 AM UTC
Chris, Your 'German Machine Gunner' looks to be chasing Julien's 'French Commando' out of the paint factory ... where, he has no doubt, just placed a timed explosive!
Sorry guys ... too much scribing, scratching, scraping, drilling, sanding, filing, fitting, glueing, filling, cleaning ... and way too much coffee!
mike
Sorry guys ... too much scribing, scratching, scraping, drilling, sanding, filing, fitting, glueing, filling, cleaning ... and way too much coffee!
mike
justsendit
Joined: February 24, 2014
KitMaker: 3,033 posts
Armorama: 2,492 posts
Posted: Wednesday, February 25, 2015 - 10:42 AM UTC
Brief 'Tug of War' update.
Last night, I did some scribing and undercutting on several of the figures. A few more Hornet Heads trickled in today got some figures closer to their final poses lots of cleanup "WORK!" necessary. In addition, Ive got several other figures on the bench.
mike
Last night, I did some scribing and undercutting on several of the figures. A few more Hornet Heads trickled in today got some figures closer to their final poses lots of cleanup "WORK!" necessary. In addition, Ive got several other figures on the bench.
mike
27-1025
Joined: September 16, 2004
KitMaker: 1,281 posts
Armorama: 1,222 posts
Posted: Wednesday, February 25, 2015 - 10:51 AM UTC
Quoted Text
Chris, Your 'German Machine Gunner' looks to be chasing Julien's 'French Commando' out of the paint factory ... where, he has no doubt, just placed a timed explosive!
Sorry guys ... too much scribing, scratching, scraping, drilling, sanding, filing, fitting, glueing, filling, cleaning ... and way too much coffee!
mike
LOL!
Julien, the replacement head looks great. I mistook it for a resin aftermarket.
Figures are not my strong suite but this will at least get some practice in.
Kinggeorges
Joined: August 31, 2005
KitMaker: 1,380 posts
Armorama: 845 posts
Posted: Wednesday, February 25, 2015 - 01:04 PM UTC
LOL too !
Looks like David against Goliath !
Very brave to attck a 120 mm figures. i've always been scared by that scale.
Mike, you just give me a great idea. Instead of making him as an ammo loader, I could give some sabotage accessories. after a quick search I found us army used M 37 demolition kit for satchel charges. Any other idea of accessories that would make him look like a real saboteur is more than welcomed !!
Best,
Julien
justsendit
Joined: February 24, 2014
KitMaker: 3,033 posts
Armorama: 2,492 posts
Posted: Wednesday, February 25, 2015 - 02:30 PM UTC
Julien, I agree with Chris: The head and beret look spot-on nice dynamic pose as well!
You got me thinking ... How about this for a vignette base? the section of railway track with your guy running away from the charge he has placed! could even include a couple of Resistance Fighters standing as lookouts. Vive la France!
Something along this theme. Note the switch-section and signal.

(photo for reference only)
mike
PS: Nicely detailed Railway Switch from ARMOR35.RU
You got me thinking ... How about this for a vignette base? the section of railway track with your guy running away from the charge he has placed! could even include a couple of Resistance Fighters standing as lookouts. Vive la France!
Something along this theme. Note the switch-section and signal.
(photo for reference only)
mike
PS: Nicely detailed Railway Switch from ARMOR35.RU
TankManNick
Joined: February 01, 2010
KitMaker: 551 posts
Armorama: 543 posts
Posted: Thursday, February 26, 2015 - 06:57 AM UTC
I have some progress shots. I added ammunition belt pouches.


Did some research and it seems Airfix pretty much got it right with the equipment. I have decided that since the figures are not in marching order that they would not be wearing backpacks. Japanese troops in action traveled light - Ammo pouches and water bottles a must. Do you think I should make them carry respirators? My understanding is that this became uncommon late in the war as it became apparent gas wasn't being used. I'll need shoulder straps (for water bottles and any packs I decide to add) so I'll try vodka bottle foil - well I didn't have any wine foil! It's plasticized so I'll see if it works.
BTW - no link from the campaign page? I had to hunt for this thread!
justsendit
Joined: February 24, 2014
KitMaker: 3,033 posts
Armorama: 2,492 posts
Posted: Thursday, February 26, 2015 - 09:01 AM UTC
Quoted Text
... I'll need shoulder straps (for water bottles and any packs I decide to add) so I'll try vodka bottle foil - well I didn't have any wine foil! It's plasticized so I'll see if it works. ... BTW - no link from the campaign page? I had to hunt for this thread!
Nick, Looking good!
I'm too shy to ask my local winery which bottles have lead foil! I've been using copier paper as a substitute and actually, it's not too bad after painting. I guess, one of these days, I should really just break down and get away from the cheap "corner wine!"
mike
justsendit
Joined: February 24, 2014
KitMaker: 3,033 posts
Armorama: 2,492 posts
Posted: Thursday, February 26, 2015 - 09:05 AM UTC
I've noticed more and more that many modelers seem to prefer adding on heads/gear/weapons prior to painting. I used to do the opposite, however, with a little more practice and as my painting hand became more steady, I've been following their method. ... Any thoughts on this?
Personally, I still prefer painting the heads separately whenever possible, as when using aftermarket heads. I like drilling-out the torso, dry-fitting and painting the heads this way, as this leaves a nice clean neckline ... and I can still reposition the head later if needed.
I twirl the point of a No.11 X-Acto blade to create a center point and pilot hole. Then, I enlarge the hole with an engraving bit quick, controllable, and doesn't melt the styrene as much.

Bit Diamter mm: 1.6 mm
Bit Diameter Inch: 1/16"
Part Number: 106
Shank Diameter: 3/32", 2.4 mm
Item Description: Engraving Cutter
mike
Personally, I still prefer painting the heads separately whenever possible, as when using aftermarket heads. I like drilling-out the torso, dry-fitting and painting the heads this way, as this leaves a nice clean neckline ... and I can still reposition the head later if needed.
I twirl the point of a No.11 X-Acto blade to create a center point and pilot hole. Then, I enlarge the hole with an engraving bit quick, controllable, and doesn't melt the styrene as much.
Bit Diamter mm: 1.6 mm
Bit Diameter Inch: 1/16"
Part Number: 106
Shank Diameter: 3/32", 2.4 mm
Item Description: Engraving Cutter
mike
Kinggeorges
Joined: August 31, 2005
KitMaker: 1,380 posts
Armorama: 845 posts
Posted: Thursday, February 26, 2015 - 12:16 PM UTC
I like the facial expression of those Airfix Japs. I find them pretty good for the time they were release.
Mike, I do paint head and arms separately, especially when for example the arm is close to the torso and if glued it would make the painting job way more complicated for the beneath parts. painting the head separately allow you to make a nice job on the neck, whereas when glued you don't insist on that part, too scared to paint the scarf in pink... For the arm part the only downside of painting separately could be the fitting: you don't dare to use putty when you spent hours working on the colors.
I discovered with my commando the melted plastic problem, eventhough I use the lowest rotating level of my dremel. I'll use your technique next time !
Julien
TankManNick
Joined: February 01, 2010
KitMaker: 551 posts
Armorama: 543 posts
Posted: Thursday, February 26, 2015 - 12:54 PM UTC
Quoted Text
I've noticed more and more that many modelers seem to prefer adding on heads/gear/weapons prior to painting.
Wow never thought of leaving off heads! Usually just leave off weapons where I can. I always thought I would end up with gaps or glue on a nicely painted part. I suppose I do prefer a plastic to plastic bond where possible. Painted parts and CA glue never seem to stick as well and must be clear matt coated to cover any glue spots showing. I guess each case is different. I never find one size fits all in modeling!

Mack_S
Joined: November 13, 2014
KitMaker: 30 posts
Armorama: 29 posts
Posted: Friday, February 27, 2015 - 05:03 AM UTC
Finally made it back to the bench to touch up the eyes on the figures. Added some eyebrows too. Makes a big difference!!

grimmo

Joined: January 17, 2006
KitMaker: 752 posts
Armorama: 569 posts
Posted: Friday, February 27, 2015 - 06:11 AM UTC
Quoted Text
bonsoir,
Here are some pics of the running man.
I decided to make him as a french unit, Commando de France, Brigade de Choc. The head comes from the Dragon german cossack set. I told to myself that the mustache would make it even more French
As you can see the front pocket are gone after some xacto work. I drilled the holes for his neck and right hand, adding some volume. I drilled also two holes in the right hand for a better fit with the ammunition box handle. In the back I made the two seewing lines characteristic of the M41 jacket. Beret as been done with Andrea milliput which I love for its smoothness. Believe me, finding the correct shape for a beret is a nightmare.
Next step: the accessoire such as Bar ammunitions belt, ammunition bandoliers etc..
by the way, Johan, where is your project ?????
Julien
My first thought was it looks like he is playing soccer! Great work!
I am working on Masterboxs' Iraq 1 USMC figures. Replaced their weapons with weapons from Live Resin, and am looking at replacing their heads as well. Pics to follow when I get my camera working.
justsendit
Joined: February 24, 2014
KitMaker: 3,033 posts
Armorama: 2,492 posts
Posted: Friday, February 27, 2015 - 08:50 AM UTC
@ Mack. Definitely much better! Some work is still needed, but I'm not the painting expert around these parts.
PS: 'Sniper Dude' has got you in the crosshairs; he's pissed at you for the muzzle "break!"
And this is where I'll be giving my undivided attention as the Pros chime in.
Cheers!🍺
mike
PS: 'Sniper Dude' has got you in the crosshairs; he's pissed at you for the muzzle "break!"
And this is where I'll be giving my undivided attention as the Pros chime in.
Cheers!🍺
mike
grimmo
Joined: January 17, 2006
KitMaker: 752 posts
Armorama: 569 posts
Posted: Saturday, February 28, 2015 - 05:01 PM UTC
here are my figures:
US Marines with Live Resin Weapons:

And the Bad Guys: and the bad guys previously built:

US Marines with Live Resin Weapons:

And the Bad Guys: and the bad guys previously built:

rolltide31

#377
Joined: June 27, 2010
KitMaker: 1,481 posts
Armorama: 93 posts
Posted: Saturday, February 28, 2015 - 10:23 PM UTC
hey all,
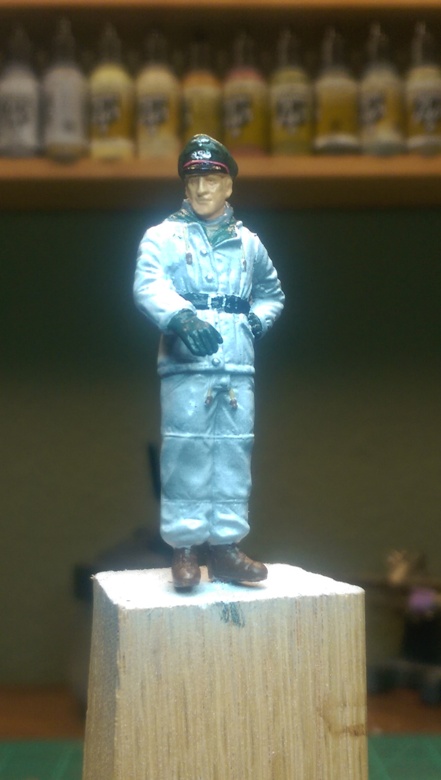
great builds going on. I applied a primer layer which will probably stay as the uniform base color since he is an SS Tank Commander.
I replaced the left hand with a verlinden hand since I didn't like the one provided in the kit.
More next weekend as I begin add detail.

Dave
great builds going on. I applied a primer layer which will probably stay as the uniform base color since he is an SS Tank Commander.
I replaced the left hand with a verlinden hand since I didn't like the one provided in the kit.
More next weekend as I begin add detail.
Dave

Neo
Joined: January 20, 2005
KitMaker: 916 posts
Armorama: 758 posts

Posted: Sunday, March 01, 2015 - 04:14 AM UTC
Got the arms on.
Grip side done, other in progress. Wire was a little loose so I jammed some scrap sprue in the hole.


Built up a bolt action rifle w/ a Tactacool style stock from an old K98. Scope not on, too fragile.
Grip side done, other in progress. Wire was a little loose so I jammed some scrap sprue in the hole.
Built up a bolt action rifle w/ a Tactacool style stock from an old K98. Scope not on, too fragile.
AnalogKid
Joined: December 20, 2014
KitMaker: 46 posts
Armorama: 42 posts

Posted: Sunday, March 01, 2015 - 10:31 AM UTC
Here with an update to my figure. Basic colors (all Vallejo acrylics) are on and covered with satin acrylic varnish. Next steps will be an oil wash to give some depth to the details and then the hard part: adding shades to the face. Although I've been practicing with oil paints for faces in the recent past I've decided to stick with acrylics for the face for this figure.

erichvon

Joined: January 17, 2006
KitMaker: 1,694 posts
Armorama: 1,584 posts

Posted: Sunday, March 01, 2015 - 02:47 PM UTC
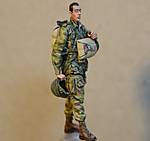
I've knocked a couple of figures up this weekend to go inside one of my buildings for the Op Market Garden campaign. It's the first time I've used Squadron green putty and I'm very impressed with it. Due to the lack of British Paras in poses that I want I'm having to convert them from standard British infantry so a lot of kit bashing going on. Here's what I've been up to on this two.

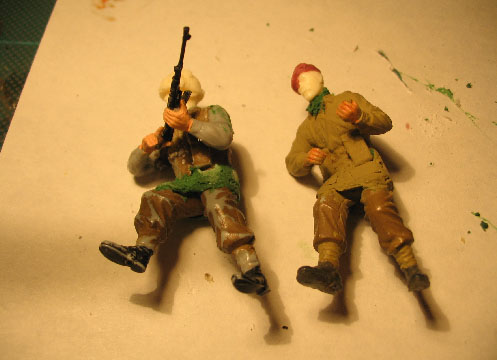
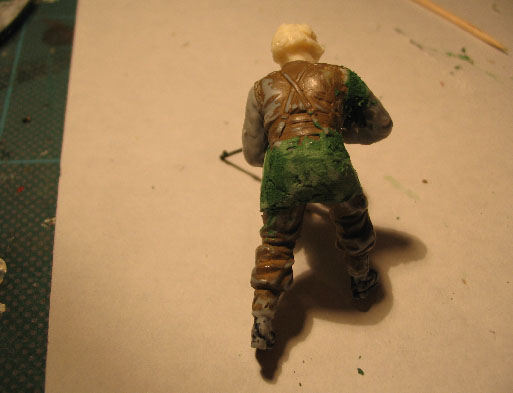
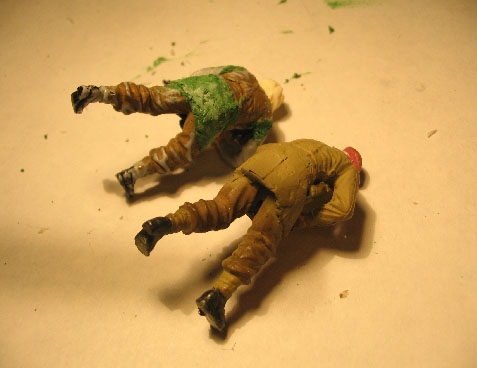
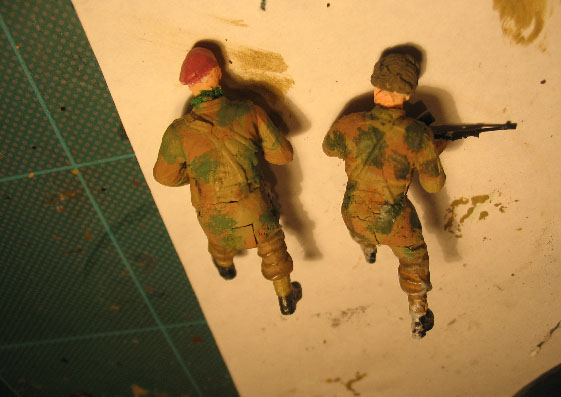
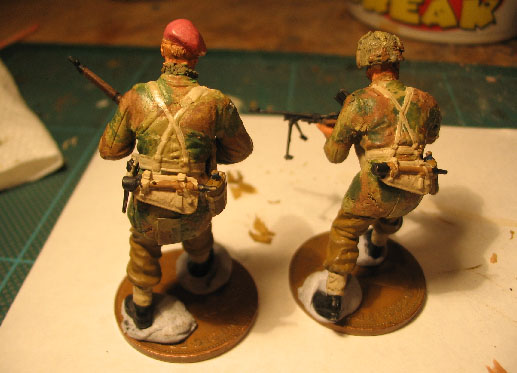
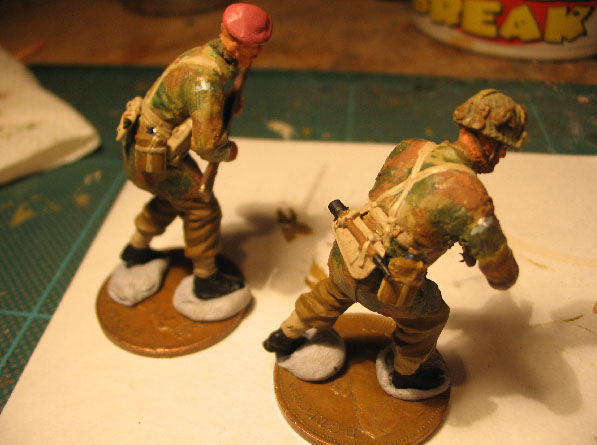
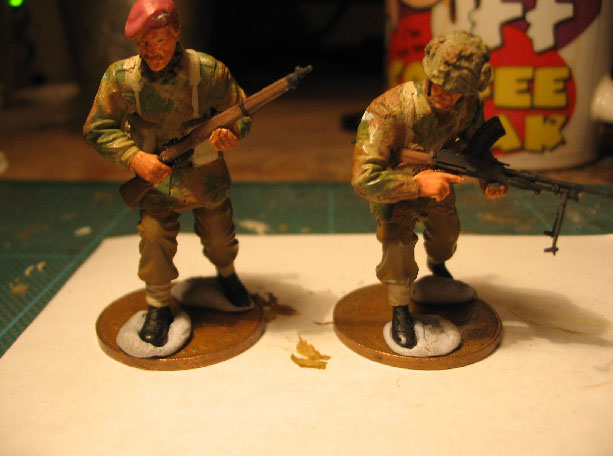
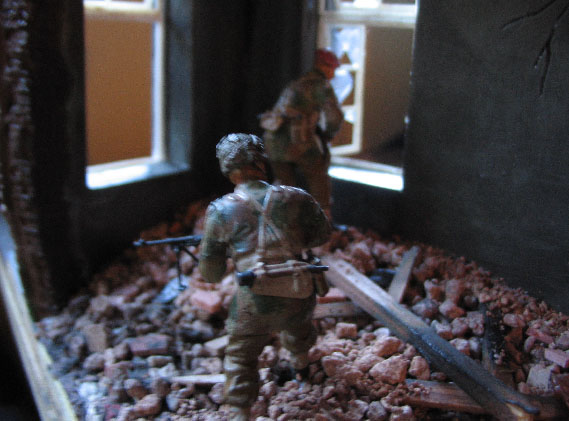
The rifleman now has a sling (forgot to take a pic of that) and I weathered the boots etc before sticking them inside the building. Exactly the poses I wanted after digging about in my abbatoir...lol
The rifleman now has a sling (forgot to take a pic of that) and I weathered the boots etc before sticking them inside the building. Exactly the poses I wanted after digging about in my abbatoir...lol
 |

WEB HOSTING BY


Copyright ©2021 Armorama and Kitmaker Network, a subsidiary of Silver Star Enterprises
All Rights Reserved. Please read our Conditions of Use and Privacy Policy.
All Rights Reserved. Please read our Conditions of Use and Privacy Policy.