


Hosted by Richard S.
Campaign :: Improve your figures!
Motives

Joined: October 15, 2013
KitMaker: 444 posts
Armorama: 428 posts
Posted: Tuesday, February 17, 2015 - 08:09 PM UTC
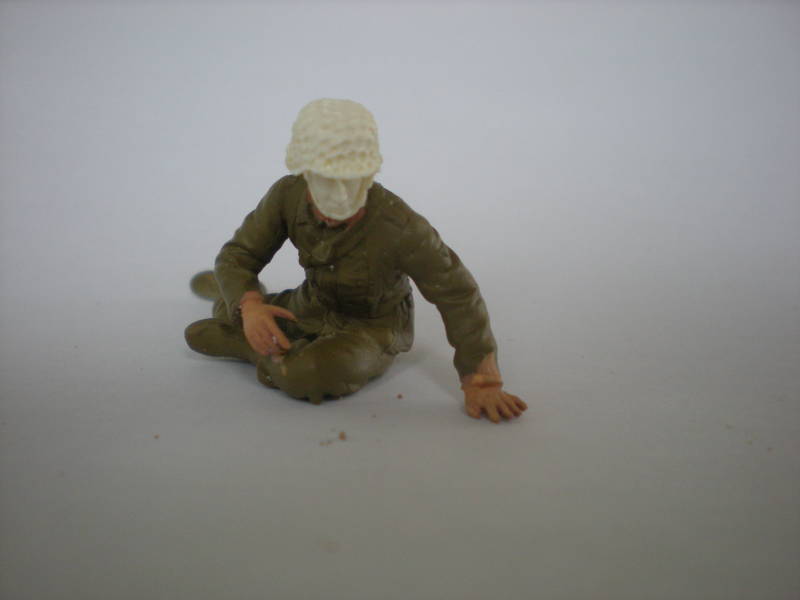
@Julien: I love your helpless guy, half sunken into the jar of paint, desperately reaching out his hand

justsendit

Joined: February 24, 2014
KitMaker: 3,033 posts
Armorama: 2,492 posts
Posted: Thursday, February 19, 2015 - 04:14 AM UTC
'Tug of War' update. Just getting some of the major modifications roughed for now.
1. MiniArt 'German Civilians' kit. Hitler Youth figure ... deprogrammed.
I scraped-off the uniform items from his torso i.e., straps, epaulettes, scarf and created some shirt details i.e., flap and buttons .. looks crooked but I might turn the torso to compensate.


2. MB Civilians, Western Region. Old Man w/cane figure.
Anger Management! I think I like the higher of the two raised canes. What say ye esteemed Peanut Gallery?


3. MiniArt Soviet Infantry kit. Soviet Commander figure.
Commander, smoking while observing activities I modified the right arm to the 'at ease' position behind the back and moved the left arm to a cigarette smoking position.


Still waiting for the Hornet Heads/Hands order to arrive so I can match them to respective personalities and finalize body positions.
mike
1. MiniArt 'German Civilians' kit. Hitler Youth figure ... deprogrammed.
I scraped-off the uniform items from his torso i.e., straps, epaulettes, scarf and created some shirt details i.e., flap and buttons .. looks crooked but I might turn the torso to compensate.
2. MB Civilians, Western Region. Old Man w/cane figure.
Anger Management!
I think I like the higher of the two raised canes. What say ye esteemed Peanut Gallery? 3. MiniArt Soviet Infantry kit. Soviet Commander figure.
Commander, smoking while observing activities I modified the right arm to the 'at ease' position behind the back and moved the left arm to a cigarette smoking position.
Still waiting for the Hornet Heads/Hands order to arrive so I can match them to respective personalities and finalize body positions.
mike

alewar

Joined: December 27, 2006
KitMaker: 773 posts
Armorama: 765 posts
Posted: Thursday, February 19, 2015 - 05:08 AM UTC
Thank you Jack, for the pic of how to paint eyes.
I start to paint my "sturmi" figure. I will retouch mine.
Please comments and advices are welcome.


Regards from the south
Alvaro
I start to paint my "sturmi" figure. I will retouch mine.
Please comments and advices are welcome.
Regards from the south
Alvaro
justsendit
Joined: February 24, 2014
KitMaker: 3,033 posts
Armorama: 2,492 posts
Posted: Thursday, February 19, 2015 - 09:10 AM UTC
Replacing heads and hands. Crazy Ivan
meet Dr. Frankenfigure Give my creation... Life!!!
Surgical Implements:
X-Acto Blade (standard No. 11, very sharp)
Electric Toothbrush w/glued-on Sanding Disk
Dremel 225-01 Flex Shaft Attachment
Pin Vise
Micro Drill Bits (various sizes)
Riffler Files (flat, round, triangular, etc.)

Let me know if I begin to "bore" people!
mike
Surgical Implements:
X-Acto Blade (standard No. 11, very sharp)
Electric Toothbrush w/glued-on Sanding Disk
Dremel 225-01 Flex Shaft Attachment
Pin Vise
Micro Drill Bits (various sizes)
Riffler Files (flat, round, triangular, etc.)
Let me know if I begin to "bore" people!
mike
Motives
Joined: October 15, 2013
KitMaker: 444 posts
Armorama: 428 posts
Posted: Thursday, February 19, 2015 - 06:20 PM UTC
Quoted Text
Electric Toothbrush w/glued-on Sanding Disk
GENIOUS!

yolk24

Joined: November 07, 2007
KitMaker: 40 posts
Armorama: 30 posts
Posted: Thursday, February 19, 2015 - 08:30 PM UTC
Enlisted, thanks Johan
My entry from verlinden german figure.

My entry from verlinden german figure.


Neo
Joined: January 20, 2005
KitMaker: 916 posts
Armorama: 758 posts

Posted: Thursday, February 19, 2015 - 08:31 PM UTC
Mike - very ambitious & impressive.
My first try did not develop (think I overworked the putty - could not get the jacket it to shape like I wanted). Back into the junk box.

New figure (maybe Dragon Night Fighters?) Cheated and used blue tape to mark limits of jacket - will be Hoody like Stalker type figure... Need a gas mask wearing head !

My first try did not develop (think I overworked the putty - could not get the jacket it to shape like I wanted). Back into the junk box.
New figure (maybe Dragon Night Fighters?) Cheated and used blue tape to mark limits of jacket - will be Hoody like Stalker type figure... Need a gas mask wearing head !
justsendit
Joined: February 24, 2014
KitMaker: 3,033 posts
Armorama: 2,492 posts
Posted: Thursday, February 19, 2015 - 11:56 PM UTC
Quoted Text
GENIOUS!
Johan, I certainly can't claim any credit for that genius. I just stumbled upon it somewhere in the forums, where another guy stumbled upon it, and another guy may have done a tech tip.
I picked up my 'Crayola, G-U-M Power Toothbrush' at a local supermarket for approx. $5.49 US! At that price, I'm considering adding another into the quiver. G-U-M Crayola Power Toothbrush.
Note: This is certainly not the "end all, be all" tool for sanding figures, I still rely on a variety of soft sanding sticks and strips. However, it is certainly a most useful timesaver.
mike
justsendit
Joined: February 24, 2014
KitMaker: 3,033 posts
Armorama: 2,492 posts
Posted: Friday, February 20, 2015 - 08:54 PM UTC
@ Alvaro, I'm not the painting expert here but the flesh-tone looks very pale to me. Also, will the tanker be moved slightly back so his hands grasp the turret ring?
@ Tom, Thanks!
Are you leaving the tape in place or removing it later. It actually looks like a good foundation for a zipper flap. Not sure if that's what you had in mind. No such thing as cheating in this war ... is there? I just use whatever I have around.
mike
Quoted Text
... Cheated and used blue tape to mark limits of jacket - will be Hoody like Stalker type figure...
@ Tom, Thanks!
Are you leaving the tape in place or removing it later. It actually looks like a good foundation for a zipper flap. Not sure if that's what you had in mind. No such thing as cheating in this war ... is there?
I just use whatever I have around. mike

Lakota

#123
Joined: November 17, 2008
KitMaker: 1,202 posts
Armorama: 635 posts
Posted: Friday, February 20, 2015 - 09:41 PM UTC
Howdy Y'all 
@Alvaro-I have to agree with Mike. You might at least try to paint some dark circles under the eyes and perhaps wash the hair with a burnt umber oil color. Don't over do it.
If it was my figure, which it isn't, I would paint the hands a dark grey/black and call them gloves. The hands look a little "fat" on this figure. I would also try a dark grey/black oil wash on the pants. If I like the shadow effects on the pants I would try it on the jacket and cap. Good luck, you've got a good start. I like it & remember this is just my 2 cents.
@Mike-I know you love a crowd and I'm seriously thinking of adding this figure to my "Operation Market Garden" vignette.
Take care,
Don "Lakota"

rossgary

Joined: July 12, 2011
KitMaker: 184 posts
Armorama: 107 posts

Posted: Saturday, February 21, 2015 - 04:27 AM UTC
Ok Gents, finally managed to make a start on this:

Had to make up the first guy so I could get the position of the second right.
After a bit of work, this is how he looks now...


So now on to the next unfortunate soul...

This is why "Unfortunate"...

So now it's starting to make sense...


Loads more to do yet!
Questions, comments, insults etc. all welcome!
All the best,
Gary
justsendit
Joined: February 24, 2014
KitMaker: 3,033 posts
Armorama: 2,492 posts
Posted: Saturday, February 21, 2015 - 05:21 AM UTC
Gary, Now we're talking! This is exactly the kind of work I've been waiting for! I'm glad youve joined in to share your methods. And now a few of my many dumb questions to follow:
1. DML Gen 2 kit (1/35 scale), I'm assuming? I've never worked with these; they look really cool!
2. Twisted wire vs. strait wire for armatures?
3. Not meaning to get ahead of myself, but when you use sculpting putty in your other posts (GreenStuff?), what ratio do you mix together?
mike
1. DML Gen 2 kit (1/35 scale), I'm assuming? I've never worked with these; they look really cool!
2. Twisted wire vs. strait wire for armatures?
3. Not meaning to get ahead of myself, but when you use sculpting putty in your other posts (GreenStuff?), what ratio do you mix together?
mike
rossgary
Joined: July 12, 2011
KitMaker: 184 posts
Armorama: 107 posts
Posted: Saturday, February 21, 2015 - 06:04 AM UTC
Hi Mike, that was fast!
Questions, questions...
1. DML Gen2 Figures - Some are good, some are very good. Detailed and complex. I think you would have to give them a try as some folks love them and some hate them. Personal choice I suppose? The figures themselves are made from a plastic which lends itself very well to re-scribing. The accessories plastic is appalling for scribing. Very soft and tears easily. If possible, I avoid Gen2 Accessories. The weapons are superb, though. Much better for re-scribing is the Gen2 Gear stuff.
2. Personally, I use twisted wire for armatures. Straight wire is very stiff and sometimes you can break other parts of the figure if you are a bit too enthusiastic bending it. Twisted wire is a bit more forgiving in this respect.
3. Ah, the old GS/ Milliput question? here goes.. Mix at about a 2/3 Milliput to 1/3 GS Ratio. Mix the Gs and the Milliput parts separately then mix the two mixed parts together. Making sense? Use the mixed putty within about 1/2 an hour, after that it starts to go off and doesn't smooth as well. Use a wet brush to smooth it out with. Lay in creases etc. with the tools of your choice after about 90m or so, when it is a bit stiffer but not yet set.
Any other questions, don't be shy!
Hope this helps mate,
All the best,
Gary
Questions, questions...
1. DML Gen2 Figures - Some are good, some are very good. Detailed and complex. I think you would have to give them a try as some folks love them and some hate them. Personal choice I suppose? The figures themselves are made from a plastic which lends itself very well to re-scribing. The accessories plastic is appalling for scribing. Very soft and tears easily. If possible, I avoid Gen2 Accessories. The weapons are superb, though. Much better for re-scribing is the Gen2 Gear stuff.
2. Personally, I use twisted wire for armatures. Straight wire is very stiff and sometimes you can break other parts of the figure if you are a bit too enthusiastic bending it. Twisted wire is a bit more forgiving in this respect.
3. Ah, the old GS/ Milliput question? here goes.. Mix at about a 2/3 Milliput to 1/3 GS Ratio. Mix the Gs and the Milliput parts separately then mix the two mixed parts together. Making sense?
Use the mixed putty within about 1/2 an hour, after that it starts to go off and doesn't smooth as well. Use a wet brush to smooth it out with. Lay in creases etc. with the tools of your choice after about 90m or so, when it is a bit stiffer but not yet set.Any other questions, don't be shy!
Hope this helps mate,
All the best,
Gary
jasperck
Joined: December 14, 2010
KitMaker: 79 posts
Armorama: 79 posts
Posted: Saturday, February 21, 2015 - 06:27 AM UTC
I have a set of "Skatspieler" tankers from Master Box that should be excellent for this. Count me in.
jasperck
Joined: December 14, 2010
KitMaker: 79 posts
Armorama: 79 posts
Posted: Saturday, February 21, 2015 - 08:55 AM UTC
Ok, let's see...
Here are the figures in question:

And here are the Vallejo paints I purchased recently for figures. I already used them on some figs for another dio and they're pretty good.

Here's the tank I'll pair the figures with. It's a CyberHobby Panther A I finished about a year and a half ago. I never glued the turret hatch down, so I'll pose that open. Unfortunately, it's in "Black Knight" markings, so it won't be an accurate scene.

And, finally, here's the diorama base I built the other day. The ruin is from MiniArt (built about four years ago) and the groundwork is spackling paste with some plaster rubble. I need to buy some static grass...

Here are the figures in question:
And here are the Vallejo paints I purchased recently for figures. I already used them on some figs for another dio and they're pretty good.
Here's the tank I'll pair the figures with. It's a CyberHobby Panther A I finished about a year and a half ago. I never glued the turret hatch down, so I'll pose that open. Unfortunately, it's in "Black Knight" markings, so it won't be an accurate scene.
And, finally, here's the diorama base I built the other day. The ruin is from MiniArt (built about four years ago) and the groundwork is spackling paste with some plaster rubble. I need to buy some static grass...
Motives
Joined: October 15, 2013
KitMaker: 444 posts
Armorama: 428 posts
Posted: Saturday, February 21, 2015 - 10:58 AM UTC
Welcome on board Jasper!
Gary: eexceptional start! Those straps look especially nice. Are the purchased from somewhere or scratched?
Gary: eexceptional start! Those straps look especially nice. Are the purchased from somewhere or scratched?

ltb073
Joined: March 08, 2010
KitMaker: 3,662 posts
Armorama: 3,078 posts
Posted: Saturday, February 21, 2015 - 07:18 PM UTC
Some great looking work guy far better than i can produce 
I added a .50 cal gunner to my 2 guy that will be seated in my M-26

The 3 of them have more paint on them now but they all need a lot more work
I added a .50 cal gunner to my 2 guy that will be seated in my M-26

The 3 of them have more paint on them now but they all need a lot more work

Neo
Joined: January 20, 2005
KitMaker: 916 posts
Armorama: 758 posts
Posted: Saturday, February 21, 2015 - 11:19 PM UTC
Mike - I'm going to leave the tape in - worked better than I hoped. Going to used same idea for pockets (but maybe metal foil).
Gary - The Unfortunate Pair look great already. Nice artistic and technical work. Can't wait to see this one !
Gary - The Unfortunate Pair look great already. Nice artistic and technical work. Can't wait to see this one !
justsendit
Joined: February 24, 2014
KitMaker: 3,033 posts
Armorama: 2,492 posts
Posted: Sunday, February 22, 2015 - 12:41 AM UTC
Gary, Thank you for the very informative reply. Ive really got to try that putty alchemy along with the wire armature technique at some point. 
mike
mike
jasperck
Joined: December 14, 2010
KitMaker: 79 posts
Armorama: 79 posts
Posted: Sunday, February 22, 2015 - 12:47 AM UTC
I've been quite busy. Yesterday I built the figures (took no time at all, but there were some nasty seams to clean up) and primed them in black before my last forum post. Later that night I sprayed Tamiya flesh on the faces and arms and gave the faces a burnt umber oil wash. Today I gave the shirts a basecoat and painted the faces.


rolltide31
#377
Joined: June 27, 2010
KitMaker: 1,481 posts
Armorama: 93 posts
Posted: Sunday, February 22, 2015 - 01:11 AM UTC
Hi guys,
Well I am coming a little late to this party and need to get caught up on all the great work everyone's doing. Here is my contribution to the campaign.
Tamiya 1/35 German Tank Crewman at Rest.


I am building the Panzer Commander with the bino's. I know I have some AM kits around but I need to dig them out. If I find them in time I will add to the figure.
The detail is pretty crisp on these figures but the seam lines as normal run into tight areas which make it difficult to clean.
So I began construction.

The fit wasn't great as you can see from the figure's crotch.
Next was adding the torso.


Again, a little fit issue with the sides. I played with it to limit the overhang as much as I could but it didn't work too well.
Next I added the head. I was going to use a Verlinden Head but after taking a hard look at this figures facial expression I kept the original head.

Well that's it for now. More updates later.
Dave
Well I am coming a little late to this party and need to get caught up on all the great work everyone's doing. Here is my contribution to the campaign.
Tamiya 1/35 German Tank Crewman at Rest.
I am building the Panzer Commander with the bino's. I know I have some AM kits around but I need to dig them out. If I find them in time I will add to the figure.
The detail is pretty crisp on these figures but the seam lines as normal run into tight areas which make it difficult to clean.
So I began construction.
The fit wasn't great as you can see from the figure's crotch.
Next was adding the torso.
Again, a little fit issue with the sides. I played with it to limit the overhang as much as I could but it didn't work too well.
Next I added the head. I was going to use a Verlinden Head but after taking a hard look at this figures facial expression I kept the original head.
Well that's it for now. More updates later.
Dave
Lakota
#123
Joined: November 17, 2008
KitMaker: 1,202 posts
Armorama: 635 posts
Posted: Sunday, February 22, 2015 - 03:22 AM UTC
Howdy Y'all
I wasn't satisfied with the Dragon "soft" head I used as a replacement. I replaced it with a Hornet head. I'm not entirely satisfied but I believe it's better.
Take care,
Don "Lakota"
I wasn't satisfied with the Dragon "soft" head I used as a replacement. I replaced it with a Hornet head. I'm not entirely satisfied but I believe it's better.
Take care,
Don "Lakota"
alewar
Joined: December 27, 2006
KitMaker: 773 posts
Armorama: 765 posts
Posted: Sunday, February 22, 2015 - 05:29 AM UTC
Thanks Mike and Don for the tips.
I can't change the figure to grab the ring. For the next one I will look with more detail.
Regards, Alvaro
I can't change the figure to grab the ring. For the next one I will look with more detail.
Regards, Alvaro
AnalogKid
Joined: December 20, 2014
KitMaker: 46 posts
Armorama: 42 posts

Posted: Monday, February 23, 2015 - 04:45 AM UTC
Greetings All,
Here with my initial post for this campaign as I just finished up my build for the WoT campaign on Friday...now onto my next project. I picked out a simple figure from my parts box that I think I've had for almost 20 years. I believe this is the commander figure from the Tamiya Panzer IV H. I remember building the kit in the late 90s but it has since been lost. However, the crew commander lives on! I like the pose of it and want to use it in one of my recently finished builds. So, here we go...pic is of the primed figure, mounted and ready to receive some color.
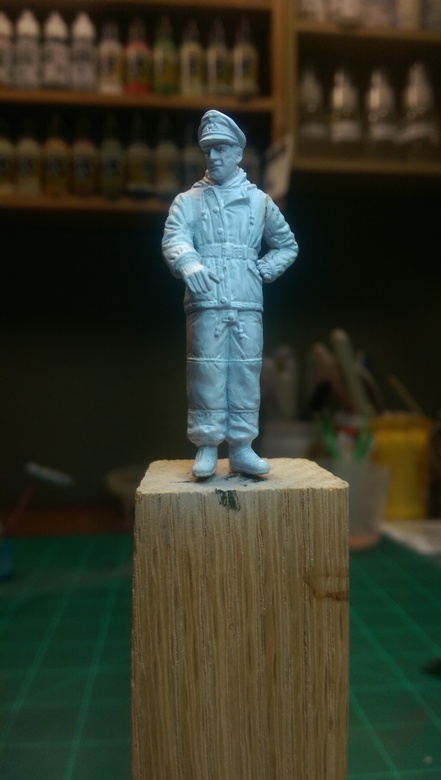
Here with my initial post for this campaign as I just finished up my build for the WoT campaign on Friday...now onto my next project. I picked out a simple figure from my parts box that I think I've had for almost 20 years. I believe this is the commander figure from the Tamiya Panzer IV H. I remember building the kit in the late 90s but it has since been lost. However, the crew commander lives on! I like the pose of it and want to use it in one of my recently finished builds. So, here we go...pic is of the primed figure, mounted and ready to receive some color.

BravoTwoZero
Joined: June 11, 2009
KitMaker: 461 posts
Armorama: 370 posts
Posted: Monday, February 23, 2015 - 05:46 AM UTC
I have completed building my 1/16th scale figures, the Tamiya German Infantryman and the Miniart French Knight. Here's how they look so far, built out of the box.


They are going to be primed and then painted. I may have to scratchbuild a strap for the French Knight. The illustration shows that the shield is hanging in the back, the molded figure does not have a strap to make this possible. Also, speaking of straps, I will probably add a sling for the MP44 for the German. I have decided to make him SS. It's still a toss up whether to paint dot pattern or the oakleaf fall camo.
Thanks!
 |

WEB HOSTING BY


Copyright ©2021 Armorama and Kitmaker Network, a subsidiary of Silver Star Enterprises
All Rights Reserved. Please read our Conditions of Use and Privacy Policy.
All Rights Reserved. Please read our Conditions of Use and Privacy Policy.