Campaigns: Completed Campaigns
Campaigns that are completed should be grouped here.
Hosted by Richard S.
Campaign :: Improve your figures!
nng-nng
Visit this Community
Bayern, Germany
Joined: October 22, 2013
KitMaker: 380 posts
Armorama: 376 posts
Posted: Saturday, February 14, 2015 - 06:14 AM UTC

Quoted Text


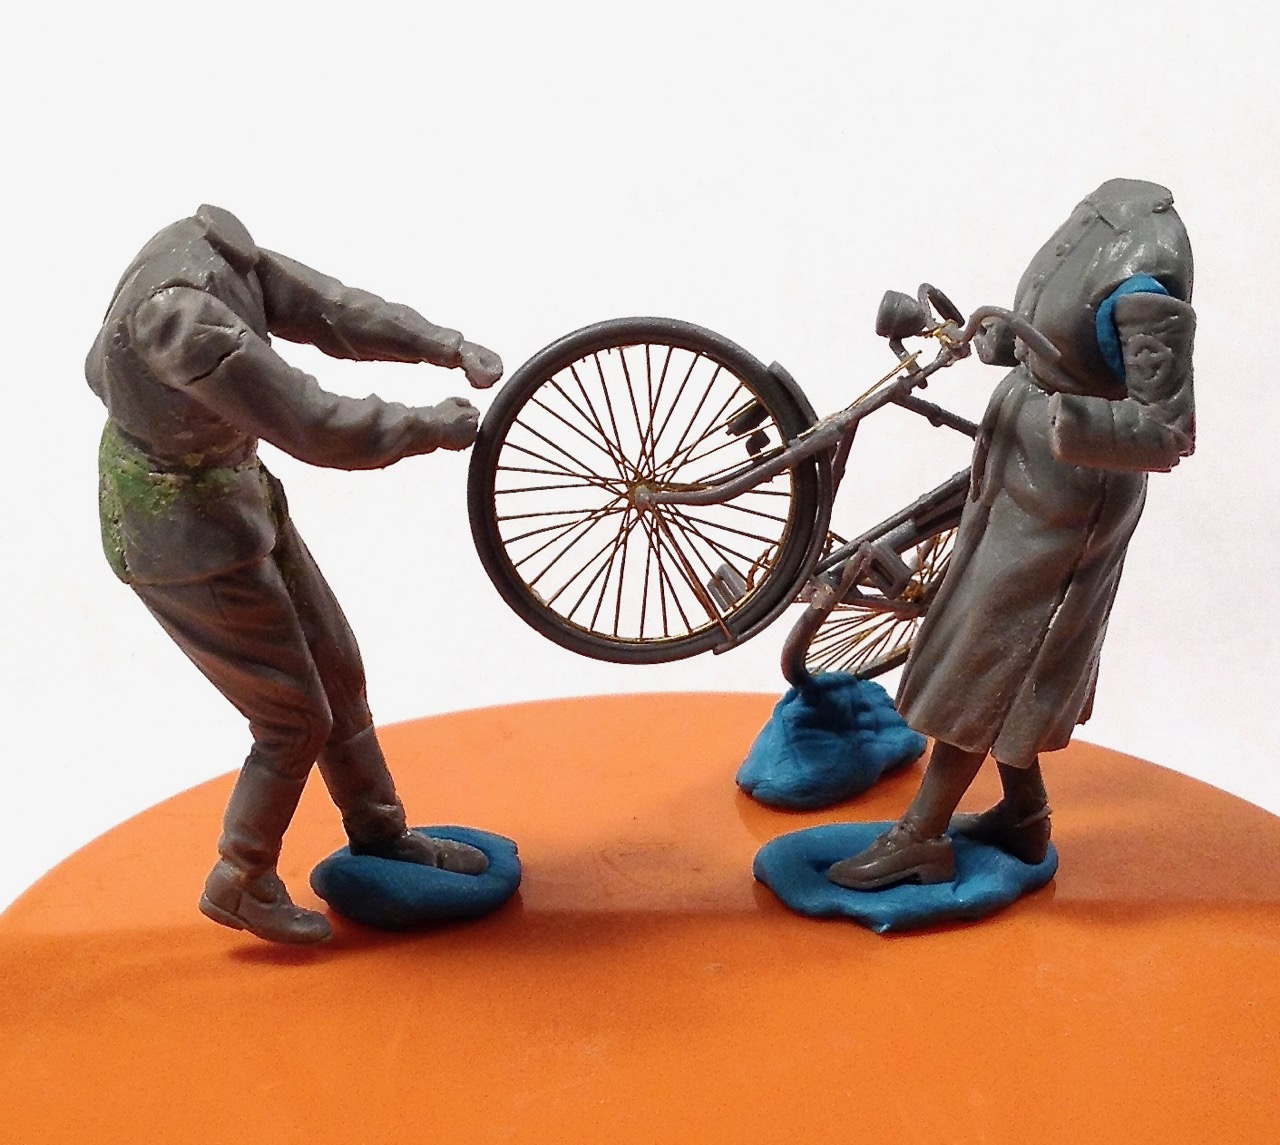
Fabian, Your pair are coming along nicely! The trowser grab, cuffs, sole upgrade, arm wound all look the part.
—mike


Thanks, can´t complain about your progress either.
That bike loooks pretty fancy, might need to get one or two aswell...

I put some paint on to test how my sculping blend in... looks quite good after some help with Mr. Surfacer and Tamiya Extra Thin.
Mack_S
Visit this Community
California, United States
Joined: November 13, 2014
KitMaker: 30 posts
Armorama: 29 posts
Posted: Saturday, February 14, 2015 - 06:29 AM UTC
Began working on my US Modern Infantry (Iraq War) figures. The kit cam with both Army and Marines. I'm just doing the Army. Will be using them in a diorama I'm planning.

I built the Saw gunner first:


He went together pretty easily but I'll have to fill gap from the two halves of the legs. Which I discovered I'll have to do on the other 3 figures as well.

The sniper came next. I didn't like how they had him standing and dialing in the scope. Having gone through sniper school back in the day, we never shot offhand and standing. So I converted him to the prone position and splayed out his pouches. I was in the Army from '85 to '89 (3/75 Ranger) and we didn't wear the body armor as depicted so I took a liberty in splaying out the pouches. Please correct me if that is wrong...I probably won't change it but I'll know for future reference.


To get him from a standing position to prone, I used a glued the Legs and torso together and let them dry. I then took a candle and heated the legs so that I could twist them outwards.


As you can see in the second picture, I burned the right leg. Paint will hide it. Next came the head. I had to re-angle the neck so I cut a wedge off the back and glued it to the front. It wasn't at good looking angle so I cut a bit off the head and then it looked good so I glued it. Had to do similar to the arms. The original figure had him dialing in the scope but I figured since he is pulling security and not engaging the enemy, I'd have him one hand the weapon as it looked more natural. To me it does. Overall I'm happy with him.


Being that these are my first figures for a diorama, I'm happy with the way they all came out. Here is the team:


And just for fun I placed them on the in-progress build that they'll be going with:


Now, on to the hard part, painting...
justsendit
Visit this Community
Colorado, United States
Joined: February 24, 2014
KitMaker: 3,033 posts
Armorama: 2,492 posts
Posted: Saturday, February 14, 2015 - 09:36 AM UTC

Quoted Text

... I then took a candle and heated the legs so that I could twist them outwards. ... As you can see in the second picture, I burned the right leg.


I love the smell of Styrene in the morning ... smells like ... victory ...

Mack, Nice work on the conversion. Careful with that muzzle. This week alone, I've seen a bent shotgun barrel, your bent rifle barrel and my broken cane. We really should take better care of our weapons!

—mike
Mack_S
Visit this Community
California, United States
Joined: November 13, 2014
KitMaker: 30 posts
Armorama: 29 posts
Posted: Saturday, February 14, 2015 - 10:58 PM UTC
Thanks Mike!!

I was a little dissapointed in the rifle barrel. It was on the sprue like that. I was thinking of heating it and pressing it between a pair of flat pliers to let it cool straight. Any other ideas on how to straighten it since it is so thin and fragile??
justsendit
Visit this Community
Colorado, United States
Joined: February 24, 2014
KitMaker: 3,033 posts
Armorama: 2,492 posts
Posted: Saturday, February 14, 2015 - 11:31 PM UTC

Quoted Text

Thanks Mike!!

... It was on the sprue like that. I was thinking of heating it and pressing it between a pair of flat pliers to let it cool straight. Any other ideas on how to straighten it since it is so thin and fragile??


I would steer away from flame, as it is very difficult to control for such small and delicate parts.

Warm water is a good alternative, but usually, I'll just set the item down on a flat surface (I use a piece of white, glossy tile for this). I apply a little Tamiya Extra Thin Cement to the part, when it begins to soften, I carefully straiten/tweak the joint as needed. HTH.

—mike
TankManNick
Visit this Community
California, United States
Joined: February 01, 2010
KitMaker: 551 posts
Armorama: 543 posts
Posted: Sunday, February 15, 2015 - 03:37 AM UTC
I thought I'd post some progress shots. These are quick snaps and I promise some clearer pictures once I've made a little more progress.

BTW faces are my biggest challenge I think. I'm going with the kit heads this time around. At some point I will have to try resin heads in a build as many seem to swear by them. (Also a way to get some variety.)


The first 2 figures shown are basically 'stock' poses right off the instruction sheet.


All the rest are altered slightly. The one figure I felt I had to change was the officer brandishing his sword. Much too dramatic for an exercise! So I switched up parts to this tame pose!


The rest of the figures were adjusted to be able to hold the weapons - I may have mixed up the torsos but I think in the end it came out all right.

This figure uses the original officer body, and I had to reposition the left foot as it looked twisted.


This one needed the left arm cut and twisted to hold the rifle. On the right arm you can also see where I tried to undercut the shirt sleeve for a little more definition.


And finally this guy. Next step will be to putty up all those shoulder gaps!


justsendit
Visit this Community
Colorado, United States
Joined: February 24, 2014
KitMaker: 3,033 posts
Armorama: 2,492 posts
Posted: Sunday, February 15, 2015 - 05:04 AM UTC
Mack, Something was bothering me regarding your Sniper's anatomy. I believe with his legs that close together, you've got his ankles a little too flat to the ground which in addition, seems to cause the hips to rise up. Maybe bending one knee and turning a foot just a tad or splaying his legs out farther might help.

You might have a look at Nick's recent post for reference (above, second image down).

I realize that you guys needed to present the smallest profile possible and I am by no means an expert on the matter. Just a thought.

—mike
Mack_S
Visit this Community
California, United States
Joined: November 13, 2014
KitMaker: 30 posts
Armorama: 29 posts
Posted: Sunday, February 15, 2015 - 11:36 PM UTC
Mike, should have waited on your post. He's now using the latest technology in sniper rifles...a short barrel. I swear the barrel never even touched the flame...Passed it over the top of the flame and it just caught fire!!

I'll have to dig through my stash and see if I have a needle that is to scale to cut down to replace the barrel with. Oh well, live and learn...

As for the legs being too close together, yes they are. The feet though are good flat, at least that was the technique back in the day. I figured I'd remedy the legs by placing him in a narrow spot between two boulders which would force that position. In addition I'll use the terrain to accomedate the rest of the body so it looks more natural.
justsendit
Visit this Community
Colorado, United States
Joined: February 24, 2014
KitMaker: 3,033 posts
Armorama: 2,492 posts
Posted: Monday, February 16, 2015 - 12:37 AM UTC

Quoted Text

... He's now using the latest technology in sniper rifles...a short barrel. I swear the barrel never even touched the flame...Passed it over the top of the flame and it just caught fire!!


Funny but not cool!

Now here's where we do like fire! Grab some sprue scraps outa' the trash, heat and stretch. Clip off a section that you like. ... insta-barrel! Note: Try scraps from different kits, as Styrene hardness will vary.


Quoted Text

As for the legs being too close together, yes they are. The feet though are good flat, at least that was the technique back in the day. I figured I'd remedy the legs by placing him in a narrow spot between two boulders which would force that position. In addition I'll use the terrain to accomedate the rest of the body so it looks more natural.


Cool!

PS: For future reference, I concur with Julien (below). That's the way to do it.
Kinggeorges
Visit this Community
Barcelona, Spain / España
Joined: August 31, 2005
KitMaker: 1,380 posts
Armorama: 845 posts
Posted: Monday, February 16, 2015 - 12:49 AM UTC
good progresses guys !
Mack, playing with fire could be dangerous Why not cutting the leg with your xacto below the knee and then reglue it in the correct position. Then fill the gap with some putty ?

Best,
julien
Mack_S
Visit this Community
California, United States
Joined: November 13, 2014
KitMaker: 30 posts
Armorama: 29 posts
Posted: Monday, February 16, 2015 - 02:09 AM UTC
Julien- Pure laziness is why I didn't cut the leg and glue it in the proper position, that and it didn't dawn on me to do so until you mentioned it.

Mike- Again, I didn't even think of stretching a piece of sprue. That work perfectly to reattach the barrel.


Guess I need to slow down a bit and think before I flame, cut, glue, etc...

Started painting the camouflage...


It looks ok. The cocktail stick idea didn't work. The square looked more round. Don't have a clue as to how the guy who did the figures for the box art managed it.

Still have more painting to do but I think its looking good so far.
Motives
Visit this Community
Stockholm, Sweden
Joined: October 15, 2013
KitMaker: 444 posts
Armorama: 428 posts
Posted: Monday, February 16, 2015 - 03:50 AM UTC
great work everyone!
I got started on Tommy #1:


I spent a lot of time trying to make all gear feel like they have some weight and sits correctly on the body. Actually somewhat pleased with where its at! next up I'll create some foil straps for the missing gear attachemnt points
Lakota
#123
Visit this Community
New Mexico, United States
Joined: November 17, 2008
KitMaker: 1,202 posts
Armorama: 635 posts
Posted: Monday, February 16, 2015 - 04:09 AM UTC
Howdy Y'all
I got a little work done on my German Grenadier (1/35 Dragon) I used an acrylic primer because the replacement head on this figure is soft plastic or vinyl.

I'm not very satisfied with the head. I'll work on it a little more but if it doesn't come out like I want, I will repace it with a resin head.

I might stick this figure into my Operation Market Garden vignette. It seems a little crowded (Target Rich Environment) if you know what I mean.
Take care,
Don "Lakota"

justsendit
Visit this Community
Colorado, United States
Joined: February 24, 2014
KitMaker: 3,033 posts
Armorama: 2,492 posts
Posted: Monday, February 16, 2015 - 05:55 AM UTC

Quoted Text

It seems a little crowded (Target Rich Environment) if you know what I mean.


You know me ... I just love a crowd!

Coming along nicely!

—mike
rossgary
Visit this Community
England - North East, United Kingdom
Joined: July 12, 2011
KitMaker: 184 posts
Armorama: 107 posts
Posted: Monday, February 16, 2015 - 10:01 AM UTC
Hi Johan,
Is it too late to join in on this one? I think I can bring something to it regarding the scratchbuilding/ conversion side.
Gary
Motives
Visit this Community
Stockholm, Sweden
Joined: October 15, 2013
KitMaker: 444 posts
Armorama: 428 posts
Posted: Monday, February 16, 2015 - 11:17 AM UTC

Quoted Text

Hi Johan,
Is it too late to join in on this one? I think I can bring something to it regarding the scratchbuilding/ conversion side.
Gary


The campaign ends July 1st so I'd say you have plenty of time to join!
justsendit
Visit this Community
Colorado, United States
Joined: February 24, 2014
KitMaker: 3,033 posts
Armorama: 2,492 posts
Posted: Monday, February 16, 2015 - 12:06 PM UTC
Shall we dance?


I've assembled (all in rough state) something like fourteen additional "Flash-Mob" characters, all the while organizing some replacement heads and hands to their respective personalities — waiting for another Hornet delivery to arrive. "Madness!!!"

I think I've got the main two characters close and the peripheral storyline is really starting to evolve. A massive putty slinging, sculpting and cleanup effort to follow! I'll try to get in a group shot sometime soon.

Stay tuned!

—mike
Neo
Visit this Community
North Carolina, United States
Joined: January 20, 2005
KitMaker: 916 posts
Armorama: 758 posts
Posted: Monday, February 16, 2015 - 06:03 PM UTC
Started my figure - Three old to make one new...


The start:

Somebody lost their head (that's no way to get ahead...):

Holes for wire:

Alot of reshaping, took off pockets, buttons, etc:

Together again:


Surgery done, now one gallon of putty please.


Mack_S
Visit this Community
California, United States
Joined: November 13, 2014
KitMaker: 30 posts
Armorama: 29 posts
Posted: Tuesday, February 17, 2015 - 01:33 AM UTC
I'm done with the initial painting...


They look better at a distance and not too close up. Trying to get a tiny point of paint to dot the eyes was tough. As you can see I didn't get them uniform. The weathering should hide some of the imperfections, but that'll come later. Have to finish the Bradley first and then build the terrain.

Overall I'm happy with them and had fun building them. Broke that dang rifle barrel off again!! Fifth time!! I'll glue it on once I'm ready to place the figures. After I weather them, else I'll probably break it off again.
ejhammer
Visit this Community
Michigan, United States
Joined: June 10, 2008
KitMaker: 230 posts
Armorama: 34 posts
Posted: Tuesday, February 17, 2015 - 01:47 AM UTC

Quoted Text

I'm done with the initial painting...


They look better at a distance and not too close up. Trying to get a tiny point of paint to dot the eyes was tough. As you can see I didn't get them uniform.


Me too. I always get one pupil slightly different than the other. Makes em look like they have a "Lazy Eye" defect.

EJ
Kinggeorges
Visit this Community
Barcelona, Spain / España
Joined: August 31, 2005
KitMaker: 1,380 posts
Armorama: 845 posts
Posted: Tuesday, February 17, 2015 - 02:52 AM UTC
Hola companeros,

Some ranom pictures of my franckensteinisation.
I used as main basis a pair of legs coming from the Dragon Omaha beach set, and the upper part of Masterbox us infantry july 44 set, from the guy pulling his wounded buddy.
It all started from my spart box (at least a part of it)


the different limbs selected


I started to get rid of the bandolier sling on the torso (there was still some remaining marks in white on the pic)


No more sling, all clear


then on to the back part


partly cleared too (the remaingin will help to give height to the sling I'll make from lead foil)


I started to work the right hand side, hollowing the hand for the future ammunition box he will carry


And lastly I add button to his jacket. His jacket is supposed to be a M41 model (I presume) but it presents pockets on the torso which M41 jacket doesn't have. I'll have to take care of that too


Next steps when I'll have some spare time

Julien
rossgary
Visit this Community
England - North East, United Kingdom
Joined: July 12, 2011
KitMaker: 184 posts
Armorama: 107 posts
Posted: Tuesday, February 17, 2015 - 03:20 AM UTC
Hi Folks,
Finally enlisted, so now I can start planning! The idea is to use three of the figures from the DML Korsun Pocket set....


I'll be using the MG team and the kneeling guy.
My vision here is a compact vignette showing the action at "Hell's Gate" where the fighting was so intense that the 72nd Infantry Division and the 5th SS Wiking were fighting as one unit. I'll be swapping out the MG for a Panzerschrek and, the kneeling guy will be changed round too. Hopefully, I'll get some time this weekend to make a start.
All the best lads,
Gary
JackG
Visit this Community
Ontario, Canada
Joined: May 28, 2006
KitMaker: 172 posts
Armorama: 122 posts
Posted: Tuesday, February 17, 2015 - 03:24 AM UTC
Great stuff everyone, and some really ambitious projects!

I don't paint figures regularly, but rarely do I find I will arrive at a perfect dot at the first try. In fact, it shouldn't be a round dot unless you are going for the startled look.


You will have to paint some skin tone above and below the eyeball to get a natural look. I'm quite certain this a required step in the face painting process, specially in 1/35 scale.


regards,
Jack
justsendit
Visit this Community
Colorado, United States
Joined: February 24, 2014
KitMaker: 3,033 posts
Armorama: 2,492 posts
Posted: Tuesday, February 17, 2015 - 11:44 AM UTC
I did a little work on this guy, he wasn't too bad to replicate — no hands needed, just a Hornet Head and some undercuts — especially to the coattails.

"Don't look, just walk away" ...


Great to see more members entering the campaign fray!

—mike
ejhammer
Visit this Community
Michigan, United States
Joined: June 10, 2008
KitMaker: 230 posts
Armorama: 34 posts
Posted: Tuesday, February 17, 2015 - 07:07 PM UTC

Quoted Text

Great stuff everyone, and some really ambitious projects!

I don't paint figures regularly, but rarely do I find I will arrive at a perfect dot at the first try. In fact, it shouldn't be a round dot unless you are going for the startled look.


You will have to paint some skin tone above and below the eyeball to get a natural look. I'm quite certain this a required step in the face painting process, specially in 1/35 scale.


regards,
Jack


Thanks for the pointers. Mine do have a rather surprised look.

EJ