

Hi Jerry, Mike - thanks for the positive words!
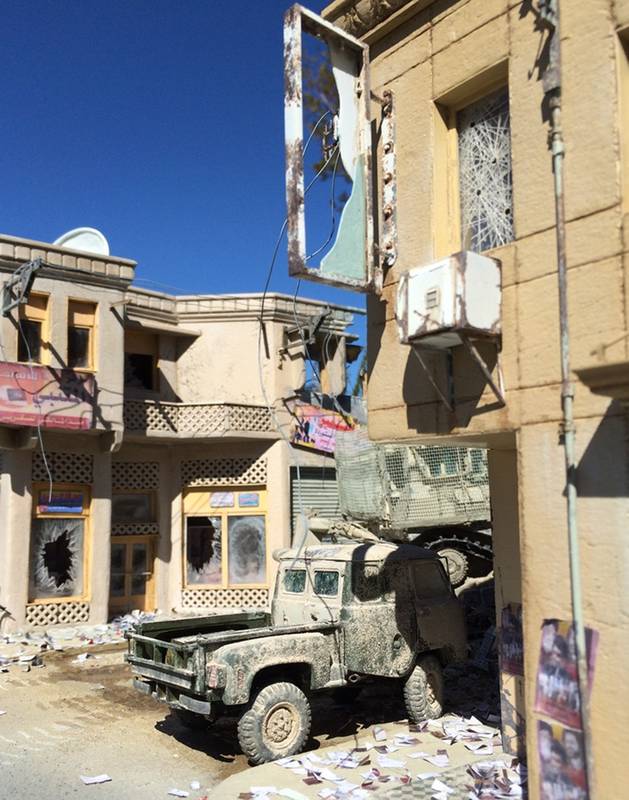
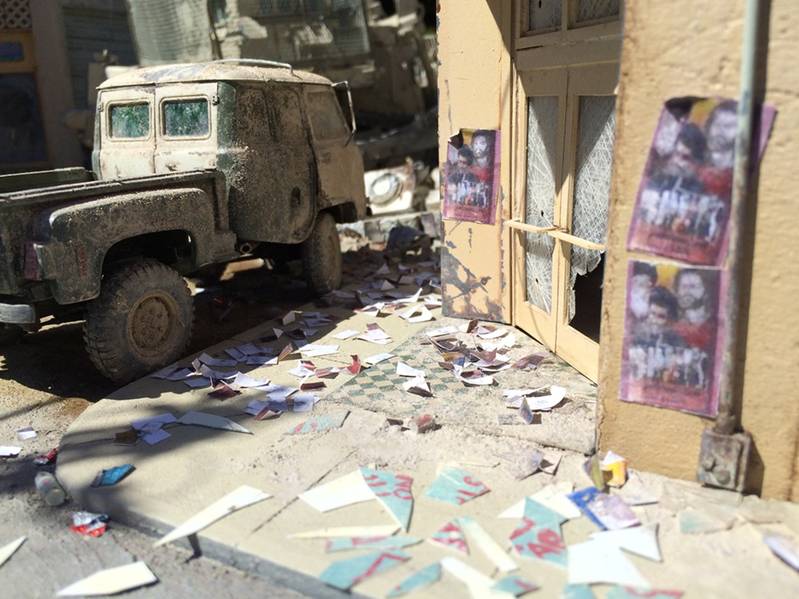
Jer - random, r-a-n-d-o-m.... You have been a long time proponent of this, and I think you are right! It looks "more" realistic than not....and much of this project has had to do with the blend of intentionally random and intentionally organized. This is an unusual rigor to pursue. I found you're also right that achieving it (apparent randomness) is easier said than done, especially with the requirement for lots and lots of randomly placed stuff - like the masonry debris, the paper strewn about, the "pattern" of damage on the walls. It's actually annoying to discover how easy it is to slip from random back to ordered subconsciously - it happens....weird...ask me how I know! (Haha)
Mike, our various conversations about making broken windows is largely similar to the above - at one point my "random" broken windows all looked remarkably similar...crap!! So, out came the mini wire cutters and I went at trying to make the broken edges of window pane look more, you got it, random!
Haha! Yes, getting this stuff done - it's become a zen experience to counter my work experience! We've been in the midst of setting budget goals, backlog projections, delivering projects, and trying to get ready for a client workshop in China! Cutting, drilling, painting and glueing is among the best ways to leave the rest behind for at least a few hours!
Thanks for checking it out
Cheers
Nick
Hosted by Darren Baker
Big Punch, Big Push

Stickframe

#362

Joined: December 01, 2013
KitMaker: 1,661 posts
Armorama: 1,202 posts

Posted: Thursday, April 02, 2015 - 10:01 AM UTC
jrutman
Joined: April 10, 2011
KitMaker: 7,941 posts
Armorama: 7,934 posts
Posted: Thursday, April 02, 2015 - 06:33 PM UTC
You have described this problem perfectly.
I have seen it done poorly in movies and TV shows and models and dios a lot.
The most common mistake I've seen is in the placement of bodies after a battle scene. They are all PERFECTLY spaced apart. I am sure the director didn't even notice!
Nature is random.
A wise old Special Forces sgt once told me as we were moving through a field at night that only humans move in a straight line through the tall grass. You could see where the dew was knocked off the blades. Animals will travel on a slightly zig zag path,sometimes drastic but never straight!
J
kurnuy

Joined: August 22, 2009
KitMaker: 1,491 posts
Armorama: 997 posts

Posted: Tuesday, April 07, 2015 - 09:48 PM UTC
Hi Nick ,
what a nice scene , very dynamic and realistic . Congratulations with the figures because they are very well painted . The buildings and vehicles are excellent just like always my friend.
Cheers
Kurt
what a nice scene , very dynamic and realistic . Congratulations with the figures because they are very well painted . The buildings and vehicles are excellent just like always my friend.
Cheers
Kurt
Stickframe
#362
Joined: December 01, 2013
KitMaker: 1,661 posts
Armorama: 1,202 posts
Posted: Wednesday, April 15, 2015 - 09:12 PM UTC
Hi guys - Kurt and Jerry - thanks for dropping by -
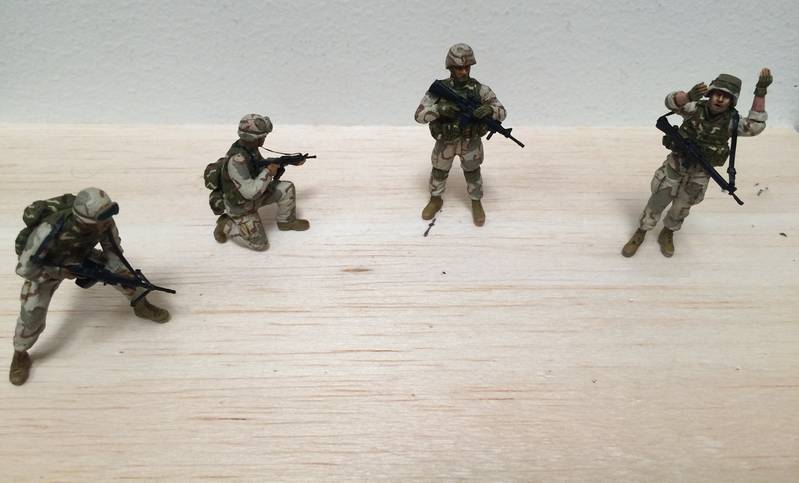
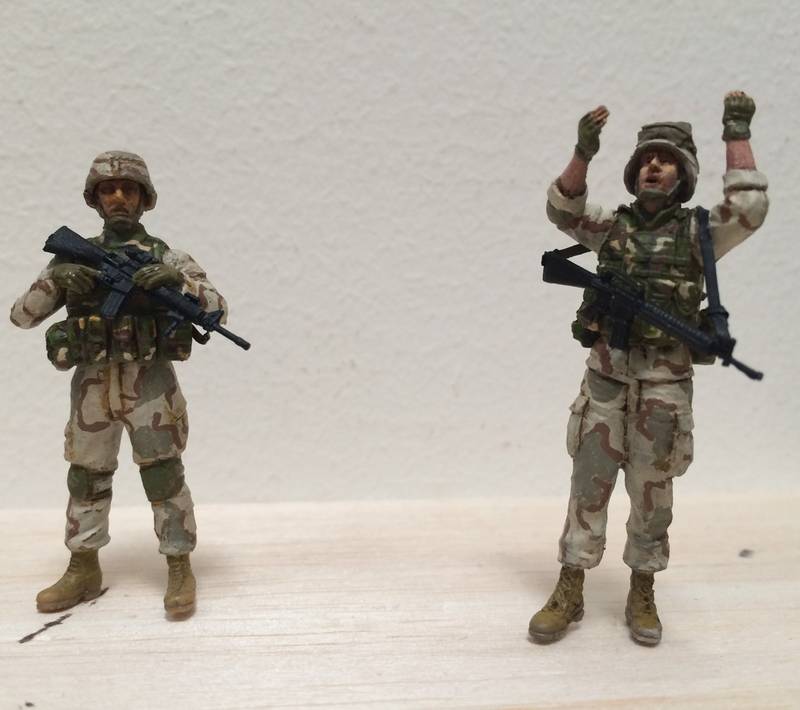
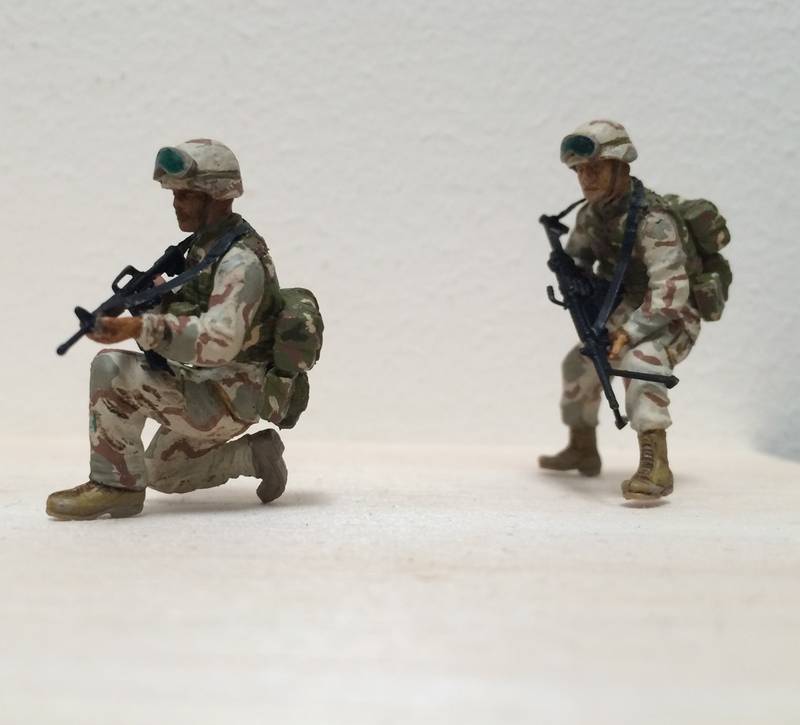
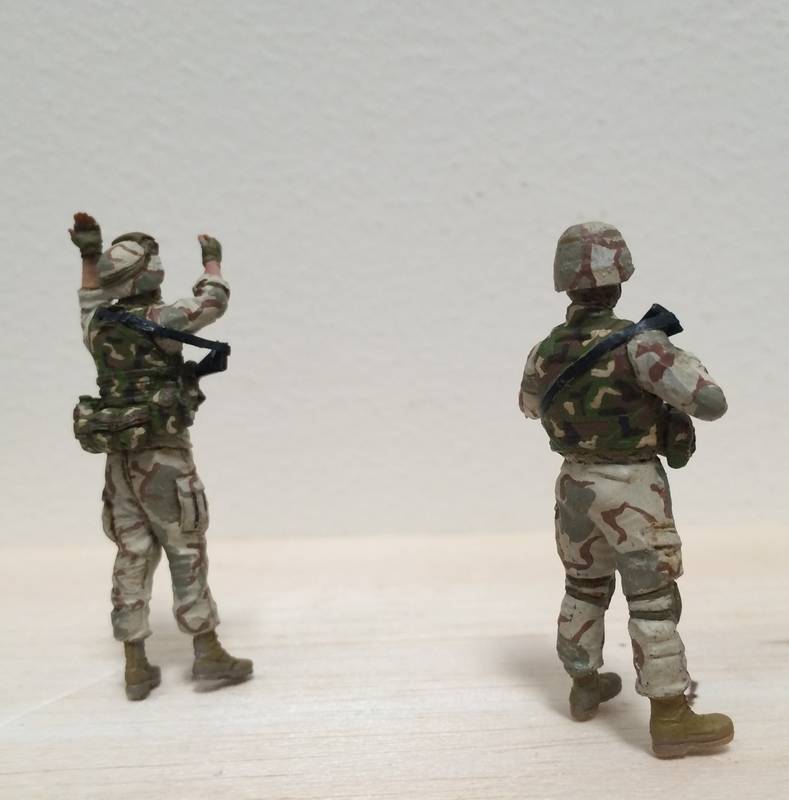
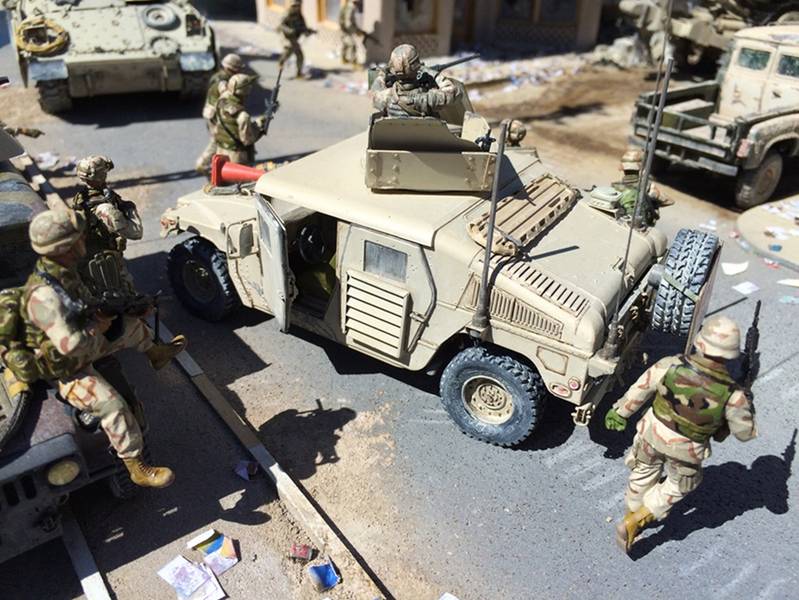
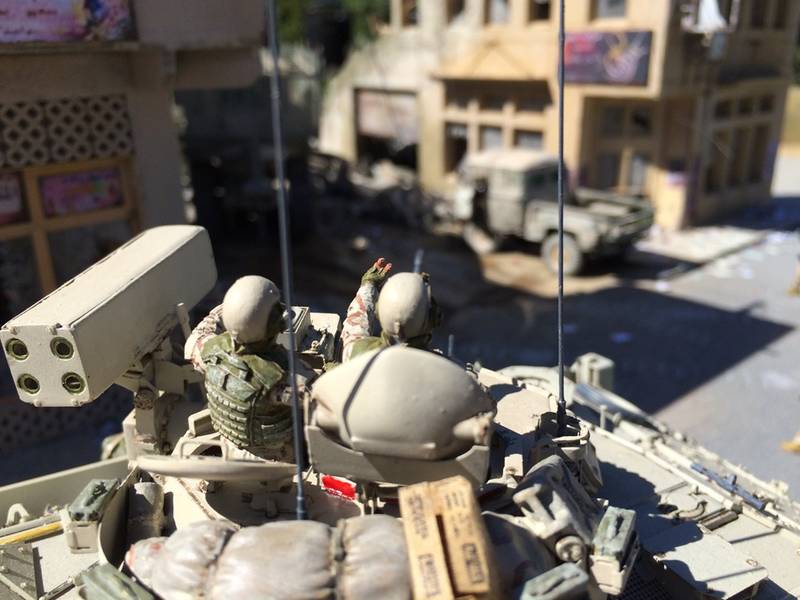
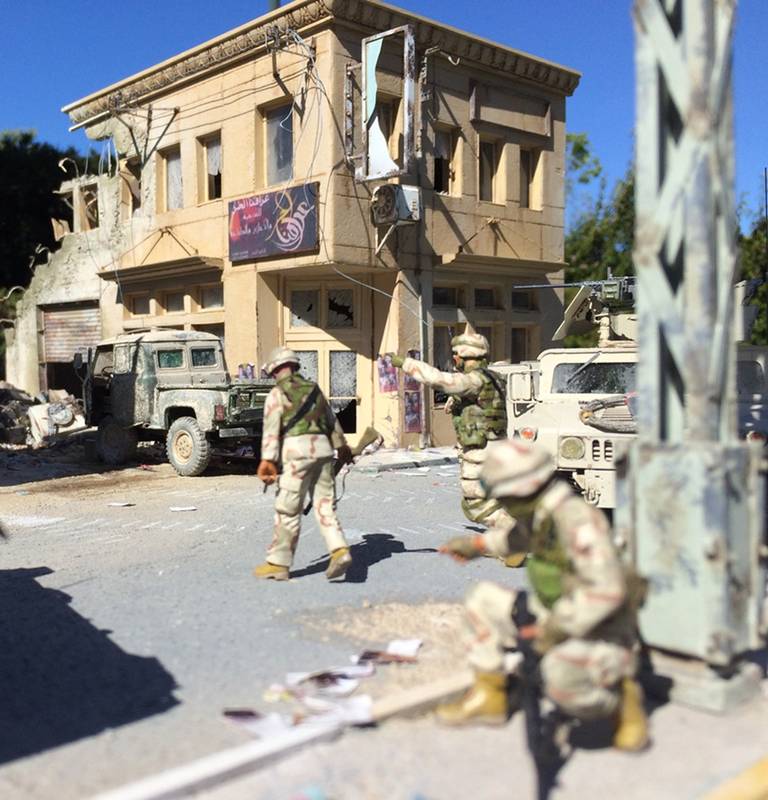
As for this project, only a quick update - I raced through building and painting some figures - so, far, OK - in the pics tho, some are before and others are after the dulcote.
Another "great" feature of taking pics is the obvious problems become more obvious - little things, like skipping the use of ammo pouches, using the wrong helmets...yeah....so, you'll see some pics...essentially before and after - the last one shows them more or less repaired -
You'll see a red arrow pointing at a guy's helmet...if you scroll back to the early photos, you'll see he started with a different type - the wrong type....so, a bit of evergreen, and a new helmet!
have a look:
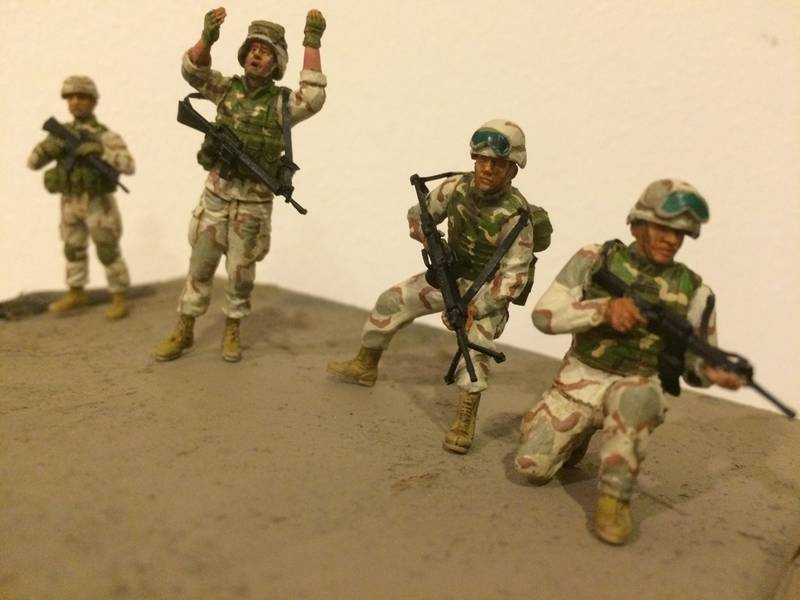
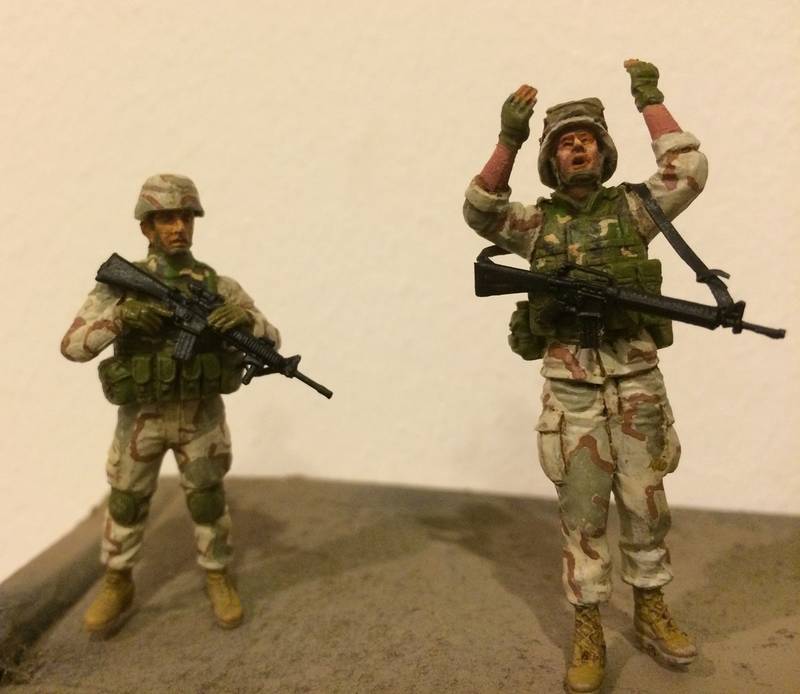
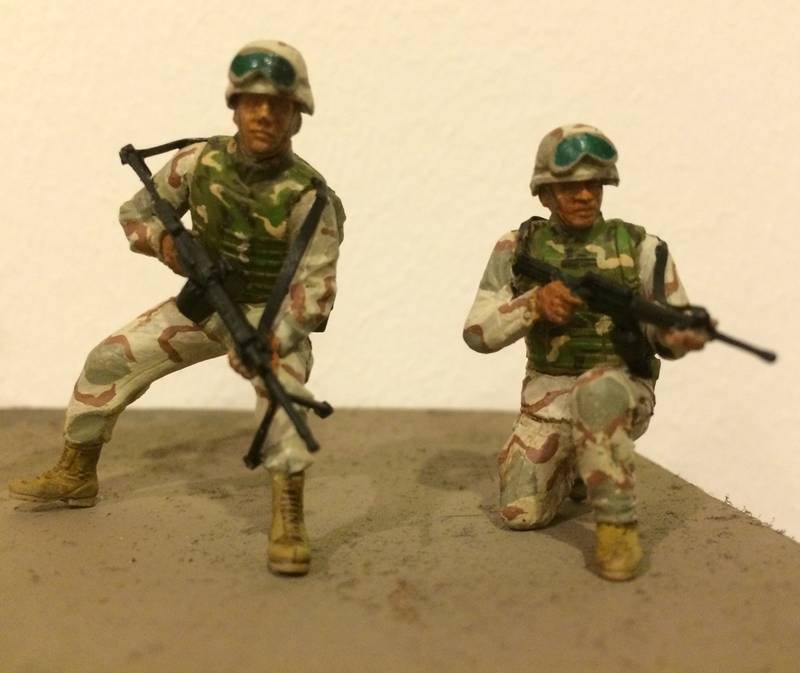
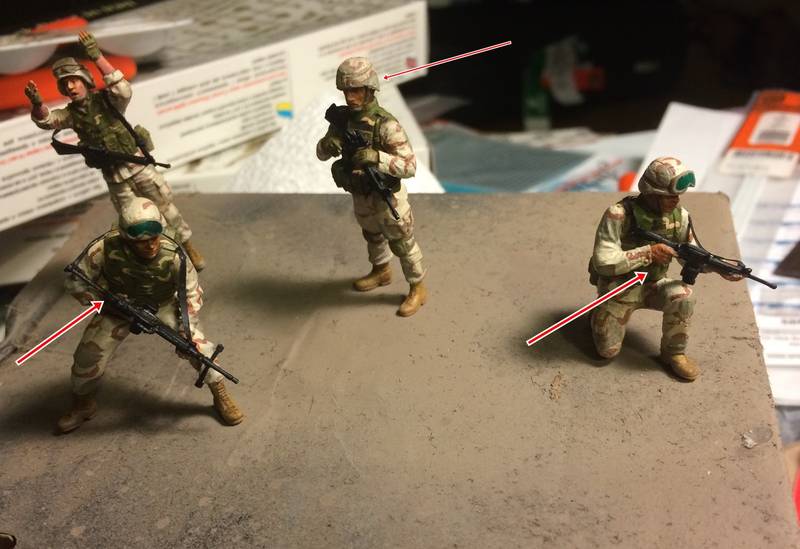
So, these are the last of the figs for this build - as shown above, the red arrows point to changes I needed to make...I've got to say, I'm more than a bit surprised the revised helmet worked so well!
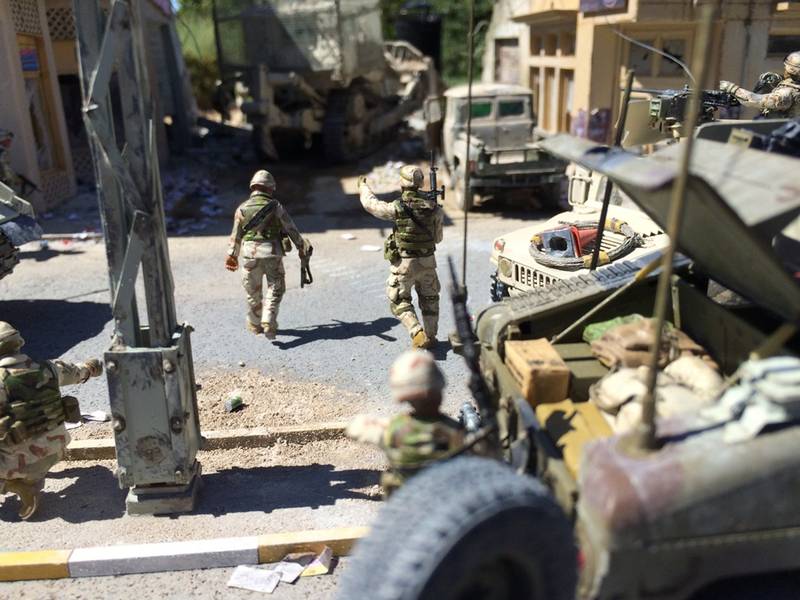
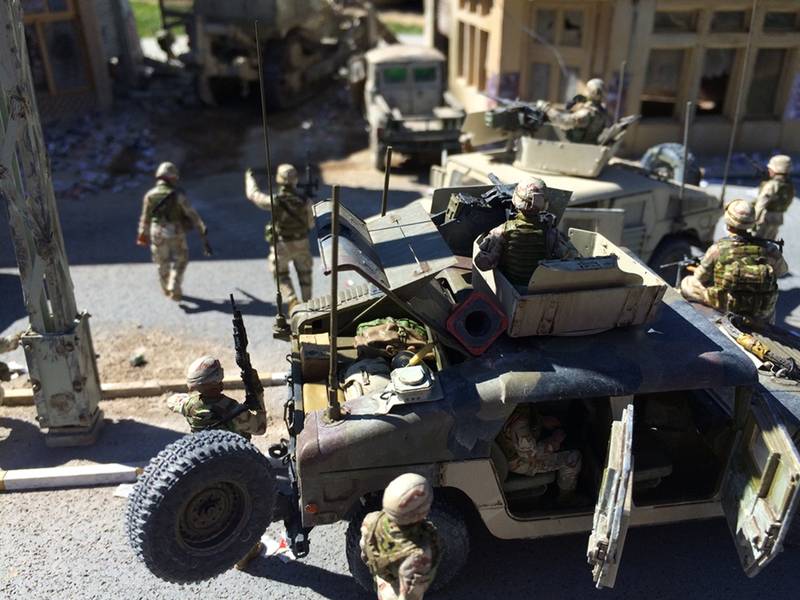
the guy with his arms up will be seen directing the CAT -
OK - need to run! thanks for checking it out
NIck
As for this project, only a quick update - I raced through building and painting some figures - so, far, OK - in the pics tho, some are before and others are after the dulcote.
Another "great" feature of taking pics is the obvious problems become more obvious - little things, like skipping the use of ammo pouches, using the wrong helmets...yeah....so, you'll see some pics...essentially before and after - the last one shows them more or less repaired -
You'll see a red arrow pointing at a guy's helmet...if you scroll back to the early photos, you'll see he started with a different type - the wrong type....so, a bit of evergreen, and a new helmet!
have a look:
So, these are the last of the figs for this build - as shown above, the red arrows point to changes I needed to make...I've got to say, I'm more than a bit surprised the revised helmet worked so well!
the guy with his arms up will be seen directing the CAT -
OK - need to run! thanks for checking it out
NIck
jrutman
Joined: April 10, 2011
KitMaker: 7,941 posts
Armorama: 7,934 posts
Posted: Wednesday, April 15, 2015 - 11:42 PM UTC
Figs look good. Maybe some contrast on the facial areas? Accentuate the low areas,etc? Some of the slings have that "floating" look. Hey,Romain is gone,someone has to do it.
J
J

HeavyArty

Joined: May 16, 2002
KitMaker: 17,694 posts
Armorama: 13,742 posts
Posted: Wednesday, April 15, 2015 - 11:49 PM UTC
The figures look good. Where did you get the ground guide? I really like him.
Stickframe
#362
Joined: December 01, 2013
KitMaker: 1,661 posts
Armorama: 1,202 posts
Posted: Thursday, April 16, 2015 - 01:37 AM UTC
Hi Jerry -
Funny you'd mention our friend Mr Romain....he would have been good and annoyed with me about these figures! He repeatedly reminded me I need to slow down and have more patience! he's right! these guys came together in about a day and a half, with a fairly heavy duty case of jet lag.... Hence, a few conclusions:
the painting turned out pretty good but not great; and,
the details are mostly, but not exactly right....uhh, yeah.
I'll be reworking the paint on the faces tonight - the good news is, they look pretty good in real life, but clearly need more attention. The pics really stink, and might make the faces look less good than they actually do...sorry - and, yes, the straps....need to be attached and not appear to be floating!
On the bright side, they could look worse!
Hi Gino - The figure you're interested in is made by Valkyrie Miniatures. He's the only resin figure of the group, and the details are certainly more crisp than the others -
Thanks for checking it out
Nick

justsendit
Joined: February 24, 2014
KitMaker: 3,033 posts
Armorama: 2,492 posts
Posted: Thursday, April 16, 2015 - 03:08 AM UTC
Haha! I knew you were just chomping at the bit to get back at it jet-lag and all! 
And you know Jerry is right about the slings a little tweezer work and theyll look a lot more natural.
Romain is gone and I really miss his "eagle-eye" critiques hes still here in spirit though. However, as I bumble through my various projects, Im still counting on you guys to keep me in line.
Great work buddy!
mike
ReconTL3-1
Joined: June 07, 2006
KitMaker: 726 posts
Armorama: 687 posts
Posted: Thursday, April 16, 2015 - 09:17 AM UTC
Hey Nick,
The figures look good for ones you rushed through and having jet lag at that. I also know what you mean about the figures looking better in real life than in photos. It's weird how that works. It seems when I take pictures of most of my figures the legs end up looking shorter than they are. It must be the angle and lighting. You seem to be running into the same problem.
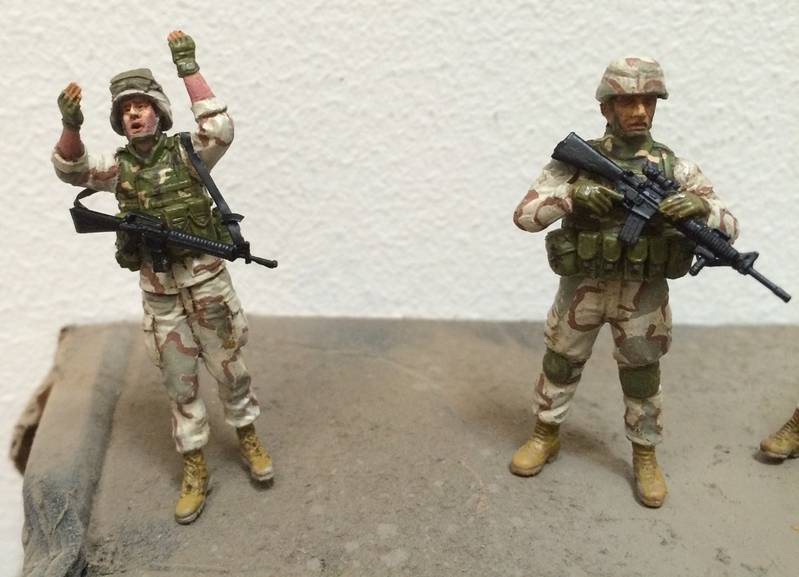
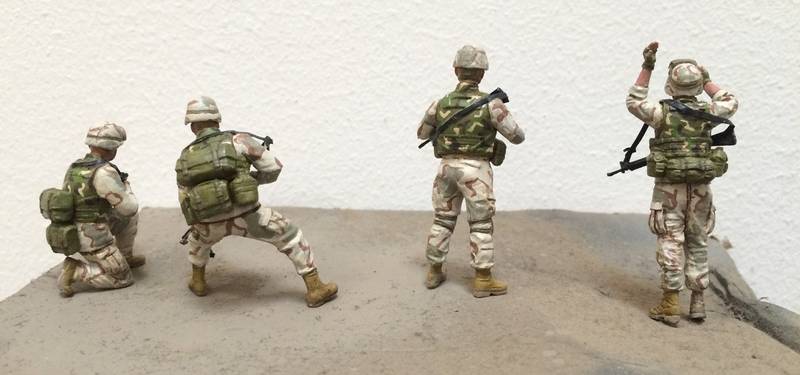
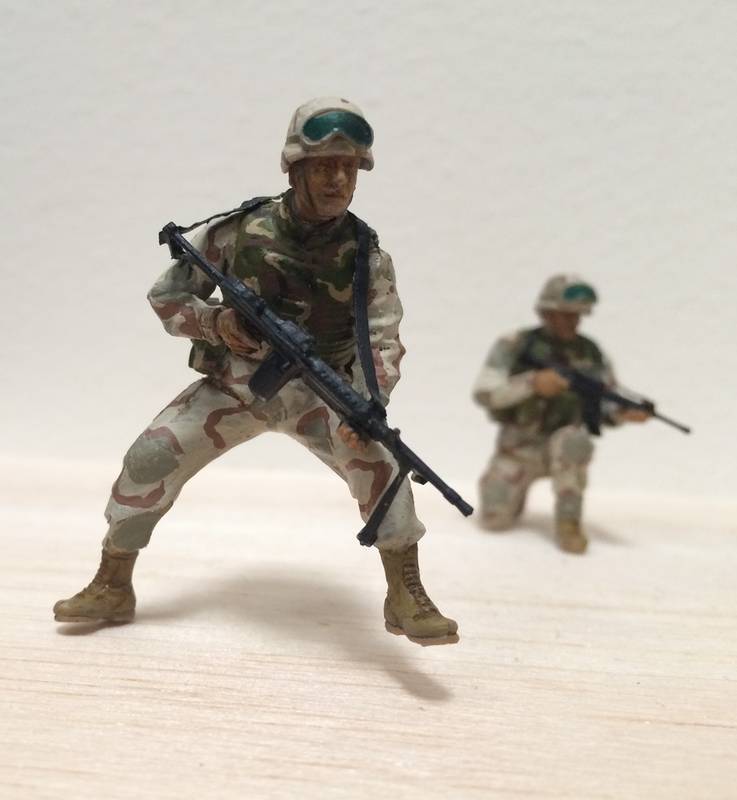
Something I cannot tell from the pictures...do you have any brown in the woodland pattern on the body armor? It looks like green and tan and perhaps black, but I cannot see the black very well. If there is brown, it is not visible. On the pouches, chances are if the body armor is woodland, then the MOLLE gear would be, too, unless if the Soldiers bought their own gear from Tactical Tailor or some other manufacturer in OD Green or something. Mixing the Woodland and OD pouches might be a good touch, too.
Slings are sometimes hard to get to look right. I really hate putting them on model weapons. For every one that comes out decent, I have three or four that were messed up.
Looking forward to more of your progress.
Cheers,
James
The figures look good for ones you rushed through and having jet lag at that. I also know what you mean about the figures looking better in real life than in photos. It's weird how that works. It seems when I take pictures of most of my figures the legs end up looking shorter than they are. It must be the angle and lighting. You seem to be running into the same problem.
Something I cannot tell from the pictures...do you have any brown in the woodland pattern on the body armor? It looks like green and tan and perhaps black, but I cannot see the black very well. If there is brown, it is not visible. On the pouches, chances are if the body armor is woodland, then the MOLLE gear would be, too, unless if the Soldiers bought their own gear from Tactical Tailor or some other manufacturer in OD Green or something. Mixing the Woodland and OD pouches might be a good touch, too.
Slings are sometimes hard to get to look right. I really hate putting them on model weapons. For every one that comes out decent, I have three or four that were messed up.
Looking forward to more of your progress.
Cheers,
James

matt
Joined: February 28, 2002
KitMaker: 5,957 posts
Armorama: 2,956 posts
Posted: Thursday, April 16, 2015 - 05:32 PM UTC
I like the selection of figures as well. They always seem to be one of the more daunting parts of a build to me. I don't know what it is about them or why they're just daunting.
I too, don't see the brown/black on the woodland. I just can;t tell which is there but the shadows might be playing with the pic.
I too, don't see the brown/black on the woodland. I just can;t tell which is there but the shadows might be playing with the pic.
Stickframe
#362
Joined: December 01, 2013
KitMaker: 1,661 posts
Armorama: 1,202 posts
Posted: Thursday, April 16, 2015 - 10:23 PM UTC
Hey guys - thanks for having a look and the great comments!
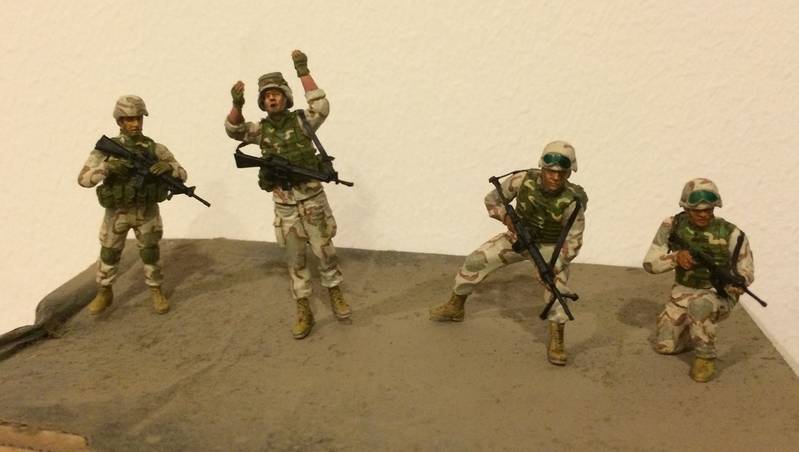
Jerry, yes, invoke your "inner Romain" M8!! he'd expect you too! and he'd hope I'd pay attention! and, well, I tried - repair attempted on the skin colors with fair success the resin guy's head look best - the other guys should have received the Hornet heads!!! they're just soft with detail and harder to paint....the weapon slings....are still not right! - hmmmm
Hi Mike - yes, impulsive model building...a great way to uh, bring down the quality??? - with equal enthusiasm though, I went back at it after work yesterday to try to fix things!
James - hi, thanks very much! very helpful info - you're right, I was missing the brown - the black is and was there, but lost in the uh, er, "lame" photos! also, thanks for the info on the pouches - they're fixed! thanks for taking the time!
Matt - thanks for dropping by! haven't heard from you in a while - yes - more paint has been added
Ok guys, take a look. They're still not great, but are better - the close pics make it look like I did the painting with a #3 brush!
her we go:
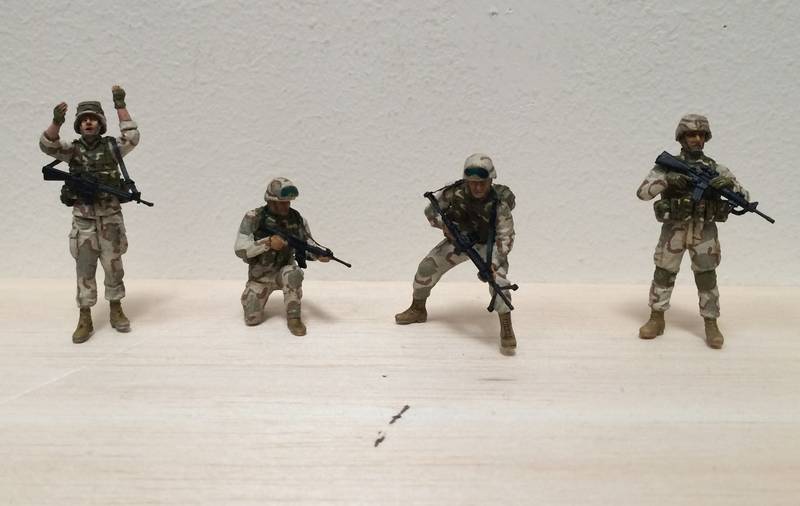
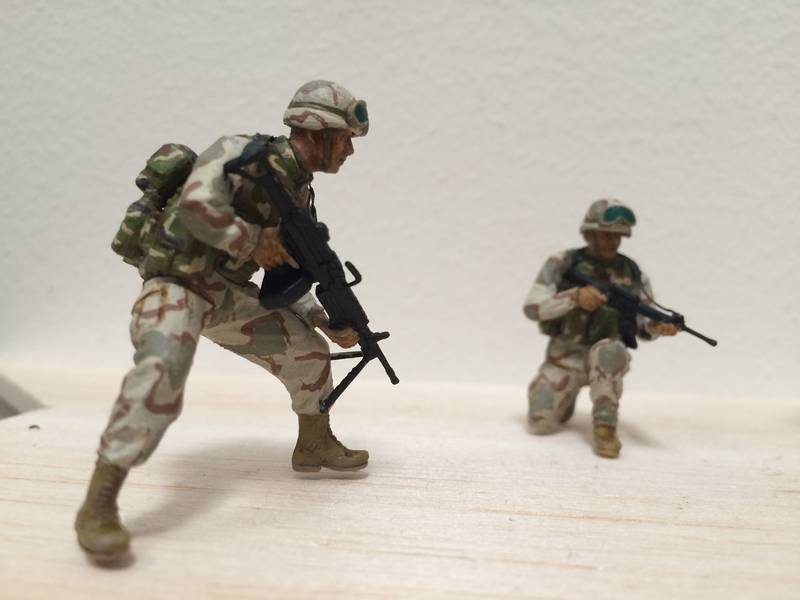
so, there you have it - if I don't keep post, I'll never get any better! so I'll keep at it!
Have a great weekend!
Cheers
Nick
Jerry, yes, invoke your "inner Romain" M8!! he'd expect you too! and he'd hope I'd pay attention! and, well, I tried - repair attempted on the skin colors with fair success the resin guy's head look best - the other guys should have received the Hornet heads!!! they're just soft with detail and harder to paint....the weapon slings....are still not right! - hmmmm
Hi Mike - yes, impulsive model building...a great way to uh, bring down the quality??? - with equal enthusiasm though, I went back at it after work yesterday to try to fix things!
James - hi, thanks very much! very helpful info - you're right, I was missing the brown - the black is and was there, but lost in the uh, er, "lame" photos! also, thanks for the info on the pouches - they're fixed! thanks for taking the time!
Matt - thanks for dropping by! haven't heard from you in a while - yes - more paint has been added
Ok guys, take a look. They're still not great, but are better - the close pics make it look like I did the painting with a #3 brush!
her we go:
so, there you have it - if I don't keep post, I'll never get any better! so I'll keep at it!
Have a great weekend!
Cheers
Nick
ReconTL3-1
Joined: June 07, 2006
KitMaker: 726 posts
Armorama: 687 posts
Posted: Thursday, April 16, 2015 - 10:58 PM UTC
No problem, Nick. That is why we post our in-progress photos...so another set of eyes can take a look and see if there is anything one missed so we can fix or improve on things if possible before we complete a particular project. I know it has been very helpful for me as sometimes I get so involved in one aspect of a figure or model and forget about adding a small detail that makes a difference. And having had several head injuries over the years, I tend to forget things more often these days and alot of times it is stuff I already know and am aware of but it just doesn't "click" at the time.
As your skill progress, you might consider getting items such as pieces of uniforms that are of camo patterns you are about to paint. You could go by pictures, but with an actual piece in front of you, you can manipulate the cloth so you can see the shadow and light effects for a particular pose as well as recognize a repeating pattern in the camo pattern. You will also find "signature" squiggles and blobs associated with a particular camo pattern.
You are doing well, my Friend. Keep it up.
Cheers,
James
Stickframe
#362
Joined: December 01, 2013
KitMaker: 1,661 posts
Armorama: 1,202 posts
Posted: Friday, April 17, 2015 - 10:33 PM UTC
Hi James, yes, as our friend Jerry has pointed out to me, and others too, keep practicing!!! It makes a world of difference! I really enjoy buildings and vehicles...then, there's that other challenge - uhh, in the real world, "people" build things, drive things, and, occupy spaces....hence, we need to build and paint them too!!! I have tended to "conveniently" place figures in shadows, vehicles, dark corners etc...you know they're there, just not focal. For this Dio tho, there are many figures and they are clearly visible....for better or worse!
Your idea about an actual sample of gear is excellent - I've been looking at pics, and attempting to match - which, while ok, is really just OK....you're right, while apparently random, there are discrete (camo) patterns and shapes, I just don't fully understand them yet!
This dio is getting close to being wrapped up - more debris to add, attach building number two, then start something new!
Thanks for taking the time to comment!
Cheers
Nick
jrutman
Joined: April 10, 2011
KitMaker: 7,941 posts
Armorama: 7,934 posts
Posted: Friday, April 17, 2015 - 11:26 PM UTC
My favorite historical artist is Don Troioni. He poses subjects for his battle scenes in period uniforms and in the same position he wants them in the scene,to include the time of day and year,for the correct light.
Taesung from Alpine miniatures does this as well for his sculpting. He takes pics of the subjects from all angles and then transforms them into 1/35 copies!!
We don't need to be so extravagant but...something similar?
J
Taesung from Alpine miniatures does this as well for his sculpting. He takes pics of the subjects from all angles and then transforms them into 1/35 copies!!
We don't need to be so extravagant but...something similar?
J
Stickframe
#362
Joined: December 01, 2013
KitMaker: 1,661 posts
Armorama: 1,202 posts
Posted: Monday, April 20, 2015 - 10:49 PM UTC
HI Jerry - wow! that is dedication! I do get it though, especially if painting - - makes sense.
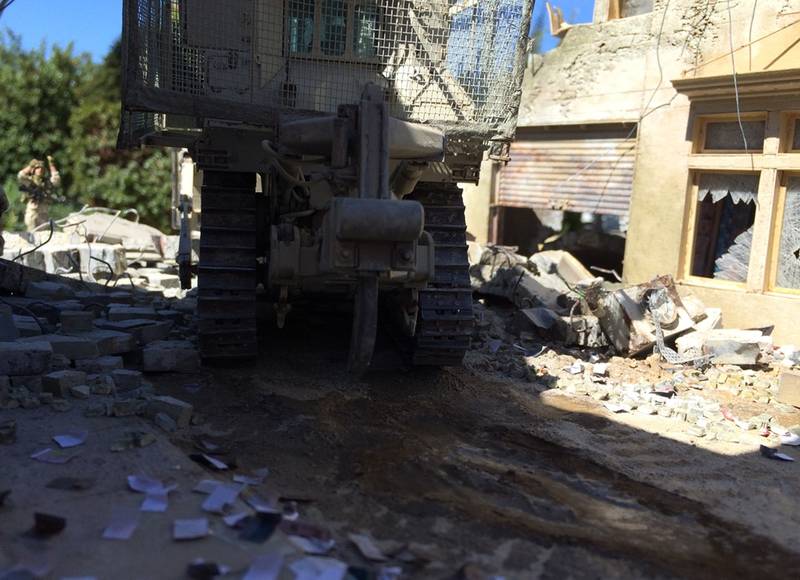
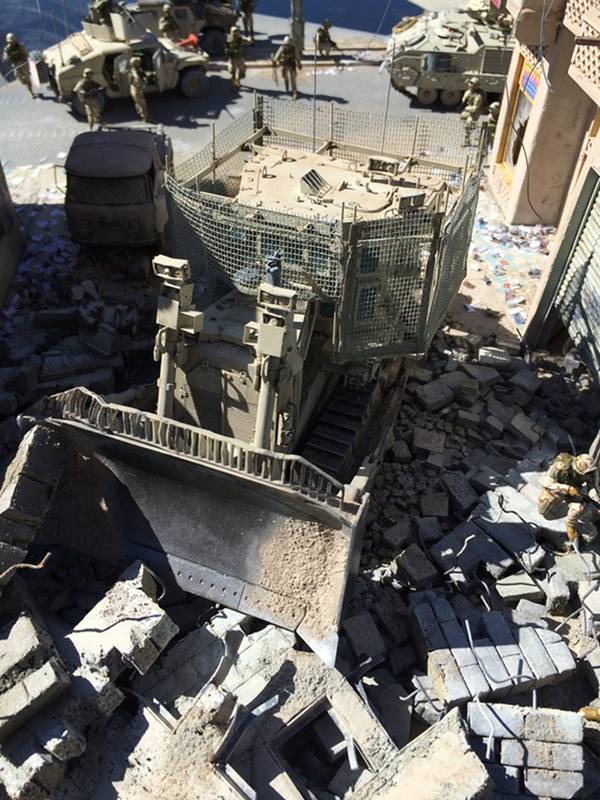
As for today, only a very brief update, but you'll get the point. Hopefully I can finish details this week, and take pictures this weekend - have a look:
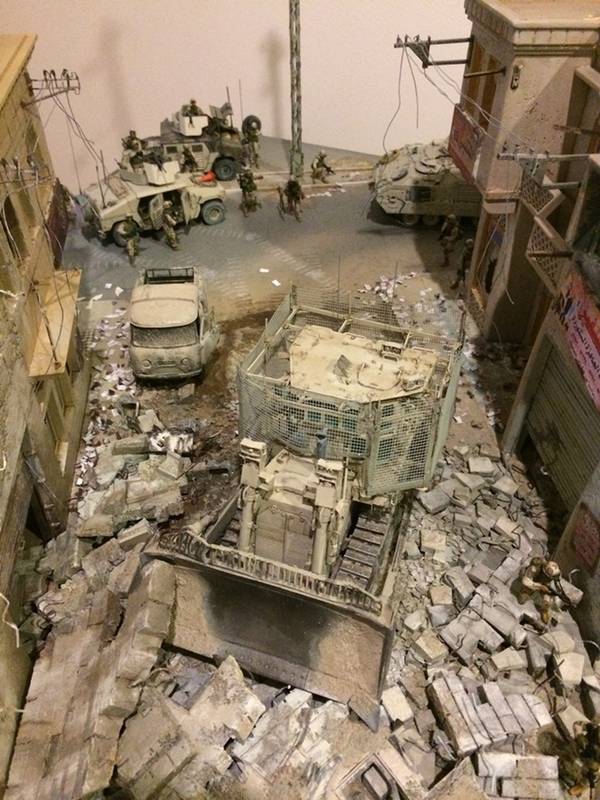
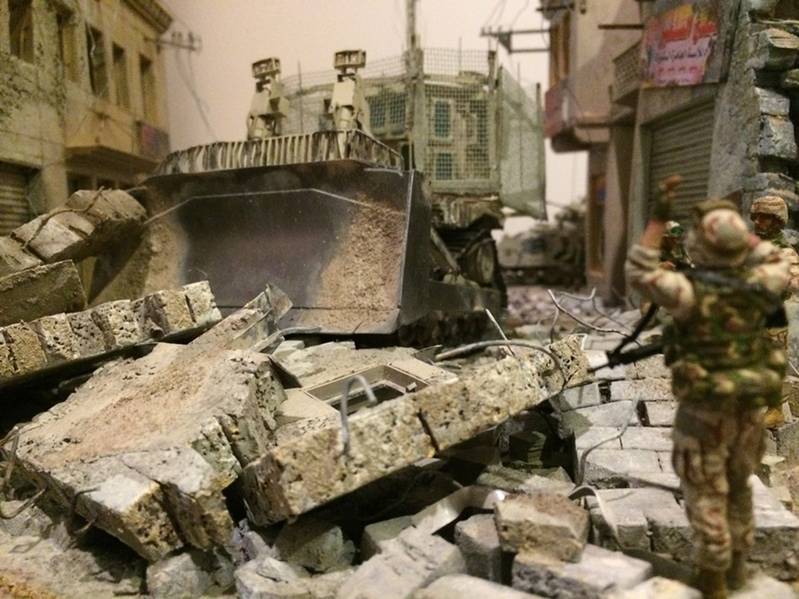
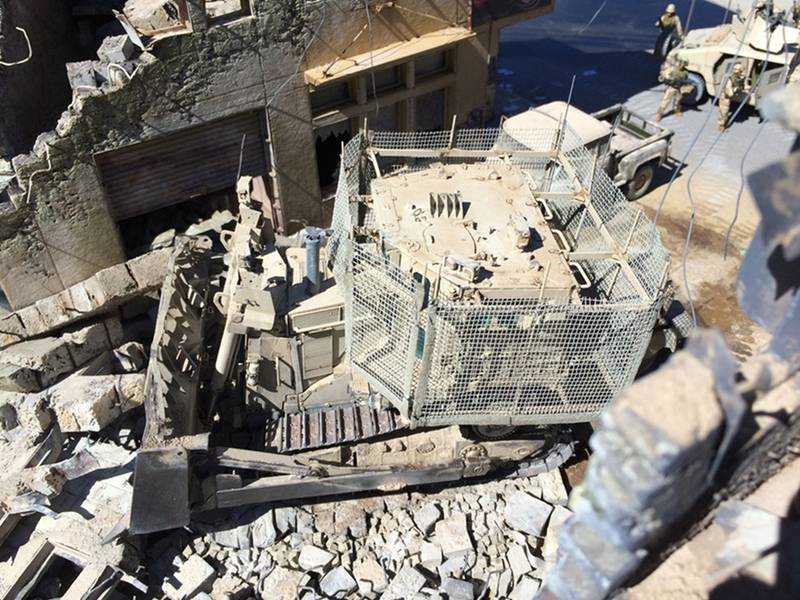
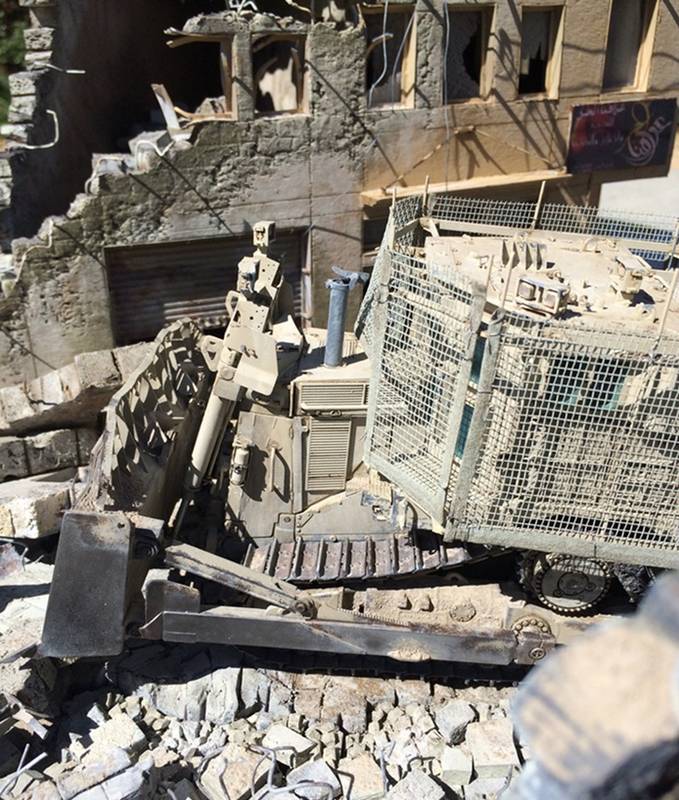
These two give a fairly good overview of the CAT in action, and a few of the new figures installed -
thanks for checking it out
Nick
As for today, only a very brief update, but you'll get the point. Hopefully I can finish details this week, and take pictures this weekend - have a look:
These two give a fairly good overview of the CAT in action, and a few of the new figures installed -
thanks for checking it out
Nick
HeavyArty
Joined: May 16, 2002
KitMaker: 17,694 posts
Armorama: 13,742 posts
Posted: Tuesday, April 21, 2015 - 02:22 AM UTC
Looking good. Keep it coming.
matt
Joined: February 28, 2002
KitMaker: 5,957 posts
Armorama: 2,956 posts
Posted: Tuesday, April 21, 2015 - 05:19 AM UTC
Simply Awesome
Stickframe
#362
Joined: December 01, 2013
KitMaker: 1,661 posts
Armorama: 1,202 posts
Posted: Tuesday, April 28, 2015 - 01:54 AM UTC
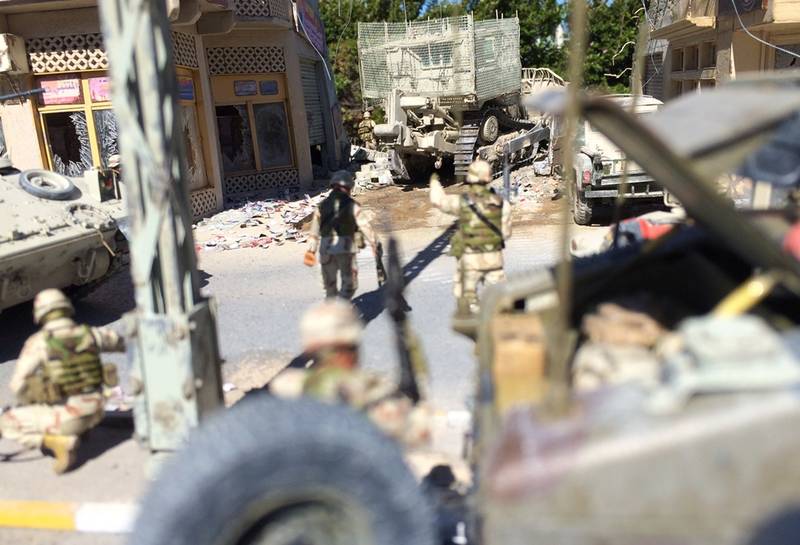
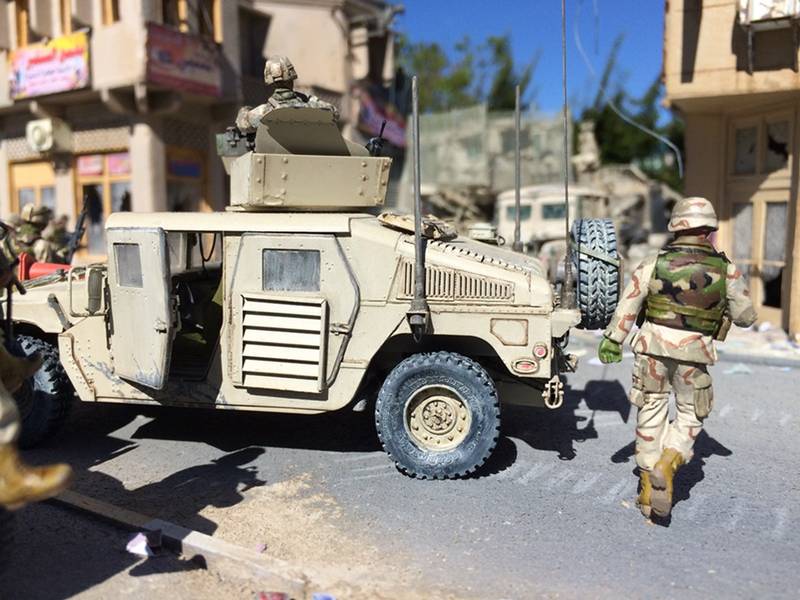
Hi guys, well time to call this one done! The sky was blue on Saturday, so out the model and I went, and below are the pics -
Gino, and James, thanks very much for your help and info along the way, it certainly elevated the build and the story being told.
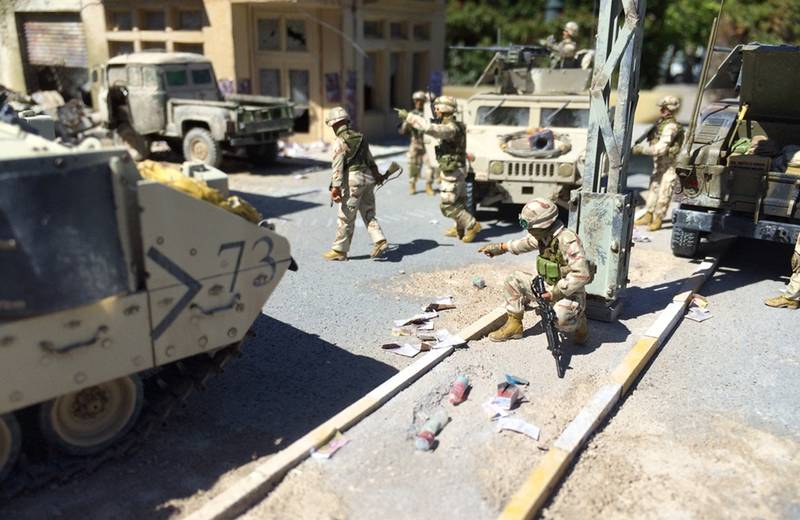
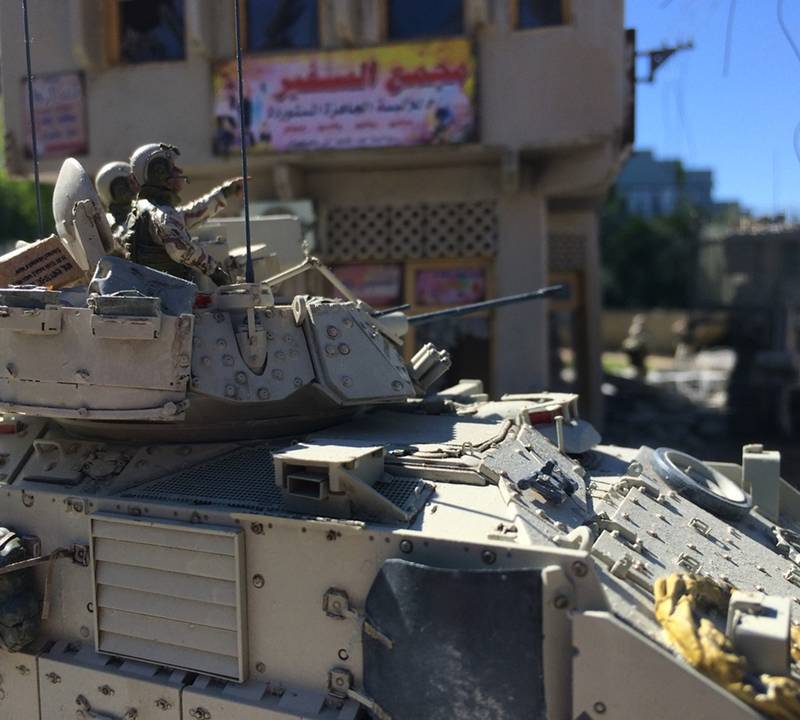
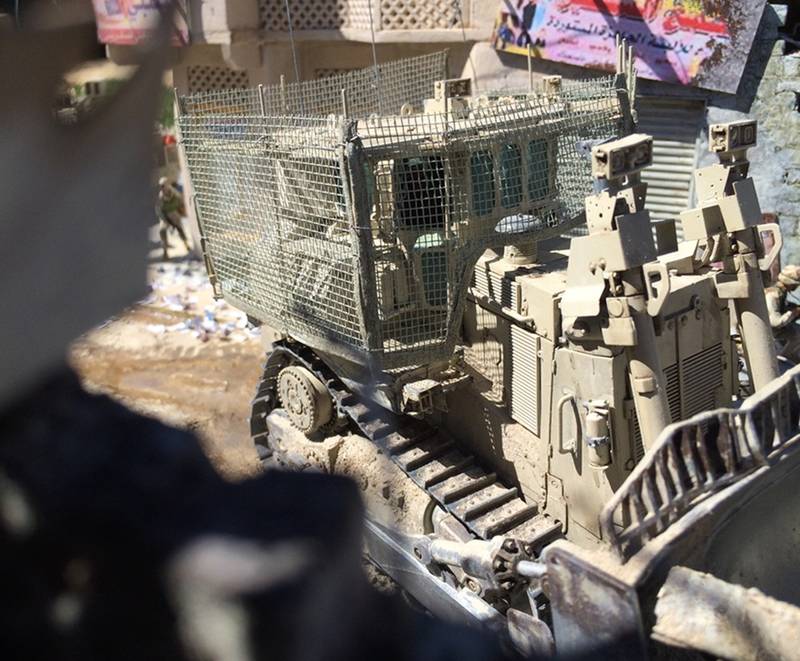
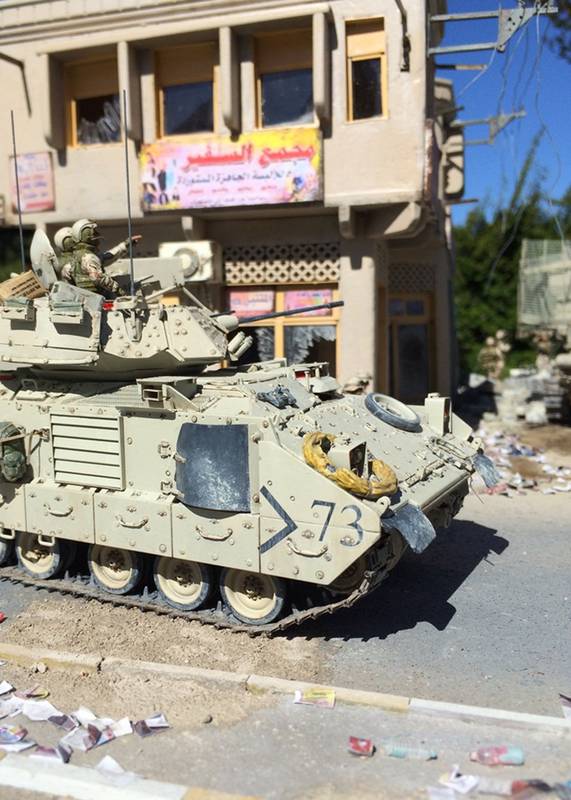
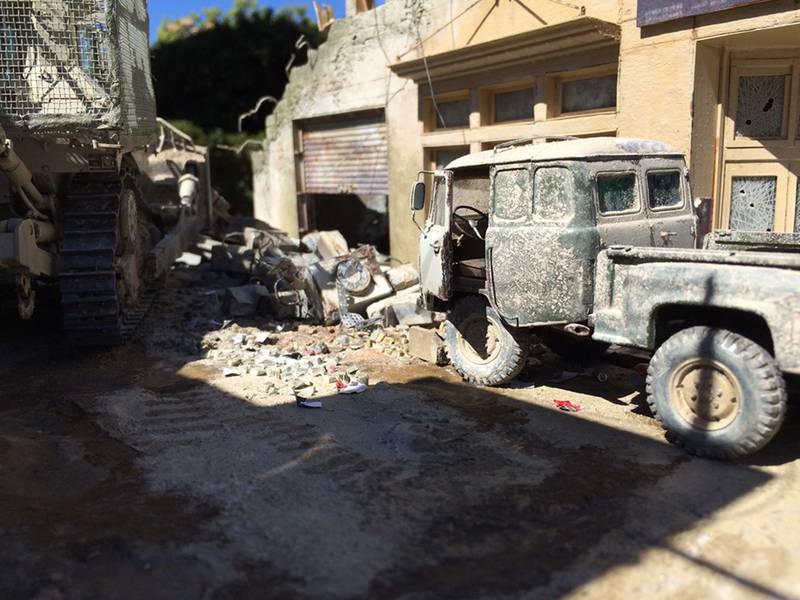
For those of you maybe new to this project, the scene is depicting activities conducted by the US Army, in 2004 in and around Baghdad, likely to have occurred close to Sadr City. The scene came to light as I did some research about the Cat D9R and what it was actually used for and where.
Along the way, I came across a report called "Tip of the Spear", which describes specific events, and defined the equipment being used. In this report, the role of the Cat became clear - essentially an urban breaching device. It also cites the use of up armored M1114s and the Bradley Linebacker. These forces were engaged to sweep buildings and places of insurgents.
Please take a look:

Ok - that's half....
Ok, there you have it - I would be remiss to not mention our friend Romain - he was instrumental when I conceived the idea for this build, and his "eagle eye" was helpful along the way! His influence remains close....
Thanks again to Gino for plenty of info and advice, and James for the clarifications too!
OK guys, thanks for having a look!
Nick
Gino, and James, thanks very much for your help and info along the way, it certainly elevated the build and the story being told.
For those of you maybe new to this project, the scene is depicting activities conducted by the US Army, in 2004 in and around Baghdad, likely to have occurred close to Sadr City. The scene came to light as I did some research about the Cat D9R and what it was actually used for and where.
Along the way, I came across a report called "Tip of the Spear", which describes specific events, and defined the equipment being used. In this report, the role of the Cat became clear - essentially an urban breaching device. It also cites the use of up armored M1114s and the Bradley Linebacker. These forces were engaged to sweep buildings and places of insurgents.
Please take a look:
Ok - that's half....
Ok, there you have it - I would be remiss to not mention our friend Romain - he was instrumental when I conceived the idea for this build, and his "eagle eye" was helpful along the way! His influence remains close....
Thanks again to Gino for plenty of info and advice, and James for the clarifications too!
OK guys, thanks for having a look!
Nick
Cookiescool2
Joined: May 09, 2014
KitMaker: 273 posts
Armorama: 270 posts
Posted: Tuesday, April 28, 2015 - 02:07 AM UTC
This is absolutely astounding! Been following this build for quite some time, and your skills are something to be jealous of! I hope to see more amazing builds in the future!
jrutman
Joined: April 10, 2011
KitMaker: 7,941 posts
Armorama: 7,934 posts
Posted: Tuesday, April 28, 2015 - 03:02 AM UTC
your skills always astound me and also the optempo of the builds but what really seals the deal are these outdoor sun lite pics every time. Brilliant work brother M8 would be proud,
J
J
justsendit
Joined: February 24, 2014
KitMaker: 3,033 posts
Armorama: 2,492 posts
Posted: Tuesday, April 28, 2015 - 04:46 AM UTC
Quoted Text
... M8 would be proud,
J
Absolutely true Jerry.
WOW!!! Another work of art breathtaking!!! Congratulations buddy!

Okay ... so I wont be getting anything done on my end need to sit back and absorb all that youve created here!

... Thats my excuse and Im sticking to it!
Keep up the phenomenal work youre on a roll!
mike
Stickframe
#362
Joined: December 01, 2013
KitMaker: 1,661 posts
Armorama: 1,202 posts
Posted: Tuesday, April 28, 2015 - 09:01 AM UTC
Hi Alan, Jerry, and Mike
Thanks guys, for the positive words!
Alan, thanks very much! Glad you like the dio. This one was fun for several reasons, including trying out the variety of materials - how to build something that "seems" real....step one: be prepared to do lots and lots of tedious and repetitive tasks, then do more of them!
Hi Jerry and Mike, well, while you guys continue to demonstrate ridiculous expertise with figures, well, I try other stuff! This project has been fun for many reasons, not the least of which was learning of the history behind the story. Clearly it could stand improvements in places! That said, it seems to hold together. The outdoor pics don't let much slip by - the bright light can be pretty honest!! I do think the time spent paid off! Next time....well, maybe better work on the figures....as you both have pointed out, practice - at least makes better!!!
Thanks for the comments!
Cheers
Nick

Sean50

Joined: March 20, 2007
KitMaker: 340 posts
Armorama: 328 posts
Posted: Tuesday, April 28, 2015 - 01:41 PM UTC
Hello there,
This is excellent stuff.
As stated above, the daylight photos are awesome.
Brilliant. Well done!
Cheers,
Sean
This is excellent stuff.
As stated above, the daylight photos are awesome.
Brilliant. Well done!
Cheers,
Sean
Stickframe
#362
Joined: December 01, 2013
KitMaker: 1,661 posts
Armorama: 1,202 posts
Posted: Tuesday, April 28, 2015 - 10:32 PM UTC
HI Sean -
Glad you like it, and thanks for your comments!
I really like taking photos in the sunshine - the difference in colors under artificial and natural light is remarkable - the shadows seem more pronounced in sunlight too - seems the subtleties, like the really fine pieces of rubble and debris, on non-slid on the Bradley can actually be seen in natural light -
cheers
Nick

CombatInScale
Joined: August 07, 2005
KitMaker: 58 posts
Armorama: 57 posts

Posted: Tuesday, April 28, 2015 - 11:09 PM UTC
unreal. The outdoor photos certainly bring this build to life. amazing work, Nick... once again.
 |

WEB HOSTING BY


Copyright ©2021 Armorama and Kitmaker Network, a subsidiary of Silver Star Enterprises
All Rights Reserved. Please read our Conditions of Use and Privacy Policy.
All Rights Reserved. Please read our Conditions of Use and Privacy Policy.