

Hosted by Richard S.
DOG Campaign

Hudson29

#460

Joined: September 16, 2014
KitMaker: 1,156 posts
Armorama: 1,024 posts
Posted: Tuesday, September 20, 2016 - 03:05 AM UTC
I'll bet your kids will love it! The colors are wonderful. Its life as a toy may be short but it will be glorious!

ClaytonFromEllijay
#454
Joined: July 10, 2016
KitMaker: 1,273 posts
Armorama: 1,138 posts
Posted: Tuesday, September 20, 2016 - 03:14 AM UTC
You could probably bang that around for a good while before a catastrophic failure...;-)
SGTJKJ

#041

Joined: July 20, 2006
KitMaker: 10,069 posts
Armorama: 4,677 posts

Posted: Tuesday, September 20, 2016 - 10:21 AM UTC
Thanks for the comments, guys. Much appreciated 

Hudson29
#460
Joined: September 16, 2014
KitMaker: 1,156 posts
Armorama: 1,024 posts
Posted: Tuesday, October 11, 2016 - 03:19 AM UTC
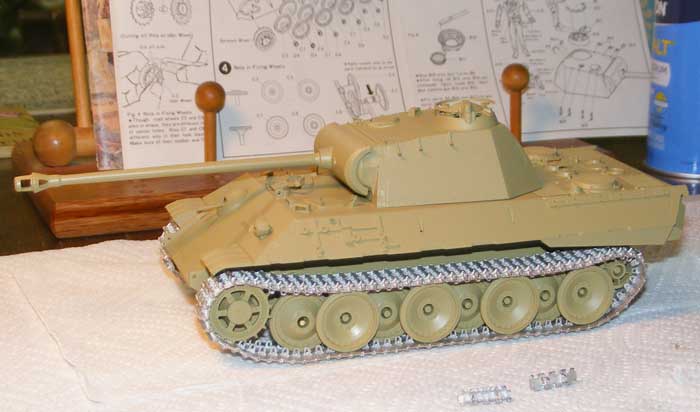
I have been making some progress on my old dog, the Tamiya Panther from 1969. I found the receipt in the box, it tells me I bought this thing on May 16, 1986. This woofer has been in my closet more than thirty years, since it was still reasonably current with the state of the art.
Belatedly, I built the Fruils. These were tough as the links all needed a lot of drilling and many needed drilling once assembled. Perhaps the tooling is getting ready for overhaul?
This should have been done at an early stage before paint as the number of links still had to be determined. I used the number listed in PANTHER IN ACTION, 87 per side which turned out to be one link too many for this kit. One was removed and the nice dark yellow paint survived the process.
One note about the fit. Everything fit like it should but for the drive sprockets. Tamiya's are slightly too narrow to fit the Fruil links. I used the process of "elastic deformation" to force the sprockets wide enough to fit. In the end, all came good and the Panther model looks like a Panther. I like this stage as the shape of the tank is still easy to see:
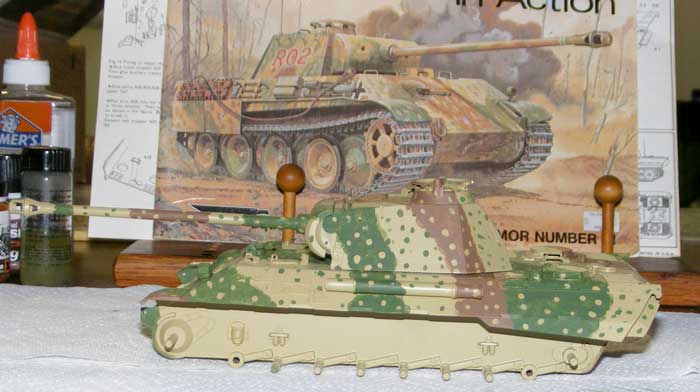
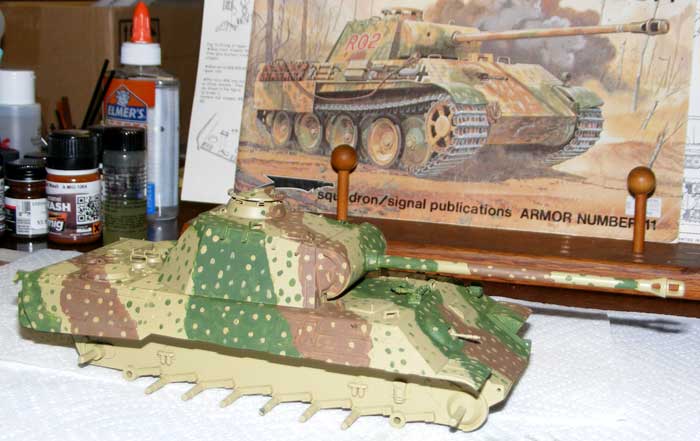
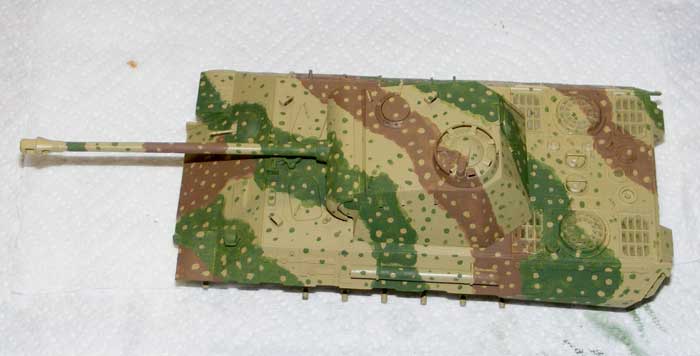
Next was some camo. I have never done multi-color jobs before and I thought I would try the scheme depicted on the cover of PANTHER IN ACTION. The art was of a G with zimm and my model is of an A without zimm but this build is for fun & practice and I thought an experiment was in order.
I applied the Tamiya acrylic with Q-tips. The paint was dripped into a bottle cap, thinned with rubbing AL and dabbed on. In some areas it looked too patchy and was treated to a second coat. Spots were daubed on with a very small modeling Q-Tip. After a day to freshen my eyes, the areas of green & red/brown were refined and the spots reapplied as needed.
It all looks a bit loud and we'll see if we can calm it down with filters later on. Here are some pictures of the initial effort before any refining:
Belatedly, I built the Fruils. These were tough as the links all needed a lot of drilling and many needed drilling once assembled. Perhaps the tooling is getting ready for overhaul?
This should have been done at an early stage before paint as the number of links still had to be determined. I used the number listed in PANTHER IN ACTION, 87 per side which turned out to be one link too many for this kit. One was removed and the nice dark yellow paint survived the process.
One note about the fit. Everything fit like it should but for the drive sprockets. Tamiya's are slightly too narrow to fit the Fruil links. I used the process of "elastic deformation" to force the sprockets wide enough to fit. In the end, all came good and the Panther model looks like a Panther. I like this stage as the shape of the tank is still easy to see:
Next was some camo. I have never done multi-color jobs before and I thought I would try the scheme depicted on the cover of PANTHER IN ACTION. The art was of a G with zimm and my model is of an A without zimm but this build is for fun & practice and I thought an experiment was in order.
I applied the Tamiya acrylic with Q-tips. The paint was dripped into a bottle cap, thinned with rubbing AL and dabbed on. In some areas it looked too patchy and was treated to a second coat. Spots were daubed on with a very small modeling Q-Tip. After a day to freshen my eyes, the areas of green & red/brown were refined and the spots reapplied as needed.
It all looks a bit loud and we'll see if we can calm it down with filters later on. Here are some pictures of the initial effort before any refining:
ClaytonFromEllijay
#454
Joined: July 10, 2016
KitMaker: 1,273 posts
Armorama: 1,138 posts
Posted: Tuesday, October 11, 2016 - 03:48 AM UTC
Looks like you're on the right track, Paul ;-)
SGTJKJ
#041
Joined: July 20, 2006
KitMaker: 10,069 posts
Armorama: 4,677 posts
Posted: Tuesday, October 11, 2016 - 06:17 PM UTC
Paul, both the kit and the squadron book bring back a lot of memories.
Great to see it come to life again.
Great to see it come to life again.
Hudson29
#460
Joined: September 16, 2014
KitMaker: 1,156 posts
Armorama: 1,024 posts
Posted: Tuesday, October 11, 2016 - 09:13 PM UTC
Thanks guys, this is a fun build, one I have no trouble getting back to in the evening. More progress tonight while watching the Dodgers/Nationals in the final division playoff game.
Hudson29
#460
Joined: September 16, 2014
KitMaker: 1,156 posts
Armorama: 1,024 posts
Posted: Tuesday, October 18, 2016 - 04:25 AM UTC
More progress with the Tamiya Panther A over the last several days. The camo has had several refinements and the dry transfers applied. One of these, a small trapezoid logo with a stylized L inside refused to fully "transfer." I'll have to give this area some damage, mud or rust . . .
Several pinwashes were done and a light yellowish brown filter brushed on to try to calm the colors and make them appear to have lived together for some weeks or months.
Here are some pics showing the Panther next to its workbench mate, a French Hotchkiss being built for Fighting Frogs:
Several pinwashes were done and a light yellowish brown filter brushed on to try to calm the colors and make them appear to have lived together for some weeks or months.
Here are some pics showing the Panther next to its workbench mate, a French Hotchkiss being built for Fighting Frogs:
ClaytonFromEllijay
#454
Joined: July 10, 2016
KitMaker: 1,273 posts
Armorama: 1,138 posts
Posted: Tuesday, October 18, 2016 - 04:55 AM UTC
Paul, your "calming" effect seems to be working!

tatbaqui
#040

Joined: May 06, 2007
KitMaker: 2,713 posts
Armorama: 2,451 posts

Posted: Tuesday, October 18, 2016 - 09:58 AM UTC
Hey Paul, what an oldie you have there -- nice build!
Hoping that I am not too late to join the party. Anyways I did not want to post till I am sure I can get this build going:
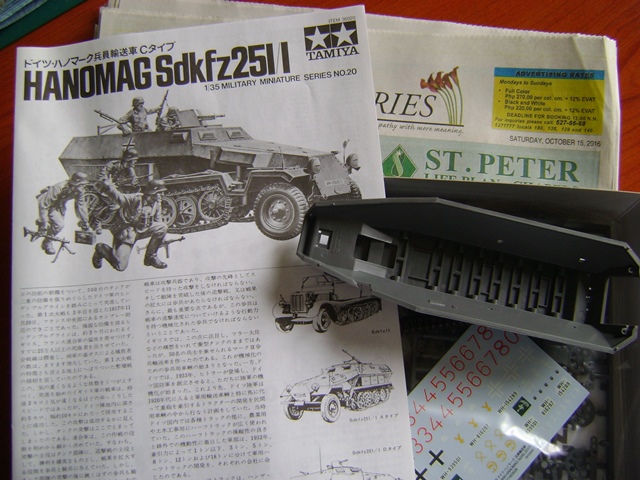
I've initially planned to do the Dragon Panther II, but decided to try my hands on a half track. The molds for this one is old as well.
While the plastic is on the soft side, the build went well -- I'd say typical of Tamiya kits.
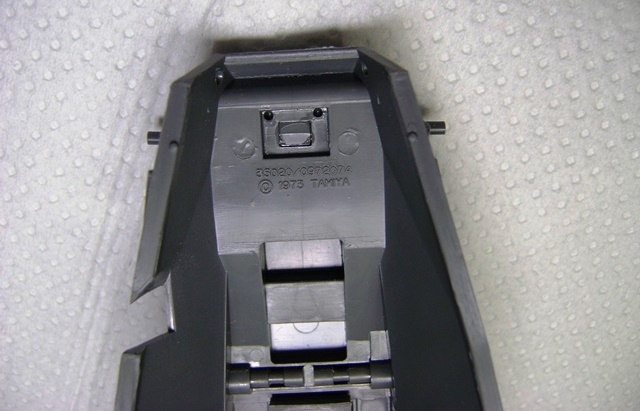
Not a major issue, but what I found a bit tricky is getting the correct angle for rear door hinges -- I've put pieces of tape and Blu-Tac to hold it while the glue sets between the hinges and its supports.
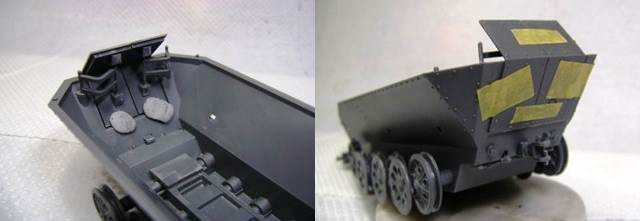
Well, the wheels seem to sit level on the ground -- hope this stays as is after mounting the tracks. For now I will move to painting the sub-assemblies.
Till next update.
Cheers,
Tat
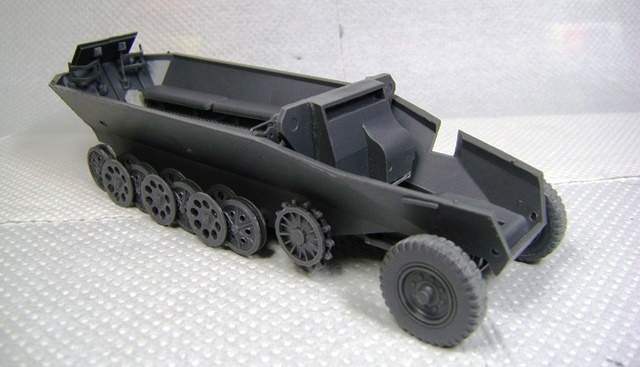
Hoping that I am not too late to join the party. Anyways I did not want to post till I am sure I can get this build going:
I've initially planned to do the Dragon Panther II, but decided to try my hands on a half track. The molds for this one is old as well.
While the plastic is on the soft side, the build went well -- I'd say typical of Tamiya kits.
Not a major issue, but what I found a bit tricky is getting the correct angle for rear door hinges -- I've put pieces of tape and Blu-Tac to hold it while the glue sets between the hinges and its supports.
Well, the wheels seem to sit level on the ground -- hope this stays as is after mounting the tracks. For now I will move to painting the sub-assemblies.
Till next update.
Cheers,
Tat
ClaytonFromEllijay
#454
Joined: July 10, 2016
KitMaker: 1,273 posts
Armorama: 1,138 posts
Posted: Tuesday, October 18, 2016 - 05:56 PM UTC
It may be a bit of a Dog, but I love that kit,Tat, a really fun build...I have 2 done already and I'm sure I'll get 3-4 more in before my building days are over...;-)
Hudson29
#460
Joined: September 16, 2014
KitMaker: 1,156 posts
Armorama: 1,024 posts
Posted: Friday, October 21, 2016 - 02:44 AM UTC
That Hanomag look pretty good so far. I think I have one of those in the pile someplace so I'm watching your progress with interest. Will you use the kit tracks? Are they rubber bands or link & length?
tatbaqui
#040
Joined: May 06, 2007
KitMaker: 2,713 posts
Armorama: 2,451 posts
Posted: Friday, October 21, 2016 - 04:47 AM UTC
Thanks Clayton, Paul!
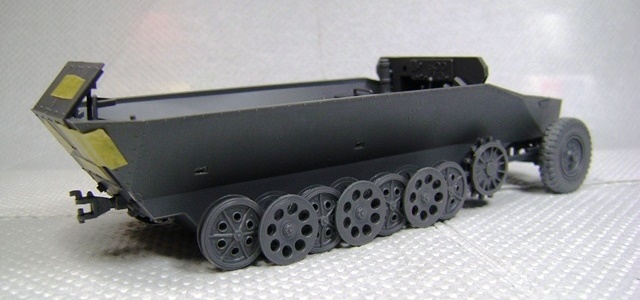
It's my first ever half-track and I must say I'm enjoying it -- good practice for the more complicated ones. The tracks are the old rubber band ones. They look ok so I'll be using it. Working on the interior paint now before putting it all together.
Cheeers,
Tat
It's my first ever half-track and I must say I'm enjoying it -- good practice for the more complicated ones. The tracks are the old rubber band ones. They look ok so I'll be using it. Working on the interior paint now before putting it all together.
Cheeers,
Tat

Cbacon84
Joined: October 10, 2012
KitMaker: 204 posts
Armorama: 45 posts
Posted: Friday, October 21, 2016 - 11:44 PM UTC
Well another Dog has come into my possession, might end up working on this, if it counts rather then my Patton due to me not having a lot of free time at the moment. Testers M4A3 with what looks like the 75MM gun. looking at it out of the box it seems to be an ex-motorized kit/toy with the mold originally from a company called New-Ray Mfg.Ltd out of Dongguan China. details are simplified but there are some nice details on the back and turret. It definitely needs some paint and might try and see if i can add some wood planks on the side. 
ClaytonFromEllijay
#454
Joined: July 10, 2016
KitMaker: 1,273 posts
Armorama: 1,138 posts
Posted: Saturday, October 22, 2016 - 01:48 AM UTC
That looks to be a real K-9 mutt...hope you can survive it, lol...;-)
Cbacon84
Joined: October 10, 2012
KitMaker: 204 posts
Armorama: 45 posts
Posted: Saturday, October 22, 2016 - 02:55 AM UTC
well did a quick test fit to show how it would look right out of the box per the instruction and all i can say is Woof, the solid silver wheels and suspension look terrible next to the OD green plastic and whoever put the front sprockets together didn't set them properly so the tracks are a little testy to set in the groves, the gun barrel does not sit flush and will have to be sanded down and the front well, its as simple as you can get. The back also still has the on/off molding and switch hole that will have to be fixed as well. However like I said there are some decent, for what this is, details the turret isn't to bad although the machine gun is a little low and the back stowage is a nice touch. I could see this kit being a nice test bed for experimenting with some scratch building as its cheap enough usually around $10-15. Could probably test out some aftermarket parts, though I've never got the mentality of putting $30s worth of parts on a $10 model. 
SGTJKJ
#041
Joined: July 20, 2006
KitMaker: 10,069 posts
Armorama: 4,677 posts
Posted: Saturday, October 22, 2016 - 05:40 AM UTC
That is a dog, Casey! It would be a nice build for a father and son build, though.
Looking forward to see what you make from it.
Looking forward to see what you make from it.
Hudson29
#460
Joined: September 16, 2014
KitMaker: 1,156 posts
Armorama: 1,024 posts
Posted: Monday, October 24, 2016 - 02:41 AM UTC
Yup, Casey, you got a woofer there. There is certainly room in the market for a starter kit for kids and adults just starting out.
I did some more work on the old Tamya Panther. It is starting to look better now. Here are a few pics of the latest work:
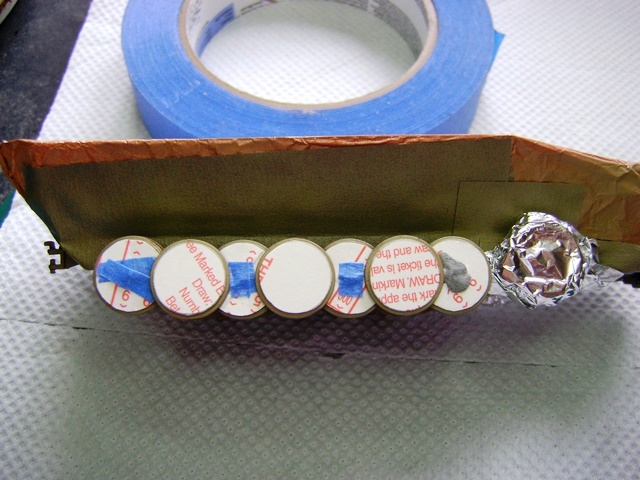
The Fruils got a bath in burnishing liquid and will be ready for additional work this evening.
I did some more work on the old Tamya Panther. It is starting to look better now. Here are a few pics of the latest work:
The Fruils got a bath in burnishing liquid and will be ready for additional work this evening.
Cbacon84
Joined: October 10, 2012
KitMaker: 204 posts
Armorama: 45 posts
Posted: Monday, October 24, 2016 - 03:09 AM UTC
@Paul I totally agree but even by starter kits I would say this is below average. For the same price you could get one of the Revell snaptite kits and probably end up with a better finished model and/or better teaching tool for kids
darthpanzer

Joined: May 27, 2011
KitMaker: 38 posts
Armorama: 17 posts
Posted: Friday, October 28, 2016 - 01:52 AM UTC
Hi. I will like to declare that I am a dog lover. I just love old kits. tamiya,s 70,s stuff, Old Nichimos, lindberg,and some more modern like releases now found under alan ,ark and other russian and eastern europe companies. Why? Precissely because they are not accurate. In fact toy like sometimes. In terms of the most inaccurate kit ever? That is a tie between lindbergs 222 armored car and the upc tiger tank. Horrible in their natural state. i turned the armored car into something similar to a At At walker. The upc tiger into something similar to a jagdtiger. Just a lot of styrene sheets, patience and imagination. i enjoyed the process and the results look coll to me. And I believe that is what matters. Is supposed to be a hobby after all.
Hudson29
#460
Joined: September 16, 2014
KitMaker: 1,156 posts
Armorama: 1,024 posts
Posted: Monday, October 31, 2016 - 01:55 AM UTC
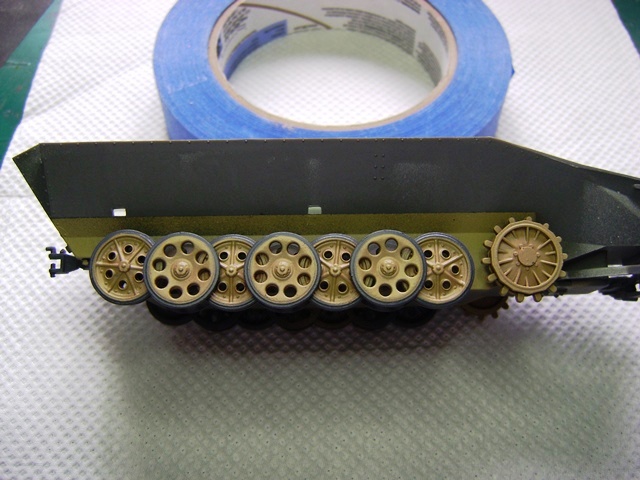
More progress on my old Dog, The Tamiya Panther. Here are the Fruils set next to another set being made up for a Hotchkiss H39:
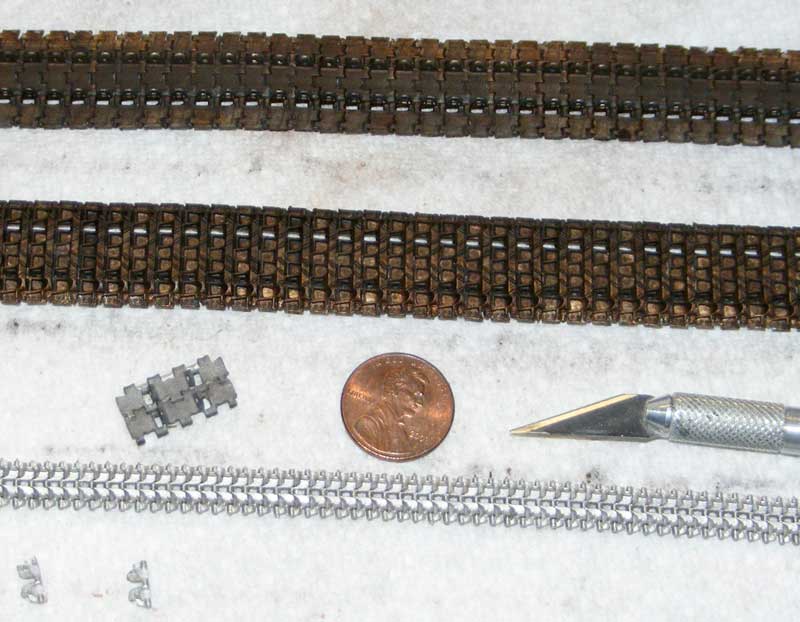
Here the tracks are assembled to the hull awaiting a bit of dusty pigment:
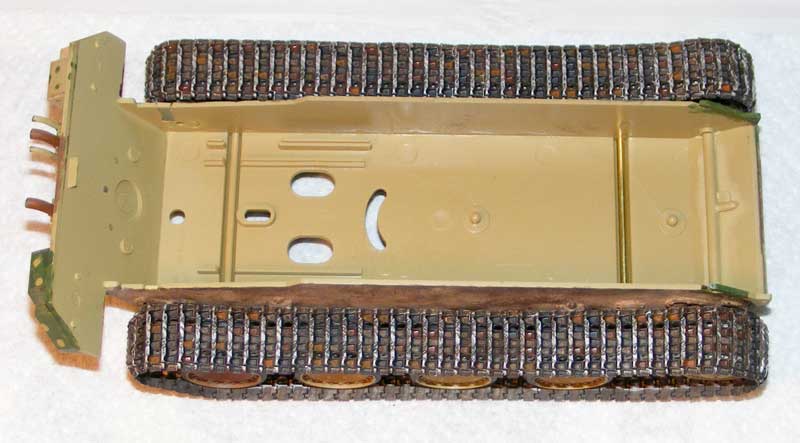
The above picture shows the brass axle made up to replace the kit part that vanished mysteriously . . .
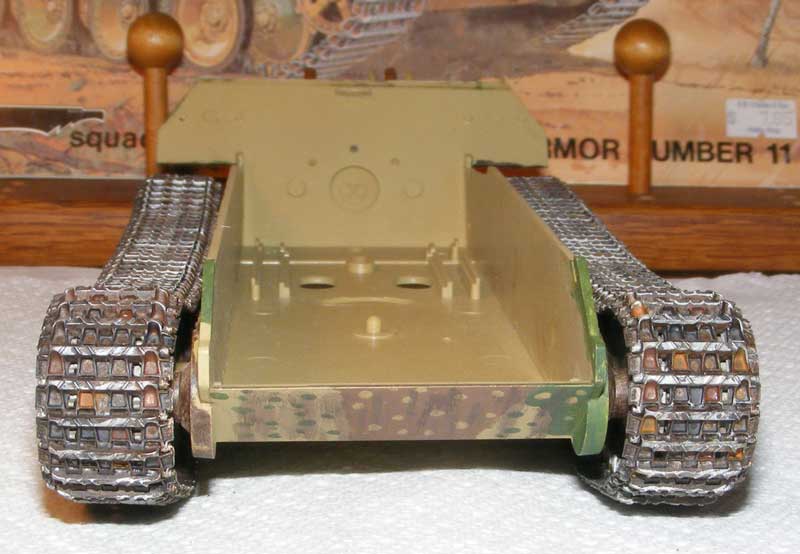
Here the tracks are assembled to the hull awaiting a bit of dusty pigment:
The above picture shows the brass axle made up to replace the kit part that vanished mysteriously . . .
ClaytonFromEllijay
#454
Joined: July 10, 2016
KitMaker: 1,273 posts
Armorama: 1,138 posts
Posted: Monday, October 31, 2016 - 02:09 AM UTC
Those treads look very good...
Hudson29
#460
Joined: September 16, 2014
KitMaker: 1,156 posts
Armorama: 1,024 posts
Posted: Monday, October 31, 2016 - 03:49 AM UTC
Thanks Clayton. I have a good pal who thinks I am throwing good money after bad by using the Fruils on this old Dog. Of course, I disagree. I'm having a good time, sharpening my skills and the old Panther is starting to look pretty respectable.
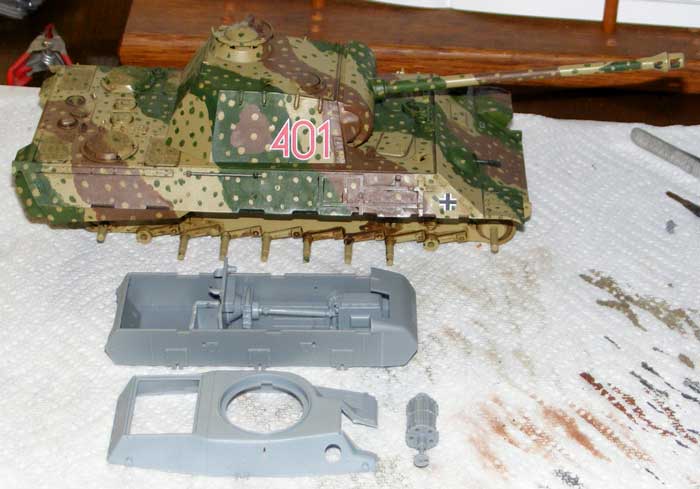
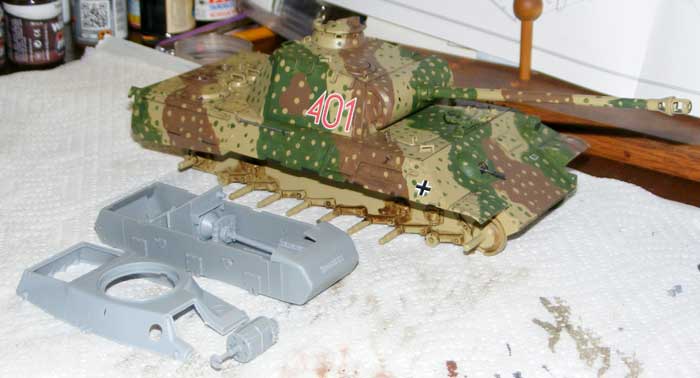
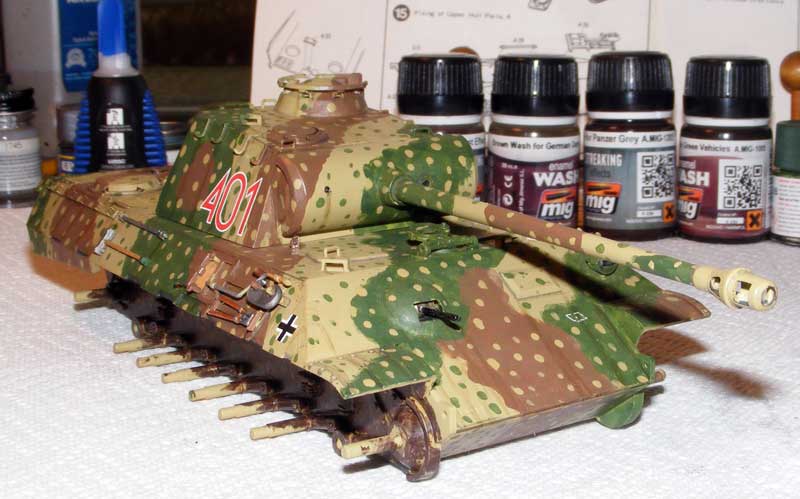
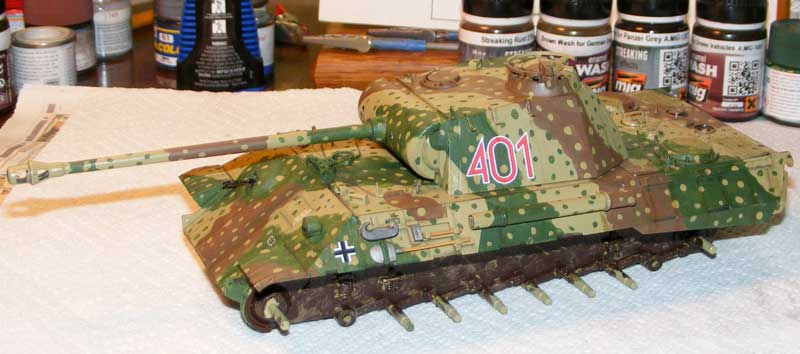
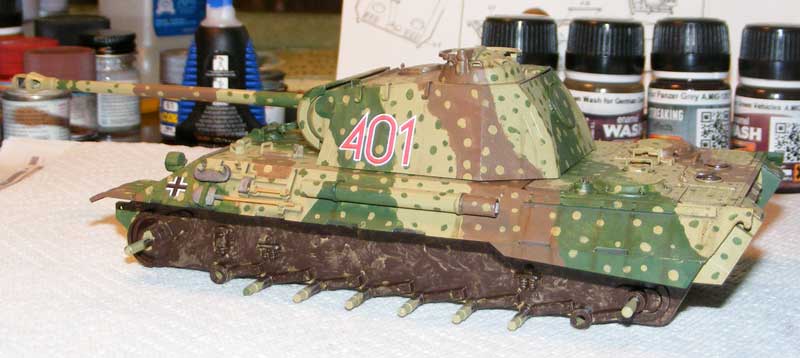
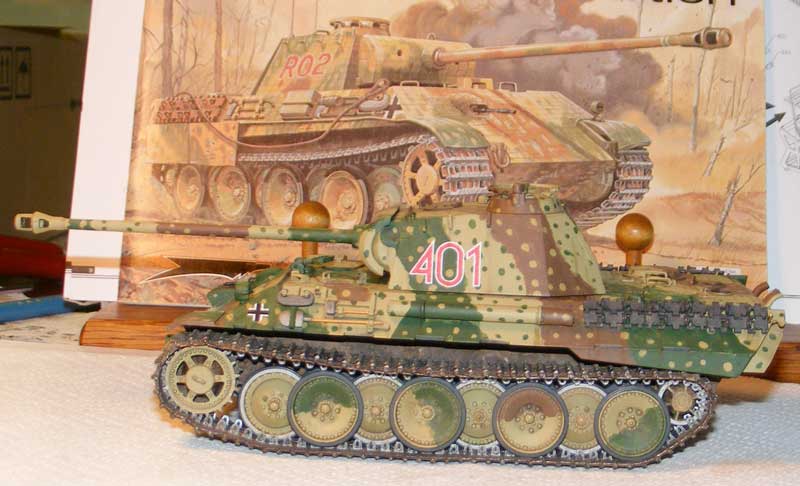
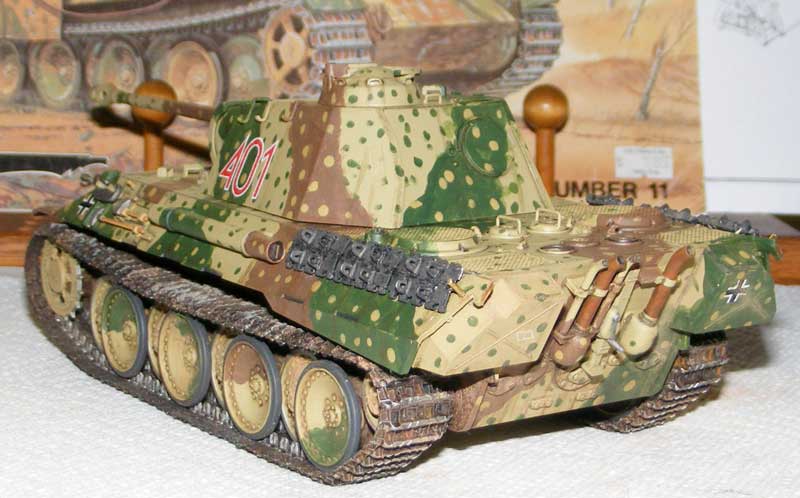
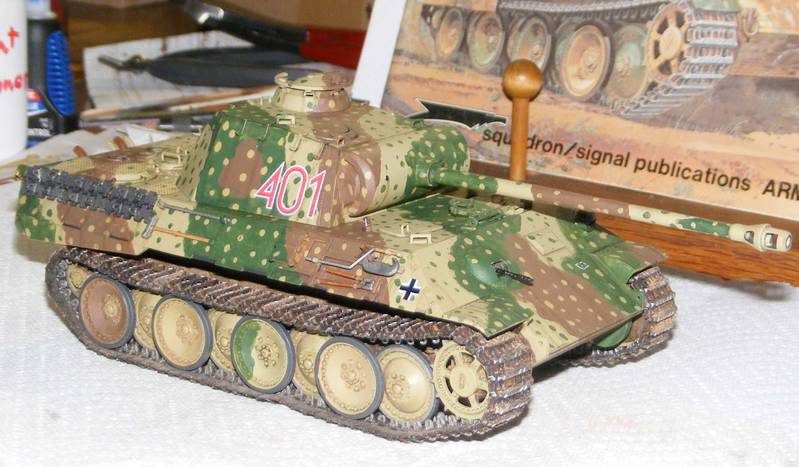
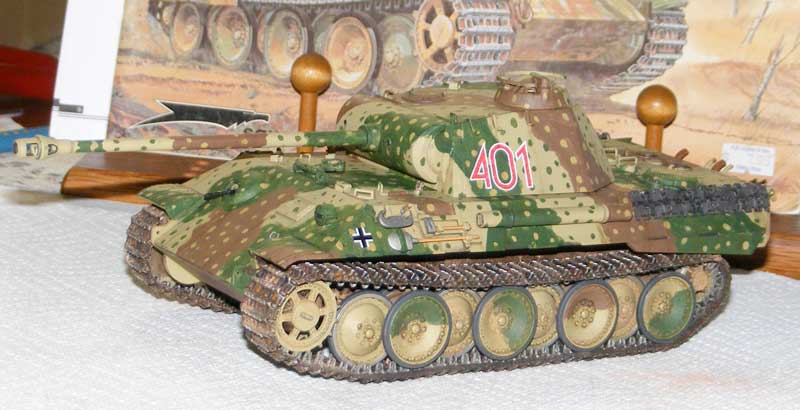
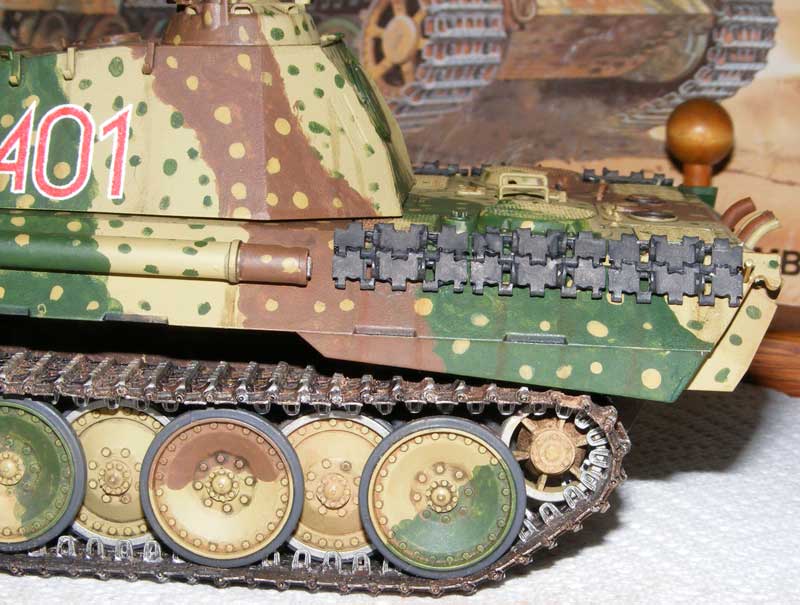
These markings are for Panzer Lehr, an elite group comprised of instructors. The paint scheme is late war as used on the later G model. This is an A made sometime after Jan 1944. I made the model as if this tank was just out of overhaul with fresh up-to-date paint, newly issued to a front line unit. It has been used but not much.
Given all of that I thought the paint shouldn't show too much wear & tear. My normal tendency is to think that if a little is good, a lot must be better - so I went back over the model with paint thinner removing weathering that I thought overblown. Now I look at it and wonder if I should have gone further with that weathering. What do you think?
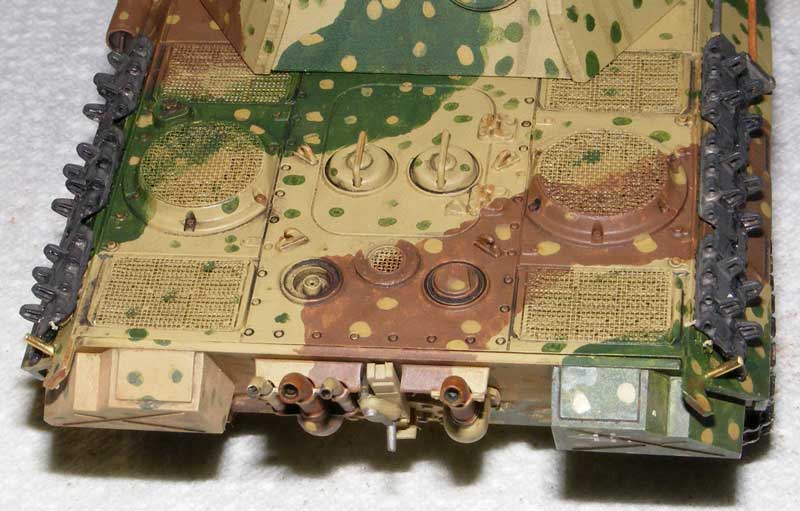
We're nearly done. Still to add are the antenna, and tow cables. I have ordered a set of these to replace the kit set. I also added some little pieces of brass rod to anchor the rear of the cables. They are still raw brass in these pictures.
Any final weathering & pigments are still to add.
These markings are for Panzer Lehr, an elite group comprised of instructors. The paint scheme is late war as used on the later G model. This is an A made sometime after Jan 1944. I made the model as if this tank was just out of overhaul with fresh up-to-date paint, newly issued to a front line unit. It has been used but not much.
Given all of that I thought the paint shouldn't show too much wear & tear. My normal tendency is to think that if a little is good, a lot must be better - so I went back over the model with paint thinner removing weathering that I thought overblown. Now I look at it and wonder if I should have gone further with that weathering. What do you think?
We're nearly done. Still to add are the antenna, and tow cables. I have ordered a set of these to replace the kit set. I also added some little pieces of brass rod to anchor the rear of the cables. They are still raw brass in these pictures.
Any final weathering & pigments are still to add.
Hudson29
#460
Joined: September 16, 2014
KitMaker: 1,156 posts
Armorama: 1,024 posts
Posted: Monday, October 31, 2016 - 03:57 AM UTC
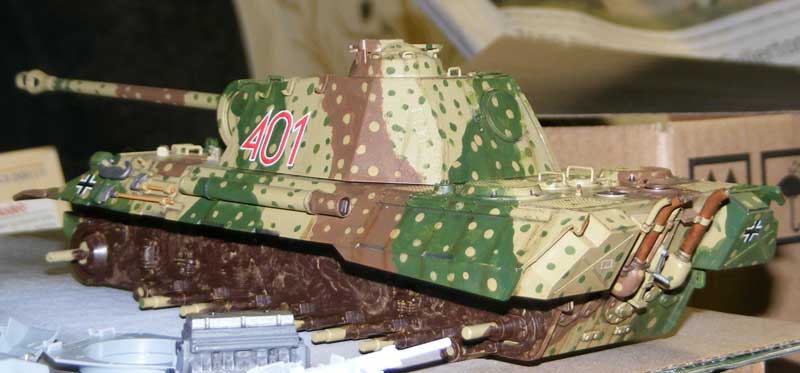
An interesting note about the camo on this Panther model. It really works. You can see the lack of contrast with the illustration I used for inspiration in the back of the pics. The model also tends to disappear in the midst of the workbench clutter in low light situations . . .
tatbaqui
#040
Joined: May 06, 2007
KitMaker: 2,713 posts
Armorama: 2,451 posts
Posted: Monday, October 31, 2016 - 11:46 AM UTC
The tracks look good Paul.
Mine's a bit slow as I've been away from the bench for a while. Today I've finished the road wheels.
Putting some paint on the interior next.
Cheers,
Tat
Mine's a bit slow as I've been away from the bench for a while. Today I've finished the road wheels.
Putting some paint on the interior next.
Cheers,
Tat
 |

WEB HOSTING BY


Copyright ©2021 Armorama and Kitmaker Network, a subsidiary of Silver Star Enterprises
All Rights Reserved. Please read our Conditions of Use and Privacy Policy.
All Rights Reserved. Please read our Conditions of Use and Privacy Policy.