


Hosted by Richard S.
Campaign Holy Orders

Namabiiru

#399

Joined: March 05, 2014
KitMaker: 2,888 posts
Armorama: 1,920 posts

Posted: Tuesday, December 27, 2016 - 05:56 PM UTC
Really shaping up, Iain!

Pave-Hawk

Joined: May 05, 2006
KitMaker: 900 posts
Armorama: 510 posts

Posted: Tuesday, December 27, 2016 - 07:28 PM UTC
Quoted Text
Really shaping up, Iain!
Shaping up slowly. There are a lot of fiddly parts and the instructions are bit odd and difficult to interpret in some places.
Have managed to get the ammo holders installed in the superstructure, and have done a few other minor sub-assemblies like the external fuel(?) tank. Also the engine bay doors which are themselves about 10 parts each. Doing an SBS on this build would have been enormous.
There's about another 10-15 parts(I hope that's all) before the upper hull is fully ready to go on the lower.
Pave-Hawk
Joined: May 05, 2006
KitMaker: 900 posts
Armorama: 510 posts
Posted: Sunday, January 01, 2017 - 04:25 PM UTC
Upper and lower hulls joined, and photoetch work has begun.

Unfortunately it looks I will be closing the back up. Not happy with the way things have gone there.

As can be seen, the fuel(?) tank filler/vent holes don't line up with the gaps that they should. The tank should be mounted further back and more towards the center of the vehicle. Unfortunately the instructions were less than clear. As it mounts right up against a piece(I think), that is removed in a later step, but that piece is not shown in the step where you add the tank.
So now I have two small holes where you can see a misaligned tank.

ClaytonFromEllijay
#454
Joined: July 10, 2016
KitMaker: 1,273 posts
Armorama: 1,138 posts
Posted: Tuesday, January 03, 2017 - 02:30 AM UTC
Finally wrapped up my Shilka "Zeus"...needed plenty of mud to cover the poor track work 
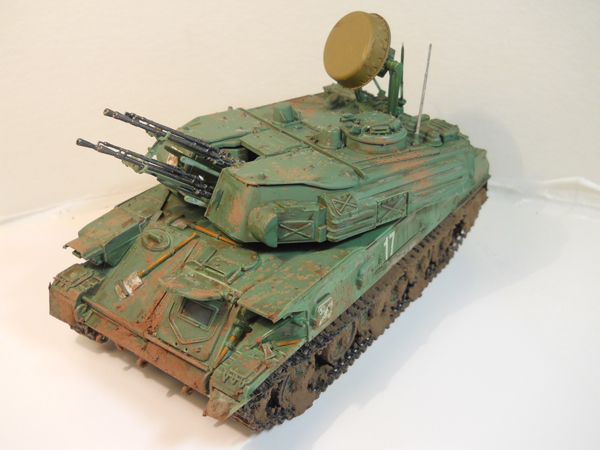
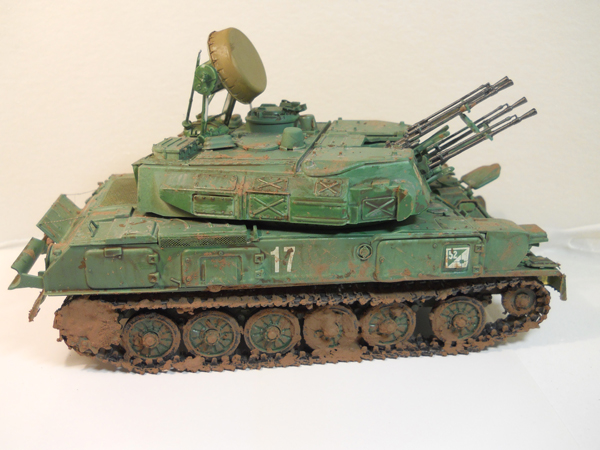
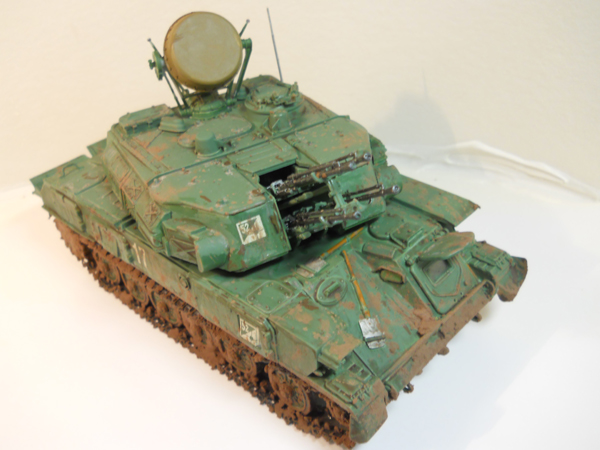
Thanks, Mark, for stretching the rules and running a great campaign!
Thanks, Mark, for stretching the rules and running a great campaign!
Namabiiru
#399
Joined: March 05, 2014
KitMaker: 2,888 posts
Armorama: 1,920 posts
Posted: Tuesday, January 03, 2017 - 02:59 AM UTC
That is one muddy vehicle. Looks great, Clayton!
ClaytonFromEllijay
#454
Joined: July 10, 2016
KitMaker: 1,273 posts
Armorama: 1,138 posts
Posted: Tuesday, January 03, 2017 - 05:23 AM UTC
Thank you Much!

Ranger74
Joined: April 04, 2002
KitMaker: 1,290 posts
Armorama: 658 posts
Posted: Tuesday, January 03, 2017 - 10:37 PM UTC
Clayton, nice work on your Zeus.
ClaytonFromEllijay
#454
Joined: July 10, 2016
KitMaker: 1,273 posts
Armorama: 1,138 posts
Posted: Wednesday, January 04, 2017 - 02:04 AM UTC
Thank you, Jeff!
Pave-Hawk
Joined: May 05, 2006
KitMaker: 900 posts
Armorama: 510 posts
Posted: Wednesday, January 04, 2017 - 03:01 PM UTC
Having to repaint the interior of some of the super structure as a final coat of Tamiya spray flat white caused some areas to orange peel 
In the meantime I have nearly competed the No. 19 wireless set.

unfortunately can't install it, as that's the side that needed repainting
In the meantime I have nearly competed the No. 19 wireless set.

unfortunately can't install it, as that's the side that needed repainting
Pave-Hawk
Joined: May 05, 2006
KitMaker: 900 posts
Armorama: 510 posts
Posted: Friday, January 06, 2017 - 12:10 PM UTC
Progress continues on the interior, and limber:

The ammo limber has been used for a couple of painting experiments, including a practice attempt at getting a realistic bronze colour. It just needs doors, wheels, and ammo.
Some progress has also been made on the hull. Its closed up and various external bits attached. Currently working on getting the suspension ready for attachment.
The gun and gun mount are now the major sub-assemblies that need work before the whole thing is ready for painting.
The tracks are still sitting is sections of ten, and will need careful handling for painting and final assembly.
Dear lord will this model ever end! So many delicate detail parts it's almost incomprehensible. I also wish there were some indications of what colour some of the interior parts should be, so I am having to make it up as I go along.

ltb073
Joined: March 08, 2010
KitMaker: 3,662 posts
Armorama: 3,078 posts
Posted: Thursday, January 12, 2017 - 05:55 AM UTC
Definitely some fit issues with this kit It almost joined the Flying Nun 

Had the figure lurking on the bench now if I can find the right shell to but in his arms

Ill be adding some storage to this as well

Had the figure lurking on the bench now if I can find the right shell to but in his arms

Ill be adding some storage to this as well

Pave-Hawk
Joined: May 05, 2006
KitMaker: 900 posts
Armorama: 510 posts
Posted: Thursday, January 12, 2017 - 06:16 AM UTC
That's looking pretty good Sal, nice work.
Namabiiru
#399
Joined: March 05, 2014
KitMaker: 2,888 posts
Armorama: 1,920 posts
Posted: Thursday, January 12, 2017 - 05:44 PM UTC
I feel your pain, Sal! I had the choice of getting the rear wall of the fighting compartment to come out straight or line up with the sides and floor, but not both! Very frustrating in an otherwise well-made kit. Looks like you pulled it off. Well done!
Pave-Hawk
Joined: May 05, 2006
KitMaker: 900 posts
Armorama: 510 posts
Posted: Sunday, January 15, 2017 - 01:39 PM UTC
Fighting compartment interior is done, apart from a few little paint touch ups. Just waiting on the gun and mount to fully button up.


Some of the interior painting may be completely fanciful but had no real info to go on.
Not sure what a typical load out would be, so excluding the limber carried rounds, I have 11 rounds AP, 17 rounds HE, and 4 rounds of smoke.


Some of the interior painting may be completely fanciful but had no real info to go on.
Not sure what a typical load out would be, so excluding the limber carried rounds, I have 11 rounds AP, 17 rounds HE, and 4 rounds of smoke.
ltb073
Joined: March 08, 2010
KitMaker: 3,662 posts
Armorama: 3,078 posts
Posted: Saturday, January 21, 2017 - 09:33 PM UTC
Nice interior work Iain
Bench time has been limited but i did manage to find some storage


got some paint on it too


Hopefully I ll get some more work done soon
Bench time has been limited but i did manage to find some storage


got some paint on it too


Hopefully I ll get some more work done soon
ltb073
Joined: March 08, 2010
KitMaker: 3,662 posts
Armorama: 3,078 posts
Posted: Tuesday, January 24, 2017 - 06:26 PM UTC
OK so Its all painted up with some markings


So before I call this one finished I feel its missing something Do I need more storage more weathering, or another figure which I dont have
Comments and suggestions are welcome


So before I call this one finished I feel its missing something
Do I need more storage more weathering, or another figure which I dont have Comments and suggestions are welcome
Namabiiru
#399
Joined: March 05, 2014
KitMaker: 2,888 posts
Armorama: 1,920 posts
Posted: Tuesday, January 24, 2017 - 07:35 PM UTC
Sal,
Looking pretty good, but since you asked here are some observations:
- The running gear look pretty clean, so I would recommend some pigments or something to dust them up a bit. The rubber on the road wheels in particular look kind of pristine, but may just be the photos.
- The addition of the figure is really nice, but I agree that if you're going to have a loader in action the absence of the rest of the crew tends to stand out
-Nice job with the washes on the engine deck, but I think some streaking on the sides is needed to really bring it together.
-This is nothing more than a personal preference of mine, but I like to spray a highly thinned coat of my base color (maybe even lightened with some tan) over any markings to blend and tone them down. To me, naked markings look unnaturally bright, but like I said that's just a matter of personal aesthetics.
-Recommend hitting the tops of the recoil slides on the main gun with some gunmetal or dark grey (they would have been highly-greased bare metal), and then rubbing them down with a graphite pencil to give them a metallic finish.
Great work on a challenging build!

jonsteed47
Joined: June 02, 2016
KitMaker: 12 posts
Armorama: 6 posts
Posted: Tuesday, January 24, 2017 - 08:33 PM UTC
why not h've something & c'lled the r'bbi ?
Namabiiru
#399
Joined: March 05, 2014
KitMaker: 2,888 posts
Armorama: 1,920 posts
Posted: Tuesday, January 24, 2017 - 09:49 PM UTC
Quoted Text
why not h've something & c'lled the r'bbi ?
Marc, IF I understand your question correctly I can only say, "I don't name 'em, I just build 'em!"
Pave-Hawk
Joined: May 05, 2006
KitMaker: 900 posts
Armorama: 510 posts
Posted: Thursday, January 26, 2017 - 01:58 PM UTC
My bishop build is progressing, but exceedingly slowly. I have reached the same pay that skewed my down on my Bronco 17pdr build, the gunsight and gun mount.
I swear Bronco just make complex models for the sake of complexity. There are PE parts so small I can barely see them on the fret, never mind manipulate them and glue them to the rest of the parts. Additionally I don't think anyone tries building the kits, as there are some seriously tiny (fractions of a millimeter) attachment points for some parts.
Since I don't think the tiny PE will be visible in the end I will be leaving off the smaller parts, as even without them it's taking me several man hours to get the fiddly bits all together, as I have to leave the parts to dry before I can handle them and add other parts.
Apart from this, the rest is done and ready for masking and paint.
Pave-Hawk
Joined: May 05, 2006
KitMaker: 900 posts
Armorama: 510 posts
Posted: Thursday, January 26, 2017 - 04:10 PM UTC

In that picture is about 24 separate pieces(ignore the off-cut in the top left corner), and at least 6 hours of glue, wait, wait wait, glue, wait wait wait glue, all because of the delicacy of some of the joins.
If it weren't for the fact Bronco have what I think is the only model of the Archer (Accurate Armours is discontinued I believe), I might try and avoid Bronco kits in future.
Namabiiru
#399
Joined: March 05, 2014
KitMaker: 2,888 posts
Armorama: 1,920 posts
Posted: Thursday, January 26, 2017 - 05:54 PM UTC
That does sound pretty over-the-top, Iain. I think Dragon is guilty to a lesser degree of the same...or maybe I've just gotten to used to Tamiya shake-and-bake kits.
For what it's worth, I use the same philosophy: If it's too small to handle, it's too small to see.
Good luck! And remember: modeling is relaxing!
For what it's worth, I use the same philosophy: If it's too small to handle, it's too small to see.
Good luck! And remember: modeling is relaxing!
ClaytonFromEllijay
#454
Joined: July 10, 2016
KitMaker: 1,273 posts
Armorama: 1,138 posts
Posted: Thursday, January 26, 2017 - 08:28 PM UTC
I would bet I only ever use 1/3 of included photoetch parts in any given kit, some so ridiculously small they make no difference at all. Dealing with micro-parts is not relaxing, 
Pave-Hawk
Joined: May 05, 2006
KitMaker: 900 posts
Armorama: 510 posts
Posted: Friday, January 27, 2017 - 02:40 PM UTC
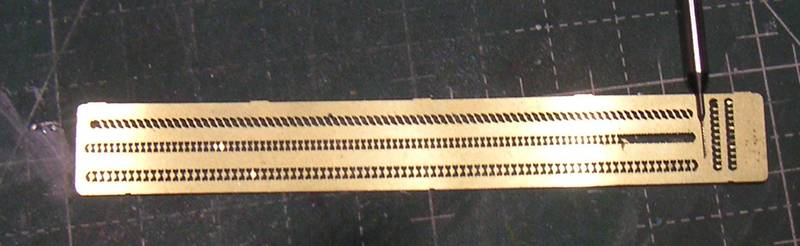
Here you go:

That broken 0.6mm drill bit is pointing to the smallest bits in that fret, part 36 a 0.4 or 0.5mm disc of brass, that somehow I am expected to cut free without losing, and attach to an only fractionally bigger part without either gluing it to myself or destroying the work already done. Suffice to say that those bits are staying on the fret.

That broken 0.6mm drill bit is pointing to the smallest bits in that fret, part 36 a 0.4 or 0.5mm disc of brass, that somehow I am expected to cut free without losing, and attach to an only fractionally bigger part without either gluing it to myself or destroying the work already done. Suffice to say that those bits are staying on the fret.
Namabiiru
#399
Joined: March 05, 2014
KitMaker: 2,888 posts
Armorama: 1,920 posts
Posted: Friday, January 27, 2017 - 04:36 PM UTC
Yep, I can see why those parts would go unused.
Check out this fret from a CV9040B I built awhile ago:
That's a .25mm bit for comparison. You can see how far I got with trying to use those...
Check out this fret from a CV9040B I built awhile ago:
That's a .25mm bit for comparison. You can see how far I got with trying to use those...
 |

WEB HOSTING BY


Copyright ©2021 Armorama and Kitmaker Network, a subsidiary of Silver Star Enterprises
All Rights Reserved. Please read our Conditions of Use and Privacy Policy.
All Rights Reserved. Please read our Conditions of Use and Privacy Policy.