

Hosted by Richard S.
Campaign Holy Orders

Pave-Hawk

Joined: May 05, 2006
KitMaker: 900 posts
Armorama: 510 posts

Posted: Friday, January 27, 2017 - 05:49 PM UTC
Have to wonder what kit makers are thinking sometimes

ClaytonFromEllijay

#454

Joined: July 10, 2016
KitMaker: 1,273 posts
Armorama: 1,138 posts
Posted: Friday, January 27, 2017 - 08:16 PM UTC
Insanity.

ltb073
Joined: March 08, 2010
KitMaker: 3,662 posts
Armorama: 3,078 posts
Posted: Saturday, January 28, 2017 - 01:43 AM UTC
Mark Thanks for the suggestions  I got back to work on it and here is what I did:
Dusted up the tracks and running gear
added some striking
hit the recoil slides with some gun metal
and another wash over it all. Now I gonna call this 1 done


I got back to work on it and here is what I did:Dusted up the tracks and running gear
added some striking
hit the recoil slides with some gun metal
and another wash over it all. Now I gonna call this 1 done


ClaytonFromEllijay
#454
Joined: July 10, 2016
KitMaker: 1,273 posts
Armorama: 1,138 posts
Posted: Saturday, January 28, 2017 - 02:12 AM UTC
Looks very good, Sal, your treads are sweet!

Namabiiru
#399
Joined: March 05, 2014
KitMaker: 2,888 posts
Armorama: 1,920 posts

Posted: Saturday, January 28, 2017 - 03:37 PM UTC
Likin' it, Sal!

Pave-Hawk
Joined: May 05, 2006
KitMaker: 900 posts
Armorama: 510 posts
Posted: Saturday, January 28, 2017 - 05:04 PM UTC
Looks good Sal, well done on the finish.
ltb073
Joined: March 08, 2010
KitMaker: 3,662 posts
Armorama: 3,078 posts
Posted: Saturday, January 28, 2017 - 06:43 PM UTC
Thanks guys 
Pave-Hawk
Joined: May 05, 2006
KitMaker: 900 posts
Armorama: 510 posts
Posted: Sunday, January 29, 2017 - 08:05 AM UTC
Gun and mount is all together and ready for painting before installation to the "turret"
Have included a comparison shot of the gun mount from the old Dragon Bishop kit, to show the relative complexity/simplicity.


Have included a comparison shot of the gun mount from the old Dragon Bishop kit, to show the relative complexity/simplicity.


Namabiiru
#399
Joined: March 05, 2014
KitMaker: 2,888 posts
Armorama: 1,920 posts
Posted: Sunday, January 29, 2017 - 05:43 PM UTC
The latter looks more like Tamiya...
Pave-Hawk
Joined: May 05, 2006
KitMaker: 900 posts
Armorama: 510 posts
Posted: Sunday, January 29, 2017 - 05:50 PM UTC
Quoted Text
The latter looks more like Tamiya...
It's pretty basic. Definitely a Dragon part, kit is from 1996, apparently a rebox of a VM kit who I have never heard of.
I never finished it because it came with instructions for a Pz1.

tatbaqui

#040

Joined: May 06, 2007
KitMaker: 2,713 posts
Armorama: 2,451 posts

Posted: Tuesday, January 31, 2017 - 08:16 AM UTC
Hello,
It's quite late in the game, so this will be a speed build for me:
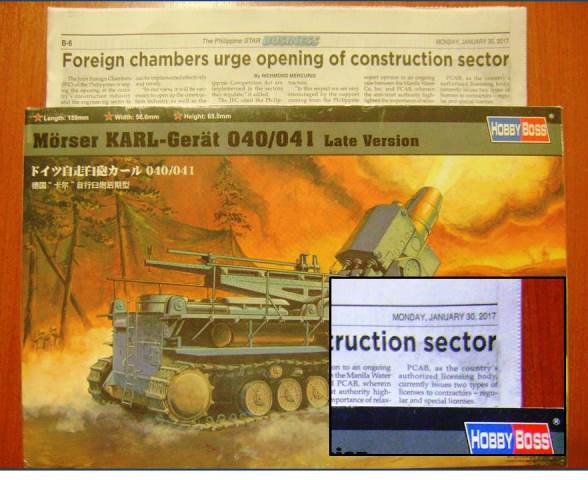

It's braille scale so hopefully it won't take as much time and meet the campaign deadline. I have 3 decal choices on finishing -- right now am leaning towards "Thor".


I had to cut and clean 44 road wheels and mount as 22 pairs. And to think I was even considering getting a braille Dora!
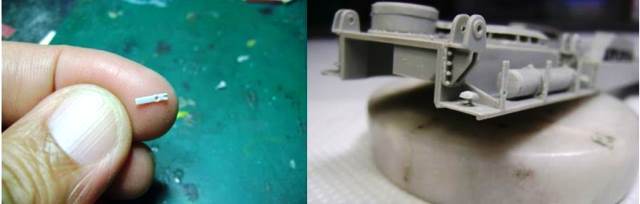
It builds quick so far. Some small parts to contend with, that small mushroom-like bit is supposed to be the Notek lamp. Nevertheles I am thankful no micro PE bending / folding needed.
I broke a couple of levers for the driver's station. Decided not to put the seat, as I found out that this section gets covered up with a plate. Finished up to Step 4, 11 more to go.

Cheers,
Tat
It's quite late in the game, so this will be a speed build for me:
It's braille scale so hopefully it won't take as much time and meet the campaign deadline. I have 3 decal choices on finishing -- right now am leaning towards "Thor".
I had to cut and clean 44 road wheels and mount as 22 pairs. And to think I was even considering getting a braille Dora!
It builds quick so far. Some small parts to contend with, that small mushroom-like bit is supposed to be the Notek lamp. Nevertheles I am thankful no micro PE bending / folding needed.
I broke a couple of levers for the driver's station. Decided not to put the seat, as I found out that this section gets covered up with a plate. Finished up to Step 4, 11 more to go.
Cheers,
Tat
Pave-Hawk
Joined: May 05, 2006
KitMaker: 900 posts
Armorama: 510 posts
Posted: Tuesday, January 31, 2017 - 05:30 PM UTC
Gun is done, mounted and she's all closed up.


Doors will be opened for display to show the interior, they are currently just held in place with some liquid masking agent.
Have to reattach some delicate pieces that snapped off during handling. Really should have waited till I was at this stage before attaching them, but I was getting impatient.
Also due to needing to eyeball the alignment of some parts the barrel is twisted slightly in rotation, and off axis by a little bit.
The barrel has also been drilled out to a reasonable depth as it was quite obviously solid just a few mm from the end of the muzzle.
tatbaqui
#040
Joined: May 06, 2007
KitMaker: 2,713 posts
Armorama: 2,451 posts
Posted: Friday, February 03, 2017 - 06:49 PM UTC
Hello,
Progress from the last couple of days:


The kit came with springs, I guess to simulate recoil. However after a several unsuccessful attempts to get it to behave in place, off it went to the spares box. And I just focused on getting more work done on the gun and its carriage.

I didn't want to take my chances on putting staples on such a narrow track, so I've decided to glue it on. Gator's Grip worked for me before, and so far it has held on.
Cheers,
Tat
Progress from the last couple of days:
The kit came with springs, I guess to simulate recoil. However after a several unsuccessful attempts to get it to behave in place, off it went to the spares box. And I just focused on getting more work done on the gun and its carriage.
I didn't want to take my chances on putting staples on such a narrow track, so I've decided to glue it on. Gator's Grip worked for me before, and so far it has held on.
Cheers,
Tat
ClaytonFromEllijay
#454
Joined: July 10, 2016
KitMaker: 1,273 posts
Armorama: 1,138 posts
Posted: Friday, February 03, 2017 - 08:11 PM UTC
Tat- great solution for flimsy-ish RB tracks! Now on my ever-growing list of "Things I learned on Armorama"
tatbaqui
#040
Joined: May 06, 2007
KitMaker: 2,713 posts
Armorama: 2,451 posts
Posted: Sunday, February 05, 2017 - 05:58 AM UTC
Thanks Clayton. Individual links may be a pain but given the choice I'd rather have them than fiddle with rubber band tracks. I've had my share of horror stories, either they're too loose or too tight resulting into broken idlers / sprockets.
Well the tracks seem to have held in since it was installed:


I thought about putting in some sag, but the length of track was just enough to wrap it around. I had to put in a piece of plastic to cover a gap. Not an elegant solution but it will do.
As I've finished the major sub-assemblies, I proceeded on the railings. Tense moments as taking them off the sprues needed extra care; cleaning them up was another round of self-induced torture.
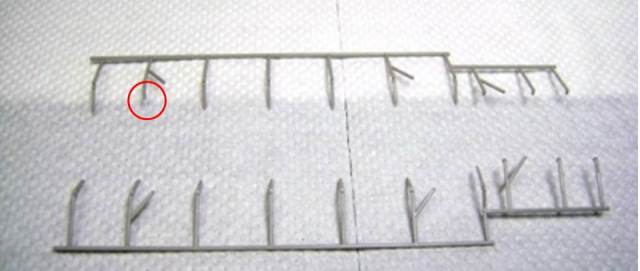
Broke a small piece in the process -- will have to remedy that later. Anyways it's still better than working with PE.
Cheers,
Tat
Well the tracks seem to have held in since it was installed:
I thought about putting in some sag, but the length of track was just enough to wrap it around. I had to put in a piece of plastic to cover a gap. Not an elegant solution but it will do.
As I've finished the major sub-assemblies, I proceeded on the railings. Tense moments as taking them off the sprues needed extra care; cleaning them up was another round of self-induced torture.
Broke a small piece in the process -- will have to remedy that later. Anyways it's still better than working with PE.
Cheers,
Tat
Pave-Hawk
Joined: May 05, 2006
KitMaker: 900 posts
Armorama: 510 posts
Posted: Sunday, February 05, 2017 - 05:52 PM UTC
Everytime I think I am ready to start painting the Bishop I discover I have missed something.
So far today I managed to discover that some ham fisted nitwit had built the external fuel tank slightly wrong despite examining the instructions multiple times.
So I tore the legs off unfortunately catastrophically, and then bodged a repair with unused parts from my AFV Club Valentine. The parts weren't quite the same but I figured close enough for government work.
After the new parts glue had dried I discovered that there were a second unused set of legs that more closely resembled the originals on one of the Bronco sprues.
So off came the AFV Club legs, to be replaced by the Bronco ones.
TL:DR In summary, I tore some bits of and replaced them, then tore those bits off and replaced them.
And that's all I have achieved today.
Slightly closer to painting.
Namabiiru
#399
Joined: March 05, 2014
KitMaker: 2,888 posts
Armorama: 1,920 posts
Posted: Sunday, February 05, 2017 - 09:11 PM UTC
Wow, Iain! Sounds like you just can't seem to catch a break with this built. You might be in line for sainthood with all of the patience that Bishop requires.
Pave-Hawk
Joined: May 05, 2006
KitMaker: 900 posts
Armorama: 510 posts
Posted: Monday, February 06, 2017 - 04:14 AM UTC
Quoted Text
Wow, Iain! Sounds like you just can't seem to catch a break with this built. You might be in line for sainthood with all of the patience that Bishop requires.
Bronco kits definitely need patience, but some of my problems are my own doing due to lack of patience, and jumping around in the instructions to try and keep some build momentum.
For Bronco kits, I highly recommend sticking with the build order in the instructions. If I get the Archer kit, that's what I will try and do I hope.
tatbaqui
#040
Joined: May 06, 2007
KitMaker: 2,713 posts
Armorama: 2,451 posts
Posted: Monday, February 06, 2017 - 04:54 AM UTC
Hello,
I initially thought of putting up the railings after painting, but then it may just be a messy affair with glue ruining the finish. Good that I did put it up as I had challenges lining up the supports to the sides, so I cut them off and replaced with rods from the spares box.

This completes the build, save for a couple of hand cranks to be installed after painting. Will put it in a bath of soapy water then move on to the primer.


Cheers,
Tat
I initially thought of putting up the railings after painting, but then it may just be a messy affair with glue ruining the finish. Good that I did put it up as I had challenges lining up the supports to the sides, so I cut them off and replaced with rods from the spares box.
This completes the build, save for a couple of hand cranks to be installed after painting. Will put it in a bath of soapy water then move on to the primer.
Cheers,
Tat
ClaytonFromEllijay
#454
Joined: July 10, 2016
KitMaker: 1,273 posts
Armorama: 1,138 posts
Posted: Monday, February 06, 2017 - 05:26 AM UTC
Looks great, Tat, hope my 1/35 looks as good (from afar)
Pave-Hawk
Joined: May 05, 2006
KitMaker: 900 posts
Armorama: 510 posts
Posted: Tuesday, February 07, 2017 - 05:44 PM UTC
That's an impressive looking little kit Tat. I like the fix on the tracks, should be reasonably inconspicuous once it's all painted up.
I finally managed to get some paint on my Bishop.


Also mounted the superstructure to the hull

Did a bit of pre-shading but it's quite subtle and isn't showing up in these photos. Next step will be the second camo colour and getting the tracks dealt with. Also missed a couple of bits on the first colour run so will need to get those sorted too.
I might be pushing my luck trying to get this finished by the campaign deadline but I will give it my best shot. I can see the finish line for this kit at last.
I finally managed to get some paint on my Bishop.


Also mounted the superstructure to the hull

Did a bit of pre-shading but it's quite subtle and isn't showing up in these photos. Next step will be the second camo colour and getting the tracks dealt with. Also missed a couple of bits on the first colour run so will need to get those sorted too.
I might be pushing my luck trying to get this finished by the campaign deadline
but I will give it my best shot. I can see the finish line for this kit at last.Namabiiru
#399
Joined: March 05, 2014
KitMaker: 2,888 posts
Armorama: 1,920 posts
Posted: Tuesday, February 07, 2017 - 11:09 PM UTC
Considering what that kit has put you through, I wouldn't be averse to discussing an extension.
Pave-Hawk
Joined: May 05, 2006
KitMaker: 900 posts
Armorama: 510 posts
Posted: Wednesday, February 08, 2017 - 03:34 AM UTC
Quoted Text
Considering what that kit has put you through, I wouldn't be averse to discussing an extension.
I'll hold off on that for now, hoping to get a couple of days next week where I can put some decent time in to finish this off.
I am dreading the tracks though
Pave-Hawk
Joined: May 05, 2006
KitMaker: 900 posts
Armorama: 510 posts
Posted: Saturday, February 11, 2017 - 11:44 AM UTC
Tracks are in the process of final assembly and initial painting.
They are going together a little easier than I anticipated.


The second cam colour is pretty basic, so I have masked areas using Humbrol maskol, and Winsor&Newton liquid mask.


Hopefully will get a chance to paint the hull/turret, and get the tracks mounted this week.
After that it's just little details like tools and some light weathering.
Pave-Hawk
Joined: May 05, 2006
KitMaker: 900 posts
Armorama: 510 posts
Posted: Tuesday, February 14, 2017 - 01:30 PM UTC
Second colour added., Gloss coat and decals next. I think I will leave the tracks to last to minimise risk of breaking them.


 |

WEB HOSTING BY


Copyright ©2021 Armorama and Kitmaker Network, a subsidiary of Silver Star Enterprises
All Rights Reserved. Please read our Conditions of Use and Privacy Policy.
All Rights Reserved. Please read our Conditions of Use and Privacy Policy.