 Yes, fuel filter.
Armor/AFV
For discussions on tanks, artillery, jeeps, etc.
For discussions on tanks, artillery, jeeps, etc.
Hosted by Darren Baker, Mario Matijasic
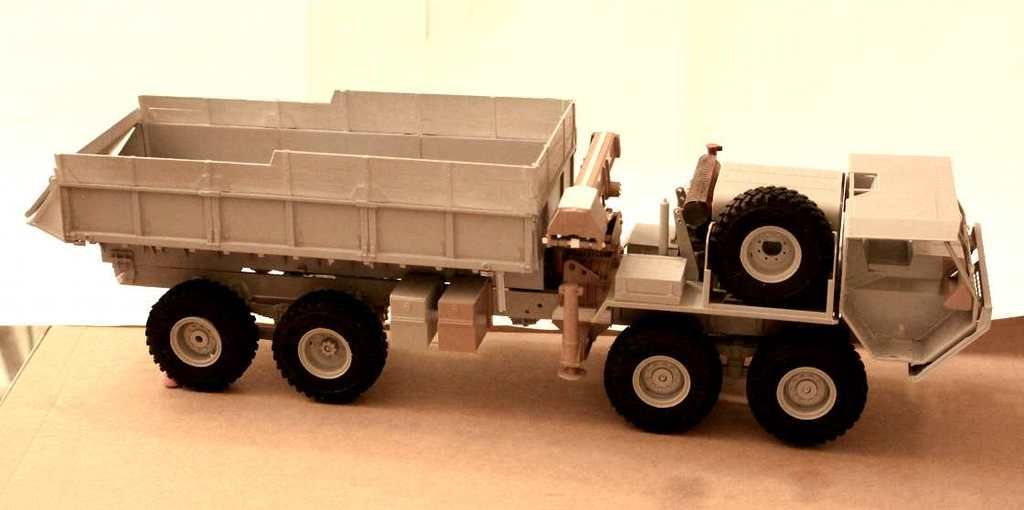
My first HEMTT - the Italeri LHS
Posted: Sunday, February 12, 2017 - 11:17 PM UTC
lindsayp

Joined: February 23, 2006
KitMaker: 9 posts
Armorama: 9 posts
Posted: Wednesday, February 15, 2017 - 07:21 PM UTC
fuel filter?


Posted: Monday, February 27, 2017 - 12:31 AM UTC
Might take quite a few of these kits to fill up a flatrack but it looks like it might have possibilities:
MMK: Stowage, Straps, and Ratchets
http://armorama.kitmaker.net/forums/256024
MMK: Stowage, Straps, and Ratchets
http://armorama.kitmaker.net/forums/256024

HeavyArty


Joined: May 16, 2002
KitMaker: 17,694 posts
Armorama: 13,742 posts

Posted: Monday, February 27, 2017 - 01:37 AM UTC
Expensive too. 8 (2 across, 4 per side) pallets to a flatrack.


Posted: Monday, February 27, 2017 - 01:53 AM UTC
Expensive. Oh yeah!
Posted: Sunday, March 05, 2017 - 01:30 PM UTC
Is it just me or does the new PLS armored cab look like the head of a Star Wars AT-AT Imperial Walker?
Posted: Wednesday, March 08, 2017 - 12:03 AM UTC
Of late I have been thinking about my next HEMTT.
Seeing as how I now have a lot of spare HEMTT parts laying around!
For this new vehicle I decided not to invest in the Real Models resin engine but I still wanted to improve the look and detail of the finished engine area. This is not going to be a build log but maybe just the sharing of a few HEMTT detailing ideas.
The wheels started spinning . . . .
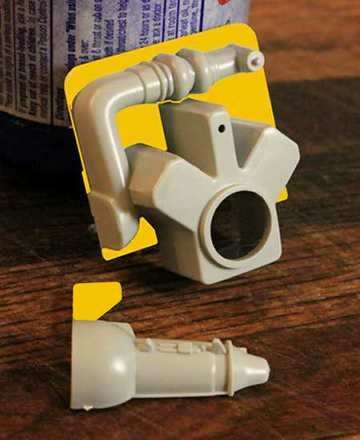
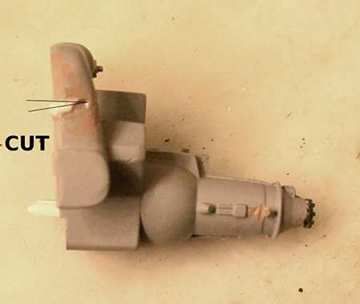
I concluded that no matter what you do to that fake wall at the front of the partial engine it still shows. Paint it matte black and it is still visible. I asked myself what could I do to make it disappear as it is not supposed to be there? Then it struck me, make it disappear - remove it! So I decided to remove the areas shown in yellow. I also made a cut in the air intake pipe in order to lean it back a bit. This would allow me to tilt the rear of the engine downward as it is in the real vehicle.
Seeing as how I now have a lot of spare HEMTT parts laying around!
For this new vehicle I decided not to invest in the Real Models resin engine but I still wanted to improve the look and detail of the finished engine area. This is not going to be a build log but maybe just the sharing of a few HEMTT detailing ideas.
The wheels started spinning . . . .


I concluded that no matter what you do to that fake wall at the front of the partial engine it still shows. Paint it matte black and it is still visible. I asked myself what could I do to make it disappear as it is not supposed to be there? Then it struck me, make it disappear - remove it! So I decided to remove the areas shown in yellow. I also made a cut in the air intake pipe in order to lean it back a bit. This would allow me to tilt the rear of the engine downward as it is in the real vehicle.

Posted: Wednesday, March 08, 2017 - 12:11 AM UTC
Posted: Wednesday, March 08, 2017 - 12:16 AM UTC
Now the plan is to paint the inside surfaces of the hood enclosure matte black and then when I paint the exterior color I will let a heavy over spray of the body color fall into the rear portion of the engine enclosure to soften this affect.


As you can see I have angled the engine, transmission and the transfer case downward as per the actual vehicle.
Once that big exhaust pipe and muffler are installed there is very little chance that anything will be seen beyond the end of that partial engine.


As you can see I have angled the engine, transmission and the transfer case downward as per the actual vehicle.
Once that big exhaust pipe and muffler are installed there is very little chance that anything will be seen beyond the end of that partial engine.
Posted: Wednesday, March 08, 2017 - 02:37 AM UTC
You might have also noticed earlier that I opened up the front air intake area of the engine enclosure. I then used a small piece of left over etch screen to knock together a radiator for this latest HEMTT beast.

And of course I had to once again open up the airway chimneys on the back wall of the cab so you just might stand a chance of actually seeing this radiator on the finished model.


(Actually, if you shine a flashlight up through the bottom front air intake on the cab and then look down through the roof vents you can see the radiator quite nicely!)
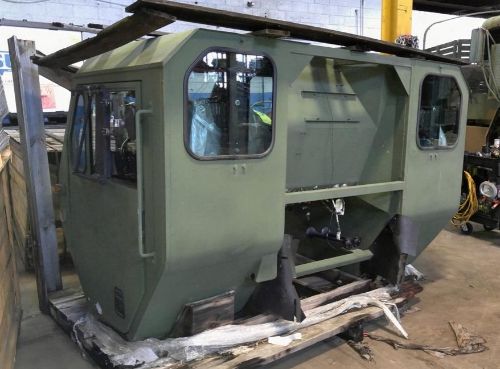

And of course I had to once again open up the airway chimneys on the back wall of the cab so you just might stand a chance of actually seeing this radiator on the finished model.


(Actually, if you shine a flashlight up through the bottom front air intake on the cab and then look down through the roof vents you can see the radiator quite nicely!)

Posted: Wednesday, March 08, 2017 - 10:13 PM UTC
For those who have been following this build from the beginning you might recall that the resin engine from Real Models had an incorrect doubly long 4 cyl. air pump as well as a double oil pump. (Covered here on pages 9 & 10) Back then I cut these in half to make the correct auxiliaries for the first HEMTT engine. This left me with two more resin details I could now add to this engine.


Finally a little touch of Dark Seafoam Green color to signify the engine was built by Detroit Diesel then add some dust and we're all good.
p.s. I also painted the air intake tube flat black and the blower and exhaust pipes in rust.
I think these few zero cost changes greatly improve the otherwise very minimal Italeri HEMTT engine!
Posted: Saturday, March 18, 2017 - 05:53 AM UTC
Posted: Saturday, March 18, 2017 - 06:57 PM UTC
Focused thread covering improving the Italeri Grove Crane for the HEMTT going on over at:
http://armorama.kitmaker.net/forums/256601

http://armorama.kitmaker.net/forums/256601

Posted: Monday, March 20, 2017 - 07:10 AM UTC
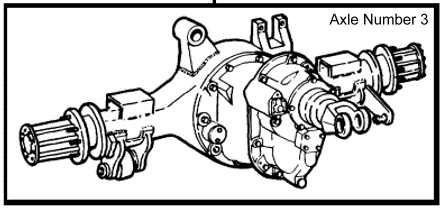
HEMTT DIFFERENTIALS:
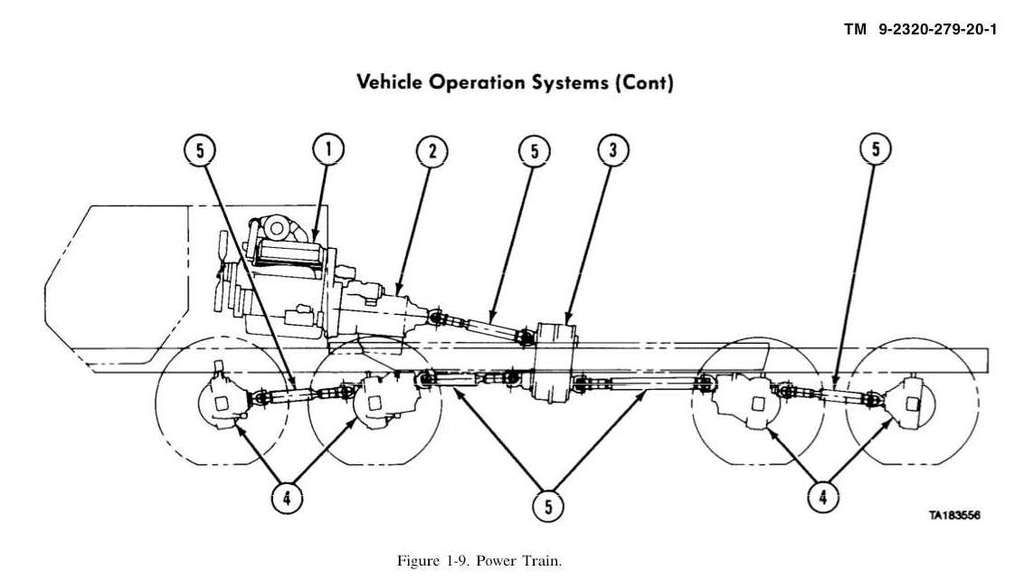
This photo posted by Rob (Dragon164) got me thinking. Maybe last time around, when I used the stock Italeri inboard gearhead differentials they may not have been as large as they needed to be?

So now I am up to my old tricks again - removing the gearheads from the two outboard differentials, adding bolt head detail and check plugs to all four difs but also enlarging the stock inboard gearhead (pass-through) differentials even more than before.


I cut the head off the gearbox and then added two .060 x .250" (Evergreen #159) shims to the assembly, glued the head back on and sanded everything to shape. That top cover on the dif is there just to add a bit more mass.
This photo posted by Rob (Dragon164) got me thinking. Maybe last time around, when I used the stock Italeri inboard gearhead differentials they may not have been as large as they needed to be?

So now I am up to my old tricks again - removing the gearheads from the two outboard differentials, adding bolt head detail and check plugs to all four difs but also enlarging the stock inboard gearhead (pass-through) differentials even more than before.


I cut the head off the gearbox and then added two .060 x .250" (Evergreen #159) shims to the assembly, glued the head back on and sanded everything to shape. That top cover on the dif is there just to add a bit more mass.
Posted: Monday, March 20, 2017 - 07:50 AM UTC
Posted: Monday, March 20, 2017 - 11:05 AM UTC
Posted: Monday, March 20, 2017 - 11:34 PM UTC
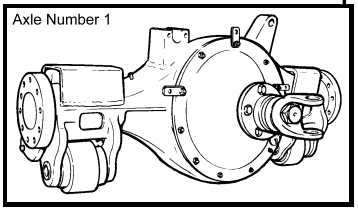
HEMTT Simple Differentials:
Be careful what you wish for - eBay Motors will provide it for you!
This one is a rear #4 axle.


Unfortunately due to the angle of the line drawing above I never realized till now, that the simple differentials had such a deep conical faceplate - my model version clearly needs more correction.
Be careful what you wish for - eBay Motors will provide it for you!
This one is a rear #4 axle.


Unfortunately due to the angle of the line drawing above I never realized till now, that the simple differentials had such a deep conical faceplate - my model version clearly needs more correction.
Posted: Tuesday, March 21, 2017 - 08:06 AM UTC

HeavyArty


Joined: May 16, 2002
KitMaker: 17,694 posts
Armorama: 13,742 posts

Posted: Tuesday, March 21, 2017 - 06:00 PM UTC
I would think it would be much easier to make the conical diff cover using A&B epoxy putty sanded to shape. That is what I would do.
Posted: Wednesday, March 22, 2017 - 07:34 AM UTC
You're probably right Gino but I am not familiar with the product you mentioned. Could you send me a Brand name?
I considered carving it out of a solid but didn't know what to use.
I considered carving it out of a solid but didn't know what to use.

HeavyArty


Joined: May 16, 2002
KitMaker: 17,694 posts
Armorama: 13,742 posts

Posted: Wednesday, March 22, 2017 - 07:54 AM UTC
A & B is a brand name. There are many other types though. It is basically two-part putty epoxy. One (A) is usually a grey putty and the other (B) a lighter color putty. Once mixed to become a different color, can be shaped like modeling clay and will harden in a couple hours. Once hard, they can be cut, sanded, shaped, etc. Comes in handy for all sorts of things.
Posted: Thursday, March 23, 2017 - 11:46 PM UTC
OK, my local hobby shop didn't have a clue regarding the A&B putty product. I will check shortly with places like Michael's Art Store and Hobby Lobby. Hopefully I will have the putty before I do the second differential.
As I said, my plastic cutting efforts did not produce the results I had hoped so I switched to using body filler putty. Since it has to go on wet it sort of obliterates what other detail (bolt heads) that may exist in the area but it does achieve the desired shape. (More or less.)
This is where I'm at for the moment:


HeavyArty


Joined: May 16, 2002
KitMaker: 17,694 posts
Armorama: 13,742 posts

Posted: Friday, March 24, 2017 - 12:03 AM UTC
Quoted Text
...my local hobby shop didn't have a clue regarding the A&B putty product.
Wow!! Really? Surprising. Craft stores may not have it. If not, body filler will work fine, its just not as sculpt-able.
Posted: Sunday, March 26, 2017 - 10:30 AM UTC
Epoxy putty
Milliput
Cheers Rob.
Milliput

Cheers Rob.
Posted: Monday, March 27, 2017 - 02:49 AM UTC
 |


