Campaigns: Completed Campaigns
Campaigns that are completed should be grouped here.
Hosted by Richard S.
Improvised Ingenuity
tatbaqui
Staff MemberNews Writer
ARMORAMA
#040
Visit this Community
Metro Manila, Philippines
Joined: May 06, 2007
KitMaker: 2,713 posts
Armorama: 2,451 posts
Posted: Sunday, March 19, 2017 - 11:09 AM UTC
Here's my update.

There are 16 of these that need to be painted.


Looking a the spares box I found some 1/35 Pz IV hub caps that seemed to fit just right. So after a couple of batches I was done with these tiny wheels.

After all has dried I proceeded to mount them. Had to watch out to make sure they were aligned before putting on the rubber band tracks.


All the other small bits came next -- tools, headlights, etc. Am now done with the hull.


Moving on towards the last few steps, the crane assembly. More smaller parts and probably trickier parts ahead!

Cheers,

Tat
tatbaqui
Staff MemberNews Writer
ARMORAMA
#040
Visit this Community
Metro Manila, Philippines
Joined: May 06, 2007
KitMaker: 2,713 posts
Armorama: 2,451 posts
Posted: Monday, March 20, 2017 - 04:30 AM UTC
Hello,

More torture with small parts last night, but I persevered to finish it before I lose momentum. Am practically done with the crane assembly except for the rigging:


The kit comes with a piece of string, per instruction it says 0.5mm, which I find too thick. Worse, one can see the fibers. Need to figure out a better a material for it. Also need to do some reading on how the rigging is done, as the instructions do not give a good visual on how it is installed.

Cheers,

Tat
ClaytonFromEllijay
#454
Visit this Community
Georgia, United States
Joined: July 10, 2016
KitMaker: 1,273 posts
Armorama: 1,138 posts
Posted: Monday, March 20, 2017 - 04:42 AM UTC
It may be too thick still, but a cure for the fibers is a wash of watery white glue...
tatbaqui
Staff MemberNews Writer
ARMORAMA
#040
Visit this Community
Metro Manila, Philippines
Joined: May 06, 2007
KitMaker: 2,713 posts
Armorama: 2,451 posts
Posted: Monday, March 20, 2017 - 04:56 AM UTC
Ah yes, thanks Clayton -- will give that a try. Cheers, Tat
KoSprueOne
Visit this Community
Myanmar
Joined: March 05, 2004
KitMaker: 4,011 posts
Armorama: 1,498 posts
Posted: Tuesday, March 21, 2017 - 07:49 AM UTC

Quoted Text

It may be too thick still, but a cure for the fibers is a wash of watery white glue...


I gotta try that next time. Those fibers totally ruin it.


petbat
Visit this Community
Queensland, Australia
Joined: August 06, 2005
KitMaker: 3,353 posts
Armorama: 3,121 posts
Posted: Tuesday, March 21, 2017 - 08:15 AM UTC

Quoted Text

Also need to do some reading on how the rigging is done, as the instructions do not give a good visual on how it is installed.

Cheers,

Tat


Hi Tat

Nice to see the 'Mini Me' of the kit I am building


Here is the rigging diagram from the 1/35th scale kit. Not that clear but might be enough to help you


In your scale, it would be unlikely that you would have a defined weave in the rope, so you could get away with nylon thread in lieu of cotton string. That might overcome the fluffing if the white glue/water doesn't work out (it usually depends on the quality of the thread. An alternate to that is ship rigging - Quality ones have little fluff.

Hope to see the finished product soon.
petbat
Visit this Community
Queensland, Australia
Joined: August 06, 2005
KitMaker: 3,353 posts
Armorama: 3,121 posts
Posted: Tuesday, March 21, 2017 - 08:20 AM UTC
Nice work on the Bruckenleger Mark. The timber colour does give the end result an interesting contrast.

Love the way you combined 2 group builds into one finished product. That is sure one monster of a build all together.

Thanks for joining in.
tatbaqui
Staff MemberNews Writer
ARMORAMA
#040
Visit this Community
Metro Manila, Philippines
Joined: May 06, 2007
KitMaker: 2,713 posts
Armorama: 2,451 posts
Posted: Tuesday, March 21, 2017 - 09:25 AM UTC

Quoted Text


Quoted Text

Also need to do some reading on how the rigging is done, as the instructions do not give a good visual on how it is installed.

Cheers,

Tat


Hi Tat

Nice to see the 'Mini Me' of the kit I am building


Here is the rigging diagram from the 1/35th scale kit. Not that clear but might be enough to help you


In your scale, it would be unlikely that you would have a defined weave in the rope, so you could get away with nylon thread in lieu of cotton string. That might overcome the fluffing if the white glue/water doesn't work out (it usually depends on the quality of the thread. An alternate to that is ship rigging - Quality ones have little fluff.

Hope to see the finished product soon.


Great, thanks Peter! This would surely be of help. Yeah I was thinking of a nylon thread as well, maybe a fishing line too? Anyways will look for something suitable. If all else fails the fallback is the one that came with the kit. Cheers, Tat
Namabiiru
Staff MemberAssociate Editor
MODEL SHIPWRIGHTS
#399
Visit this Community
Rhode Island, United States
Joined: March 05, 2014
KitMaker: 2,888 posts
Armorama: 1,920 posts
Posted: Friday, March 31, 2017 - 04:38 AM UTC
I'll kick off my build for this campaign tomorrow at the monthly club meeting. Here's my starting photo still in plastic:


bwiber
Visit this Community
Washington, United States
Joined: August 03, 2008
KitMaker: 436 posts
Armorama: 320 posts
Posted: Friday, March 31, 2017 - 05:33 AM UTC
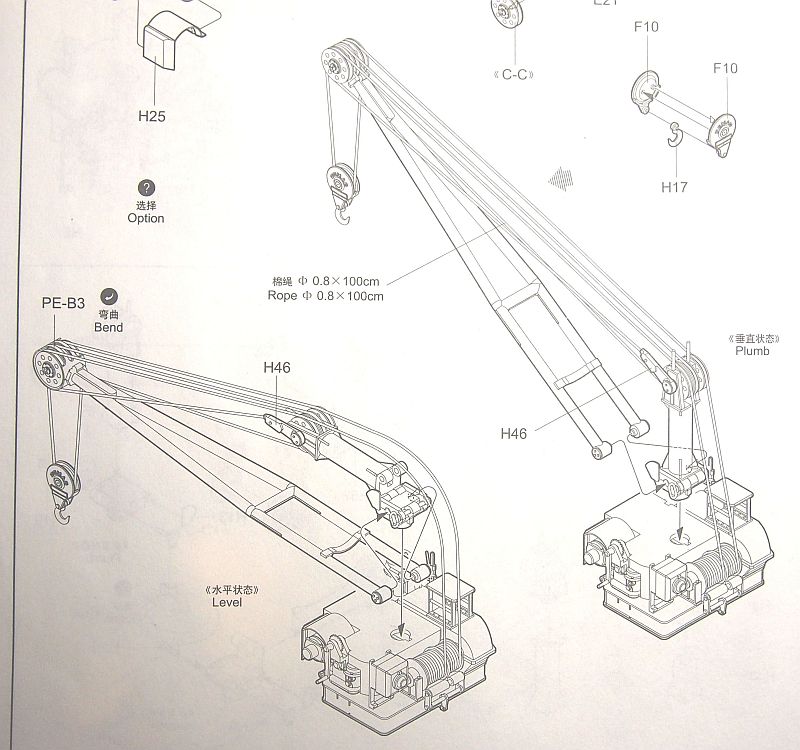
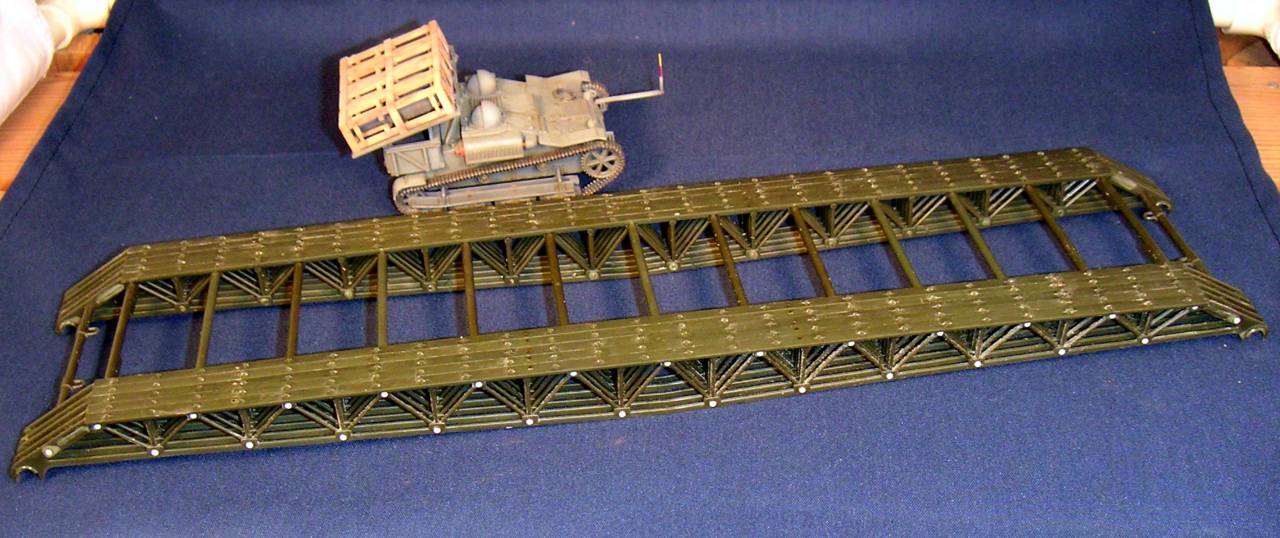
Some amazing stuff being put together. Both of the cranes are very nice.... will look amazing when rigged. That short tracked bridge layer was nice enough, but to put it up on the recovery trailer really sets it off....

Looking forward to more....

And now for my little update. Unfortunately, I got so busy building that I forgot to post. And then again, just how much can you say about building track?


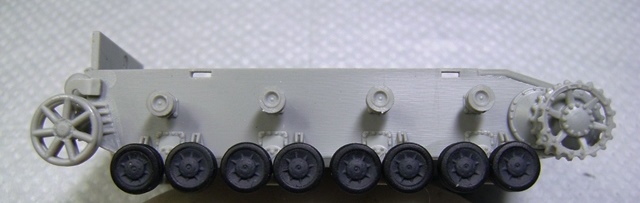
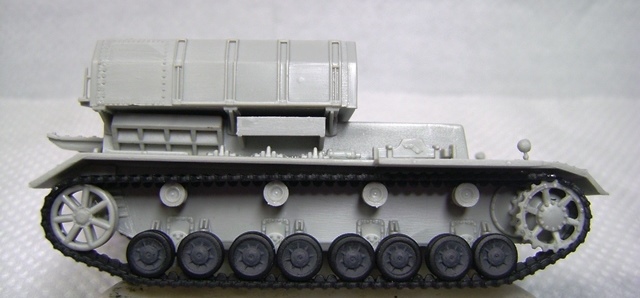
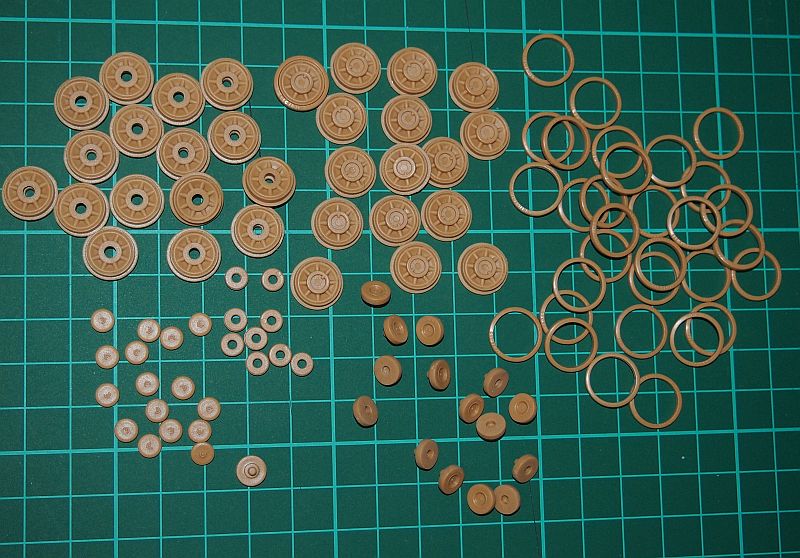
Bronco Pzh 2000 track and the sprockets from the Revell kit. Added bolts, but I still need to add some details to bring them up to the level that the track are.


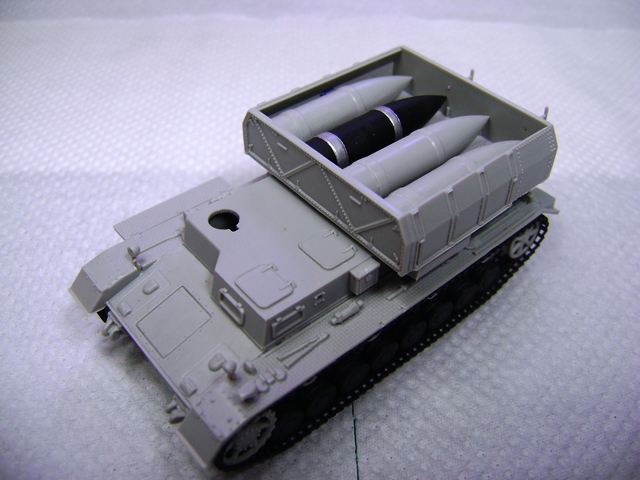
Replacement drivers hatch with the mesh screen. I have since added the tabs to bolt it down.


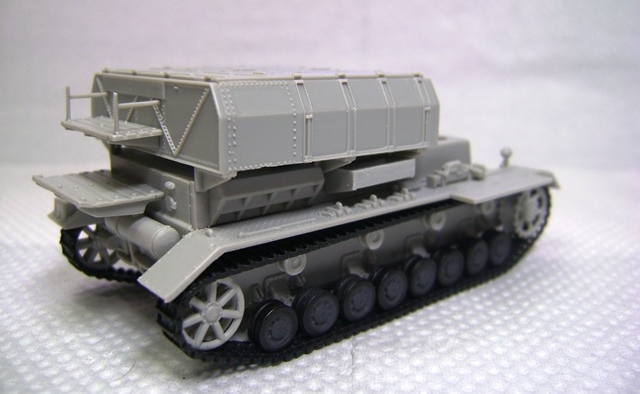
Used the plans to make the work deck frame... and it fits pretty good. Wrong in places, but still a good fit. Decided to go another way to make sure that the fit is right and that I got the changes that have been made. The plans are early, and I am trying to model a current version.


So, I built the work deck supports. It is actually suspended over the top of the hull. You can see a couple pieces of the frame in place over the front supports.


The rubber push pads. I have to make the push pads before I can frame the rest of the work deck as they do interact. Besides which, they are an area that has been redesigned since the drawings. So, back to the photos...

Later, Bob
Namabiiru
Staff MemberAssociate Editor
MODEL SHIPWRIGHTS
#399
Visit this Community
Rhode Island, United States
Joined: March 05, 2014
KitMaker: 2,888 posts
Armorama: 1,920 posts
Posted: Friday, March 31, 2017 - 06:16 AM UTC
Amazing build, Bob. Just amazing.

bwiber
Visit this Community
Washington, United States
Joined: August 03, 2008
KitMaker: 436 posts
Armorama: 320 posts
Posted: Friday, March 31, 2017 - 08:41 AM UTC

Quoted Text

Amazing build, Bob. Just amazing.


Thanks Mark. I think the amazing part will be finishing this one. Took 8 years to do the Dutch BARV. However, this one is progressing a bit faster.

I think that that bridge layer of yours will be another interesting build. So many very nice builds going on in this campaign, I am surprised that it doesn't show up on the main page more often. But there is still hope.

Later, Bob
ClaytonFromEllijay
#454
Visit this Community
Georgia, United States
Joined: July 10, 2016
KitMaker: 1,273 posts
Armorama: 1,138 posts
Posted: Friday, March 31, 2017 - 06:47 PM UTC
The final Photo Gallery of this Campaign will be amazing...good things happening!
petbat
Visit this Community
Queensland, Australia
Joined: August 06, 2005
KitMaker: 3,353 posts
Armorama: 3,121 posts
Posted: Saturday, April 01, 2017 - 01:49 AM UTC
Welcome aboard Marc. Interesting choice of kit. I will be really interested to see how that one goes together.

Bob, your work just continuous to impress. I do not know what else to say.

Clayton, I agree wholeheartedly, the gallery will be amazing.
petbat
Visit this Community
Queensland, Australia
Joined: August 06, 2005
KitMaker: 3,353 posts
Armorama: 3,121 posts
Posted: Saturday, April 01, 2017 - 02:13 AM UTC
Okay where I am up to.

Well my 'rear end' tendencies got the better of me, as they usually do. I was not that happy with Trumpeter's 10 year old take on the suspension and running gear in this kit. Their drive sprocket was actually quite good with bolt details on the inside as well, as was the idler, but the idler has a PE ring to depict the undercut rim of the real deal, but Trumpter made it oversized so it sits on the face of the Idler rim, when it should actually be recessed inside the rim. The drive sprocket housings were really terrible when compared to the originals though ..... so I removed it all!!

Found an old Tristar Panzer IV Running Gear Set 2 in the stash, and could not resist using it. Whilst not actually depicted on the box top, the set also contains the Drive sprocket housings for the different Ausf versions of the Panzer IV, the various drive sprockets and all BUT the Early pattern Idler I need for the Ausf D...... but I have a Tristar Ausf D kit that actually contained 2 sets of these ... GOLD :-)

Any way, here is the hull with most of the suspension in place:


Comparison of the Tristar Set with the Trumpeter, where you can see so much more detail and the retaining bolts are much larger - look more the part:

.

Still have to fit the bolts to the Tristar ones; the Tristar set doesn't have them so I will shave off the Trumpeter ones and use those. Note also the Dragon tow mounts - again so much better than the trumpeter ones.


Comparison of the Tristar Drive housing to the Trumpeter one. I had to remove all moulded on detail from the hull side to fit the Tristar one:


And of course, the road wheels and return rollers to complete the set - note the name 'Continental' on the tyre side:
petbat
Visit this Community
Queensland, Australia
Joined: August 06, 2005
KitMaker: 3,353 posts
Armorama: 3,121 posts
Posted: Saturday, April 01, 2017 - 02:29 AM UTC
Some work done on the upper hull too. I have fit the driver hatch and the rear compartment hatch. The rear hatch was just the radio operator's hatch from the gun tank and used to cover a storage compartment.

I replaced the Trumpeter ones with Dragon ones from the spares box. The Trumpeter ones were inaccurate. The lock fitting is upside down on the rear hatch and on both hatches the lock was set too far inward of the edge. There are no photographs of the closed hatches on the real vehicle so there is some conjecture around whether the hatches had locks or not, so shaving these off the Trumpter kit was an option.

I still have to fit the handle known to have been fitted to the front edge of the hatches (Trumpeter got that right):


I have also made a start on the Geschossgreifer (shell gripper). The ends are just fitted for the pic. Trumpeter also provide a multipart PE version... debating whether I am Masochistic enough to tackle that one.

That is it for now
Namabiiru
Staff MemberAssociate Editor
MODEL SHIPWRIGHTS
#399
Visit this Community
Rhode Island, United States
Joined: March 05, 2014
KitMaker: 2,888 posts
Armorama: 1,920 posts
Posted: Saturday, April 01, 2017 - 05:49 AM UTC
"debating whether I am Masochistic enough to tackle that one"

You know you want to...

bwiber
Visit this Community
Washington, United States
Joined: August 03, 2008
KitMaker: 436 posts
Armorama: 320 posts
Posted: Saturday, April 01, 2017 - 06:02 AM UTC

Quoted Text

"debating whether I am Masochistic enough to tackle that one"

You know you want to...


Mark, I am going to bet he is probably like me. I start a debate like that knowing that I will tackle the PE part, and half way through building it start to wonder about my sanity.

Peter, After all the superb work on the suspension units if the PE is a real improvement over the kit part (which looks pretty good actually) it would be shame not to take a run at it. But it is your call...

The question is.... Does Tat's small version come with the PE option for the claw? Inquiring minds want to know....

Bob
LinusB
Visit this Community
Western Australia, Australia
Joined: March 21, 2016
KitMaker: 247 posts
Armorama: 126 posts
Posted: Monday, April 03, 2017 - 05:27 AM UTC
Hi all

I picked up this the other day although the boxing is actually Asuka.

ClaytonFromEllijay
#454
Visit this Community
Georgia, United States
Joined: July 10, 2016
KitMaker: 1,273 posts
Armorama: 1,138 posts
Posted: Monday, April 03, 2017 - 06:35 PM UTC
That will look great, Linus!
tatbaqui
Staff MemberNews Writer
ARMORAMA
#040
Visit this Community
Metro Manila, Philippines
Joined: May 06, 2007
KitMaker: 2,713 posts
Armorama: 2,451 posts
Posted: Wednesday, April 05, 2017 - 06:23 AM UTC

Quoted Text


Quoted Text

"debating whether I am Masochistic enough to tackle that one"

You know you want to...


Mark, I am going to bet he is probably like me. I start a debate like that knowing that I will tackle the PE part, and half way through building it start to wonder about my sanity.

Peter, After all the superb work on the suspension units if the PE is a real improvement over the kit part (which looks pretty good actually) it would be shame not to take a run at it. But it is your call...

The question is.... Does Tat's small version come with the PE option for the claw? Inquiring minds want to know....

Bob


Go for it Peter. You'd still have the plastic option if things don't turn up to your expectations.

Bob, the minime I'm building is all plastic -- and I'm not complaining!

Cheers,

Tat
Namabiiru
Staff MemberAssociate Editor
MODEL SHIPWRIGHTS
#399
Visit this Community
Rhode Island, United States
Joined: March 05, 2014
KitMaker: 2,888 posts
Armorama: 1,920 posts
Posted: Sunday, April 09, 2017 - 02:10 AM UTC
What started as a dry-fit of the bridger turned into a completed bridge section:


The fit was so tight that once everything was together I was concerned I would break something trying to take it back apart so I decided, "What the heck; just glue it."

This kit is no Tamiya shake'n'bake kit, but it's the nicest kit from any Russian company that I have built.

KoSprueOne
Visit this Community
Myanmar
Joined: March 05, 2004
KitMaker: 4,011 posts
Armorama: 1,498 posts
Posted: Sunday, April 09, 2017 - 08:17 AM UTC
I agree. I've built that IT-28 Bridgelayer several years ago and had a lot of fun.


Namabiiru
Staff MemberAssociate Editor
MODEL SHIPWRIGHTS
#399
Visit this Community
Rhode Island, United States
Joined: March 05, 2014
KitMaker: 2,888 posts
Armorama: 1,920 posts
Posted: Sunday, April 09, 2017 - 04:38 PM UTC

Quoted Text

I agree. I've built that IT-28 Bridgelayer several years ago and had a lot of fun.


I found your blog on another site as I was searching for reference photos. I hope mine turns out half as nice as yours. The bridge has been something of a challenge to this point, but the chassis seems to be going together smoothly enough.

ClaytonFromEllijay
#454
Visit this Community
Georgia, United States
Joined: July 10, 2016
KitMaker: 1,273 posts
Armorama: 1,138 posts
Posted: Sunday, April 09, 2017 - 07:23 PM UTC
It's looking very good, Mark