Hosted by Richard S.
I Really Want To Build This KIT!
Posted: Wednesday, July 12, 2017 - 06:42 PM UTC
White seems very appropriate, Jesper! They are looking great!
Mrclark7

Joined: June 04, 2017
KitMaker: 503 posts
Armorama: 477 posts

Posted: Thursday, July 13, 2017 - 09:43 AM UTC
I would go white also.
Mrclark7

Joined: June 04, 2017
KitMaker: 503 posts
Armorama: 477 posts

Posted: Thursday, July 13, 2017 - 09:55 AM UTC
Pretty much got it ready for priming.
Right out of the gate hit a bump and slowed thing bad when I had to figure out understanding the jack. While trying to reference it with other builds I was confused why it was sitting so low.

Next slow down came to turret fit issues. But after some work got the fit knocked out.


I am still trying to decide if I am going to use the muzzle bracket in up position or not.

I do know that I will not bother using the supplied spare tracks that came with the kit as detail is bad.

So just need to sand down the wheels while I pick a final color.

Right out of the gate hit a bump and slowed thing bad when I had to figure out understanding the jack. While trying to reference it with other builds I was confused why it was sitting so low.

Next slow down came to turret fit issues. But after some work got the fit knocked out.


I am still trying to decide if I am going to use the muzzle bracket in up position or not.

I do know that I will not bother using the supplied spare tracks that came with the kit as detail is bad.

So just need to sand down the wheels while I pick a final color.

Posted: Thursday, July 13, 2017 - 02:16 PM UTC
Thanks for the comments, Clayton and Kelly. White it is. Hope I can pull it of.
More to follow
More to follow

Posted: Saturday, July 15, 2017 - 04:01 AM UTC
A little more progress. The figures are just loosely mounted.
I am quite satisfied with the white heads and yellow beaks. Next are a lot of touch ups and the washes and highlights. Still a long way to go.


I am quite satisfied with the white heads and yellow beaks. Next are a lot of touch ups and the washes and highlights. Still a long way to go.


Posted: Saturday, July 15, 2017 - 06:23 AM UTC
Yes!
petbat

Joined: August 06, 2005
KitMaker: 3,353 posts
Armorama: 3,121 posts

Posted: Sunday, July 16, 2017 - 03:31 AM UTC
Keep taming the Beast Kelly. You find a few more little issues as you go a bit further, but so far looking good.
Excellent Jesper. Yes the White heads really do make a difference there. Be interested to see how they come up after the washes, etc.
Excellent Jesper. Yes the White heads really do make a difference there. Be interested to see how they come up after the washes, etc.
petbat

Joined: August 06, 2005
KitMaker: 3,353 posts
Armorama: 3,121 posts

Posted: Sunday, July 16, 2017 - 03:45 AM UTC
Okay where I am at... under pressure to finish here. Spent a lot of time on fixing detail issues with the kit so pushing it a bit now.
First up tracks assembled all 138 links x 2, give or take. These take a LOT of time as they are so small they easily fold up on each other as you assemble them. Even laying them on reversed painter's tape to hold them didn't help much. Also I have added rings of 30 thou and 10 thou styrene to the inside of the idlers. They are way too thin compared to pics of the real thing, and there is a lot of play when you fit them between the tracks. The second 10 thou ring on top has a slightly smaller diameter to give me the ability to make the small lip that injection moulding won't allow.

First up tracks assembled all 138 links x 2, give or take. These take a LOT of time as they are so small they easily fold up on each other as you assemble them. Even laying them on reversed painter's tape to hold them didn't help much. Also I have added rings of 30 thou and 10 thou styrene to the inside of the idlers. They are way too thin compared to pics of the real thing, and there is a lot of play when you fit them between the tracks. The second 10 thou ring on top has a slightly smaller diameter to give me the ability to make the small lip that injection moulding won't allow.

petbat

Joined: August 06, 2005
KitMaker: 3,353 posts
Armorama: 3,121 posts

Posted: Sunday, July 16, 2017 - 03:58 AM UTC
Next up some of the smaller details. The aerial mast in the kit is basically a blob compared to the real thing as is the Notek convoy light - flat and lacking detail. The replacement are Dragon spares, with triangular fillets off their tow mount for the Pzr IV on the mast support. The rest is styrene stock. The cable is yet to be fitted.
The Hobby Boss shovel is being replaced by another Dragon spare, it is under sized and that knob on the end is in none of my reference pics! The Dragon one has been filed down to thickness. The crank is being replaced for 2 reasons, the clasps are in the wrong place, and I always replace them to avoid breaking them when removing seams.

Then there is most of the finishing touches to the rear area. The idler adjusters are scratch built, as are the various rods and cables added since the last pic. The brass step is the HB one, but it is actually too long and bows if you just bend it, so I cut off one end, filed the long section down, then glued the end back on after attaching the bracket to the kit. You can also see where I have removed the mounting blocks for the tools from the kit and replaced them with styrene in the correct positions - more on that later

In this pick you can see the other details added to the beam from spares, etc. I still need to add the bolts to the brass step brackets.
You can also see the brake lines added at the rear and the missing connector to the front wheel raising mechanism, also bits from the spares box.

The Hobby Boss shovel is being replaced by another Dragon spare, it is under sized and that knob on the end is in none of my reference pics! The Dragon one has been filed down to thickness. The crank is being replaced for 2 reasons, the clasps are in the wrong place, and I always replace them to avoid breaking them when removing seams.

Then there is most of the finishing touches to the rear area. The idler adjusters are scratch built, as are the various rods and cables added since the last pic. The brass step is the HB one, but it is actually too long and bows if you just bend it, so I cut off one end, filed the long section down, then glued the end back on after attaching the bracket to the kit. You can also see where I have removed the mounting blocks for the tools from the kit and replaced them with styrene in the correct positions - more on that later

In this pick you can see the other details added to the beam from spares, etc. I still need to add the bolts to the brass step brackets.
You can also see the brake lines added at the rear and the missing connector to the front wheel raising mechanism, also bits from the spares box.

petbat

Joined: August 06, 2005
KitMaker: 3,353 posts
Armorama: 3,121 posts

Posted: Sunday, July 16, 2017 - 04:22 AM UTC
Next another rear shot - I'll pass on the injection thanks Matron. 
Here you can see the rain channel added, the cable for the light over the regn no. (HB gives you a thick plate to glue on, but from references, it appears the numbers were painted on the doors.) The HB cable moulding has a strange loop on it which is not evident in any references and their cable stops at the door edge! Hard to find clear pics of where the cable runs, I have just one pic that seems to show it running as I have done. Just have to add the clips to these now.
You can also see the door bumpers which HB do not provide. These were fitted to stop the doors hitting the tracks. Made a few of these before I got it right.
You will also notice a fair bit of filler around doors and hatches. There is a gap around just about every fitting in the kit.

Here you can see the exhaust added, the front brake lines and the kit fitting mounts removed and the forward ones added in repositioned locations with clamps added. HB has you mount the shovel well forward and all the clamps are in the wrong positions. Even the aerial and Trafficator mounts are too close together and have to be removed and replaced (if accuracy is your thing).
You can also see the hole drilled in the hull for the aerial mount and if you look close, the stop that has been added just above the rear wishbone. This was to stop the wheels being raised too high and fouling on the tracks.

Lastly the other side. Again the mounts for the tools have been replaced and located in the correct positions. Funny how the look out of square in the pic A couple more to add, the axe blade holder to make and fit, then the Aber clamps get fitted. (Note: if you ever build this kit, of all the references I have, most show only the crank fitted to the vehicles, with only a couple with the axe fitted as well, just one pic with the wire cutters in the lower rear fitting and the crank fitted, and just one other with a pickaxe (not in the HB kit) fitted with the crank and axe.)

Anyway, that's it for now. Quite a few words here, I hope you stayed for the journey

Here you can see the rain channel added, the cable for the light over the regn no. (HB gives you a thick plate to glue on, but from references, it appears the numbers were painted on the doors.) The HB cable moulding has a strange loop on it which is not evident in any references and their cable stops at the door edge! Hard to find clear pics of where the cable runs, I have just one pic that seems to show it running as I have done. Just have to add the clips to these now.
You can also see the door bumpers which HB do not provide. These were fitted to stop the doors hitting the tracks. Made a few of these before I got it right.
You will also notice a fair bit of filler around doors and hatches. There is a gap around just about every fitting in the kit.

Here you can see the exhaust added, the front brake lines and the kit fitting mounts removed and the forward ones added in repositioned locations with clamps added. HB has you mount the shovel well forward and all the clamps are in the wrong positions. Even the aerial and Trafficator mounts are too close together and have to be removed and replaced (if accuracy is your thing).
You can also see the hole drilled in the hull for the aerial mount and if you look close, the stop that has been added just above the rear wishbone. This was to stop the wheels being raised too high and fouling on the tracks.

Lastly the other side. Again the mounts for the tools have been replaced and located in the correct positions. Funny how the look out of square in the pic
 A couple more to add, the axe blade holder to make and fit, then the Aber clamps get fitted. (Note: if you ever build this kit, of all the references I have, most show only the crank fitted to the vehicles, with only a couple with the axe fitted as well, just one pic with the wire cutters in the lower rear fitting and the crank fitted, and just one other with a pickaxe (not in the HB kit) fitted with the crank and axe.)
Anyway, that's it for now. Quite a few words here, I hope you stayed for the journey
Posted: Sunday, July 16, 2017 - 06:15 PM UTC
My word, Peter, that's quite a treasure trove of info for when I build mine...Thanks for the class!

BTW- IF an extension is desired by anyone, let me know so I can pass it upstairs- as it is, this campaign closes 2 weeks from tomorrow...


BTW- IF an extension is desired by anyone, let me know so I can pass it upstairs- as it is, this campaign closes 2 weeks from tomorrow...


Posted: Tuesday, July 18, 2017 - 08:40 PM UTC
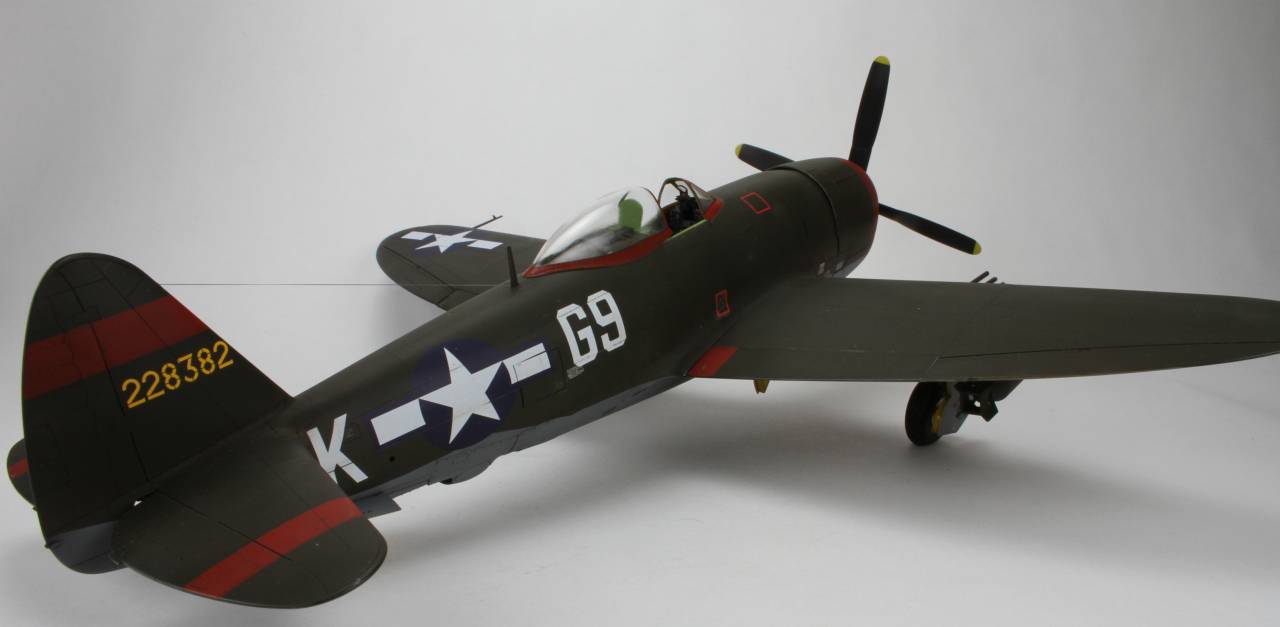
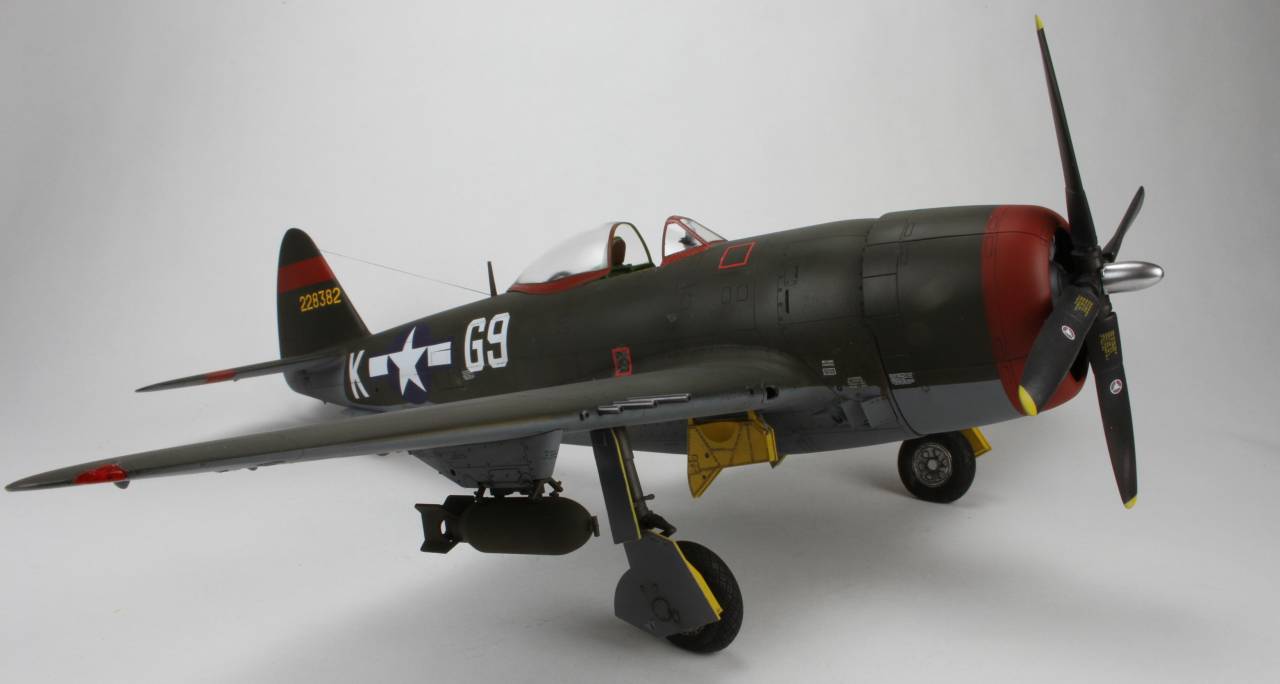
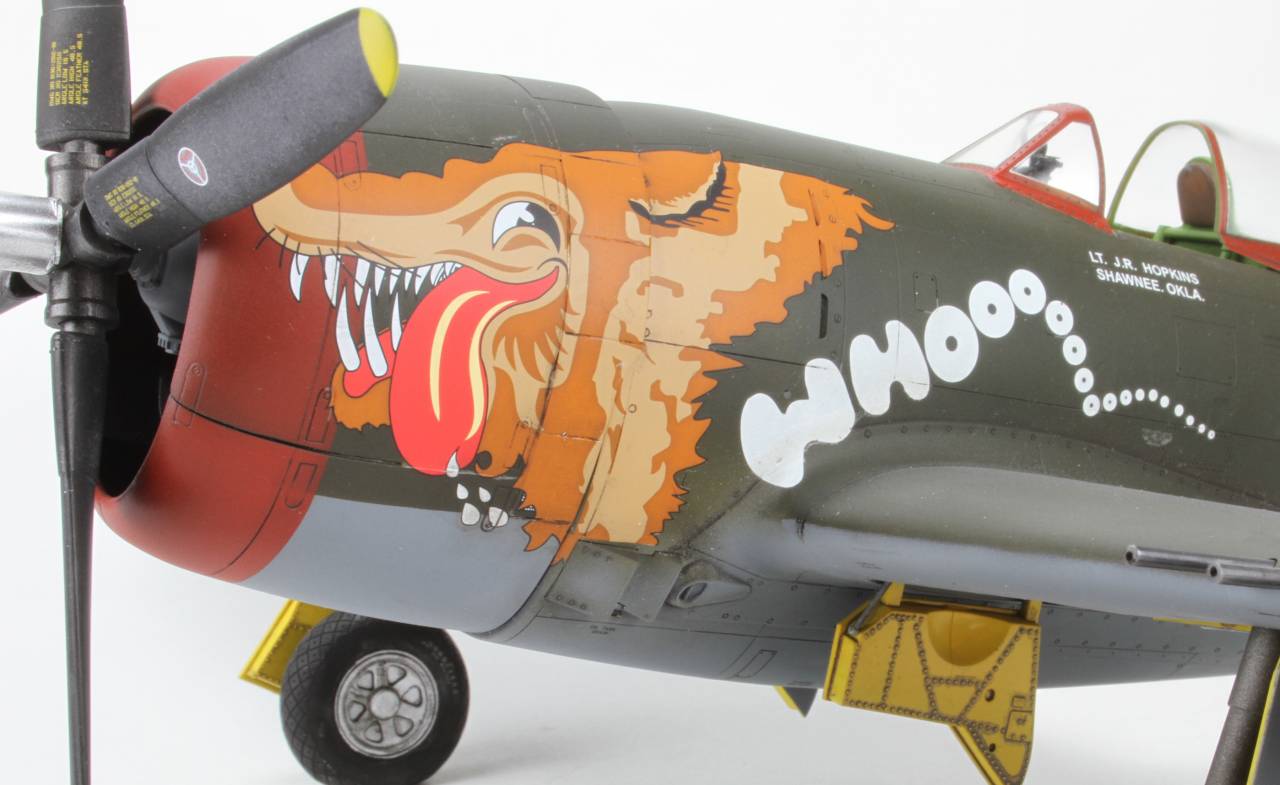
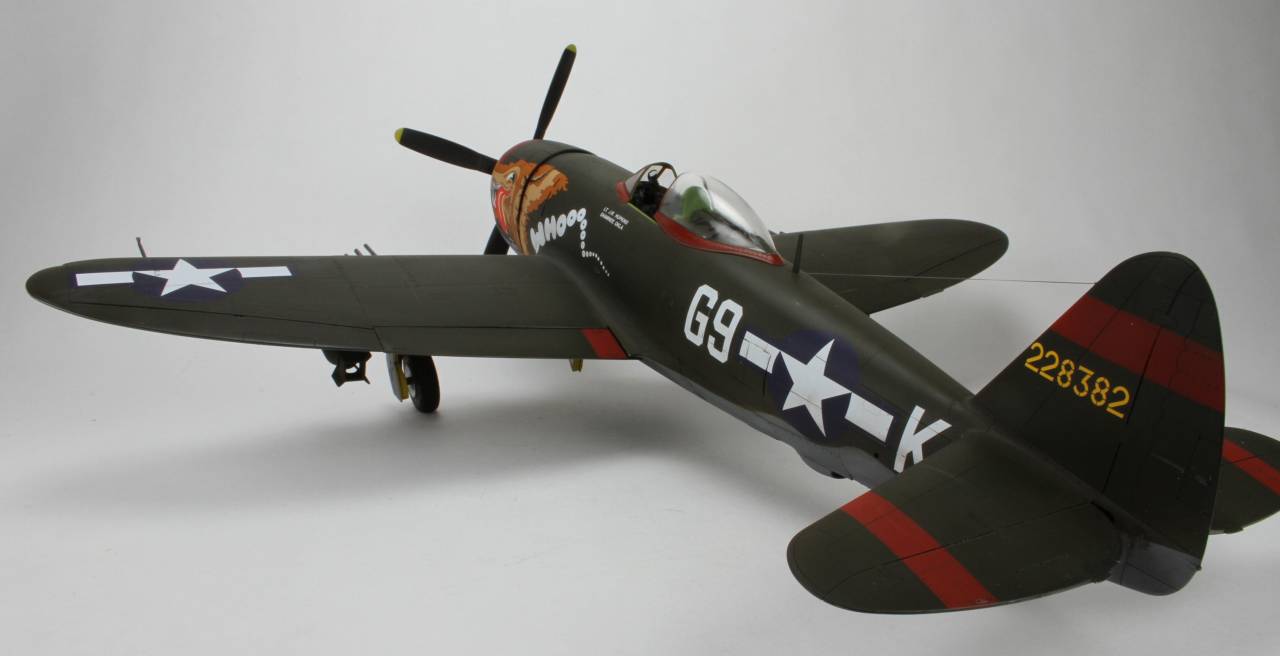
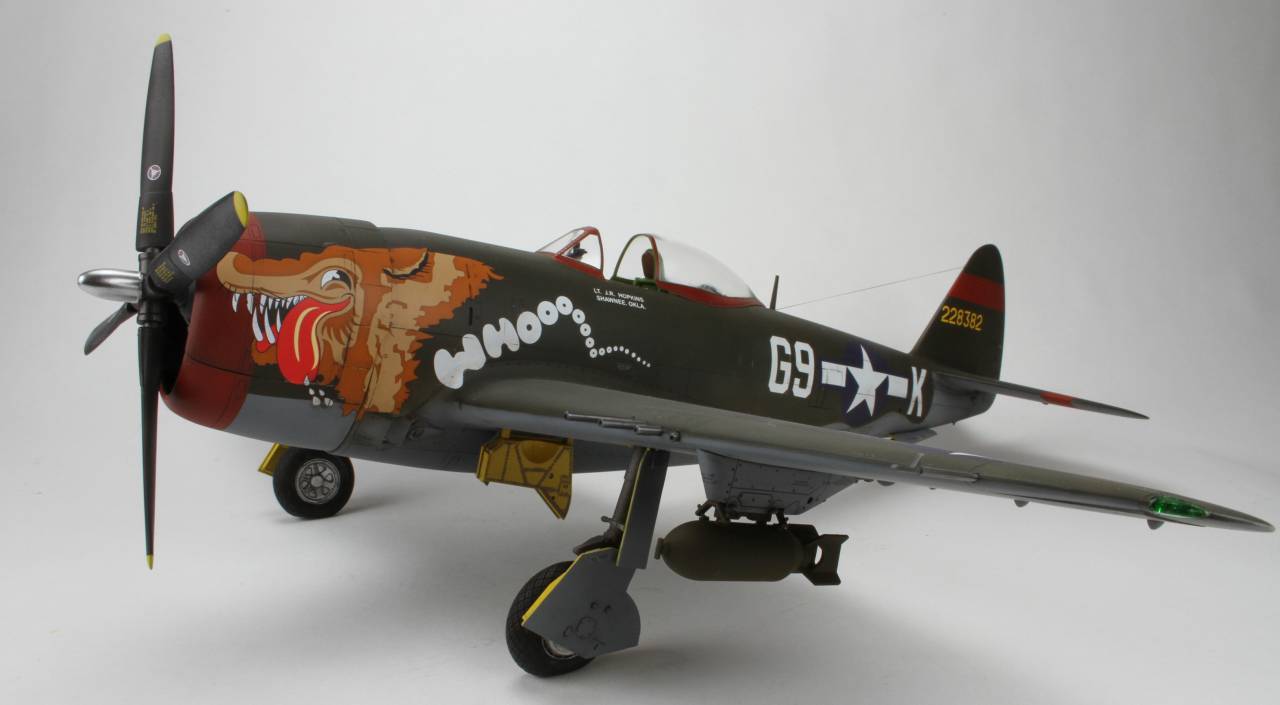
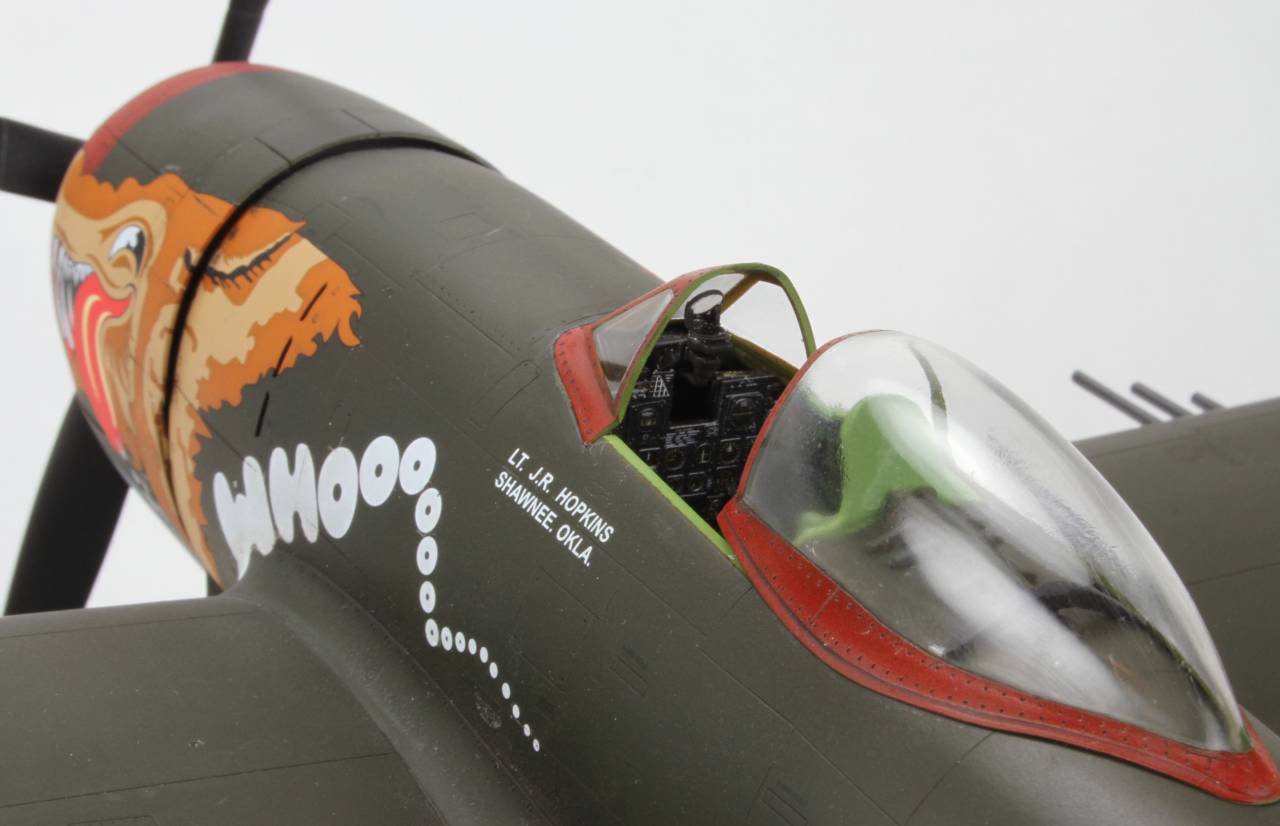
Here are the finished photos of the P-47D 1/32 scale by Eduard (really Hasegawa plus eduard PE in an Eduard Box)
Same photos are in the gallery.
Great Campaign with a plethora of different models.
Tom
Same photos are in the gallery.
Great Campaign with a plethora of different models.


Tom
Posted: Wednesday, July 19, 2017 - 01:34 AM UTC
Beautiful Work, Tom! The decal job is glorious!!! 
I'm glad you really wanted to build that kit!

I'm glad you really wanted to build that kit!

petbat

Joined: August 06, 2005
KitMaker: 3,353 posts
Armorama: 3,121 posts

Posted: Wednesday, July 19, 2017 - 05:33 AM UTC
Whoooooooooooo Hooo. Love it. Yes sure is a striking finish on that one; a real eye catcher for the collection Tom.
Thanks for sharing and joining in.
Thanks for sharing and joining in.
Posted: Wednesday, July 19, 2017 - 12:31 PM UTC
Great and colorful build, Tom. That will really catch attention when fisplsyed.
Thanks for participating
Thanks for participating

petbat

Joined: August 06, 2005
KitMaker: 3,353 posts
Armorama: 3,121 posts

Posted: Thursday, July 20, 2017 - 09:04 AM UTC
Okay, final details added and ready for a wash down and then primer when dry.
I also added covers to the headlights from Magic Sculpt, as the vehicle I am doing had them fitted. I will also need to make a flag to drape over the front too.
Clayton, I probably will need a small extension to the time limit at this rate.!


I also added covers to the headlights from Magic Sculpt, as the vehicle I am doing had them fitted. I will also need to make a flag to drape over the front too.
Clayton, I probably will need a small extension to the time limit at this rate.!


Removed by original poster on 07/21/17 - 13:15:33 (GMT).
Posted: Thursday, July 20, 2017 - 06:16 PM UTC
Looking great,Peter! Extension request has been sent! I really want to see you finish this.
Mrclark7

Joined: June 04, 2017
KitMaker: 503 posts
Armorama: 477 posts

Posted: Saturday, July 22, 2017 - 09:55 AM UTC
Well, as much as I thought about going pink pather, Ive gone boring sand. It will still get another coat to deepen it. And I might add some stripes or go the brown green route.
doing wheels are mixed for me. With this kit its a beating doing all the wheels front AND back, but once spraying and seeing the masking coming out beautiful it makes it worth it. This model was a little odd in that eight of the wheels have a slightly different track rubber size than the other wheels. I ended up doing it two ways. one way how it comes, and another making the wheels look the same as all other wheels. I am going to end up just doing all the same. I would need to study the panther more to be able to figure out what was norm.


doing wheels are mixed for me. With this kit its a beating doing all the wheels front AND back, but once spraying and seeing the masking coming out beautiful it makes it worth it. This model was a little odd in that eight of the wheels have a slightly different track rubber size than the other wheels. I ended up doing it two ways. one way how it comes, and another making the wheels look the same as all other wheels. I am going to end up just doing all the same. I would need to study the panther more to be able to figure out what was norm.


petbat

Joined: August 06, 2005
KitMaker: 3,353 posts
Armorama: 3,121 posts

Posted: Saturday, July 22, 2017 - 02:00 PM UTC
Looking good Kelly. If I remember correctly, that Tamiya kit provides the 2 'centre' road wheels in one moulding, hence the tyre is thicker - it is actually representing 2 tyres
Well the 254 is primed and has its base coats on. Will apply blue based filter then once dry will decal. Once before, I made the mistake of decaling first and the white in the decals ended up a pale blue....
Once that is done, the real painting begins...
Well the 254 is primed and has its base coats on. Will apply blue based filter then once dry will decal. Once before, I made the mistake of decaling first and the white in the decals ended up a pale blue....
Once that is done, the real painting begins...
Posted: Saturday, July 22, 2017 - 11:57 PM UTC
Hey, Kelly, in my mind, sand is not boring, there are a million shades of it! 

Posted: Sunday, July 23, 2017 - 02:52 AM UTC
These guys are getting close to done. Just a few details and the bases left.
More to follow soon


More to follow soon


Mrclark7

Joined: June 04, 2017
KitMaker: 503 posts
Armorama: 477 posts

Posted: Sunday, July 23, 2017 - 02:53 AM UTC
Quoted Text
Looking good Kelly. If I remember correctly, that Tamiya kit provides the 2 'centre' road wheels in one moulding, hence the tyre is thicker - it is actually representing 2 tyres
Well the 254 is primed and has its base coats on. Will apply blue based filter then once dry will decal. Once before, I made the mistake of decaling first and the white in the decals ended up a pale blue....
Once that is done, the real painting begins...
Peter, after to some research I can see what you are trying to say. The Tamiya version only has one rim outer on the middle section wheels.
I would like to camo this one also. But its going to be a tester for me I think. I have had very bad luck doing pin washes and finally think I have discovered my blunder. I was using vallejo matt or gloss which are acrylics also and when I go to pin wash i get bad results. I am going to try Tamiya lacquer and see if I can finally get results like I think I can.
I have a paladin I am starting next and need to figure the technique out before trying on that model. The panther is such a cheap model and fast to build that I will probably build more just to try other ideas out on also first.
Posted: Sunday, July 23, 2017 - 09:01 AM UTC
More progress update. 
 [/url]


 [/url]


Posted: Sunday, July 23, 2017 - 06:09 PM UTC
Quoted Text
Looking great,Peter! Extension request has been sent! I really want to see you finish this.
Extension granted to 8/15!!!!!

 |


