Queensland, Australia
Joined: August 06, 2005
KitMaker: 3,353 posts
Armorama: 3,121 posts
Posted: Monday, November 25, 2019 - 07:50 PM UTC
Last minute rush - love it. For once I am ahead of the game..
Very nice additional detail Robert. Excellent weathering too.
Angel, nicely done too. Still not used to 3/4 of it not being scratch built though

Shell. Looking good on the paper panzer. I took the turret from my kit and added it to a later release of the Panther G... and it has been a shelf queen ever since. I'll need to dig that out now as seeing yours has given me the push to get back and finish it.
On the Bench:
Dust, styrene scraps, paint splotches and tears.

#490
Sofiya, Bulgaria
Joined: September 22, 2016
KitMaker: 1,432 posts
Armorama: 1,390 posts
Posted: Monday, November 25, 2019 - 08:07 PM UTC
Quoted Text
...
Angel, nicely done too. Still not used to 3/4 of it not being scratch built though...
Well, there will be 2 scratchbuilt ammo basket covers one day, but I guess that won't change the ratio too much...

Västra Götaland, Sweden
Joined: May 29, 2018
KitMaker: 397 posts
Armorama: 388 posts
Posted: Monday, November 25, 2019 - 10:16 PM UTC
Looks good Angel. I am waiting for the halftruck...
#490
Sofiya, Bulgaria
Joined: September 22, 2016
KitMaker: 1,432 posts
Armorama: 1,390 posts
Posted: Tuesday, November 26, 2019 - 03:32 AM UTC
So am I, Bogi!
Waiting for the Styrene "Sd.Kfz.7" Muse to drop by...
Sofar I only play the "Open the box-Take a look-Close the Box" game

Bangkok, Thailand / ไทย
Joined: September 17, 2013
KitMaker: 1,617 posts
Armorama: 1,150 posts
Posted: Tuesday, November 26, 2019 - 09:35 PM UTC
Progress for Wednesday 27/11/19.
Still dry fit of tires and little parts to add, but we're getting there in time.


Have to focus on the 88 now. Did some weathering already, just needs the POP.
More to come later this week.
Robert Jan


Texas, United States
Joined: June 04, 2017
KitMaker: 503 posts
Armorama: 477 posts
Posted: Wednesday, November 27, 2019 - 06:12 PM UTC
Well opened the bags tonight and started the building. Might start the painting tomorrow.
Texas, United States
Joined: June 04, 2017
KitMaker: 503 posts
Armorama: 477 posts
Posted: Wednesday, November 27, 2019 - 06:35 PM UTC
Okay, need some help. can anyone give me input on how the seats are supposed to be when building in the towing position? it shows on the side, but does that mean they are just laying on the footbed of the gun while in transport? What kept them from bouncing out? Or is this just a build flaw?

Queensland, Australia
Joined: August 06, 2005
KitMaker: 3,353 posts
Armorama: 3,121 posts
Posted: Thursday, November 28, 2019 - 07:26 AM UTC
Hi Kelly
The stem of the seat was in a fitting so it could be lowered 90 degrees


On the Bench:
Dust, styrene scraps, paint splotches and tears.
#465
Nordrhein-Westfalen, Germany
Joined: September 12, 2014
KitMaker: 398 posts
Armorama: 394 posts
Posted: Thursday, November 28, 2019 - 08:48 AM UTC
Lots and lots of superb work on display here - If I had time, Id comment on everything individually, but for now Ill just say wow.
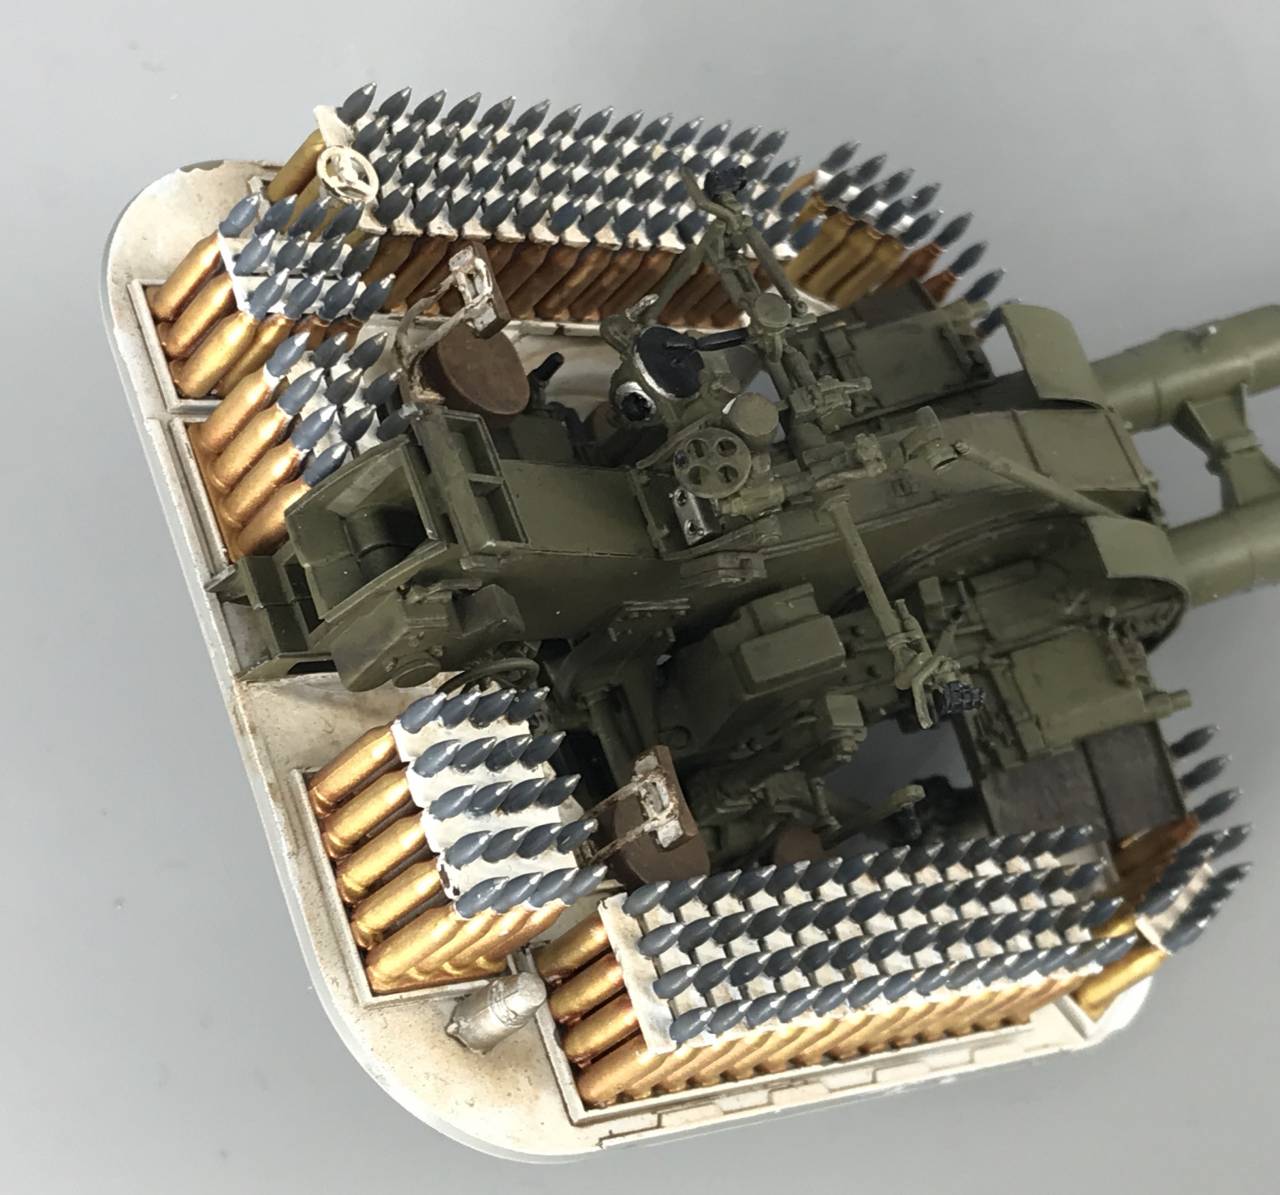
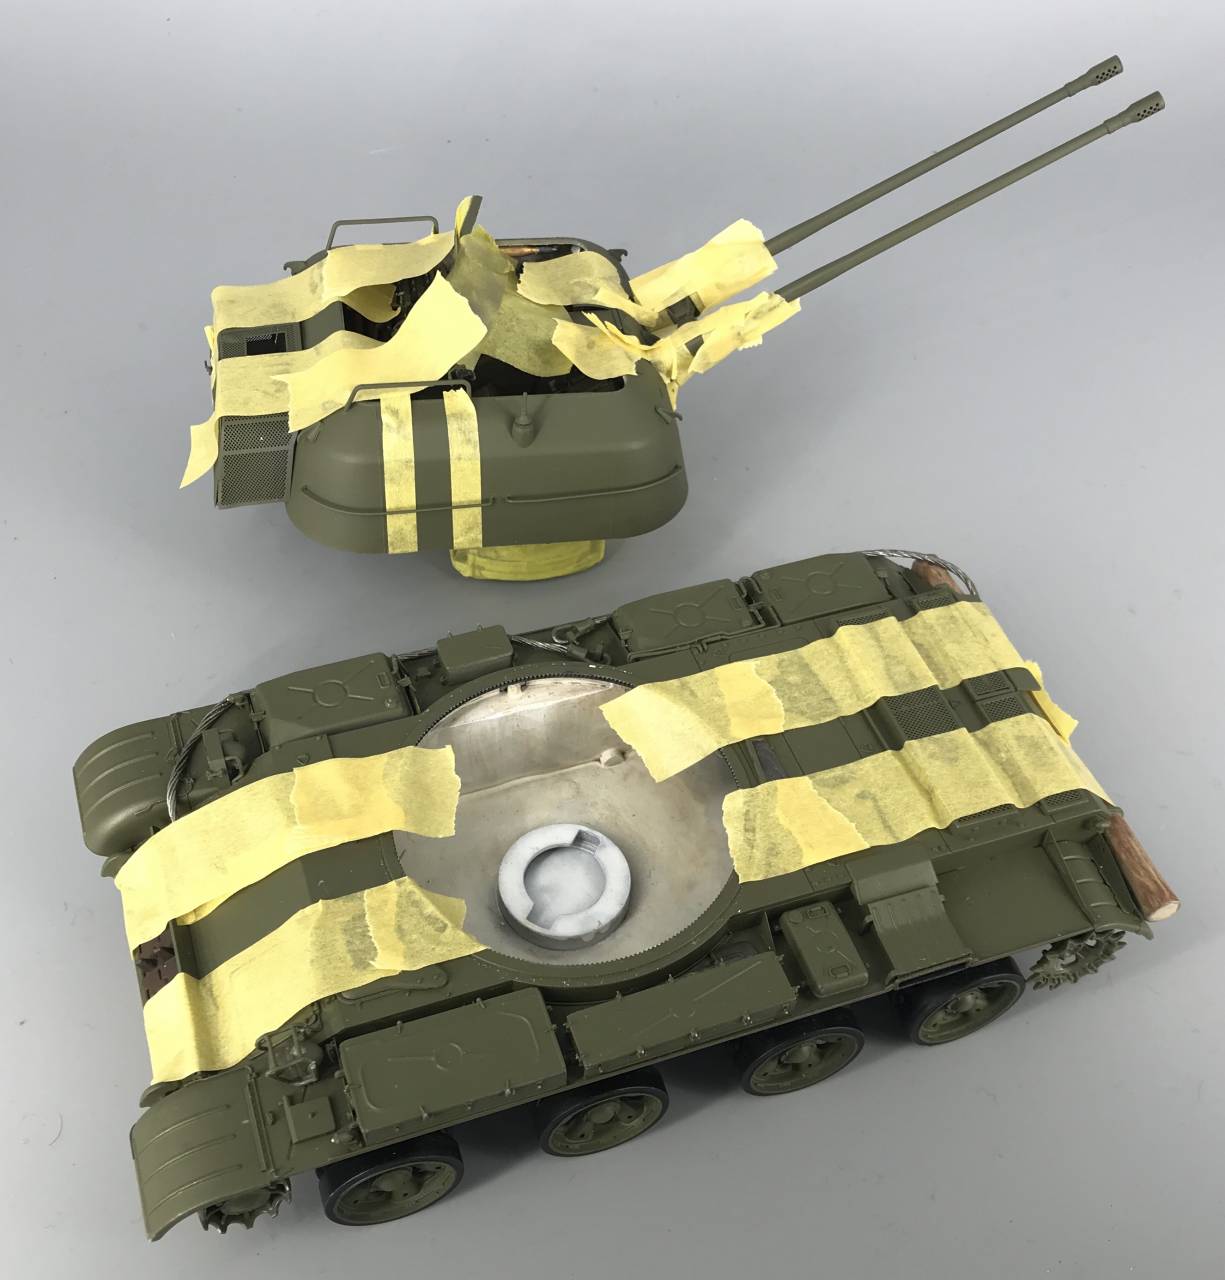
Anyway, sorry about disappearing for a very long time, but work has been stuck in punishment mode for a couple of months and what little time has been left over I first spent finishing the build for the Trumpeter Mk. 5 campaign, then doing the tedious brushwork for the interior of the open-topped turret of my ZSU-57-2 (all that ammo was murder!) - the rest of the painting was pretty straightforward. And Im very grateful for the extension until Saturday, since theres no way I would have been able to come close to finishing on Oct. 31st.
On to what Ive got done on the offending beast in the last six weeks or so:


And then, the masking for the recognition stripes, since this is going to be a vehicle from the Soviet invasion of Czechoslovakia in 68:
Good luck to the other last-minute rushers like me and see you on Saturday for the final pics.
Have fun,
Jerry
Bangkok, Thailand / ไทย
Joined: September 17, 2013
KitMaker: 1,617 posts
Armorama: 1,150 posts
Posted: Thursday, November 28, 2019 - 11:05 AM UTC
Looks absolutely fantastic Jerry. The interior color is just WOW. Very convincing.
Robert Jan
GulfWarrior
 Campaigns Administrator
Texas, United States
Joined: January 05, 2010
KitMaker: 1,051 posts
Armorama: 1,029 posts
Posted: Thursday, November 28, 2019 - 02:42 PM UTC
Current campaigns:
I Like Big GUNS...And I Cannot Lie (2S1 Gvozdika)
Operation Snow White (Maultier w/ 37mm Flak Gun)
Stryker Campaign (AFV Club Stryker Dragoon)
1st Gulf War, 30th Anniversary (Dragon MLRS)
Queensland, Australia
Joined: August 06, 2005
KitMaker: 3,353 posts
Armorama: 3,121 posts
Posted: Thursday, November 28, 2019 - 03:24 PM UTC
Very nicely done Jerry. I'm looking forward to the end product! You could have saved a week or so and not painted the brass on the rounds that go up against the turret wall!

(Been there done that too....)
Richard could be a couple of things.
Humidity? Are you using a water trap?
Spraying too heavy a coat. These paints need ultra light coats with drying in between. Don't try and cover like you do with Tamiya.
Surface you are spraying on. What primer/paint did you use? Mig can bead on the wrong type due to surface tension.
Have you seen these?
https://www.youtube.com/watch?v=gyte6l1Gokwhttps://www.migjimenez.com/en/module/csblog/detailpost/12-6-acrylics.htmlOn the Bench:
Dust, styrene scraps, paint splotches and tears.
GulfWarrior
Campaigns Administrator Texas, United States
Joined: January 05, 2010
KitMaker: 1,051 posts
Armorama: 1,029 posts
Posted: Thursday, November 28, 2019 - 03:57 PM UTC
The primer is Vallejo gloss black primer. The colors are Vallejo Model Air Aluminum and Model Air Steel. Both were top-coated with Future.
Moisture I don't is an issue. I've got a moisture trap on my line and I keep a close watch on it.
I'm hoping I can still salvage the project; but it won't be a contest winner now.


Current campaigns:
I Like Big GUNS...And I Cannot Lie (2S1 Gvozdika)
Operation Snow White (Maultier w/ 37mm Flak Gun)
Stryker Campaign (AFV Club Stryker Dragoon)
1st Gulf War, 30th Anniversary (Dragon MLRS)
Texas, United States
Joined: June 04, 2017
KitMaker: 503 posts
Armorama: 477 posts
Posted: Thursday, November 28, 2019 - 06:40 PM UTC
Quoted Text
Hi Kelly
The stem of the seat was in a fitting so it could be lowered 90 degrees
yeah Peter I see that, just there is no way to make it with the item from that spot. Ive gonna ahead a decided to just build it in non towing use.
Queensland, Australia
Joined: August 06, 2005
KitMaker: 3,353 posts
Armorama: 3,121 posts
Posted: Thursday, November 28, 2019 - 10:00 PM UTC
Quoted Text
Both were top-coated with Future.
Future Floor polish... that may be the culprit. It might be creating the tension pulling into beads. Try a couple of tests on some card- one coated with future and one just painted - and see the result when you spray both at the same time.
On the Bench:
Dust, styrene scraps, paint splotches and tears.
Bangkok, Thailand / ไทย
Joined: September 17, 2013
KitMaker: 1,617 posts
Armorama: 1,150 posts
Posted: Thursday, November 28, 2019 - 10:13 PM UTC
On the home stretch...
Needs some examination tonight and tomorrow morning.
Some photos...


Not finished yet...
Almost there...
Robert Jan
GulfWarrior
Campaigns Administrator Texas, United States
Joined: January 05, 2010
KitMaker: 1,051 posts
Armorama: 1,029 posts
Posted: Friday, November 29, 2019 - 02:29 AM UTC
Thanks, Pete! Ill give that a try as soon as I can.
Excellent work, Robert! Very nicely done!
Current campaigns:
I Like Big GUNS...And I Cannot Lie (2S1 Gvozdika)
Operation Snow White (Maultier w/ 37mm Flak Gun)
Stryker Campaign (AFV Club Stryker Dragoon)
1st Gulf War, 30th Anniversary (Dragon MLRS)
#490
Sofiya, Bulgaria
Joined: September 22, 2016
KitMaker: 1,432 posts
Armorama: 1,390 posts
Posted: Friday, November 29, 2019 - 04:34 AM UTC
Excellent ZSU-57-2, Jerry!
I look in owe to the rows and rows of painted shells...
Sorry to hear that, Richard!
I can't offer any advice as I stopped using Vallejo/AK/Mig type of acrylics ever since I opened a bottle of Tamiya...
I hope you'll find a solution and will show us your Ganef.
Well Robert, thats an WOW!
Damn sure this gun will be a show-stopper!
GulfWarrior
Campaigns Administrator Texas, United States
Joined: January 05, 2010
KitMaker: 1,051 posts
Armorama: 1,029 posts
Posted: Friday, November 29, 2019 - 04:42 AM UTC
Yeah, I normally love Tamiya paints; but for this one I went with Vallejo just because of their ease of clean-up, from what I've seen on YouTube.
I'm thinking my problem might have more to do with the Future I clear coated the model with before applying my decals. I added a second coat of Ultra-Matt yesterday and it seemed to help clear it up. I'll check it again later today and see if one last light coat fixes it.
Current campaigns:
I Like Big GUNS...And I Cannot Lie (2S1 Gvozdika)
Operation Snow White (Maultier w/ 37mm Flak Gun)
Stryker Campaign (AFV Club Stryker Dragoon)
1st Gulf War, 30th Anniversary (Dragon MLRS)
Queensland, Australia
Joined: August 06, 2005
KitMaker: 3,353 posts
Armorama: 3,121 posts
Posted: Friday, November 29, 2019 - 07:31 AM UTC
Sensational Robert. Looks just fantastic.
Good luck Richard. Fingers crossed.
I found Vallejo difficult to spray with but love their brush painting quality. I use them for all my weathering since all the MIG products wash and effects paints I had went off in the bottle. Thinning Vallejo with water gives a thin opaque finish and the separation of pigments gives you tonal variation.
I use AK paints for my US OD as I love the colour, and once I got the 'Ogre' technique down pat (like onions they are made up of lots of layers - Shrek joke) I get good results. It is just very time consuming, especially the frequent nozzle cleaning.
On the Bench:
Dust, styrene scraps, paint splotches and tears.
Bangkok, Thailand / ไทย
Joined: September 17, 2013
KitMaker: 1,617 posts
Armorama: 1,150 posts
Posted: Friday, November 29, 2019 - 08:32 PM UTC
Bangkok, Thailand / ไทย
Joined: September 17, 2013
KitMaker: 1,617 posts
Armorama: 1,150 posts
Posted: Friday, November 29, 2019 - 09:09 PM UTC
So after 30 minutes I got so frustrated, the ICE age gallery does not work.
My attempts to upload one simple picture seems not to work, although it is all 'successfully' I don't see them, because I did some more.
Typical

Bangkok, Thailand / ไทย
Joined: September 17, 2013
KitMaker: 1,617 posts
Armorama: 1,150 posts
Posted: Friday, November 29, 2019 - 09:29 PM UTC
It really sucks.
So thanks for the attention and nice comments.
The gallery shows no final pictures of my build.
I'll leave it that way.
Robert Jan
Queensland, Australia
Joined: August 06, 2005
KitMaker: 3,353 posts
Armorama: 3,121 posts
Posted: Friday, November 29, 2019 - 10:20 PM UTC
Did you resize the pics Robert? The ones you posted here exceed the size limit for gallery pics. I usually resize to 800 x 600 pixels with DPI 96 using Irfanview (free program you can download).
BTW, you have done a magnificent job. That close up pic could be mistaken for a photo of the real deal.
On the Bench:
Dust, styrene scraps, paint splotches and tears.
Bangkok, Thailand / ไทย
Joined: September 17, 2013
KitMaker: 1,617 posts
Armorama: 1,150 posts
Posted: Friday, November 29, 2019 - 10:32 PM UTC
Will see if I can fix it. We're ahead of closing times set, so let's see.
Thanks for the advise on resize of pics.
edit...
Used to the flashing internet and options, it almost became a struggle.
Well resized and fixed.
All is ok now, thanks again.
Robert Jan