The Crossley is looking excellent, nice work M. Some great builds still coming along.
Al.
Campaigns
Where Armorama group builds can be discussed, organized, and updates posted.
Where Armorama group builds can be discussed, organized, and updates posted.
Hosted by Darren Baker, Richard S.
Soft skinned
Posted: Thursday, October 06, 2011 - 08:43 AM UTC
steph2102

Joined: April 23, 2011
KitMaker: 735 posts
Armorama: 606 posts

Posted: Friday, October 07, 2011 - 05:34 AM UTC
hello
Here are some photos of my progress


Here are some photos of my progress
Posted: Friday, October 07, 2011 - 09:11 AM UTC
Hi Steph,
That is coming along a treat.
Al
That is coming along a treat.
Al

steph2102

Joined: April 23, 2011
KitMaker: 735 posts
Armorama: 606 posts

Posted: Friday, October 07, 2011 - 09:44 AM UTC
Yes, not fast, I work on the diorama. and I have too much of the campaign began. I think I'm addicted 
steph

steph

ltb073

Joined: March 08, 2010
KitMaker: 3,662 posts
Armorama: 3,078 posts

Posted: Friday, October 07, 2011 - 01:56 PM UTC
Quoted Text
Yes, not fast, I work on the diorama. and I have too much of the campaign began. I think I'm addicted
steph
Yes, looking good there Steph and yes this is very addicting


windysean

Joined: September 11, 2009
KitMaker: 1,917 posts
Armorama: 735 posts

Posted: Sunday, October 09, 2011 - 12:22 PM UTC
Quoted Text
This is a big campaign! Popular idea.
Here's my starting post...
I've included the April 14, 2011 The Onion free newspaper to authenticate the date.
Using the Italeri M1097A2 kit (#6484), note parts trees are still in bags.
Added M60 and its pedestal from a Tamiya M151A2 kit.
Photos of the Three Kings humvee, taken off the worldwide web, as a guide to build by. (So I make no claims that my humvee will be any more authentic than the movie one).
thanks,
Sean.
That was waaaaaay back on April 17th. I finally got back to it. The kit build is going quickly...

I was going to show the M60 parts and the movie photos, but I see my starting photo pretty much showed all that. I just have to put the rest together now.

still 22 days to get this in!
-Sean H.
madmax5510

Joined: May 06, 2008
KitMaker: 354 posts
Armorama: 343 posts

Posted: Monday, October 10, 2011 - 01:08 AM UTC
Hi to all!
Can i call, my Opel Blitz Ambulance,finished.So,Normandie 1944:


Now is time to go to another campaign.
Goodluck to all!
Dani
Can i call, my Opel Blitz Ambulance,finished.So,Normandie 1944:


Now is time to go to another campaign.
Goodluck to all!
Dani

Nito74

Joined: March 04, 2008
KitMaker: 5,386 posts
Armorama: 4,727 posts

Posted: Monday, October 10, 2011 - 03:31 PM UTC
Great work on that Blitz Dani !!
After these shots

I managed to finish the cabin, suspension and started assembling the wheels,
Hope to finish it in 1 or 2 weeks.
After these shots

I managed to finish the cabin, suspension and started assembling the wheels,
Hope to finish it in 1 or 2 weeks.

windysean

Joined: September 11, 2009
KitMaker: 1,917 posts
Armorama: 735 posts

Posted: Tuesday, October 11, 2011 - 03:40 PM UTC
To make the B-Pillar rollbar on my M998, I cut most of the kit cab rear apart...


Then cleaned that up with files and sandpaper, then laminated another piece of styrene to it, to thicken and shape it...

Now installed...

gun pedestal added...

and assembly nearly complete! I'm ready for paint...

Pardon the long post-- I don't usually work so fast
Comments and suggestions welcome!
thanks,
-Sean H.


Then cleaned that up with files and sandpaper, then laminated another piece of styrene to it, to thicken and shape it...

Now installed...

gun pedestal added...

and assembly nearly complete! I'm ready for paint...

Pardon the long post-- I don't usually work so fast

Comments and suggestions welcome!
thanks,
-Sean H.

zontar

Joined: August 27, 2006
KitMaker: 1,646 posts
Armorama: 1,557 posts

Posted: Tuesday, October 11, 2011 - 06:42 PM UTC
Wow!! I haven't checked in for a while and there is some great work going on.
Sean: good to see your work on that kit. I'm saving mine for scrap!!
Happy Modelling, -zon
Sean: good to see your work on that kit. I'm saving mine for scrap!!
Happy Modelling, -zon

emroglan

Joined: December 16, 2004
KitMaker: 1,163 posts
Armorama: 842 posts

Posted: Tuesday, October 11, 2011 - 09:42 PM UTC
Dani, your little ambulance looks impressive. Good job!
Sean, nice progress on the Humvee. I'm following with great interest.
After seeing all these nice models, I really want to build another softskin. Pity I'm in neck deep with Aeroscale campaigns and must build more and more aircraft... ahem... I mean aerial targets
Sean, nice progress on the Humvee. I'm following with great interest.
After seeing all these nice models, I really want to build another softskin. Pity I'm in neck deep with Aeroscale campaigns and must build more and more aircraft... ahem... I mean aerial targets

Posted: Tuesday, October 11, 2011 - 11:48 PM UTC
nothing major here..
just got a basecoat of black on my jeep build.. here is a pic..

laters
Delbert
just got a basecoat of black on my jeep build.. here is a pic..

laters
Delbert
steph2102

Joined: April 23, 2011
KitMaker: 735 posts
Armorama: 606 posts

Posted: Friday, October 14, 2011 - 03:57 AM UTC
hello
Here are pictures of my contribution. comments welcome.
thank steph


Here are pictures of my contribution. comments welcome.
thank steph
Posted: Friday, October 14, 2011 - 04:03 AM UTC
Lotsa neat stuff getting posted! As for me, I've sprayed my Kubelwagen with dark grey and then a thin coat of buff to give it that "hastily camo'd" look for the desert. Next up is a ton of detail painting, some chipping where the buff is rubbing off to reveal factory grey, and of course assembly of the bits. Did I mention I might not make the deadline?...
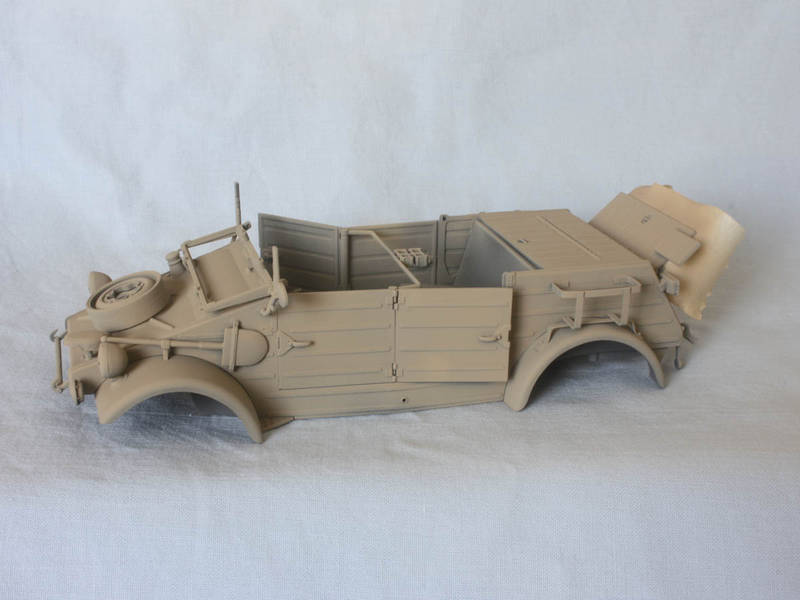
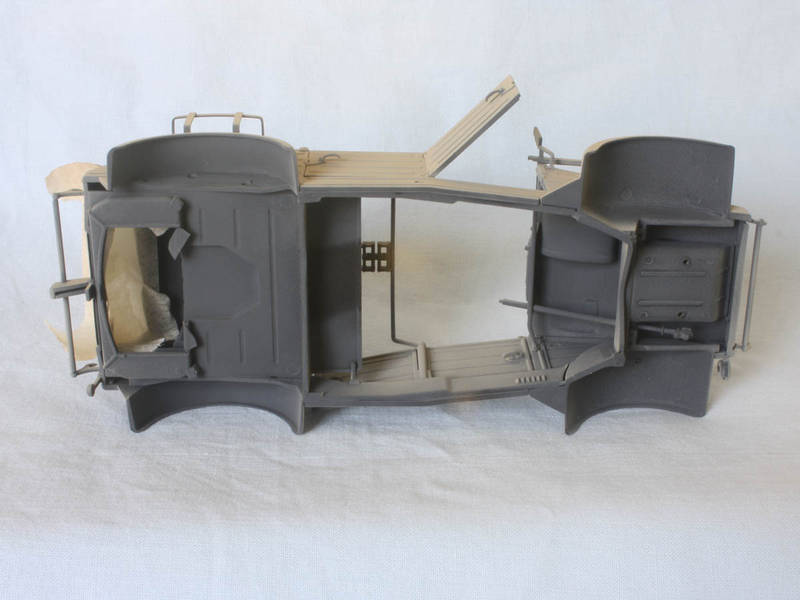
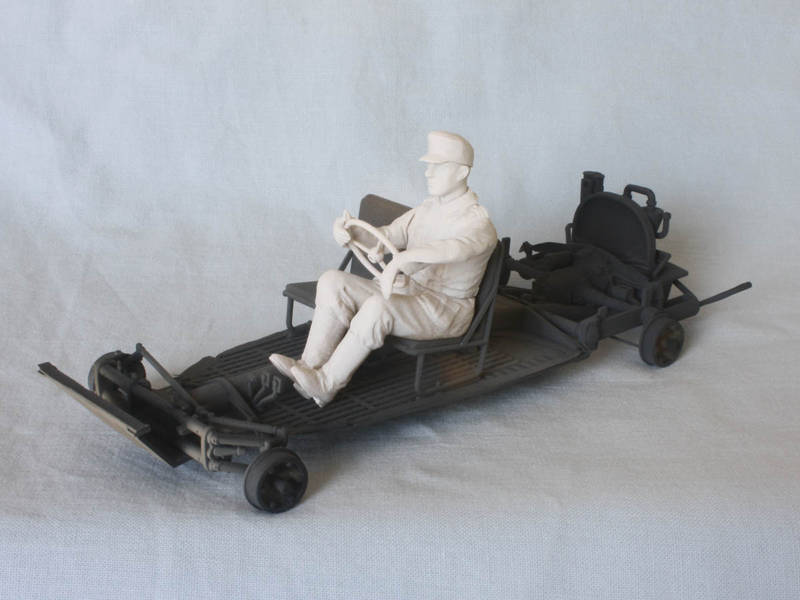
Tom


Tom
Posted: Friday, October 14, 2011 - 03:22 PM UTC
howdy all
an update on my willies jeep build.
Sprayed the base coat of Model Master Olive Drab (ANA 613). It went over the flat black coat very well, though I think it made the OD appear a little darker than I expected.

Then I wanted to lighten it up a bit using a color modulation style to bring some color contrast to the model. I chose Model Master Faded Olive Drab. However I personally prefer a slightly greener OD so I added in a bit of Testors Flat Yellow. I may have added a tad to much, as I think I over greened it a bit, but I think some of the later weathering will tone that down. Here are some pictures..
I tried not to cover the entire model in the faded color so there will be darker and lighter area's.
You can see some of the color modulation around the front fenders, wheels, and sides of the model.


laters all.
Delbert
an update on my willies jeep build.
Sprayed the base coat of Model Master Olive Drab (ANA 613). It went over the flat black coat very well, though I think it made the OD appear a little darker than I expected.

Then I wanted to lighten it up a bit using a color modulation style to bring some color contrast to the model. I chose Model Master Faded Olive Drab. However I personally prefer a slightly greener OD so I added in a bit of Testors Flat Yellow. I may have added a tad to much, as I think I over greened it a bit, but I think some of the later weathering will tone that down. Here are some pictures..
I tried not to cover the entire model in the faded color so there will be darker and lighter area's.
You can see some of the color modulation around the front fenders, wheels, and sides of the model.


laters all.
Delbert

windysean

Joined: September 11, 2009
KitMaker: 1,917 posts
Armorama: 735 posts

Posted: Sunday, October 16, 2011 - 09:24 AM UTC
I'm still picking away at this one. It's developing into a nice, clean build, if I say so myself.
Here I painted the base coat, then while wet, quickly dusted darker on the lower parts and white on the upper parts. (No airbrush: old school)

Here's where I started painting details...

And more details and the decals...

Next come the washes and my first attempt at powders (yes, in over 30 years of building).
Thanks for looking,
-Sean H.
Here I painted the base coat, then while wet, quickly dusted darker on the lower parts and white on the upper parts. (No airbrush: old school)

Here's where I started painting details...

And more details and the decals...

Next come the washes and my first attempt at powders (yes, in over 30 years of building).
Thanks for looking,
-Sean H.


windysean

Joined: September 11, 2009
KitMaker: 1,917 posts
Armorama: 735 posts

Posted: Monday, October 17, 2011 - 01:33 AM UTC
...and I'm back.
Wash with burnt umber, with dabs of black or white wherever appropriate...

The wash really brings out the mold ejector pin marks

Tried to bend the warped clear pieces back to flat, but they were too brittle, so I had to trace and cut new from clear sheet styrene.

Finally, the headlights were hemispherical bug-eyes that looked totally wrong, so I just filled the cavities with Micro Krystal Klear, which SHOULD dry clear. I don't usually apply it this thick, so I'll tell you when I find out myself whether it remains foggy or truly clear.

Cheers!
-Sean H.
Wash with burnt umber, with dabs of black or white wherever appropriate...

The wash really brings out the mold ejector pin marks


Tried to bend the warped clear pieces back to flat, but they were too brittle, so I had to trace and cut new from clear sheet styrene.

Finally, the headlights were hemispherical bug-eyes that looked totally wrong, so I just filled the cavities with Micro Krystal Klear, which SHOULD dry clear. I don't usually apply it this thick, so I'll tell you when I find out myself whether it remains foggy or truly clear.

Cheers!
-Sean H.

emroglan

Joined: December 16, 2004
KitMaker: 1,163 posts
Armorama: 842 posts

Posted: Monday, October 17, 2011 - 01:49 AM UTC
Hi Sean, good going!
The headlights should dry well, I sometimes apply it that thick. However, if it remains somewhat foggy, use a thin needle/pin to punch a small hole. It will enable it to dry and you can repair the hole (after it's dry) with more Kristal Klear.
If I were you, instead of filling the headlight cavity completely, I would turn the model nose down and try to apply Kristal Klear in a thin film. It takes practice but looks more realistic in my opinion.
Posted: Monday, October 17, 2011 - 11:09 AM UTC
Update on my jeep.
I decided I went a little too green on my build, so I leaned the color back towards Olive drab with a thin overspray of Flat OD green..

I decided I went a little too green on my build, so I leaned the color back towards Olive drab with a thin overspray of Flat OD green..


windysean

Joined: September 11, 2009
KitMaker: 1,917 posts
Armorama: 735 posts

Posted: Tuesday, October 18, 2011 - 01:16 AM UTC
Delbert, I like the color you've arrived at now. OD experts may say otherwise, but that looks right to me.
Over on my build, I made some stowage from Sculpey putty. My photos show at least one field pack hanging on the driver's side. I'm guessing one or more on the other. This is one of those builds that I had been planning for so many years that I forgot many details of the original film. Someday I'll probably see it again and make some changes to my build. I made a duffle bag too, and even a Bart Simpson doll for the front!

It was as small as I could make him, a tad larger than the prototype, but he'll have to do. I'll make straps for the bags from masking tape or styrene strip.
Cheers!
-Sean.
Over on my build, I made some stowage from Sculpey putty. My photos show at least one field pack hanging on the driver's side. I'm guessing one or more on the other. This is one of those builds that I had been planning for so many years that I forgot many details of the original film. Someday I'll probably see it again and make some changes to my build. I made a duffle bag too, and even a Bart Simpson doll for the front!

It was as small as I could make him, a tad larger than the prototype, but he'll have to do. I'll make straps for the bags from masking tape or styrene strip.
Cheers!
-Sean.
skyhawk

Joined: June 03, 2003
KitMaker: 1,095 posts
Armorama: 743 posts

Posted: Tuesday, October 18, 2011 - 04:14 AM UTC
Hey all,
some great stuff on this campaign!
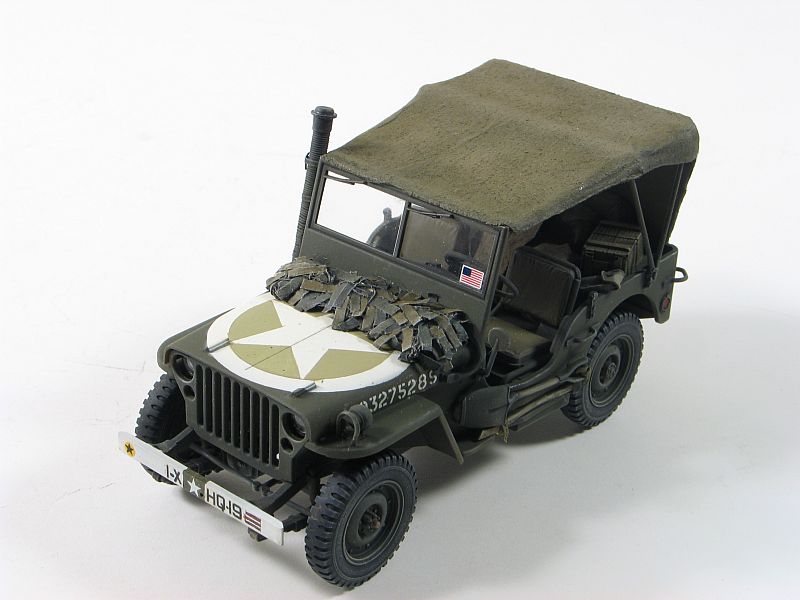
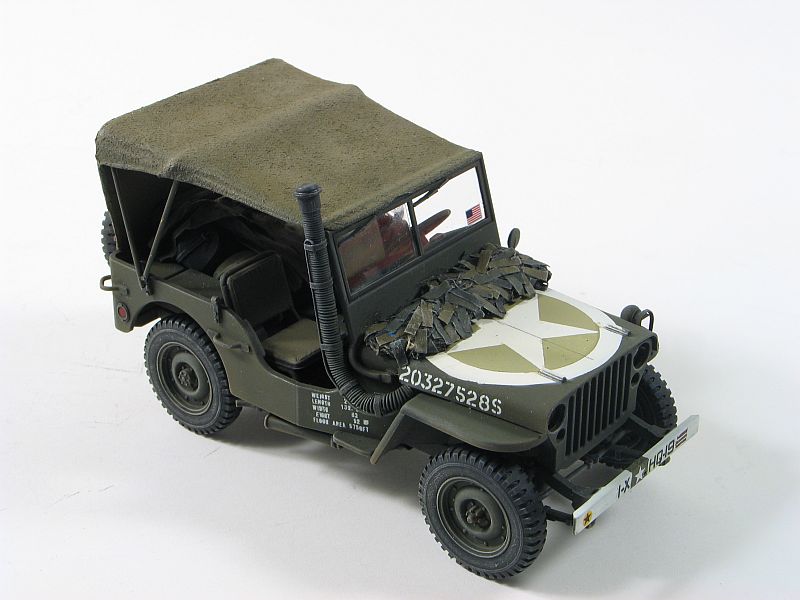
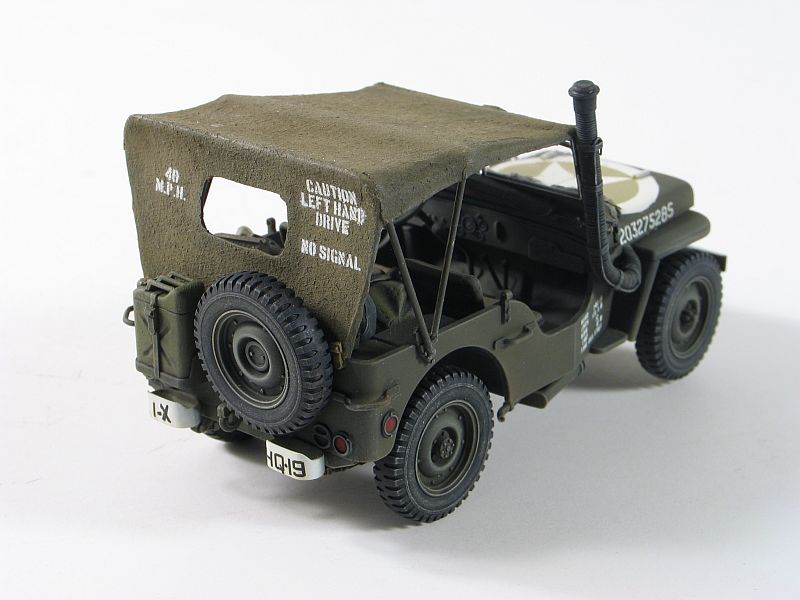
thought I would toss in my Willys MB, June 1944 for submission. Im getting back into the jeep kick, and this is #1 of 4 currently on the bench!
Basicly OOB Taymia 1/35 kit, with a Italeri tilt covered in tea bag to replicate the canvas. I also replaced the bows with brass wire. Wading tube is shaped plastic rod with copper wire wraped around it. Camo net is rolled gauze with strips of tape tucked in randomly. The "gas paint" star was done using a home cut mask. Rest of the markings are cobbled together from various sources. Enjoy!
Andy


steph2102

Joined: April 23, 2011
KitMaker: 735 posts
Armorama: 606 posts

Posted: Tuesday, October 18, 2011 - 04:43 AM UTC
hello
Andy, very nice model. good idea for the camouflage net.
steph
Andy, very nice model. good idea for the camouflage net.
steph

17741907

Joined: December 05, 2007
KitMaker: 953 posts
Armorama: 705 posts

Posted: Tuesday, October 18, 2011 - 11:02 AM UTC
Looking great Andy...Well done.... 

Posted: Tuesday, October 18, 2011 - 02:19 PM UTC
my jeep is getting jealous...
lol
very nice build..
lol
very nice build..

emroglan

Joined: December 16, 2004
KitMaker: 1,163 posts
Armorama: 842 posts

Posted: Tuesday, October 18, 2011 - 09:05 PM UTC
Splendid job Andy!
 |


