You could leave a small amount of the paint exposed to the air on a palette and it might thicken as it dries out.
By the way, have you been shaking the Vallejo bottles before using them? It's necessary to thoroughly mix the pigment and solution in the bottle, otherwise it can come out very watery.
Campaigns
Where Armorama group builds can be discussed, organized, and updates posted.
Where Armorama group builds can be discussed, organized, and updates posted.
Hosted by Darren Baker, Richard S.
The Marine Corps Campaign ( Official Thread )
vertigo

Joined: November 11, 2004
KitMaker: 388 posts
Armorama: 113 posts

Posted: Thursday, December 29, 2011 - 12:31 AM UTC
ltb073

Joined: March 08, 2010
KitMaker: 3,662 posts
Armorama: 3,078 posts

Posted: Thursday, December 29, 2011 - 01:36 AM UTC

AgentG

Joined: December 21, 2008
KitMaker: 1,109 posts
Armorama: 1,095 posts

Posted: Thursday, December 29, 2011 - 04:20 AM UTC
Rob, uneven coverage is referred to as "panel line seperation". It frequently occurrs when spray painting a car model with a rattle can. The trick is to sneak up on the paint. Several light "mist coats" are required to give "tooth" to the finish before the "wet coats" are applied.
Adding more paint won't help once it occurs. I'd let it dry completely then return and drybrush the area with a lighter shade for highlights.
With some acrylics, one word, Primer, Primer, Primer. Sorry that's three. I have never used Model Air, but I have used Model Color extensively. It has never seperated like that when brush painting. Vallejo likes PRIMER.
I'm thinking the paint was bad to begin with. If not that, the PSI was way too high for the amount of thinner used.
Wish I could be more help.
G

melonhead

Joined: July 29, 2010
KitMaker: 662 posts
Armorama: 457 posts

Posted: Thursday, December 29, 2011 - 04:28 AM UTC
the problem that he is having with the paint not sticking to edges is because he is hand painting airbrush paints.
airbrush paints are typically thinned more than normal paints.
you will have to add more paint after the first coat dries or find a way to get it to thicken
airbrush paints are typically thinned more than normal paints.
you will have to add more paint after the first coat dries or find a way to get it to thicken

Buckeye198

Joined: May 02, 2010
KitMaker: 596 posts
Armorama: 265 posts

Posted: Thursday, December 29, 2011 - 04:49 AM UTC
Bruce, I live in Cleveland. For the past month, the temperature has been steady around a steamy 40 degrees, so I wouldn't say it gets cold here. The paint, however, may think differently and it's very possible that it's been ruined by the cold.
Alcatraz, yes I shake the crap outta them before using. Yes, their colors are very good, but in my opinion, I don't think they're worth the effort that I've had to put into them. But I'm thinking that your idea of leaving a bit out to dry may be my best solution.
Wayne, there is primer on this model. Two coats, in fact. I suppose that the primer may have also had difficulties getting into those crevices, causing the problem I"m having handpainting the acrylics. It's just a bit too late to go spraying primer again, but I do have the same color Testors enamel in a bottle as in the rattler. Should I brush that grey into the trouble-spots, let it dry, then continue with the Vallejo? (Other people can chime in as well if they know what to do.)
Sal, the construction and paintjob look great!! Boy do I wish there were a way to make my own custom-color Testors rattle cans...


Buckeye198

Joined: May 02, 2010
KitMaker: 596 posts
Armorama: 265 posts

Posted: Thursday, December 29, 2011 - 04:17 PM UTC
It's the end of the day and I'm calling the camo done! (The fact that I only have two more working days back home is a big factor for my sudden push to finish up  ) The black paint, like the brown, went on flawlessly, and I touched up the green a bit more. The vents/grills and all the textured bits came out good enough for me in all three colors. I'm not sure yet how to weather it though. I wouldn't think there would be water/oil streaks or dust due to the seawater "bath," so what would it look like? Keep in mind, I still have to do the decals and a flat coat as well as the figures and random small surface details. Thanks in advance!
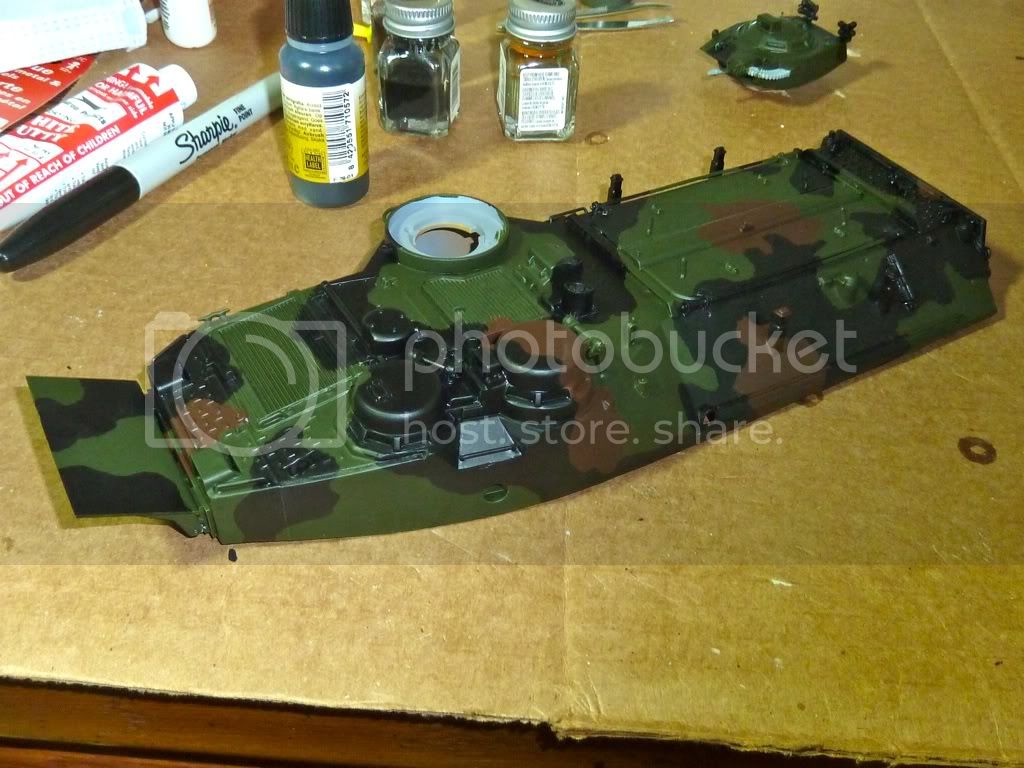
 ) The black paint, like the brown, went on flawlessly, and I touched up the green a bit more. The vents/grills and all the textured bits came out good enough for me in all three colors. I'm not sure yet how to weather it though. I wouldn't think there would be water/oil streaks or dust due to the seawater "bath," so what would it look like? Keep in mind, I still have to do the decals and a flat coat as well as the figures and random small surface details. Thanks in advance!

melonhead

Joined: July 29, 2010
KitMaker: 662 posts
Armorama: 457 posts

Posted: Thursday, December 29, 2011 - 05:10 PM UTC
if they are making a shore landing, they really will not have much of any streaking. when they splash, the almost go all the way in the water when leaving the well deck of the ship. they leave the ship getting a good head of speed and get completely wet by the time its done...
here is a video that gives you an idea
http://www.youtube.com/watch?v=Uer5AHgdLSE
when the amtraks are on the ship, they are clean. so, they really have little to no dirt because of customs or whatever it is. they dont want to bring foreign dirt and such into the US which means they have to be thoroughly cleaned before getting on the ship that is carrying them.
But, if you are going to do any depicting of any weathing. a gloss coat will be best to show wetness.
steph2102

Joined: April 23, 2011
KitMaker: 735 posts
Armorama: 606 posts

Posted: Thursday, December 29, 2011 - 06:22 PM UTC
hello,
Here the progress of my willys ambulance.
steph


Here the progress of my willys ambulance.
steph
ltb073

Joined: March 08, 2010
KitMaker: 3,662 posts
Armorama: 3,078 posts

Posted: Friday, December 30, 2011 - 03:08 PM UTC
@ Robby, your paint job looks like it turned out ok 
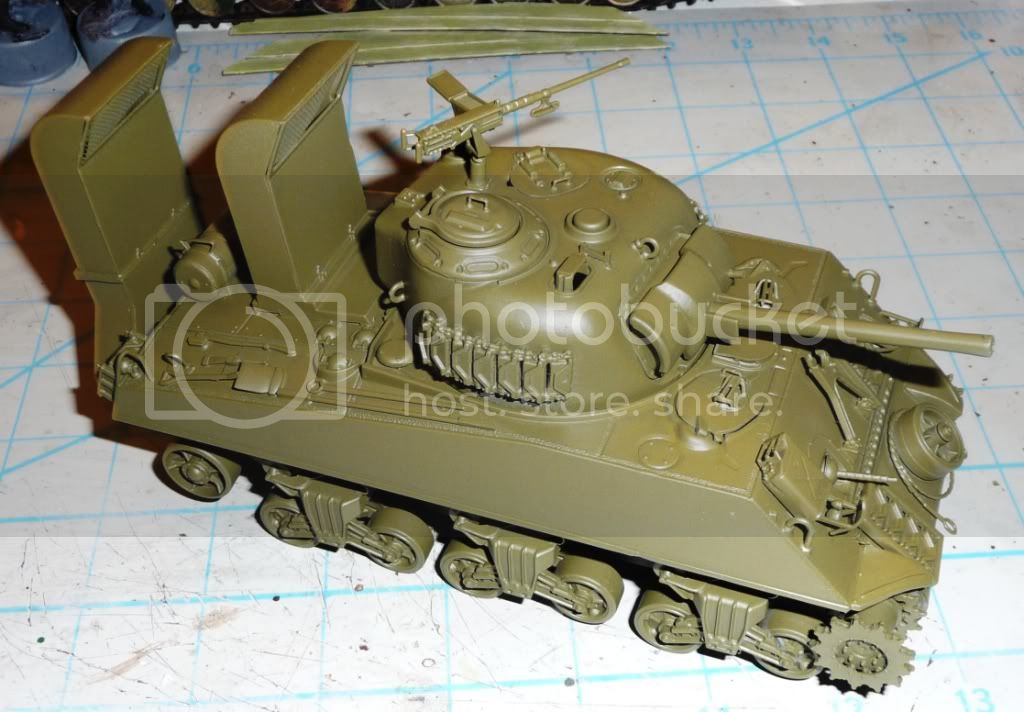
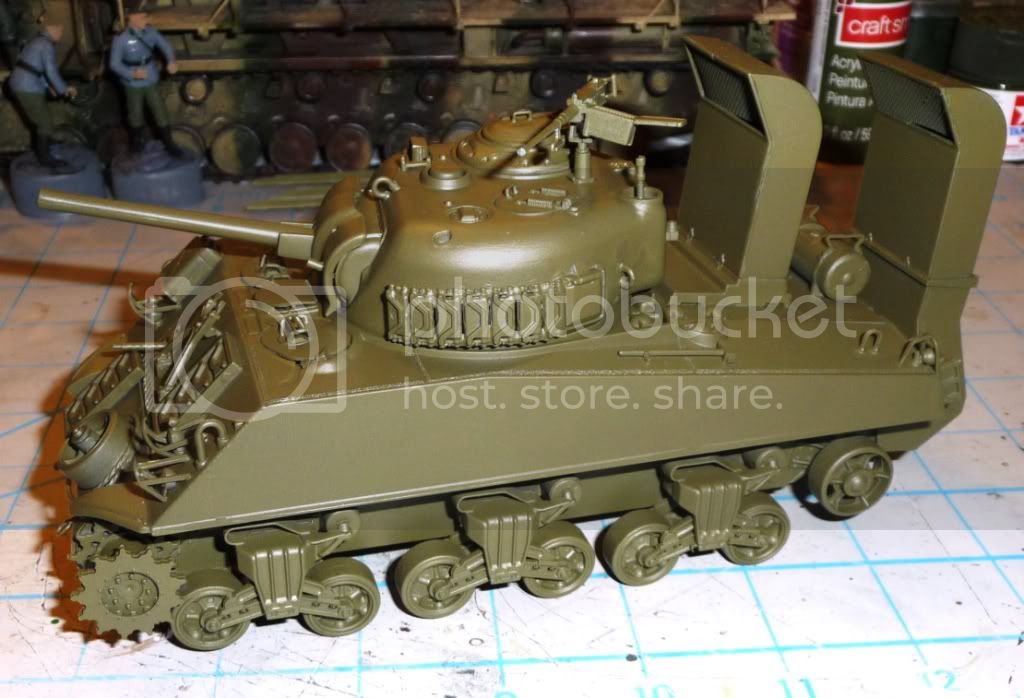
While I was searching the net I came across the photo of a USMC Sherman
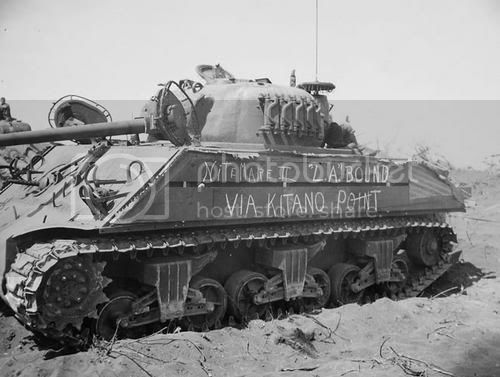
which my kit happens to have the same markings and I said to myself gee Wayne just put those metal spikes on 1 of his Shermans so I figured why not
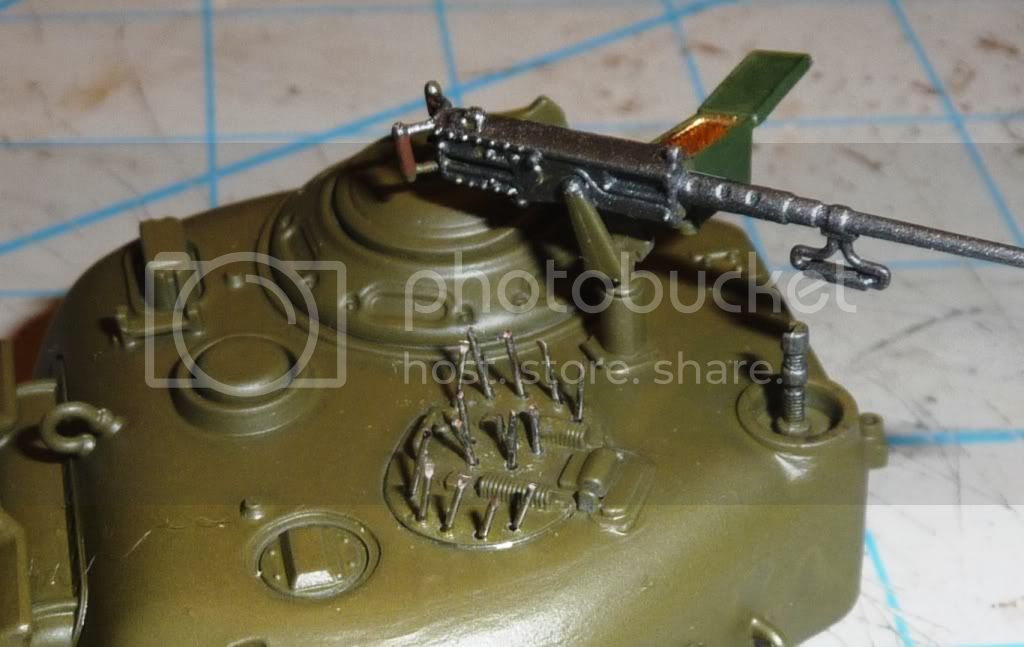
However I have run into a problem with these stiff 1 piece tracks does anybody know how to soften them up
And does anybody have any other photos of Nite Mare II?

While I was searching the net I came across the photo of a USMC Sherman

which my kit happens to have the same markings and I said to myself gee Wayne just put those metal spikes on 1 of his Shermans so I figured why not

However I have run into a problem with these stiff 1 piece tracks does anybody know how to soften them up

And does anybody have any other photos of Nite Mare II?

AgentG

Joined: December 21, 2008
KitMaker: 1,109 posts
Armorama: 1,095 posts

Posted: Friday, December 30, 2011 - 04:39 PM UTC
Sal, that's the only photo of Nitemare II I've ever seen in print. That's a C Co. tank of the 5th Battalion. They used nails on the turret hatches, but abbreviated screens on the bow hatches.
Your build is a looking good!
Rob, after years of riding in and on those beasts I was topside one day during ops. Imagine my shock when the darn gator drove off the ramp, mostly disappeared under water, resurfaced, and then chugged merrily ashore.
I REALLY thought about that my next ride to the beach.
G
Removed by original poster on 12/31/11 - 07:31:50 (GMT).

Buckeye198

Joined: May 02, 2010
KitMaker: 596 posts
Armorama: 265 posts

Posted: Friday, December 30, 2011 - 07:32 PM UTC
Sal and Wayne, I'm glad to say that all is well on my bench and I've really been cruising along with the build since my last post! (Picture-update will be soon.) Your detailing is looking really nice, but what do the nails do? Are they just plain intimidation or something? As for the tracks, here are some threads to look up. This one gives a few ideas of how to soften tracks, but the consensus seems to be to leave the tracks alone initially and then create your own sag on the model. This next one deals with weathering band tracks and sprouts a few other threads as well. Hope that helps!

AgentG

Joined: December 21, 2008
KitMaker: 1,109 posts
Armorama: 1,095 posts

Posted: Saturday, December 31, 2011 - 02:33 AM UTC
Rob, the nails were welded on to add some "stand off" distance to protect against satchel charges and mines tossed by the enemy. Some had wire mesh screens, and some had nails. Look at Sal's photo of Nitemare, it has both screens and nails.
G
G

Buckeye198

Joined: May 02, 2010
KitMaker: 596 posts
Armorama: 265 posts

Posted: Saturday, December 31, 2011 - 05:12 AM UTC
Geez I can barely see that stuff in the picture! Now here's a thought...if a mine or charge should be thrown and lands on top of some of those nails, could the explosion end up projecting the nails through the hatches to pierce the crew? Sorry if that's a dumb question...I was never very good at physics 


AgentG

Joined: December 21, 2008
KitMaker: 1,109 posts
Armorama: 1,095 posts

Posted: Saturday, December 31, 2011 - 06:14 AM UTC
The nails were three inches long, 17 penny as I recall, and the nail head was welded to the outside of the hatch. No, they would not have been propelled through the hatch, however a big enough charge could take out the hatch itself. Good thing was it would take quite a charge to accomplish that, and at least half the force would go up anyway. With shaped charge warheads, distance and composition is your friend. Shaped charges are designed to burn an itty bitty hole through the armor. It burns at incredibly high temps setting everything inside alight. They must detonate a specific distance from the target to allow for the molten jet to form and work it's magic. If that distance can be increased by say wood, concrete, rubber, kevlar, etcetc you stand a chance of defeating the round. That's why steel mesh is so effective. It detonates the round well away from the hull.
Ever see an RPG round on TV? Notice how the warhead is two cones back to back? The tip is the fuse, the base is the explosive formed inside that cone with thin sheet copper as a cover. Fuse ignites explosive, pressure and heat comes from all directions at once, deforming copper sheet into a molten taper of metal at hyper speed.
There endeth the lesson from an old Bomb Squad guy.
G
Ever see an RPG round on TV? Notice how the warhead is two cones back to back? The tip is the fuse, the base is the explosive formed inside that cone with thin sheet copper as a cover. Fuse ignites explosive, pressure and heat comes from all directions at once, deforming copper sheet into a molten taper of metal at hyper speed.
There endeth the lesson from an old Bomb Squad guy.

G

Buckeye198

Joined: May 02, 2010
KitMaker: 596 posts
Armorama: 265 posts

Posted: Saturday, December 31, 2011 - 07:07 AM UTC
Damn. I always [i[kind of[/i] knew how shaped charges work, but that is an excellent lesson! The nails make a lot more sens now, and I can see how even the wood would at least give some element of protection. Almost like how a bullet will still hurt like hell with a bulletproof vest on, but you won't get pierced...with the obvious difference of bullets vs shaped charges, of course 


Buckeye198

Joined: May 02, 2010
KitMaker: 596 posts
Armorama: 265 posts

Posted: Saturday, December 31, 2011 - 10:25 AM UTC
And before 2011 comes to a close, I'd like to formally declare the plastic part of my build complete! I still have to finish the water, but it looks really nice right now. Just need some highlighting, wave/wake effects, and to unite the model with the base, but that will be done in a few months, since I'll be going back to school tomorrow. I'll keep watching the other builds in the meantime though, so keep up the good work everyone!
All the accessories are on (the rope and chain were a lot of fun to work with) and the figures are painted and glued into place, though I did have to cut off the commander's feet to get him to stay. The wetslide decals--printed in 1992--dissolve into billions and billions of pieces, and so they are completely useless. I contacted Tamiya to see if there is any hope for a newer spare set. The kit is discontinued, so I kinda doubt it. Doesn't hurt to ask though. Worst case, the decals are all black stencil ID numbers, so I'll just bail on them. The dio will be plenty impressive even without ID.
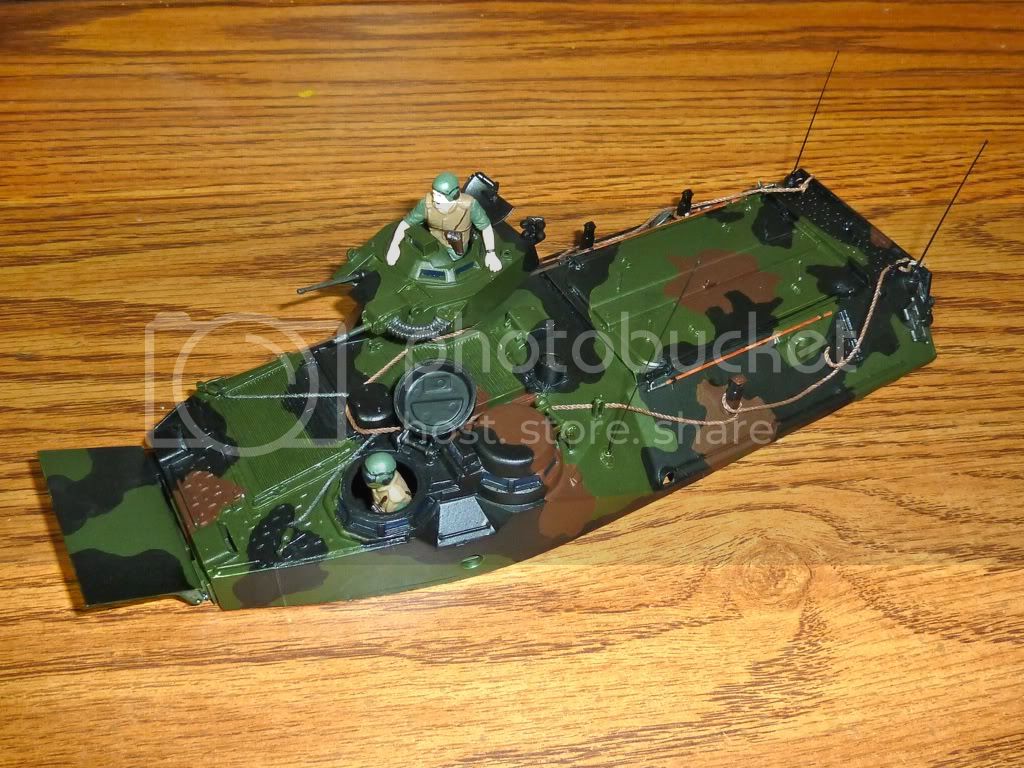
A bit intimidating, no?
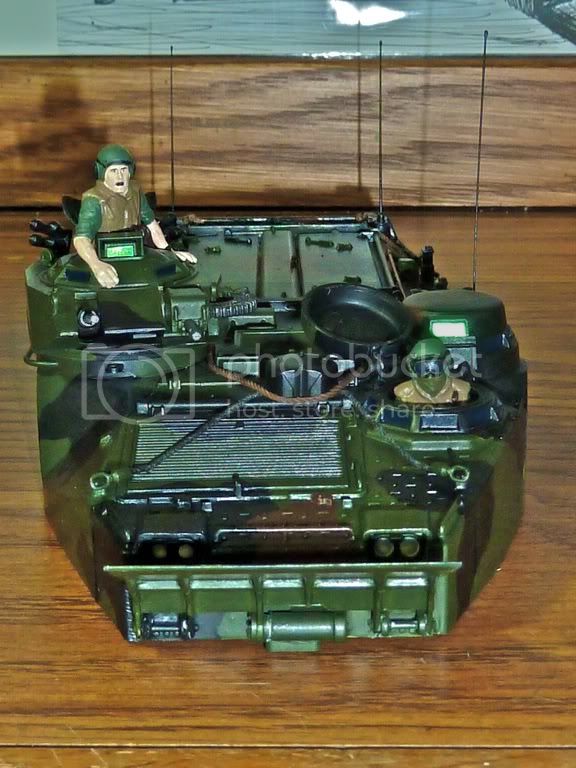
All the accessories are on (the rope and chain were a lot of fun to work with) and the figures are painted and glued into place, though I did have to cut off the commander's feet to get him to stay. The wetslide decals--printed in 1992--dissolve into billions and billions of pieces, and so they are completely useless. I contacted Tamiya to see if there is any hope for a newer spare set. The kit is discontinued, so I kinda doubt it. Doesn't hurt to ask though. Worst case, the decals are all black stencil ID numbers, so I'll just bail on them. The dio will be plenty impressive even without ID.


A bit intimidating, no?

steph2102

Joined: April 23, 2011
KitMaker: 735 posts
Armorama: 606 posts

Posted: Monday, January 02, 2012 - 06:49 AM UTC
hello,
here are my progress, almost finished. someone could tell me the color for the paint used by USMC. merçi
steph


here are my progress, almost finished. someone could tell me the color for the paint used by USMC. merçi
steph
ltb073

Joined: March 08, 2010
KitMaker: 3,662 posts
Armorama: 3,078 posts

Posted: Tuesday, January 03, 2012 - 01:52 AM UTC
Hi Guys,
I made some progress on nite Mare II. With a little patience and glue I resolved my track problem
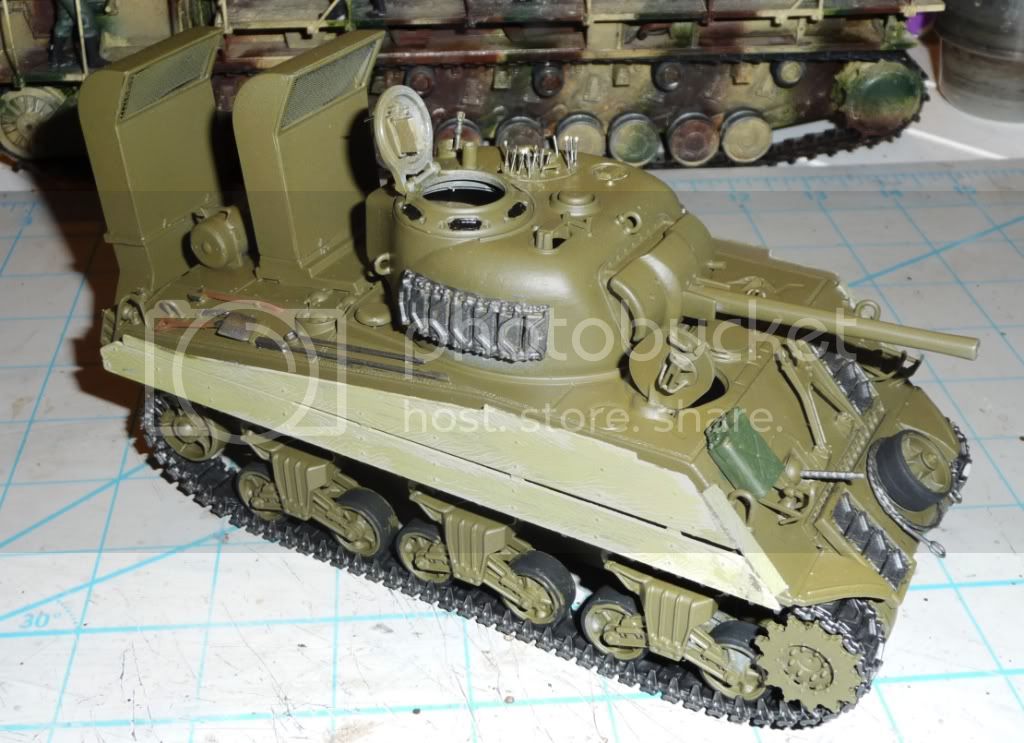
And added on the wood armor
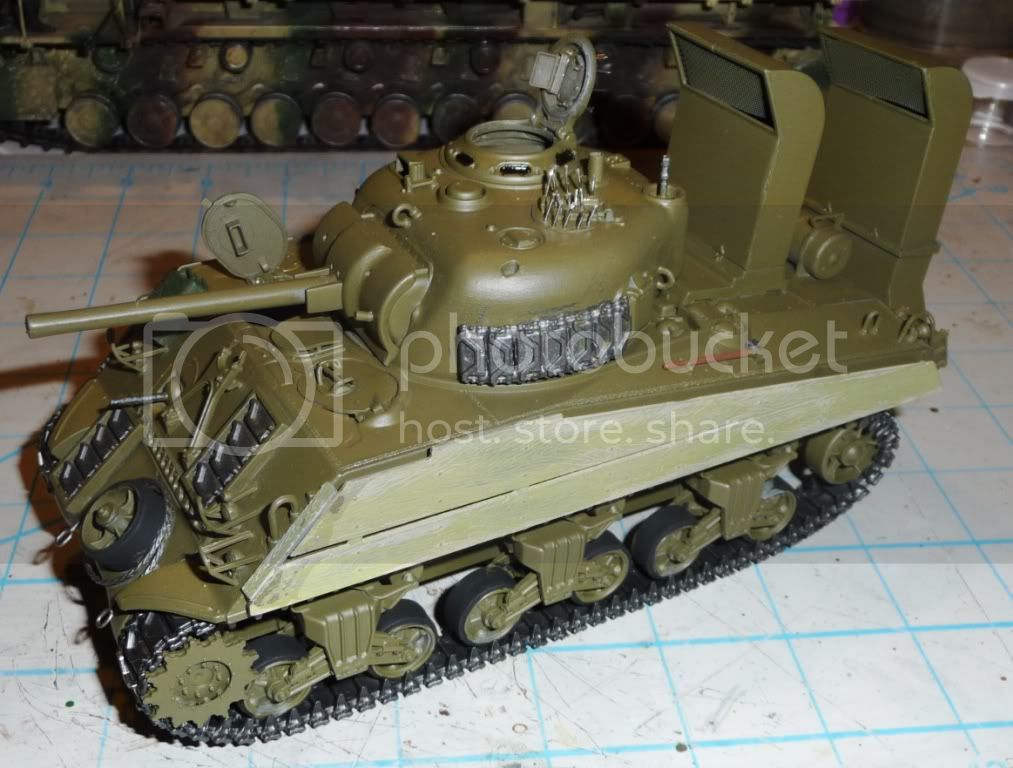
I'm not going to attempt to add the screens to the lower hatches this late inthe build but I did find some Tamiya Leather Necks is the spare parts box to add in
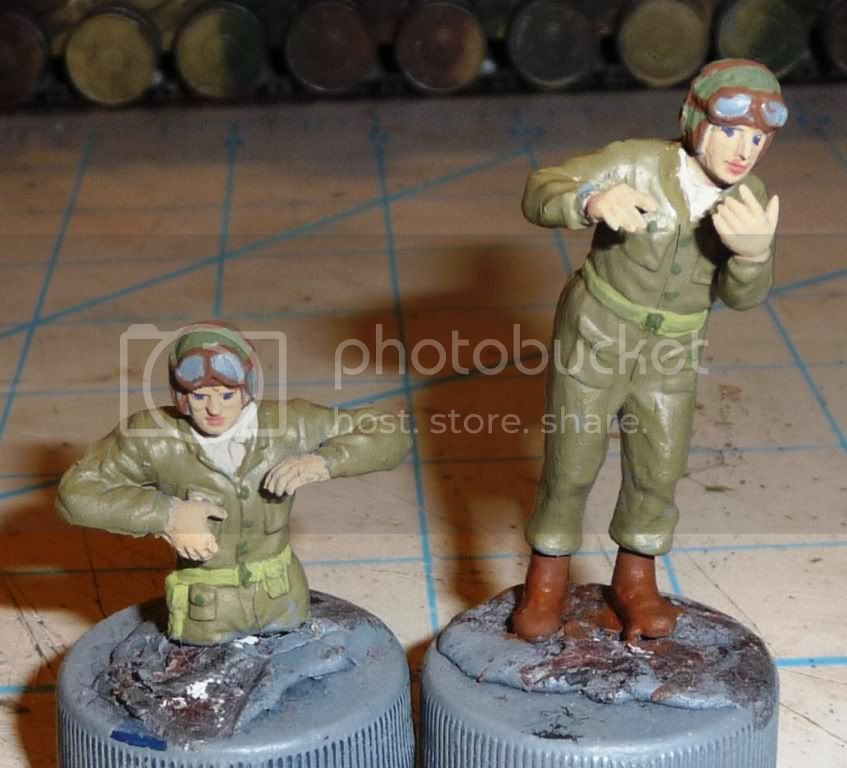
Need to touch up some spots like the road wheels then add some storage
I made some progress on nite Mare II. With a little patience and glue I resolved my track problem

And added on the wood armor

I'm not going to attempt to add the screens to the lower hatches this late inthe build but I did find some Tamiya Leather Necks is the spare parts box to add in

Need to touch up some spots like the road wheels then add some storage

erhntly

Joined: June 11, 2004
KitMaker: 1,426 posts
Armorama: 464 posts

Posted: Tuesday, January 03, 2012 - 08:45 AM UTC
Hi dear friends,
I would like to join this campaign. I planning to build a BTR 50 PK. (PST 1/72 scale)
"in the campaign rules :
3) All models must have one photo which includes a newspaper dated
on/or after December 15, 2011"
thats ok.. I I took photos...


enjoy..
I would like to join this campaign. I planning to build a BTR 50 PK. (PST 1/72 scale)
"in the campaign rules :
3) All models must have one photo which includes a newspaper dated
on/or after December 15, 2011"
thats ok.. I I took photos...


enjoy..

Grenadier37

Joined: June 02, 2008
KitMaker: 232 posts
Armorama: 45 posts

Posted: Tuesday, January 03, 2012 - 09:09 AM UTC
Sorry, no in progress pics. I've been building this for a local club/Total Tamiya build. So you may have seen these before. It's almost complete, it needs some vision blocks, antenna and stowage to top it off.


Posted: Tuesday, January 03, 2012 - 06:52 PM UTC
Hello Grenadier37,
I do not know when you started your build, But I need to refresh 2 rules for this campaign so there is no misunderstandings:
Rule #2 Models will not be started before the start date ( December 15, 2011 ).
Rule #3 All models must have 1 photo which include a newspaper dated on/or after December 15, 2011 and posted on the thread before you start the ( your ) build.
You also have to post 1 WIP photo per the rules.
As I do not know when you started your build, and You did not post a photo that I know of showing the newspaper and the spruces in the bags I do not think your build is allowed under the rules.
If you can show that you did fulfill rule 2 ,3 and the WIP rule I will allow the build in.
Please show me that I am wrong as I would love to let your build in.
If you have any questions you can ask them here in the threads or PM me,
Thanks for your understanding,
Cheers,
Bruce
I do not know when you started your build, But I need to refresh 2 rules for this campaign so there is no misunderstandings:
Rule #2 Models will not be started before the start date ( December 15, 2011 ).
Rule #3 All models must have 1 photo which include a newspaper dated on/or after December 15, 2011 and posted on the thread before you start the ( your ) build.
You also have to post 1 WIP photo per the rules.
As I do not know when you started your build, and You did not post a photo that I know of showing the newspaper and the spruces in the bags I do not think your build is allowed under the rules.

If you can show that you did fulfill rule 2 ,3 and the WIP rule I will allow the build in.
Please show me that I am wrong as I would love to let your build in.

If you have any questions you can ask them here in the threads or PM me,
Thanks for your understanding,
Cheers,
Bruce


Grenadier37

Joined: June 02, 2008
KitMaker: 232 posts
Armorama: 45 posts

Posted: Wednesday, January 04, 2012 - 04:39 AM UTC
Slow down there Haus...e-hem... If I may quote myself, "I've been building this for a local club/Total Tamiya build". In other words, I'm sharing.
One thing I enjoy about this hobby is we share our artwork with others in the hobby so they might appreciate our artwork as much as we appreciate theirs. And we display our finished (or nearly finished) works so that our fellow modelers might forward to us constructive comments and tips for improving the quality of our artwork, as well as increasing the pleasure (aka. fun) we derive from the hobby.
One thing I enjoy about this hobby is we share our artwork with others in the hobby so they might appreciate our artwork as much as we appreciate theirs. And we display our finished (or nearly finished) works so that our fellow modelers might forward to us constructive comments and tips for improving the quality of our artwork, as well as increasing the pleasure (aka. fun) we derive from the hobby.

Buckeye198

Joined: May 02, 2010
KitMaker: 596 posts
Armorama: 265 posts

Posted: Wednesday, January 04, 2012 - 04:53 AM UTC
Hey Grenadier! Whether or not you'll be allowed to use that for this campaign (and whether or not you were trying to get in...), that's a solid build right there! The only suggestion I can make would be in regards to the decals. Maybe it only showed up in the pictures, but there's a lot of empty decal space, if you know what I mean. Either try to dirty them up now to hide the discoloration, or just remember on your next model to try to cut closer to the actual decal, trimming off the decal's edges/borders and also cutting out the clear decal film between the "USMC" and the "506037" serial number...or whatever those numbers were! If you don't end up getting a ribbon for this model, thanks for sharing with fellow Marine-enthusiasts! (And Bruce, don't worry...I was also thinking he was enlisting without the newspaper or WIP shots)
steph2102

Joined: April 23, 2011
KitMaker: 735 posts
Armorama: 606 posts

Posted: Wednesday, January 04, 2012 - 08:14 AM UTC
hello, I deliver all my photos (since disappeared). here is my progress on my jeep ambulance USMC. Grenadier 37 very beautiful model .
steph


steph
 |


