Should I add the gun ring to the White? I'm thinking yes.
The Tamiya after market ring kit should work just fine with some slight modification. That's what I used for my Mack NO.
On the real thing the three arms that connect the gun rail ring to the upright poles can be unbolted from the ring and extended / adjusted to allow for larger or smaller sized cabs. On the Mack I had to cut two of them off the ring and reposition them to accommodate the much larger cab. However the White cab isn't that much bigger than the Deuce and a Half so the Tamiya unit might work without modification! I will check it out tonight as I have a gun ring kit in my Deuce spares box.
Armor/AFV
For discussions on tanks, artillery, jeeps, etc.
Hosted by Darren Baker, Mario Matijasic
White 666 Semi-Tractor
Posted: Monday, June 22, 2015 - 07:21 PM UTC
Posted: Tuesday, June 23, 2015 - 12:26 AM UTC
Posted: Tuesday, June 23, 2015 - 04:25 AM UTC
Working tonight on the spare tire mount:
A combination of scratch built parts and the stock spare tire brackets from the kit.
There will be a stabilizer strap that gets welded to the left leg of the winch and then angles up and over to bolt into one of the lug nut holes on the spare wheel.
____________________________________________________________________________________
Something similar: Scratch built spare tire racks for the larger 7 1/2 ton Mack NO (before I corrected the wheel rims.)
Marknasim
United States
Joined: January 03, 2010
KitMaker: 54 posts
Armorama: 35 posts
Joined: January 03, 2010
KitMaker: 54 posts
Armorama: 35 posts
Posted: Tuesday, June 23, 2015 - 04:44 AM UTC
Yes…add that .50!!!! She is looking good!!!!
Posted: Tuesday, June 23, 2015 - 04:45 AM UTC
Yep, the gun ring is definitely in! I may have to relocate the front arm on the Tamiya ring but the other two are in perfect position.
Posted: Tuesday, June 23, 2015 - 07:57 AM UTC
Posted: Tuesday, June 23, 2015 - 05:50 PM UTC
Also started working on removing the seam lines on the rubber tires. First I go at them with a Dremel Tool using an abrasive wheel and then finish up with some medium grit sand paper.
I think roughing the tires up a bit makes them look more realistic anyway.
In the above photo the lower left set of rear tires has been roughed up. The others are still OOB stock. You can see the finished tires have a more realistic flat "grey haze" finish to them. Much better than the glossy black of the stock tires. After a little pastel chalk weathering they will be perfect!
The same treatment has worked very well on the big Tamiya rubber tires on my Dragon Wagon and also on the same Tamiya tires as used on my Mack NO. (see photo below)
Roughed up and weathered tires on my Mack NO. (Same tires as on Tamiya Dragon Wagon)
_________________________________________________________________________________________
Finished rear bogie of the White semi-tractor, Tire seams removed, tread roughed up and all dust weathering applied.
Posted: Tuesday, June 23, 2015 - 10:50 PM UTC
Posted: Wednesday, June 24, 2015 - 07:20 AM UTC
OK, the White now has a gun ring! However it WILL also be posed with the canvas top in the raised position so I don't know yet if I will have the 50 cal. mounted or just the empty Taska cradle up top! Could also do a canvas covered 50 but I did that once already on my Mack NO.
Using a modified gun ring from the Tamiya Deuce after-market detail set. The fit was very close. The two rear brackets required no changes at all, however the front bracket had to be shortened slightly. Add to that some scratch made tapered support posts and you're in business!
In the second photo above, my apologies as I now see that I did not have the cab seated properly and also the fifth wheel is out of alignment as these items are just dry fitted for the time being!
There is a lot of mechanism not present on that disk style emergency brake assembly seen just in front of the air tanks. The White truck just has a nice brake disk on the drive shaft but otherwise it is unsupported and floating in thin air. I am thinking of beefing up the detail in this area with some scratch work!
There should be a frame cross member here plus brake linkage rods, levers and the caliper actuator arms surrounding the brake disk.
(F.Y.I. - The wartime Diamond T cargo truck employed the same E brake mechanism as the White 666. On the recently introduced Diamond T model, Mirror Models considered it important enough to include some of this complex detail in THEIR model!)
Just say'n.
Detail included in Mirror Models Diamond T
(Sorry for the poor quality photo.)
Posted: Wednesday, June 24, 2015 - 08:06 PM UTC
Posted: Thursday, June 25, 2015 - 06:14 PM UTC
Posted: Monday, June 29, 2015 - 06:08 PM UTC
HeavyArty
Florida, United States
Joined: May 16, 2002
KitMaker: 17,694 posts
Armorama: 13,742 posts
Joined: May 16, 2002
KitMaker: 17,694 posts
Armorama: 13,742 posts
Posted: Monday, June 29, 2015 - 06:13 PM UTC
Looking good. A couple things though. It looks like you are missing a piece of diamond tread plate work platform between the winch and 5th wheel. Also, where is/is there a pole that holds the gladhands and hoses for the air lines and trailer power cord?
Posted: Monday, June 29, 2015 - 06:13 PM UTC
Posted: Monday, June 29, 2015 - 06:18 PM UTC
Quoted Text
Looking good. A couple things though. It looks like you are missing a piece of diamond tread plate work platform between the winch and 5th wheel. Also, where is the pole that holds the gladhands and hoses for the air lines and trailer power cord?
All in good time . . . been thinking about those very items.
Gotta finish detailing the E-brake assembly first before I close up that area!
Have some O scale glad hands coming from Wiseman Model Services (check them out on eBay - a lot of good O scale railroad stuff that the AFV modeler can use!**) Also I was considering using wood planking for the service deck instead of tread plate - not sure if that is OK though. I do like the idea of having the planking loosely laid so there is a little "see-through" depth to that whole area.
** Glad Hands, Drain Cocks, Globe Valves, Hand Tools, Heavy Vehicle Jacks, Bench Vices, Anvils, Winches, Pulleys, large multi-sheave heavy crane Block & Tackle and some small Machine Tools.
Frenchy
Rhone, France
Joined: December 02, 2002
KitMaker: 12,719 posts
Armorama: 12,507 posts
Joined: December 02, 2002
KitMaker: 12,719 posts
Armorama: 12,507 posts
Posted: Monday, June 29, 2015 - 06:20 PM UTC
Talking about reference pics, there are a few about the cargo truck variant (soft cab), including the one posted by Mike, here :
http://www.wheelsofvictory.com/index14.html
Just click on "Corbitt - White cargo"
H.P.
http://www.wheelsofvictory.com/index14.html
Just click on "Corbitt - White cargo"
H.P.
HeavyArty
Florida, United States
Joined: May 16, 2002
KitMaker: 17,694 posts
Armorama: 13,742 posts
Joined: May 16, 2002
KitMaker: 17,694 posts
Armorama: 13,742 posts
Posted: Monday, June 29, 2015 - 06:28 PM UTC
Very good. I vote diamond tread plate since that is what it appears to be in this pic.
Posted: Monday, June 29, 2015 - 06:41 PM UTC
Quoted Text
Very good. I vote diamond tread plate since that is what it appears to be in this pic.
I agree but the vehicle you are looking at does not have the winch and things seem to be done a bit differently when the winch is present. I'm in the process of looking for proper reference on this detail.
Posted: Tuesday, June 30, 2015 - 04:25 AM UTC
THE NUT JOB!
I mentioned earlier that on all my vehicles I make a point of adding small nut & bolt castings to represent the various drain plugs located around the truck underbody. This photo will give you an idea what I am talking about.
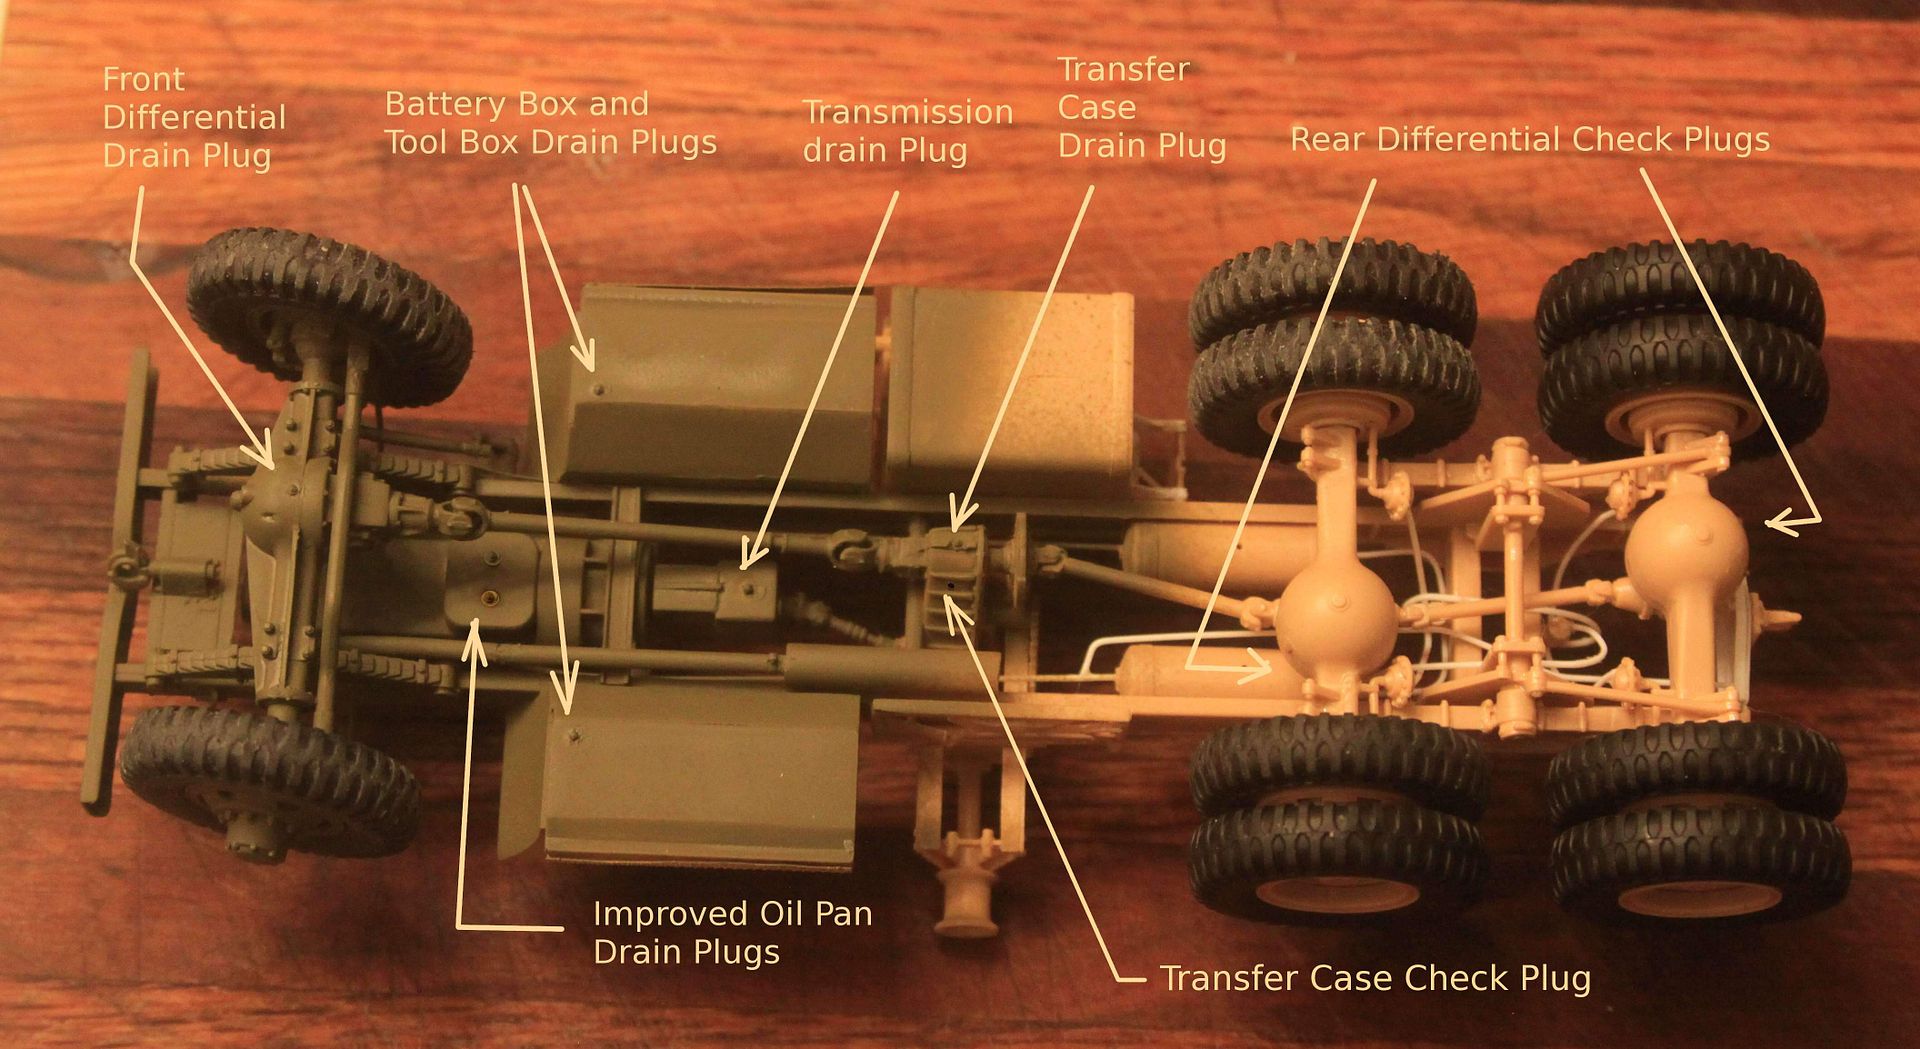
Every differential has two plugs; a drain plug on the bottom and a fluid level check plug about 3/4 of the way up the side. Remove the check plug, if the gear oil runs out there was too much in the differential. If no gear oil runs out then you stick your pinky in the check hole, if you come out with oil on your finger the level was just right, and if you cannot feel any oil at all then the differential has been leaking and you need to add more oil before the unit runs dry.
Given current plastic molding technology almost all model differentials will have one but not both plugs so at least one needs be added as the arrows indicate.
In the case of the HobbyBoss White truck because of the way the front axle is set on the sprue the check plug is there but the drain plug is not. On the rear differential it is the reverse.
MOVING ON . . .
The engine oil pan, the transmission oil pan and the bottom of the transfer case should all have oil drain plugs. I suggest to add drain plugs as necessary.
Not sure the battery box and tool box would have had drain plugs but it is reasonable to think they would have. As an example; every WWII Jeep has two drain plugs one on each side of the front floorboard to drain rainwater that might accumulate. If this White truck were to run through deep water or if one of the batteries cracked and started leaking, it might be handy to have a way to drain the fluids out of these boxes!
These nut n' bolt castings come in an assortment of sizes and are packaged roughly 200 to a pack for $2-3 plus shipping.
F.Y.I. - I use 2 inch, O scale, "Nut, Bolt and Washer" plastic castings from Tichy Train Group for adding these details. Tichy set # 8142. Drill a small hole in the model, add a touch of model glue and slide the stem of the bolt casting into the hole.
I mentioned earlier that on all my vehicles I make a point of adding small nut & bolt castings to represent the various drain plugs located around the truck underbody. This photo will give you an idea what I am talking about.
Every differential has two plugs; a drain plug on the bottom and a fluid level check plug about 3/4 of the way up the side. Remove the check plug, if the gear oil runs out there was too much in the differential. If no gear oil runs out then you stick your pinky in the check hole, if you come out with oil on your finger the level was just right, and if you cannot feel any oil at all then the differential has been leaking and you need to add more oil before the unit runs dry.
Given current plastic molding technology almost all model differentials will have one but not both plugs so at least one needs be added as the arrows indicate.
In the case of the HobbyBoss White truck because of the way the front axle is set on the sprue the check plug is there but the drain plug is not. On the rear differential it is the reverse.
MOVING ON . . .
The engine oil pan, the transmission oil pan and the bottom of the transfer case should all have oil drain plugs. I suggest to add drain plugs as necessary.
Not sure the battery box and tool box would have had drain plugs but it is reasonable to think they would have. As an example; every WWII Jeep has two drain plugs one on each side of the front floorboard to drain rainwater that might accumulate. If this White truck were to run through deep water or if one of the batteries cracked and started leaking, it might be handy to have a way to drain the fluids out of these boxes!
These nut n' bolt castings come in an assortment of sizes and are packaged roughly 200 to a pack for $2-3 plus shipping.
F.Y.I. - I use 2 inch, O scale, "Nut, Bolt and Washer" plastic castings from Tichy Train Group for adding these details. Tichy set # 8142. Drill a small hole in the model, add a touch of model glue and slide the stem of the bolt casting into the hole.
Posted: Tuesday, June 30, 2015 - 05:41 AM UTC
DOWN THE DRAIN
This is the first time that I have drawn attention to the following point and address it on one of my models:
Just about every air tank on the brake systems of every piece of heavy equipment should have a drain cock. This drain is opened occasionally by the motor pool maintenance crews to release moisture that may accumulate in the system. This is also a detail that is left off by most all model manufactures.
Again the model railroad hobby industry comes to the rescue: HO scale drain cocks cast in brass. These come from from Cal-Scale and are offered six to a pack. Cal-Scale set # 6145.
Interesting that the Cal-Scale drawing shows the valve with the handle in the open position but fortunately the actual castings are molded with the handle in the closed position.
_____________________________________________________________________________
As an additional example: Here is a photo of the brake air reservoir on the 20 ton low bed trailer. Note the drain cock on the bottom of the tank.
DocEvan
California, United States
Joined: August 09, 2014
KitMaker: 180 posts
Armorama: 180 posts
Joined: August 09, 2014
KitMaker: 180 posts
Armorama: 180 posts
Posted: Tuesday, June 30, 2015 - 08:57 AM UTC
Eye candy! I love it!
Quoted Text
DOWN THE DRAIN
This is a first for me on the following point:
Every air brake tank on every piece of heavy equipment should have a drain cock used to release moisture that may accumulate in the system. This is a detail left off by most model manufactures.
Again the model railroad hobby industry comes to the rescue.
HO scale drain cocks from Cal-Scale six to a pack.
Posted: Tuesday, June 30, 2015 - 07:38 PM UTC
Thanks Doc!
__________________________________________________________________________
Here's a beautifully restored White/Corbitt cargo truck with soft top and a 50 cal. gun ring:
Photo comes to us by way of the tanksim.org.ru website>
Photo by Liejon Schoot
I wish HB had made the battery box door a separate piece. See how it has greater 3D depth on the real thing! Oh well ya can't have everything! After all it IS a great kit!
Posted: Friday, July 03, 2015 - 08:58 PM UTC
Some general reference from the TM.
These annotated photographs answer a number of questions that I was interested in. I hope this helps others!
Note the brass fire extinguisher on the front wall of the cab. (A detail missing from the HB kit.)
________________________________________________________________________________________
I WISH SOMEONE WOULD OFFER A TURNED BRASS PYRENE FIRE EXTINGUISHER IN 1/35th SCALE!
_______________________________________________________________________________________
Note floor mounted headlight dimmer switch on far left floorboard. (Another place to apply a nut n' bolt casting or just a short length of plastic rod.)
_______________________________________________________
Posted: Friday, July 03, 2015 - 09:10 PM UTC
Posted: Saturday, July 04, 2015 - 01:12 AM UTC
Hi Mike,
Looks like another for your fleet of good looking rigs - nice build!
The chain drive winch - I know, part of the kit...I prefer a PTO no chain! - I know, wrong vintage...I've never used a chain driven winch, gear drive or electric motor only - sorry, getting a bit off topic, I just like trucks.
The brake idea of yours (showing it) is a good one - nice touch
I'll vote yes for the diamond plate deck - I know, you didn't ask for a vote! I like the look -
Ok - thanks for the WIP pics, build looks great - have a good one,
Nick