Armor/AFV
For discussions on tanks, artillery, jeeps, etc.
White 666 Semi-Tractor
Frenchy
Visit this Community
Rhone, France
Joined: December 02, 2002
KitMaker: 12,719 posts
Armorama: 12,507 posts
Posted: Wednesday, July 15, 2015 - 11:57 AM UTC
Another option :

Wouldn't it be possible to caretakingly thin the hood panel from the inside as much as possible (until the inner "lip" disappears....) and then glue the grill from the inside ?

H.P.
165thspc
#521
Visit this Community
Kentucky, United States
Joined: April 13, 2011
KitMaker: 9,465 posts
Armorama: 8,695 posts
Posted: Wednesday, July 15, 2015 - 04:10 PM UTC
I think I would rather try the idea posed by MrRoo to thin the metal etch to finally fit. Particularly since the model is already assembled.

Unfortunately the die is now cast, I glued those grills in with CA glue. I suspect I would ruin those delicate etched parts if I tried to remove them now.

I am just pointing all this out as a warning to other modelers who might meet the same problem in the future.
165thspc
#521
Visit this Community
Kentucky, United States
Joined: April 13, 2011
KitMaker: 9,465 posts
Armorama: 8,695 posts
Posted: Thursday, July 16, 2015 - 06:42 PM UTC
Last night's production on the 20T trailer: 7-16-2015

165thspc
#521
Visit this Community
Kentucky, United States
Joined: April 13, 2011
KitMaker: 9,465 posts
Armorama: 8,695 posts
Posted: Thursday, July 16, 2015 - 08:00 PM UTC
I suspect I am driving some people crazy with all my "bolt head" added detail. However I feel anytime you can add additional three dimensional detail to a model it will enhance the visual complexity and visual depth. And to me, THAT'S A GOOD THING!

More Bolt Heads:

From the TM: (Washout plugs would not show on the cargo version but on the tractor these are very visible.


Hey, it looks like there is more rivet detail I can add to those main frame rear cross members.
165thspc
#521
Visit this Community
Kentucky, United States
Joined: April 13, 2011
KitMaker: 9,465 posts
Armorama: 8,695 posts
Posted: Thursday, July 16, 2015 - 08:04 PM UTC
And a bit more:

And all these details are topside not underneath so they will show!
165thspc
#521
Visit this Community
Kentucky, United States
Joined: April 13, 2011
KitMaker: 9,465 posts
Armorama: 8,695 posts
Posted: Friday, July 17, 2015 - 07:14 AM UTC
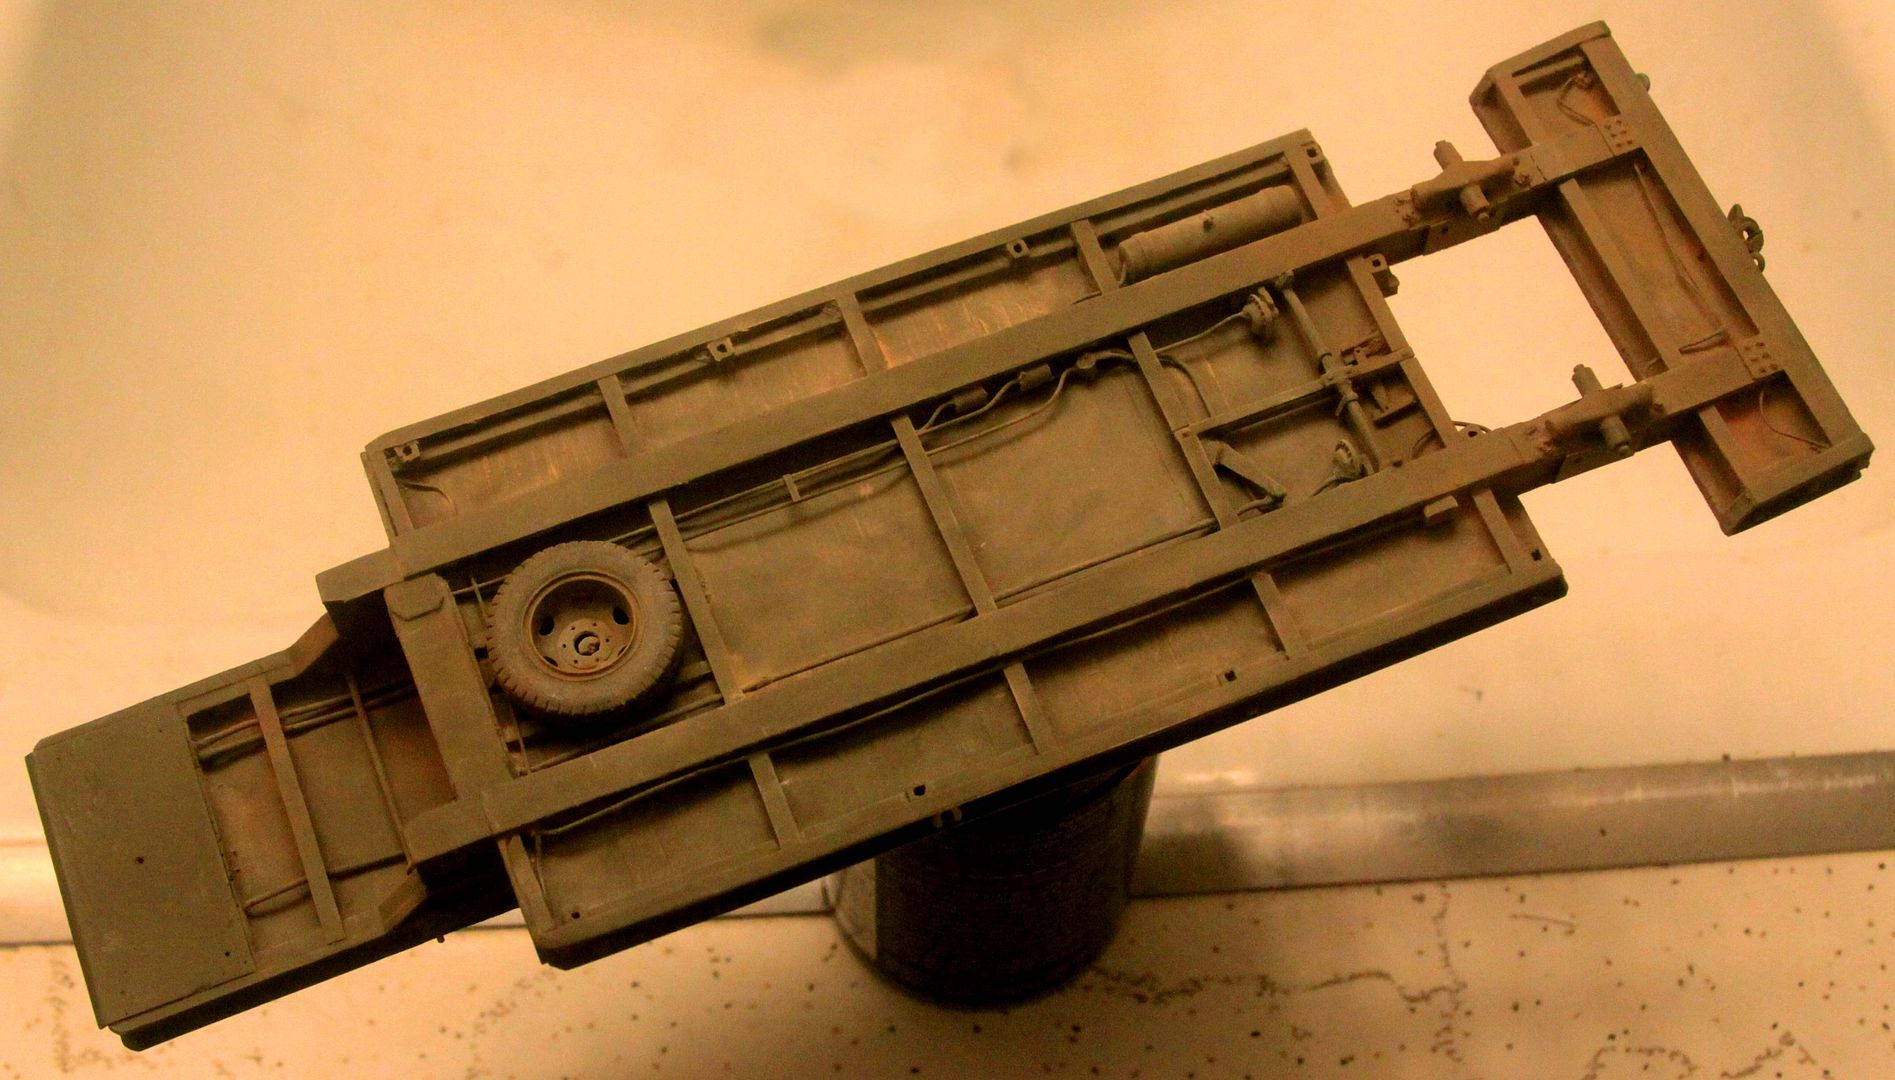
Progress on the 20T trailer for Friday, July 17, 2015

Underbody detailing is done, manual brake mechanism, air brake mechanism, air lines, air tank AND electrical wiring! Thank Heavens! Ready to paint!


And I even got in my drain valve on the air tank!
165thspc
#521
Visit this Community
Kentucky, United States
Joined: April 13, 2011
KitMaker: 9,465 posts
Armorama: 8,695 posts
Posted: Friday, July 17, 2015 - 09:25 AM UTC
And now painted:

165thspc
#521
Visit this Community
Kentucky, United States
Joined: April 13, 2011
KitMaker: 9,465 posts
Armorama: 8,695 posts
Posted: Friday, July 17, 2015 - 04:25 PM UTC
Frenchy I'm in Luv with that spare tire location on the tractor and the delicate rack that it mounts on! Thanks for providing the reference on that one!

Regards. Mike
165thspc
#521
Visit this Community
Kentucky, United States
Joined: April 13, 2011
KitMaker: 9,465 posts
Armorama: 8,695 posts
Posted: Friday, July 17, 2015 - 09:48 PM UTC
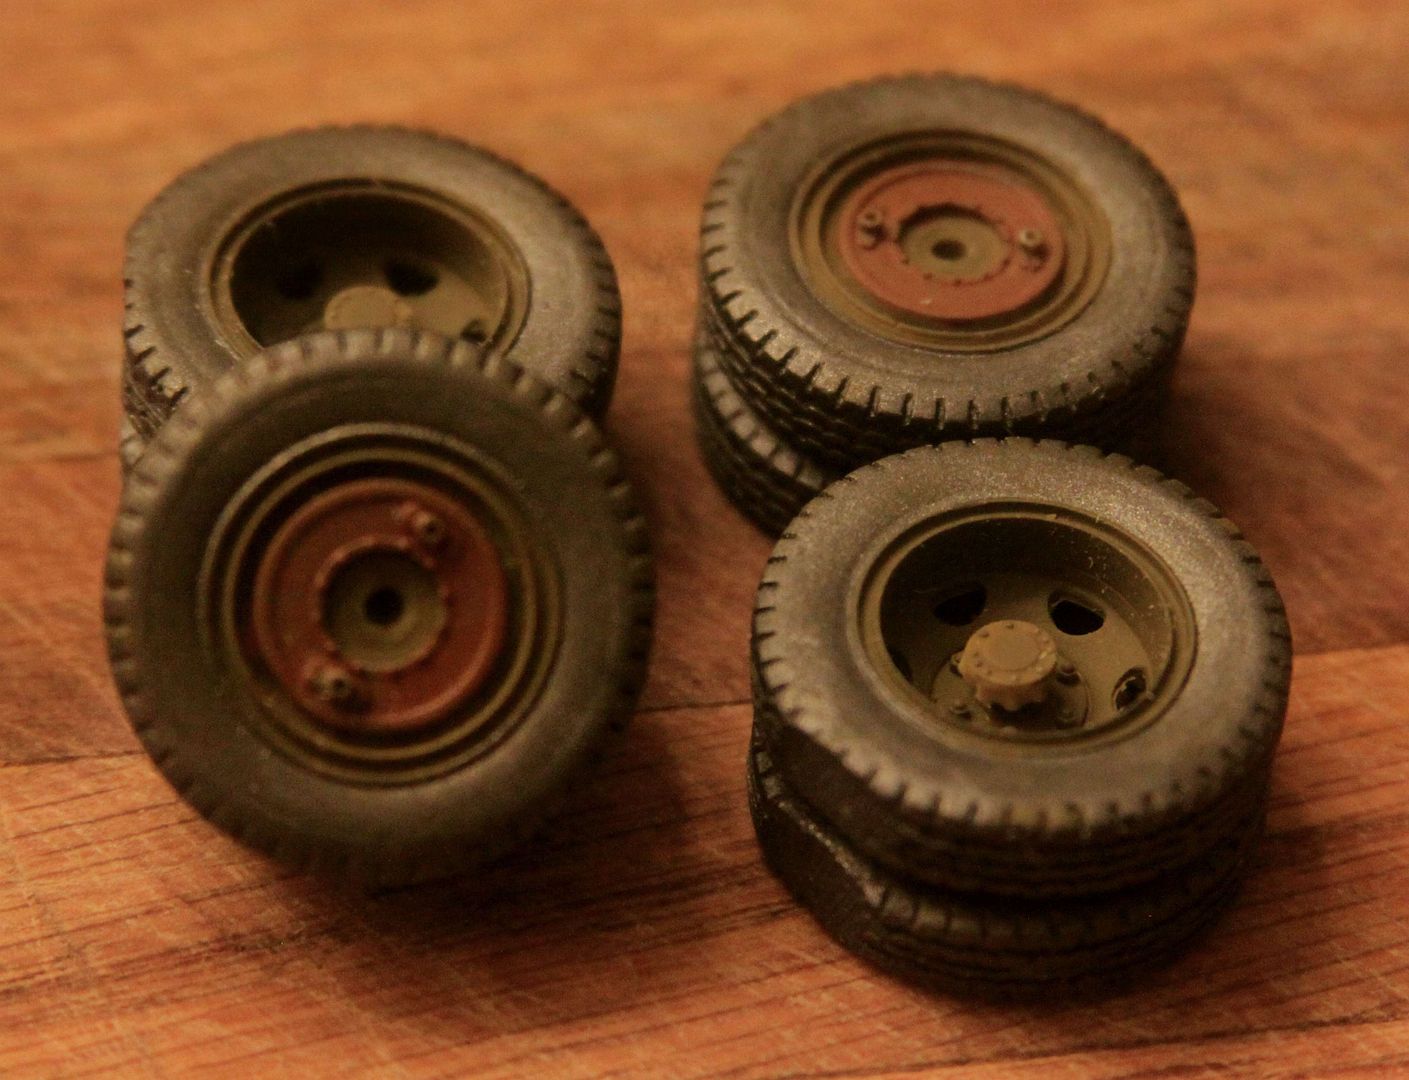
Trailer wheels painted and ready to mount.

In case anyone might be interested; On resin or cast plastic tires I usually prime them with Matte Olive Drab (In this case Model Masters #1911) and then finish coat the tire using a semi-transparent, metalizing, Gun Metal color. I feel this gives me a proper aged, faded, silvery, oxidized rubber look. I don't tend to like the look I get when I just paint them with straight flat black, it ends up looking too "parade ready!"


As you can see from the photo, on any solid model tire I also grind a "weighted" flat spot into the ground contact area of the tire for greater realism. This "weighted"spot on the tires is especially important on this type trailer because this trailer is a "hard tail" (no spring suspension) so the only bounce this trailer has is that which is in the tires which are often intentionally left under-inflated for that reason!

I also normally go over the brake drum area with a bit of diluted rust paint color because hot brakes, just like exhaust pipes, mufflers, and flexing leaf springs do not tend to hold onto their paint for very long so they rust first.

I know that I tend to overdo this rust treatment and will usually try and tone it down a bit in the weathering process.
165thspc
#521
Visit this Community
Kentucky, United States
Joined: April 13, 2011
KitMaker: 9,465 posts
Armorama: 8,695 posts
Posted: Friday, July 17, 2015 - 10:53 PM UTC
More in-depth coverage of the construction of the 20T trailer can be found at:

https://armorama.kitmaker.net/forums/236939
Marknasim
Visit this Community
United States
Joined: January 03, 2010
KitMaker: 54 posts
Armorama: 35 posts
Posted: Friday, July 17, 2015 - 11:30 PM UTC
Man that is looking SWEET!!!! you have done some fine work there on that White my friend, the trailer too…….. You got me wanting one of those trailers now….how much did that set you back?
Another thing…where did you get the info. for the detail on the trailer…brake lines etc…..?
ericadeane
Visit this Community
Michigan, United States
Joined: October 28, 2002
KitMaker: 4,021 posts
Armorama: 3,947 posts
Posted: Saturday, July 18, 2015 - 12:20 AM UTC
the TM for the 666 trucks can be downloaded for free here:

https://archive.org/details/TM9-813
165thspc
#521
Visit this Community
Kentucky, United States
Joined: April 13, 2011
KitMaker: 9,465 posts
Armorama: 8,695 posts
Posted: Saturday, July 18, 2015 - 06:27 AM UTC

Quoted Text

…where did you get the info. for the detail on the trailer…brake lines etc…..?


Regarding the source of the reference; someone, I think Frenchy (I will have to go back and check) posted links to the White TM and the 20 ton trailer on the website "Scribd" and they were having a one week free trile so I got to download the White, the 14 and 20 ton trailers and the book on the four ton trucks all for free!

As to price I think with the VAT and the exchange rate it was around 135 US! Probably more than I have ever paid for a single model kit but it was one of those "I just gotta have it!" type of things!
165thspc
#521
Visit this Community
Kentucky, United States
Joined: April 13, 2011
KitMaker: 9,465 posts
Armorama: 8,695 posts
Posted: Saturday, July 18, 2015 - 06:31 AM UTC

Quoted Text

There's a TM dealing with the 6-ton trucks series you can read online here (if needed, you can also make screen captures as well ) :

http://fr.scribd.com/doc/166770621/TM-9-813-WHITE-CORBITT-AND-BROCKWAY-6-TON-TRUCK-1944

Mike (sorry for calling you Mick before...) I guess the trailer you're looking for could be one of these :

http://fr.scribd.com/doc/190209989/Tm-5-9218-SEMI-TRLR-LOW-BED-20T-DOLLY-20TD-SEPT-1944

http://fr.scribd.com/doc/188627588/Tm-5-9200-XBBM-TRAILER-LOW-BED-16-TON-OCT-1943

http://fr.scribd.com/doc/173046185/Tm-9-897-22-Ton-Low-bed-Trailer-La-Crosse-Df6-22

H.P.


Here's a re-broadcast of Frenchy's links to Scribd. Check it out maybe they still have their free offer going. Mike
DocEvan
Visit this Community
California, United States
Joined: August 09, 2014
KitMaker: 180 posts
Armorama: 180 posts
Posted: Saturday, July 18, 2015 - 08:06 AM UTC
You're a man after my own heart. I believe strongly in giving the eye something to look at!


Quoted Text

And a bit more:

And all these details are topside not underneath so they will show!

165thspc
#521
Visit this Community
Kentucky, United States
Joined: April 13, 2011
KitMaker: 9,465 posts
Armorama: 8,695 posts
Posted: Saturday, July 18, 2015 - 09:10 PM UTC
Another detail I just noticed on the trailer are these rectangular steel plates welded to the main "I" beams just above the trunnion axle assemblies. I assume these are to add strength and ridigity to the wheel support structure.


So . . . .

165thspc
#521
Visit this Community
Kentucky, United States
Joined: April 13, 2011
KitMaker: 9,465 posts
Armorama: 8,695 posts
Posted: Sunday, July 19, 2015 - 12:21 AM UTC
Well here is a look at my standard light / medium dose of weathering. (I did go a little heavier on the red clay mud around the rear wheels and on the underside of the goose neck as the tractor tires would splash mud there.) Normal road dust everywhere else.


I may decide to get even more serious with the weathering as time goes by.
Removed by original poster on 07/20/15 - 16:22:55 (GMT).
165thspc
#521
Visit this Community
Kentucky, United States
Joined: April 13, 2011
KitMaker: 9,465 posts
Armorama: 8,695 posts
Posted: Thursday, July 23, 2015 - 08:17 PM UTC
Very sorry all. This has been a wasted week starting with a trip Sunday to the emergency room with my first ever, but very extreme, gall bladder attack and hopefully ending this weekend with the removal of same!

So no way the White semi rig is gonna make it the this weekends I.P.M.S. Nationals and neither am I. Been so weak and sometimes in pain that I could not begin to work on this vehicle!
27-1025
Visit this Community
North Carolina, United States
Joined: September 16, 2004
KitMaker: 1,281 posts
Armorama: 1,222 posts
Posted: Thursday, July 23, 2015 - 10:26 PM UTC

Quoted Text

Very sorry all. This has been a wasted week starting with a trip Sunday to the emergency room with my first ever, but very extreme, gall bladder attack and hopefully ending this weekend with the removal of same!

So no way the White semi rig is gonna make it the this weekends I.P.M.S. Nationals and neither am I. Been so weak and sometimes in pain that I could not begin to work on this vehicle!


Damn! All the best and heal up soon.
Frenchy
Visit this Community
Rhone, France
Joined: December 02, 2002
KitMaker: 12,719 posts
Armorama: 12,507 posts
Posted: Thursday, July 23, 2015 - 11:04 PM UTC


H.P.
165thspc
#521
Visit this Community
Kentucky, United States
Joined: April 13, 2011
KitMaker: 9,465 posts
Armorama: 8,695 posts
Posted: Friday, July 24, 2015 - 01:24 AM UTC
Thanks guys. I appreciate it!

Dang and I wanted to at least open the box on the Mirror Models bulldozer meant to ride on this beast.
165thspc
#521
Visit this Community
Kentucky, United States
Joined: April 13, 2011
KitMaker: 9,465 posts
Armorama: 8,695 posts
Posted: Saturday, July 25, 2015 - 06:10 AM UTC
Amazing, in that something that hurt sooooo much being in there could feel sooooooo good being gone! Doc said it was one of the worst he had ever seen. Yet I never had any trouble with my Gall Bladder till just last week!

In any case feeling much, much better now and no pain at all! Thank you guys for the kind regards.

Now back to modeling!!!
165thspc
#521
Visit this Community
Kentucky, United States
Joined: April 13, 2011
KitMaker: 9,465 posts
Armorama: 8,695 posts
Posted: Friday, July 31, 2015 - 08:07 AM UTC
Only one day pain free and then back into recurring complications land. Serious infection spread and now back in hospital. We will know in another ten days.

Sure does cut into my modeling time! Cheers!
justsendit
Visit this Community
Colorado, United States
Joined: February 24, 2014
KitMaker: 3,033 posts
Armorama: 2,492 posts
Posted: Friday, July 31, 2015 - 08:16 AM UTC
Best wishes Michael. Looking forward to seeing you back in action soon ... but don't rush recovery on our account, we're a patient bunch ... or is that a bunch of patients!

Heal brother, heal ...

—mike