@Matthew
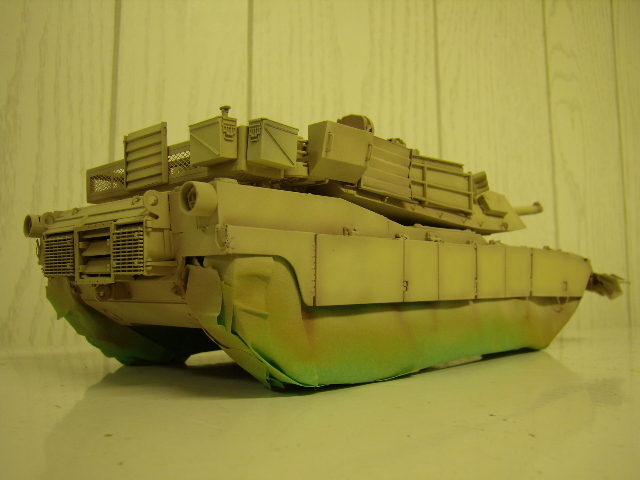
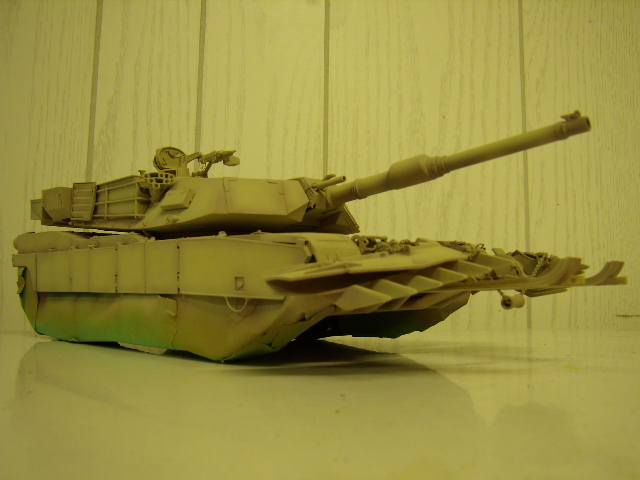
i think you got this thing at the end of the barrel pointing in the wrong direction
i hope you can correct it
,Gijs
Campaigns
Where Armorama group builds can be discussed, organized, and updates posted.
Hosted by Darren Baker, Richard S.
OIF
HazZaRd
Noord-Brabant, Netherlands
Joined: May 25, 2006
KitMaker: 291 posts
Armorama: 288 posts
Joined: May 25, 2006
KitMaker: 291 posts
Armorama: 288 posts
Posted: Friday, August 17, 2007 - 07:56 AM UTC
HeavyArty
Florida, United States
Joined: May 16, 2002
KitMaker: 17,694 posts
Armorama: 13,742 posts
Joined: May 16, 2002
KitMaker: 17,694 posts
Armorama: 13,742 posts
Posted: Friday, August 17, 2007 - 12:55 PM UTC
Quoted Text
@Matthew
i think you got this thing at the end of the barrel pointing in the wrong direction
i hope you can correct it
,Gijs
Yup, the MRS (Muzzle Reference Sensor) needs to be turned 180 degrees. Other than that, looks like it is coming along well. Good job.
f1matt
Manitoba, Canada
Joined: August 13, 2006
KitMaker: 1,021 posts
Armorama: 805 posts
Joined: August 13, 2006
KitMaker: 1,021 posts
Armorama: 805 posts
Posted: Friday, August 17, 2007 - 10:26 PM UTC
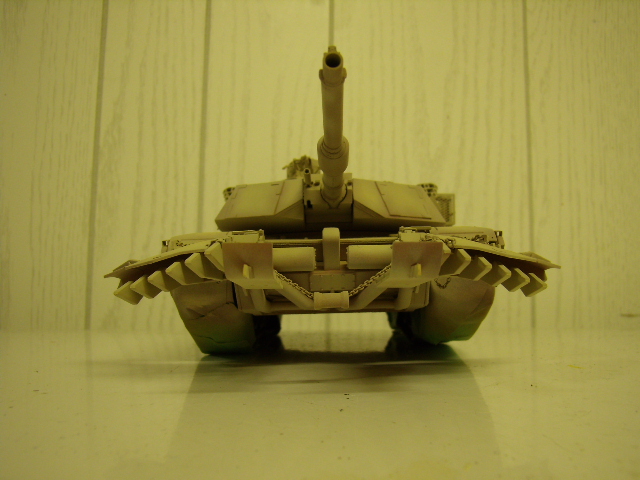
Thanks Gijs and Gino. How did I miss that one? Well I'm glad you guys spotted that . She's gonna be painted any time now. By the way the mine plow is attached and hopefully pointing the right direction.
Posted: Sunday, August 19, 2007 - 03:25 PM UTC
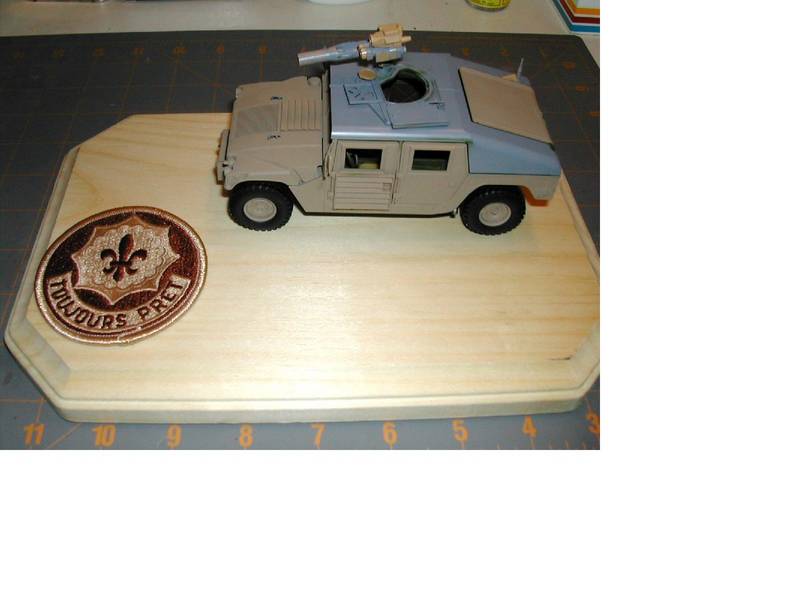
Well, here is the beginning of my contribution to the OIF campaign. I thought I had a good base coat on the interior but the digital camera sure does bring out every imperfection and missed spot. I am almost embarrassed. The top is still colored with primer. There is lots of work to still be done.
Here are few pics:
This is the basic concept of the base it will be displayed on. I am building the kit OOB using the 2nd Armored Cavalry Regiment decals (OIF 2003-2004). I served, in an attached capacity, with the 2nd ACR in Al-Kut during the same time frame. The patch is the desert subdued patch that was authorized for wear with the 3-color desert uniform. There will be an engraved plate next to the patch that will have the vehicle nomenclature, unit information and time period.
mustang05
Joined: July 05, 2007
KitMaker: 7 posts
Armorama: 6 posts
KitMaker: 7 posts
Armorama: 6 posts
Posted: Monday, August 20, 2007 - 04:31 PM UTC
howdy, newbie armor modeler here with questions I hope some of you can answer for me. I'm using the Tamiya 1:35 Humvee kit
I'm planning on building a Humvee from the operation where Saddam's sons were killed:
so, my questions are:
- do I have to scratch build the smoke grenade launchers? or is there a resin copy available somewhere?
- same question with the optics on the TOW launcher plus where can I find more info about that TOW launcher?
- where can I find closer pics of the SAW mount ? .. or TOW launcher too
- I noticed in some pics of the soldiers, some guys have the US flag and 101st patch on the same shoulder, what would be on the other shoulder ?
- lastly, are there any other changes I need to do to the Tamiya kit?
sgtreef
Oklahoma, United States
Joined: March 01, 2002
KitMaker: 6,043 posts
Armorama: 4,347 posts
Joined: March 01, 2002
KitMaker: 6,043 posts
Armorama: 4,347 posts
Posted: Monday, August 20, 2007 - 10:37 PM UTC
Tubes come with Tamiya Kit.
If you are not using the kit then oops can't help.
Bret looks good their buddy.
Would not worry about missed spots once you button it up.
Now if shamelessly I am posting where I stand on mine but not for campaign.
Hope you don't mind kind of look alike's
Might add those tubes still look like they are smoking.
Hope you don't mind Bret.
HeavyArty
Florida, United States
Joined: May 16, 2002
KitMaker: 17,694 posts
Armorama: 13,742 posts
Joined: May 16, 2002
KitMaker: 17,694 posts
Armorama: 13,742 posts
Posted: Tuesday, August 21, 2007 - 03:09 PM UTC
Quoted Text
so, my questions are:
- do I have to scratch build the smoke grenade launchers? or is there a resin copy available somewhere?
Blast has a HMMWV upgrade set, BL35050K, which includes the smoke grenade launchers, new weapons ring with rear M249 mount and shield, M2 .50 cal, Mk 19, and M249 SAW.
[quote]- same question with the optics on the TOW launcher plus where can I find more info about that TOW launcher?[quote]
The Tamiya M1046 kit includes the TOW and all its parts, along with the armored doors as in your pic. For more info on the tow, Pete "Epi" Becerra has a detailed article on the TOW in the Features section here at Armorama.
Quoted Text
See above.- where can I find closer pics of the SAW mount ? .. or TOW launcher too
Quoted Text
- I noticed in some pics of the soldiers, some guys have the US flag and 101st patch on the same shoulder, what would be on the other shoulder ?
The flag is worn by all US soldiers as of 2003. It is worn on the right side. When a division or other major command patch is on the right side, it is a combat patch. It denotes that the wearer has been in a combat zone for at least 30 days. The left side patch is for the current unit of assignment. I'm not sure what division or units killed Saddam's sons, but that patch would be on the left side.
Quoted Text
- lastly, are there any other changes I need to do to the Tamiya kit?
The radio is incorrect for a current one. It should have a SINCGARS radio. Pro Art has a nice SINCGARS set. Also, the tires could be updated to radial tires. Many resin companies have tire sets. Other than that, it is pretty accurate and well detailed.
Good luck.
A-Train
Scotland, United Kingdom
Joined: June 10, 2004
KitMaker: 715 posts
Armorama: 433 posts
Joined: June 10, 2004
KitMaker: 715 posts
Armorama: 433 posts
Posted: Wednesday, August 22, 2007 - 05:18 AM UTC
Firstly, I know the CIP are rubbish.
I'm about 45% done, i spent almost three months on the groundwork alone, and now that i'm finished the plaster used to make the groundwork is breaking off.
The figures are Dragon Modern US Marines, the Humvee is Tamiya's 1025. I'm trying to depict the early stages of invasion. It's probably more inaccurate than hitting the numbers on a dartboard. The CIPs were scratchbuilt, made from photocard, and i didn't realise until i CA glued them onto the doors how naff they really were. The figures are in good need of a paint, and i'm no good with faces. I need to replace the M203 'cause the barrel has broken off, and as for all the other weapons, well lets just say i'm tearing my hair out.
Anyway, here's five quick photos.
Excuse the background, i took them quickly.
Oh, and one last thing, The humvee is actually three tone camo, and i just attacked it with MIG pigments to make it look really dusty.
I need to fix that windscreen...
HazZaRd
Noord-Brabant, Netherlands
Joined: May 25, 2006
KitMaker: 291 posts
Armorama: 288 posts
Joined: May 25, 2006
KitMaker: 291 posts
Armorama: 288 posts
Posted: Wednesday, August 22, 2007 - 05:43 AM UTC
Looks nice Scott question how did you make the ground work specialy the road i like the cracks and holes and that
also the chair where did you get it from
Keep up the good work ,Gijs
also the chair where did you get it from
Keep up the good work ,Gijs
A-Train
Scotland, United Kingdom
Joined: June 10, 2004
KitMaker: 715 posts
Armorama: 433 posts
Joined: June 10, 2004
KitMaker: 715 posts
Armorama: 433 posts
Posted: Wednesday, August 22, 2007 - 05:59 AM UTC
Gijs, the roadwork was just a small layer of plaster applied to the wooden base, the cracks were simply a heavy weight tapped off the dried plaster, breaking small bits off.
The chair is from an old tamiya kit, can't remember the name, but i picked it up for about 2 quid at the LHS.
Three more quick photos.
The chair is from an old tamiya kit, can't remember the name, but i picked it up for about 2 quid at the LHS.
Three more quick photos.
mustang05
Joined: July 05, 2007
KitMaker: 7 posts
Armorama: 6 posts
KitMaker: 7 posts
Armorama: 6 posts
Posted: Friday, August 24, 2007 - 11:23 AM UTC
Thanks for all the help Gino, just wanted to clarify then:
They were from the 101st, so the Screaming Eagle patch would be on both shoulders then? This pic is cropped from the original size:
as for the TOW, the optics in the kit don't look like this to me:
Quoted Text
The flag is worn by all US soldiers as of 2003. It is worn on the right side. When a division or other major command patch is on the right side, it is a combat patch. It denotes that the wearer has been in a combat zone for at least 30 days. The left side patch is for the current unit of assignment. I'm not sure what division or units killed Saddam's sons, but that patch would be on the left side
They were from the 101st, so the Screaming Eagle patch would be on both shoulders then? This pic is cropped from the original size:
as for the TOW, the optics in the kit don't look like this to me:
f1matt
Manitoba, Canada
Joined: August 13, 2006
KitMaker: 1,021 posts
Armorama: 805 posts
Joined: August 13, 2006
KitMaker: 1,021 posts
Armorama: 805 posts
Posted: Friday, August 24, 2007 - 06:00 PM UTC
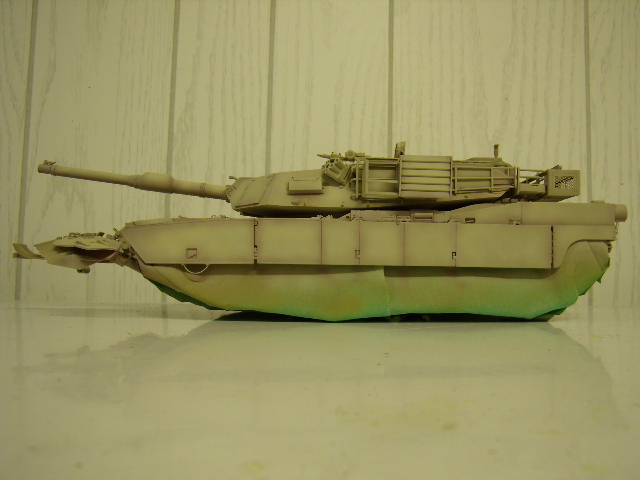
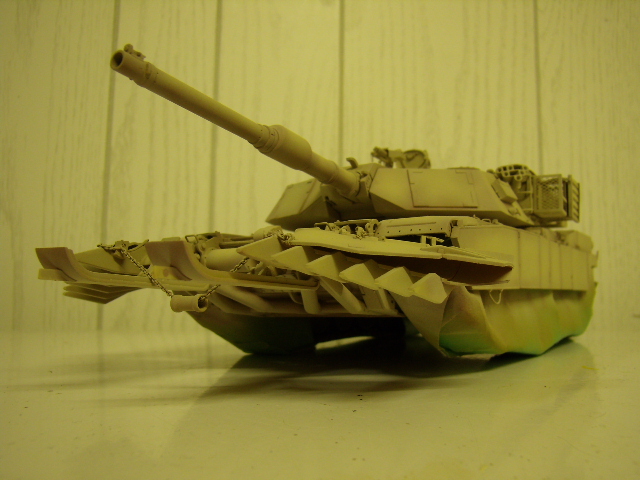
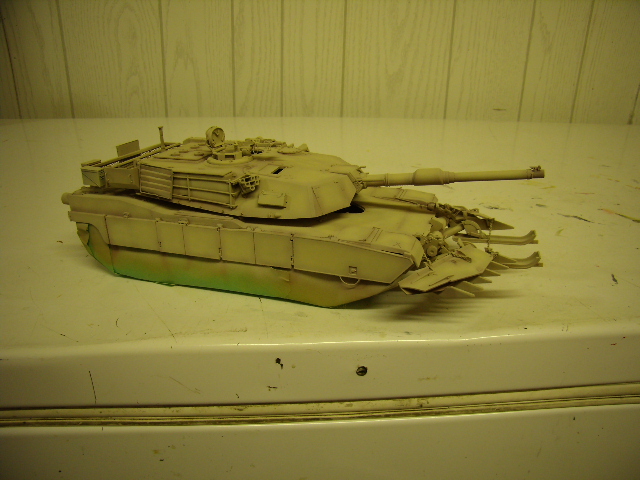
Well I was in a hurry but I managed to take a few WIP pics today. My Abrams was primed with Tamiya dark yellow, than pre-highlighted and shaded with flat white and NATO brown. I than applied a thin layer of Model Master FS 33531. I want to tone down the pre-shading a little more and the colour still doesn't quite look right. So any way this is how she looks as of right now. Many more layers of paint to come. I think this is where i have the most fun actually. I did fix the muzzle reference sensor. Anything else look out of place or just plain wrong? Please let me know if you spot anything. I'd rather fix it now than later. Sorry for the picture quality. Will take some better ones once painting is finished.
f1matt
Manitoba, Canada
Joined: August 13, 2006
KitMaker: 1,021 posts
Armorama: 805 posts
Joined: August 13, 2006
KitMaker: 1,021 posts
Armorama: 805 posts
Posted: Friday, August 24, 2007 - 06:46 PM UTC
I seem to recall seeing a picture of an OIF Abrams with a large "jolley rogers" pirate flag on it. Anybody else see it and happen to know what unit it might have been?
sgtreef
Oklahoma, United States
Joined: March 01, 2002
KitMaker: 6,043 posts
Armorama: 4,347 posts
Joined: March 01, 2002
KitMaker: 6,043 posts
Armorama: 4,347 posts
Posted: Saturday, August 25, 2007 - 01:05 AM UTC
Looking Good Matt .
I like the preshade on that M1.
Can't wait to see it done.
I like the preshade on that M1.
Can't wait to see it done.
DeskJockey
Virginia, United States
Joined: July 17, 2006
KitMaker: 1,558 posts
Armorama: 1,159 posts
Joined: July 17, 2006
KitMaker: 1,558 posts
Armorama: 1,159 posts
Posted: Saturday, August 25, 2007 - 01:06 AM UTC
Matt-your Abrams is looking very nice! The only thing I could spot (and I am by no means an authority) was that the CIP panel on the right side of the turret is pointing up instead of down, like they other two are. IIRC, the panel louvers should point down when it is activated, and up when it is turned off.
f1matt
Manitoba, Canada
Joined: August 13, 2006
KitMaker: 1,021 posts
Armorama: 805 posts
Joined: August 13, 2006
KitMaker: 1,021 posts
Armorama: 805 posts
Posted: Saturday, August 25, 2007 - 02:03 AM UTC
Well that was an easy fix. I used the CIP's from Eduard and never glued in place the corrugated inserts so I was able to re-orient it easily. It's now right side up. Thanks Lucas.
sgtreef
Oklahoma, United States
Joined: March 01, 2002
KitMaker: 6,043 posts
Armorama: 4,347 posts
Joined: March 01, 2002
KitMaker: 6,043 posts
Armorama: 4,347 posts
Posted: Saturday, August 25, 2007 - 03:02 AM UTC
Good catch there old eagle eye Lucas.
Okay my turn, Scott that one Guy has a Bent or broke barrel on his Weapon.
Can't shoot like that.
Okay my turn, Scott that one Guy has a Bent or broke barrel on his Weapon.
Can't shoot like that.
ladder5
England - North, United Kingdom
Joined: May 04, 2006
KitMaker: 89 posts
Armorama: 86 posts
Joined: May 04, 2006
KitMaker: 89 posts
Armorama: 86 posts
Posted: Saturday, August 25, 2007 - 04:59 AM UTC
Quoted Text
I seem to recall seeing a picture of an OIF Abrams with a large "jolley rogers" pirate flag on it. Anybody else see it and happen to know what unit it might have been?
hi
A cpy 4-64 arm 3ID 'Assassins' flew the 'jolly rodger' in iraq 2003. if you want a few photos PM me with your email address
mark
f1matt
Manitoba, Canada
Joined: August 13, 2006
KitMaker: 1,021 posts
Armorama: 805 posts
Joined: August 13, 2006
KitMaker: 1,021 posts
Armorama: 805 posts
Posted: Sunday, August 26, 2007 - 08:46 AM UTC
Well I think I am finally satisfied with the colour. Since my last update I sprayed a very light coat of Xtracolor x610 Havoc Sand. This was applied in a rough pattern with the brush held far from the model (relatively). Looked better. Then I applied a mix of Gunze H313 and Tamiya XF-60 dark yellow. About 1-2 ratio. Again this was applied in a very thin layer. I didn't want to completely cover the previous layers. I just wanted to "adjust" them. I suppose these layers might be similar to a filter. This next layer was applied in a random squigly pattern a little closer to the model. Pictures of the real thing show them with fairly even paint usually so I wanted variety but I wanted to keep any shading fairly subtle. I took the pictures outdoors so the colour changes slightly depending on whether a cloud was overhead at the time or not.
That's all for now. Thanks for looking.
f1matt
Manitoba, Canada
Joined: August 13, 2006
KitMaker: 1,021 posts
Armorama: 805 posts
Joined: August 13, 2006
KitMaker: 1,021 posts
Armorama: 805 posts
Posted: Sunday, August 26, 2007 - 09:53 AM UTC
Holy crow. Thanks for all those wonderful pictures Mark. They will really help me with this build.
sgtreef
Oklahoma, United States
Joined: March 01, 2002
KitMaker: 6,043 posts
Armorama: 4,347 posts
Joined: March 01, 2002
KitMaker: 6,043 posts
Armorama: 4,347 posts
Posted: Sunday, August 26, 2007 - 12:26 PM UTC
That tank is coming out killer f1 matt.
Really a clean build.
So what kit was this again.
Really a clean build.
So what kit was this again.
f1matt
Manitoba, Canada
Joined: August 13, 2006
KitMaker: 1,021 posts
Armorama: 805 posts
Joined: August 13, 2006
KitMaker: 1,021 posts
Armorama: 805 posts
Posted: Sunday, August 26, 2007 - 05:56 PM UTC
Thanks again Mark. I will have to build a tank from the 4-64th now. I have the pirate flags from Archer and looks like they are going on this build. I noticed an elephant spray painted on the turret front of an A cpy, 3ptn tank. Do you know if this marking was applied to only this particular unit or others as well? i think for this marking I can probably just make my own stencil and spray it on. Jeff, the kit is Dragon's gorgeous AIM kit with a mineplow taken from the Tamiya kit.
ladder5
England - North, United Kingdom
Joined: May 04, 2006
KitMaker: 89 posts
Armorama: 86 posts
Joined: May 04, 2006
KitMaker: 89 posts
Armorama: 86 posts
Posted: Monday, August 27, 2007 - 03:39 AM UTC
no worries Mat
ive many more pics to send to you but they keep getting returned. the message says your intray may be full.
the elephant head is on because the 4-64 arm are known as the 'Tuskers'
mark
f1matt
Manitoba, Canada
Joined: August 13, 2006
KitMaker: 1,021 posts
Armorama: 805 posts
Joined: August 13, 2006
KitMaker: 1,021 posts
Armorama: 805 posts
Posted: Monday, August 27, 2007 - 05:22 AM UTC
I know it's not much of an an update (maybe i should just start my own build blog) but I am just so happy with the results. I noticed the elephant head on the turret of tanks from the 4-64 "tuskers" (go figure). I made my own stencil for the head by simply drawing it on a piece of paper and then tracing it with an x-acto. A fresh blade is a must. Then taped it to the turret and sprayed a light mix of black and deck tan. Worked perfectly. Tee hee. I love it.
HazZaRd
Noord-Brabant, Netherlands
Joined: May 25, 2006
KitMaker: 291 posts
Armorama: 288 posts
Joined: May 25, 2006
KitMaker: 291 posts
Armorama: 288 posts
Posted: Monday, August 27, 2007 - 07:20 AM UTC
Looks Great Matt, cant wait to see any more process
i'm busy on a usmc M1A1 building out the AIM kit with tamiya usmc goodies but i dont think i will finish it before the campaign ends
Great Stuff everybody
,Gijs
i'm busy on a usmc M1A1 building out the AIM kit with tamiya usmc goodies but i dont think i will finish it before the campaign ends
Great Stuff everybody
,Gijs