

1⁄35Tasca Sherman III
8
Comments
bogies!
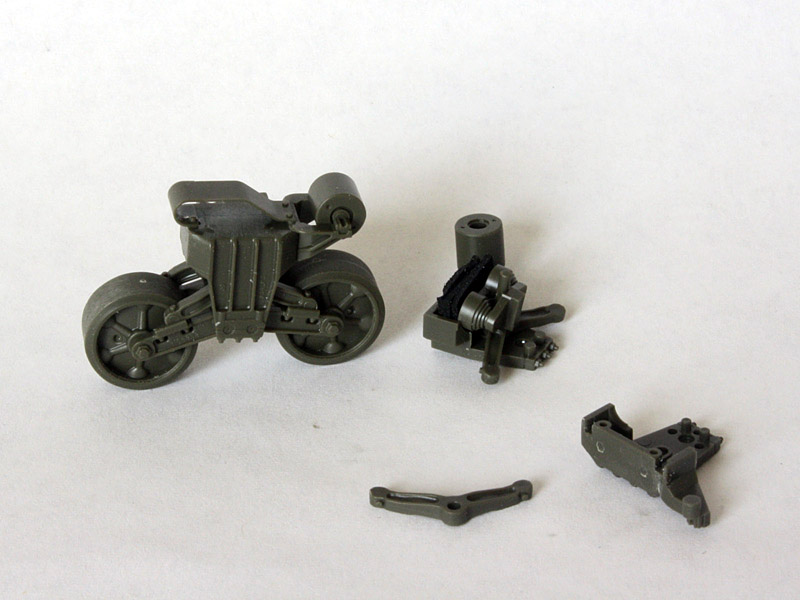
Real Sherman bogies are made from a big saddle-shaped casting into which the springs and suspension arms are bolted. Tasca follows the typical path of building this casting from two parts one for the front half and one for the back half that mates to the hull. However, the springs are cast short to allow three layers of thin foam to act as a compressible cushion. The spring and the two rocker arms attached to it ride up and down in a groove when the wheels get pushed up, and the foam presses them down again just like real springs would. Since the suspension arms are separate, each wheel can move independently and the whole suspension accurately imitates the movement of the real thing.
I followed the instructions carefully, and applied liquid glue very sparingly so all the parts could move - it would be all too easy to gum it all up. I also found that a little extra sanding of the top edges of the spring allowed it to slide easier without binding. The odd part was having to measure and cut strips from the foam, since Tasca could have done this much easier at the factory. Oh, and it can take more fingers than most folks have on two hands to get it all lined up. I piled the foam, the spring, and rockers onto one half, added the other half to trap them, and then holding the halves together I gently pried the sides apart just enough to insert the two wheel sets. Then, after re-aligning everything so the casting halves fitted together again I gently applied glue across the top and faces of the casting (along the joint) taking care not to glue the spring into place. I was paranoid, and spent a good few minutes flexing the wheels (and thus the spring) while the glue evaporated until I was sure nothing had got stuck.
Once the basic parts were together and dried I used a flat file to sand down the top and leading faces of the big casting to remove the joint before adding the track-return skid on top. Then I marked and drilled the four empty bolt holes on the leading face opposite the return roller bracket, because the real castings were not handed and had mounting holes for the bracket at both ends.
The only negative part of these excellent bogies is the way the road wheels are trapped by the assembly process. Normally Id glue up the suspension arms and then saw through the axles to leave stubs so the wheels can be snapped into place after painting, but the separate arms of Tascas design dont leave enough support if the axle is cut, so I had to trap the wheels in place from the start.
With the bogies finished I am now at the end of basic construction. Ill make up the soft stowage from tissue & PVA glue before painting, but the plastic work is done!

About the Author


FROM: ENGLAND - EAST ANGLIA, UNITED KINGDOM
A Yank living overseas on a long-term basis, I've been building tanks since the early '70s. I relish the challenges of older kits (remember when Tamiya was "new"?...) because I love to scratch-build.
Comments

Hi Tom,
Cracking build with and excellent finish. Congrats you have a real gem here.
Enjoyed the build story very infomrative.
Al
JUL 24, 2011 - 08:04 AM

Tom, congrats on another great one form you! the scribing on the sponsons is first class.
Cheers!
Stefan
JUL 31, 2011 - 12:12 AM

Tom,
thanks for sharing your build with us.
Outstanding your "assembly guide".
Did I interpreted it correctly.
You show a "re-furbished" SHERMAN III with cast DV hoods that was upgrade by the so-called "Blitz Program", i.e. applique armor, and M34A1 mantlet!
Outstanding work!
Cheers
Hauke Krapf
AUG 05, 2011 - 09:02 AM
Hauke,
Yes - it definitely looks to have been refurbished at some point. The applique armour, wide mantlet, and MG stowage brackets on the turret are late features, but the sun compass bracket tells me the turret was used in the Africa campaign. I have no other detail - just what can be seen in the three original photos. But then that's half the fun!
Tom
AUG 06, 2011 - 05:39 AM

Very comprehensive review, Tom. Makes me wish I wasn't putting a stop to my WWII era. Maybe I'll try to fit one in as a "waiting for the glue to set and paint to dry" kit.
AUG 06, 2011 - 05:53 AM

Tom,
That is artistry. What a wonderful job you did mate. Thank you for taking the time to walk us through.
Cheers, Stu
SEP 11, 2011 - 02:10 AM
Copyright ©2021 by Tom Cromwell. Images and/or videos also by copyright holder unless otherwise noted. The views and opinions expressed herein are solely the views and opinions of the authors and/or contributors to this Web site and do not necessarily represent the views and/or opinions of Armorama, KitMaker Network, or Silver Star Enterrpises. All rights reserved. Originally published on: 2011-07-24 00:00:00. Unique Reads: 25139

WEB HOSTING BY


Copyright ©2021 Armorama and Kitmaker Network, a subsidiary of Silver Star Enterprises
All Rights Reserved. Please read our Conditions of Use and Privacy Policy.
All Rights Reserved. Please read our Conditions of Use and Privacy Policy.