


Dioramas
Do you love dioramas & vignettes? We sure do.
Do you love dioramas & vignettes? We sure do.
Hosted by Darren Baker, Mario Matijasic
M1A1 Abrams "BOOM STICK"

theduke2sg

Joined: February 11, 2006
KitMaker: 63 posts
Armorama: 60 posts
Posted: Monday, February 25, 2008 - 04:00 PM UTC
Dear Sir. Be very careful about adding live stocks in your diorama. Especially with Arab backgorund. As far as I know, the Muslims believe that dogs are filthy and they do not keep them. So, it may not be so correct to have a dog in your M1A1 Diorama. BTW, good job on your M1. I like all the little details that you have put in. (Such as the dice at the MG mount.)

Airchalenged

Joined: October 21, 2006
KitMaker: 188 posts
Armorama: 121 posts

Posted: Monday, February 25, 2008 - 04:08 PM UTC
Sweet Mother of God this is amazing as always Matt.
Matt
Matt

18Bravo
Joined: January 20, 2005
KitMaker: 7,219 posts
Armorama: 6,097 posts
Posted: Monday, February 25, 2008 - 07:43 PM UTC
Every time I look at this I become more inspired to build my own. My only problem (with the kit, not with your work) is the cast on numbers. I remember in a review of this kit seeing numbers cast on one portion of the armor. They seemed very uniform. Are they indeed the same all over the model? The ones I've seen are obviously welded on, and apparently by different welders, depending upon the location. Did the kit get them right for the most part?
And I think the shepherd and goat are particularly well done. The red/white keffiah and the dishdasha are so ubiquitous here. I'm sure I've seen that guy somewhere...
Partially true. The Arabs I know do not care for dogs at all, which is problematic sometimes as we have one. (sort of, when she gets hungry) They do, however, keep dogs. Every shepherd I've seen has at least one or two, and they're fun to watch because they're very good at what they do.
Villages are packed with dogs. While they might appear feral, they are very well taken care of, and valued by the community as watch dogs. They's also extremely loyal to the villagers, even if they are no strangers to having stones thrown at them.

And yes, every mud hut, no matter how far removed from civilization, even if there are no power lines, has a satellite dish...
And I think the shepherd and goat are particularly well done. The red/white keffiah and the dishdasha are so ubiquitous here. I'm sure I've seen that guy somewhere...
Quoted Text
Be very careful about adding live stocks in your diorama. Especially with Arab backgorund. As far as I know, the Muslims believe that dogs are filthy and they do not keep them. So, it may not be so correct to have a dog in your M1A1 Diorama...
Partially true. The Arabs I know do not care for dogs at all, which is problematic sometimes as we have one. (sort of, when she gets hungry) They do, however, keep dogs. Every shepherd I've seen has at least one or two, and they're fun to watch because they're very good at what they do.
Villages are packed with dogs. While they might appear feral, they are very well taken care of, and valued by the community as watch dogs. They's also extremely loyal to the villagers, even if they are no strangers to having stones thrown at them.
And yes, every mud hut, no matter how far removed from civilization, even if there are no power lines, has a satellite dish...


f1matt

Joined: August 13, 2006
KitMaker: 1,021 posts
Armorama: 805 posts

Posted: Wednesday, February 27, 2008 - 04:55 PM UTC
Well for starters I have to say I feel extremely flattered and honored by everyones comments.  I was hoping this would be a friendly site when I joined but wow. You gentlemen are too kind. A Nobel prize? It may be a bit much.......but I accept!
  Unfortunately I didn't prepare a speech
  Is a small update ok?
First as far as the dog is concerned, I think 18 Bravo explained it well. They may not be man's best friend. But they are there. Good reference pics too for next time I paint an Iraqi dog. Thnx 18 bravo. And I agree about the silver ring on the spare wheels. I'm fixing that tonight. The picture with the brown CIP is interesting. Never seen that before. Could you divulge approximately when this was taken. Was it an A1 or A2? Just curious. If it's too hush hush I understand. Oh and I took some pictures of the turret and hull cast numbers.


As you can see they are absolutely perfect. Too perfect I suppose.
On to the build. Everything WAS going great. More small details being added. The water was progressing nicely. The base received a coat of black. And then....... I nearly ruined the whole damned project. What happened? I decided to play with my Mig pigments some more. I don't have much experience with pigments but I wanted to try them out for some subtle weathering. To be specific I wanted to weather the anti slip coat and wheels. These areas collect dust and dirt very quickly and I felt this wasn't well represented yet. I mixed up a wash of a few powders and applied it with a medium sized brush. The anti slip coating on the hull looked better so I moved on to the wheels and the turret. I'm not sure why but when it started to dry it looked awful. What have I done!? AAaaaaaahhhhhh!!!!!!  I tried to remove it but I hadn't applied a protective coat of Future and it wouldn't come off. Now what? I tried mixing up some dust and spraying the affected areas with a new dusty coat to cover it up. Still looked like crap.
My "ruined" turret. I know it may not seem that bad but it looked worse in person. It really looked bad.

By this point I thought I had pooched the whole thing and was thinking it may be a failure. After the shock had worn off I looked it over and came up with my plan of attack. I couldn't give up just yet. I felt I might have a chance at fixing the tank. Today (my first day off since "the incident") I went out and bought some paints. I figured I would try to to repaint the areas I had nearly ruined. This isn't as easy as it sounds. To begin with the base coat was mixed from several different colours. And shading had been applied. Various stages of weathering had gone on. It took nearly all day to come up with a close mix. Still not quite exact but as close as I could get.

Here is the turret after spraying the new base coat on to the anti slip covered areas. To help it blend in with the rest of the tank, a very thin coat used to cover most of the turret, gun and parts of the hull so it would all match.

And just about an hour ago I added a dark wash of oil paints to help restart the weathering process on the roof. it's finally starting to look the part again.


So that's where I'm at. The situation appears to be back under control, crisis averted. I feel like I'm back to DEFCON 4 now.
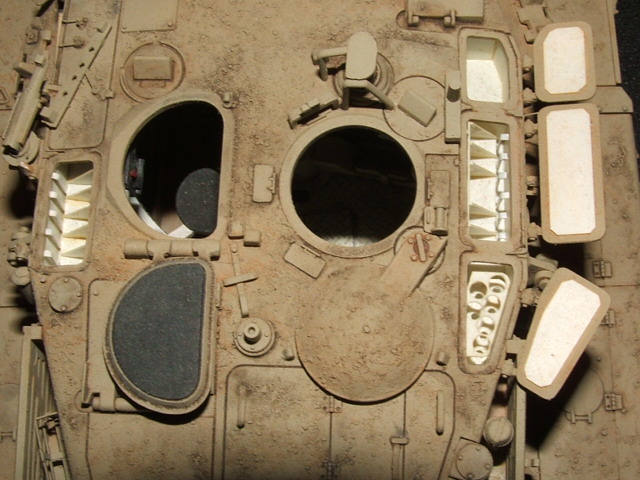
And if any one is curious as to why the doors on the "doghouse" are closed it's because I didn't want to get paint inside and it turns out they still work.
-Matt
I was hoping this would be a friendly site when I joined but wow. You gentlemen are too kind. A Nobel prize? It may be a bit much.......but I accept! Unfortunately I didn't prepare a speech Is a small update ok?First as far as the dog is concerned, I think 18 Bravo explained it well. They may not be man's best friend. But they are there. Good reference pics too for next time I paint an Iraqi dog. Thnx 18 bravo. And I agree about the silver ring on the spare wheels. I'm fixing that tonight. The picture with the brown CIP is interesting. Never seen that before. Could you divulge approximately when this was taken. Was it an A1 or A2? Just curious. If it's too hush hush I understand. Oh and I took some pictures of the turret and hull cast numbers.
As you can see they are absolutely perfect. Too perfect I suppose.
On to the build. Everything WAS going great. More small details being added. The water was progressing nicely. The base received a coat of black. And then....... I nearly ruined the whole damned project.
What happened? I decided to play with my Mig pigments some more. I don't have much experience with pigments but I wanted to try them out for some subtle weathering. To be specific I wanted to weather the anti slip coat and wheels. These areas collect dust and dirt very quickly and I felt this wasn't well represented yet. I mixed up a wash of a few powders and applied it with a medium sized brush. The anti slip coating on the hull looked better so I moved on to the wheels and the turret. I'm not sure why but when it started to dry it looked awful. What have I done!? AAaaaaaahhhhhh!!!!!! I tried to remove it but I hadn't applied a protective coat of Future and it wouldn't come off. Now what? I tried mixing up some dust and spraying the affected areas with a new dusty coat to cover it up. Still looked like crap. My "ruined" turret. I know it may not seem that bad but it looked worse in person. It really looked bad.
By this point I thought I had pooched the whole thing and was thinking it may be a failure. After the shock had worn off I looked it over and came up with my plan of attack. I couldn't give up just yet. I felt I might have a chance at fixing the tank. Today (my first day off since "the incident") I went out and bought some paints. I figured I would try to to repaint the areas I had nearly ruined. This isn't as easy as it sounds. To begin with the base coat was mixed from several different colours. And shading had been applied. Various stages of weathering had gone on. It took nearly all day to come up with a close mix. Still not quite exact but as close as I could get.
Here is the turret after spraying the new base coat on to the anti slip covered areas. To help it blend in with the rest of the tank, a very thin coat used to cover most of the turret, gun and parts of the hull so it would all match.
And just about an hour ago I added a dark wash of oil paints to help restart the weathering process on the roof. it's finally starting to look the part again.
So that's where I'm at. The situation appears to be back under control, crisis averted. I feel like I'm back to DEFCON 4 now.
And if any one is curious as to why the doors on the "doghouse" are closed it's because I didn't want to get paint inside and it turns out they still work.
-Matt
18Bravo
Joined: January 20, 2005
KitMaker: 7,219 posts
Armorama: 6,097 posts
Posted: Wednesday, February 27, 2008 - 06:51 PM UTC
Quoted Text
The picture with the brown CIP is interesting. Never seen that before. Could you divulge approximately when this was taken. Was it an A1 or A2? Just curious. If it's too hush hush I understand. Oh and I took some pictures of the turret and hull cast numbers.
-Matt
Again, fantastic job! Personally, I couldn't see anything wrong in the pics, but I certainly understand wanting to get it "just right."
The brown panels.
Hmmm...
An M1A2 SEP V2. Taken in the last week. If anyone looks up where they are right now, well, that's still not where I am.
The cast numbers are indeed much rougher, but now I'm being too picky. Yours look great with the weathiering.
The anti slip coating is the other area I hope they reworked on the A2, as it's just too regular and way overdone. Again, it's certainly not on you, but the kit.
Please post more pics!
ETA: Ah. One other thing-
In your rear view of the tank (the one below the photos of the hand and the print made from it) you can see part of the right rear armor. There is a black rubber strip that separates the hull from the armor. I imagine if it's a repaint, the rubber could have gotten painted as well, but I haven't seen this so far. I can post a top view some time in the future if you would like. It'd still be an easy fix.
f1matt
Joined: August 13, 2006
KitMaker: 1,021 posts
Armorama: 805 posts
Posted: Thursday, February 28, 2008 - 08:01 AM UTC
I would love to see any detail shots you may have. I see from your pictures a few other small details I can work on.
And thanks for sharing some info on the Abrams with the brown CIP.

To you and your men. Stay safe and good luck.
-Matt
And thanks for sharing some info on the Abrams with the brown CIP.
To you and your men. Stay safe and good luck.
-Matt
f1matt
Joined: August 13, 2006
KitMaker: 1,021 posts
Armorama: 805 posts
Posted: Thursday, February 28, 2008 - 06:55 PM UTC
I think I have basically finished fixing the roof of the turret. 

To replicate the dust that collects in the anti slip coating I once again turned to my Mig pigments. Only instead of a thin wash I used a medium sized brush and just dabbed the powder on in a random pattern. I used a mix of roughly 70% ashes white and 30% Gulf War sand. This helps give the impression people with dirty, dusty boots have been walking on the turret. After the powder is applied the excess is blown off and the remaining powder is gently blended by the same brush. Don't over blend or you will lose the contrast and it will all become one colour. We're looking to add some variety and make the one colour camo interesting. And only use small amount of pigments. It's easier to add then it is to remove. Believe me I know. Oddly enough as nice as the turret looks I think the effect came out much better on the hull. Which is a little irritating because you will hardly see any of it. I'll have to build an Abrams with it's turret turned.
This is exactly the effect I was going for. Which doesn't happen often enough. Ha.

As you may have noticed a few more details have gone on to the turret. Several ammo boxes (both 12.7mm and 7.62mm) have been added. They come from about 4 different companies so I had to place them in a way that the subtle detail differences would be less obvious. The open boxes are from Eduard.
Various items located on the turret received some weathering via pigments. The Cooler, boxes, drink containers, and even the duffle bags received some dust. I didn't forget, Joe!

I even figured out why the Commander looks so ticked off. He was thirsty! Let's give him a drink.

And since Grunt finished his tour and went home, he gave his trusty M-4 to the Cmdr. You'd think he'd at least crack a smile.
Apparently the Cmdr has been firing off his gun as well because I just noticed some spent brass lying around. Courtesy of Mission Models. Follow the white arrows.

The can of "Pepsee" is from Accurate Armour which provides decals for the resin cans.
To weather the crew tent I mixed more pigments with some tap water. This was painted on and left to dry. On thing to note is that the pigment will dry much lighter as compared to when it is wet. After it has dried the excess is removed with a q-tip and my finger. To help blend the edges I lightly went over the tent with a soft brush.

The tent that I saw in a real picture was much dustier but I figured it matched my tank as is.
Since repainting a large portion of the turret roof I was concerned that the turret colours may no longer match the hull. What do you guys think. Does everything look like it "fits"?


I hope it all matches because I ain't redoing it again.
Ok. Back to the water. To add some subtle ripples I thought I would use Woodland Scenics water effects. The water already in place was fully cured and even comes from the same company. I figured adding a layer that was no more then 1mm thick would be fine. But No!!!

For some stupid reason these products work quite fine separately. But when used together they turn cloudy. Why?!?! Aren't they meant to be used together? Apparently not. I figure I will give the water effects a few more days to dry and hope it turns clear. Otherwise I will add one more layer of water and simply tint it brown to cover the cloudiness. I'm running out of tire. Soon it won't be there anymore.
One last thing. I was thinking of adding a spare wheel to the turret. How are these mounted? Are they attached using bolts? I'm pretty sure it isn't just tossed on. I noticed some "bolts" on the roof that might be used. Any body out there know?

I think I saw a post a while ago asking the same question but I can't seem to find it.
Well I was hoping to be done by now but with repainting the turret and the water being difficult I guess you guys will have to wait till next week. I work Friday through to Sunday so I'll be back Monday with more pics hopefully.
By the way I like emoticons.


-Matt
To replicate the dust that collects in the anti slip coating I once again turned to my Mig pigments. Only instead of a thin wash I used a medium sized brush and just dabbed the powder on in a random pattern. I used a mix of roughly 70% ashes white and 30% Gulf War sand. This helps give the impression people with dirty, dusty boots have been walking on the turret. After the powder is applied the excess is blown off and the remaining powder is gently blended by the same brush. Don't over blend or you will lose the contrast and it will all become one colour. We're looking to add some variety and make the one colour camo interesting. And only use small amount of pigments. It's easier to add then it is to remove. Believe me I know. Oddly enough as nice as the turret looks I think the effect came out much better on the hull. Which is a little irritating because you will hardly see any of it. I'll have to build an Abrams with it's turret turned.
This is exactly the effect I was going for. Which doesn't happen often enough. Ha.
As you may have noticed a few more details have gone on to the turret. Several ammo boxes (both 12.7mm and 7.62mm) have been added. They come from about 4 different companies so I had to place them in a way that the subtle detail differences would be less obvious. The open boxes are from Eduard.
Various items located on the turret received some weathering via pigments. The Cooler, boxes, drink containers, and even the duffle bags received some dust. I didn't forget, Joe!
I even figured out why the Commander looks so ticked off. He was thirsty! Let's give him a drink.
And since Grunt finished his tour and went home, he gave his trusty M-4 to the Cmdr. You'd think he'd at least crack a smile.
Apparently the Cmdr has been firing off his gun as well because I just noticed some spent brass lying around.
Courtesy of Mission Models. Follow the white arrows.The can of "Pepsee" is from Accurate Armour which provides decals for the resin cans.
To weather the crew tent I mixed more pigments with some tap water. This was painted on and left to dry. On thing to note is that the pigment will dry much lighter as compared to when it is wet. After it has dried the excess is removed with a q-tip and my finger. To help blend the edges I lightly went over the tent with a soft brush.
The tent that I saw in a real picture was much dustier but I figured it matched my tank as is.
Since repainting a large portion of the turret roof I was concerned that the turret colours may no longer match the hull. What do you guys think. Does everything look like it "fits"?
I hope it all matches because I ain't redoing it again.
Ok. Back to the water. To add some subtle ripples I thought I would use Woodland Scenics water effects. The water already in place was fully cured and even comes from the same company. I figured adding a layer that was no more then 1mm thick would be fine. But No!!!
For some stupid reason these products work quite fine separately. But when used together they turn cloudy. Why?!?! Aren't they meant to be used together? Apparently not. I figure I will give the water effects a few more days to dry and hope it turns clear. Otherwise I will add one more layer of water and simply tint it brown to cover the cloudiness. I'm running out of tire. Soon it won't be there anymore.
One last thing. I was thinking of adding a spare wheel to the turret. How are these mounted? Are they attached using bolts? I'm pretty sure it isn't just tossed on. I noticed some "bolts" on the roof that might be used. Any body out there know?
I think I saw a post a while ago asking the same question but I can't seem to find it.
Well I was hoping to be done by now but with repainting the turret and the water being difficult I guess you guys will have to wait till next week. I work Friday through to Sunday so I'll be back Monday with more pics hopefully.
By the way I like emoticons.
-Matt
Epi
Joined: December 22, 2001
KitMaker: 3,586 posts
Armorama: 2,556 posts

Posted: Thursday, February 28, 2008 - 07:09 PM UTC
I was going to wait till you where completely done to leave my comments, but since you asked a question, I guess I will answer it since i know the answer. Yes, the road wheel is mounted using at least one of those bolts. A longer one is replaced where the original came out of to make up the difference in the space of the road wheel rim.
So get back to work so i can collect all your pictures when your finally done for my references!
So get back to work so i can collect all your pictures when your finally done for my references!

f1matt
Joined: August 13, 2006
KitMaker: 1,021 posts
Armorama: 805 posts
Posted: Thursday, February 28, 2008 - 08:18 PM UTC
Quoted Text
So get back to work so i can collect all your pictures when your finally done for my references!
Yes SIR!
And thanks for the answer.
-Matt

18Bravo
Joined: January 20, 2005
KitMaker: 7,219 posts
Armorama: 6,097 posts
Posted: Friday, February 29, 2008 - 01:28 AM UTC
Here's the rubber strip. There's one on each of the three rearmost armor plates. I can't tell if the kit has the metal strip that attaches it, but if not, I'd be surprised if it hasn't been done in PE.

Here are those welded on numbers. The photo you posted of the turret number looks more "hand done" than the hull ones, and thus more correct.

It's looking great. If I thought I could get one in time, I'd start one here.
Here are those welded on numbers. The photo you posted of the turret number looks more "hand done" than the hull ones, and thus more correct.
It's looking great. If I thought I could get one in time, I'd start one here.
18Bravo
Joined: January 20, 2005
KitMaker: 7,219 posts
Armorama: 6,097 posts
Posted: Friday, February 29, 2008 - 01:50 AM UTC
I was looking at Lufkey's build, another great one by the way, when I noticed something odd. Dragon seems to have indeed included the metal strips on the rear armor, but APPARENTLY botched it, and put it inboard rather than outboard. Lufkey's photos show the strip on the kit armor against the hull, as opposed to this:

f1matt
Joined: August 13, 2006
KitMaker: 1,021 posts
Armorama: 805 posts
Posted: Tuesday, March 04, 2008 - 12:49 PM UTC
Great pictures 18 Bravo. I've decided I won't worry about detailing the rubber strip.....on Boom Stick. I'll be sure to add it to "Yet to be Named Abrams". The close up of the rear deck was interesting too. The anti slip coat isn't nearly as even as I thought it was. Guess I should sand it off Boom Stick and re-do it. Maybe not. I guess I can live with it. The quality of those pictures are amazing. A lot of small details I'm making notes of for the next one.
So the water is sloooooooowly looking better. Here are a couple shots to compare. The first was taken last week.
And this one was taken last night. As you can see the cloudiness is going away. I think I will just leave it as is and hope it turns out. I think it looks much more interesting with the small ripples.

Okay so the other part of the tank I had to repair along with the roof was the road wheels. These were repainted. In the case of the green wheels the paint was stripped off and completely re done. After a base coat of NATO green (which was painted a slightly different shade on each wheel, not that you can tell now ) A thin wash of white oil paint went on. This would help guide me when painting the silver. Thanks again 18 Bravo. The silver band is now wider.

I broke out the trusty Testors silver and my new 18/0 brush.

Here are the wheels at different stages of painting.

And the finished wheels after a coat of Mig pigments, paint chips and other detail painting. the wheel hubs are glued back on too.

I used some Mig light brick dust to weather the wheels because the earth on the diorama has a slight pinkish hue to it and this helps the wheels match the base. The Mig pigments were mixed with water and applied like a wash. Only when dry they return to a powder like state. This lets you remove the excess with a q-tip and blend in the remaining pigments with a soft brush.

I think I need to work more on the sand coloured wheels. They look kinda boring in comparison to the rest of the tank. Maybe some dry brushing for added depth and a few chips here and there.


The barrel tip needed some attention too. To match my references small chips were added. Various greens, and rust colours were used. The inside of the barrel was painted a dark greenish brown colour. And to finish it off a little Testors silver was dry brushed around the inside rim of the barrel.

More pigment washes were applied to the track width mine plow to dust it up to match the rest of the vehicle. Pigment washes are great for getting dust into all those fine recesses and corners where it would naturally build up.

I figured to help fill the large open area on the top front of the turret a spare wheel and drive sprocket could go on. A very common sight on these tanks. I made my own nut and bolt to hold the wheel in place. It looks ok but I think the nut is a little to big.

A hole was drilled into the turret roof where the bolt would go (see last update). Nothing has been glued in place in case I somehow screwed up the location of the wheel. Also I can make a better nut and bolt to replace my first one with no problem.


Some damage on the tire was created by carving away the excess plastic with an x-acto knife. To make it easier, I outlined the damage with a sharpie first.
And that's where I'm at right now. So how can I make my nut and bolt better? Should the nut be smaller? Any recommended colours? Silver seems a little too bright. Maybe dark grey and rust?
-Matt
Maybe not. I guess I can live with it. The quality of those pictures are amazing. A lot of small details I'm making notes of for the next one.So the water is sloooooooowly looking better. Here are a couple shots to compare. The first was taken last week.
And this one was taken last night. As you can see the cloudiness is going away. I think I will just leave it as is and hope it turns out. I think it looks much more interesting with the small ripples.
Okay so the other part of the tank I had to repair along with the roof was the road wheels. These were repainted. In the case of the green wheels the paint was stripped off and completely re done. After a base coat of NATO green (which was painted a slightly different shade on each wheel, not that you can tell now
) A thin wash of white oil paint went on. This would help guide me when painting the silver. Thanks again 18 Bravo. The silver band is now wider. I broke out the trusty Testors silver and my new 18/0 brush.
Here are the wheels at different stages of painting.
And the finished wheels after a coat of Mig pigments, paint chips and other detail painting. the wheel hubs are glued back on too.
I used some Mig light brick dust to weather the wheels because the earth on the diorama has a slight pinkish hue to it and this helps the wheels match the base. The Mig pigments were mixed with water and applied like a wash. Only when dry they return to a powder like state. This lets you remove the excess with a q-tip and blend in the remaining pigments with a soft brush.
I think I need to work more on the sand coloured wheels. They look kinda boring in comparison to the rest of the tank. Maybe some dry brushing for added depth and a few chips here and there.
The barrel tip needed some attention too. To match my references small chips were added. Various greens, and rust colours were used. The inside of the barrel was painted a dark greenish brown colour. And to finish it off a little Testors silver was dry brushed around the inside rim of the barrel.
More pigment washes were applied to the track width mine plow to dust it up to match the rest of the vehicle. Pigment washes are great for getting dust into all those fine recesses and corners where it would naturally build up.
I figured to help fill the large open area on the top front of the turret a spare wheel and drive sprocket could go on. A very common sight on these tanks. I made my own nut and bolt to hold the wheel in place. It looks ok but I think the nut is a little to big.
A hole was drilled into the turret roof where the bolt would go (see last update). Nothing has been glued in place in case I somehow screwed up the location of the wheel. Also I can make a better nut and bolt to replace my first one with no problem.
Some damage on the tire was created by carving away the excess plastic with an x-acto knife. To make it easier, I outlined the damage with a sharpie first.
And that's where I'm at right now. So how can I make my nut and bolt better? Should the nut be smaller? Any recommended colours? Silver seems a little too bright. Maybe dark grey and rust?
-Matt

sgtreef
Joined: March 01, 2002
KitMaker: 6,043 posts
Armorama: 4,347 posts
Posted: Tuesday, March 04, 2008 - 02:06 PM UTC
First lost track of this build but Gosh darn it this is Sweet a fine job on everything so far.
Can't wait to see what else you come up with Matt.
Suggestion on the bolt is grandt line or one of those other companies that make them resin nuts and bolts.
I think Legends and Verlinden and calibre 35 does also I think.
Good luck and as Pete said a good save coming up.
Can't wait to see what else you come up with Matt.
Suggestion on the bolt is grandt line or one of those other companies that make them resin nuts and bolts.
I think Legends and Verlinden and calibre 35 does also I think.
Good luck and as Pete said a good save coming up.
f1matt
Joined: August 13, 2006
KitMaker: 1,021 posts
Armorama: 805 posts
Posted: Tuesday, March 04, 2008 - 06:29 PM UTC
Hey Jeff. Welcome back. I wanted to see if I could scratch build a decent enough looking nut and bolt first. But I think I will get an after market item. It is such a visible detail it better look the part. I realize in a diorama not every detail has to be perfect since it is about the overall view but when people start looking close I still want it to look the best it can.
-Matt
-Matt

sinBAD

Joined: May 12, 2006
KitMaker: 15 posts
Armorama: 14 posts

Posted: Wednesday, March 05, 2008 - 10:24 AM UTC
Hi Matthew,
Excellent job man,I can't wait to see it finished,hope it will be soon
I have question for you and I'm sorry if I repeat to ask the same question but what is the main color of the M1A1, cause I tried to use tamiya's XF-59 and it was the best choice for me.
Thanks man and keep up the good work.
C U
Excellent job man,I can't wait to see it finished,hope it will be soon
I have question for you and I'm sorry if I repeat to ask the same question but what is the main color of the M1A1, cause I tried to use tamiya's XF-59 and it was the best choice for me.
Thanks man and keep up the good work.
C U
18Bravo
Joined: January 20, 2005
KitMaker: 7,219 posts
Armorama: 6,097 posts
Posted: Wednesday, March 05, 2008 - 07:05 PM UTC
Quoted Text
Great pictures 18 Bravo. I've decided I won't worry about detailing the rubber strip.....on Boom Stick. I'll be sure to add it to "Yet to be Named Abrams". The close up of the rear deck was interesting too. The anti slip coat isn't nearly as even as I thought it was. Guess I should sand it off Boom Stick and re-do it.
I think I need to work more on the sand coloured wheels. They look kinda boring in comparison to the rest of the tank. Maybe some dry brushing for added depth and a few chips here and there.
Matt,
The water looks great, and the little improvements are really making the tank a show stopper. I'm not pleased with the kit's anti-slip coating either, but it would certainly be a major undertaking to remove it all without losing any detail. Didn't one version (Tamiya?) come without it? I would almost prefer a Dragon Turret/Tamiya Hull kitbash if that's the case. Unless of course Tamiya's hull is no good. Any thoughts?
ETA: Just read the Canadian Leo thread, and the post about using Rustoleum textured paint . In my opinion, there's no way no get the real look with that. Perhaps on a Paladin or similar vehicle that uses precut, uniformly textured panels. Even then, I think wet/dry sandpaper works better, and use that.
This is by no means a highjack (who could hijack a thread about such a good looking tank?) but I thought I would (again) post the anti-slip on my Merkava. I use finely sifted sand, embedded into thinned white glue or paint.
As for the wheels, the real ones are decidedly boring as well. The side with the green replacement wheels has a lot of visual interest already. I'd go with perhaps one blown seal on that side, and maybe two on the other side. I'd make one of them more extreme, with straight lines of oil streaking from the hub, radiating out, as if it blew while the wheels were rotating at a high rate of speed. This is a shot of a less extreme one, but interesting nonetheless:

Can't wait to see more.
18Bravo
Joined: January 20, 2005
KitMaker: 7,219 posts
Armorama: 6,097 posts
Posted: Friday, March 07, 2008 - 01:07 AM UTC
Quoted Text
Great pictures 18 Bravo...
So how can I make my nut and bolt better? Should the nut be smaller? Any recommended colours? Silver seems a little too bright. Maybe dark grey and rust?
-Matt
Thanks. Yes, it could be a little smaller, but more importantly, it needs to be changed.
Right now you have a nut threaded on to a bolt protruding from the turret. In actuality, it's a bolt threaded into the turret top. So all you will see is the bolt head.
As for the color, try a 1:2 mix of gold and aluminum until you get what you want. It will not rust by the way.
Looking good!

Tankrider
Joined: October 07, 2002
KitMaker: 1,280 posts
Armorama: 1,208 posts
Posted: Friday, March 07, 2008 - 12:38 PM UTC
18 Bravo,
I gave Matt the tip on the brown/od stripes on the CIP. If you have your tanker buddies turn their CIP to the "on" position you will see the brown no power thermal tape that Matt is representing.
Matt,
Use a Grandt Line nut & washer casting and use a yellowish silver color on it, to represent the cadium plating. You cna throw some empty soda cans, MRE trash or a couple of kevlars in the wheel for some additional visual interest...
John
f1matt
Joined: August 13, 2006
KitMaker: 1,021 posts
Armorama: 805 posts
Posted: Friday, March 07, 2008 - 08:25 PM UTC
Thanks John. I'm going to go hunting at a few hobby shops today to see if anyone carries something I can use for the nut/washer and bolt. And I have several water bottles and cans of coke I can toss around the tank. I was thinking of adding one more interesting item too.
Hello 18 bravo. I agree about the non-slip coat. it's just too even. I think the technique with gluing fine sand would work the best as it gives you so much control. I know the Tamiya kits don't have a non-slip coat. Maybe a kit bash is in my future? Don't be surprised if it happens.
I did add one blown seal to the "plain jane" side. I basically just tried to make an exact copy of the picture you posted. And to help make all of the sand coloured road wheels more interesting I decided to highlight all of the bolts with pure Polly S hopper car beige. It acts like a highlight and gives the wheels a more 3-D look. I suppose it woks along the same lines as "colour modulation". And if you have more interesting detail shots please keep them coming. I'm learning something every time I see one.
And now an update as to where I'm at.
The base.......DONE! Hurray. The water still isn't 100% clear but I'm just going to have to live with how ever it looks now.
And as far as Boom Stick herself.........so close, but not quite. All I need is that little bolt and she's done. Later on today I think I'm going to permanently add the tank to the base, add the figs and re-attach the razor wire and antennas. I'll take some pictures later on today.
I've got a little more work to do!
-Matt

slodder
Joined: February 22, 2002
KitMaker: 11,718 posts
Armorama: 7,138 posts
Posted: Friday, March 07, 2008 - 11:37 PM UTC
G O L D
So much detail, so much work. Im glad the water is clearing up. I'd hate to have to go backward on the base at all.
So much detail, so much work. Im glad the water is clearing up. I'd hate to have to go backward on the base at all.

Epi
Joined: December 22, 2001
KitMaker: 3,586 posts
Armorama: 2,556 posts
Posted: Saturday, March 08, 2008 - 06:48 AM UTC
It's about time Matt!!!!!!!! Clearing some space and making a folder on my computer for your pictures buddy!
You have inspired me to get back to my AIM and A2 Abrams with all this work you have done. Once I finish doing the reviews on the AFV IDF Shot and Real Models M1127 RV and the Trumpeter Stryker, I am going to get back to my Abrams and hope they turn out as good as yours!
Clearing some space and making a folder on my computer for your pictures buddy! You have inspired me to get back to my AIM and A2 Abrams with all this work you have done. Once I finish doing the reviews on the AFV IDF Shot and Real Models M1127 RV and the Trumpeter Stryker, I am going to get back to my Abrams and hope they turn out as good as yours!
f1matt
Joined: August 13, 2006
KitMaker: 1,021 posts
Armorama: 805 posts
Posted: Sunday, March 09, 2008 - 03:53 PM UTC
Okay so it's not quite done. There is still some tweaking to be done. But it's real close. I'd say about 99.98% done. Almost.
I've added a few extra cans of pop and some water bottles.

So I went out and eventually found some Grandt Line nuts and bolts. They even have washers.

In that shot you can also see a can of Sprite in the wheel. The empty smoke discharger has some sky painted in it.
Oh, you can't quite make out the nut/bolt detail? Here you go.

The nut was sprayed Model Master brass for the anodized look and the rest is good old Testors silver again.
To go with the spent .50 cal brass lying around I made up some spent cartridge links that also come from Mission Models.

To make them more "workable" they were annealed with a candle. This softens the metal. Too bad I got a drop of water on the map. You could have been reading it now.

Oh and I finally figured out a quick way to give the wheels a little more depth. Simple highlights by painting the wheel bolts pure Polly S hopper car beige.

One of the sand coloured wheels received some extra attention. I copied the picture of a blown out seal as best I could.

And if you follow the arrows you will see some of the hubs were painted silver in the center. Some were more rusty. Others are just covered in dust. This adds a little variety.
The full bodied tanker from Alpine received some dust on his goggles. The excess was wiped off with my finger. I almost forgot to give him a cigarette. The way he has his hand positioned it just makes sense. To me anyway.


Anyone notice the upside down can of Sprite? Well I didn't notice because till now I couldn't read the darn thing. And for anyone making home made decals go easy on the protective clear spray. As you can see if you add to much the decal will be very thick. Now I know.
And here it is all together. Remember she's only really very almost done. But everything you see is now glued on and staying put.
Drum roll please.

I present a nearly complete..........
Boom Stick! Ta-da!

I'm not hearing any applause. To be honest I didn't hear the drum roll either.
Okay so here she mostly is.


Hopefully later on this week I will take her to a friend's place for a proper photo shoot. With a proper camera.
One thing I still want to add to the base is a symbol of the 64th armoured. So here comes one more custom decal.
 .
.
I'm only using one in case anyone is wondering.
And here is one more shot of the flag. The inspiration for this whole mess.

Well next time I post in this thread it should all be 100% done. See you then.
-Matt
Almost. I've added a few extra cans of pop and some water bottles.
So I went out and eventually found some Grandt Line nuts and bolts. They even have washers.
In that shot you can also see a can of Sprite in the wheel. The empty smoke discharger has some sky painted in it.
Oh, you can't quite make out the nut/bolt detail? Here you go.
The nut was sprayed Model Master brass for the anodized look and the rest is good old Testors silver again.
To go with the spent .50 cal brass lying around I made up some spent cartridge links that also come from Mission Models.
To make them more "workable" they were annealed with a candle. This softens the metal. Too bad I got a drop of water on the map. You could have been reading it now.
Oh and I finally figured out a quick way to give the wheels a little more depth. Simple highlights by painting the wheel bolts pure Polly S hopper car beige.
One of the sand coloured wheels received some extra attention. I copied the picture of a blown out seal as best I could.
And if you follow the arrows you will see some of the hubs were painted silver in the center. Some were more rusty. Others are just covered in dust. This adds a little variety.
The full bodied tanker from Alpine received some dust on his goggles. The excess was wiped off with my finger. I almost forgot to give him a cigarette. The way he has his hand positioned it just makes sense. To me anyway.
Anyone notice the upside down can of Sprite? Well I didn't notice because till now I couldn't read the darn thing. And for anyone making home made decals go easy on the protective clear spray. As you can see if you add to much the decal will be very thick. Now I know.
And here it is all together. Remember she's only really very almost done. But everything you see is now glued on and staying put.
Drum roll please.
I present a nearly complete..........
Boom Stick! Ta-da!
I'm not hearing any applause.
To be honest I didn't hear the drum roll either. Okay so here she mostly is.
Hopefully later on this week I will take her to a friend's place for a proper photo shoot. With a proper camera.
One thing I still want to add to the base is a symbol of the 64th armoured. So here comes one more custom decal.
. I'm only using one in case anyone is wondering.
And here is one more shot of the flag. The inspiration for this whole mess.
Well next time I post in this thread it should all be 100% done. See you then.
-Matt
slodder
Joined: February 22, 2002
KitMaker: 11,718 posts
Armorama: 7,138 posts
Posted: Monday, March 10, 2008 - 12:08 AM UTC
WHAT - Done, can't be? You have to start a new one so I can see more diorama brilliance.
Super job, can't wait to give this a home in a build feature or On Display feature.
Super job, can't wait to give this a home in a build feature or On Display feature.

GVoakes
Joined: September 04, 2007
KitMaker: 193 posts
Armorama: 132 posts
Posted: Monday, March 10, 2008 - 01:54 AM UTC
I don't know, Matt. It still looks incomplete. Shouldn't you add some flies buzzing around the tankers
seriously - amazing job!
seriously - amazing job!

wastegas
Joined: October 07, 2006
KitMaker: 69 posts
Armorama: 58 posts
Posted: Monday, March 10, 2008 - 07:51 AM UTC
WOW!
I'm speachless.

I'm speachless.
 |

WEB HOSTING BY


Copyright ©2021 Armorama and Kitmaker Network, a subsidiary of Silver Star Enterprises
All Rights Reserved. Please read our Conditions of Use and Privacy Policy.
All Rights Reserved. Please read our Conditions of Use and Privacy Policy.