Dioramas
Do you love dioramas & vignettes? We sure do.
M1A1 Abrams "BOOM STICK"
f1matt
Visit this Community
Manitoba, Canada
Joined: August 13, 2006
KitMaker: 1,021 posts
Armorama: 805 posts
Posted: Saturday, October 13, 2007 - 06:50 PM UTC
@ Grant - Will try to make it Monday but with work you never know. I will try to have this thing all done in time for November's meeting. I promise you will see it in person.

@ Lucas - I will see what I have decal wise. Maybe if my printer is up to it I can maybe make my own.

Alex, Scott, Yufkey and everyone else. Thank you again for the positive support. I think I will try installing some of that grass I painted today.

f1matt
Visit this Community
Manitoba, Canada
Joined: August 13, 2006
KitMaker: 1,021 posts
Armorama: 805 posts
Posted: Sunday, October 14, 2007 - 01:47 PM UTC
The grass that I painted in the previous update was put to work today. Cut off some of the grass, dip one piece in some white glue and place the grass in the hole. Repeat about 500 times. I don't know how many holes I actually drilled but it took several hours to do.


Glad it's done. Course I still have to install an even larger amount of tall grass on the opposite corner. Next step will be trying water for the first time. Getting it all around the grass will be interesting.


f1matt
Visit this Community
Manitoba, Canada
Joined: August 13, 2006
KitMaker: 1,021 posts
Armorama: 805 posts
Posted: Tuesday, October 16, 2007 - 03:03 PM UTC
Time to start the water. I don't want to do more tedious grass just yet. I am using a product called Water Effects from Woodland Scenics. I found it at the local railroad hobby shop and thought why not.


It goes on very thick.


It has begun to harden already (applied a few hours ago), but since I applied a very thick layer it may take two or even three days to become nice and clear all the way through. I don't know if you could tint it like other water effect products so I will simply paint the water when it has dried fully. Then I will apply another layer of "water".


It is so thick I simply wiped off the excess along the edge and left it as is. There is no border to hold the water in place. Interesting stuff. Hope it turns out.

DCJnr123
Visit this Community
Arizona, United States
Joined: May 07, 2007
KitMaker: 51 posts
Armorama: 49 posts
Posted: Tuesday, October 16, 2007 - 05:42 PM UTC
I didnt realize it was for doing a whole water scene, I thought it was for waves........
David
f1matt
Visit this Community
Manitoba, Canada
Joined: August 13, 2006
KitMaker: 1,021 posts
Armorama: 805 posts
Posted: Tuesday, October 16, 2007 - 06:16 PM UTC
Well David we are going to find out. Fingers crossed.
slodder
Visit this Community
North Carolina, United States
Joined: February 22, 2002
KitMaker: 11,718 posts
Armorama: 7,138 posts
Posted: Tuesday, October 16, 2007 - 10:22 PM UTC
The green really makes the base come alive. I'm watching that water.....
f1matt
Visit this Community
Manitoba, Canada
Joined: August 13, 2006
KitMaker: 1,021 posts
Armorama: 805 posts
Posted: Wednesday, October 17, 2007 - 08:31 PM UTC
Me too Scott. It is very slowly turning clear. Very slowly. But as long as it gets there eventually that's all that matters.

I spent a few hours designing some decals for my TC's star studded helmet. Haven't applied them yet but they should look good once on. The stars will look better than simple dots of white paint. If you look close enough anyway. They are ludicrously tiny. Each star is only about .25 mm across. Makes me wonder what other custom decals I could make? I did see a picture of a tanker with his nickname and other graffiti painted on his helmet. Maybe I could try that.

Mmmm.

Interesting.


Yoni_Lev
Visit this Community
Washington, United States
Joined: September 20, 2007
KitMaker: 861 posts
Armorama: 394 posts
Posted: Thursday, October 18, 2007 - 05:55 PM UTC
The grass looks great, and it really adds some nice color to the base.

The tanker helmets are just awesome. And Goat and Dog look like they're coming along, too. Keep up the good - and inspiring - work.


-YL
f1matt
Visit this Community
Manitoba, Canada
Joined: August 13, 2006
KitMaker: 1,021 posts
Armorama: 805 posts
Posted: Sunday, October 21, 2007 - 06:51 PM UTC
Thanks Yoni. Well progress has been slow but here is what has been going on lately.

I present Dog. I think he turned out pretty good. First try!!!


Goat is all done too.


She can be difficult to work with sometimes.

I think she may have a drinking problem.

So the water. Guess I got greedy trying to apply such a thick layer. I managed to remove the offending layer with relatively little damage to the base. A new creek bed of Celluclay was just put down. I will try the same product again only I will apply much thinner layers.


Got started on some more stowage.


And I re-painted the TC's helmet. Come on you shouldn't be surprised by now. Actually you guys are probably surprised I have completed models on the shelf. Only a few but they do exist. I tried to only remove the paint on his helmet without damaging his face but no luck. Oh well. I am quickly becoming experienced at painting faces. After removing the paint a new white base coat is applied. The lines are once again drawn on with a pencil. Only this time I mask off the white areas. With extremely thin strips of tape.

Spray some Tamiya flat red.

And remove the mask. He looks kinda po'd now doesn't he? He wants to go in his tank already!

Much better. A little touching up and we apply a new flesh base color. A coat of gloss will go on next in preparation for my decal which will be a strip of blue down the center with white stars. Hopefully will get that on sometime tomorrow.


It sure is neat (although somewhat time consuming) to be able to make your own decals. It takes a while to draw the art needed for printing but the results are one of a kind.Unless you print two of course.

More soon I hope.
KoOkiE
Visit this Community
West-Vlaaderen, Belgium
Joined: April 11, 2007
KitMaker: 2,625 posts
Armorama: 154 posts
Posted: Sunday, October 21, 2007 - 07:43 PM UTC
hey, i've been reading through the thread, and must say you've done a fine job so far. interesting too to see the things you try out for this dio, you remind me of myself

if you want, this is a link to an article i wrote on painting faces with oils, based on a tutorial i found on the kitmaker network. the english version is here, and the dutch article i wrote can be found here. i'ld suggest you read the english one and look at my article for a nice example of each step, since the original poster didn't take pics of his example between steps and i did.
this is the end result of this technique:

might i add, this was only the third face i ever painted with oils, and the 4th face i painted ever. this tutorial opened up a portal for me, and gave me the oportunity to finish heads like i hoped to do.
hope it helps.
good luck!
f1matt
Visit this Community
Manitoba, Canada
Joined: August 13, 2006
KitMaker: 1,021 posts
Armorama: 805 posts
Posted: Sunday, October 21, 2007 - 08:45 PM UTC
Thanks for looking Steven, I'm a fan of your work too. Loved your recent Firefly diorama. The technique you use for painting faces is similar to what I have tried. I just need to keep practicing. I am pretty sure I know where and what paint to apply. it's just a matter of getting better at actually applying the paint and getting better at blending in such tiny spaces. I have a lot of respect for figure painters. Especially guys (and gals) who work in tiny 1/35. Well it's tiny for figure painting anyway.


One thing I like about posting pictures of my work online is it gives me a chance to really look up close and personal at what I have done. I can see if I have missed anything or if something didn't quite turn out right. My digital camera is now my worst critic. And if it looks good in these big pictures where say the figure is 5 times bigger than in real life. You know it'll look great in person.

DeskJockey
Visit this Community
Virginia, United States
Joined: July 17, 2006
KitMaker: 1,558 posts
Armorama: 1,159 posts
Posted: Monday, October 22, 2007 - 12:51 PM UTC
Matt--I think Dog and Goat came out looking pretty good, although Goat's balance issues might merit the wire-through-the-hoof treatment for when she goes on the base...

By the way, what are you using to strip off the oil paints on your figures? Whatever it is, it seems to do a great job without harming the detail.
f1matt
Visit this Community
Manitoba, Canada
Joined: August 13, 2006
KitMaker: 1,021 posts
Armorama: 805 posts
Posted: Wednesday, October 24, 2007 - 03:45 PM UTC
Hi Lucas. I use Easy Off oven cleaner to strip off unwanted layers of paint. Works like a charm and doesn't damage what you're working on. Not sure about clear plastic though.

Anyway, Let's see what I've been up to. Ah yes. Home made decals. I spent quite a while drawing the art for my decals on Photoshop. One pixel at a time. For some reason the black ink is more durable than colored ink. I discovered this when after printing my decals I sprayed a clear coat over them. The black held up relatively fine but the blue (which had printed off perfectly) simply became a blue blur. It took a few tries and the decals did still bleed a little when I applied the clear coat, so this is the best that they're going to be. Unfortunately even a little bit of ink bleed makes an impact when the decals are so freaking tiny.

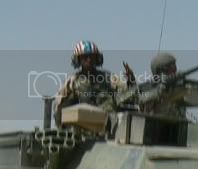
First the stars for the TC.

Again not as sharp as before the clear coat but without one they would disintegrate in the water. And here they are on the helmet.
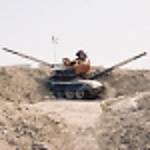
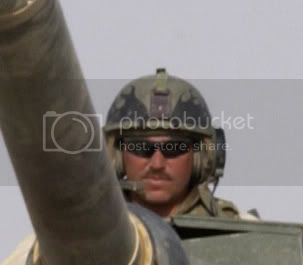
First the real thing.

Now my attempt. Well third really.


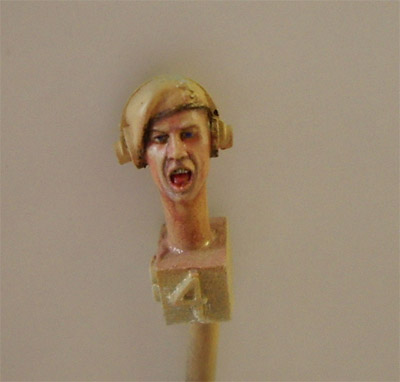
He still needs his bottom lip painted and his helmet strap added. Almost ready to go on his body.
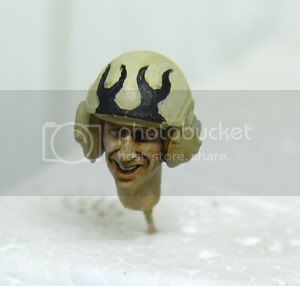
Next. The flames!


As you can see from the real helmet they were not painted the same on each side so I copied this.

My helmet is sand colored instead of green to help the flames stand out more.


I really love how his face turned out. Great expression too. These Hornet heads are simply the best out there. And this is how good they look when they are painted by someone with little experience. I think these flames are much better than my first attempt.


And finally the most intricate decal so far. This was inspired by a photo from the book Thunder Run published by Concord. A tanker had written "wild bunch" on his helmet and, well, again I couldn't resist. Again I used Photoshop to draw the artwork one pixel at a time. Actually the first decal I printed was too small! I printed another. Here it is.

Tiny huh.

Keep in mind this was the enlarged version. I tried to copy the original as best I could. It came out prtty close. Unfortunately there was a little color bleed. Not as bad as the stars but Like I said it doesn't take much.


I see he needs some touch up painting. None of the heads have received a flat clear coat yet so they are still a little shiny.

What else. Soldier got some camo to help blend in with the crowd. His vest needs another coat. I have seen vests with this color so I think it's accurate. Whether they are the exact same type of vest I am not sure.


Glued on some stowage. The packs with dust covers are very nice pieces from Legend. One (not used here but will save for my next M1) even comes with a bullet hole. A neat little detail. They were painted with a Model Master sand color and Humbrol for the other camo colors. Hi-lighting was done by mixing the base colors with white oil paint. Shading was by mixing the base colors with raw umber oil paint.


The creek bed got a fresh layer of dark brown paint. Over this went a very thin coat of the Woodland Scenics Water Effects. I am applying it about 1mm at a time.

And after about eight hours it looks like this.

The bottle says it takes a full 24 hours to dry so hopefully it will all be nice and clear tomorrow. I think it will take about six coats in total.

See you guys later.


Yoni_Lev
Visit this Community
Washington, United States
Joined: September 20, 2007
KitMaker: 861 posts
Armorama: 394 posts
Posted: Wednesday, October 24, 2007 - 08:14 PM UTC
Wow...those finished helmets sure do look neat. I agree, the final version of the flamed helmet looks better than the first, but there's no way I would have had the patience to re-do it. And that "Wild Bunch" decal is off the hook. Man, that's some tiny detail. It hurts my eyes to even think about it.

Goat and Dog look great, too. And it's nice to see that Soldier is sporting some DCUs.

As usual, great work.


-YL
JeepLC
Visit this Community
Virginia, United States
Joined: June 20, 2007
KitMaker: 510 posts
Armorama: 469 posts
Posted: Thursday, October 25, 2007 - 02:35 AM UTC
That is all looking apsolutely stunning! I am glad you repainted the helmets. they look much better now. I definately do not have the partience for that sort of a redo.

-Mike
f1matt
Visit this Community
Manitoba, Canada
Joined: August 13, 2006
KitMaker: 1,021 posts
Armorama: 805 posts
Posted: Thursday, October 25, 2007 - 06:06 PM UTC
I'm not sure if it's patience or if I'm simply being stubborn! I do go through a lot of Easy-Off oven cleaner though. An interesting element for many of my models. Thanks for the comments Mike and Yoni. I really do enjoy your feedback and I would love to hear any more ideas you guys may have. Time to apply another coat of "water".

johnlinford
Visit this Community
England - South West, United Kingdom
Joined: October 28, 2006
KitMaker: 203 posts
Armorama: 195 posts
Posted: Friday, October 26, 2007 - 09:07 AM UTC
The stowage you have done so far looks really good , I look forward to seeing more of this , almost do'nt want it to end
take your time eh
DeskJockey
Visit this Community
Virginia, United States
Joined: July 17, 2006
KitMaker: 1,558 posts
Armorama: 1,159 posts
Posted: Friday, October 26, 2007 - 03:10 PM UTC
Nice job on the helmets! The stars came out real well, despite the bleeding (does your printer have colorfast inks? If so, you might want to try buying a cartridge and experimenting). The flames are very cool, as is the graffiti.

As for Soldier, the tan vest is only used by the U.S. Marines (AFAIK), so you may want to try a Woodland scheme instead (unless you intend to make him a Marine).
f1matt
Visit this Community
Manitoba, Canada
Joined: August 13, 2006
KitMaker: 1,021 posts
Armorama: 805 posts
Posted: Friday, October 26, 2007 - 04:52 PM UTC
You couldn't be more right about the vest Lucas. I completely forgot that it is used by the Marines,and not the Army. Will paint some woodland camo on it now. To be honest though it is trickier to paint I like the look of the woodland camo. I am not sure what kind of inks my printer uses but I will investigate. Also I've discovered it's pretty fun making your own decals. Wouldn't be surprised if from now on every model I do has some kind of custom decal on it. Hopefully with experience they will only get better. I don't know what I'd do without you guys to help me out. Glad to know you all have my "six" covered.

Hey John. I won't bother rushing anything so I think this blog has a ways to go still. Loved what you did with this kit. Have you made any progress on your tank crew? Your gonna have to post some pics when they're done. And starting late next week my work schedule changes. This will give me the option of more time off and thus more time to get real work done. lol.

I ordered a different product for making water (also by Woodland Scenics). What I have isn't really meant for a whole scene (now I know) so I got something more appropriate. Guess I will focus on the other elements of the diorama. One thing about dioramas. They're is always something to do. Be it the base, figures, the model, etc, etc.

yufkey70
Visit this Community
Texas, United States
Joined: July 16, 2005
KitMaker: 264 posts
Armorama: 263 posts
Posted: Saturday, October 27, 2007 - 04:38 AM UTC
Eveythning you have done so far looks pretty amazing. Looking foward to seeing it when your done. For me, I just finished painting the the tracks for my M1A1. I should have some more picture by the end of this weekend. Keep up the good work
johnlinford
Visit this Community
England - South West, United Kingdom
Joined: October 28, 2006
KitMaker: 203 posts
Armorama: 195 posts
Posted: Saturday, October 27, 2007 - 08:52 AM UTC
I have not done much , been working , and of course being English i have been drinking far too much beer , but will post some weathering pics tomorrow if your interested
love this thread
john
bananaJOE
Visit this Community
Niedersachsen, Germany
Joined: July 12, 2007
KitMaker: 71 posts
Armorama: 68 posts
Posted: Wednesday, November 07, 2007 - 01:10 AM UTC
hey matt, how's it going with your diorama and "boom stick" ?

really amazed by the work you've put in this project

cannont wait to some progress

see you soon hopefully ^^

cheers Alex
f1matt
Visit this Community
Manitoba, Canada
Joined: August 13, 2006
KitMaker: 1,021 posts
Armorama: 805 posts
Posted: Wednesday, November 07, 2007 - 05:27 AM UTC
Been kinda busy with work lately but I have today off so I should have something to post soon Alex. I think I will work on the tank itself today. There are still a lot of small details to add.
f1matt
Visit this Community
Manitoba, Canada
Joined: August 13, 2006
KitMaker: 1,021 posts
Armorama: 805 posts
Posted: Wednesday, November 07, 2007 - 05:29 AM UTC
Well John, being Canadian I understand about the beer. I would love to see your latest pics.
RoelGeutjens
Visit this Community
Belgium
Joined: March 17, 2005
KitMaker: 410 posts
Armorama: 383 posts
Posted: Wednesday, November 07, 2007 - 07:30 AM UTC
Hey

Your boomstick is gonig the right way. Looks great so far. The update on the helmets look good better then before though! Keep us updated. I wonder what scene you are goning to display there

Cheers Roel