Dioramas
Do you love dioramas & vignettes? We sure do.
M1A1 Abrams "BOOM STICK"
DeskJockey
Visit this Community
Virginia, United States
Joined: July 17, 2006
KitMaker: 1,558 posts
Armorama: 1,159 posts
Posted: Wednesday, February 06, 2008 - 06:56 AM UTC
Wow!!! Both the razor wire and the battle board look excellent. Matt--I think when this one is finished you will have built the ultimate Abrams model.
ricknroll
Visit this Community
Oregon, United States
Joined: September 02, 2005
KitMaker: 39 posts
Armorama: 31 posts
Posted: Wednesday, February 06, 2008 - 10:22 AM UTC

Quoted Text


@ Rick Lawler. Is this THE Rick Lawler. The one who built Dragon's half-track with the most mind blowing etch set ever made? I must honestly say I was stunned when I first came across your v-blog. And just like yourself I read it start to nearly finished over at least a couple of hours. I enjoyed every minute. Still can't believe you managed to get everything lined up. There were just so many parts. Tough to find words to say how ga ga I was over that one. Not to mention your other works of art. Obviously I'm a big fan of yours and was thrilled to see you visit armorama for a change. My biggest hat certainly goes off to you as well. Keep 'em coming Rick

-Matt


Um, yep....it's me. That's quite the warm welcome, thanks-I'm quite humbled. Once again, congrats on a great looking build, I'll be looking forward to seeing it all put together on it's base.

take care,
Rick Lawler
SGTJKJ
#041
Visit this Community
Kobenhavn, Denmark
Joined: July 20, 2006
KitMaker: 10,069 posts
Armorama: 4,677 posts
Posted: Wednesday, February 06, 2008 - 03:47 PM UTC
As already pointed out this is the ultimate OIF Abrams model.

Thanks for sharing
f1matt
Visit this Community
Manitoba, Canada
Joined: August 13, 2006
KitMaker: 1,021 posts
Armorama: 805 posts
Posted: Wednesday, February 13, 2008 - 03:17 AM UTC
You guys are trying to make me blush. I will agree that it certainly is MY best Abrams so far. At least until the next one .

Okay, so lately I've been working on the base since that is the last major bit of work left to do. The tank and figures are all about 95% done so once the base is completed this should all go together fairly quickly.

Now as I typed before, I didn't want this to be another diorama where because it's Iraq it has to be all desert. Here is some of my inspiration.


My diorama was based more on this type of vegetation.


Who knew?


I bought a couple of grass products by Mininatur.


These are sheets of grass "tufts". They have grass on both sides of the sheet and you get enough for several projects. Using a pair of tweezers or even just your fingers, grab a few tufts of grass and stick it on the base. Done. The grass has a small amount of adhesive on it already so you just have to stick it on the base. I only glued them down if they were being difficult. At first I only added a few tufts of grass. But then I figured since I bought it I may as well use it and covered the base with grass. Some tufts were removed to help restore a patchy appearance to the grass. Also this helps hide the fact that the grass I used only comes in two different lengths. It is a little uniform looking but I can live with it. I tried trimming them with scissors but the grass resisted so it stays the way it is.

Tall prairie tufts summer. 6mm tall I think.


Tall prairie tufts spring. 4 or 5mm tall.


The base looked green but too uniform. To add some texture I used various grades of coarse foliage from Woodland Scenics. It is easier to use this stuff if you put them in a zip lock bag.


So now we have decent looking grass and weeds. A mixture of white glue, water and laundry detergent (breaks up the water tension) was sprayed on to secure the coarse foliage. It still doesn't look natural. :-(


The grass need to be painted to help blend the colours.


These paints were mixed together into three different shades and sprayed over the greenery. First dark green for shadows and then lighter tones for highlights. The tall grassy reeds on the bank were also in need of a touch up. In painting the sandy earth tones the grass looked dead and needed to be brightened up a bit. The water got some paint on it but since more layers of muddy water were to come it didn't really matter.

Well that looks better.


Of course now the earth need to be repainted. My earth colours.


Once again these were mixed into several shades and applied darkest to lightest. This took quite some time as you have to be very careful not to paint the grass. The earth was outlined around the grass and then filled in. All of these layers are fairly thin and act more like filters. Adjusting the colours and not changing them completely. This isn't very exciting to do and it takes a while but it beats the heck out of masking.

Hooray. The grass is green and the earth is earthy again.


The water has been making progress too.


First a wall was built up using layers of Woodland Scenics water effects. The wall is then filled in with the proper product this time around. Woodland Scenics realistic water.


To tint the water some WS realistic water is poured into a small bowl and tinted with Aircraft Colours RLM 81 braunviolett. A good dirty brown colour.

The idea was to have the water fairly clear so you could see down into it. This was why I wanted a clear wall to contain the water. But one layer was tinted too much so there was no longer a point to having a clear wall. I decided to paint the wall to match the rest of the base. Filler putty has gone on and been sanded. Some more work is needed but it's getting there.


So here's where I am at right now with the base. I need to finish up work on the corner. Add two more layers of water. Repaint the base black. And then I can start adding figs, animals and even a tank to the whole thing.


Oh and remember the Jeep? You may have noticed an old car wheel in the water. Well the Jeep did make it onto the diorama. Just in a more subdued role. The wheel was painted dark green and then some yellow, blue and rust went on to give it some history.

I can actually see light at the end of the tunnel!!!!!

-Matt
GVoakes
Visit this Community
Manitoba, Canada
Joined: September 04, 2007
KitMaker: 193 posts
Armorama: 132 posts
Posted: Wednesday, February 13, 2008 - 08:29 AM UTC
WOW! Fantastic work, Matt!

I`m really impressed with all the detail - this is obviously going to be another one of those builds of yours that you see something new every time you look at it!

By the way - where did you find the Mininatur grass? I have a few projects that I could use that for.
JeepLC
Visit this Community
Virginia, United States
Joined: June 20, 2007
KitMaker: 510 posts
Armorama: 469 posts
Posted: Wednesday, February 13, 2008 - 09:27 AM UTC
Apsolutely stunning as always. I am happy to see your progess. How are the figures coming along?

-Mike
f1matt
Visit this Community
Manitoba, Canada
Joined: August 13, 2006
KitMaker: 1,021 posts
Armorama: 805 posts
Posted: Wednesday, February 13, 2008 - 01:08 PM UTC
Thanks Grant. It's always a pleasure to hear from you. You can find the Mininatur grass here.

http://www.scenicexpress.com/

This is where I purchased it. And a few other items. A useful site.

Is next Monday the next IPMS meeting? If so I can bring some and show you in person. It's been too long.

And thanks Mike. The figures are basically all done.

I do have one (albeit rather long) question for any one who might know concerning uniforms. Who decides whether crews wear things like unit patches, flags and name tags? I looked through most of my references and it seems that crews wearing the all green tank suit rarely if ever wore any patches at all during the invasion. And what about name patches on body armour? Is it up to the individual soldier? I have so many pictures with soldiers not wearing markings at all. I ask because I have some very nice decals for uniforms and would like to use them but I don't want to if it's inaccurate.

As always any thoughts you guys may have would be great.

-Matt
slodder
Visit this Community
North Carolina, United States
Joined: February 22, 2002
KitMaker: 11,718 posts
Armorama: 7,138 posts
Posted: Wednesday, February 13, 2008 - 04:31 PM UTC
Great grass work - honestly not what I expected, but the images show that there is a ton of grass on scene.

Can't wait to see the M1 on it.
ti
Visit this Community
Dalarnas, Sweden
Joined: May 08, 2002
KitMaker: 2,264 posts
Armorama: 1,763 posts
Posted: Wednesday, February 13, 2008 - 05:27 PM UTC
I love everything you've done on this tank and then some... all the details but especially the weathering.
Epi
Visit this Community
Texas, United States
Joined: December 22, 2001
KitMaker: 3,586 posts
Armorama: 2,556 posts
Posted: Wednesday, February 13, 2008 - 06:03 PM UTC
Matt,
Uniforms question?
If I remember correctly, the Woodland and DCU IBA didn't have velcro on the front to attach rank and name tag, so the soldiers had to get it sewn on. It would all depend on unit SOP (Standard Operating Procedures) what would be allowed to be sewn on uniforms and IBA's. I do know that the new ACU IBA's have a velcro on the front for the rank and name tag. Plus, some soldiers just didn't want to take the time to get the stuff sewn on. As for the NOMEX tanker suit, I have to look in the FM 670-1, but I think it does say that patches didn't have to be sewn on and that too was dependent on unit SOP.

Hope this helped out in your question.
f1matt
Visit this Community
Manitoba, Canada
Joined: August 13, 2006
KitMaker: 1,021 posts
Armorama: 805 posts
Posted: Monday, February 18, 2008 - 08:33 AM UTC
I think it does Pete. I've decided to add flags and the 3rd ID patches to the figures.

Also I have decided that having grunt (the infantry soldier) was one figure too many for this dio. With the Arab farmer, the goat, dog, and of course three tankers all in there already he just didn't quite fit. Six is company but sevens a crowd! So grunt has been given his walking papers and been honorably discharged.

Back to the base. I was looking at the corner with the water and was not quite satisfied with how it looked.


As you can see the (formerly) clear wall along the edge of the base doesn't have a nice corner to it and even with the new water going in, it won't be blended in completely. It's more obvious in person. To remedy the situation I decided to add some land. Just enough to conceal the unsightly corner. A mixture of Celluclay, sand, water, white glue and detergent was carefully applied to the base using a small flat head screwdriver. Hey whatever works.


The land was shaped with the same screwdriver and my fingers. Here it is after it has almost fully dried and been lightly sanded to smooth out the sides.


Some more work is needed to clean it up but it looks better already. Once it is fully dry I will paint it and maybe add a little grass to it as well.


Now back to the tank. Notice anything different?


The antennas and coils of razor wire have been removed temporarily so they (hopefully) won't get damaged during the final stages of detailing. And something has been added. Two somethings actually. Nothing as flashy as a flag but essential for any true tank. Tow cables. The cables were made by using the kit cable ends and the copper cables came from Karaya.


These were painted dark grey with the ends painted dark green. The comlpeted cables were sprayed with a thin coat of a dust colour to tone things down a bit. To weather the cables a wash of the same dusty colour went on. Now since the cables went on so late in the project they had to fit around the stowage that is already glued in place. Because of this they probably aren't in exactly the right spot. Can't really help it but I think they'll do.

Heading down the final stretch now. If I stay focused I could have it all done in a week or two.

The Celluclay is all dry now so I'm off to paint.

-Matt
f1matt
Visit this Community
Manitoba, Canada
Joined: August 13, 2006
KitMaker: 1,021 posts
Armorama: 805 posts
Posted: Monday, February 18, 2008 - 01:26 PM UTC
While looking through pic after pic of Abrams wheels I figured I'd try once more to try and replicate a detail commonly found on spare road wheels.

Spare road wheels are often (if not always) NATO green with the hub still retaining the hulls colour. In many cases this would be the sand coloured camo. I had already replicated the green wheels with the sand coloured hub but tried and failed to replicate the silver ring. Also a common detail on spare road wheels as you can see in the following pics.


And here's probably the clearest shot I have.


The first time around I tried to outline the silver ring with paint. This did not work. I couldn't get the ring nice and round. I tried masking the ring but with the bolts in the way and the small size of the wheel it was too darn frustrating. This time I used a 10/0 brush to simply use a back and forth motion in between the bolts with Testors silver. Basically I just filled in the area between the bolts and gave the ring a gentle arc to round it out. It felt like a tense version of connect the dots. I practiced on two road wheels from my M1A12 kit first to see if this would actually look decent. It did. In fact I'd say the finished practice wheel tuned out the best. This is probably because it wasn't already mounted to a model.


My best "silver ring".


After a successful test run I decided to try it on my tanks three spare wheels.


Here's my first wheel with the silver applied. It was quick to do. Only took about a half hour to paint all three wheels. A few touch ups and it looked good enough. Not perfect but acceptable.


The nuts were painted Model Master dark anodonic grey buffing metalizer. Only for airbrushing? Not this time. The bolts were highlighted with the same Testors silver as before.


Of course I still have to spray on one more layer of dust which will blend things together a bit but that's basically it for the wheels. Guess I could add the clear caps for the wheels pretty soon. Maybe tomorrow.

-Matt
Animal2394
Visit this Community
Austria
Joined: February 02, 2008
KitMaker: 2 posts
Armorama: 1 posts
Posted: Monday, February 18, 2008 - 09:15 PM UTC
You made a great work, Matt! Your M1A1 inspires me for my model of a M1A2 SEP, i hope i can get a bit close to your work. Your M1 is one of the best i´ve ever seen.

Greetings
René

P.S: Sorry for my bad english
ricknroll
Visit this Community
Oregon, United States
Joined: September 02, 2005
KitMaker: 39 posts
Armorama: 31 posts
Posted: Tuesday, February 19, 2008 - 02:37 AM UTC
A real Gem, Matt, top to bottom. It's the "small" stuff that makes this project so huge....attention to the wheels, fixing the base corner....etc, etc.,etc. Thanks for your wonderful example.

RickLawler
DeskJockey
Visit this Community
Virginia, United States
Joined: July 17, 2006
KitMaker: 1,558 posts
Armorama: 1,159 posts
Posted: Tuesday, February 19, 2008 - 07:15 AM UTC
Excellent work on the base and the wheels, Matt!! You really have a gift for detail and realism.
f1matt
Visit this Community
Manitoba, Canada
Joined: August 13, 2006
KitMaker: 1,021 posts
Armorama: 805 posts
Posted: Saturday, February 23, 2008 - 11:01 AM UTC
Thanks for the ongoing support guys. And your english is just fine Rene. The only secret is to study your references. That's where you find the neat little details to bring your models to life.

Well Grant, I promised you an update today so here it is.

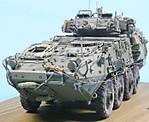
Friday was very productive. Weathering is almost done on the tank. A flat coat with a drop of sand went on. Some subtle rust streaking was applied by adding small dots of rust coloured oil paint to various paint chips and scratches. To streak the paint, dip a wide brush in some thinner, dab off the excess and pull the wet brush down over the paint.


To add some texture I added some Mig pigments to the wheels. These need to be painted the appropriate earth/sand colour still. Other than that the wheels are done . I also added small amounts of Mig pigments all over to give the illusion of sand in various nooks and crannies all over the tank. A drop of mineral spirits will keep the pigments in place. Oh and how did I keep the clear wheel hubs clear? Same as the crews in real life. I simply wiped them clean right after the weathering was applied. These hubs are cleaned and inspected very often so it's accurate even on a filthy tank to have the hubs clean (relatively anyway).

I noticed that where the crew climbs over the tank, there tends to be a lot of small smudges of dirt. This was replicated with very small dots of payne's grey oil paint and then gently blended with a soft brush. No thinner.


Oh the figures. I'll get to them in a minute.

I wanted to add a dirty hand print somewhere too. I was inspired by a WWI aircraft model by local modeling god Tom Morgan. It had a tiny dirty hand print and it made a lasting impression.

At first I tried simply painting one by hand but I couldn't get it to look right. I even tried using a hand from Hornet as a stamp with wet paint but that didn't work either. What else might work? How about one more custom decal? To quote Homer, "Lisa, you can't go this far and not go further". So off to Photoshop I go. I spent a good two and a half hours drawing and tinkering with my hand print. I held my hand on the screen and traced the outline to get started. Here's what I ended up with.


It's kinda creepy actually. And here's the final decal ready to go next to the Hornet hand to ensure it's correct size.


The decal on the model.


It was going to go in a more obvious spot but I think this works. Gives viewers something to "find" if they look close enough. The print will be blended with a very light layer of dust later on.

What's next?

Oh, the water is very close to being done.


Figures? In a second. First a little more weathering. The co-ax machine gun on most Iraq based Abrams gets a lot of use. Where the co-ax meets the mantlet tends to get heavily stained. I looked over my references (of course) and the staining on each tank is unique. Almost like each tank's own fingerprint. I printed off a couple of good pictures and went to work. The staining was again done with oils. More tiny spots of payne's grey. Only this time in a specific pattern and closer together then the dirt smudges. These were blended and more layers were added. A total of about five layers of paynes grey was needed. It goes on very thin. Even straight from the tube. To sharpen out some of the staining detail a black prismacolor pencil crayon was used. Yes, the same as used on the Tuskers elephant head from so long ago. You can apply soft lines with these high quality pencil crayons. Here's the finished product.


Not much left but the figures. Ok fine, here you go. The figs are 99% done. Here's how they look. Oh and the heads aren't yet glued so I can fine tune them after everything is installed.

The Cmdr looking......well.....thrilled obviously.


The standing crewman.

Each crewman has a mic (sprue), radio cable (annealed copper wire), and helmet strap (lead foil).

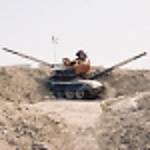
I LOVE this shot. The tank looks so big!


His helmet reads "Wild Bunch".


The farmer complete with walking stick. Remember, old wood isn't brown. It's a silvery grey.


Goat!


This guy is my favorite figure out of them all.


And a few shots with everything being tested. Nothing is glued yet.


Obviously several things need to be added still. The loaders MG. Antennas, razor wire. Dozens of water bottles and cans of coke. Spare ammo boxes. The Cmdr's M4 carbine. Some spent .50 cal shells. Oh and the head lights are in too. It was nearly impossible with the headlight guards and mine plow already installed. But they are there. Even if no one ever sees them, I know they're there.

I'm busy tonight and tomorrow. And I work Monday and Tuesday. So I hope to finish everything Wednesday or Thursday.

I can't wait to work on something else for a change. Like another M1 dio.

-Matt
DeskJockey
Visit this Community
Virginia, United States
Joined: July 17, 2006
KitMaker: 1,558 posts
Armorama: 1,159 posts
Posted: Saturday, February 23, 2008 - 12:16 PM UTC
Matt-your Abrams looks incredible!! I really like the way the whole dio is coming together, too. Congrats!!
GVoakes
Visit this Community
Manitoba, Canada
Joined: September 04, 2007
KitMaker: 193 posts
Armorama: 132 posts
Posted: Saturday, February 23, 2008 - 12:29 PM UTC
Amazing...

Simply Amazing...

And I thought you would have a tought time bettering that HMMV diorama that you did

tsitsosdera
Visit this Community
Attica, Greece / Ελλάδα
Joined: September 29, 2005
KitMaker: 30 posts
Armorama: 21 posts
Posted: Saturday, February 23, 2008 - 10:16 PM UTC
Hats off for you Matthew i think they must put your picture next to the word DETAIL in the dictionary.
Looking forward for your next inspirational work cheers!!!!!!
dropshot
Visit this Community
Provincia de Pontevedra, Spain / España
Joined: October 23, 2006
KitMaker: 300 posts
Armorama: 214 posts
Posted: Saturday, February 23, 2008 - 10:32 PM UTC
Matt I think you deserve a Nobel Prize for services to mankind,modeller mankind. I wonder how many of us actually realize how much we save on this sight by not having to spend on some expensive publications that explain how to ,give ideas & product information. A fantastic contribution,Thanks Matt.
18Bravo
Visit this Community
Colorado, United States
Joined: January 20, 2005
KitMaker: 7,219 posts
Armorama: 6,097 posts
Posted: Saturday, February 23, 2008 - 10:33 PM UTC
Awesome job. I can't believe I haven't been following this more closely. The dio is great, but the tank is really the best I've seen of the subject. Since arriving here, I've gotten inspired to do one myself. The silver on the wheel looks very well done. It may not quite be wide enough, as it appears to extend almost to where the wheel changes thickness, but that's really being too picky, which I don't want to be.
SIRNEIL
Visit this Community
England - South East, United Kingdom
Joined: July 30, 2007
KitMaker: 658 posts
Armorama: 599 posts
Posted: Saturday, February 23, 2008 - 10:46 PM UTC
hi matt
your attention to detail is stunning,but now i'm looking forward to your next build
all the best
neil
18Bravo
Visit this Community
Colorado, United States
Joined: January 20, 2005
KitMaker: 7,219 posts
Armorama: 6,097 posts
Posted: Saturday, February 23, 2008 - 11:03 PM UTC

Quoted Text

Why are the panels on the CIP alternating between green and sand? I have never seen a CIP that looked like that before. They are all either sand or green, not a mix of the two.


Or brown.

Personally, I like the alternating colors as you have done, but now that it's been done...
slodder
Visit this Community
North Carolina, United States
Joined: February 22, 2002
KitMaker: 11,718 posts
Armorama: 7,138 posts
Posted: Saturday, February 23, 2008 - 11:51 PM UTC
This is looking great - nothing more to say other than thank you the incredible build thread
Outerarm
Visit this Community
England - South East, United Kingdom
Joined: September 20, 2007
KitMaker: 240 posts
Armorama: 233 posts
Posted: Monday, February 25, 2008 - 01:48 PM UTC
Quite incredible -- really looking forward to seeing it all wrapped up.

Cheers,
Ian