Dioramas
Do you love dioramas & vignettes? We sure do.
M1A1 Abrams "BOOM STICK"
f1matt
Visit this Community
Manitoba, Canada
Joined: August 13, 2006
KitMaker: 1,021 posts
Armorama: 805 posts
Posted: Wednesday, November 07, 2007 - 05:09 PM UTC
Thanks Yufkey, John, Alex, and Roel. You guys are so nice you deserve to see the latest. This is where we left off.

Not bad, but still a little light on the stowage. Let's see what I can do about that.

Boom Stick's back!


That's better. The turret feels like it weighs a couple of pounds now. Why don't we look a little closer.

Remember my "stowage lump"? Well I decided it didn't look natural enough. I installed a bunch of stowage from Real Model, Legends, Verlinden and Dragon along with my "lump". Over this went a new tissue paper tarp. A few patches of tissue paper (only a single ply for the patches to help them blend in) and it was looking better. This was painted a nice green color and after this had dried to the touch, straps made from masking tape and painted Tamiya buff (with a little green mixed in) were added. The carabiner that attaches the strap to the BRE was from the Verlinden M1025 detail set. I really lucked out there. I knew I was saving that sheet of PE for something! I got a little green paint on one of the 40mm ammo boxes so I repainted it. This is why the box on the back of the BRE looks brighter now. Looking at the duffle bags now I think they are too green. Too bad. Too late to repaint them.


I must have placed and then re-arranged the stowage at least a dozen times before it looked right.

I added a crew tent from Legends.

All the various greens and khaki colors I mixed as I went.

In this next shot you can see the highlights and shadows better on the camo covered ruck sacks.

Let's climb on.

Don't be shy. You can get closer than that!

Now for some overall pictures.


Such a cool looking vehicle.


Don't worry. There is more stowage to come. And a at least a hundred other details to add still. And figures to finish. And a base.

-Matt
f1matt
Visit this Community
Manitoba, Canada
Joined: August 13, 2006
KitMaker: 1,021 posts
Armorama: 805 posts
Posted: Wednesday, November 07, 2007 - 05:29 PM UTC
I still have a pile of jerry cans, ammo boxes (two sizes), water bottles, and a cooler to add so there is plenty more to come. I realize she's been missing the crew steps at the front for a while. They broke off some time ago and I figure there is no point in adding them until right near the finish. Of note, I have not sprayed a coat of clear flat yet. The paint simply looks like this because of the weathering so far. I will spray some on but it won't need much. I'm also debating about putting an abandoned (or just parked, maybe broke down) car on the corner opposite the water and tall grass. This way I don't have to add another 200 (or more) blades of grass in one by one to fill the empty space. It looks cool but crap is it tedious. I do have an old Tamiya Jeep I could use. A Jeep in Iraq? You bet!

How often do you see a Jeep next to a Abrams? It would look so tiny. What do you guys and gals think?

slodder
Visit this Community
North Carolina, United States
Joined: February 22, 2002
KitMaker: 11,718 posts
Armorama: 7,138 posts
Posted: Wednesday, November 07, 2007 - 11:12 PM UTC
The stowage is looking good. I really like the small chips and dents and such. Really brings life to the whole thing
sgtreef
Visit this Community
Oklahoma, United States
Joined: March 01, 2002
KitMaker: 6,043 posts
Armorama: 4,347 posts
Posted: Wednesday, November 07, 2007 - 11:59 PM UTC
That is one killer Tank you have their the best I have seen lately.
Only thing which I hate even to say is that one Duffel bag on top of the Rations box is noway it will stay their.
Take it from me I used to have all of my platoons Duffel bags in my Tool truck in Korea and let me tell you The Plt. Sgt made sure his was last cause time I got to the field they were all over the place.
Great Job
Boy that wants me to grab another one out of the closet and start slapping some glue to plastic.
bananaJOE
Visit this Community
Niedersachsen, Germany
Joined: July 12, 2007
KitMaker: 71 posts
Armorama: 68 posts
Posted: Thursday, November 08, 2007 - 04:10 AM UTC
...beatiful killer queen...

stunning work matt!

you mentioned the duffel-bags too greenish color, in my opinion it looks good and realistic because they have not all the same green color i think?!
idea with the jeep seems to be not the worst- to bad i don't know anything about iraqi jeeps

go on and keep us updated!

cheers and good luck Alex
f1matt
Visit this Community
Manitoba, Canada
Joined: August 13, 2006
KitMaker: 1,021 posts
Armorama: 805 posts
Posted: Thursday, November 08, 2007 - 08:06 AM UTC
Thanks guys. I'll see what I can do about the duffle bag. I'll try to either move it or secure it with another strap.
DeskJockey
Visit this Community
Virginia, United States
Joined: July 17, 2006
KitMaker: 1,558 posts
Armorama: 1,159 posts
Posted: Thursday, November 08, 2007 - 03:02 PM UTC
Very good looking Abrams, Matt. I really like the way it came out. As for the Jeep, until you place the tank on the dio base, it's hard to know if you really need to fill the corner with another vehicle or even grass. You may just want to leave it as bare ground.
yufkey70
Visit this Community
Texas, United States
Joined: July 16, 2005
KitMaker: 264 posts
Armorama: 263 posts
Posted: Sunday, November 11, 2007 - 01:01 AM UTC
looks pretty good, I like all of the detail you have done.
f1matt
Visit this Community
Manitoba, Canada
Joined: August 13, 2006
KitMaker: 1,021 posts
Armorama: 805 posts
Posted: Monday, November 12, 2007 - 04:07 PM UTC
I have been trying to figure out what to do with the offending duffel bag. It is glued on and would cause a bit of damage to remove it. Also the large green tarp covers a portion of it so it would also be damaged. So I can leave it the way it is and move on. Or I can try plan B. One thing my tank is missing is a bright orange aerial I.D. tarp. This could be added to cover the duffel bag. Maybe not all of it but enough anyway. I figure if I can do it right it could look as though the duffel bag has been secured with the original tarp or a hidden rope maybe or even secured by the orange tarp itself. I should be able to reposition one of the long straps as well. Now my question to you gents is approximately how big should one of these orange tarps be? I have seen a few in pictures and some are small and others look huge. Also, do they have any holes in the corners to help secure them? It's of to the LHS tomorrow for a resupply mission. More pictures soon.
Red4
Visit this Community
California, United States
Joined: April 01, 2002
KitMaker: 4,287 posts
Armorama: 1,867 posts
Posted: Wednesday, November 14, 2007 - 12:15 PM UTC
The VS-17 panels are 20"x72". They have 6 grometted eyelets, one on each corner and two in the middle. Try making a bungee cord or rope to secure the duffel bag to the bussle rack. You could hide the other end under the large tarp. Hopes this helps. "Q"
slodder
Visit this Community
North Carolina, United States
Joined: February 22, 2002
KitMaker: 11,718 posts
Armorama: 7,138 posts
Posted: Wednesday, November 14, 2007 - 12:57 PM UTC
Why don't you try just adding a third strap across the load to tie down the 'offending duffel'.
Yoni_Lev
Visit this Community
Washington, United States
Joined: September 20, 2007
KitMaker: 861 posts
Armorama: 394 posts
Posted: Friday, November 16, 2007 - 07:24 PM UTC
Strap and duffel issues aside, I think the model looks pretty darn fantastic!
f1matt
Visit this Community
Manitoba, Canada
Joined: August 13, 2006
KitMaker: 1,021 posts
Armorama: 805 posts
Posted: Monday, November 19, 2007 - 08:20 PM UTC
Still deciding exactly how I want to proceed with the duffle. I know basically what I want to do. It's just a matter of figuring out the best way to do it. Got the .50 cal mounted along with a little more stowage. I want to add the vision blocks next. I work all day tomorrow but Wednesday should be a full build day.
johnlinford
Visit this Community
England - South West, United Kingdom
Joined: October 28, 2006
KitMaker: 203 posts
Armorama: 195 posts
Posted: Tuesday, November 20, 2007 - 07:38 AM UTC
Hey Matt , that looks fantastic . Stowage is so hard to get right , unless you got solid reference to go by it can look all wrong, but that looks great.
The colours and weathering so far all look great.
Periscopes are another long winded affair eh. Good luck with them.Keep it up.
f1matt
Visit this Community
Manitoba, Canada
Joined: August 13, 2006
KitMaker: 1,021 posts
Armorama: 805 posts
Posted: Thursday, November 22, 2007 - 03:03 PM UTC
Time for an update. Vision blocks done! First try. Almost. I decided the best way (that I could think of) would be to first paint the kit VB's a sand color and glue them in place. Next using thin masking tape as a template I cut out little rectangles that would fit the vision blocks. Sequins bought at Michael's were used to replicate the clear portion of the vision block. They are easy to cut and can even be sanded with a sanding stick to fine tune their shape. The sequins were glued on with a small amount of white glue.

Here is the driver's hatch. The center block needs a set of small wipers still. They had to be cut off to allow the sequin to fit.


The loader's hatch was my first attempt. I didn't use the kit VB for this one. A sequin was simply cut to a size to fill the hole. It looked good enough but as I already stated, a modified technique was used for the others.


Here is the Commander's cupola. Now glued in place. The gun is mounted and is awaiting an ammo box with some bullets. These have been painted and are the next parts to be added. The vision blocks are all in.


I was looking at my stowage set for my Stryker from Blast when I noticed a resin map board, complete with binoculars and even a water bottle resting on a small tarp. I figured it would make a neat addition but the water bottle is solid yellow resin and the binoculars resting on the map board would make adding a map difficult. I decided I could still add this detail by making my own map board. I went online and found a map of Baghdad from 2003 that was used by the U.S. military. Perfect! Might not be the exact same map used by the tankers but close enough. It was shrunk down, printed out, and glued to another piece of paper to stiffen it a little. A border was made of Evergreen strip styrene and thin strips of masking tape wrapped around the corners. A tarp made from tissue paper soaked in water / white glue was added and painted green once dry. The binoculars came from Tamiya. A resin water bottle (clear not solid yellow) will be added as well once some clear flat has been sprayed on.


I spent a while trying to decide what to do about the "offending duffle bag". Well as you can see in the above picture it's still there. Only now a box of Mountain Dew and a jerry can are helping to keep it in it's place. Also I added and repositioned a new cargo strap to help keep it from falling off the tank.

This is the before pic.


And how it looks now.

This picture turned out a little dark so I brightened it up a little in Photoshop. It's not really this bright.


In this next picture you can see the stowage added inside the two smaller racks on the side of the turret.

A few jerry cans as well as an Alice pack were added.


Also got some work done on the Cmdr's large front sight.

The clear portion on the right was removed and replaced with another interesting product I found at Michael's. Can't find the package right now but it wasn't too far from the sequins in the store. To make the optics behind the new "glass" I simply cut out a rectangle from a green sequin. The circular optic was made with a punch and die set. These were glued in place with a little white glue.

A Verlinden cooler was also glued in place. Before installation it was lightly textured with baking powder. Thin strips of masking tape gave me the vertical stripes. Acrylic paint was brushed on where I wanted the texture to remain. This acted like a thin glue for the powder. Keep in mind I used baking powder. NOT baking soda. This is a must have for any OIF tank.

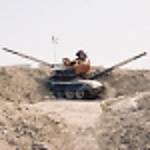
The barrel received a thin strip of tape painted in a khaki-ish colour. I am not sure what it's purpose was but this was common to many OIF Abrams. Also common to some tanks with mine plows, were thin strips of tape added to the long striped poles sticking up from the plow.


The mail man came by today with a present I have been waiting a while for. Uniform decals from Echelon.


This will last me for quite a while. These are the finest decals I have ever seen. Spare letters are even included to make custom names. I thought about it and no I haven't decided yet to name a tanker after myself or a friend. Maybe.


Guess that's it for now.


Next I will add the cables for the mine plow. Later and thanks for all the comments.

Oh and in case anyone was curious. Yes I saw the latest decals by Echelon and I think it's funny to see the real "Boom Stick" for once. Guess I'll have to trash this one and start aaaaaall over. NOT!
Yoni_Lev
Visit this Community
Washington, United States
Joined: September 20, 2007
KitMaker: 861 posts
Armorama: 394 posts
Posted: Thursday, November 22, 2007 - 05:35 PM UTC

Dude, sweet!

Seriously, this is one fantastic looking build. The work is really tip-top.

Those Echelon decals look like they're going to be fun. (C'mon, I know you want to name one of those tankers "Sinclair"...I know you do.)

-YL


f1matt
Visit this Community
Manitoba, Canada
Joined: August 13, 2006
KitMaker: 1,021 posts
Armorama: 805 posts
Posted: Thursday, November 22, 2007 - 07:50 PM UTC
Well...... ok Yoni. You're right. How can I resist naming one of my little guys after me. Glad you liked the update, and here is a little more for everyone to look at.

Notice anything new? The large sight in front of the Cmdr's cupola has finally found a home.

A handsome beast the Abrams.

Here's a closer look.

Still need to add the wipers on the driver's hatch, not to mention some weathering around the co-ax machine gun. I am still very proud of how the elephant's head turned out. It was a hand made stencil , then airbrushed. The tusks were touched up with a black pencil crayon. It is a must for any tank of the 4-64 "Tuskers".

The loader's hatch has been glued in place. Also the M2 Browning has gotten it's ammo box (Eduard PE) along with some ammo (OOB) that I guess I didn't need to spend all that time painting.


In this shot you get a good look (finally) of the fuzzy-dice.


That map deserves a closer inspection too.

Digital cameras are amazing. Pretty impressed with my humble printer too.

Well see ya later.
slodder
Visit this Community
North Carolina, United States
Joined: February 22, 2002
KitMaker: 11,718 posts
Armorama: 7,138 posts
Posted: Friday, November 23, 2007 - 04:11 AM UTC
Better and better every time. Great details. And yes your printer is great.
DeskJockey
Visit this Community
Virginia, United States
Joined: July 17, 2006
KitMaker: 1,558 posts
Armorama: 1,159 posts
Posted: Friday, November 23, 2007 - 04:49 AM UTC
Wow!!! Excellent work, Matt!

I only offer one tip (and it's not even about the model!): you may want to lower your ISO setting on the camera and increase the exposure time in order to avoid the grainy look that your closeups have right now. Not all cameras have this feature, though, and you will need a tripod.
f1matt
Visit this Community
Manitoba, Canada
Joined: August 13, 2006
KitMaker: 1,021 posts
Armorama: 805 posts
Posted: Monday, November 26, 2007 - 05:55 PM UTC
Well as far as the camera, I actually am shooting on the lowest ISO setting. It goes as low as 80 so that's what I have been using. I do have a couple of tri-pods but I find the most useful items for keeping my camera steady is a small wooden box and a couple of pennies for shims. Hey it works. I certainly try to experiment every time I take pictures. Also I have a couple of friends with very fancy (read expensive) cameras and I will get one of them to shoot a lot of pictures when everything is done. Doubt I will take any outdoor pictures when it is completed as it will be very cold by then. Will wait till spring for that. At least I hope it will be done before spring.

Not a big update today but this is what has been added. The cables for the track-width mine-plow have finally been attached


I had to remove a vision block from the driver's hatch as I forgot that is where the large cable is inserted into the hull. Good thing I didn't glue it in place.


Looking through my references another neat little detail caught my eye. A pack with a camo dust cover jumped out at me . Why? Because it had been ripped and repaired with a couple of strips of duct tape. The duct tape was even peeling off from the top. This had to go my tank. What to use? Well real duct tape (though technically too thick) was the right colour and even nice and sticky. Two thin strips were cut and applied to the alice pack. It looked good enough to me. It didn't want to peel at first like in the photo, so some Zap-A-Gap was used to keep the tape where I wanted it.


The three antennas were painted today but not installed. Still deciding how I want to go about replicating the flag used by A company of the 4-64. Nicknamed the "assasins" they often had jolley rogers flags mounted from an antenna. It seems at least two different sizes as well as designs were used. Hope to add it soon as this detail was my original motivation to build a tank from this unit.

I just noticed the finger print on the extended bustle rack. A shot of the original base colour and a dark wash or two should fix it.

-Matt
DeskJockey
Visit this Community
Virginia, United States
Joined: July 17, 2006
KitMaker: 1,558 posts
Armorama: 1,159 posts
Posted: Tuesday, November 27, 2007 - 03:04 PM UTC
Looking very nice! Will you weather the duct tape to dust it up a bit, or leave it as a recent patch?
f1matt
Visit this Community
Manitoba, Canada
Joined: August 13, 2006
KitMaker: 1,021 posts
Armorama: 805 posts
Posted: Tuesday, November 27, 2007 - 09:42 PM UTC
The real thing looked like a recent patch so I will leave it as is. The shiny silver should help break up all that flat paint around it. Okay, whats next? Well before I start my large jolly rogers flag I wanted to practice my flag making skills on something smaller. And luckily for me a very popular way to demonstrate one's patriotism was by flying the stars'n'stripes. One common way to display the flag was by attaching it to an antenna. Another was by simply taping a small flag to the wind sensor. I chose the latter. The flag came from Archer Fine Transfers. Two flags (mirror images of each other) are placed against each other. Between the two dry transfers a thin piece of lead foil is placed. This sandwich is burnished down and the excess lead foil trimmed off. Glue it to a small piece of stretched sprue, paint, and voila. A flag is born. A thin strip of masking tape (painted green to match my references) is used to secure the flag to the wind sensor. The flag is then gently folded to make it look like it is blowing in the wind. It took a couple tries but it turned out looking just like my references.


In the grand scheme of things it's a small detail but it was big fun to do. One step closer to that finish line.


-Matt
slodder
Visit this Community
North Carolina, United States
Joined: February 22, 2002
KitMaker: 11,718 posts
Armorama: 7,138 posts
Posted: Tuesday, November 27, 2007 - 11:13 PM UTC
Matt - this is fantastic - the details make it look lived in and look as if it came right out of OIF.
ADNeate
Visit this Community
New Brunswick, Canada
Joined: July 29, 2007
KitMaker: 93 posts
Armorama: 92 posts
Posted: Wednesday, November 28, 2007 - 05:28 AM UTC
Impressive as always!
RoelGeutjens
Visit this Community
Belgium
Joined: March 17, 2005
KitMaker: 410 posts
Armorama: 383 posts
Posted: Wednesday, November 28, 2007 - 07:22 AM UTC
Hey Matt

Your abrams is coming right along :-) Great progress until now. Just 1 minor thing it might be just me but I don't like the periscope glasses that much. The colours are to extreme if you know what I mean from yellow green blue etc.... I would just stay with maybe orange red and purple and some lighter tones between them just like the real deal.

Grtz Roel