Dioramas
Do you love dioramas & vignettes? We sure do.
M1A1 Abrams "BOOM STICK"
f1matt
Visit this Community
Manitoba, Canada
Joined: August 13, 2006
KitMaker: 1,021 posts
Armorama: 805 posts
Posted: Friday, September 21, 2007 - 07:37 PM UTC
Think I am finally ready to paint the base. After looking at my references I wasn't very satisfied with the texture. Or lack there of. It was too plain compared to my pictures. I had only applied a layer of Celluclay to represent the soil. I have spent the last couple days tweaking it. It started off with a fresh but thin layer of Celluclay. This had both fine and coarse sand mixed in. Over this I sprinkled some Woodland Scenics fine turf. To top it off I sprinkled on some baking powder here and there. These textures combine to make it a lot more interesting and realistic.


The only thing was that... I forgot to represent the track prints left in the soil where the tank had driven. Oops. Went back and added a little more of my Celluclay mix and pressed a length of track into the drying soil mix.


That's better. Even though my pictures showed the track prints are subtle they are still there. This also helps convey that this is a 68 ton beast instead of a half pound model. I plan on giving the sides of the base one more hit of fine sandpaper and a couple more coats of gloss. I will let this dry and get back to the figures.

See you all later.

DCJnr123
Visit this Community
Arizona, United States
Joined: May 07, 2007
KitMaker: 51 posts
Armorama: 49 posts
Posted: Friday, September 21, 2007 - 08:03 PM UTC
This is coming on really nice.
David
slodder
Visit this Community
North Carolina, United States
Joined: February 22, 2002
KitMaker: 11,718 posts
Armorama: 7,138 posts
Posted: Friday, September 21, 2007 - 11:19 PM UTC
Hats off to the extent of work you put into texture on the ground, that's worth a feature in itself.

Are the animals Dougs Originals? I know you can pull of a bit 'nip-tuck' surgery on the poor pup.
docdios
#036
Visit this Community
England - West Midlands, United Kingdom
Joined: December 01, 2001
KitMaker: 1,998 posts
Armorama: 1,236 posts
Posted: Saturday, September 22, 2007 - 06:19 AM UTC
I'm enjoying watching this progress, some of the ideas as Scott has suggested would make an excellent SBS article.

Keep up the good work Matt

cheers

Keith Forsyth
DeskJockey
Visit this Community
Virginia, United States
Joined: July 17, 2006
KitMaker: 1,558 posts
Armorama: 1,159 posts
Posted: Saturday, September 22, 2007 - 09:55 AM UTC
Matt--if you have a Tamiya OIF kit (Bradley, Abrams, M113, etc.) or their modern accessory set, you might be able to cut the paw off of the puppy that comes in the accessory sprue and add it to your three-legged dog. I don't know if they are the same size, but it should be close (and should be easier than sculpting a new one,I think).
f1matt
Visit this Community
Manitoba, Canada
Joined: August 13, 2006
KitMaker: 1,021 posts
Armorama: 805 posts
Posted: Sunday, September 23, 2007 - 05:00 PM UTC
I had forgotten about the Tamiya dog I have. Thanks Lucas. Oh and yes the animals are both from Doug's originals. I was contemplating getting the scared cow too but that would probably be overkill for a small diorama.

Well it had to happen. I started on the area where I have the least experience. Figure painting. Aaaaaaaaah! I'm scared.

Okay. Regroup and focus.

By the way has anybody else noticed that Humbrol is STILL using those stupid containers. Why? WHY? Every other company knows they suck. How hard is it to change? Well as you may have guessed I am using Humbrol paints for the figures. I do really like the paint. But only the paint. My tankers are being painted first. Say hi gentleman. Can we see a little front and back?


I haven't painted a figure in a couple years so I thought I better start with the uniforms and then progress with the face. The uniforms have received a base green coat as well as two shades of highlights and two shades of shadows. I then painted the camo pattern on the vests. Kinda wishing I had only one guy to paint as it does take a while. Oh well. I think I need to blend a few of my shadows a little better. More layers of paint to come.


Thanks for the comments. Damn those figures look big on screen. I see I have some more work to do on my shadows. More soon.
redaye
Visit this Community
New York, United States
Joined: December 15, 2003
KitMaker: 123 posts
Armorama: 67 posts
Posted: Monday, September 24, 2007 - 05:55 AM UTC
WOW!! I am really impressed with all your work so far. I can't wait to see the final result. Great work
Joe
f1matt
Visit this Community
Manitoba, Canada
Joined: August 13, 2006
KitMaker: 1,021 posts
Armorama: 805 posts
Posted: Monday, September 24, 2007 - 05:56 AM UTC
Just a small update today. Touched up the shadows and highlights a little. They might get tweaked a little more but I may leave them as is. Had fun adding some color. I will add a pin wash here and there to help bring out some of the finer detail after I spray on a protective clear coat. Just need to paint the gloves and boots and then I will start the fleshy bits.


The game Halo 3 comes out at midnight tonight so I won't be getting any more work done today. Probably won't get much if any sleep tonight.

Any thoughts on the figures so far? Also I ordered a set of the new decals from Echelon. This will cover the uniform markings. Apparently they even come with name patches. I might try to put my own name on one of the figures. Later guys.
docdios
#036
Visit this Community
England - West Midlands, United Kingdom
Joined: December 01, 2001
KitMaker: 1,998 posts
Armorama: 1,236 posts
Posted: Monday, September 24, 2007 - 07:19 AM UTC
looking good Matt

my technique to working with Humbrol is to add a little flat black to the base colour, to darken it a little and paint this over the whole area.

then add more black to the base colour for the shadows and paint these in. I also outline all the belts, webbing etc. with this as well.

then just using the plain base colour( no black), dry brush this across the high parts of the figure this will give you a high light colour and blend the shadows in at the same time.

Then add a little white or flesh colour to the base colour and dry brush this over the real tops of all the creases to give a final high light, the dry brushing does all the blending for you. (depending on the figure i some times do one more highlight with more white added and dry brushed in)

then add all the camo pattern, and finally i use a thinned wash of sepia oil paints in the shadow areas to add shadow to the camo pattern.

it takes a little practise but you can get some great results with it.

look forward to seeing this progress.

cheers

Keith Forsyth
b3bones
Visit this Community
Ohio, United States
Joined: July 31, 2004
KitMaker: 3 posts
Armorama: 2 posts
Posted: Monday, September 24, 2007 - 07:35 AM UTC
Matt,

I just gotta tell you, this is one heck of a build you are doing. Thanks for putting so much effort into not only the build, but also the photography and describing what you are doing. Kudos to you!
DeskJockey
Visit this Community
Virginia, United States
Joined: July 17, 2006
KitMaker: 1,558 posts
Armorama: 1,159 posts
Posted: Monday, September 24, 2007 - 12:09 PM UTC
Very nice working on the figures, Matt!! I especially like the Interceptor vests--what colors are you using for the cammo and the attachment tapes?

f1matt
Visit this Community
Manitoba, Canada
Joined: August 13, 2006
KitMaker: 1,021 posts
Armorama: 805 posts
Posted: Monday, September 24, 2007 - 08:50 PM UTC
Thanks Joe, Keith, Boyd.

I like your technique for figure painting Keith. It's similar too what I have done only It's sounds like an improved version. Might try it on the Arab farmer and grunt figures.

I just got the Lionmarc modern .50 cal barrel in the mail. Looks gorgeous. I also have the .50 cal detail set from Armorscale too. Will have to build my M2HB next. I know. I know. The M2HB looks great OOB. I just couldn't help it. Those aftermarket sets were just too cool to say no.
f1matt
Visit this Community
Manitoba, Canada
Joined: August 13, 2006
KitMaker: 1,021 posts
Armorama: 805 posts
Posted: Tuesday, September 25, 2007 - 03:15 PM UTC
Thanks Lucas. The vests were a lot of fun to paint. If I remember correctly I used Humbrol 150 mixed 50/50 with 121 for the tape. Actually with the exception of Model Master flat black and white (for mixing to create shadows and highlights) all paints for the figures so far are Humbrol. The green for the vest was 117 and 72 at 50/50. The full figured tanker by Alpine received #62 for the leathery brown on his vest. This was a little too light so for the other guys I added some #66 dark grey just to tone it down. I figured a little variety between uniforms would be realistic. Also I didn't want to risk messing it up by re doing it. The black is MM flat black with Humbrol 66. The light greenish brown on the vest is #121 mixed with a little of #150. Say 80/20. Or until it looks right. I used some Dragon box art (modern U.S. Marines) painted by Ron Volstad (who else) as reference for the pattern.

In the mail I received the new Pro Art radio set. You get a lot in the box. I can't believe how tiny the hand held radios are. Not to mention the digital cameras. I should spray primer on it and take some pictures so you guys can see it for yourselves.

More pics soon.
coldwar
Visit this Community
Metro Manila, Philippines
Joined: January 21, 2006
KitMaker: 27 posts
Armorama: 17 posts
Posted: Tuesday, September 25, 2007 - 11:13 PM UTC
hi matthew, Nice tank,makes me inspired.

very nice model and cool figures.

f1matt
Visit this Community
Manitoba, Canada
Joined: August 13, 2006
KitMaker: 1,021 posts
Armorama: 805 posts
Posted: Wednesday, September 26, 2007 - 06:02 PM UTC
So I'm working on my M2HB and after assembling and painting it I started to look at my references. Stupid I know. I was wondering if my M2 should have the cocking lever (I think that's what it's called) or handles at the back of the receiver.


Do some .50's have a solenoid instead of the handle on the side? Dos this replace the handle or is it simply next to it?

My references make it difficult to tell either way.
Any help is much appreciated.

Matt


DeskJockey
Visit this Community
Virginia, United States
Joined: July 17, 2006
KitMaker: 1,558 posts
Armorama: 1,159 posts
Posted: Thursday, September 27, 2007 - 03:58 AM UTC
I think neither of those should be on your M2. Check out this thread for more info.

f1matt
Visit this Community
Manitoba, Canada
Joined: August 13, 2006
KitMaker: 1,021 posts
Armorama: 805 posts
Posted: Thursday, September 27, 2007 - 04:29 AM UTC
Thank you Lucas. I had forgotten about that thread. Well I already lost the charging handle right after painting so that modification is welcome. Spent ten minutes trying to find it in the carpet.

Oh and surgery was a success on my three legged dog. Using a donor leg and a little epoxy putty I was able to make him whole again.
DeskJockey
Visit this Community
Virginia, United States
Joined: July 17, 2006
KitMaker: 1,558 posts
Armorama: 1,159 posts
Posted: Thursday, September 27, 2007 - 05:54 AM UTC
Glad to hear you managed to make your dog whole. Now just make sure PETA doesn't find out you cut off a puppy's leg to do so!!
Yoni_Lev
Visit this Community
Washington, United States
Joined: September 20, 2007
KitMaker: 861 posts
Armorama: 394 posts
Posted: Thursday, September 27, 2007 - 08:00 AM UTC
I read through this whole thread, and all I can say is WOW. That is some really nice work!

b3bones
Visit this Community
Ohio, United States
Joined: July 31, 2004
KitMaker: 3 posts
Armorama: 2 posts
Posted: Thursday, September 27, 2007 - 09:04 AM UTC

Quoted Text

Thank you Lucas. I had forgotten about that thread. Well I already lost the charging handle right after painting so that modification is welcome. Spent ten minutes trying to find it in the carpet.

Oh and surgery was a success on my three legged dog. Using a donor leg and a little epoxy putty I was able to make him whole again.


I hate to admit it, and I was not going to say it before, but I was kinda thinking it would have been cool if you left your dog with three legs. Probably because I grew up next door to a kid that had a three-legged dog, and that was one cool dog...
GVoakes
Visit this Community
Manitoba, Canada
Joined: September 04, 2007
KitMaker: 193 posts
Armorama: 132 posts
Posted: Friday, September 28, 2007 - 04:08 AM UTC
Nice work, Matt!

Looking forward to seeing this in person - at least, I'm assuming you'll be bringing it out to a club meeting in the foreseeable future?

By the way, thought about writiing an article for the Journal about your build process?
f1matt
Visit this Community
Manitoba, Canada
Joined: August 13, 2006
KitMaker: 1,021 posts
Armorama: 805 posts
Posted: Friday, September 28, 2007 - 06:00 PM UTC
Don't worry Grant. You and the rest of IPMS Winnipeg will see it in person when it is done. I suppose I could whip something together for the Sprue.

As far as a three legged dog. Maybe for my next Abrams dio. Oh yes, I am planning another already.

Unfortunately it seems I'm taking two steps forward than one step back lately. I lost the charging handle for the .50. But it's okay cause turns out I don't need it.

Than I fixed the dogs leg.


Too bad I lost the goats tail. Sigh.


Started painting the base. Don't worry about the black finish. I am going to sand it one final time and than give it a final coat of black and clear gloss.

First was a coat of Tamiya desert yellow.


This was followed with some Tamiya buff.


And most recently I decided to touch up the surface of my dirt road with some baking powder. I am using this to replicate a finer and smoother surface to parts of the road. Specifically where it is driven on.


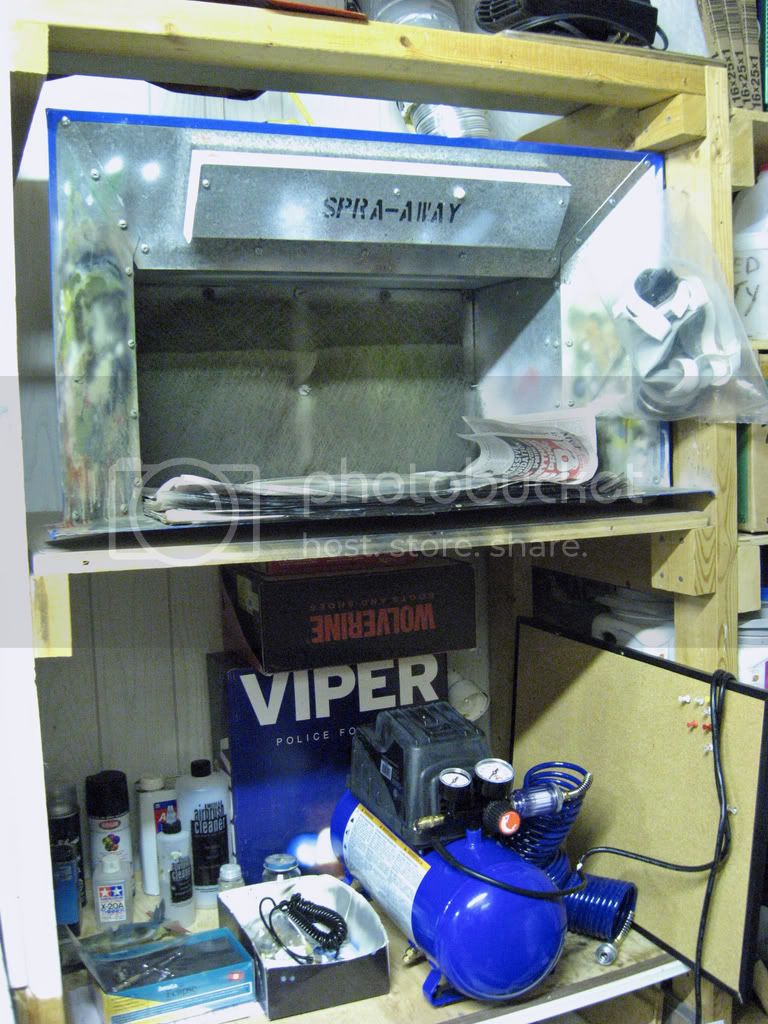
This is sealed with a coat of hairspray to keep it from being blown off during the painting process. I WAS about to spray on another colour but then....I killed my compressor. 
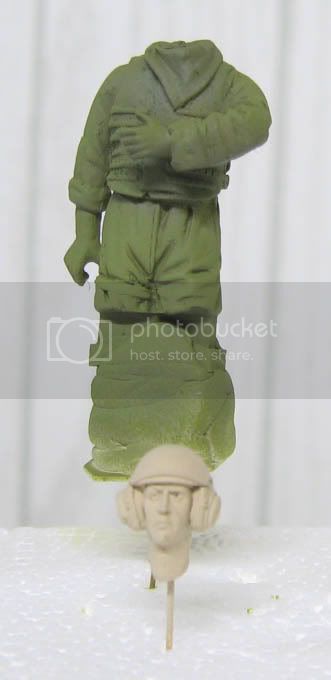
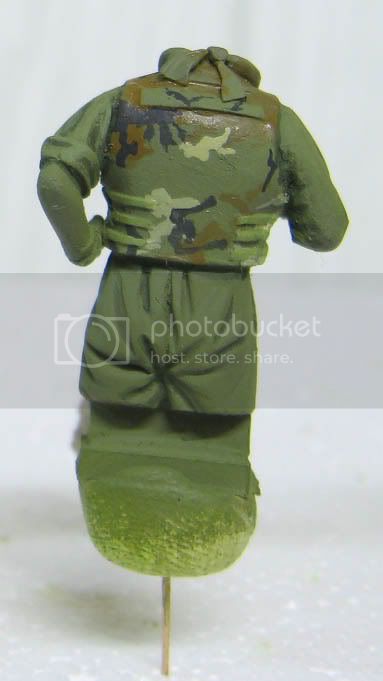
I managed to knock it off it's shelf and crash it went. Damn. Well I have been planning to get a new one for some time so I guess later today will do. Maybe one with a resevoir. And I need to get something so I can adjust the pressure. Haven't had that ability yet but that will soon change. Also I have finished my M2HB. Just need to paint it. Again. I have painted it three times and I am yet to be completely satisfied with the results. Fourth times the charm I hope.

Thanks for the comments. Bye for now.
slodder
Visit this Community
North Carolina, United States
Joined: February 22, 2002
KitMaker: 11,718 posts
Armorama: 7,138 posts
Posted: Saturday, September 29, 2007 - 12:21 AM UTC
I know you didn't think you'd be doing as much conversion work on animals as you going into this one

Don't think it's been said yet - but the base is 'killer' the high jet black is fantastic. It sets off the top wonderfully.
f1matt
Visit this Community
Manitoba, Canada
Joined: August 13, 2006
KitMaker: 1,021 posts
Armorama: 805 posts
Posted: Saturday, September 29, 2007 - 10:32 AM UTC
Thanks Scott. I was originally going to make the base flat or satin black but it looked sooo good glossy. The masking tape peeled off some of the gloss coat as you can see in the last picture. No biggy. Needed more work any way. You are right about the animals. If you don't lose anything or get a bad batch they are wonderful. If I can't find the tail it should be easy to fix.

Oh and I did get myself a brand new compressor today. It is oil-less (easy maintenance) with a 3 gallon tank. Air pressure is adjustable. And I even went out and got a moisture trap. The compressor was on sale at Home Depot for 99 bucks. Canadian or American. It no longer matters.

Here is a picture of where I do my spraying.

The spray booth was made locally and is still going strong after many years of use. The compressor is a Campbell Hausfeld and my airbrush (which I only bought this summer) is an Iwata Eclipse HP CS. I love my Iwata AB. It is so easy to use.

Well I guess I better get painting.
f1matt
Visit this Community
Manitoba, Canada
Joined: August 13, 2006
KitMaker: 1,021 posts
Armorama: 805 posts
Posted: Sunday, September 30, 2007 - 03:38 PM UTC
Started painting some faces today. I figured since I had the colours I wanted in acrylic I would try them. Never used acrylics for faces. Probably won't ever again. They dry so bloody quick I can't really play with the shadows and highlights at all. Well this is how they turned out. Guess I will strip off the paint and go out and buy some enamels.


The camera makes them look more browny-yellow than they really are. Still playing with the settings. They didn't turn out terrible but I am my own worst critic and I am not satisfied with what I have... again.

I think instead of an assembly line approach I will paint the faces start to finish one at a time. This will hopefully create more variety in skin tones.

Will try again later.