

Hosted by Darren Baker
The Womb
Removed by original poster on 09/08/09 - 12:31:23 (GMT).
jba

Joined: November 04, 2005
KitMaker: 1,845 posts
Armorama: 777 posts

Posted: Monday, September 07, 2009 - 08:38 PM UTC
9AM and the half French (and Luxembourgian) time and here we go again
Now I had my form ready, what to do with it? I hesitated quite a lot with this one. Should I pour resin in it? what?
In the end I opted to stick with what i knew, so I sealed the plaster with some superglue, greased the form carefully and pressed some Magic Sculp inside with a modeling knife, trying the whole not being too thick

Now the Magic Sculp is probably the mopst handy scratchbuilding material I use but it jhas its shortcomings. One of those is that it would tend to glue to the plaster far more than it would on plastic for instance. So I didn't wait for the MS to be thoroughly dry before removing the parts I did. To ensure I would have a circular shape in the end, I let the shape rest in some other circular plaster mould I did previously...

eh eh, now It is dry and what do I have to do? that's right, cutting the openings alright, and generally speaking thinning the two halves, I spent hours over a few days to do that, with a few accidents in the way, but well.. in the end it was sort of worth

Now I had my form ready, what to do with it? I hesitated quite a lot with this one. Should I pour resin in it? what?
In the end I opted to stick with what i knew, so I sealed the plaster with some superglue, greased the form carefully and pressed some Magic Sculp inside with a modeling knife, trying the whole not being too thick
Now the Magic Sculp is probably the mopst handy scratchbuilding material I use but it jhas its shortcomings. One of those is that it would tend to glue to the plaster far more than it would on plastic for instance. So I didn't wait for the MS to be thoroughly dry before removing the parts I did. To ensure I would have a circular shape in the end, I let the shape rest in some other circular plaster mould I did previously...
eh eh, now It is dry and what do I have to do? that's right, cutting the openings alright, and generally speaking thinning the two halves, I spent hours over a few days to do that, with a few accidents in the way, but well.. in the end it was sort of worth

roudeleiw

Joined: January 19, 2004
KitMaker: 2,406 posts
Armorama: 2,224 posts

Posted: Monday, September 07, 2009 - 09:17 PM UTC
How many nights did you dream the build to get this procedure ready? Or ar you doing your thinking under the shower?
That is really impressive! In a few steps only from a plastic ball to a deadly turret, chapeau!
Claude
That is really impressive! In a few steps only from a plastic ball to a deadly turret, chapeau!
Claude


jagd654

Joined: July 14, 2008
KitMaker: 296 posts
Armorama: 280 posts
Posted: Tuesday, September 08, 2009 - 07:12 AM UTC
WOW, JB, I am impressed 

 !!!!! Looking forward to the next stages. Cheers !
Kenneth.
!!!!! Looking forward to the next stages. Cheers !Kenneth.
jba
Joined: November 04, 2005
KitMaker: 1,845 posts
Armorama: 777 posts
Posted: Tuesday, September 08, 2009 - 07:30 PM UTC
Claude there is something like this indeed -may it be computer programming or hard diorama work, I always find my ways while laying half asleep after the light is closed, that's because the mind wanders easily 
Thank you Kenneth!! That's still the start of this thing
so..
Honestly it took me some time to get that!

The 2 halves seem to join okay..

Time to put the photoetch near the windows..so now you can see another use of this phototetch: by trimming with an X-Acto around the openings following the straight metal parts, I will be able to thin the ball turret enough so that nobody can see the actual thickness of the thing
I have been shaping the photoetch so that it can follow the curve of the ball by pressing the bits against one of my original plastic balls.

Thank you Kenneth!! That's still the start of this thing
so..
Honestly it took me some time to get that!
The 2 halves seem to join okay..
Time to put the photoetch near the windows..so now you can see another use of this phototetch: by trimming with an X-Acto around the openings following the straight metal parts, I will be able to thin the ball turret enough so that nobody can see the actual thickness of the thing
I have been shaping the photoetch so that it can follow the curve of the ball by pressing the bits against one of my original plastic balls.
FSancho

Joined: September 23, 2006
KitMaker: 58 posts
Armorama: 41 posts
Posted: Wednesday, September 09, 2009 - 05:17 AM UTC
Hello Jean,
jo, jo, jo !!!! He has returned ... (I missed you.) As always, your work Super Original.
I will alert your developments.
Best Regards my friend,
Fernando Sancho.
PD: Did you edit your DVD?
jo, jo, jo !!!! He has returned ... (I missed you.) As always, your work Super Original.
I will alert your developments.
Best Regards my friend,
Fernando Sancho.
PD: Did you edit your DVD?

newfish

Joined: June 23, 2008
KitMaker: 2,329 posts
Armorama: 2,110 posts

Posted: Wednesday, September 09, 2009 - 06:58 AM UTC
JBA I really should of commented earlier but I've been so busy with college.
Great work with making your own etch fret. I noticed you have the turret in two halves is this so is this easier for painting and to work on the interior? . So are you going to have the turret damged with it being washed out?. If so how do you plan to convey it being washed out with buckets? 
 . Sorry about the 24546545645 questions! . Fasanating work JBA!. Keep it up my good friend.

Great work with making your own etch fret. I noticed you have the turret in two halves is this so is this easier for painting and to work on the interior?
. So are you going to have the turret damged with it being washed out?. If so how do you plan to convey it being washed out with buckets? . Sorry about the 24546545645 questions! . Fasanating work JBA!. Keep it up my good friend. 
jba
Joined: November 04, 2005
KitMaker: 1,845 posts
Armorama: 777 posts
Posted: Wednesday, September 09, 2009 - 07:29 PM UTC
dear Fernando, long time no speak indeed No DVD yet!! But I have 100G of Galilée files that I may edit at some point! Thanks for viewing my friend, i will keep you posted
Thanks Jaymes, indeed I have some stuff to put in the turret: the gunner (see below), the 2 Browning bodies + some details like sight. Not i will bother much about those as most of it will be hidden, but still it must be looking like it's see a through turret. About the washing out thing no, I intend to do a diorama coming AFTER the actual washing up. I had first ask on Aeroscale about those steam hoses that they have on aircraft runways, but the silence on that part of Kitmaker can be deafening.
Still, there is one reason why I put that in water effects, there will be water indeed.
There is something I didn't tell -it's one of the main reasons why I choose 1/32 instead of 1/35, surer there is this question of Browning guns, but also that the Ball Turret gunner was to be very small to fit, so If I was about to do a tiny guy, he would look even tinier if I were to model it in 1/35 if you follow me
Anyway, I always wonder at those modellers who love their work so much that they got to the length of modelling some stuff that nobody will be able to see in the end. i am not like that. Once the Turret will be closed what will we be able to see of the gunner? his feet basically.
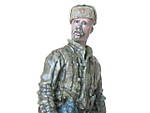
So I decided to only spend a few short hours in doing it -and not even do a sculpting but more a conversion of sorts. I Happen to own that Tamiya Schwimmwagen that I have been cannibalizing for various projects for years and I set up in taking the driver and bend him to the appropriate shape..

So i have been arranging the arms and back so that he looks like he is bending on one of the shotguns. I use some Green Stuff to tie the parts together, it makes a very strong bond

Does he fit?..

Dressing the guy with a Magic Sculp coat

In the end that how he looks like (well i have been sanding him a bit more thoroughly than that.
I have been using some Green stuff for the helmet and some of the pockets.

No DVD yet!! But I have 100G of Galilée files that I may edit at some point! Thanks for viewing my friend, i will keep you postedThanks Jaymes, indeed I have some stuff to put in the turret: the gunner (see below), the 2 Browning bodies + some details like sight. Not i will bother much about those as most of it will be hidden, but still it must be looking like it's see a through turret. About the washing out thing no, I intend to do a diorama coming AFTER the actual washing up. I had first ask on Aeroscale about those steam hoses that they have on aircraft runways, but the silence on that part of Kitmaker can be deafening.
Still, there is one reason why I put that in water effects, there will be water indeed.
There is something I didn't tell -it's one of the main reasons why I choose 1/32 instead of 1/35, surer there is this question of Browning guns, but also that the Ball Turret gunner was to be very small to fit, so If I was about to do a tiny guy, he would look even tinier if I were to model it in 1/35 if you follow me
Anyway, I always wonder at those modellers who love their work so much that they got to the length of modelling some stuff that nobody will be able to see in the end. i am not like that. Once the Turret will be closed what will we be able to see of the gunner? his feet basically.
So I decided to only spend a few short hours in doing it -and not even do a sculpting but more a conversion of sorts. I Happen to own that Tamiya Schwimmwagen that I have been cannibalizing for various projects for years and I set up in taking the driver and bend him to the appropriate shape..
So i have been arranging the arms and back so that he looks like he is bending on one of the shotguns. I use some Green Stuff to tie the parts together, it makes a very strong bond
Does he fit?..
Dressing the guy with a Magic Sculp coat
In the end that how he looks like (well i have been sanding him a bit more thoroughly than that.
I have been using some Green stuff for the helmet and some of the pockets.

youngc

Joined: June 05, 2007
KitMaker: 2,166 posts
Armorama: 1,080 posts

Posted: Wednesday, September 09, 2009 - 10:20 PM UTC
G'day JB,
Don't think I'm not following! I only have time to peek once in a while... only to follow my favourite topics. Big scary final exams are looming... so I'm
Anyway your work here looks brilliant. PE, sculpting... wow!
Talk soon mate,
Chas
Don't think I'm not following! I only have time to peek once in a while... only to follow my favourite topics. Big scary final exams are looming... so I'm
Anyway your work here looks brilliant. PE, sculpting... wow!
Talk soon mate,
Chas

jagd654
Joined: July 14, 2008
KitMaker: 296 posts
Armorama: 280 posts
Posted: Thursday, September 10, 2009 - 12:30 AM UTC
Hey JB !
Brilliant idea using the Tamiya figure for the ball gunner !!!! I've always wondered what to do with the "short " guy . Does it mean then that you won't be making all the oxygen hoses,straps,etc. that is usually seen on such aircrew men ? I wish I could do that (not making stuff that cannot be seen by others-I'm one of the guilty "hidden details" modelers
  ) Until your next update, my friend. Cheers !
Kenneth .
!Brilliant idea using the Tamiya figure for the ball gunner
!!!! I've always wondered what to do with the "short " guy . Does it mean then that you won't be making all the oxygen hoses,straps,etc. that is usually seen on such aircrew men ? I wish I could do that (not making stuff that cannot be seen by others-I'm one of the guilty "hidden details" modelers ) Until your next update, my friend. Cheers !Kenneth
.
slodder

Joined: February 22, 2002
KitMaker: 11,718 posts
Armorama: 7,138 posts
Posted: Thursday, September 10, 2009 - 12:35 AM UTC
jba
This is moving along really well. For a round plaster piece it is amazing. I would not want to have to control myself with these materials.
The figure was an added bonus, nice sculpting.
This is moving along really well. For a round plaster piece it is amazing. I would not want to have to control myself with these materials.
The figure was an added bonus, nice sculpting.


bobman331
Joined: April 13, 2009
KitMaker: 177 posts
Armorama: 142 posts

Posted: Thursday, September 10, 2009 - 03:52 PM UTC
lmao when isaw that i got a choclate medal jba gave me....my heart leapt with happieness...becase i hd just recived a medal from on of the modeling god...lolololololol. this looks to be an amazin model. are you just doin a cross section? anothr submerged plane? with a horribly drowned gunner? another dio that just pours emotion like jaws or galilee? 
jba
Joined: November 04, 2005
KitMaker: 1,845 posts
Armorama: 777 posts
Posted: Thursday, September 10, 2009 - 07:57 PM UTC
Hi Chas, well i thought you had read the foreword of the SBS which implied the diorama would be of graphic material, and -as an under 18 years old citizen- decided to exclude yourself from something that might potentially shock or hurt you , anyway, I thank you for visiting and hope you succeed handsomely your exams
Hi Kenneth, he is short is he? that Tamiya Schwimmwagen guy doesn't look at all like the Germans I ever got to meet believe me Well, there will be some hoses, but ABOVE the ball turret, indeed there were at least 3 different plugs coming to the ball turret, it really gives the thing a Matrix / Star Wars / Gundam look -actually it's one of the reasons why i was so caught by the ball turret, it really looks like a TIE fighter without the wings! There is so much of a retro-futurism thing about it.
But you know about the hidden details, well no.. I guess you know about Joseph Neumyer? When i first learned he was in fact a sort of art director and that it was an army of Oompa Loompas that were doing all the building/ Painting for him I was first really pissed. But then I thought about it twice and think that he is right! Actually, I have SO much diorama ideas inside my head that I wouldn't mind having 2 or 3 guys working for me to get the job actually done because I am so bloody slow ! So well, no time for hidden details indeed..
Well they look like of great quality no problem, but then I laughed and laughed again at seeing them! You know this uniformity I condemn in diorama making? well it starts with everybody *using the same tint of rust* -that same MIG one I was holding in my hands!
So I am sorry, but I will keep on mixing my won pigments -using Migs of course, but really not straight from the pot .. errr "jar" or whatever their efficient commercial service calls them.
All that to say, that the last thing I want is that my dioramas could look like the ones of someone else, and that i am ready to go any length to ensure that, and that indeed means having to control some stuff that ruins my clothes
Ah! Erik that will be the only place you can ever get a medal from me as I decided to go on an indefinitely strike on modelling shows
Nope, no cross section, I need to keep this thing open to insert the gunner once painted + the Guns. I will close it in the end -especially because there is a lot of stuff, like hoses coming out of the turret. This diorama will pour out emotion (and blood) but in a more dry manner, it will not be a romantic diorama! I really have to succeed those kind of different water effects and the light control I plan for that one are really hard to obtain, and that will be a lot of stress when i will be there .. but just not yet
Anyway, thanks for those who check daily, plenty of pics to follow so that you are sure you don't check for nothing
Look at this, this is some sort of support for the ball turret that you find inside the plane

So well, here we go, Owning that circular cutter is one really great thing when you have rounds to cut (obviously)

So i started by doing the circles that will end up around the Ball Turret. I had done some in photoetch but those were way too thin.

That's the most stupid way i found yet to vacuform something: I put one of my balls on my Iron holder and pressed the heated plastic against it this way! Well, it worked tremendously well

It worked

So now you can see how it is after some extra supports done out of Magic Sculp and a bit of extra photoetch.

Hi Kenneth, he is short is he? that Tamiya Schwimmwagen guy doesn't look at all like the Germans I ever got to meet believe me
Well, there will be some hoses, but ABOVE the ball turret, indeed there were at least 3 different plugs coming to the ball turret, it really gives the thing a Matrix / Star Wars / Gundam look -actually it's one of the reasons why i was so caught by the ball turret, it really looks like a TIE fighter without the wings! There is so much of a retro-futurism thing about it.But you know about the hidden details, well no.. I guess you know about Joseph Neumyer? When i first learned he was in fact a sort of art director and that it was an army of Oompa Loompas that were doing all the building/ Painting for him I was first really pissed. But then I thought about it twice and think that he is right! Actually, I have SO much diorama ideas inside my head that I wouldn't mind having 2 or 3 guys working for me to get the job actually done because I am so bloody slow ! So well, no time for hidden details indeed..
Quoted Text
Thanks for popping out Scott. hey what you say just remind me that yesterday I received my first ever order for MIG PIGMENTS, 6 jars that I needed because I am tired of mixing colours with my Windsor and Newton ones - you know how they are the real thing and they can't compare etc.I would not want to have to control myself with these materials.
Well they look like of great quality no problem, but then I laughed and laughed again at seeing them! You know this uniformity I condemn in diorama making? well it starts with everybody *using the same tint of rust* -that same MIG one I was holding in my hands!
So I am sorry, but I will keep on mixing my won pigments -using Migs of course, but really not straight from the pot .. errr "jar" or whatever their efficient commercial service calls them.
All that to say, that the last thing I want is that my dioramas could look like the ones of someone else, and that i am ready to go any length to ensure that, and that indeed means having to control some stuff that ruins my clothes
Ah! Erik that will be the only place you can ever get a medal from me as I decided to go on an indefinitely strike on modelling shows
Nope, no cross section, I need to keep this thing open to insert the gunner once painted + the Guns. I will close it in the end -especially because there is a lot of stuff, like hoses coming out of the turret. This diorama will pour out emotion (and blood) but in a more dry manner, it will not be a romantic diorama! I really have to succeed those kind of different water effects and the light control I plan for that one are really hard to obtain, and that will be a lot of stress when i will be there
.. but just not yet Anyway, thanks for those who check daily, plenty of pics to follow so that you are sure you don't check for nothing
Look at this, this is some sort of support for the ball turret that you find inside the plane
So well, here we go, Owning that circular cutter is one really great thing when you have rounds to cut (obviously)
So i started by doing the circles that will end up around the Ball Turret. I had done some in photoetch but those were way too thin.
That's the most stupid way i found yet to vacuform something: I put one of my balls on my Iron holder and pressed the heated plastic against it this way! Well, it worked tremendously well
It worked
So now you can see how it is after some extra supports done out of Magic Sculp and a bit of extra photoetch.
endrju007

Joined: December 05, 2007
KitMaker: 2,435 posts
Armorama: 1,256 posts

Posted: Thursday, September 10, 2009 - 09:23 PM UTC
Jean-Bernard,
Once again youve done something that looks incredibly easy, and Id even think that it actually is if only I wouldnt try to do something like that before
Id never managed to keep the thickness of heat treated plastic equal on the required area
I really cant wait too see the final result after what youve written after such beautiful and romantic dioramas of yours it is going to be real shock treatment to see more brutal and served cold diorama made by you.
Andrzej


jaypee

Joined: February 07, 2008
KitMaker: 1,699 posts
Armorama: 168 posts

Posted: Thursday, September 10, 2009 - 10:16 PM UTC
Always wondering if styrene would behave like that. I often smash mould canopys using perspex sheet. Keeping the thickness is a trick of getting the plastic floppy enough so you don't need to pull too hard to conform to the shape. Kudos for the action shot.
I like the trim it in place style.
As far as having teams do your work for you. All masterworks are produced in such a way. For example Titian worked as a painter for bellini's studio, before starting out on his own. Ideas come quicker than the means to produce them.
I'm happy watching an artist at work though I'll stick to painting plastic kits.

CReading

#001

Joined: February 09, 2002
KitMaker: 1,726 posts
Armorama: 892 posts
Posted: Friday, September 11, 2009 - 03:15 AM UTC
JBA,
You never cease to amaze. Following closely.
Oompa Loompa
C.
You never cease to amaze. Following closely.
Oompa Loompa
C.

martyncrowther
Joined: September 12, 2007
KitMaker: 1,548 posts
Armorama: 1,407 posts
Posted: Friday, September 11, 2009 - 03:38 AM UTC
Breath taking!

yeahwiggie

Joined: March 24, 2006
KitMaker: 2,093 posts
Armorama: 1,359 posts

Posted: Friday, September 11, 2009 - 04:43 AM UTC
[b][ put one of my balls on my Iron holder and pressed the heated plastic against it this way! Well, it worked tremendously well
/b]
Boy ! That must've hurt!!
It's not just the way you are writing, but what you are building and showing is truely breathtaking.
On the other hand it is not inspiring. You dwarf us all!!
/b]
Boy ! That must've hurt!!
It's not just the way you are writing, but what you are building and showing is truely breathtaking.
On the other hand it is not inspiring. You dwarf us all!!

grave_digger

Joined: December 30, 2008
KitMaker: 952 posts
Armorama: 834 posts

Posted: Friday, September 11, 2009 - 09:55 AM UTC
Good progres, JBA, that´s coming along nicely, and also your techniques are quiet interesting. Keep that going.
Libor
Libor
bobman331
Joined: April 13, 2009
KitMaker: 177 posts
Armorama: 142 posts
Posted: Friday, September 11, 2009 - 11:42 AM UTC
wow nice work with the photoetch. i could never really get that homade pe stuff to work. alwas ended up with an acid burn and some charred bits ashes of brass at the bottom of a very sad 15 year old modeler with a can full of acid. and extremely light pockets....i think ill stick with the venderlin and areis stuff......oh and btw, real rust crushed into a powder works ten times better than mig pigements... i just scrape some off the sighn post in front of my house...

Grumpyoldman
Joined: October 17, 2003
KitMaker: 15,338 posts
Armorama: 7,297 posts

Posted: Friday, September 11, 2009 - 01:26 PM UTC
The Bullets are in flight!

jba
Joined: November 04, 2005
KitMaker: 1,845 posts
Armorama: 777 posts
Posted: Friday, September 11, 2009 - 08:45 PM UTC
Andrzej, to get the heat uniform on all sides I try to get patient and slowly hover the plastic over the fame -duh, i am pretty sure you do this too! Actually it works only for small surfaces, I needed basically 1 inch 1/2, for bigger surfaces I put a lot of plastic in the dustbin. I should build one of those vacuform DIY machines whose plans you can find on internet..
well, me too can't wait for the result, I indeed have a few weeks in advance with the build but I can't say yet uit is a success
John-Paul with this (bad) methodology you hurt your fingers a lot, really even a small vacuform machine -but something that actually *holds* the plastic borders for you should be a must. Didn't knew about le Titien, but knew about Damien Hirst! Plastic kits are great, but how on earth will you ever get a Fairey Barracuda in 1/32 ?
Charles, a *handsome* Oompa Loompa
You are a bit huge for a Oompa Loompa now I come to think about it
Martyn thanks
Ron you got me, I was actually aware of that special part right since the start but here I let it slip away, it hurts
Thanks for the dwarf, but the one below I don't
hey Libor, complete accuracy, constance and symmetry are your child, they are not mine
Well Erik, you know the acids I use are mostly harmess, they sure ruin clothes but they are very "thin" you see. No chance to burn yourself or you really dip your hands for minutes in the stuff. The vapours are not very good once heated but there is nothing to compare with real blighter material like polyester resin for instance.
I think you are right with real rust, but you see Mig pigments are good because they are really thin, and rust is good because it is less, and bad artist pigments are also good because they are rough, don't mix etc etc. Nobody is really right and all this stuff serves equally depending whether you want texture or not. I don't use real rust myself (though I should probably) simply because I don't want to have the "real colour" of the rust and depend too much on external sources of light. If I want to do a sunlit rust I will use a different colour than if I want rust under a truck for instance. It's all a question of light, and how a diorama should bring its own with it
Dave, it looks like rain on The Womb
Thanks
So now let's work on the axis of the ball Turret, one each side of the thing.
As you could see on the photoetch fret (if you got good eyes) I had foreseen to do the side axis as some photoetch part -that's a piece less to cut in plastic for me. There is also the fact that Photoetch is strong enough to allow me to apply a thin plastic strip on the outside to make the main "support" metal part.

How to get this shape? simple, i first cut a sheet of very thin platsic, shaped it around a sort of small pen or needle, and then with a nail shaped the "change of shape", after I just had to glue it on the fret

Here i actually glue the plastic bit -the trick to get the shape still right despite the torsion applied to the plastic was to keep a "tail" long enough so that the plastic keeps it shape, so i just had to put the plastic on the axis and it was okay
honestly, I am not sure my English vocabulary is enough to explain this bit

So a few extra plastic bits, 2 photoetch bits I had made on puprose, two of those great O'Meara sponsored rivets and I call it finished!
Is it perfect?
No!
One of the inner rounds is bigger than the other

well, me too can't wait for the result, I indeed have a few weeks in advance with the build but I can't say yet uit is a success
John-Paul with this (bad) methodology you hurt your fingers a lot, really even a small vacuform machine -but something that actually *holds* the plastic borders for you should be a must. Didn't knew about le Titien, but knew about Damien Hirst! Plastic kits are great, but how on earth will you ever get a Fairey Barracuda in 1/32 ?
Charles, a *handsome* Oompa Loompa
You are a bit huge for a Oompa Loompa now I come to think about it
Martyn thanks
Ron you got me, I was actually aware of that special part right since the start but here I let it slip away, it hurts
Thanks for the dwarf, but the one below I don't
hey Libor, complete accuracy, constance and symmetry are your child, they are not mine
Well Erik, you know the acids I use are mostly harmess, they sure ruin clothes but they are very "thin" you see. No chance to burn yourself or you really dip your hands for minutes in the stuff. The vapours are not very good once heated but there is nothing to compare with real blighter material like polyester resin for instance.
I think you are right with real rust, but you see Mig pigments are good because they are really thin, and rust is good because it is less, and bad artist pigments are also good because they are rough, don't mix etc etc. Nobody is really right and all this stuff serves equally depending whether you want texture or not. I don't use real rust myself (though I should probably) simply because I don't want to have the "real colour" of the rust and depend too much on external sources of light. If I want to do a sunlit rust I will use a different colour than if I want rust under a truck for instance. It's all a question of light, and how a diorama should bring its own with it
Dave, it looks like rain on The Womb
Thanks
So now let's work on the axis of the ball Turret, one each side of the thing.
As you could see on the photoetch fret (if you got good eyes) I had foreseen to do the side axis as some photoetch part -that's a piece less to cut in plastic for me. There is also the fact that Photoetch is strong enough to allow me to apply a thin plastic strip on the outside to make the main "support" metal part.
How to get this shape? simple, i first cut a sheet of very thin platsic, shaped it around a sort of small pen or needle, and then with a nail shaped the "change of shape", after I just had to glue it on the fret
Here i actually glue the plastic bit -the trick to get the shape still right despite the torsion applied to the plastic was to keep a "tail" long enough so that the plastic keeps it shape, so i just had to put the plastic on the axis and it was okay
honestly, I am not sure my English vocabulary is enough to explain this bit
So a few extra plastic bits, 2 photoetch bits I had made on puprose, two of those great O'Meara sponsored rivets and I call it finished!
Is it perfect?
No!
One of the inner rounds is bigger than the other
Pavlovsdog
Joined: June 05, 2006
KitMaker: 438 posts
Armorama: 352 posts

Posted: Friday, September 11, 2009 - 09:27 PM UTC
Jean -Bernard ,
Wonderful inspiring thought provoking stuff ! keep up the great work ,
Best wishes,
Jerry
Wonderful inspiring thought provoking stuff ! keep up the great work ,
Best wishes,
Jerry

Plasticbattle
#003
Joined: May 14, 2002
KitMaker: 9,763 posts
Armorama: 7,444 posts

Posted: Friday, September 11, 2009 - 11:18 PM UTC
Hi JB. Some images that might help....


Plasticbattle
#003
Joined: May 14, 2002
KitMaker: 9,763 posts
Armorama: 7,444 posts
Posted: Friday, September 11, 2009 - 11:20 PM UTC


 |

WEB HOSTING BY


Copyright ©2021 Armorama and Kitmaker Network, a subsidiary of Silver Star Enterprises
All Rights Reserved. Please read our Conditions of Use and Privacy Policy.
All Rights Reserved. Please read our Conditions of Use and Privacy Policy.