Hosted by Darren Baker
The Womb
Posted: Friday, September 11, 2009 - 11:23 PM UTC
slodder
North Carolina, United States
Joined: February 22, 2002
KitMaker: 11,718 posts
Armorama: 7,138 posts
Joined: February 22, 2002
KitMaker: 11,718 posts
Armorama: 7,138 posts
Posted: Saturday, September 12, 2009 - 01:32 AM UTC
The round hanger is great. I can not wait to see how this is going to be displayed - a cut out of a fuselage, just the hanging ball, .....
jagd654
Singapore / 新加坡
Joined: July 14, 2008
KitMaker: 296 posts
Armorama: 280 posts
Joined: July 14, 2008
KitMaker: 296 posts
Armorama: 280 posts
Posted: Saturday, September 12, 2009 - 06:18 AM UTC
Hey JB !
Awesome update, my friend !!!!! I never really thought to get the ball-shape for the turret that way. Frank's series of detailed photos for the B-17 ball turret should really help you there with the construction details. Looking forward to the next step in the journey . Cheers !
Kenneth .
Awesome update, my friend !!!!! I never really thought to get the ball-shape for the turret that way. Frank's series of detailed photos for the B-17 ball turret should really help you there with the construction details. Looking forward to the next step in the journey . Cheers !
Kenneth .
bobman331
Massachusetts, United States
Joined: April 13, 2009
KitMaker: 177 posts
Armorama: 142 posts
Joined: April 13, 2009
KitMaker: 177 posts
Armorama: 142 posts
Posted: Saturday, September 12, 2009 - 07:39 AM UTC
jba i think the undescribable things you are talking about are the vertical axles or somthing like that.
exigent99
Joined: July 30, 2007
KitMaker: 100 posts
Armorama: 78 posts
KitMaker: 100 posts
Armorama: 78 posts
Posted: Saturday, September 12, 2009 - 08:12 AM UTC
What I find intriguing is that fact that this thread is labeled as water effects.....unless I missed something earlier in the thread, or it was a mistake, I'm eager to see how water will get worked into this one.
jba
Rhone, France
Joined: November 04, 2005
KitMaker: 1,845 posts
Armorama: 777 posts
Joined: November 04, 2005
KitMaker: 1,845 posts
Armorama: 777 posts
Posted: Sunday, September 13, 2009 - 12:01 AM UTC
-Well thanks a lot Jerry, nice to see you popping out on that one as well!
-Hey Frank, wow, i am astonished, much thanks for this! I thought I had check most books on B-17, but not a Lou Drendel one (I have some of his books on Vietnam planes though). The thing is, I am sure there are several versions of Sperry ball turret, i also suspect that for instance the same B-17 version like the E for instance would have been getting some different kind of ball turrets that all differ in minor details. That's a question i should ask on specialist forums, but I would suspect some different factory would have build the ball turret which would be then delivered to the Boeing factories..
Consider this:
There are 4 rivets that hold the browning, i don't get this on my version. There is a small "attach" on the axle, i don't get that either, same thing for the pins and metal part that protects the place where the cartridges are ejected. Some similar differences exist also with the exit hatch which show 2 big depressions that i didn't end up in modelling. really you can cry for me Argentina, because If i had gotten your pics earlier, maybe i would have make a much better work
Oh well, thanks for posting them, the first picture with the hit is particularly frightening. mine will not be that punctured, just 2 windows smashed and that would be enough.
The weathered ball Turret pic is very interesting as I asked myself about that. What would be the average life expectancy of a B-17 delivered in '43? maybe 3 or 4 trips to Germany? 30 hours of flight before being wrecked? So the weathering would not be that huge? yet your pic and another I have would prove that
1/ the ball turret got showered by dust and mud during landing and take of.
2/ you needed a lot of grease to make that thing work.
Questions questions... thanks again for the great reference
Question for airy guys -no company does ammunitions bands for browning machine guns in 1/32? I have been finding some in 1/48, but no 1/32..
Kenneth my friend, if you knew how much i am advanced in that diorama compared to what the SBS shows
Erik, exactly those are the vertical axles My English can be pretty bad to explain such precise things.
Matthew, I can't do a diorama without any water in it, If i do, my throat would get too dry while building basically..
there are 3 things I want to succeed in this diorama:
-the ball turret because it's technically something I never did
-the colour scheme with a big burst of light only on some metallic parts while the rest would be somewhat left in darkness
-the water effects that must tie the scene together.
And as usual the last point will be the harder to obtain
Anyway, we are Sunday, tomorrow I will spend the day in muddy (but really handsome) Burgundy so I won't get any time for an update so today i will just show a few things..
So i was building my dioramas outside lately, which means a 80m² square carpet monster with dried leaves grass and all, and it that ate that:
how angry could I get?
Anyway, time for another photoetch sheet!
pjmooney
Virginia, United States
Joined: October 22, 2007
KitMaker: 107 posts
Armorama: 102 posts
Joined: October 22, 2007
KitMaker: 107 posts
Armorama: 102 posts
Posted: Sunday, September 13, 2009 - 08:41 AM UTC
Hey JB -
I LOVE this build, but I love all your work - so inspirational to those of us struggling in the shadows. However, this one is special as my Uncle, Mike Marinnan was a ball turret gunner on a B-17F - and he was an IRISHMAN from New York. We tend to be built close to the ground for better stability. ;-)
I've crawled all over and around ball turrets and got a chance to fly in a 17 and observe a turret in operation as a crew member demonstrated all aspects of getting in and out, and moving around in flight.
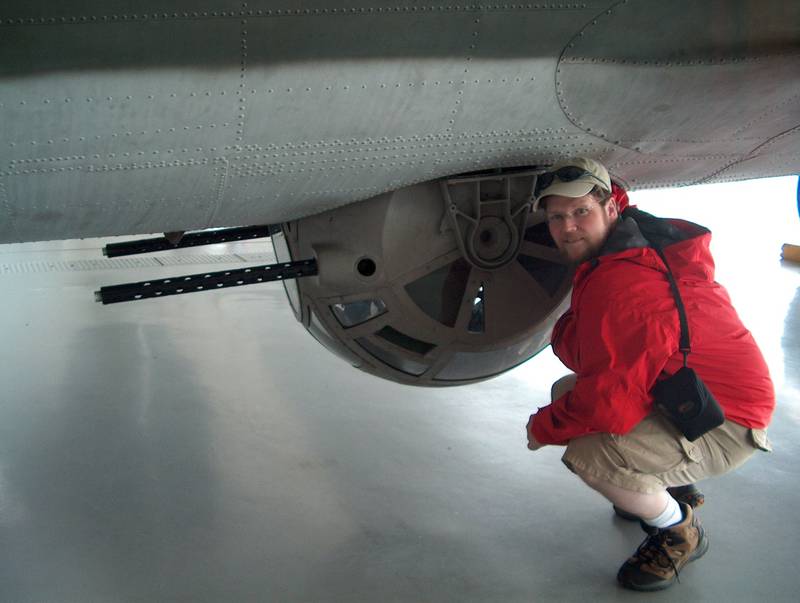
I also got a chance to crawl around outside of a turret at the American Air Museum at Duxford, where they have a 17G made up as a F and painted as Memphis Belle (she flew in the movie). Here's a photo of me on the starboard side of the turret...
I suggest you contact the good folks at IWM Duxford and ask for their help photographing any aspect you need. In my experience they have been an incredible resource and VERY helpful!
Good luck and can't wait to see more!!!!
Pat Mooney
I LOVE this build, but I love all your work - so inspirational to those of us struggling in the shadows. However, this one is special as my Uncle, Mike Marinnan was a ball turret gunner on a B-17F - and he was an IRISHMAN from New York. We tend to be built close to the ground for better stability. ;-)
I've crawled all over and around ball turrets and got a chance to fly in a 17 and observe a turret in operation as a crew member demonstrated all aspects of getting in and out, and moving around in flight.
I also got a chance to crawl around outside of a turret at the American Air Museum at Duxford, where they have a 17G made up as a F and painted as Memphis Belle (she flew in the movie). Here's a photo of me on the starboard side of the turret...
I suggest you contact the good folks at IWM Duxford and ask for their help photographing any aspect you need. In my experience they have been an incredible resource and VERY helpful!
Good luck and can't wait to see more!!!!
Pat Mooney
jba
Rhone, France
Joined: November 04, 2005
KitMaker: 1,845 posts
Armorama: 777 posts
Joined: November 04, 2005
KitMaker: 1,845 posts
Armorama: 777 posts
Posted: Monday, September 14, 2009 - 08:21 PM UTC
Hey Pat, i thought the image was pretty good enough to get it big way
Thanks indeed for the compliments -may I notice that while your grandfather was fit to enter in the ball turret, your picture show both things
-how tall you are
-how the ball turret would be probably waaay too small for you
Thanks a lot for your suggestion -re, contacting IWM Duxford, but honestly it is too late as I completely finished the turret itself last week-end
I can live with a few inaccuracies in my ball turret, as you can see, some details appearing in yours don't match Frank's version which then don't match mine
Now for that ole dejà vu feeling..
Developing the fret..
ooh it shines in the sun..
In the ferric chloride bath, checking halfway
Here are the pieces, notice that as I never attach my metal pieces to the fret, I have to, filter the acid to get the little bits.. Some are missing obviously!
My machine didn't etch the whole fret at the same speed, so some of the bits are overburn, no problem, we will use those later too
roudeleiw
Luxembourg
Joined: January 19, 2004
KitMaker: 2,406 posts
Armorama: 2,224 posts
Joined: January 19, 2004
KitMaker: 2,406 posts
Armorama: 2,224 posts
Posted: Monday, September 14, 2009 - 11:50 PM UTC
Jean Bernard,
i just think that you reached another modeling or scratchbuilding dimension with this build.
So many difficult parts in such a tiny area, that's an achievement!
Claude
(not going to do PE-frets myself anytime soon, i saw the hint from a few days ago)
i just think that you reached another modeling or scratchbuilding dimension with this build.
So many difficult parts in such a tiny area, that's an achievement!
Claude
(not going to do PE-frets myself anytime soon, i saw the hint from a few days ago)
Posted: Tuesday, September 15, 2009 - 02:32 AM UTC
Hi JB. Glad the images are helpful ... and sorry they have caused more questions. Thats wasn´t the idea. I had the chance to get these, so I took all that I could get, to help with your project. I have no personal interest in aircraft, so i didn´t realise there were different versions. Im enjoying the thread anyway!
jagd654
Singapore / 新加坡
Joined: July 14, 2008
KitMaker: 296 posts
Armorama: 280 posts
Joined: July 14, 2008
KitMaker: 296 posts
Armorama: 280 posts
Posted: Tuesday, September 15, 2009 - 03:12 AM UTC
JB, my friend, another TOP NOTCH update to your thread !!!!! Honestly, you must have pretty good eyesight to do such intricate photo-etch frets; I'd probably go "blind" doing them myself . Anyhow, I think you hit the nail on the head by stating that there were probably as many detail differences in the ball-turret details as there were ball-turret manufacturers. After all, it was a world war ! Cheers and looking forward to the next installment.
Kenneth .
Kenneth .
barbacanosa
Baleares, Spain / España
Joined: August 09, 2005
KitMaker: 296 posts
Armorama: 250 posts
Joined: August 09, 2005
KitMaker: 296 posts
Armorama: 250 posts
Posted: Tuesday, September 15, 2009 - 05:14 AM UTC
JB, you leave me speechless
I always thought you load the model with more artistic of the forums.
but is also now I have to remove the hat to the technical quality
you show.
What planet are you from??
saludos
Domi
I always thought you load the model with more artistic of the forums.
but is also now I have to remove the hat to the technical quality
you show.
What planet are you from??
saludos
Domi
jba
Rhone, France
Joined: November 04, 2005
KitMaker: 1,845 posts
Armorama: 777 posts
Joined: November 04, 2005
KitMaker: 1,845 posts
Armorama: 777 posts
Posted: Tuesday, September 15, 2009 - 09:36 PM UTC
Thanks Claude! It would seem pretty bold to say that your builds would benefit from homemade PE as they are already impressive enough, and yet and yet..
You know I built the machines myself, but i know some are available -but not for cheap- directly on the internet. I really think the hard part is to design the fret..
Happy to know you enjoy the thread Frank! Come on, i am ABSOLUTELY happy that you participate this way and make me ask new questions etc! If I didn't want that i would stay on my own website doing things in my corner. Building a part of such a well known plane, it was bound to be somewhat at least partly inaccurate, because I don't know loads about planes, but in the end that's no problem as what i want to create is a striking scene, not necessary a perfect one.
Then even when I modelled a long forgotten French cruiser, guys like Rui Matos and Jim Baumann came up with innacuracies in what i was doing
so yeah, thanks again basically
Kenneth my friend, you wouldn't believe how my eyesight is poor, I wear glasses most of the time, and I lost my best pair last week -I've got a replacement one that makes me look like i"m out of Wayne's World these days
I love that one! quote of the day!
Thank you Domi, you are of another planet you too you know
So what are these parts? I supposed you guessed right by thinking is was indeed some B-17 structural elements. One bigger for the center, and the 2 thinnest each side. Which means 2 of them to do one structural element, there should be enough to do 5.
I am going to weld those -so the first thing is to clean the parts with Acetone, so that I can remove all the photoresist material still stuck to the part
So here is the material i use! Some crappy Camping Gaz iron that i will change because the electric cable is so thick that i knock all the stuff on my desk while moving it, some Carrs flux and solder, and a thing to hold the iron with a small damp sponge on it to clean the iron.
I usually weld on an old kitchen tile (there was aplenty in the cellar when we moved in -along, would you believe it - some Wehrmacht postal bags complete with eagle and cross!!!)
Here is the B-17 section after 1 hour of welding!
You know I built the machines myself, but i know some are available -but not for cheap- directly on the internet. I really think the hard part is to design the fret..
Happy to know you enjoy the thread Frank! Come on, i am ABSOLUTELY happy that you participate this way and make me ask new questions etc! If I didn't want that i would stay on my own website doing things in my corner. Building a part of such a well known plane, it was bound to be somewhat at least partly inaccurate, because I don't know loads about planes, but in the end that's no problem as what i want to create is a striking scene, not necessary a perfect one.
Then even when I modelled a long forgotten French cruiser, guys like Rui Matos and Jim Baumann came up with innacuracies in what i was doing
so yeah, thanks again basically
Kenneth my friend, you wouldn't believe how my eyesight is poor, I wear glasses most of the time, and I lost my best pair last week -I've got a replacement one that makes me look like i"m out of Wayne's World these days
Quoted Text
After all, it was a world war
I love that one! quote of the day!
Thank you Domi, you are of another planet you too you know
So what are these parts? I supposed you guessed right by thinking is was indeed some B-17 structural elements. One bigger for the center, and the 2 thinnest each side. Which means 2 of them to do one structural element, there should be enough to do 5.
I am going to weld those -so the first thing is to clean the parts with Acetone, so that I can remove all the photoresist material still stuck to the part
So here is the material i use! Some crappy Camping Gaz iron that i will change because the electric cable is so thick that i knock all the stuff on my desk while moving it, some Carrs flux and solder, and a thing to hold the iron with a small damp sponge on it to clean the iron.
I usually weld on an old kitchen tile (there was aplenty in the cellar when we moved in -along, would you believe it - some Wehrmacht postal bags complete with eagle and cross!!!)
Here is the B-17 section after 1 hour of welding!
HONEYCUT
Victoria, Australia
Joined: May 07, 2003
KitMaker: 4,002 posts
Armorama: 2,947 posts
Joined: May 07, 2003
KitMaker: 4,002 posts
Armorama: 2,947 posts
Posted: Wednesday, September 16, 2009 - 12:21 AM UTC
Egads!
Fastidious, meticulous, etcetera.
I get in these moods occasionally Jean-Bernard, but they are momentary and sporadic, and I need to go out and kick a ball to save my sanity
You my friend manage a sustained burst time and time again...
I am in no way an aircraft afficionado but this is holding my interest just fine
Look forward to some more
Brad
slodder
North Carolina, United States
Joined: February 22, 2002
KitMaker: 11,718 posts
Armorama: 7,138 posts
Joined: February 22, 2002
KitMaker: 11,718 posts
Armorama: 7,138 posts
Posted: Wednesday, September 16, 2009 - 12:41 AM UTC
So "THATS" what the second fret is for! Holy cow scratching a section of B17 - NICE
jagd654
Singapore / 新加坡
Joined: July 14, 2008
KitMaker: 296 posts
Armorama: 280 posts
Joined: July 14, 2008
KitMaker: 296 posts
Armorama: 280 posts
Posted: Wednesday, September 16, 2009 - 01:00 AM UTC
WOW, JB; I'm truly speechless !!!! That's one mighty fine piece of welding you did there .I'm glad you liked the quote about "it being a world war" . Sometimes people tend to forget the actual situation the vehicles/aircraft/people were in whilst seeking for the most "accurate" depiction of the above mentioned items they are trying to model. As long as the item works, who really cares about the minute details ? BTW, did you ever find a use for those discarded German postal bags ? I may be tempted to buy one off you if the price is reasonable ! Cheers, my friend, and I hope you find a better pair of spectacles to use soon !
Kenneth .
Kenneth .
jba
Rhone, France
Joined: November 04, 2005
KitMaker: 1,845 posts
Armorama: 777 posts
Joined: November 04, 2005
KitMaker: 1,845 posts
Armorama: 777 posts
Posted: Wednesday, September 16, 2009 - 07:57 PM UTC
Hey Brad my friend! happy to see you here too - Thanks for your enthusiastic comments That plane will still be resting on solid ground, in a pool of dust and other things!
Right Scott, that will be a small part though
Now I just wonder how looks like burnt out aluminium..
Kenneth, you know about world war and accuracy and etc. When I was doing my military service, I have to wear "blue" clothes for the desk job, and "green" ones for the dirty work. But they couldn't find some suitable green stuff for me, so they ended up giving over long trousers that were so new they were *shiny* and were *baggy* too, and some too short jacket that were maybe 20 years old that looked faded brown or something -indeed like a Punk's is Not Dead sort of jacket . So now when I read about accuracy in uniforms, I tend to chuckle quite a bit Unfortunately i don't have any photo..
But I have of my mail bags! Not to sell sorry but lying comfortably under my garden hose and other stuff to pour concrete. The second one which is below the brown one is in much better state.
What you can find in those old French houses is amazing. People scavenged what they could in those times.
Thanks about your interest as always
So tis is all the welding done, quite flimsy actually. You may notice the radio operator's window hanging poorly
Now is the first part of my life time feud against online sellers. I mean, repairing computers I noticed that the trouble only happened when guys truly hated their computers. I must truly hate online sellers as I can't keep having problems with those!
1/ Tiger Models, One of the less worse of the lot, ah, well, actually okay their packet i received nearly 2 month after my payment, expensive mailing charges but nothing gross or insulting like some others. but no other hassle honest!
So in the packet was some lead foil that I was keeping for such an occasion. indeed I strongly believe that in model making you should use the right material in scale. Which means, wood in really must be wood, stone must be stone like etc.. I will have the time to go further into that in a next build. Well, I think the properties of burnt out and crumpled aluminium would be p^rett nicely rendered using some metal!
Cutting at the right size..
Flak.. and nightmare fighters
rivets.. not a too clean job here
Right Scott, that will be a small part though
Now I just wonder how looks like burnt out aluminium..
Kenneth, you know about world war and accuracy and etc. When I was doing my military service, I have to wear "blue" clothes for the desk job, and "green" ones for the dirty work. But they couldn't find some suitable green stuff for me, so they ended up giving over long trousers that were so new they were *shiny* and were *baggy* too, and some too short jacket that were maybe 20 years old that looked faded brown or something -indeed like a Punk's is Not Dead sort of jacket . So now when I read about accuracy in uniforms, I tend to chuckle quite a bit Unfortunately i don't have any photo..
But I have of my mail bags! Not to sell sorry but lying comfortably under my garden hose and other stuff to pour concrete. The second one which is below the brown one is in much better state.
What you can find in those old French houses is amazing. People scavenged what they could in those times.
Thanks about your interest as always
So tis is all the welding done, quite flimsy actually. You may notice the radio operator's window hanging poorly
Now is the first part of my life time feud against online sellers. I mean, repairing computers I noticed that the trouble only happened when guys truly hated their computers. I must truly hate online sellers as I can't keep having problems with those!
1/ Tiger Models, One of the less worse of the lot, ah, well, actually okay their packet i received nearly 2 month after my payment, expensive mailing charges but nothing gross or insulting like some others. but no other hassle honest!
So in the packet was some lead foil that I was keeping for such an occasion. indeed I strongly believe that in model making you should use the right material in scale. Which means, wood in really must be wood, stone must be stone like etc.. I will have the time to go further into that in a next build. Well, I think the properties of burnt out and crumpled aluminium would be p^rett nicely rendered using some metal!
Cutting at the right size..
Flak.. and nightmare fighters
rivets.. not a too clean job here
youngc
Western Australia, Australia
Joined: June 05, 2007
KitMaker: 2,166 posts
Armorama: 1,080 posts
Joined: June 05, 2007
KitMaker: 2,166 posts
Armorama: 1,080 posts
Posted: Wednesday, September 16, 2009 - 10:16 PM UTC
Great work with the foil there JB.
What do you find advantageous about $6.50 lead foil over household foil? Is it thicker, stronger, more rigid?
You only notice this as a consequence of your ability to take super macro photography!
This is going really well mate!
Chas
What do you find advantageous about $6.50 lead foil over household foil? Is it thicker, stronger, more rigid?
Quoted Text
You may notice the radio operator's window hanging poorly
Quoted Text
rivets.. not a too clean job here
You only notice this as a consequence of your ability to take super macro photography!
This is going really well mate!
Chas
martyncrowther
England - West Midlands, United Kingdom
Joined: September 12, 2007
KitMaker: 1,548 posts
Armorama: 1,407 posts
Joined: September 12, 2007
KitMaker: 1,548 posts
Armorama: 1,407 posts
Posted: Wednesday, September 16, 2009 - 10:45 PM UTC
Wow that is a great piece of modelling, it looks grwat. Well done!
Posted: Thursday, September 17, 2009 - 03:30 AM UTC
Looking real good JB.
I also would be curious why lead foil (from the US) in lieu of regular aluminum foil from the kitchen. Aluminum foil must be easier to obtain? Just curious as to your thoughts on this.........
Cheers,
C.
I also would be curious why lead foil (from the US) in lieu of regular aluminum foil from the kitchen. Aluminum foil must be easier to obtain? Just curious as to your thoughts on this.........
Cheers,
C.
slodder
North Carolina, United States
Joined: February 22, 2002
KitMaker: 11,718 posts
Armorama: 7,138 posts
Joined: February 22, 2002
KitMaker: 11,718 posts
Armorama: 7,138 posts
Posted: Thursday, September 17, 2009 - 03:37 AM UTC
JB - question, why welding/soldering over superglue? I was just looking at the interior work and thought that it would be faster and easier to use superglue. Fewer 'rigs' and hands needed.
Just curious.
Just curious.
jba
Rhone, France
Joined: November 04, 2005
KitMaker: 1,845 posts
Armorama: 777 posts
Joined: November 04, 2005
KitMaker: 1,845 posts
Armorama: 777 posts
Posted: Thursday, September 17, 2009 - 06:41 AM UTC
Now I will be late with the update tomorrow so I answer the question today
Chas and Charles, thanks for commenting! the difference between lead foil and aluminium one is HUGE! Indeed the kitchen aluminium deforms itself but doing mostly some straight edges while I need something more soft or flexible to do some realistic bends or Flak effects. The lead deforms itself, allows to be pushed like a sort of bevel you see and is also much stronger than aluminium foil. look at the way the rivets are "pushed", you can't get that with aluminium
Martyn thanks as always!
Scott there is nothing in common between welding and CA-ing the photoetch. Did you see the piece I had to do? some straight sections that had to be attached at straight angle against a sort of flat base, no way would that hold with CA, I had to weld the whole. If you add that i am quite Parkinsonian every time i do a diorama, i would have destroy the stuff in a coupla seconds if it wasn't weld.
I know I tend to destroy a lot of the stuff between the actual building and the weathering, I am careless and tend to suffer from an overcrowded working plan. So I try to ensure that what I build will actually end up on the diorama, this is why I weld. Believe me the bond is EXTREMELY strong with welding
here is an extra pic!
pjmooney
Virginia, United States
Joined: October 22, 2007
KitMaker: 107 posts
Armorama: 102 posts
Joined: October 22, 2007
KitMaker: 107 posts
Armorama: 102 posts
Posted: Thursday, September 17, 2009 - 11:45 AM UTC
JB,
This build takes the cake...the lead foil is brilliant and looks SO good. I just don't think that I have the patience or skill to do that amount of soldering. I struggle with my PE sets as it is and the superstructure you constructed is brilliant. I'd love to know how you manage such complex soldering construction.
You're an inspiration!
Pat
Grumpyoldman
Consigliere
Florida, United States
Joined: October 17, 2003
KitMaker: 15,338 posts
Armorama: 7,297 posts
Joined: October 17, 2003
KitMaker: 15,338 posts
Armorama: 7,297 posts
Posted: Thursday, September 17, 2009 - 07:29 PM UTC
JB, you should have told me you needed lead foil also, I would have sent a foot or two.
Posted: Thursday, September 17, 2009 - 08:28 PM UTC
JB, "modelling" is an understatement with your work, we should henceforth refer to it as art...
I'm watching this...
Cheerio!
Stef
I'm watching this...
Cheerio!
Stef