Constructive Feedback
For in-progress or completed build photos. Give and get contructive feedback!
761st Sherman project
ProfessorP
Visit this Community
Minnesota, United States
Joined: February 20, 2007
KitMaker: 339 posts
Armorama: 325 posts
Posted: Tuesday, May 31, 2011 - 03:21 AM UTC
Hi Brad. Nice to see you checking in right away! The figures haven't been cleaned up yet. They are right out of the box with only the casting blocks removed and blue-tac (actually grey-tac) holding them together. I just did this to get a sense of the shapes and placement. They'll get some trimming, flash removal and I'll be sure to adjust the hand on the TC and any other anomalies once I get to the actual assembly.

Any recommendations on how to approach the turret interior? I think just suggesting the shapes would suffice...maybe a seat, part of the breach and the radio rack in the bustle? Possibly the basket floor and some ammo stowed? i haven't yet pulled out my references but if memory serves, I think that is what might be glimpsed through the loaders hatch.

On the other hand, it might actually be easier to switch to the later turret with the oval hatch!

Thanks for the feedback!
tylusfaust
Visit this Community
New Jersey, United States
Joined: December 18, 2005
KitMaker: 371 posts
Armorama: 217 posts
Posted: Wednesday, June 08, 2011 - 01:12 PM UTC
Don,
Fantastic job. The figures look fine to me. I don't see any real size discrepancy, especially considering that people are different sizes anyway. Great paint job on the driver. If I can offer anything by way of constructive criticism, I'd say that the driver's face could use some white in the corner of the eyes and maybe a few more contrasts on the folds of the clothes. But great job.

This sherman is an inspiration and a off the beaten path topic.
AgentG
Visit this Community
Nevada, United States
Joined: December 21, 2008
KitMaker: 1,109 posts
Armorama: 1,095 posts
Posted: Wednesday, June 08, 2011 - 04:29 PM UTC
Just an initial observation.

I'd hate to tangle with the fellow in the bow gunner's hatch, he's one big man.


They look fine as placed and like it was said, people are all different sizes anyway!

G
tylusfaust
Visit this Community
New Jersey, United States
Joined: December 18, 2005
KitMaker: 371 posts
Armorama: 217 posts
Posted: Wednesday, June 08, 2011 - 06:05 PM UTC
Its the 1940's so I guess the BIG bow gunner is the guy that gets out of the tank when some guy makes a racist comment as they drive by.
Plasticbattle
#003
Visit this Community
Donegal, Ireland
Joined: May 14, 2002
KitMaker: 9,763 posts
Armorama: 7,444 posts
Posted: Wednesday, June 08, 2011 - 06:34 PM UTC
Love your choce of crew Don. Im not a sherman fan, but its looking great as well ... love the improvements you´ve added.
Is there anyway you can have the guy at the back of the turret facing forward, as the other 3 are? It would help the composition a lot, if they all are looking at the same thing/ same direction.
ProfessorP
Visit this Community
Minnesota, United States
Joined: February 20, 2007
KitMaker: 339 posts
Armorama: 325 posts
Posted: Thursday, June 09, 2011 - 05:25 PM UTC
Hi Guys. Well the Shermie project seems to have stalled a bit for the time being. Planned to get stuck in right away after the other project was done but, well, you know…

Raul, you are correct, the driver fig could use a few touch-ups. He was my first fig painted in 5 years and really was a bit of a practice piece. I will sharpen him up just a bit when I get round to doing the others.

Wayne, the bow gunner is big but not THAT big! There's a bit of foreshortening going on in the photo due to the angle. He's much closer to the lens so appears bigger than he actually is. He's really just broader through the shoulders than the others, but yeah, he looks as if he could put the hurt on a few guys if needed!

Frank, thanks for the nice words. You raise an interesting point and one that came to mind when I was fooling around with placement of these guys. Because of the way he's posed, he really didn't fit anywhere else. Originally I wanted him posed behind the loader's hatch with his foot hanging inside the hatch behind the gunner. But with the hatches open and the .50 cal mounted, that didn't work. I can get his head turned a bit more so that he's looking parallel to his shoulders but he still won't be looking straight forward. i could put him on the front of the turret but that seems a bit of an odd place for him to be sitting for some reason. SO…I've been thinking about placing him where he is and having the tank rolling along the road with some locals off to the side waving at them. That way the guy sitting on the turret would have something to look at.

However, based on what I've read so far, the 761st didn't roll through a lot of friendly territory since they were usually at the forefront of the attack, so I don't know how accurate that scene would be. I'm guessing all units enjoyed the occasional trip through a friendly village so it seems possible. But I'll need a little more thought on the placement of this guy and how to incorporate him into the scene a little better. I'm open to suggestions!

Thanks for all the comments and I'll try to get some work done on the final bits in the meantime.
lukiftian
Visit this Community
British Columbia, Canada
Joined: March 12, 2010
KitMaker: 791 posts
Armorama: 592 posts
Posted: Friday, June 10, 2011 - 06:14 PM UTC
The Formation tools look marvelous, but in practice I recall US tanker crews wrapping their tools up in a tarp to deter theft. You can see the tarp in one of the photos above.
portonion
Visit this Community
Scotland, United Kingdom
Joined: April 08, 2011
KitMaker: 36 posts
Armorama: 29 posts
Posted: Saturday, June 25, 2011 - 04:42 AM UTC
I cant wait to see this finished!

An inspiring subject and an inspiring unit!
barkingdigger
Staff MemberAssociate Editor
ARMORAMA
#013
Visit this Community
England - East Anglia, United Kingdom
Joined: June 20, 2008
KitMaker: 3,981 posts
Armorama: 3,403 posts
Posted: Saturday, June 25, 2011 - 09:37 AM UTC
Don,

It's been a while since I checked in, but I really like your crew! (I wouldn't change anything about that guy at the back - it's a bit hokey if everyone in a "relaxed" scene is staring at exactly the same thing. I mean, I know over time a crew gets to be mighty close and all, but...)

As for the loader's hatch, with the figure leaning forward like that it's mostly the floor and the radio you need to add - he conveniently blocks the view of the gun and fiddly stuff on the other side of the turret!

Tom
PH-Designs
Visit this Community
England - West Midlands, United Kingdom
Joined: June 21, 2011
KitMaker: 87 posts
Armorama: 83 posts
Posted: Saturday, June 25, 2011 - 10:29 AM UTC
Don

Very Very nice work everything looks just right and in it's place.
This will be one to watch to see how it finishes.

Pete
Big-John
Visit this Community
Ohio, United States
Joined: August 12, 2010
KitMaker: 731 posts
Armorama: 711 posts
Posted: Saturday, June 25, 2011 - 10:48 AM UTC
Hi Don,

I agree with tom, I wouldn’t change the figures either. The crewman on the back could be staring off into space thinking about home. Or if your going to set this in a diorama or busy base, you could have a German casualty laying on the side of the road and he could be staring at it, pondering his own fate.
fificat
Visit this Community
California, United States
Joined: January 10, 2011
KitMaker: 135 posts
Armorama: 109 posts
Posted: Sunday, August 28, 2011 - 11:27 AM UTC
Prof--Love how this build is going. BUT what did you get switched off on to stop now? Hope you are in good health, and keep modeling.
ProfessorP
Visit this Community
Minnesota, United States
Joined: February 20, 2007
KitMaker: 339 posts
Armorama: 325 posts
Posted: Sunday, August 28, 2011 - 03:55 PM UTC
Arthur, thanks for the well wishes. Indeed everything is fine but I decided to take the summer off from modeling to maximize family fun time and enjoy the warm weather. Fear not, the 761st Sherman project will resume shortly.

Thanks to all for following this blog and offering your kind words and suggestions. Sorry to disappoint anyone with the lack of progress lately but summer in Minnesota cannot be missed when we know what's coming in just a couple more months!

Cheers!
HM2Somers
Visit this Community
New York, United States
Joined: March 24, 2007
KitMaker: 51 posts
Armorama: 17 posts
Posted: Wednesday, August 31, 2011 - 01:28 AM UTC
Don,
This is such a beautiful build I can't help but congratulate you. So thorough on the Sherman and I thought the figures looked great. Then I saw the painted figure and was blown away. You are very skilled. It will be nice to see the finished project.
Have a nice summer as it is almost over.
Pam
shopkin4
Visit this Community
Illinois, United States
Joined: March 29, 2009
KitMaker: 1,135 posts
Armorama: 1,030 posts
Posted: Wednesday, August 31, 2011 - 10:55 AM UTC

Quoted Text

Arthur, thanks for the well wishes. Indeed everything is fine but I decided to take the summer off from modeling to maximize family fun time and enjoy the warm weather. Fear not, the 761st Sherman project will resume shortly.

Thanks to all for following this blog and offering your kind words and suggestions. Sorry to disappoint anyone with the lack of progress lately but summer in Minnesota cannot be missed when we know what's coming in just a couple more months!

Cheers!


You and me both. My builds take a back seat when the weather is nice. Kills my motivation which doesnt help when I can't focus on one kit
errains
#045
Visit this Community
South Carolina, United States
Joined: September 23, 2005
KitMaker: 362 posts
Armorama: 350 posts
Posted: Wednesday, August 31, 2011 - 12:58 PM UTC
Hey Don,

Good to hear from you and even better to know that you have not given up on this outstanding build. I Totally understand about setting your priorities. I'll be keeping a look out for this when you start back up.

And feel free to drop me a note anytime, I'm looking forward to the exchange.

Enjoy the summer and more importantly the family!
GregCloseCombat
Visit this Community
California, United States
Joined: June 30, 2008
KitMaker: 2,408 posts
Armorama: 2,394 posts
Posted: Wednesday, August 31, 2011 - 05:06 PM UTC
This is so awesome - great job on all aspects! I'll remember to watch this thread
ProfessorP
Visit this Community
Minnesota, United States
Joined: February 20, 2007
KitMaker: 339 posts
Armorama: 325 posts
Posted: Wednesday, February 22, 2012 - 07:31 PM UTC
I'll apologize in advance for the long post here, but it HAS been a while. Seeing the fantastic results of the recently completed Sherman projects of Dave DaSilva (armour_dude), Wayne Gray (AgentG) Eric Rains (errains) and a few others here, has rekindled my desire to complete my own Sherman project. I never intended to be away from it for this long and as many others on this site have often said, life just kind of got in the way. I've got a litany of excuses, (all good ones, I assure you) but I'll spare you the details of all except the one that makes me look really, really dedicated. Surely, once you read THIS excuse…er…I mean, explanation, it will become clear that my motivation for this project never waned and that I have instead exercised a zen-like patience as I awaited a critical component, without which, this project could not meet my exacting standards! OK, well, maybe that's a bit much…what I meant to say was…ON TO THE PROJECT UPDATE!

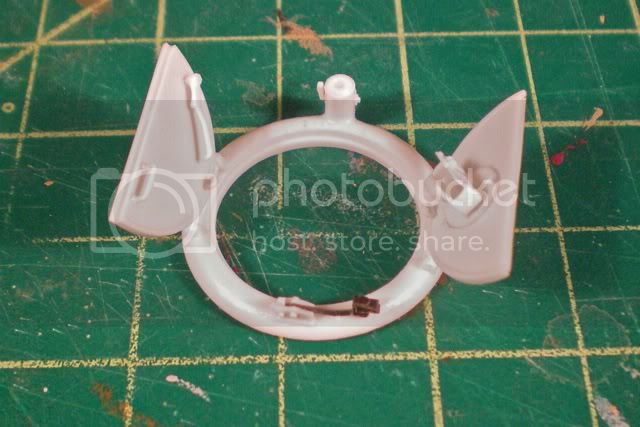
It's been so long now that I don't even remember how it originally came to my attention, but somehow I learned that the split loaders hatch provided in the DML M4A3 (76) is apparently not only poorly rendered, but also the wrong one for this turret. As I began to read more about the M4A3 (76) and found more reference photos of the actual hatch, I realized that if I was going to be making the upgrades I wanted in other areas, the loaders hatch had to be changed as well. Not only that, but I knew I wanted to model it in the open position and I had no reference photos or idea what the inside of that hatch was supposed to look like. I figured something in resin would already have the necessary research done and would save me time (HA!) over scratching my own from the few photos I had. At the time (June 2010), Formations was the first stop for all things Sherman related. So I checked their website and it appeared that they had the correct hatch for this turret. A quick email to Rob Ervin however confirmed that the split hatch I was looking at on the Formations site, while appearing to be correct, was not suitable as a replacement for the "low-profile" hatch actually used on the 76mm turret. Worse still, Rob had no immediate plans to produce one in the near future. Bummerz…

Next stop was the Tiger Models website. They too had several Sherman replacement hatches but again, none for the 76mm turret. Correspondence with them gave me an inkling that something was in the works though, so I figured I'd be patient and play the waiting game for a couple of months (HA!) until it came out. If I remember correctly, this was around February, 2011. In the interim, I continued to work on other parts of the project and even sidetracked myself with a really fun figure painting project. Then I took the summer off…and continued to wait…and wait…Summer turned to fall and eventually I did get a little tired of waiting. So I tried to scratch together a "better than DML" version of the hatch using parts from the old Italeri 76mm turret. But I didn't really like the way it had turned out and I still wasn't 100% confident that the interior was accurate in any way.


So I waited some more until…just about two weeks ago, when, upon opening my mailbox, I saw a small USPS flat rate box (If it fits, It ships!) containing my very own Tiger Models, late production, low profile, split cupola, D94598 hatch! AT LAST! (cue glorious choir music).


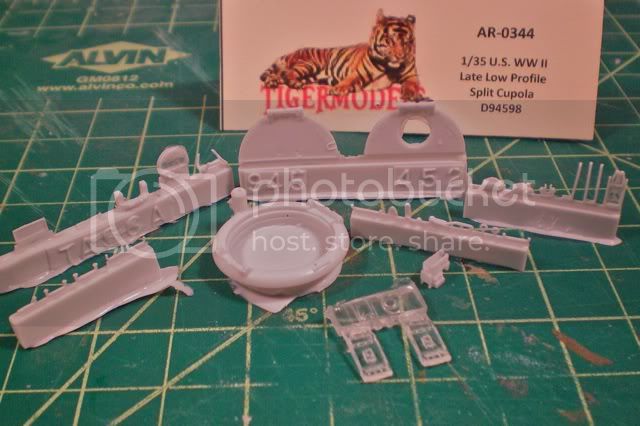
My zen-like patience had finally paid off. So, along with the great work I had been witnessing by my fellow Shermanites mentioned above, I took it as a sign that it was FINALLY time to pick up where I Ieft off and start getting this project wrapped up.

RECAP: So, construction of the kit is virtually complete with the exception of the loader's hatch and the Panda tracks (yeah, I know…they could have been DONE by now…but remember that zen-like patience?). However, there are a couple of other minor details that need to be addressed due to the pose and placement of the loader figure and I mentioned this in an earlier post. Namely, making some interior bits and pieces that will be unavoidably visible through the open hatches. Again using bitz from the old Italeri kit as a basis, I was able to mod up a 76mm gun breech. Not a lot of it will be seen but it's something...


I'll also be trying to fab up a radio unit that nestles into the turret bustle. Not much of that will be seen either so I'm not going to go for super-detailing, but having something there should look better than a big empty hole. The 76mm turret only had a partial turret basket and likely wouldn't be visible through the hatch, but the ammo storage bins in the hull floor would be an easy fabrication and if someone looks straight down through the hatch, it'd be something else to see, so I think I'll add that as well. I already have items to use for stowage, which will be fairly light since I don't have good reference photos showing the 761st tanks heavily laden. If all goes well, I hope to have these bits done in the next couple of weeks and then it will be on to final construction of the crew and laying down a primer coat.

Cheers and thanks for hanging in there with me.
Big-John
Visit this Community
Ohio, United States
Joined: August 12, 2010
KitMaker: 731 posts
Armorama: 711 posts
Posted: Wednesday, February 22, 2012 - 09:00 PM UTC
Nice to see you back on this project Don. Looking forwarf to following along again.
TimStreeter
Visit this Community
Minnesota, United States
Joined: October 19, 2008
KitMaker: 91 posts
Armorama: 80 posts
Posted: Thursday, February 23, 2012 - 12:25 PM UTC
Yea Don! Good to see you back in the saddle. Patience is a virtue, isn't it? Hope to see you at the next MMFS meeting and you can show me exactly what the difference is with the hatch.

Cheers,

Tim
Totalize
Visit this Community
Ontario, Canada
Joined: February 04, 2009
KitMaker: 743 posts
Armorama: 549 posts
Posted: Friday, February 24, 2012 - 06:37 AM UTC
Don,

Great to see you making your presence known again. I really like your work and think your project is a creative one for sure.

Thanks for the kind words on my 4th Armored Division Vignette. Looking forward to seeing more of your excellent work.

Dave.
AgentG
Visit this Community
Nevada, United States
Joined: December 21, 2008
KitMaker: 1,109 posts
Armorama: 1,095 posts
Posted: Friday, February 24, 2012 - 10:56 AM UTC
Whoo Hoo!

He's Back!

G
Ironmike
Visit this Community
California, United States
Joined: March 28, 2006
KitMaker: 287 posts
Armorama: 270 posts
Posted: Friday, February 24, 2012 - 12:33 PM UTC
Very nice, Don. I like the texture on the turret and the details you have added. The 761st was Patton's premier tank outfit when things got rough. Nice work on the crew, aren't the Hornet heads the best. I have used dozens of them over the years.
Keep us posted, buddy.
Did you know a film was supposed to be in the works, one of the big time b-ball players was behind it. Not sure of the progress. That would be something to see and is long overdue.
Ironmike
errains
#045
Visit this Community
South Carolina, United States
Joined: September 23, 2005
KitMaker: 362 posts
Armorama: 350 posts
Posted: Monday, February 27, 2012 - 09:58 AM UTC
I’ve been out of pocket over the past week or so with family in town and what do find?? Don is back in the game!!!

MOST EXCELLENT!!

Good to see you, Don and I’m looking forward to seeing more on this mighty Sherman!

Best Regards
Eric
ProfessorP
Visit this Community
Minnesota, United States
Joined: February 20, 2007
KitMaker: 339 posts
Armorama: 325 posts
Posted: Tuesday, February 28, 2012 - 05:46 PM UTC
Trying to keep the ball rollin' so here's an update. First a hearty thanks to all for the nice welcome back messages...this is a very inspiring community and seeing all of your terrific work makes it difficult not to get motivated.

So this week, I tried to tackle a few things but I'll report on those at a later time when I'm able to get some photos taken. For tonight, here's my assessment of the Tiger Models hatch.

This thing was like a mini kit in itself! Detail is vert good all around but I thought there was an unnecessary amount of flash on most of the pieces. But the resin quality is very good and not at all brittle, so cleanup was easy even if a bit tedious. The instructions are a bit confusing but everything fit together pretty well once it was clear which parts were to be used and which weren't. The very light color makes it difficult to see the details but here's a shot of the finished low-profile hatch. (Note: I liked the PE .50 cal barrel lock better than the resin one so I scavenged it off the hatch I had built earlier).:


Comparing it to the Dragon kit hatch and the one I tried to cobble together makes the wait for this all the more worthwhile. On the left is the kit piece, center is my homebuilt monstrosity and on the right, obviously the Tiger Models kit.


If you look closely you can see the two hatch lock knuckles on the Tiger piece, just inboard of the springs. The Italeri hatch has a couple of little bumps molded in the same locations but they really don't do a good job of rendering the hatch locks. Not only are these completely missing from the Dragon piece, but it isn't even the right hatch. Dragon attempt to render the D69993 high profile hatch when this turret should have the D94598 low profile hatch. Not only is it lower in profile, but the area surrounding the springs is a completely different shape. The Italeri hatch is closer but the interior of this hatch is rendered incorrectly (and I made it worse).


With a lack of good reference materials, I tried to model the interior of the hatch based on photos of other hatches. So I added padding around the interior ring and a head pad to the underside of one of the hatches. (middle) The Tiger Models kit is devoid of these features so I assume I got it wrong. The resin piece also has a hatch lever that I hadn't gotten around to fabricating for mine and the hatch lock release pins just opposite the springs on each hatch are also included, which I didn't know about. The Dragon piece (top) is, once again, inaccurate and poorly rendered especially around the periscope attachment point. Since the hatches will be open, these details seemed pretty important to me so I'm glad this has turned out.

Next, I'll get cracking on the few interior bits that can be seen and I'll report on the other stuff that I did this week, all of it related to the turret and crew.

Thanks for checking in.