_GOTOBOTTOM
Dioramas
Do you love dioramas & vignettes? We sure do.
That Aussie's in Iraq Diorama, 2006
Adamskii
Visit this Community
South Australia, Australia
Joined: November 06, 2010
KitMaker: 537 posts
Armorama: 474 posts
Posted: Saturday, January 22, 2011 - 07:11 PM UTC
Well here we go. Been putting this off for a while but I guess time to start collating all the info I have so far, and capturing the final legs of my journey with this diorama. I usually dont like posting half built shots of dioramas. Get too many questions about what is to come rather than what has prgressed so far.

What is the diorama about ?
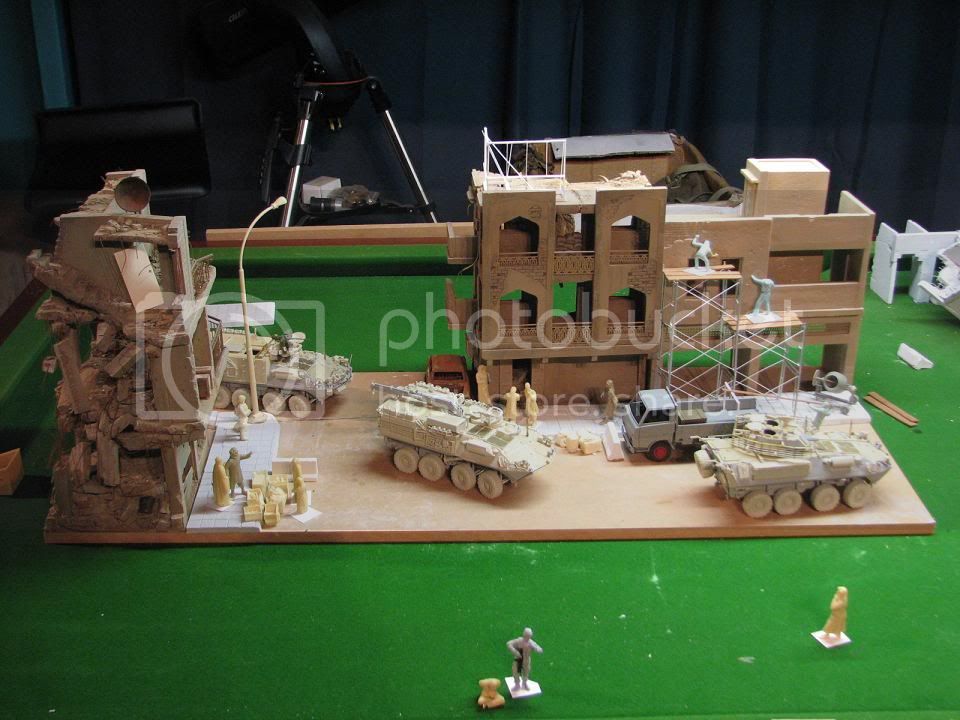
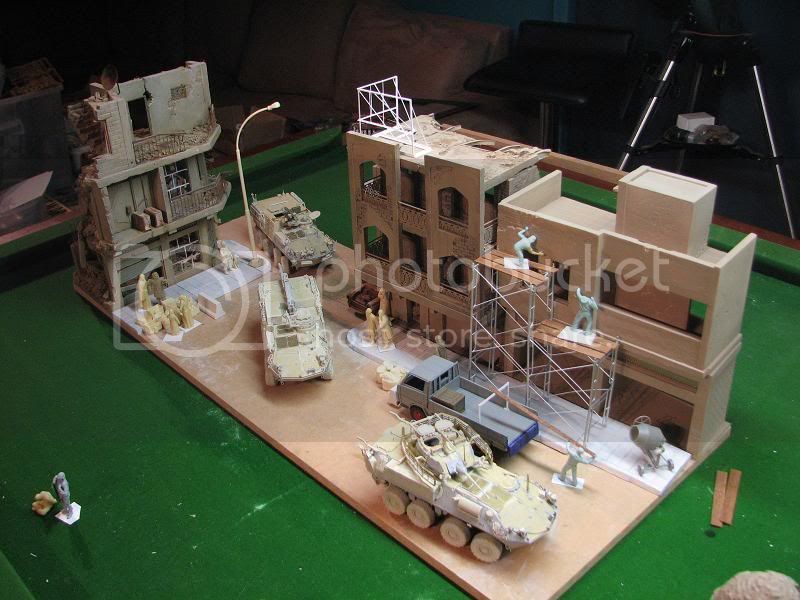
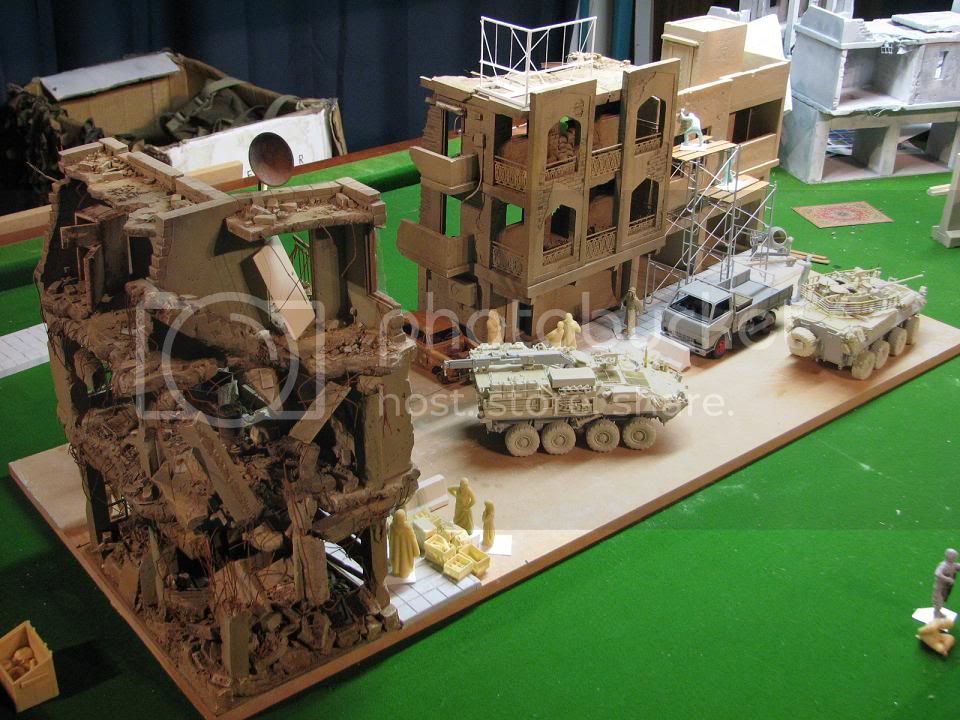
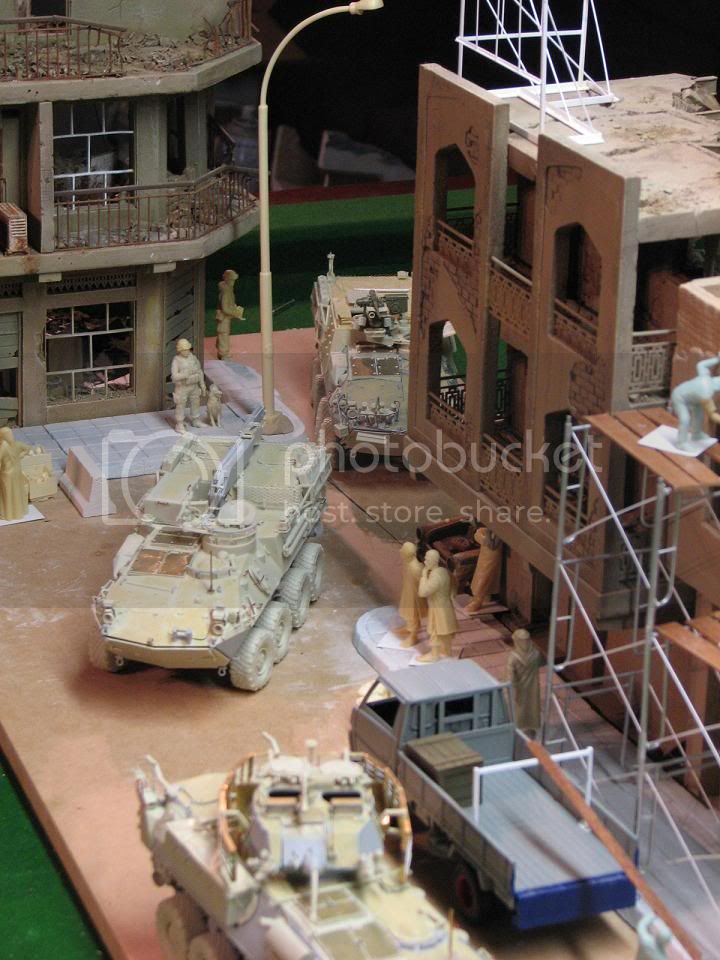
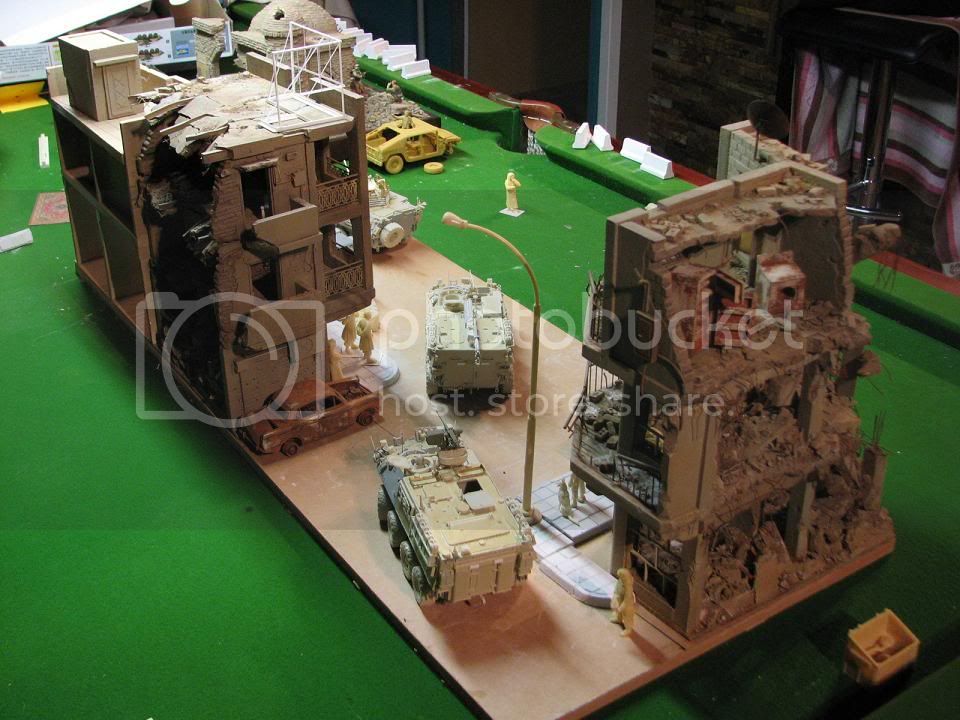
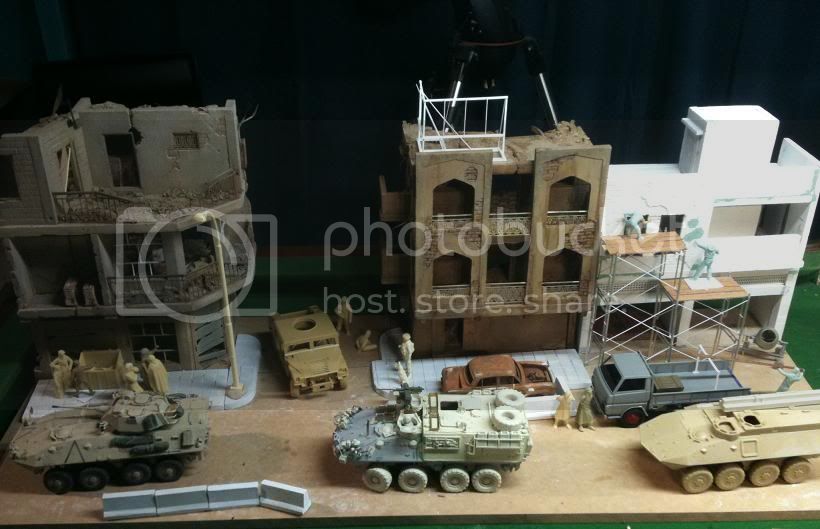
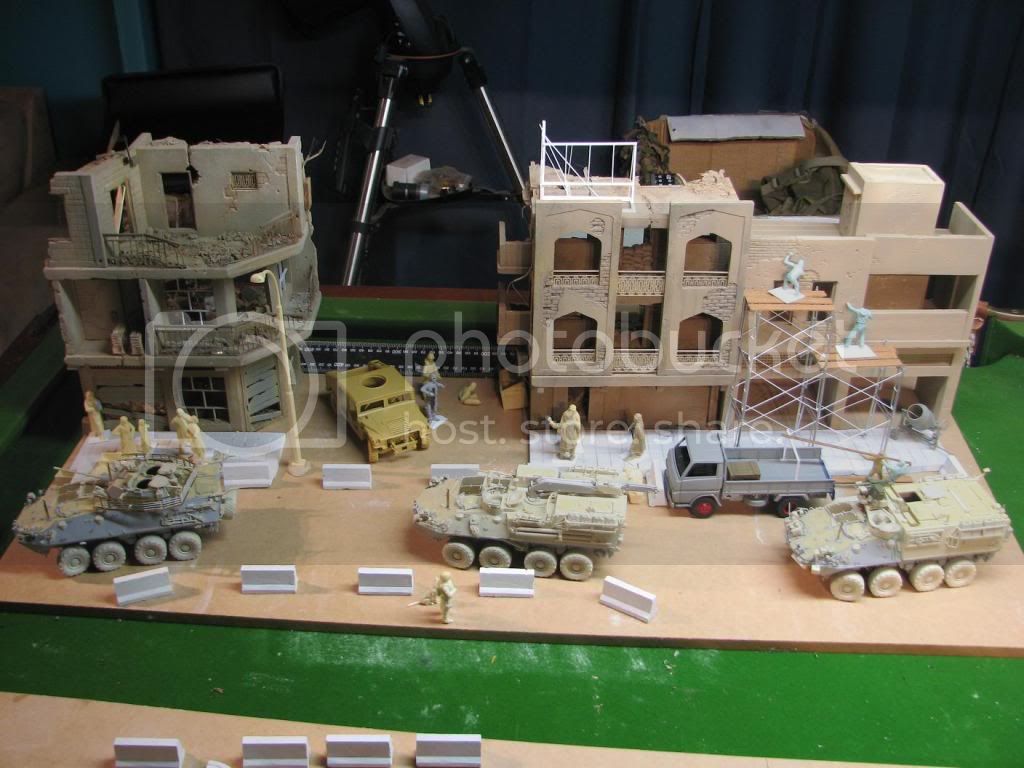
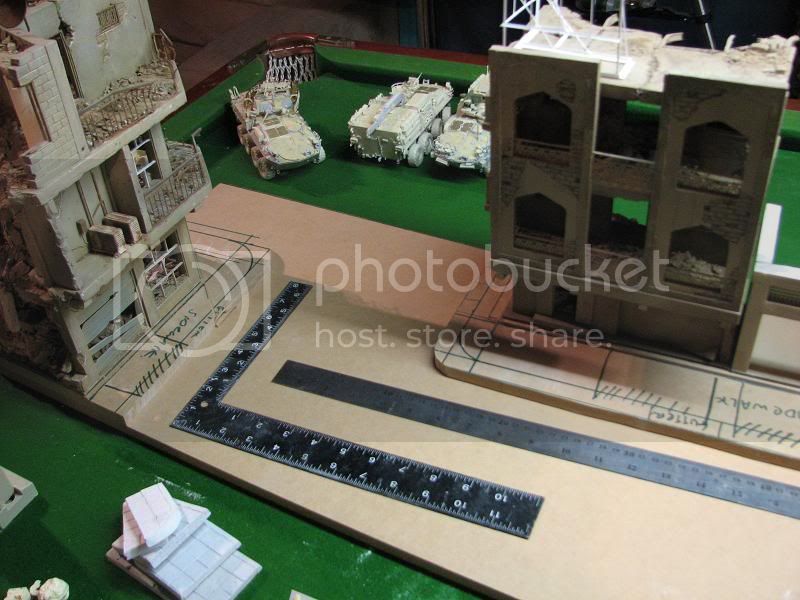
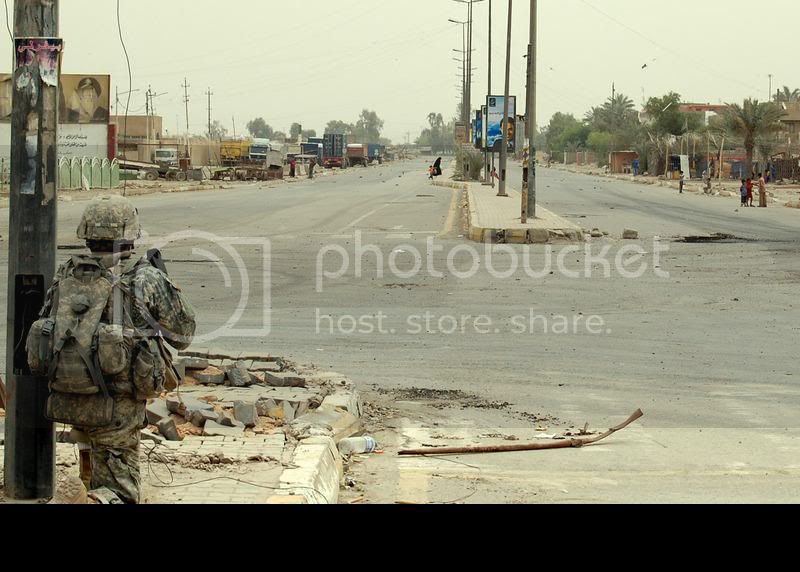
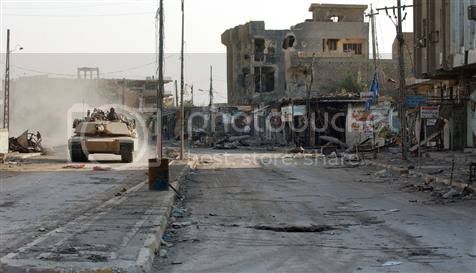
Essentially I wanted to build one that shows the Australian presence in Iraq, particularly Baghdad, on a SECDET (security Detachment) patrol in our ASLAV variants.I want to show these vehicles patrolling one of their zones during the reconstruction stage of Iraq. This is the story line. Simple.

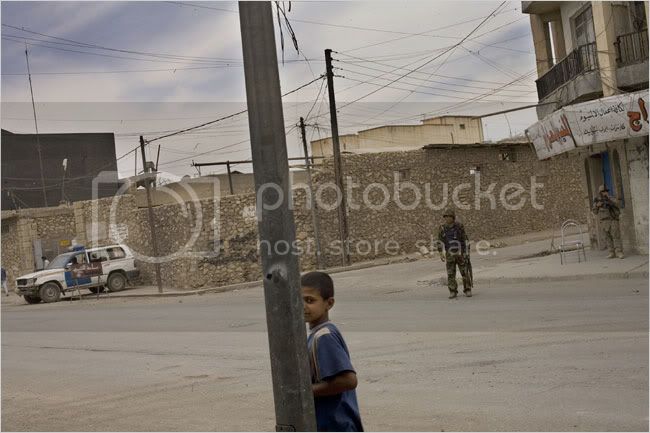
The tone of the diorama is one of reconstruction and optimisim. It is not about realities of war or social commentary. It asks the viewer to enjoy craftsmanship and detail. It shows the local civiallians going about their daily life under the watchfull eye of the Security force in the Aussies.

The diorama has had many chages and has evolved into something that now sits well with me in design and composition. The evolution of the diorama will be posted in as best as way as I can represent.

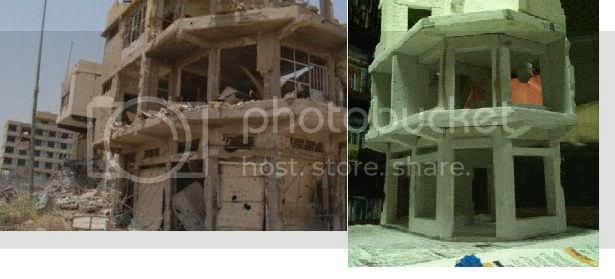
I build for competition. So with that in mind I build with the full knowledge of judging and standards or scrutiny that will be applied. I dont build for myself and therefore I like to reseacrh the elemnts of the diorama to ensure that they are factual or plausible. I do take artistic liberties where appropriate, but as long as it is plausible. I am definitely a student of the Shep Paine school of diorama construction and faithfully follow his observations and commentary. I understand that in Australia, I will definitely encounter service personnel who "know" what the vehicles should look like and their configurations, so Once again that must be historically correct.

Let me put that last point in perspective. Imagine as a builder of German Tiger tanks Michael Wittman was to look over your model in a comp. Other than sweating bullets, you would want to make sure you crossed your t's and dotted your i's. Not just to impress the guy, but to make sure he does'nt dismiss the model as just like all the others. I also have this passion that when a serviceman looks at my art, he not only appreciates it's craftmanship, but the fact a civvy has taken the time to get it right.

The Blog
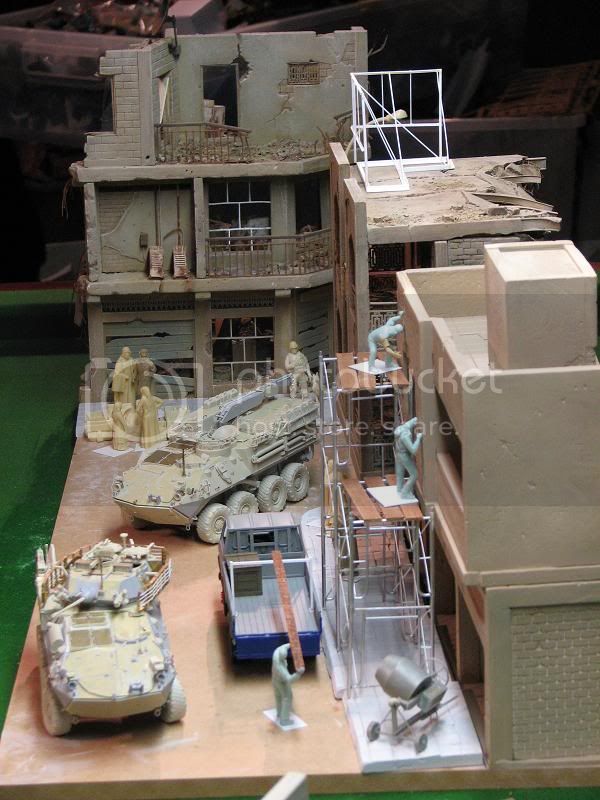
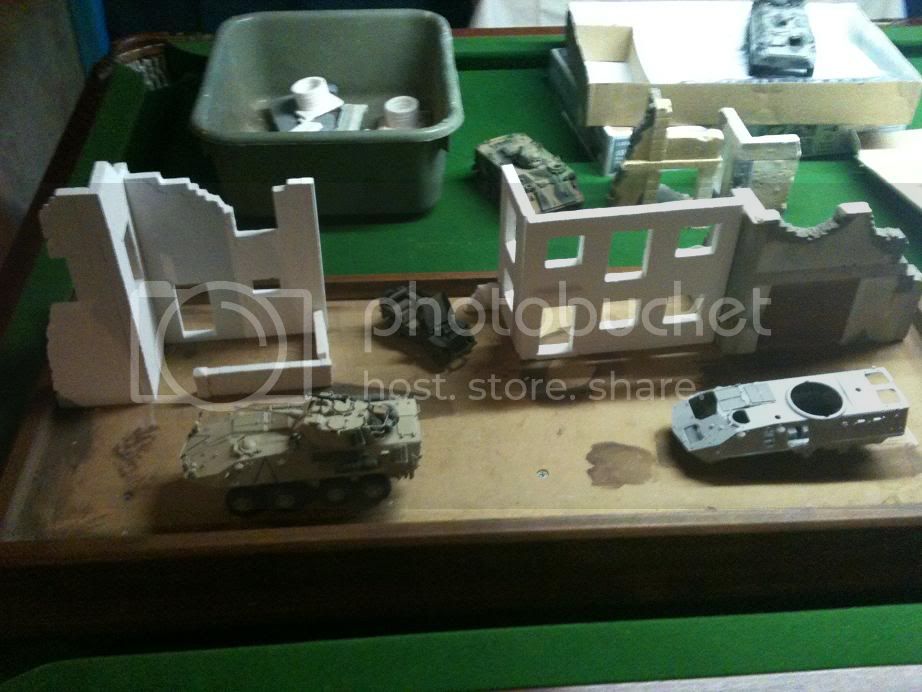
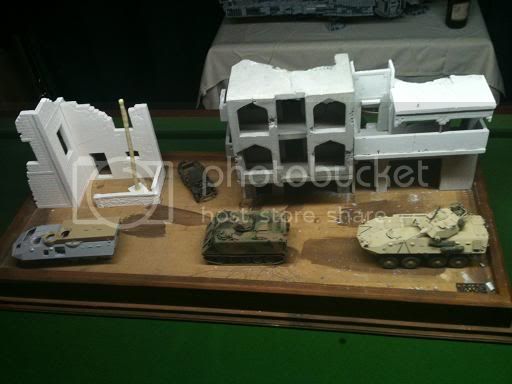
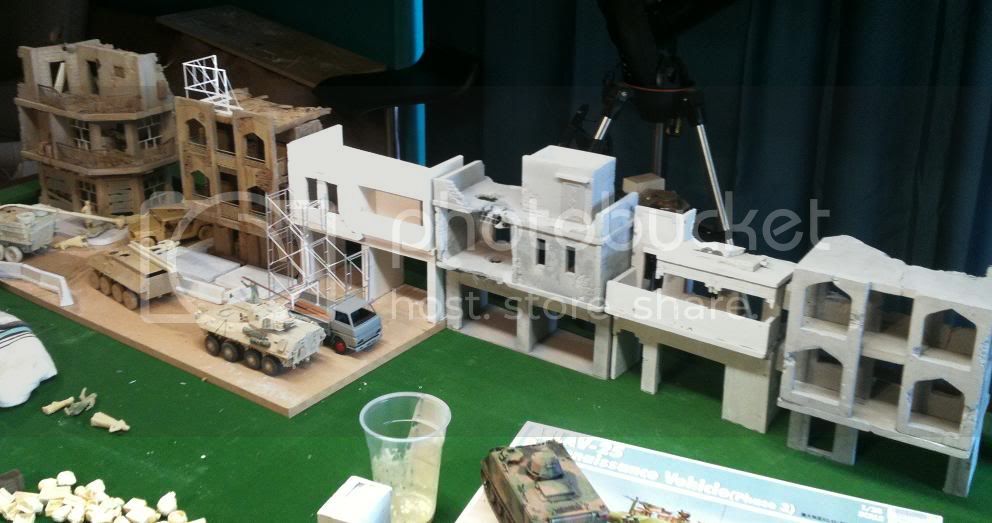
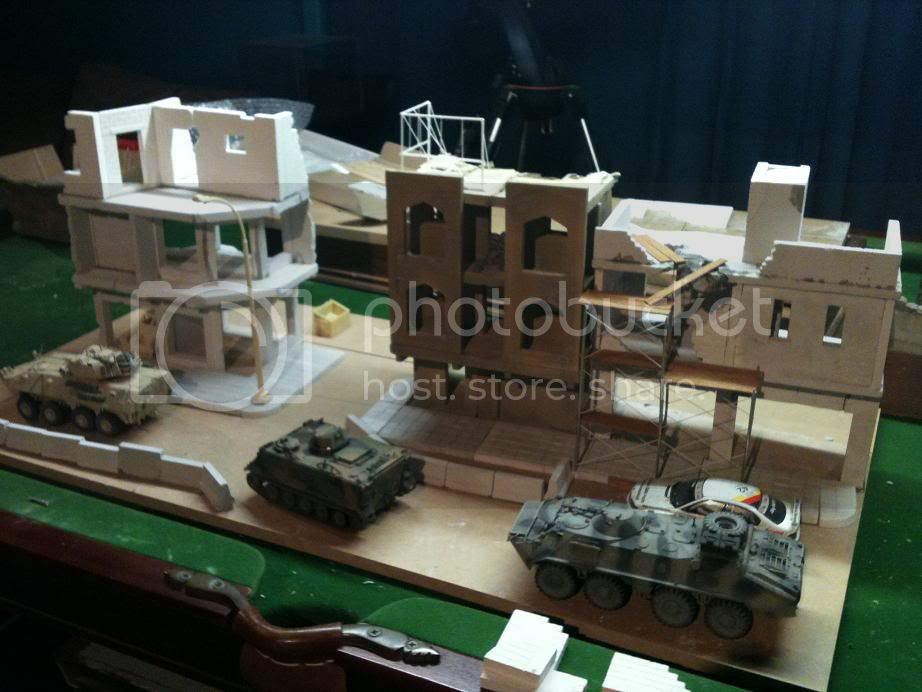
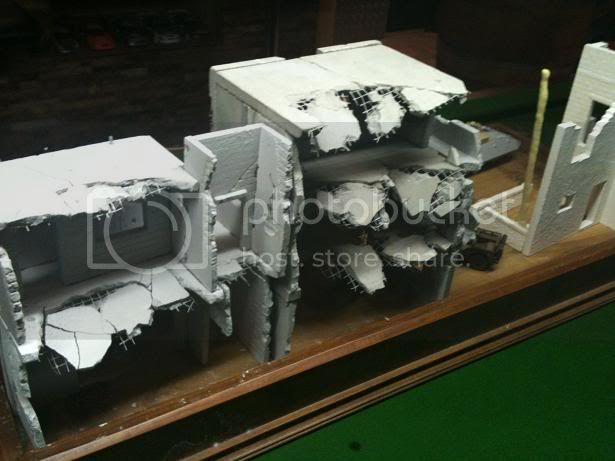
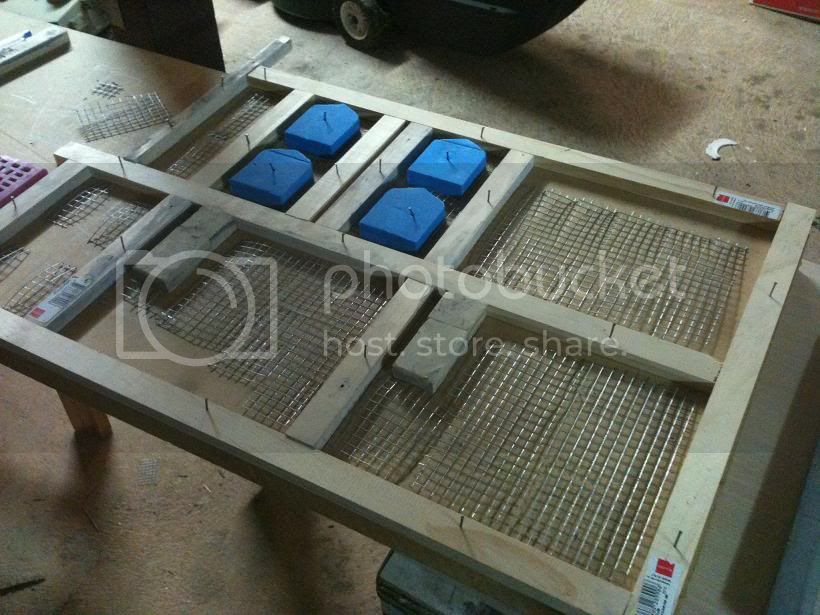
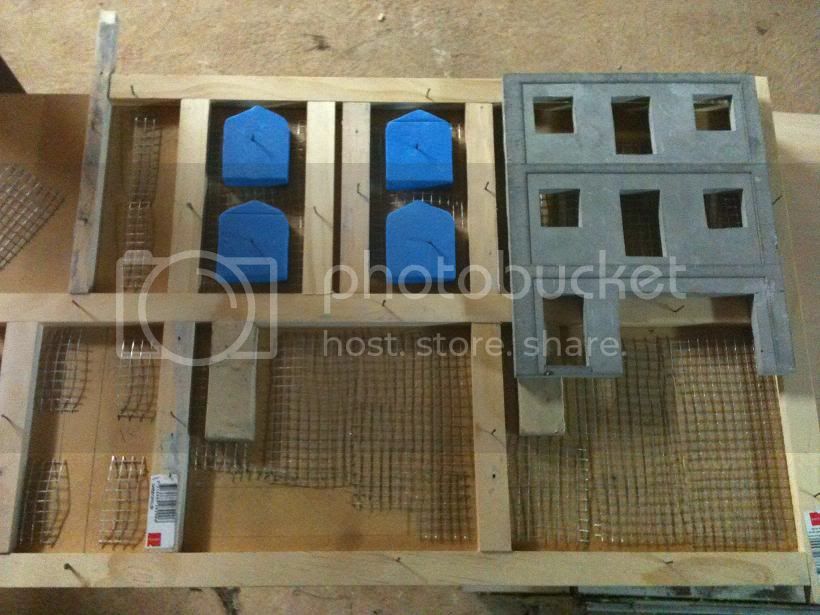
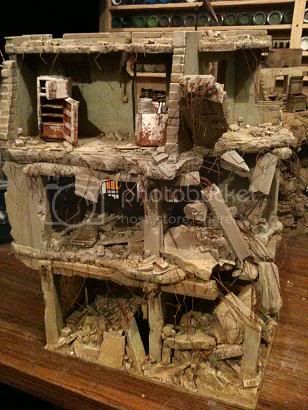
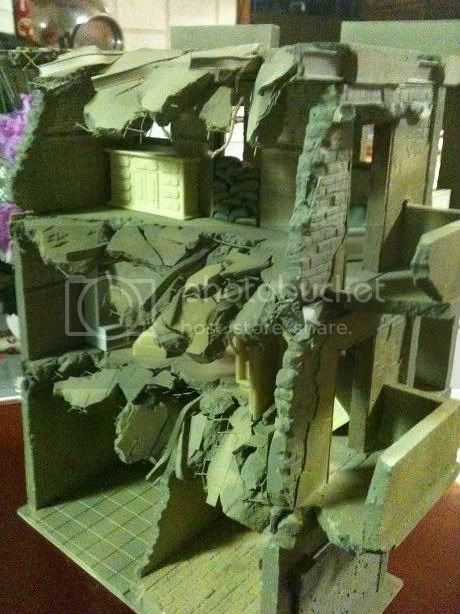
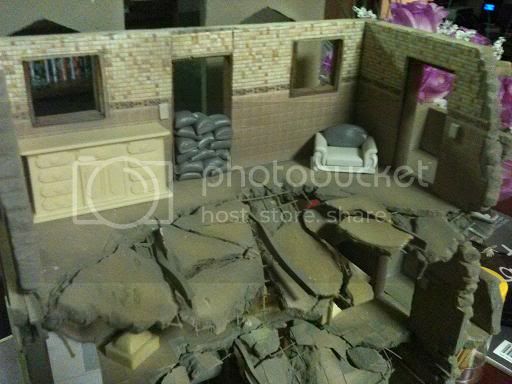
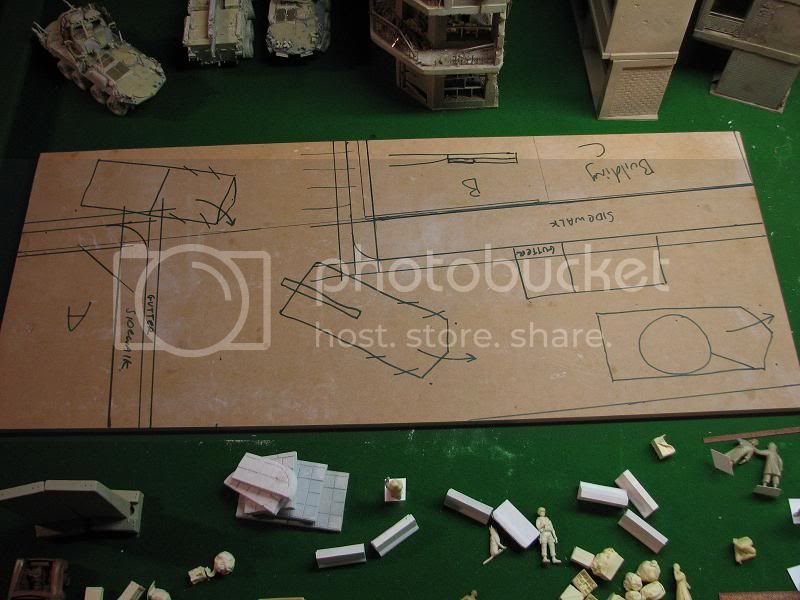
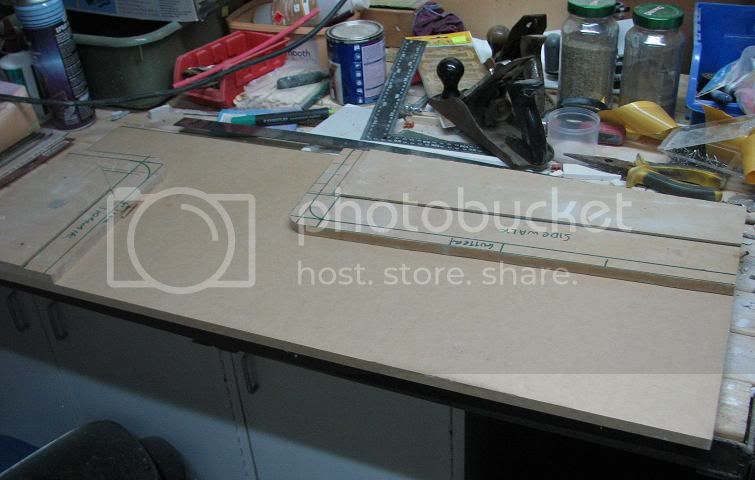
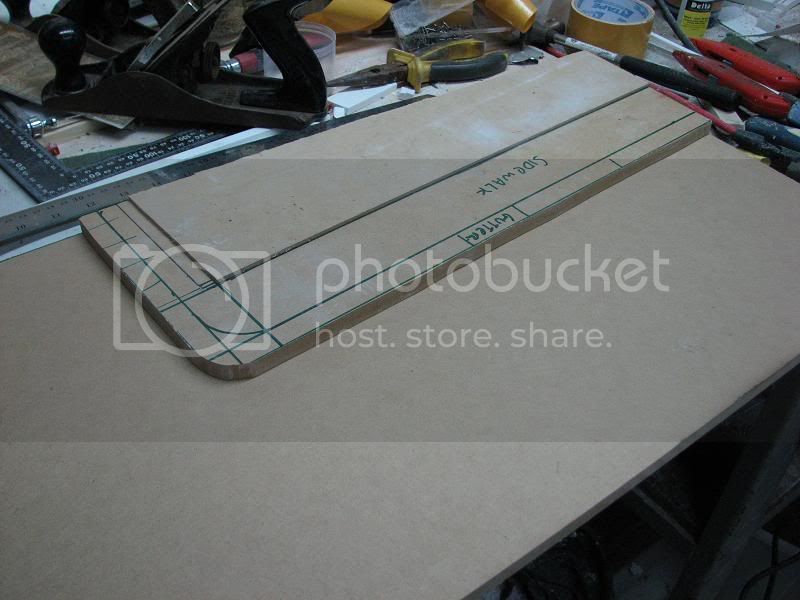
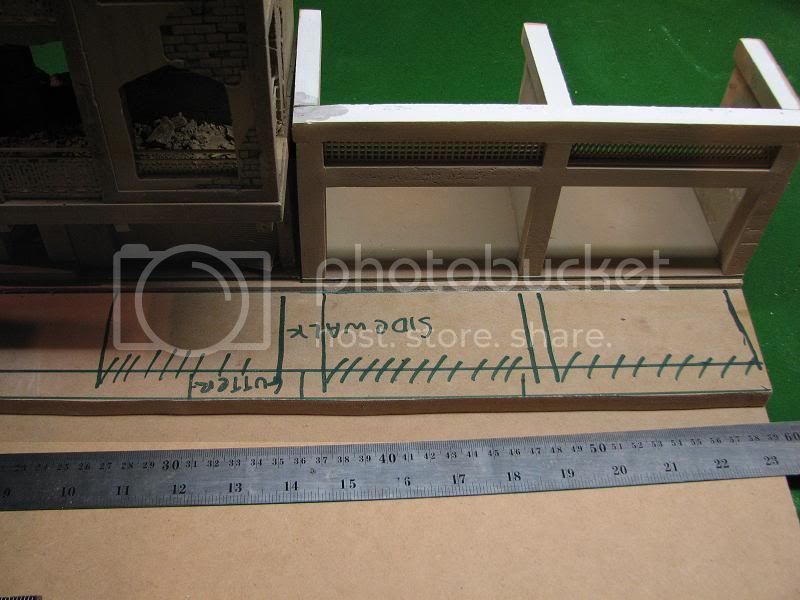
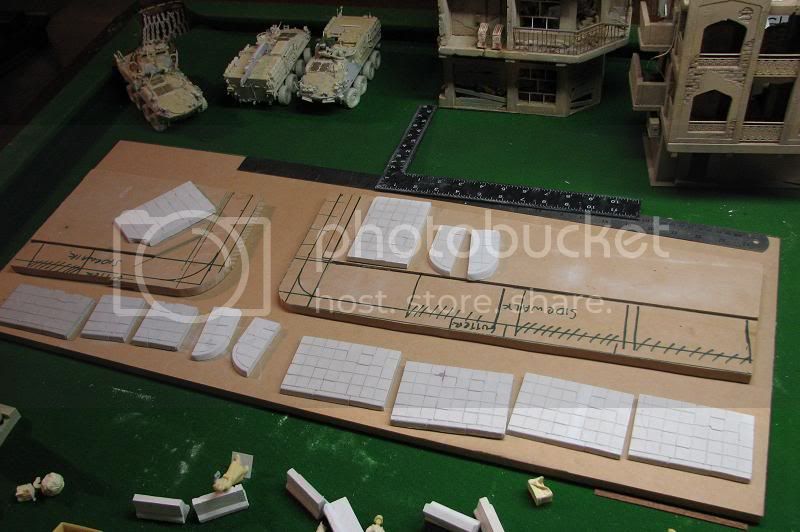
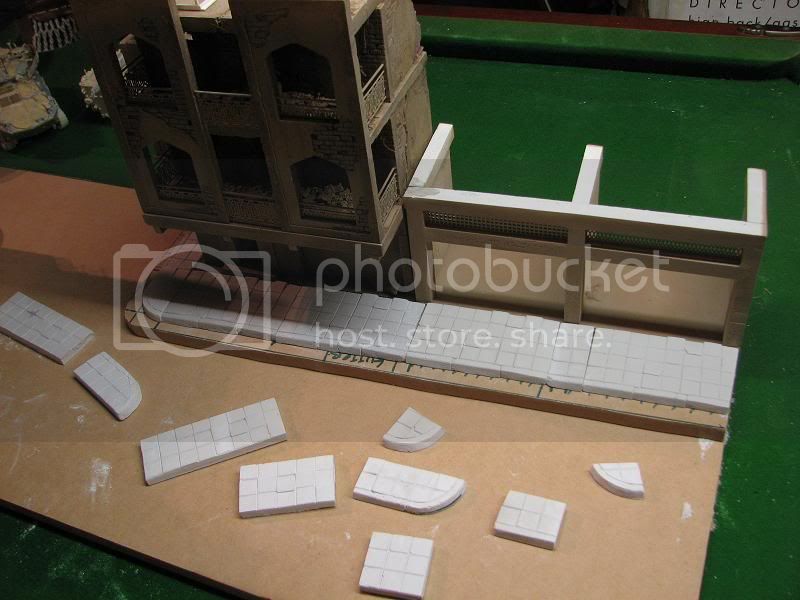
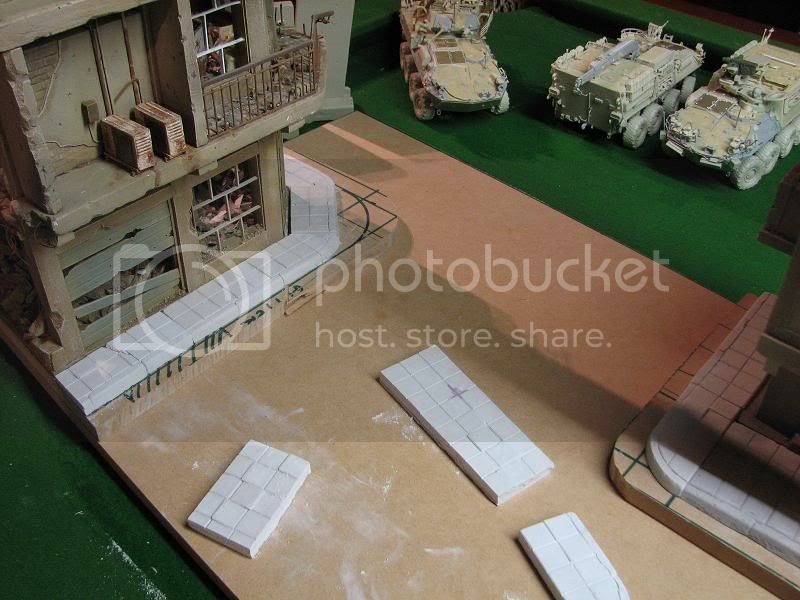
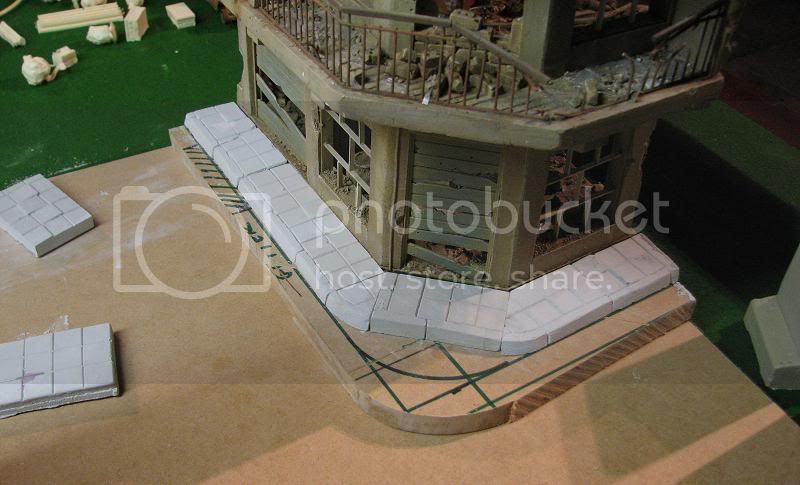
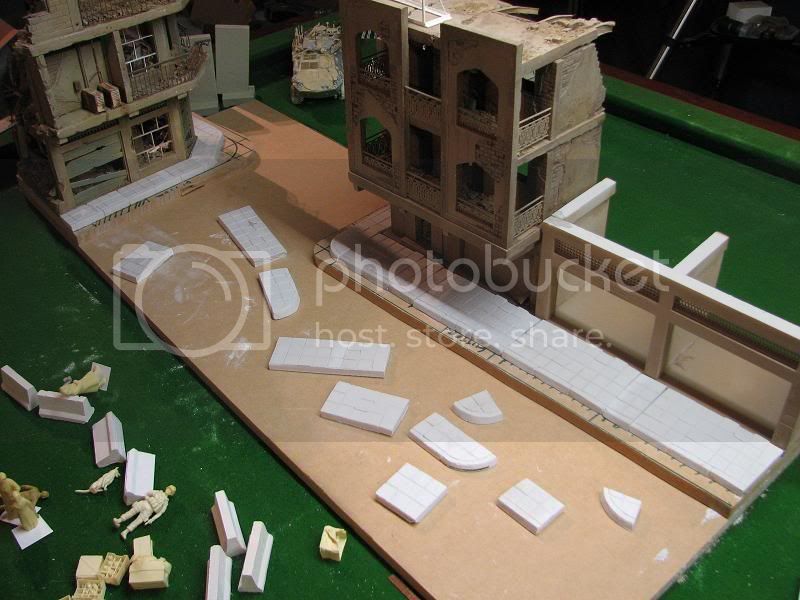
I'm not sure where to start - so many beginnings. I guess i will post some pics of where I am at right now. Then I will post some evolution shots of the layout. A couple of issues and challengs to be shown. Also the big one that alot of people have asked me to do is detail how I have made my buildings. I promised I would cover that off as best as I could. The buildings are done now, but I did take a few in progress shots (reference pics for the judging schedule).

Comments.
I very much welcome all comments. I love the good ones letting me kow somethings hitting the mark. The ones that tell me i screwed something up are just as valuable - If I get them in progress, I can address or fix the issue. If the problem is a misunderstanding then I can take the opportunity to clarify. PLease let me know if you something that you think is not right. It;'s odd but getting constructive criticism can be difficult sometimes. I promise I wont bite the head off anyone, and if it's not something to say in public - just private message me and let me know there.

Lastly, about me. I would see myself as a lansdcape builder foremost. A painter second and a model builder last. What i fail on in construction I make up for in painting (usually). I have a philosophy on dioramas that i really hold dear to my heart and I guess its what drives me to build. Basically it goes like this. The diorama is a 3d image - one that is a snapshot in time- they do not move. The layout and composition must be pleasing to the eye. The diorama is a whole, it is not an awesome vehicle on a lump of mud or sand. If The vehicles should be removed then the buildings or landscape should be classed as a model on their own! for example a bridge in a diorama with atnk could have the tank removed and a rally car driving over it or a horse drawn carriage, the bridge should be the same quality (not necesairly design). The same amount of detail to a vehicle should be put into researching architecture or road design, signs, foliage and so on. Nothing hangs over the egde of my diorama, but it shouldnt look like it's posed to fit. Thats a nutshell of it.

So I'll go sort out some pics now. I hope you enjoy this part of the construction

Adam
HONEYCUT
Visit this Community
Victoria, Australia
Joined: May 07, 2003
KitMaker: 4,002 posts
Armorama: 2,947 posts
Posted: Saturday, January 22, 2011 - 07:34 PM UTC
Hey Adam
Sounds enticing mate, and modern warfare isn't my bag. I like the depth of thought you have put into it before anything has even started.
I will be having a look at the progression of this for certain
Brad
Adamskii
Visit this Community
South Australia, Australia
Joined: November 06, 2010
KitMaker: 537 posts
Armorama: 474 posts
Posted: Saturday, January 22, 2011 - 07:52 PM UTC
ok better move quick - I did'nt expect response that fast !

So here are the shots of the dio now. Remember its at the composition layout stage. There are TONNES of details to be added to the buildings and streets, including all the signage and wiring. The right most building is only base coated and None of the buildings are at their final stage of painting and weathering. These pics are simply indicative of whats in store

This is the final layout evolution (so far). But with the comp comming soon I must lay it to rest and glue things down!

enjoy

Adam

PS as yet the diorama is not named.
since taking these pics I have fixed the wheels on the middle ASLAV - the original layout called for it to be turning the other way..


Much more to follow....
Silantra
Visit this Community
Putrajaya, Malaysia
Joined: March 04, 2004
KitMaker: 2,511 posts
Armorama: 913 posts
Posted: Saturday, January 22, 2011 - 08:13 PM UTC
Adam,

this is simply wow..... this is mind blowing and saliva dropping even at this stage... how did u do the scaffold??

a nice snooker table is being sacrificed as well...

good luck mate!
Adamskii
Visit this Community
South Australia, Australia
Joined: November 06, 2010
KitMaker: 537 posts
Armorama: 474 posts
Posted: Saturday, January 22, 2011 - 08:45 PM UTC

Quoted Text

Adam,

this is simply wow..... this is mind blowing and saliva dropping even at this stage... how did u do the scaffold??

a nice snooker table is being sacrificed as well...

good luck mate!


yeah I been copping alot of flak over the snooker table.. perhaps the person who gave it to me and then changed their mind should come get it before anything bad happens..

The scaffold is made from aluminium tubing, and cut and bent to size. Each A frame is built to fit onto another so the whole thing comes apart and can be built as a real one would. It is an exact replica of scaffolding I have in a photo or construction in Iraq.

Thanks for the comments! the scaffolding is very delicate and I built it several months ago - so shows some damage - I might be rebuilding it new and if I do I will detail how I go about it.

FYI the vehicles have also been blog build here on armorama, and anyone not familiar with them heres the links -

https://armorama.kitmaker.net/forums/169413&page=1
and
https://armorama.kitmaker.net/forums/169096&page=1

Adam
henkp
Visit this Community
Overijssel, Netherlands
Joined: September 30, 2005
KitMaker: 1,080 posts
Armorama: 1,064 posts
Posted: Saturday, January 22, 2011 - 09:52 PM UTC
realy great job love it
henk
Adamskii
Visit this Community
South Australia, Australia
Joined: November 06, 2010
KitMaker: 537 posts
Armorama: 474 posts
Posted: Saturday, January 22, 2011 - 11:15 PM UTC
Evolution

The diorama began simply. I have a spare base from another project and wanted to use it up. Also my wife gave birth in July and I knew I wasnt going to have much model building time over the next few years so this was going to be my last go for a while.. so I figured I'd make it a big one. As explained I wanted it to be Australian themed, and Iraq.

heres is the very first test photo I did with the base, and using bits n pieces from the spares box.

The first major hurdle was that I did not like the buildings. Verlinden ones are fantastic, but not big enough for a diorama of this size. Originally I was going to combine several sets to build somethoing but the postage from anywhere to Australia kills it. A verlinden building might be $15 on ebay, but postage to Australia they want like $50 US ? why so expensive I have no idea.. dont get me started on ebay postage.. Anyways I decided to make my own buildings. here is a photo of the first buildings being posed.

still using old vehicles for the layout.
Alot of versions of the buildings have been made, and in the beginning I had no plans to document them. I do have construction shots of how I cast each one and will post shortly. I had to do a very intesive research into middle east architecture, looking for common themes and construction methods. so with each new building design i improved on the last. here is a photo of al the buildings cast.. Also some were recast due to bad plaster mixes ( they were crumbling during glue together! )

The buildings design changed as the story did. The story evolved from a simple patrol to an excuse for how much crap can I fit into 3 square feet. A Humvee was added into the side street, and it became a quasi checkpoint. I love the figure of the guy being arrested and I decided to place that there in the street. (this is the first of many bad decisions that eventually led to me culling much of the stuff I added)
The building on the left was one I bought from Firestorm. Beautifull it was, but once the hotel and other building were made, it wasnt impressive in weight and size to hold its own on the left and balance was an issue. So I designed a corner store based on a picture. Originally the car port had the mig crushed car in it.. (later removed)

the corner building

the significant damage to the rar of the hotel, and to the rear of the corner store, had me trying to work out how to make the building on the right either also destroyed or otherwise. the problems were it is a very narrow facade and any destruction would leave a building with just the front walls in place. The original one was just this but it really looked posed.heres a pic


Someone pointed out how great the back of the hotel looked and pity the right building didnt have that damage on the front so we could see it. very quickly that great idea became the construction crew rebuilding the blown front.
heres a pic before the scaffold was built. this building is the one that crumbled and was later replaced. This building was the second one for the right side (eventually a third building is what I go with! )


From here the street began to really take shape and the story was evolving more and more.. The figures began to be considered. Apart from the construction crew, I bought pretty much every arab civilian available in 1:35 and there are not many - so have doubled up and changed arms and heads to trick the eye to thinking there are no two the same. Anyways heres what it began to look like - ( I actually have dozens of variations of this look but this is a fair representation)

the road block and jersey barriers were becomming an issue. I couldnt settle on a position for them. Much reference material was sought on road blocks and I didnt like how they lay them out in reality, doesnt make for a good model. And I didnt have much room to fit. I had already abandoned the pre made base and extended it 100mm wide, and an extra 70mm deep. Also i couldnt settle on the figure positions. The arrested iraqi had all the attention with an angry guy shouting at the americans in the humvee, and the other civvies watching on. The problem bubbled up when I asked my brother what he thought of my progess his response " why are the three vehicles in front on the humvee diorama?" mortified I realised what I had done. The buildings, the layout, the figures, everything centered around the humvee in the side street, and the 3 ASLAVS which were supposed to be the focus, had become superfluous to the show. I could run a bandsaw down the street and cut the buildings and humvee on one side and stil have a diorama. Somethig was very wrong with the design. here is one of the final incarnations before I changed it up big time.

I was always moving the mig car around and eventually removed it, the barriers were eventually placed how a checkpoint might do it ,and the figures looking on at the arrest. the Aussies driving by. I was gettingalot of praise on how it looked but some people said it was like a parade. In my gut I knew it was a bad design. the story was lost - a patrol, an arrest , a marketr stall, people on construction crews.. not really interacting or having purpose.

thats when for a month i did nothing but sit and stare.,,
_Viper_
Visit this Community
Roma, Italy
Joined: April 15, 2010
KitMaker: 163 posts
Armorama: 86 posts
Posted: Saturday, January 22, 2011 - 11:22 PM UTC
Fantastic job mate!

Way beyond anything I would even dare dreaming of for a Diorama.

And I think you are very close at accomplishing one of your goals: even at THIS stage, if you were to remove the ASLAV and replace them by a man on a bicycle, it would still draw my 100% attention.

Just a couple of questions out of curiosity:

- the buildings (the one with the "oriental" facade in particular) are all scratch-built by you? If so, you used Paine's technique he describes in his book?
- Just as a confirmation: is the burnt car Mig's? Is the civilian truck one of Fujimi's (or Aoshima's)? If I remember well those latter are in 1/32 scale: It seems they fit well with the rest, the figures in particular.
- finally (yeah, third question): it seems you are using a mix of figures, with some from Verlinden if I am not mistaken: I was wondering wether you are coming across any conflicts in their dimensions as I have read and have experienced when attempting some kitbashing that Verlinden's tend to be closer to 1/32 and therefore may look a bit weird when placed next to others.

Finally, although I am not sure you will need it given your modelling abilities, you may want to check this upcoming set from trumpeter which could help you with some poses of the workers:

http://www.trumpeter-china.com/a/gb2312/product/other/bingren/2010/1229/1837.html

All in all it is really outstanding.


callmehobbes
Visit this Community
England - North West, United Kingdom
Joined: April 17, 2005
KitMaker: 751 posts
Armorama: 740 posts
Posted: Saturday, January 22, 2011 - 11:30 PM UTC
This is simply brilliant. The composition is (to my untrained eye) just right, it has a natural flow to it it, taking the viewer on a mini tour of a street showing both the destruction and the re-contruction. I don't think I've ever seen scaffolding in a dio before but having seen this, I'm willing to bet it will begin to appear in loads.It fits the dio perfectly. I'll be following this one closely!
_Viper_
Visit this Community
Roma, Italy
Joined: April 15, 2010
KitMaker: 163 posts
Armorama: 86 posts
Posted: Saturday, January 22, 2011 - 11:33 PM UTC
Well I guess we posted on top of each other and you just answered most of my questions!

I think the final placement of buildings is really key in drawing attention and asking you to go around the board and look at it from all sides.

It is really nice to see how it has evolved and how you were able to take people's comments in and not be afraid to turn everyhting around if needed.

One thing: evwn if not were before, I would try to keep Mig's car in, for me it helps create the atmosphere of re-building.

I am still interested on the size issue (or not) for the figures.

one more question (or confirmation) so the humvee is out now?

Thanks and again great job.

Adamskii
Visit this Community
South Australia, Australia
Joined: November 06, 2010
KitMaker: 537 posts
Armorama: 474 posts
Posted: Sunday, January 23, 2011 - 12:52 AM UTC
Nice responses - lots of questions so heres some answers !

"Oriental" facade building -
I call it the "hotel" or building B2 (3 buildings on the base - a, b and c, the 2 references the second version), is completely scratchbuilt. It was the first one I tried to construct(B1). The second version was much more succesful - in the picture above with about 6 buildings in it - you can see on the very end is B1. I have a picture of the moulding process - this might give you an idea how I made them - I just just assumed how they make the verlinden type ones, and without making silicone moulds I made wooden ones. essentially a building is just plaster sheets with holes in the right spots..


The MIg Car
The MIg car is the one I used. I really love this vehicle an I reckon did a good job on the paintwork. But I have learned from people who were actually there - scrap meal is big business, Unless the car is a fresh bomb one, it would be stripped and removed for scrap metal within hours of it being abandoned. So aparently it is very rare to see them around (especially in the post aggresion part of the conflict)

The truck
The truck is a Fujimi Dyna in 1/32 scale. The debate on scale with this is well versed. What we settled on was that the dyna in its natural size is actually a very small light truck, and even if slightly oversize in 1/32 compared to 1/35 (2 mm longer and 1.25mm higher than it should be) the size mistake only makes it a mid size light truck. It works very well with the rest of the vehicles. Interestingly an original plan was to have a MIG hilux being escorted by two ASLAVs. Also having oversized Verlinden figures just helps.

The Verlinden figures.
yeah bit of a fail in scale. verlinden figures have always been oversize in most forums and I agree. However the same answer is always applied - people are different sizes too. As long as the equipment they carry stays consistent, then variation in height is acceptable. For example a verlinden m16 and a Dragon m16 might look different sizes together so that would not work - the same size must be used to qualify height differeces andnot scale difference. For German figures it has been belt buckle sizes and helmets that must be constant. Fortunately the Arabs dont have much equipment and lots of robes and bulky headwear so the overscale is'nt noticeable. Also I am using almost exclusively Verlinden Arabs as no one else makes ones suitable for an urban street scene. I am changing them of course to suit, but no conflict arising between Verlinden and say Tamiya (always undersize) with scale imperfection.

the humvee
Its out. I do not want any Americans in there at all! If the Humvee is in there it really leads down a path to becomming a Humvee diorama with ASLAV's on it. I have spent alot of money of the legend US figures and Humvee crew, bought the Bronco M114, loads of updates and accesories, and now will put them aside for another project. Remember I could easily pull the ASLAVS off the board and replace with Abrams, or Bradlys, or Challengers or Warriors or amtracks or whatever - thats the point of building a street thats a model in itself. Its an Aussie Diorama, so I try to keep a focus there. Its very easy with large dioramas to have too many sub plots going on- I already fell into that trap once. If I had to place another vehicle it would be the Japanese LAV. the Japs operated in the same AO as the Aussies at one stage and there are pics of them interacting - so I have considered that but once again it shows a multinational force, and detracts from my Aussie theme. As a small token to the US though, I might add the the dog and handler from legends on the street - they are a great figure set and a foot patrol would not be out of place. TBA on that . Lastly the other reason I bailed on the long street idea was the HUMvee had all the action of the arrest and the Aussies were just driving by - that bothered me about the message it sent about what we did there.

I hope these offer some insight to your questions folks ! Am looking forward to explaining more.

Adam
Anirudharun
Visit this Community
England - West Midlands, United Kingdom
Joined: February 16, 2008
KitMaker: 597 posts
Armorama: 530 posts
Posted: Sunday, January 23, 2011 - 05:27 AM UTC
Terrific work Adam. After teasing us with a few shots of this massive layout in your ASLAV blogs, I've been waiting to see you start this for a while now.

I really admire your commitment to accuracy, and I think it'll really pay off when the piece is finished.
I prefer your new layout as it adds some depth to the diorama and blends the vehicles into the street better. Plus it doesn't obscure the ASLAVs entirely from one side. Are you planning on filling the rooms with any furniture or leaving them as empty ruins?

I agree about leaving the humvee out since it doesn't quite fit with the theme of aussie vehicles. Maybe you could replace it with the the Bushmaster IMV thats been slated for release? That would retain the aussie theme, and allow you to have the detained suspect in the dio.

Any plans to have any Aussie figures in the dio, either in hatches or on foot patrol? That would really add something to the dio, but I guess that would call for some figure sculpting, or modifications of the ACM figures. But your up for a challenge aren't ya?

Keep up the good work

Anirudh

meaty_hellhound
Visit this Community
Alberta, Canada
Joined: July 23, 2010
KitMaker: 786 posts
Armorama: 753 posts
Posted: Sunday, January 23, 2011 - 05:44 AM UTC
your diorama and the details of you writings and musings are a pleasure to read Adam. seeing the evolution of the diorama composition is very insightful as i feel the "s" pattern of the final layout much better than the straight row of vehicles.

i very much appreciated the first post with the reasoning of your projects as i found many similarities in my philosophies to my return to the hobby. in the past i just built dioramas that only my family and friends saw but sharing them with the community and planning to show them at model shows encourages me to try much harder.

one suggestion i may add is for the Dyna truck, if you paint it a very dark colour this will contract its visual scale in relation to its surroundings. if you were to paint it a light colour it would have even more volume dimensionally. by painting a dark blue pallete it would also benefit to colour relation rather than painting a dark red hue so that it minimizes the scale difference as much as possible.

Also, if the Mig burnt out car is buried by a lot of rubble i could see this slowing down the scrap metal collectors for a few hours. most of the burnt wrecks i see in pics are usually buried and the ones sitting on the streets are stripped clean to the frame.

look really forward to as many pics and writings you have to share on this project as it i greatly enjoy your work. cheers, bd.
bill1
Visit this Community
West-Vlaaderen, Belgium
Joined: August 14, 2005
KitMaker: 3,938 posts
Armorama: 520 posts
Posted: Sunday, January 23, 2011 - 05:47 AM UTC
Yo Adam,

Wow, what a project! the last setting is sure the best one...nice vechicles, love the builder figs!

can't wait to see the paint job.

Stunning work!

Grt Nico
Adamskii
Visit this Community
South Australia, Australia
Joined: November 06, 2010
KitMaker: 537 posts
Armorama: 474 posts
Posted: Sunday, January 23, 2011 - 10:02 AM UTC
Up for a challenge?

No, not at all... lol. Thanks for the comments again folks, heres some answers that i hope enlighten the discussion. I really appreciate the suggestions for 2 reasons, firstly some are things that I havent thought of yet (nice), and secondly, those I have thought of validate my thought process.

Furniture.
Absolutely. the corner store is like an electronics store, so there are white goods and stuff scattered throughout, also some desks and the like. That building has evidence of being used as a fortified position with sandbags on the first floor and a sniper firing point on the drums inside. this does not photograph well, but should give you an idea that it wont be totally empty.

The hotel (middle building) definitely does aswell. The damage to the rear is considerable - basically cleaving the building in half! so such a violent impact wouldnt really leave much and any subsequent fire would burn it - also looting and scavenging is like a full time job for the poorest people so undeterred by access, they would nab anything i'm sure. however I do want furniture inside so by artistic license I have added some. heres some pics of the back of it with some trial furniture arrangements


the last building is intact - I have agonised over this one most. the decision to keep it intact was basically why would they be restoring the front of a blown up building ? so the interior wil represnt a liveable space. I do not have a picture of this yet but rest assures it will have something in there interesting. The two ground floor garages will be detailed - one will be a garage/ workshop, the other will either be the same, or, maybe a shopfront. TBA.

The BushMaster..(BuMa or BM)
Another vehicle I have agonised over. Yes I wanted one in this Diorama. an extensive thread on the progression of thought can be found here
https://armorama.kitmaker.net/forums/166730&page=1 . Basically I can't do it in Iraq. The vehicles never combined often enough to be a common patrol. I have photos of them operating together (ASLAV and BM), but down south near Al Samawah in the AMTG, open desert country, not urban. I too am dissapointed by this as it was definitely the logical step. The BM has been delayed again and again and its conceivable It wont be ready by Easter! so i decided to go with the fitters vehicle - that gave me the three hull types In the Aussie army on 1 diorama.

MiG under rubble
very nice. originally the mig car was under the rubble in the garage on the corner store. the problem was I painted the car , and then coiuldnt paint the rubble or building without destroying the cars paintwork with it being in situ when painting. So it was removed. I regret that. Good idea though, but the car doesnt fit into rubble pile aywhere else. I do have 1 spot where it could go but will look closely how it works. Rubble piles are also scavenger prone. bricks are scarce and detsroyed builldings have their bricks taken almost immeadiately to patch up other buildings. ultimate recycling. So I am wary of rubble piles because unless new they are gone! my buildings are bombed out probably a couple years before the setting so not much chance of the rubble remaining in piles. this could be contentious issue as some people will want to see rubble around the buildings and in a diorama thats the norm, but in this instance, it qould be quite historically wrong.

Colour of truck
Not considered yet, but i love the though process of a darker colour. Nice.

Aussie figures
All vehicles will be crewed. the drivers generally adopted hull down so closed hatches for them. the commanders are chest high only but they will be there. I have one or two ideas about passengers (NOT on top never happenes) but some other things. As for foot patrol - up for a challenge ? I hate figures more than photo etch. so why do a 30 plus figure diorama? they tell the story. Consider an Aussie foot patrol in the streets. Lots of pics and video of them doing it, but as usual their equipment and uniform is unique so would require much skill in figure remodelling. If their walking up the street, would need to be several to sell the idea and that is alot of work. I have a time constraint and I think this may be reaching a little high. I am remodelling other figures - iu have some old fat european women that I am changing into the Black Burqua wearing BMO's that are often seen, and , two running children in european school clothes that I will turn into arab kids chasing the ASLAVs down the street (new bare feet and legs, change torso clothes, maybe change hair/ or heads etc) enough figure remodelling with civilians at this stage . Great idea, but My challenge cup is brimming over at the moment !

thanks for the thoughts folks

Adam
by the way sorry for typos - I type fast but not accurate !
Figuremdlr
Visit this Community
Colorado, United States
Joined: July 21, 2008
KitMaker: 8 posts
Armorama: 7 posts
Posted: Sunday, January 23, 2011 - 11:21 AM UTC
Wow that is a beauty!
VLADPANZER
Visit this Community
Lebanon
Joined: December 20, 2010
KitMaker: 568 posts
Armorama: 549 posts
Posted: Monday, January 24, 2011 - 04:43 AM UTC
Hi Adam,

Nice!!! Your buildings are really good replicas! It seems you enjoy large dioramas, really cool idea! One question, do you no longer like to play pool(Billiards) ?


Regards,
Anirudharun
Visit this Community
England - West Midlands, United Kingdom
Joined: February 16, 2008
KitMaker: 597 posts
Armorama: 530 posts
Posted: Monday, January 24, 2011 - 05:02 AM UTC
Hey Adam

It seems you've thought of just about everything to do with this build. I think that, with regards to the furniture, it might be a good idea to just hint at furniture amongst the ruins - such as a cupboard door or a cushion rather than have whole pieces which as you said would most likely have been looted.

I can also see how adding one figure could easily escalate into many which would be a lot of work. I like the idea of using civilians around the ASLAVs, especially the children chasing it which adds a human touch to the diorama.

On a small note, what did you use to to make the sandbags? they really look the part

Anirudh

callmehobbes
Visit this Community
England - North West, United Kingdom
Joined: April 17, 2005
KitMaker: 751 posts
Armorama: 740 posts
Posted: Monday, January 24, 2011 - 06:24 AM UTC
A set of Aussie figures is long overdue!
specmod
Visit this Community
Australia
Joined: August 12, 2009
KitMaker: 93 posts
Armorama: 91 posts
Posted: Monday, January 24, 2011 - 10:19 AM UTC
Gidday mate, this is going to be a stunning piece of work, when finished. Those buildings are fantastic, i love the colapsed sections with the exposed reo, very clever. Keep up the great work on this colossal dio . well done.
Cheers Andrew
Adamskii
Visit this Community
South Australia, Australia
Joined: November 06, 2010
KitMaker: 537 posts
Armorama: 474 posts
Posted: Monday, January 24, 2011 - 10:40 AM UTC

Quoted Text

A set of Aussie figures is long overdue!


Couldnt agree more. Although I suspect the resin makers will have to be the ones who come to the party.

That said I do have some hope. I think I have read in the forums "watch this space" mentioned by Jason Miller from Arms Corps Models when talking about full length modern Aussie figures. He does the crew 1/2 figures, and if he managed a full length fell on patrol that would be awesome, a saw gunner and rifleman would be nice . The hardest part is that there are uniform variations, on the body armour especially, that preclude the figures being "general" modern set in middle east. Theres barely enough US soldier sets for modern middle east, and no styrene afghan allied sets i know of.

I also think, that when Trumpeter release their interpretation ( ) of the ASLAV type 2 hull PC, a set of 4 Aussie diggers might accompany it. Styrene figs always leave a bit to be desired in regards to quality though. There are few oddities in figs - the JSDF humanitarian set, the modern germans, and so on, but not enough.

I have small wishlist of figs in styrene as a minimum or resin be better -
Modern Aussies, moden Middle east refugee set, Modern middle east civilian set (checkpoint set ?), Modern Middle east Iraq police/army, Modern anything.

The pool table
ok I'm going to cover it later. I take your points. lol

sandbags
two part figure sculpting epoxy putty (very long cure time/work time). always remember to keep them small - not the oversize tamiya ones. A normal modern sandbag barely comes up to the knee when full and tied off. Thats my scale sandbag tip. Once pressed together, shape the seam with a flat edge like some styrene strip, and impress some pattern into them with guaze bandage or loose weave cotton.

furniture
The parts you see in the photos are trial parts - I recast the the buffet and removed the drawers and opened the cupboard doars so it looks much more destroyed. the armchair will have new cushions with rips in them and there will be rubble over the furniture too.. so won't overdo it.

Am currently working on the street. looking high and low for baghdad street gutter pics, and in particular, the metal grates that cover the drains, and sewer frams (man hole covers). I have some pics but not perfect ones.

The hunt continues! thanks for the comments folks.
Adam
AussieReg
Staff MemberAssociate Editor
AUTOMODELER
#007
Visit this Community
Victoria, Australia
Joined: June 09, 2009
KitMaker: 8,156 posts
Armorama: 194 posts
Posted: Monday, January 24, 2011 - 12:25 PM UTC
Hi Adam. This is looking superb so far, and a great thread for future reference for myself when I eventually tackle my first dio.


Quoted Text

The pool table
ok I'm going to cover it later. I take your points. lol


Don't worry about that, a few chunks of plaster and glue stuck in the felt just add to the challenge !!

Looking forward to seeing this first hand when you bring it across mate.

Cheers, D
didgeboy
Visit this Community
Washington, United States
Joined: September 21, 2010
KitMaker: 1,846 posts
Armorama: 1,509 posts
Posted: Monday, January 24, 2011 - 01:11 PM UTC
Adam;
Amazing. I would love to see you post a whole tutorial on buildings, the examples you give are great but I am sure there is much more to it. Although you make it sound so simple, I might just try it soon. Cheers.
Adamskii
Visit this Community
South Australia, Australia
Joined: November 06, 2010
KitMaker: 537 posts
Armorama: 474 posts
Posted: Monday, January 24, 2011 - 01:28 PM UTC
So this is logged as a build log.. yet mostly I been talking, so heres some building progress.

The street.
Now the buildings are apparently in a great position, i can consider securing their footprint to the base, and working on the street and sidewalk. The construction of the street is as per my build in the diorama techniques forum
https://armorama.kitmaker.net/forums/170011&page=1

to recap however, basically I use the dried flower arranging foam as a 10mm thick base, then plaster the top in thin layer, texture it, llet ot dry, then crack the layer like an eggshell. reasonably good results, and with the suggestions offered in the guide by other members , their improvements will make for a satisfactory surface.

The sidewalks sections I made a master and have been casting them for months - everytime I cast a building or whatever, I use the leftover plaster to make sidewalk sections. i prefer plaster as it can be shaped easy and cracked or worn like stone/cement does. the sidewalk sections are raised from the street of course, and the gutter sets a baseline for the height of the street.

Some observations on Iraq/ Baghdad sttreets -

they have next to no camber
the gutters have few obvious drains
manholes are rare
most gutters are overflowing with water and streets are usually wet
the kerbing is not consistent (different heights and designs)
sidewalks are not consistant (different patterns, materials, widths etc)

so with that in mind, and a few reference pics, heres what I am working on.

firsty I shadowboard the streets buildings and fixtures

then I build a 10mm base for them to sit on. taking into account the width of the sidewalk and the width of the gutter. Each building is built/glued on a 3mm board so it can moved around (convenient that). Each building also gets a second 3mm board under its own footprint, raising it 6mm ( the thickness of the kerbing/ sidewalk casts.


test fit the buildings


cast plaster sidewalk sections layout. The tile pattern will be very weathers once layout os confirmed - that is cracked and missing tiles added, textured/worn and also missing sections.

trim to size and test fit


sidewalk and road preparation done, ready for the next step (when I get the time!)


A few reference pictures. remember its not the people or vehicles here thats important (although handy for other things), but the street camber, gutter design, kerb and sidewalk...


If anyone thinks these pics should be credited let me know. I basically save as most pics as I fnd them and have thousands of them but couldnt tell you where I got any from.

Adam
Adamskii
Visit this Community
South Australia, Australia
Joined: November 06, 2010
KitMaker: 537 posts
Armorama: 474 posts
Posted: Monday, January 24, 2011 - 01:43 PM UTC

Quoted Text

Adam;
Amazing. I would love to see you post a whole tutorial on buildings, the examples you give are great but I am sure there is much more to it. Although you make it sound so simple, I might just try it soon. Cheers.


Interesting question.. Yes i will do a tutorial on it in the buildings section or techniques section of the diroama forums. However I am pushed fortime at the moment and cant do it just yet. When this ones finished, i will do a complete step by step guide. I promise.

I get asked why I am giving away my "secrets" (lol) so to speak, well as you point out its easy to say how to do it or show it. But the execution of the techniques is'nt quite that simple, and what works for one individual may not necessarily work for another.

Either way I'm happy to encourage others to give it a try and make the overall standard just that little bit better maybe.

Adam
 _GOTOTOP