Dioramas
Do you love dioramas & vignettes? We sure do.
Clervaux River
roudeleiw
Visit this Community
Luxembourg
Joined: January 19, 2004
KitMaker: 2,406 posts
Armorama: 2,224 posts
Posted: Sunday, March 27, 2011 - 10:50 PM UTC
Here is one in progress picture of my planting efforts.
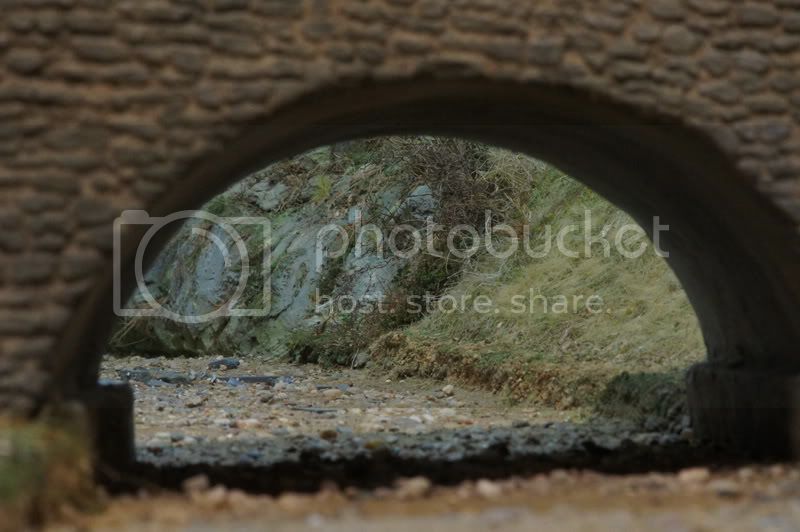
I am not fiished yet, some final coloring to do and more importantly some trees are missing.


You need to remember that this part alone is 2 feet long, so a lot of vegetations fits in there!

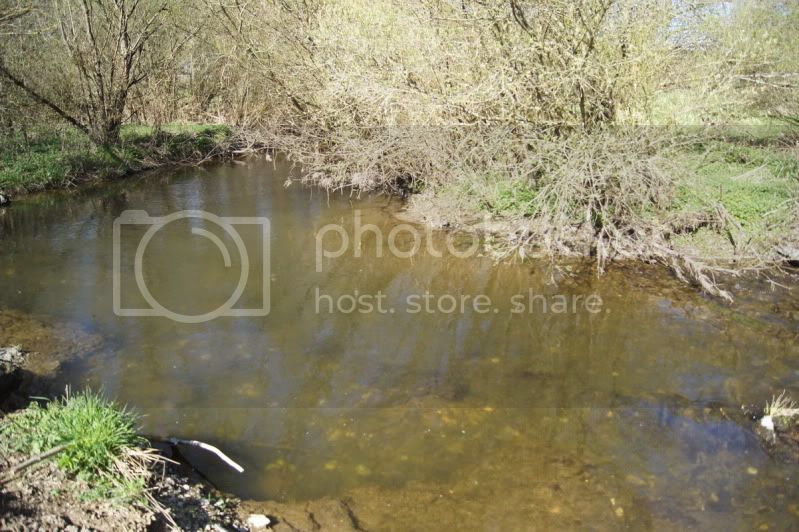
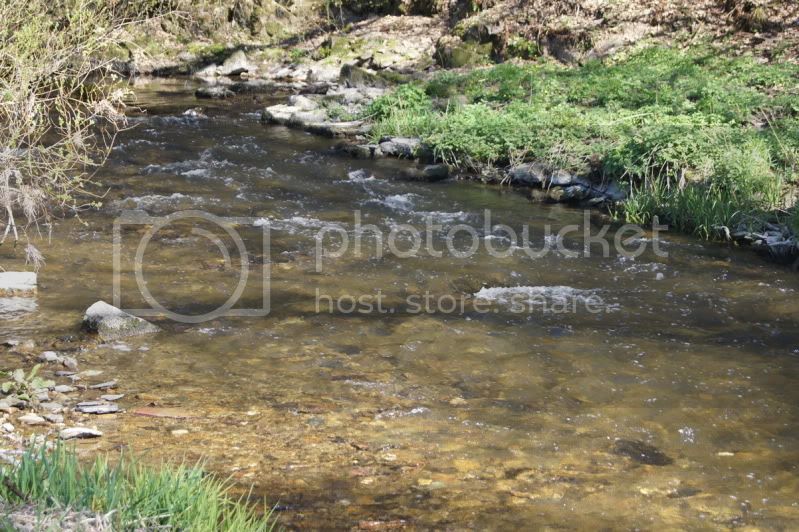
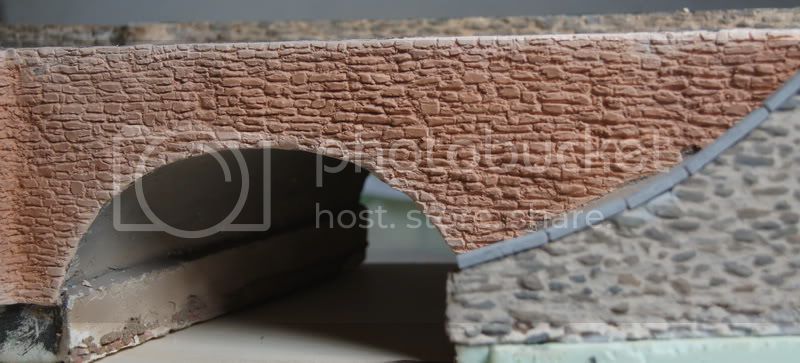
I planned for a small stream running into the Clervaux river. I felt that there was something wrong with it all the time, that it was not what i wanted.

Finally this weekend i took the cutter and proceeded to a major rearrangement.
I am more satisfied now


I know that some people love looking at others working desk, so here are two pictures of mine, taken yesterday evening.
Left side of the room

Notice the roots lying on the floor, this is where i make my selections

Right side of the room


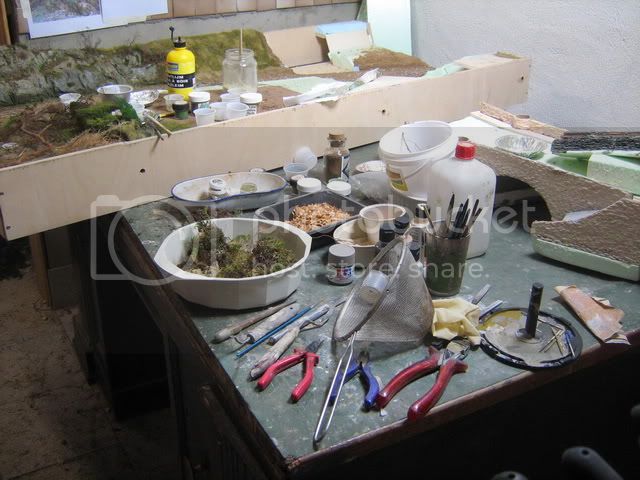
Basically a big mess, but normal during planting sessions.

Claude
slodder
Visit this Community
North Carolina, United States
Joined: February 22, 2002
KitMaker: 11,718 posts
Armorama: 7,138 posts
Posted: Sunday, March 27, 2011 - 11:10 PM UTC
How deep will the creek be? Based on the photo references maybe .5 to 1cm? That is going to be a lot of water and heavy too.
WIth the life span of this and its size how do you plan on keeping dust off it? On the water I use I have to plan for that as the dust can settle on the water and really dull the appearance.
roudeleiw
Visit this Community
Luxembourg
Joined: January 19, 2004
KitMaker: 2,406 posts
Armorama: 2,224 posts
Posted: Monday, March 28, 2011 - 12:04 AM UTC
Hi Scott,

The creek is large (15 cm) and i did not work with a level, just on eye feeling. Over the 1.5 meter lenght there is certainly the potential of some problems to come.

I hope that i can keep the level around 0.5 cm. Let's just say that i am improvising a lot, like so often, this time of course at the potential cost of another gallon of resin water! LOL

The first picture may give a wrong impression about the needed height. The visible rock part is nearly completely overhanging above the river.
(I realize that my pictures are again unworthy, i compressed a bit to much i think)

Can't plan a lot regaring the potential dust problem. The biggest problem is going to be the timeframe until completion of the module. Once the river made i have three houses to build and other stuff to do, the module must stay in the working room,so obviously i need to hide the river as well as possible. My own expo room is relatively dust free, a cover over the river should protect it very well.

Years from now, well, .....impossible to plan. My wish is that a future permanent expo covers the whole thing anyway.

JBA, if you happenn to look into this one of these days, what are your experiences regarding dust with your water dios? Never heard you mentionning something!

Claude
dioman13
Visit this Community
Indiana, United States
Joined: August 19, 2007
KitMaker: 2,184 posts
Armorama: 1,468 posts
Posted: Monday, March 28, 2011 - 01:28 AM UTC
Hey Claude, When I pour my water I cover ot with a thin see through curtin till it dries completly to keep off the dust. Here in Indiana the 3rd biggest crop is dust. After it cures I just dust it off once in awhile with a soft brush.
Plasticbattle
#003
Visit this Community
Donegal, Ireland
Joined: May 14, 2002
KitMaker: 9,763 posts
Armorama: 7,444 posts
Posted: Monday, March 28, 2011 - 01:56 AM UTC
Hi Claude. Another fascinating chapter on this amazing build! Looking good so far. The vegetation on the rock looks very natural.
You mentioned your photograph quality a few times .... are you planning a second book? Maybe its time to keep decent images?
roudeleiw
Visit this Community
Luxembourg
Joined: January 19, 2004
KitMaker: 2,406 posts
Armorama: 2,224 posts
Posted: Monday, March 28, 2011 - 03:10 AM UTC

Quoted Text

You mentioned your photograph quality a few times .... are you planning a second book? Maybe its time to keep decent images?


Where do you think that my frustration comes from? It's really getting anoying for me. It's exactly what i want to do, do good photos for the book.
Two times already i choose a spot on the wall to demonstrate, through a fotosequence, how i did the vegetation, just to see the photos unfocussed.

Getting the right light and camera settings for this size of dio is not easy. Neutral backdrop is not possible also. It all takes so much time i do not always want to invest.

I think i need to try harder (and buy a new faster camera). This one needs a minute to digest a tiff picture. I must be able to to rapid successions with different settings.

Cheers

Claude
Abydos
Visit this Community
New York, United States
Joined: August 11, 2005
KitMaker: 231 posts
Armorama: 225 posts
Posted: Monday, March 28, 2011 - 03:26 AM UTC
Hi Claude, looks good , keep up the great work, have you decided what you are going to use for water? and the rapid parts? so my next question is, are you going to do the other side of town now? once you complete the river. its not many who can say they have a town in their workshop! it truly looks awesome, i have followed this your blog since it was only the caslte, very impressive Claude very impressive!!!!
roudeleiw
Visit this Community
Luxembourg
Joined: January 19, 2004
KitMaker: 2,406 posts
Armorama: 2,224 posts
Posted: Monday, March 28, 2011 - 03:58 AM UTC
Hi William,

On this module , with half the river, are coming 3 houses, togive the main road a town look (houses on both sides of the street).
On the last module (still 80x70 cm), is only planned the rest of the river and one lonely superbe house, who probably will take a year to build by itself.

Than it will be finished!
I explained somewhere here already, it is impossible to continue for me
Lack of space is one point only, another point is the height i would have to model the opposite ridge of the castle, nearly 1.8 to 2 meter high with leads again to space and transport problems.

This is an element i misplanned 6-7 years ago, or at least underestimated.
(The problems started as i did not plan enough slope from the castle down to the village)

Now you could dream of someone (a Clervaux museum for example) giving me the space required and the mission to complete it like planned, leading to a 2.2 x4 m dio certainly)
But i don't know if i would do that anyway, it would be to complicated to plan as a hobby. It also will stay a dream forever for sure.

Thanks for your interest on the dio everyone!

Claude

Forgot your question about the water. I will use Envirotex and some Acryl Gel for rapids
montythefirst
Visit this Community
England - South West, United Kingdom
Joined: August 04, 2007
KitMaker: 1,055 posts
Armorama: 199 posts
Posted: Monday, March 28, 2011 - 04:05 AM UTC
great work
roudeleiw
Visit this Community
Luxembourg
Joined: January 19, 2004
KitMaker: 2,406 posts
Armorama: 2,224 posts
Posted: Monday, April 04, 2011 - 09:42 AM UTC
Thanks Simon

Still planting one side of the river, slowly, one piece after the other


Not finished yet! On the left side is the creek for the small stream leading to the river. On the shadow side i do lots of green!


Claude
dioman13
Visit this Community
Indiana, United States
Joined: August 19, 2007
KitMaker: 2,184 posts
Armorama: 1,468 posts
Posted: Monday, April 04, 2011 - 04:04 PM UTC
Hey Claude, coming along as nice as ever. A question about your water. Did you say sometime ago that after using the acrylic gel on top of the envirotex, that you poured a shallow cover of envirowtex on top of the gel? If you did, did it work without any whitening of the gel? Computer is having a hissy fit and can't get to the first page on this section. bob d.
roudeleiw
Visit this Community
Luxembourg
Joined: January 19, 2004
KitMaker: 2,406 posts
Armorama: 2,224 posts
Posted: Monday, April 04, 2011 - 06:26 PM UTC
A far as i remember the gel did not whiten. But do not take my first tests as a fact.
My gel was full of brush stokes, so i thought a coat of resin over it would straighten that out but then i did not use enough resin to cover it really well.
This is all playing around with this stuff to know it better. In fact i did not touch it anymore since a month as i am to much occupied with the vegetation.

Correct smoothing of the gel will probably render all other manipulation useless.

I will restart retesting this week after a trip to Clervaux to check the correct water color. (and having had a lunch at a restaurant situated in the former stables of the castle! LOL)

Cheers

Claude

dioman13
Visit this Community
Indiana, United States
Joined: August 19, 2007
KitMaker: 2,184 posts
Armorama: 1,468 posts
Posted: Wednesday, April 06, 2011 - 09:32 AM UTC
Thanks for the fasr reply Claude. Just made the ripples a bit too high and want to (lower) them a bit. bob d.
jrutman
Visit this Community
Pennsylvania, United States
Joined: April 10, 2011
KitMaker: 7,941 posts
Armorama: 7,934 posts
Posted: Monday, April 11, 2011 - 09:21 AM UTC
I am new to this site since yesterday and I have to tell you that this is some of the finest groundwork that I have ever seen in 50+ years of modeling. Well done!
J
roudeleiw
Visit this Community
Luxembourg
Joined: January 19, 2004
KitMaker: 2,406 posts
Armorama: 2,224 posts
Posted: Monday, April 11, 2011 - 09:28 PM UTC
Thank you Jerry, i'm honored.

I think using good reference pictures is essential to replicating vegetation. Patience until it gets boring is another.

Talking about references.
I went up to Clervaux this weekend to get pictures from the river.

Glad i did that!

The river is clearly more a yellow green, translucid all the way and pretty fast running through the whole area. This are very helpfull pictures.
I am glad i inserted already this stones in the riverbed, i will add more, smaller ones and will lighten up the color of the ground.


For those who do not know what colored slate can look like, here is a nice architectural detail from the church of Clervaux, showing colored slate in all it's splendour


More pictures of my trip are in my Blog, link beneath.

Cheers

Claude


newfish
Visit this Community
England - West Midlands, United Kingdom
Joined: June 23, 2008
KitMaker: 2,329 posts
Armorama: 2,110 posts
Posted: Monday, April 11, 2011 - 10:57 PM UTC
Hi Claude. I can see how frustrating it is trying to model and prepare photographs for the book. I'm lazy when it comes to photographing. Never the less I can see the great work going on. The plants on the side of the river bed look realistic the varying tones look great! Are you going to use resin for the water?

jrutman
Visit this Community
Pennsylvania, United States
Joined: April 10, 2011
KitMaker: 7,941 posts
Armorama: 7,934 posts
Posted: Tuesday, April 12, 2011 - 02:24 AM UTC
You are correct about the color of the water but is it the water itself that is green/yellow or is it the growth on the river bottom? I tend to think it's the growth,as the water is pretty swift flowing?
This may be easier for you,to add green algi or moss to the bottom and then clear resin? Or?
J
roudeleiw
Visit this Community
Luxembourg
Joined: January 19, 2004
KitMaker: 2,406 posts
Armorama: 2,224 posts
Posted: Tuesday, April 12, 2011 - 02:46 AM UTC

Quoted Text

You are correct about the color of the water but is it the water itself that is green/yellow or is it the growth on the river bottom? I tend to think it's the growth,as the water is pretty swift flowing?
This may be easier for you,to add green algi or moss to the bottom and then clear resin? Or?
J


Exactly Jerry, i just came up from my hobby room where i prepared "test river beds" with different colors.
The water itself is pretty clear. I probably do not even need to care about a lot of different resin colors to simulate depth. All looks so clear from bottom to top.
Hey, if i need depth i will buy another gallon of resin! LOL

There is a reason why the water is so clear.
The river Clervaux , called "Klierf" is in fact born only 2 km upstream, where a smaller river called "Wiltz" (like the town ) passed under a hill, is joined by a smaller stream and is then renamed "Klierf". All that situated in the non industrial (still today) north of the country, explains the clear, unpolluted water.

Of course someone may try to argue different conditions for December, but let's not push it to far. If am finished with this dio, no one living through this period will still be alive. !


@James


I will use Envirotex resin.

Greets
Claude
roudeleiw
Visit this Community
Luxembourg
Joined: January 19, 2004
KitMaker: 2,406 posts
Armorama: 2,224 posts
Posted: Saturday, April 16, 2011 - 07:58 AM UTC
Remember my bridge? The one i made with stonework made out of wood glue.

I started already painting it but really never got happy with the look


Especially when i looked at this reference pic


The stonework is very different.

So yesterday i took the Dremel, and sanded away all the raised stones and replaced it with airdrying clay where i modelled the new stonework in.


LOL, from my experience of the last wall i made like that, i remembered that the clay took a lot of time to dry to a workable texture (at least a day), this because of the temperature in my cellar.
So i said to myself, HMM , it is airdrying clay, so let's put it in the air! Right away.
Fortunately i took a look after 2 hours because the borders already started to whiten, means drying! (see the picture) You absolutely must do the stonework when still humid enough! So instead of a slow work over two days, i needed to start right away and do all the work in one stretch. (photo above)

The stonework as seen on the picture will get a few more passes to straighten out all stones and other problems.
Did the backside today, so the last two days i had essentially no real progrss, but i will certainly be happier now as i have the right stonework.

Cheers

Claude
dioman13
Visit this Community
Indiana, United States
Joined: August 19, 2007
KitMaker: 2,184 posts
Armorama: 1,468 posts
Posted: Saturday, April 16, 2011 - 11:01 AM UTC
Much better looking Claude. Looks the part now.
roudeleiw
Visit this Community
Luxembourg
Joined: January 19, 2004
KitMaker: 2,406 posts
Armorama: 2,224 posts
Posted: Sunday, April 17, 2011 - 08:12 AM UTC
Thanks Bob,

I did already finish the new stonework and lately started also with the tower.

Here is some preliminary testing of parts of it. As this towers exist no more, i have a hard time getting the height right.


Growing, growing! :-)

Claude
roudeleiw
Visit this Community
Luxembourg
Joined: January 19, 2004
KitMaker: 2,406 posts
Armorama: 2,224 posts
Posted: Wednesday, April 27, 2011 - 09:00 AM UTC
Ok, the bridge is nearly finished, except the towers of course.
With the painting of the stones, the laying and grouting of most of the cobblestone (the later hard to reach part) , the build of the side entrance, this took quiet a while


Painting of the cobblestones will be done once the connections to the other road parts and modules is made. It's difficult already to get those matching colorwise, i do not want to make it even more complicated
On the left side you notice the reserved place for the tower.


A view under the bridge. No water in there, not yet


Cheers

Claude

meaty_hellhound
Visit this Community
Alberta, Canada
Joined: July 23, 2010
KitMaker: 786 posts
Armorama: 753 posts
Posted: Wednesday, April 27, 2011 - 10:59 AM UTC
looks like another major piece nearly done Claude, i like the little archway at the end of the bridge too. the towers look like a complex little project onto themselves. cheers, bd.
roudeleiw
Visit this Community
Luxembourg
Joined: January 19, 2004
KitMaker: 2,406 posts
Armorama: 2,224 posts
Posted: Wednesday, April 27, 2011 - 06:36 PM UTC

Quoted Text

the towers look like a complex little project onto themselves. cheers, bd.


Thanks and yes, this is no easy piece. I started the build but am stil not sure about my measures. The towers (and he bridge) do not exist anymore so i don't have any measures and must only rely on my feeling to get the height relation to the bridge somewhat accurate.
I will probably not succeed completely as my bridge is probably a few centimeters to small, so this has some repercussions on the towers size. I ill do my best.

Oh, i forgot, the grassland on the right behind the bridge (last picture) is not finished yet. I will also try to plant a wildrose hedge there with remaining rose hips! Should be a nice color spot!

Claude
hulkster
Visit this Community
Alicante, Spain / España
Joined: November 26, 2009
KitMaker: 78 posts
Armorama: 76 posts
Posted: Wednesday, April 27, 2011 - 10:58 PM UTC
I really like this...(will buy ur nxt book )...lol
can't wait 4 the rain...don't let us wait to long please....