_GOTOBOTTOM
Dioramas
Do you love dioramas & vignettes? We sure do.
Clervaux River
roudeleiw
Visit this Community
Luxembourg
Joined: January 19, 2004
KitMaker: 2,406 posts
Armorama: 2,224 posts
Posted: Sunday, March 06, 2011 - 12:50 AM UTC
Hi everyone,

The adventure of Dio Clervaux continues!
As you probably know already i must change my initial plans.
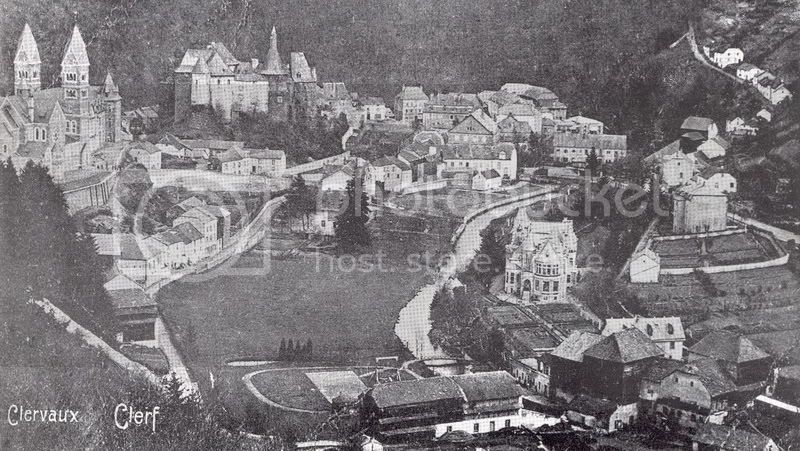
I had planned an addition of roughly 1.2 meters to finish my scene with the german army attacking on the opposite side of the castle.
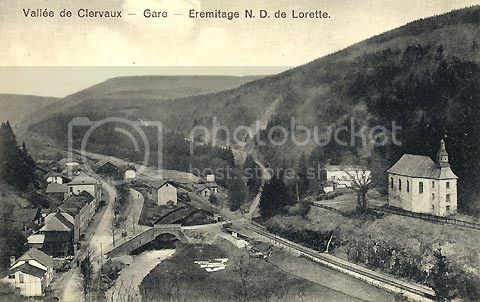
The problem is this one: To model convincingly a similar topography as in the real town of Clervaux, would have meant to build the opposite hill at a height of 2 meters!!! To reach this insane height i would need at least a space of 2-3 meters and i only have 1.5 meters left in my room!
At this stage i need to put that plan to rest. Maybe in the future, as a separate dio, but not now.
I will conclude the actual Dio Clervaux with two modules, 70 cm wide over the whole lengths of 2.2 meters. This will include a lot of nice features and will provide a good entry point to the village.
The only drawback, again, is the lack of action in this part of the town.

I will show you again the paln and some features of the build.

Here is a rough sketch. Yes , i am working so messy and i like that! :-)


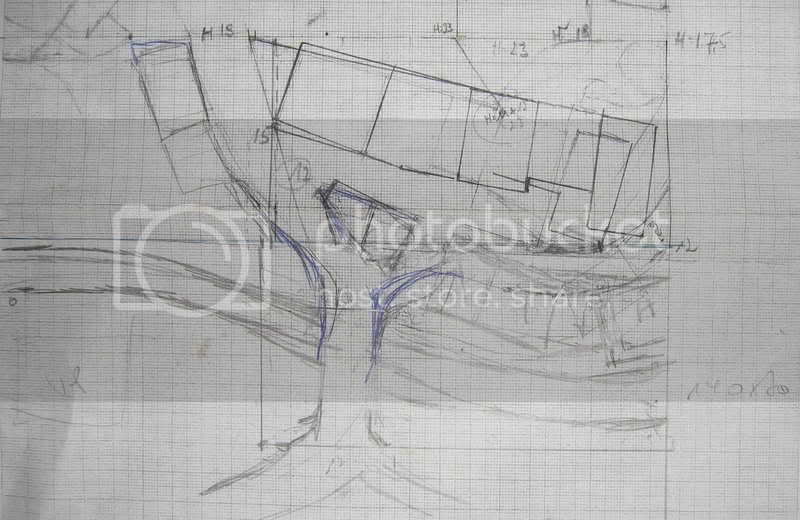
Right in the middle of it is the "park island " with the willow.
The part on the lower right side is the one I am doing now, it is 1,4x0.7 m big It will include also 3-4 houses, perhaps one in half to allow inside views.
Complicated houses like a pharmacy and a bike shop for example.
The bridge (spanning over the 2,2 meter river) is about 50 cm long by itself (i underestimated that one badly in my initial thoughts)
Here in this picture on the lower left side

Notice the little towers on the bridge, well , here is one in detail

I need to make two of them!
That, and a resin river of 1,4 meters is the menu for modul 6

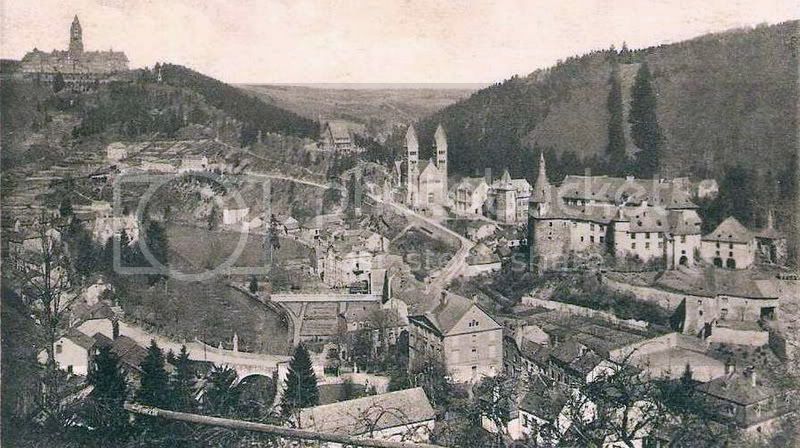
Module 7 (only 0,8 x 0,7) will then feature this nice house (near the middle, on the right side of the river), of which, for now i have only bad pictures


Let's start with the build:

Lot's of styrodur to make the basic shape of everything.
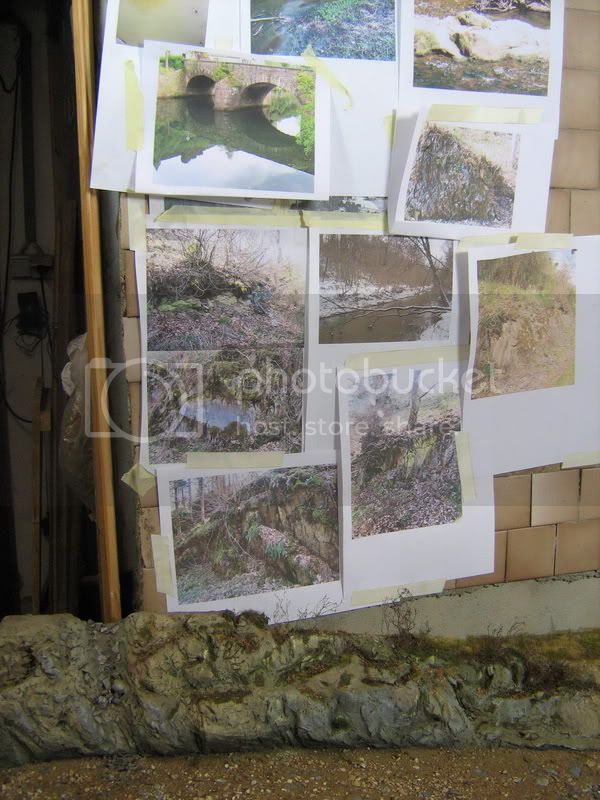
The rocks on the left side of the river are interfering with ease of manipulation, so will the walls on the right side, so I need to build this part by part to be able to have a good reach on everything

I skip the raw styro picture to show you the sculpting of the rocks


I redid it a few times before I was satisfied.

Here is the setup for the bridge with stairs leading down to the river


I build a small wall who is going to border some gardens


Here is the start of the stone covering of the bridge


and the finish, after also having covered the whole thing with a paste


Yesterday evening I laid the bed of the river, the sand mix is still wet .
As the river will not be very deep and it runs through slate land, I incorporated already a lot of stones in the river bed


So, my picture taking is still only mediocre, I can't really put a 1,5 meter long dio in the photo booth to better pics, sorry.

Thanks for looking

Claude

PS. I have still some books to sell from Château Clervaux :-)


newfish
Visit this Community
England - West Midlands, United Kingdom
Joined: June 23, 2008
KitMaker: 2,329 posts
Armorama: 2,110 posts
Posted: Sunday, March 06, 2011 - 02:18 AM UTC
Great to see this rolling Clause I am really interested to see how you tackle river itself. You seem to of made a nice start. From the detailed sketch we are in for a treat. I am interested to see how you change this slight alteration and the counter attack.

Jaymes

callmehobbes
Visit this Community
England - North West, United Kingdom
Joined: April 17, 2005
KitMaker: 751 posts
Armorama: 740 posts
Posted: Sunday, March 06, 2011 - 02:27 AM UTC
It's like meeting an old friend! Glad to see the updates.
hulkster
Visit this Community
Alicante, Spain / España
Joined: November 26, 2009
KitMaker: 78 posts
Armorama: 76 posts
Posted: Sunday, March 06, 2011 - 02:32 AM UTC
I have been desperatly waiting for this one to be continued...nice start so.
Can´t wait for your "watersolution"...
Gorizont
Visit this Community
Sachsen, Germany
Joined: November 28, 2007
KitMaker: 1,462 posts
Armorama: 1,289 posts
Posted: Sunday, March 06, 2011 - 04:04 AM UTC
The story continues.... NICE!
I´m sure, all of us waited for this moment.

Greetings and thanks for the update!
Soeren
AlanL
Visit this Community
England - East Anglia, United Kingdom
Joined: August 12, 2005
KitMaker: 14,499 posts
Armorama: 11,675 posts
Posted: Sunday, March 06, 2011 - 04:16 AM UTC
Hi Claude,

Excellent, looking forward to the further additions.


Al
HEINE-07
Visit this Community
Ohio, United States
Joined: February 28, 2007
KitMaker: 392 posts
Armorama: 198 posts
Posted: Sunday, March 06, 2011 - 05:48 PM UTC
Hello! Thank-you for persisting with this monumental endeavor, and sharing everything so generously with everyone here. Your skills must certainly be fluent and sharp by now. I have two questions about the third photograph, counting upwards from here:

>>Are the stone wall sections made by casting some material into a mold--what material would you cast with--plaster?
>>The curved section of stone running along the bridge--is this an original piece of carving--it too is not a casting, right--is it the self-hardening clay, like you used for the court-yard ground surface?

Here is a question about the seventh photograph, counting upwards from here:

>>This shows rocks carved from blue styrofoam--then, is some material added back on top of the carved areas--what would the added material be--is it the self-hardening clay?

--HEINE-7
vonHengest
Visit this Community
Texas, United States
Joined: June 29, 2010
KitMaker: 5,854 posts
Armorama: 4,817 posts
Posted: Sunday, March 06, 2011 - 06:43 PM UTC
I'm really looking forward to seeing your techniques with modeling water
roudeleiw
Visit this Community
Luxembourg
Joined: January 19, 2004
KitMaker: 2,406 posts
Armorama: 2,224 posts
Posted: Sunday, March 06, 2011 - 07:00 PM UTC
Thanks for the welcome! Glad to see everyone back.

Well, for the water section, you will have to deal with someone without any experience, so i hope i will keep the overall standard, at least. As i am surfing the web for every little tip i can find, i doubt that you will learn anything new regarding the water from me. I already choose Envirotex (found the only importer in Europe for that stuff). I am in the middle of testing it, colors, ripples and so on, the usual.
Does anyone know how to overcome the brush streaks when aplying heavy acrylic gel for the ripples (only with a coat of resin or gloss on top of it i presume?) You see, i need help here !

Hi Rick, i waited for this questions to come! :-)
I did not want to make the first post to long, so i waited for the questons to pop up.


Quoted Text

have two questions about the third photograph, counting upwards from here:
>>Are the stone wall sections made by casting some material into a mold--what material would you cast with--plaster?
>>The curved section of stone running along the bridge--is this an original piece of carving--it too is not a casting, right--is it the self-hardening clay, like you used for the court-yard ground surface?


The curved section is only a half cardboard tube glued on the styro. It will be the lower part of the tower. In fact, i must start the tower now to verify if the diameter i choose for the lower section will really work out at the tip.
All the stone work here is still the one used for the castle. I think i posted this priocedure already (years ago, LOL) when i made the tower of the witch chapel.
Into my silicone mould i do not pour plaster or anything similar, but apply two coats of white wood glue. When hardened i have a sheet of wall made of glue!
I apply this one on the wall , whith glue again. The sheet is very thin, breaks easily when completely dry, but with the aid of a hair dryer it nearly lays itself smoothly around the round surface by itself. (slightly warmed up ). I wish i would haver had this solution for the castle tower's!
As the glue is translucid i am painting the surface dark before glueing on. Also, the glue wall is very smooth and needs roughing up. Thats why i applied the paste (stuff used to glue on styro strips on the wall, hardens very well and is workable, it's a rest from my renovation work the last two months). The paste also covers the tousands of air holes.
As yousee, the method has disadvantages, but i could never do such small round surfaces with my method from the castle.


Quoted Text

Here is a question about the seventh photograph, counting upwards from here:

>>This shows rocks carved from blue styrofoam--then, is some material added back on top of the carved areas--what would the added material be--is it the self-hardening clay?


I apply plaster on top of it, with a bit of white glue on the Styro for better adherence and a shot of glue into the plaster to avoid later cracks. I am not confortable to carve details in styro (or have the wrong styro) , so i prefer carving into plaster (before it is completely hardened).
By the way, the long wall on the right side of the river is made of self hardening clay.

I have the feeling that after all those years i can skip some steps of my build sequences because most of it is known , so i simply ask you to get back to me (like Rick did) if something remains unclear and i will try to get into more detail.

Another thing to mention. Stress time is over! Last year i put myself into unneeded modeling stress because of expo deadlines. No more of this , it's a hobby and i will take my time to do this part. As there is massive vegetation to do, three houses, you are in for a long ride on this one! :-)

Claude
ivanhoe6
Visit this Community
Wisconsin, United States
Joined: April 05, 2007
KitMaker: 2,023 posts
Armorama: 1,234 posts
Posted: Monday, March 07, 2011 - 02:49 AM UTC
Thank You Claude for taking us on another adventure to Castle Clervaux. This should be a fun, wet journey. Thanks again for sharing you valuable time by answering everybodies questions. And you are right, modeling should be fun and relaxing ! Take your time and enjoy the completion of the "greatest diorama in the world". Tom
vayhan
Visit this Community
Istanbul, Turkey / Türkçe
Joined: October 27, 2010
KitMaker: 51 posts
Armorama: 45 posts
Posted: Monday, March 07, 2011 - 06:23 AM UTC
Hello Claude,
First of all thanks for sharing the big dio with us. I have been several times visited your pages to learn more.

I really like the paste on walls. i am that progress. Waiting for your water solution. I bought Valejos Transparent Water. But when i have used it , i saw that when it dries it has gaps. Dont know why. I just tried.

Anyway looking forward for updates.

Volkan
VLADPANZER
Visit this Community
Lebanon
Joined: December 20, 2010
KitMaker: 568 posts
Armorama: 549 posts
Posted: Tuesday, March 08, 2011 - 05:38 AM UTC
Hi,

Always a pleasure to see your work Claude!!! I am glad to see you continuing work on your project.

Regards,
seb43
Visit this Community
Paris, France
Joined: August 30, 2005
KitMaker: 2,315 posts
Armorama: 2,158 posts
Posted: Tuesday, March 08, 2011 - 10:07 AM UTC
I have the chance to live 20 km from Clervaux and I was lucky enough to stay 10 days in this beautiful small village and I knew all the corners of the village by heart.
Just to tell you that Claude is insane and really everytime I am going to Clervaux for my work, I am thinking of Claude's work.
My hat' off to you and your skills and patience
Seb
dioman13
Visit this Community
Indiana, United States
Joined: August 19, 2007
KitMaker: 2,184 posts
Armorama: 1,468 posts
Posted: Tuesday, March 08, 2011 - 10:42 AM UTC
Hey Claude, After learning alot from you, maybe I get to help you this time. I have an envirotex river section on a dio I am doing now. For the acrylic gel for my ripples I used a childs medicine sreinge. Just fill with the acrylic gel and push the plunger, no brush strokes. Hope this is of some help. bob d.
roudeleiw
Visit this Community
Luxembourg
Joined: January 19, 2004
KitMaker: 2,406 posts
Armorama: 2,224 posts
Posted: Tuesday, March 08, 2011 - 06:57 PM UTC
Thanks a lot everyone for being on the watch again. This surely helps to push this project further


Quoted Text

For the acrylic gel for my ripples I used a childs medicine sreinge. Just fill with the acrylic gel and push the plunger, no brush strokes. Hope this is of some help. bob d.


This certainly helps, thank you Bob, i will give it a try but have no doubt that it will work.

Claude

PS. A few word about expos.

I just got my first invitation for this year. It will be in Luxembourg's town of Walferdange. It is a european wide well known model train expo and i will be there as a special attraction so to say. A local touch, but without a train. 3000 visitors expected over the weekend of 12/13 Nov., not bad at all.
I got a tentative invit for the Ramma expo in Sedan (Fr) in October, but no major model expo in Europe has yet invited me this year, after Euromilitaire and ScaleModelFactory last year. Still time to do so! Transport cost payed is a minimum!
dioman13
Visit this Community
Indiana, United States
Joined: August 19, 2007
KitMaker: 2,184 posts
Armorama: 1,468 posts
Posted: Thursday, March 10, 2011 - 02:41 AM UTC
Hey Claude, Something I should have mentioned earlier. When my acrylic ripples were dry, I used future floor polish to try and blend in and lowwer the ripples on the envirotex water. The gel started to turn white/frosting, so I wiped it off as quick as I could. I should have done a test first but I did not think ahead. I'm not sure of the end results with the future added to the top of the acrylic, if it will clear up or not so test first. I got a little upset with my self and haven't tried a test yet but will get back to it after a bit.
roudeleiw
Visit this Community
Luxembourg
Joined: January 19, 2004
KitMaker: 2,406 posts
Armorama: 2,224 posts
Posted: Thursday, March 10, 2011 - 03:00 AM UTC
I tested already to cover the resin with Future and it was a complete miss. It did not dry clear and was a general mess. I will never try again with it because i would never take the risk later on the finished river.
A thin layer of resin over the one with the acryl ripples will probably do it. I tested that one already but will do more.

Thanks

Claude
sfctur1
Visit this Community
California, United States
Joined: December 12, 2007
KitMaker: 643 posts
Armorama: 497 posts
Posted: Saturday, March 12, 2011 - 07:43 AM UTC
Claude,
Welcome back. Looking great so far. I had checked your Blog and say you were back in action. So as always looking foward to all your updates.
Tom
downtowndeco
Visit this Community
Montana, United States
Joined: December 08, 2005
KitMaker: 306 posts
Armorama: 272 posts
Posted: Saturday, March 12, 2011 - 04:16 PM UTC
IMO unless the river is only a few inches, maybe a foot deep the rocks and all that on the bottom should/would not show. Better than to detail the river bottom would be to make it smooth but paint it to create the depth. Lighter colors near the shore & low spots/sand bars on the river, darker (almost to black) in the deep areas. Let it dry & then pour your resin maybe an 1/8" deep. The "depth" is just an illusion but looks great, trust me on this one.

Randy Pepprock
Diorama Plus
jba
Visit this Community
Rhone, France
Joined: November 04, 2005
KitMaker: 1,845 posts
Armorama: 777 posts
Posted: Sunday, March 13, 2011 - 06:16 AM UTC
Well Claude sorry i should spot that one more often.
First I congratulate you for getting into such a big project yet again! For a water first timer you really see huge.


Quoted Text

Does anyone know how to overcome the brush streaks when applying heavy acrylic gel for the ripples (only with a coat of resin or gloss on top of it i presume


I just don't get it, I have the feeling you are drowning in a glass of water here. Just a *soft* brush does the trick and doesn't leave any trace.. for some special effects i also "paint" with acrylic gel using my fingers and hitting slightly the surface.

btw, about the overall effect, I sort of agree with Randy above, I don't think you should care about the bottom of the stream -unless of course you have been visiting Clervaux on the winter and you can attest that the river's water height wasn't that high.
roudeleiw
Visit this Community
Luxembourg
Joined: January 19, 2004
KitMaker: 2,406 posts
Armorama: 2,224 posts
Posted: Sunday, March 13, 2011 - 06:54 PM UTC

Quoted Text

I just don't get it, I have the feeling you are drowning in a glass of water here.


LOL, i agree, i feel a bit like a few years back when i started modeling and felt the need to get everything right the first time. Well, here it is the case, but, rest assured Jean Bernard, i am not panicking yet.
My question regarding the streaks was an easy solution as i tried only once or twice before.

Thank you JBA, Randy and Tom for commenting.
Of course, and you believe me when i say that i was already informed this far, depth is mostly an illusion in modeling water.

To the contrary , i am still not sure what sort of water to make here.

I am going up to Clevaux shortly (for us Luxembourgers a 1 hour cardrive is already a well planned trip, LOL) and check what i find, but the whole area of interest for me has substantially changed since mid last century. The river is canalized and partly put under the ground, so a direct comparison is impossible.

Let me show you some pictures:

Here is the river 1 km upstream, this is the entrance to Clervaux

Here it is 500 m downstream of my area, both are of course contemporary pictures


This doesn't look very deep!

Here is a actual picture of the river where the Clervaux one is flowing into, the bigger "Sauer" river. The picture (i found no other this morning) is taken 50 km downstream he place where both meet, just to highlight that this looks still not so deep.


My plan for now, and this is also to get some diversificatioon into a 2 meter river, is to start with a more translucend part. Near the bridge, where the landscape is changing from rocks to fields, make it then a bit deeper (underground has changed from pure slate to a more normal soil) and start changing the color and adding more muddy colors.

I consider the stones i added already to the soil as a safeguard for every case.
This was a 10 minutes work, so not really a hard task.

Thanks guys for your input, i really appreciate!

Claude

Edit: I am on my home PC now and have another pic to show you. This is the Clervaux river roughly 10 km downstream my area


Fenrell
Visit this Community
United States
Joined: October 02, 2008
KitMaker: 5 posts
Armorama: 4 posts
Posted: Wednesday, March 23, 2011 - 06:49 AM UTC
Just a thought, was the river actually flowing at the time your diorama depicts, or was it frozen over?
Buck_Compton
Visit this Community
Limburg, Netherlands
Joined: October 04, 2009
KitMaker: 155 posts
Armorama: 102 posts
Posted: Wednesday, March 23, 2011 - 06:58 AM UTC
Hey Claude,

Again my compliments with your work!! I have had the luck to see your Diorama at the SMC challenge and I was astonished. A few months ago I had some contact regarding the Base products you've used on your Diorama. I have been able to find a portion of Styropur. Now I have a question about how to prepare, shape and finish the base.

1 I have a couple of plates what type of glue do I use at best to glue these plates togheter?

2 Wich kind of tools work at best with styropur?

3 When the shape/terrain is formed the way i like it to be do i have to "impregnate" it for protection?

Cheers Remi
roudeleiw
Visit this Community
Luxembourg
Joined: January 19, 2004
KitMaker: 2,406 posts
Armorama: 2,224 posts
Posted: Wednesday, March 23, 2011 - 07:03 PM UTC

Quoted Text

Just a thought, was the river actually flowing at the time your diorama depicts, or was it frozen over?


Yes, it was flowing. To my knowledge it never freezes over, it's to fast (ok, maybe in some record winter it may do that, but i never heard of). Also, the "real" winter started only a few days later in the Luxembourg Ardennes , with heavy snowfall and so. Thanks for your input John

Hi Remi, glad you loved it.

1. I am attaching the plates with white wood glue. Better let it dry a few days if you want to do heavy cutting later, it bonds well, but needs a lot of time to get there.

2. Mostly i am cutting with sharp cutters, blades knifes. Big chumps can be cut with a saw also. If you are down to your height and shape use sanding paper to smooth it to your needs.
3. No impragnation on the styro. Just add want you need. Plaster if you want to do a rock. Carve the details in the plaster before it hardens completely .
Earth mixes for terrain and roads and bases for grassland or wood.
A coat of white glue under all this helps the first adherence but is not a must.

Have fun

Claude

roudeleiw
Visit this Community
Luxembourg
Joined: January 19, 2004
KitMaker: 2,406 posts
Armorama: 2,224 posts
Posted: Thursday, March 24, 2011 - 06:02 AM UTC
I made a pause regarding water testing and started painting the bridge and doing landscape.
Until now all the pictures i took were blurred or unfocused except this overview where you can see that i am working with some reference pictures , al taken in the north of Luxembourg, slate country


More detailed pics will follow once i get some satisfying ones.

Claude
 _GOTOTOP