Hosted by Darren Baker
An ambitious project

vonHengest

Joined: June 29, 2010
KitMaker: 5,854 posts
Armorama: 4,817 posts

Posted: Wednesday, February 22, 2012 - 12:35 PM UTC
It's great to see your project coming along here Victor!
Lagumiles
Joined: December 30, 2003
KitMaker: 156 posts
Armorama: 135 posts
KitMaker: 156 posts
Armorama: 135 posts

Posted: Wednesday, February 22, 2012 - 08:05 PM UTC
Hi Victor, thanks for your answer.
Perfect explaination, and things
are coming up really oustanding.
I confirm what Chuck said about wax, it comes with different
names as for countries, Future, Klir, Klear, Clear etc.
Thanks
Moreno
Perfect explaination, and things
are coming up really oustanding.
I confirm what Chuck said about wax, it comes with different
names as for countries, Future, Klir, Klear, Clear etc.
Thanks
Moreno
jointhepit

Joined: May 14, 2006
KitMaker: 3,829 posts
Armorama: 881 posts

Posted: Thursday, February 23, 2012 - 10:05 AM UTC
just speachless, I follow this post and my god is this good stuff!
very inspiring post
greetz
very inspiring post
greetz

olivato

Joined: August 16, 2005
KitMaker: 127 posts
Armorama: 107 posts

Posted: Monday, February 27, 2012 - 12:33 PM UTC
Hi everyone, the big time come!!!
Jeremy: Thanks for keeping supporting me from the first days, when I started with the project.
Moreno: Anything you want to ask, no problem. Thanks for the advice about the different names, but I'm still looking for it.
Jointhepit: Thank you for your words and time.
Yes, it's time to put everything on the base again and see if there are any problems. Luckily for me there is no significant problem, only a little one on the verticality, but easy to fix.
Seeing everything together again (this is the first time since the beginning of the project) makes me happy and especially because this vision that I had in my head when I started is starting to materialize.
One of the things that I love about dioramas is to see how this picture you imagined in your mind, becomes a reality, it´s a pleasure.
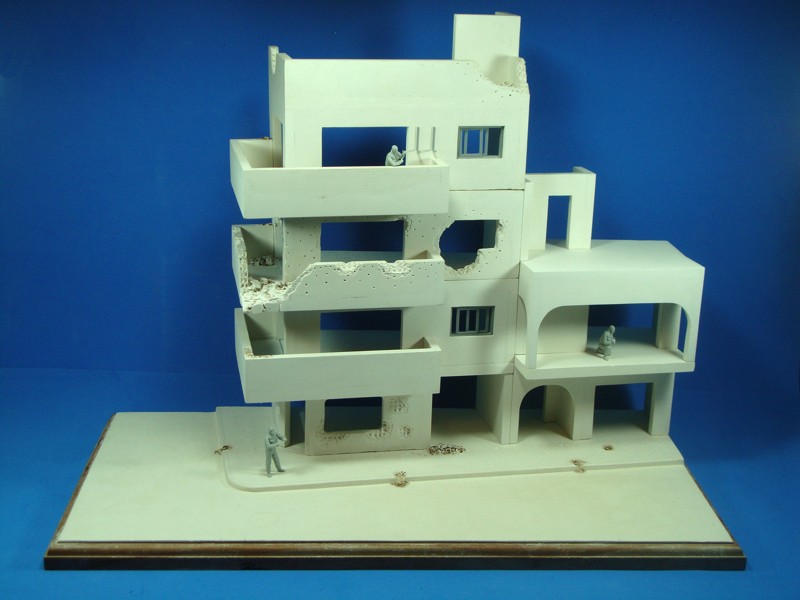
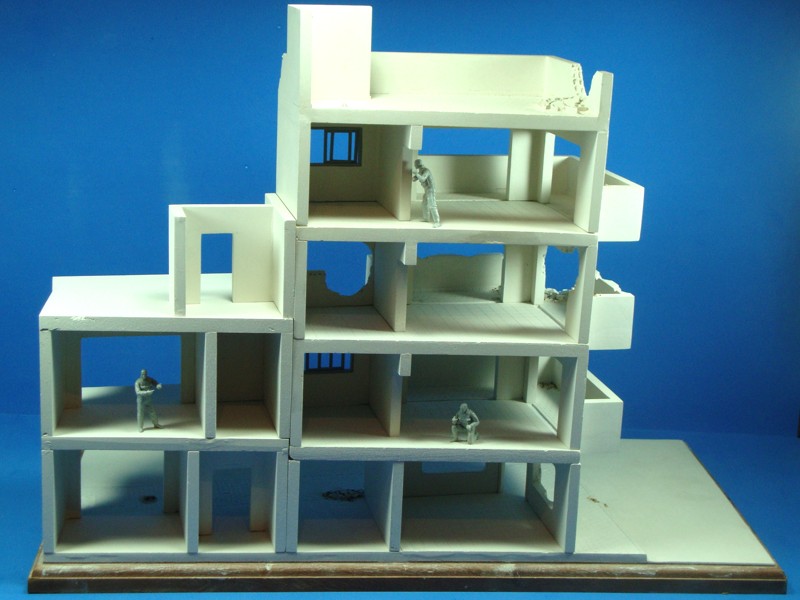
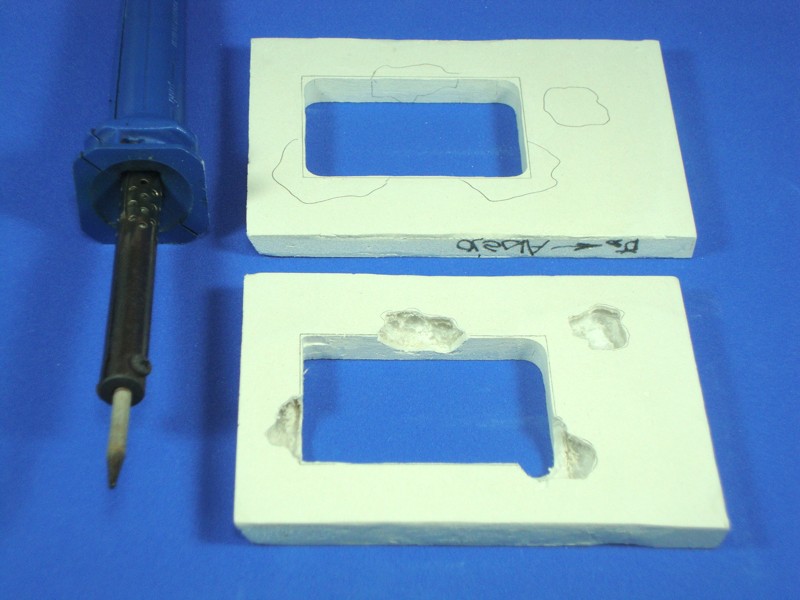
When I showed how I made the destroyed walls, I forgot to describe some first steps.
When the wall is ready, I first mark the places to be destroyed. Then with a minidrill I cut these areas. With a soldering iron I burn the polystyrene close to the hole to put more Das so I can sculpt the hollow briks.
When you put the Das into the hole, maintain the Das very wet (and soft) because at this time the wall is very fragile, it doesn´t have the "soul" of polysterene.
Now the process continues as I told you before.
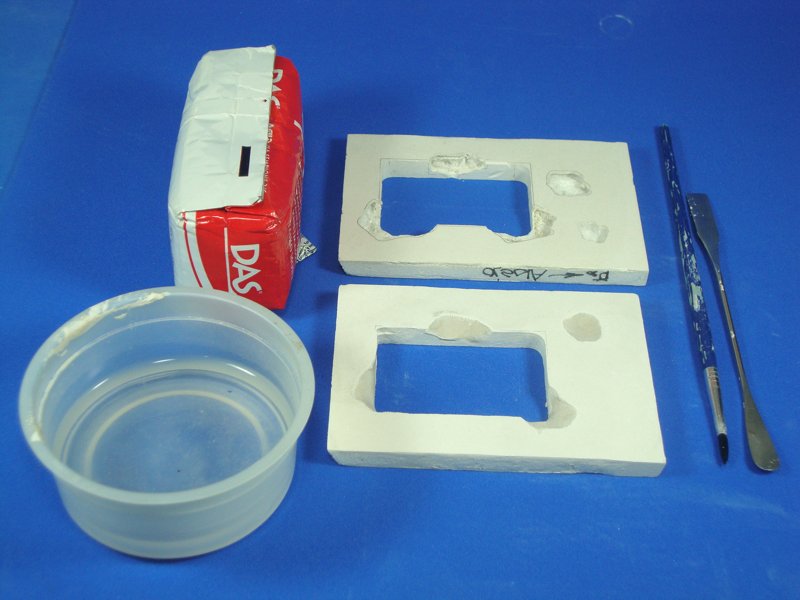
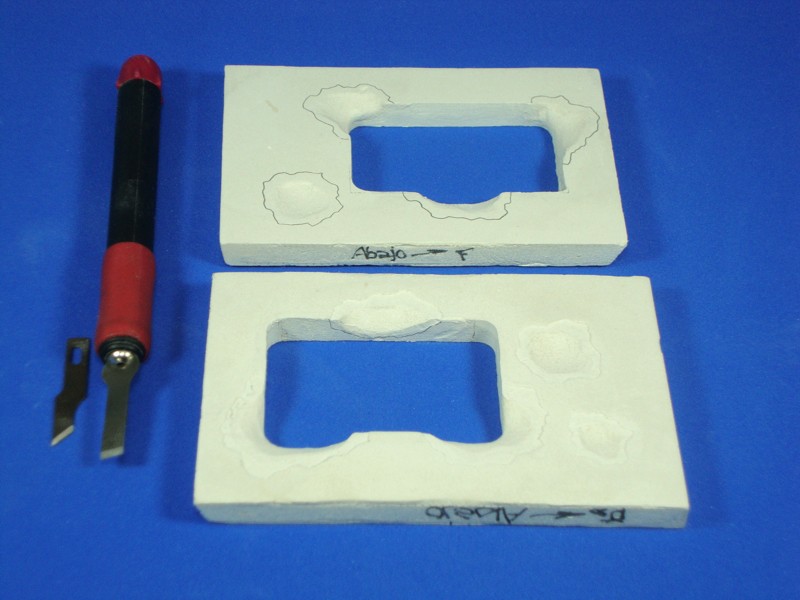
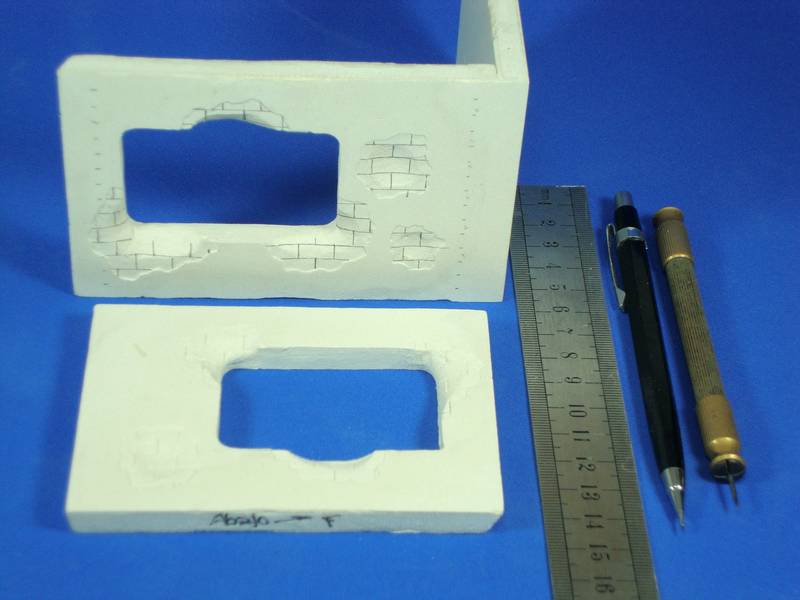
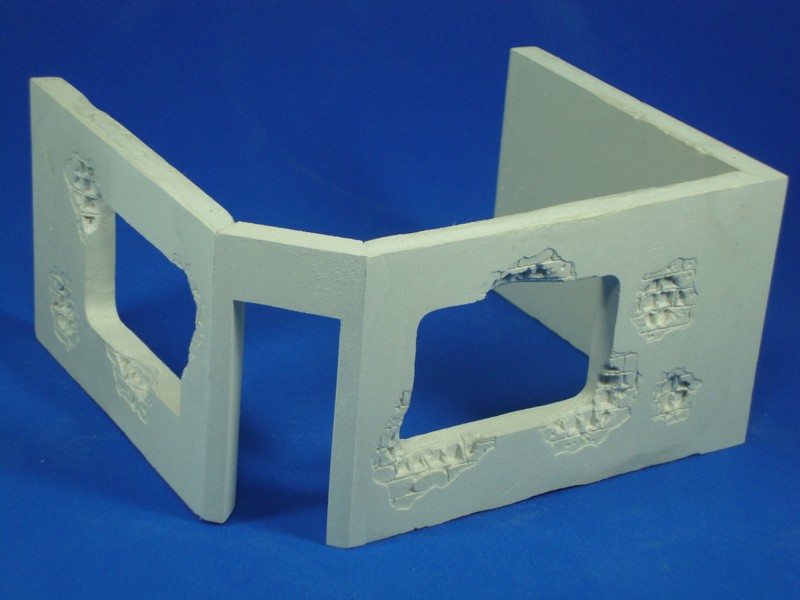
Here are some pictures of how I made the debris.
I prepare all the things I'm going to need on the process in advance, because I have 10-20 minutes to work with the Das, before it starts to dry and gets difficult to handle.
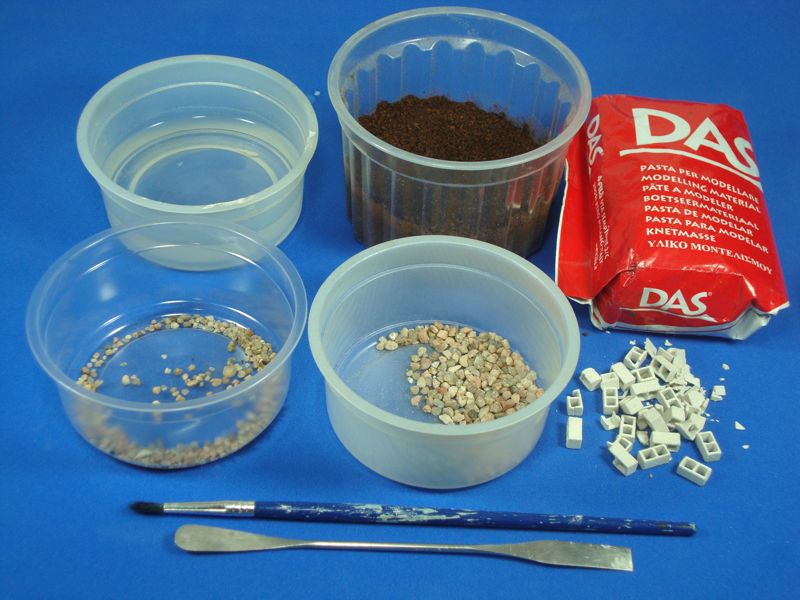
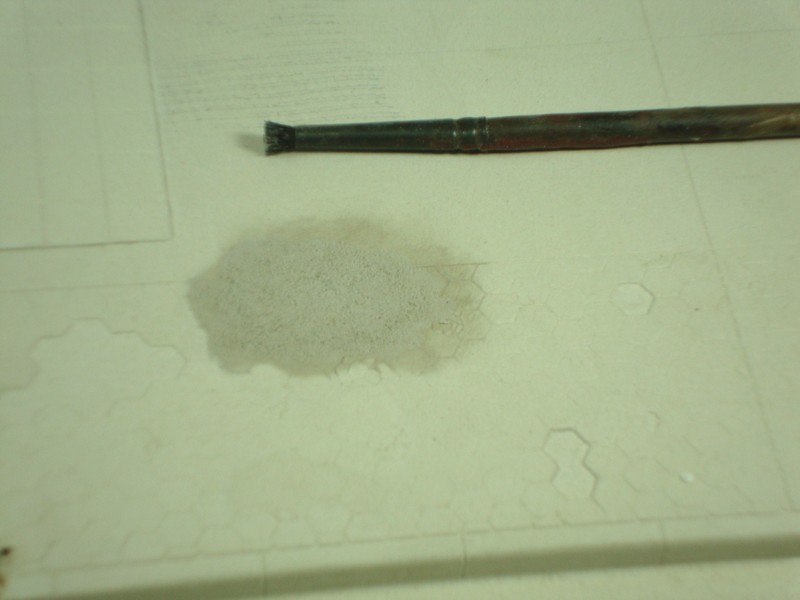
First I wet the place where I'm going to put the debris.
I put Das on the place and prick it with a brush with hard and short hair, to create a sandy effect.
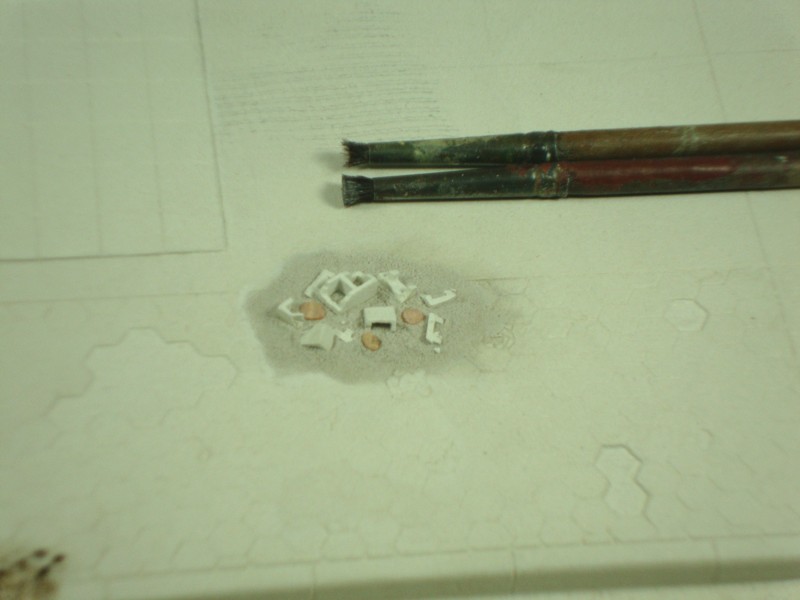
Later I put the hollow bricks into the Das and prick them again with the brush.
After that I add some rocks (the ones you put in fishbowls).
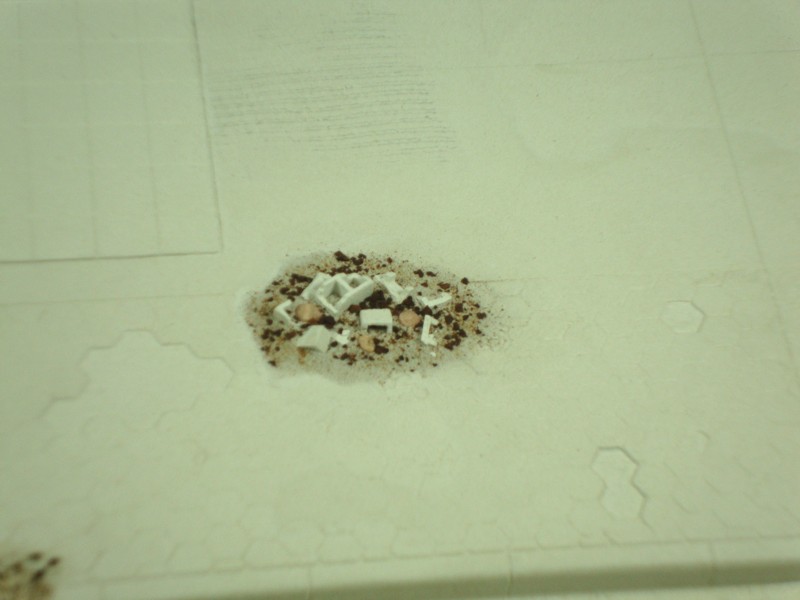
Finally I add some grinded coffee and prick again to insert it in the Das.
I'll see you soon!
Jeremy: Thanks for keeping supporting me from the first days, when I started with the project.
Moreno: Anything you want to ask, no problem. Thanks for the advice about the different names, but I'm still looking for it.
Jointhepit: Thank you for your words and time.
Yes, it's time to put everything on the base again and see if there are any problems. Luckily for me there is no significant problem, only a little one on the verticality, but easy to fix.
Seeing everything together again (this is the first time since the beginning of the project) makes me happy and especially because this vision that I had in my head when I started is starting to materialize.
One of the things that I love about dioramas is to see how this picture you imagined in your mind, becomes a reality, it´s a pleasure.


When I showed how I made the destroyed walls, I forgot to describe some first steps.
When the wall is ready, I first mark the places to be destroyed. Then with a minidrill I cut these areas. With a soldering iron I burn the polystyrene close to the hole to put more Das so I can sculpt the hollow briks.
When you put the Das into the hole, maintain the Das very wet (and soft) because at this time the wall is very fragile, it doesn´t have the "soul" of polysterene.
Now the process continues as I told you before.


Here are some pictures of how I made the debris.
I prepare all the things I'm going to need on the process in advance, because I have 10-20 minutes to work with the Das, before it starts to dry and gets difficult to handle.

First I wet the place where I'm going to put the debris.
I put Das on the place and prick it with a brush with hard and short hair, to create a sandy effect.

Later I put the hollow bricks into the Das and prick them again with the brush.
After that I add some rocks (the ones you put in fishbowls).

Finally I add some grinded coffee and prick again to insert it in the Das.

I'll see you soon!
ahandykindaguy

Joined: August 20, 2008
KitMaker: 1,295 posts
Armorama: 1,191 posts

Posted: Monday, February 27, 2012 - 03:31 PM UTC
Again i think WOW just isn't enough, yet all I can think of to say Victor. A very impressive build indeed. I am glad to see you are getting everything put together soon, it looks amazing, and absolutely massive! Great work. Keep up the updates, we are all eagerly awaiting them.
Dave
Dave

Lagumiles
Joined: December 30, 2003
KitMaker: 156 posts
Armorama: 135 posts
KitMaker: 156 posts
Armorama: 135 posts

Posted: Monday, February 27, 2012 - 08:10 PM UTC
Something could help finding Future in Argentina the Johnson Company sells the equivalent of "Future Floor Wax" as "Blem brillo acrilico incoloro".
I got this on the web so I am not sure for it.
Moreno
I got this on the web so I am not sure for it.
Moreno
flugwuzzi

Joined: November 02, 2007
KitMaker: 633 posts
Armorama: 599 posts

Posted: Monday, February 27, 2012 - 11:41 PM UTC
GREAT WORK, Victor.
Interesting Project and excellent pics/explanations.
Thanks for sharing this with us and keep on with your great work.
cheers
Walter
Interesting Project and excellent pics/explanations.
Thanks for sharing this with us and keep on with your great work.
cheers
Walter

olivato

Joined: August 16, 2005
KitMaker: 127 posts
Armorama: 107 posts

Posted: Friday, March 09, 2012 - 02:06 PM UTC
Hi everyone!!!
Dave: Thank you very much for your words and support.
Moreno: Thanks for the advice, I finally found it under the name you gave me. Now I have to try it. Thank you.
Walter: Thank you for your words and the time to see my project.
I have been working in many things at the same time, but nothing is finished yet... and this is not the first time that this happened to me on this post, I have to reorganize my work in a different way.
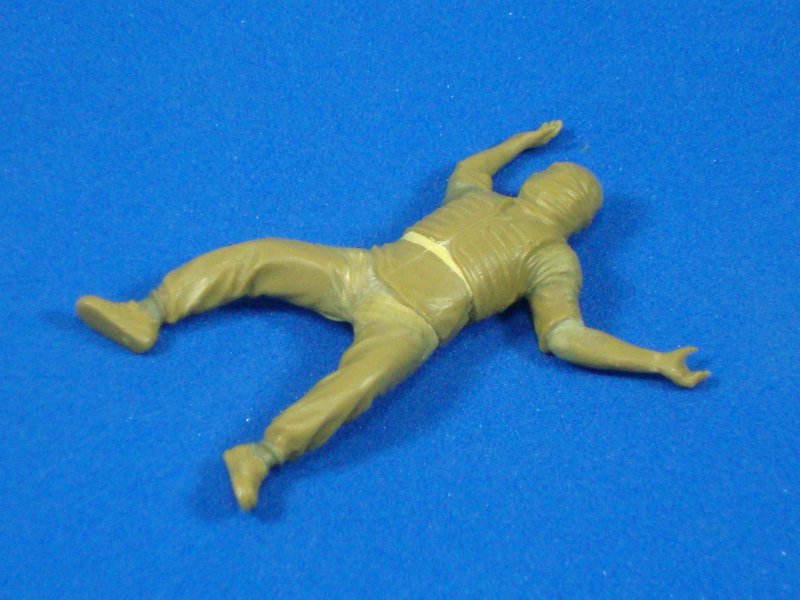
This time I'm posting some pictures of the first finished rebel ready to paint.
The final step on the transformation was the addition of Tamiya Epoxy (quick type) to sculpt some wrinkles.
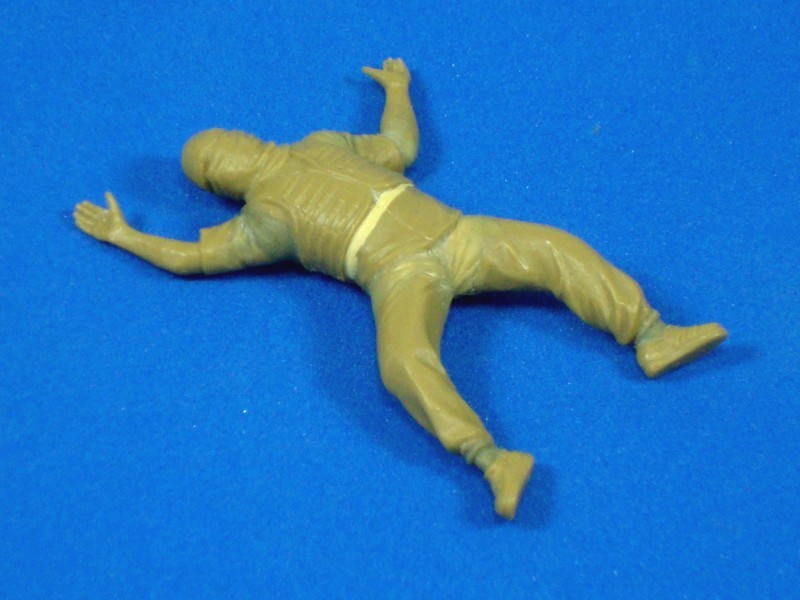
I think they are good, but if you think there is something to improve, or wrong, please let me know, because this is the first time I completely transform a figure. (the others times I changed an arm or a leg)
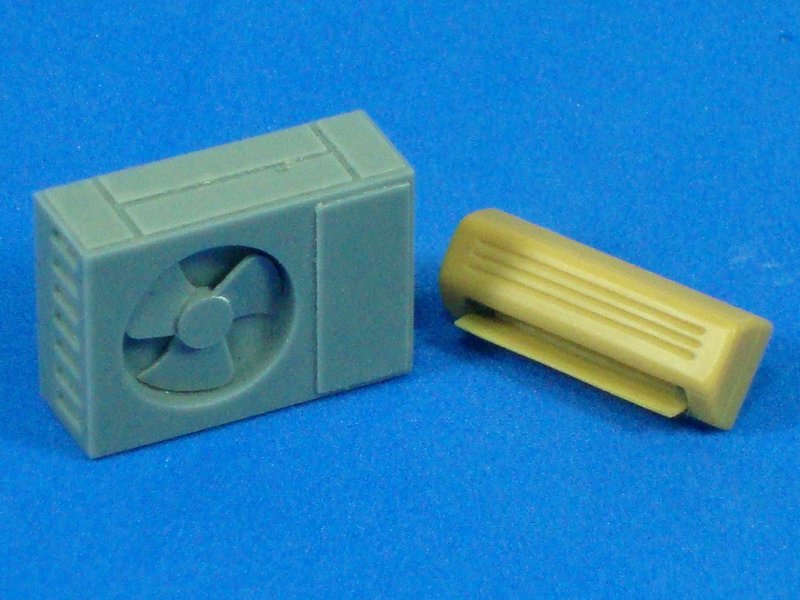
You remember my air conditioner. They have two units, one outside and another inside... Where is my inside unit?. I have to make one.
I´m actually working on the banister for the terrace and balcony of the house. Here you can see the design and where I am. I expect I can do it as I designed it.
This project is my first time on many things. Yes, it´s the first time I've transformed a figure, constructed a block of flats, made such a big diorama, taken pictures of the process, even learnt English to write here. Thanks to my wife (she is a teacher of English) you can read this post, because she corrects all my ugly English, and turns it into a readable post.
There is a lot of work on the final stage, so in future days I will be updating this thread while I'm finishing each step.
Dave: Thank you very much for your words and support.
Moreno: Thanks for the advice, I finally found it under the name you gave me. Now I have to try it. Thank you.
Walter: Thank you for your words and the time to see my project.
I have been working in many things at the same time, but nothing is finished yet... and this is not the first time that this happened to me on this post, I have to reorganize my work in a different way.
This time I'm posting some pictures of the first finished rebel ready to paint.
The final step on the transformation was the addition of Tamiya Epoxy (quick type) to sculpt some wrinkles.

I think they are good, but if you think there is something to improve, or wrong, please let me know, because this is the first time I completely transform a figure. (the others times I changed an arm or a leg)

You remember my air conditioner. They have two units, one outside and another inside... Where is my inside unit?. I have to make one.

I´m actually working on the banister for the terrace and balcony of the house. Here you can see the design and where I am. I expect I can do it as I designed it.

This project is my first time on many things. Yes, it´s the first time I've transformed a figure, constructed a block of flats, made such a big diorama, taken pictures of the process, even learnt English to write here. Thanks to my wife (she is a teacher of English) you can read this post, because she corrects all my ugly English, and turns it into a readable post.
There is a lot of work on the final stage, so in future days I will be updating this thread while I'm finishing each step.

olivato

Joined: August 16, 2005
KitMaker: 127 posts
Armorama: 107 posts

Posted: Monday, March 19, 2012 - 12:18 PM UTC
Hi!
As you saw, the main structures of the buildings are complete, so now I´m focusing on the internal details of each floor.
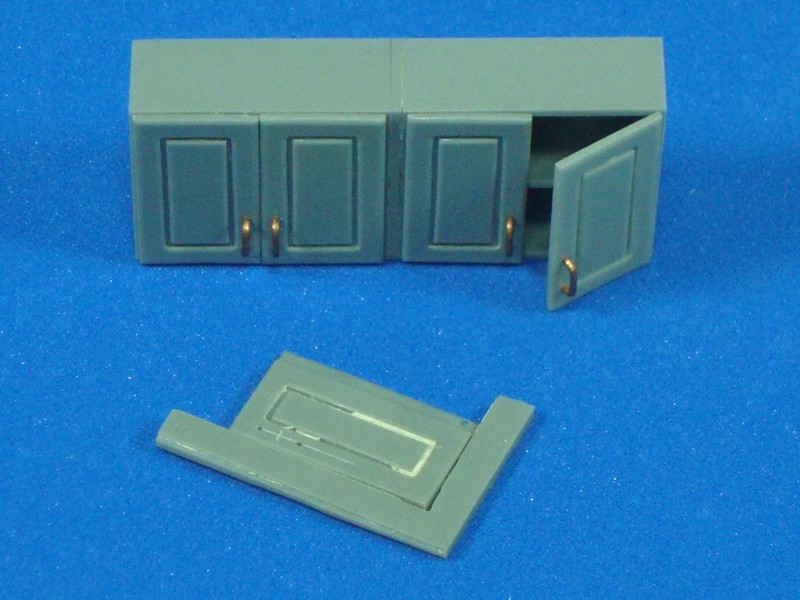
When I did the furniture for the kitchen, I made it in a modular way so with the same furniture I can make different kitchens' lay-outs.
Thinking about this, I've repeated enough modules to make the three kitchens. My workbench is really tiny, so I had the modules everywhere.
This is the first kitchen I have done.
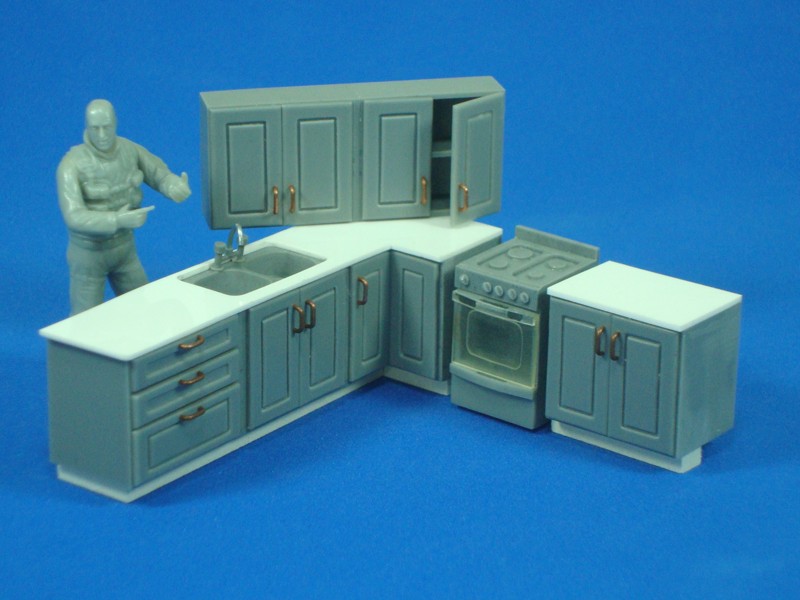
If you are wondering how I placed all the handles in exactly the same place, I made a template with a left-over door and a square. The rest was simple, I put the template on each door and adjust one with the other with the square.
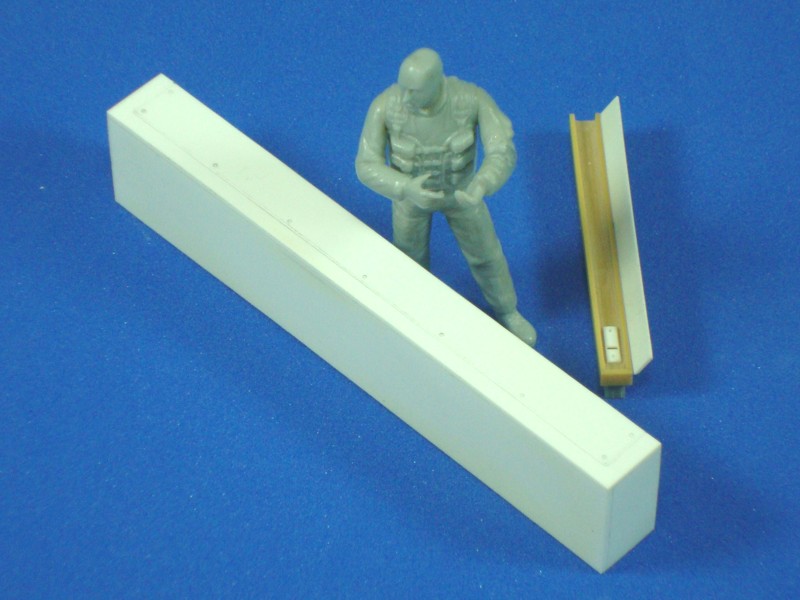
Another thing I need is a cover for the rolling shutter and a strap to operate it.
This is going to be useful on the 2nd floor, where the curved frames for the explosion is. I want to make the tube as if it had fallen.
Now, thinking on the 2nd floor, I made some "tools" for the rebels. I made a soldering iron and a support for it.
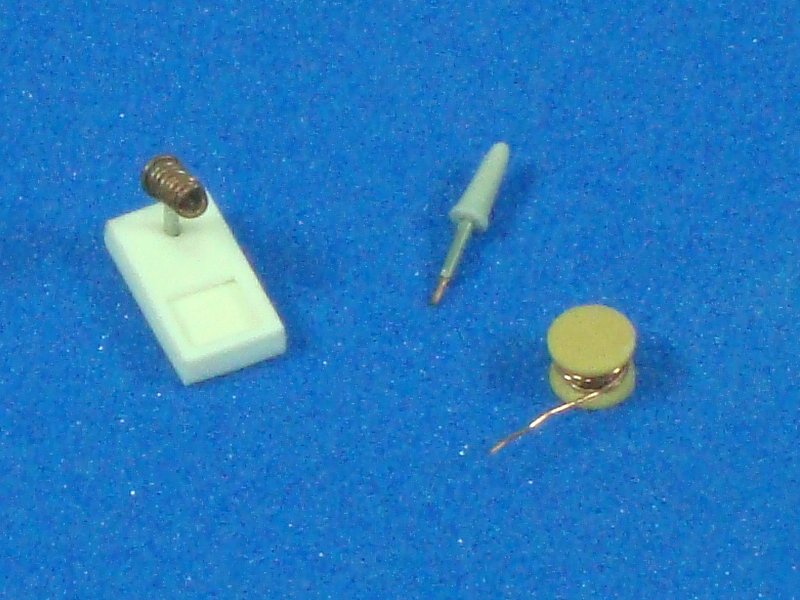
If you can't picture how tiny they are, here is a picture with a reference.
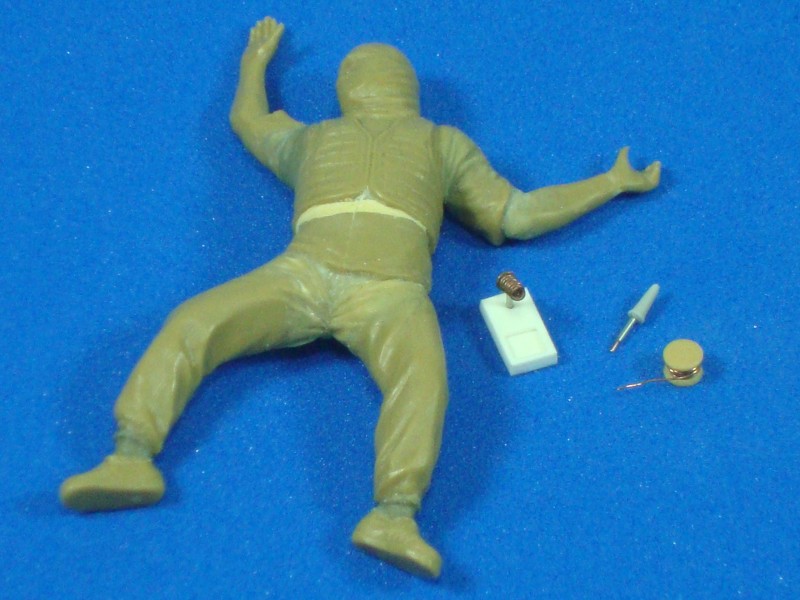
Finally I have finished the 2nd rebel and it's ready to paint.
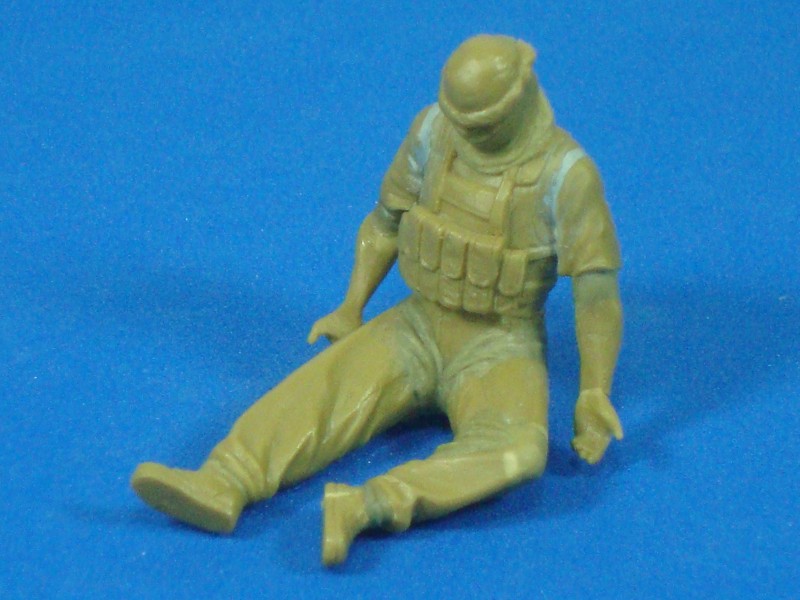
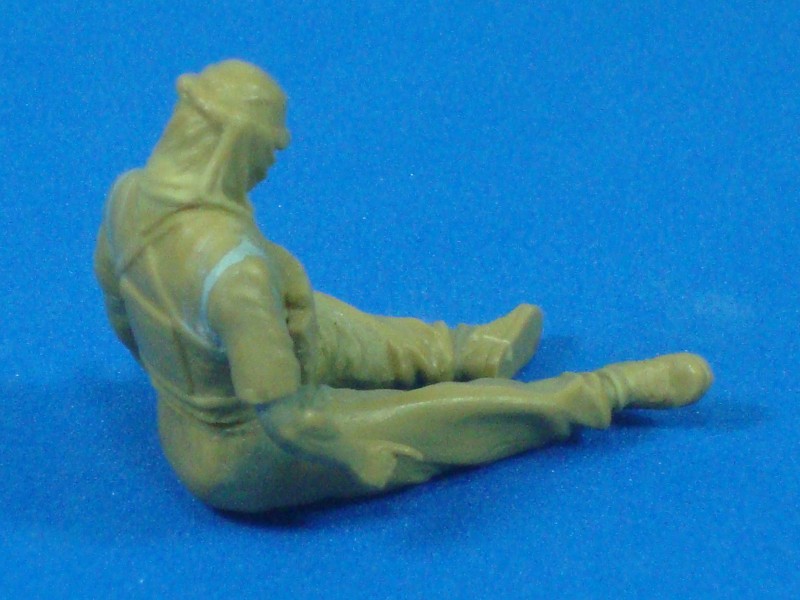
I am still working on a lot of things, so be patient, everything is moving on in the right way.
As you saw, the main structures of the buildings are complete, so now I´m focusing on the internal details of each floor.
When I did the furniture for the kitchen, I made it in a modular way so with the same furniture I can make different kitchens' lay-outs.
Thinking about this, I've repeated enough modules to make the three kitchens. My workbench is really tiny, so I had the modules everywhere.
This is the first kitchen I have done.

If you are wondering how I placed all the handles in exactly the same place, I made a template with a left-over door and a square. The rest was simple, I put the template on each door and adjust one with the other with the square.

Another thing I need is a cover for the rolling shutter and a strap to operate it.
This is going to be useful on the 2nd floor, where the curved frames for the explosion is. I want to make the tube as if it had fallen.

Now, thinking on the 2nd floor, I made some "tools" for the rebels. I made a soldering iron and a support for it.

If you can't picture how tiny they are, here is a picture with a reference.

Finally I have finished the 2nd rebel and it's ready to paint.


I am still working on a lot of things, so be patient, everything is moving on in the right way.
Pops53

Joined: November 05, 2011
KitMaker: 100 posts
Armorama: 98 posts

Posted: Wednesday, March 21, 2012 - 05:03 PM UTC
Forgive my levity --- I have only the utmost respect for your brilliant and creative diorama of a conflict we see daily in the headlines --- but you also have had an amazing accomplishment Victor! You have somehow taken a hardened terrorist (clearly posed as a gunman clutching his AK) and somehow managed to turn him into a Century 21 realtor showing off an efficiency apartment! 
On a more serious note, the chase through Riyadh to try and recover a kidnapped intelligence analyst near the end of the The Kingdom, a 2007 movie, climaxes in a block of apartments not unlike the ones you are modeling. Perhaps you might find some addition decorative inspiration in that film.
Incidentally, a brilliant use of coffee grounds! Bravo!

olivato

Joined: August 16, 2005
KitMaker: 127 posts
Armorama: 107 posts

Posted: Monday, April 09, 2012 - 12:27 PM UTC
Hi everyone!!!
Fred: Thanks for your words, your time, but overall, your sense of humor. You know I´m very careful when I take the pictures, but when I read your post and saw the photo again, it started to laugh.
Your advice about the movie came in the perfect moment. I saw the movie when I started this project as reference for the external shape of the building. Now that I'm focusing on the internal details your advice come perfect. Thank you very much.
I have been working on the furniture for the 3rd floor and some things for the 2nd floor.
When I look at other modelers' work I always find the pictures of the process really useful, i have taken pictures to make the step by step. Now I have to go through all the photos in the camera, organize the pictures of each process and give them some touches with the Corel Photoshop (resize, contrast, brightness, etc). In these days I'm going to update this process.
Let's start with a TV.
As usual, I first make a drawing as a reference for sizes and shape scaled to 1:35.
For the TV I started with two cubes of resin with the total size of the TV.
I glued the two cubes with a little bit of cyanoacrylate. Then, I sanded it together to reach the form as I need.
The first cube is for the screen and the second for the back cover.


After that I separated the cubes and I gave the second cube the shape show in the pictures.


I put a little piece of plasticard on the first cube to represent the screen of the TV.
I made a little base and drilled a handle on the side to carry the TV.

Finally I glued everthing together and now I have something close to a TV.

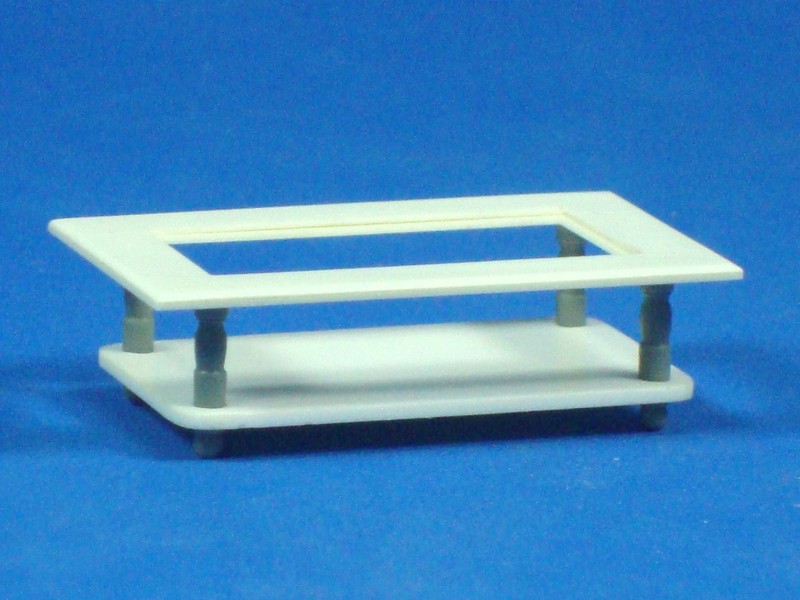
As for the coffee table, I started with the table legs because I'm going to make one and repeat the rest in resin.
I sculpted the table leg with a mini bench lathe. Before buying the bench lathe, I used to sculpt this shape with a minidrill. With the minidrill the shapes aren´t so perfect, but they are still useful.
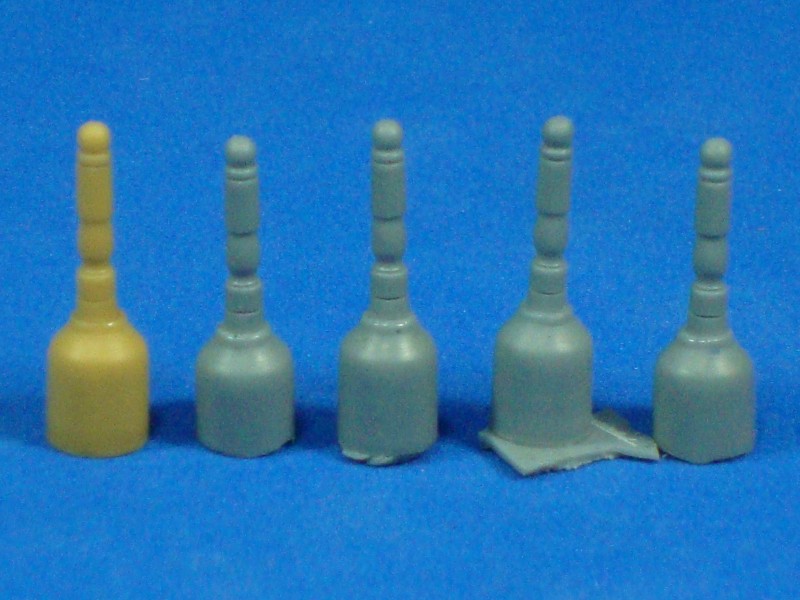
I made the upper table with two plasticard of 0.5mm glued together. The hole inside is for a transparent plasticard to simulate a glass.
I made a lower table from a plasticard of 1mm.
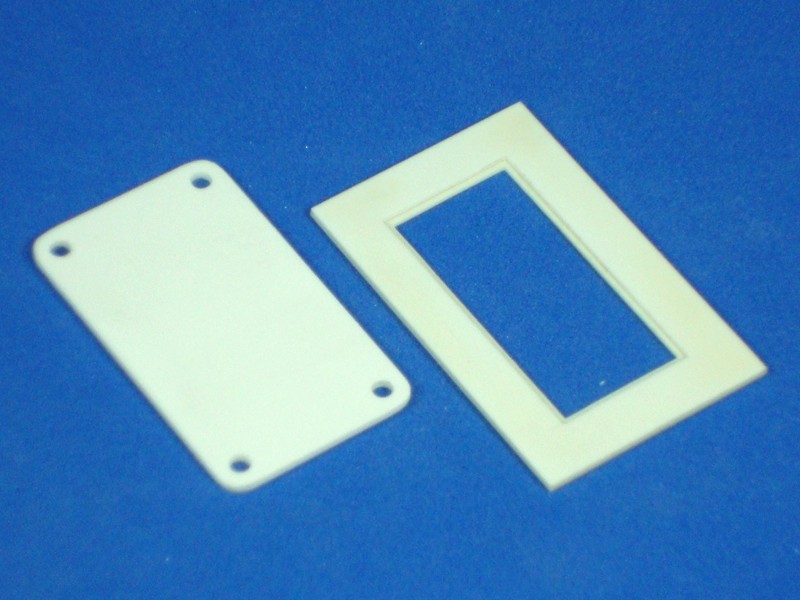
Finally I rounded the edges, put evrything together and you have a coffee table.
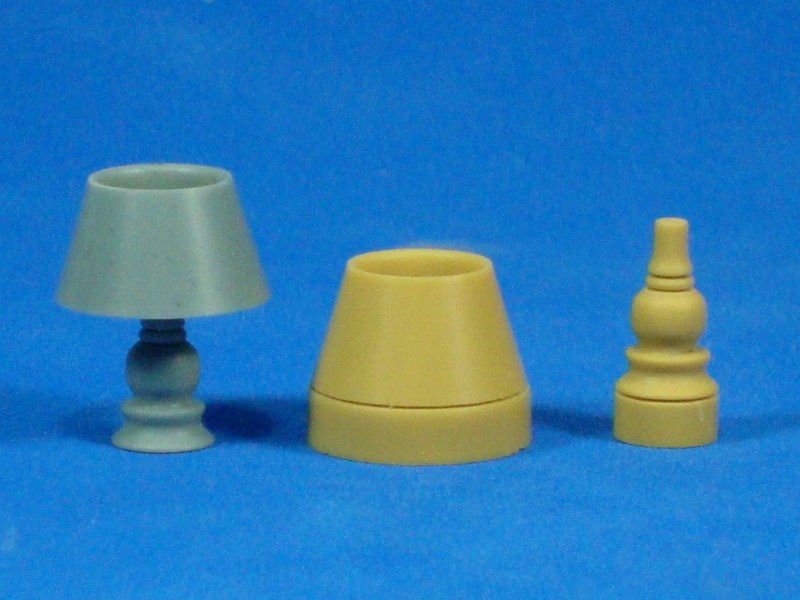
Finally a lamp.
I made all this lamp with the mini bench lathe. This is a very useful tool for all kinds of circular shapes.
A picture with "Mr Reference".
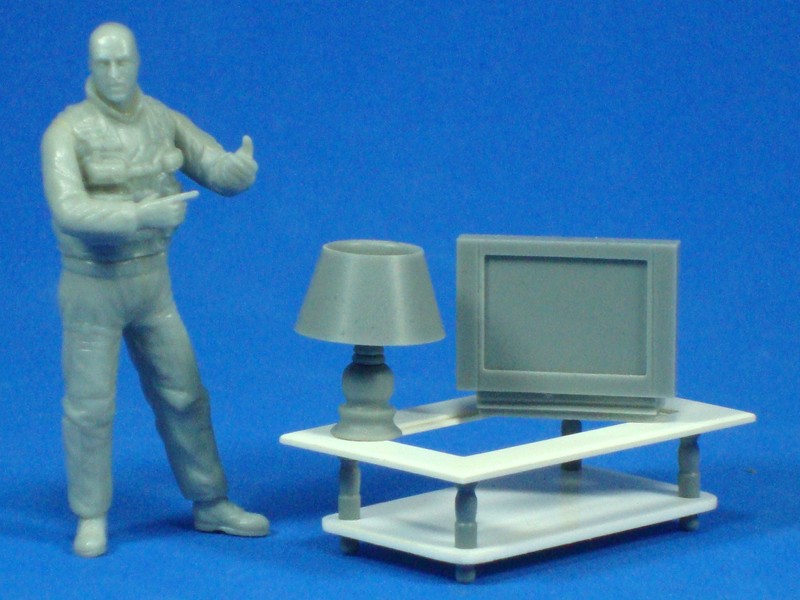
I'll go on organizing the pictures (and working on the parts for the diorama) for the next post. I'll see you soon.
Fred: Thanks for your words, your time, but overall, your sense of humor. You know I´m very careful when I take the pictures, but when I read your post and saw the photo again, it started to laugh.
Your advice about the movie came in the perfect moment. I saw the movie when I started this project as reference for the external shape of the building. Now that I'm focusing on the internal details your advice come perfect. Thank you very much.
I have been working on the furniture for the 3rd floor and some things for the 2nd floor.
When I look at other modelers' work I always find the pictures of the process really useful, i have taken pictures to make the step by step. Now I have to go through all the photos in the camera, organize the pictures of each process and give them some touches with the Corel Photoshop (resize, contrast, brightness, etc). In these days I'm going to update this process.
Let's start with a TV.
As usual, I first make a drawing as a reference for sizes and shape scaled to 1:35.
For the TV I started with two cubes of resin with the total size of the TV.
I glued the two cubes with a little bit of cyanoacrylate. Then, I sanded it together to reach the form as I need.
The first cube is for the screen and the second for the back cover.


After that I separated the cubes and I gave the second cube the shape show in the pictures.


I put a little piece of plasticard on the first cube to represent the screen of the TV.
I made a little base and drilled a handle on the side to carry the TV.

Finally I glued everthing together and now I have something close to a TV.

As for the coffee table, I started with the table legs because I'm going to make one and repeat the rest in resin.
I sculpted the table leg with a mini bench lathe. Before buying the bench lathe, I used to sculpt this shape with a minidrill. With the minidrill the shapes aren´t so perfect, but they are still useful.

I made the upper table with two plasticard of 0.5mm glued together. The hole inside is for a transparent plasticard to simulate a glass.
I made a lower table from a plasticard of 1mm.

Finally I rounded the edges, put evrything together and you have a coffee table.

Finally a lamp.
I made all this lamp with the mini bench lathe. This is a very useful tool for all kinds of circular shapes.

A picture with "Mr Reference".

I'll go on organizing the pictures (and working on the parts for the diorama) for the next post. I'll see you soon.
callmehobbes

Joined: April 17, 2005
KitMaker: 751 posts
Armorama: 740 posts

Posted: Tuesday, April 10, 2012 - 04:47 AM UTC
I'm in awe - Have you thought about producing your own line of accessories. The standard of your work is simply breathtaking.
parrot

Joined: March 01, 2002
KitMaker: 1,607 posts
Armorama: 1,581 posts

Posted: Tuesday, April 10, 2012 - 09:19 AM UTC
I'll second that idea.
I don't have the time or the skill to do the job you have,but I would certainly be interested in purchasing your creations.
Tom

I don't have the time or the skill to do the job you have,but I would certainly be interested in purchasing your creations.
Tom


sfctur1

Joined: December 12, 2007
KitMaker: 643 posts
Armorama: 497 posts

Posted: Tuesday, April 10, 2012 - 12:55 PM UTC
I would also be interested in purchasing some of your creations.
Tom


Tom


olivato

Joined: August 16, 2005
KitMaker: 127 posts
Armorama: 107 posts

Posted: Tuesday, April 10, 2012 - 02:39 PM UTC
Hi everyone!!!
Callmehobbes, Tom and Thomas: Thank you very much for your encouragement and your interest in my resin pieces.
When I started this post I never thought I would receive so much support from other modelers around the world. But, the fact that someone wants something that I have created is beyond anything I had imagined. On the other hand, doing something that may allow me to get back at least some of all the money I have invested so far is an idea that I'm seriously considering. Thanks again.
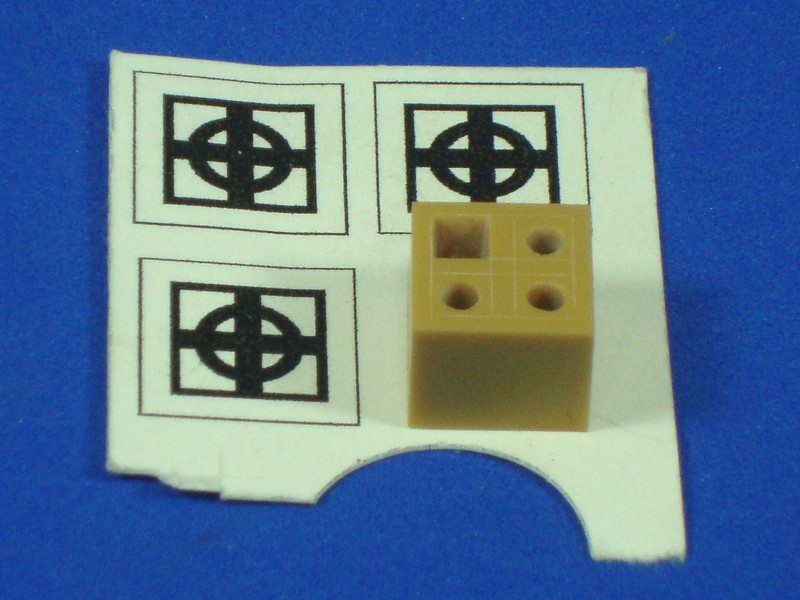
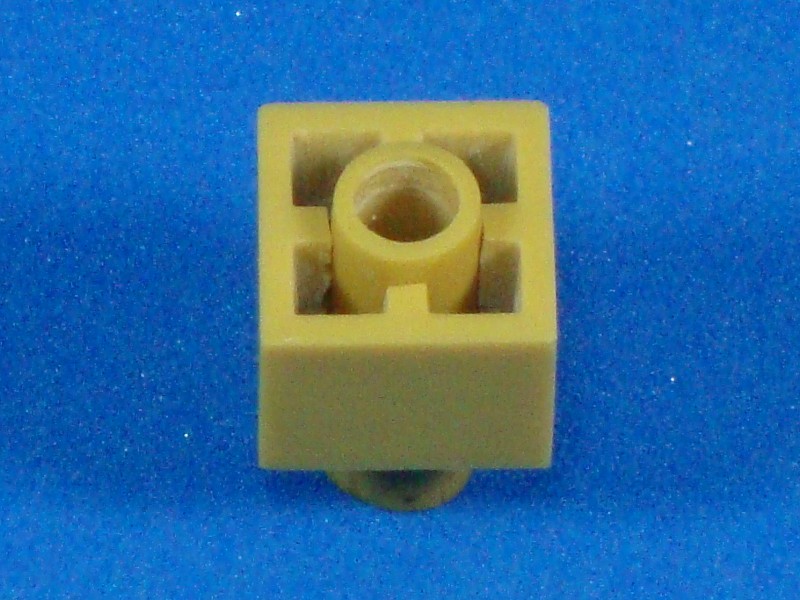
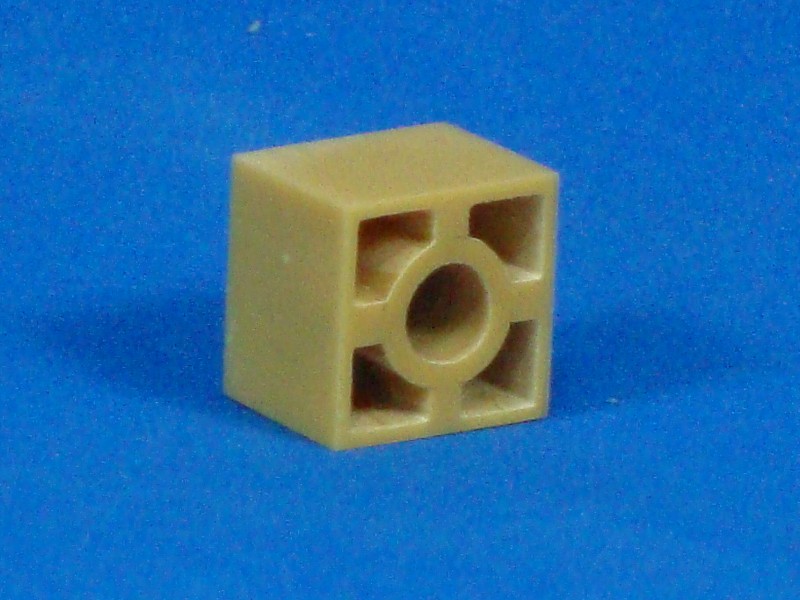
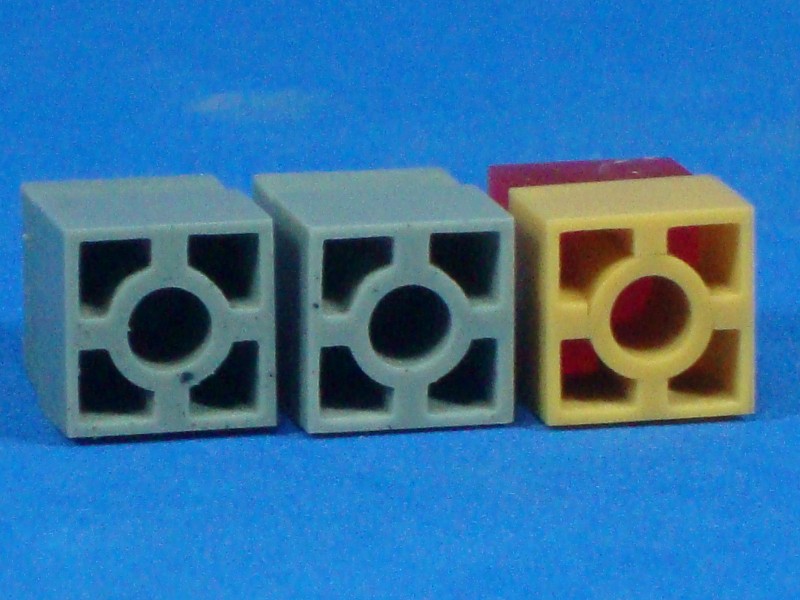
Do you remember the banister for the terrace? I've finished it but I've changed it a little bit from the original that I designed.

As I am planning to make just six or nine in resin and then repeat them in plaster out of a rubber mold, I removed the little cross that was inside the circle from the original model. It would have been difficult for the plaster to reach that -bare in mind that the little cube is only 1 cm by 1 cm.
I went on taking out the four small squares that I had marked
Then I carved a circle in the centre and made a cylinder with the same diameter.
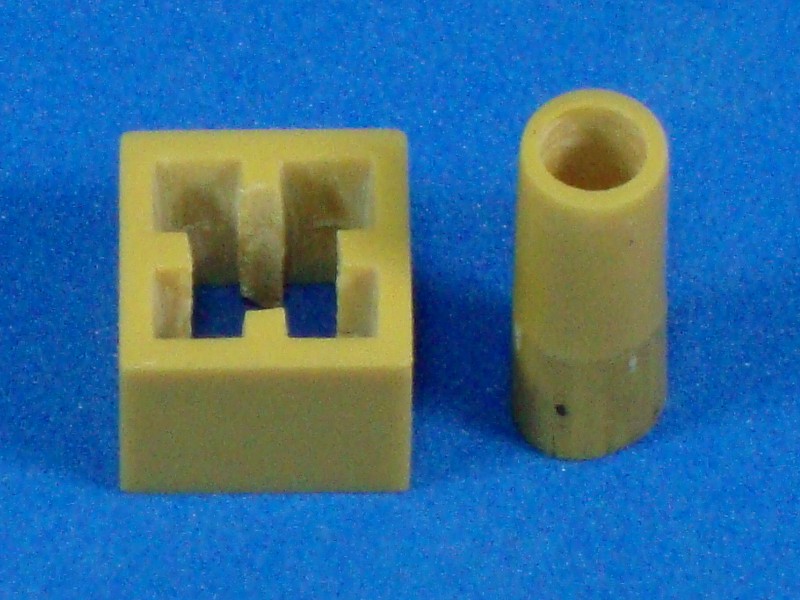
I placed the cylinder inside the cube, trimmed the excess, refilled with cyanoacrylate, sanded everything and here is the final result:
Anyway, I really like the final design.
Callmehobbes, Tom and Thomas: Thank you very much for your encouragement and your interest in my resin pieces.
When I started this post I never thought I would receive so much support from other modelers around the world. But, the fact that someone wants something that I have created is beyond anything I had imagined. On the other hand, doing something that may allow me to get back at least some of all the money I have invested so far is an idea that I'm seriously considering. Thanks again.
Do you remember the banister for the terrace? I've finished it but I've changed it a little bit from the original that I designed.

As I am planning to make just six or nine in resin and then repeat them in plaster out of a rubber mold, I removed the little cross that was inside the circle from the original model. It would have been difficult for the plaster to reach that -bare in mind that the little cube is only 1 cm by 1 cm.
I went on taking out the four small squares that I had marked
Then I carved a circle in the centre and made a cylinder with the same diameter.

I placed the cylinder inside the cube, trimmed the excess, refilled with cyanoacrylate, sanded everything and here is the final result:


Anyway, I really like the final design.

slodder

Joined: February 22, 2002
KitMaker: 11,718 posts
Armorama: 7,138 posts

Posted: Wednesday, April 11, 2012 - 12:24 AM UTC
Your technique for creating masters for casting is great. Enough to show us what we need to see and not overly done. Thanks for sharing.
roudeleiw

Joined: January 19, 2004
KitMaker: 2,406 posts
Armorama: 2,224 posts

Posted: Wednesday, April 11, 2012 - 03:12 AM UTC
Great scratchbuilding Victor! and so clean, i am never able to work like that
Greets
Claude
Greets
Claude
VLADPANZER

Joined: December 20, 2010
KitMaker: 568 posts
Armorama: 549 posts

Posted: Friday, April 13, 2012 - 07:48 AM UTC
Such astounding scratch work, just wonderful … the kitchen is coming along nicely … I seriously can’t wait to see it painted.
Regards,


Regards,


blockhaus

Joined: July 04, 2003
KitMaker: 693 posts
Armorama: 682 posts

Posted: Friday, April 13, 2012 - 08:47 AM UTC
Hi Victor, I´m very impresed with yours skills , not only in the building, but in all accessoires, it´s superb
un trabajo maravilloso!
un trabajo maravilloso!

olivato

Joined: August 16, 2005
KitMaker: 127 posts
Armorama: 107 posts

Posted: Saturday, April 14, 2012 - 01:16 PM UTC
Hi!
Scott: Thanks for taking the time to see my project. I show the process to help with new ideas. It has helped me a lot to see other modelers' work.
Claude: Thanks for continuing supporting me.
Vladimir: Thanks for following my work from the first day. Yesterday I received some figures from Verlinden, and now with the furniture complete I'm going to start to paint from the top.
Blockhaus: Thank you for your words, and the support. Un abrazo.
Another little project: an armchair, but to be honest, I started this one without too much expectations.
I didn´t know if I had the skill to finish it with the standard of the rest of the furniture, but anyway I decided to finish it.
In the end, I liked, so I kept it.
The process started looking up some drawing of an armchair on the internet, and I found this one.
I scaled it to 1:35 and printed it to make a template.
As in the building, I wanted to make a soul of polystyrene.
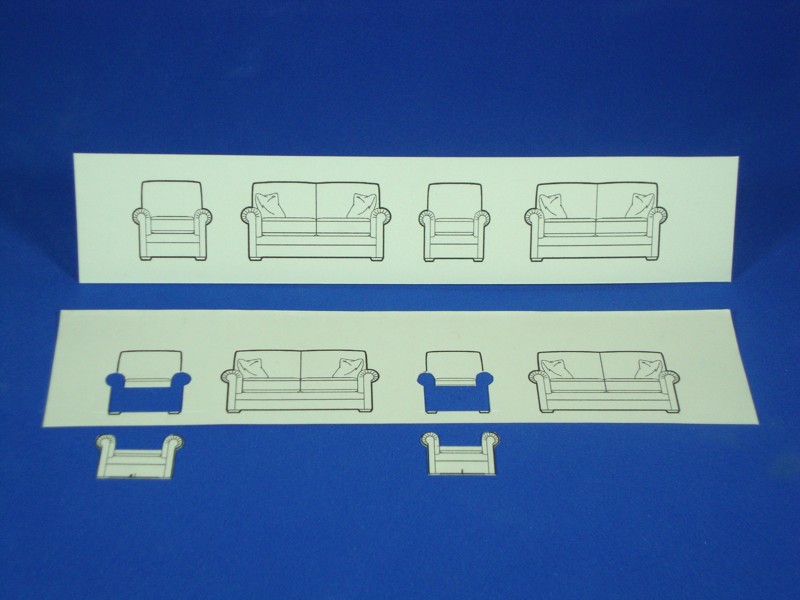
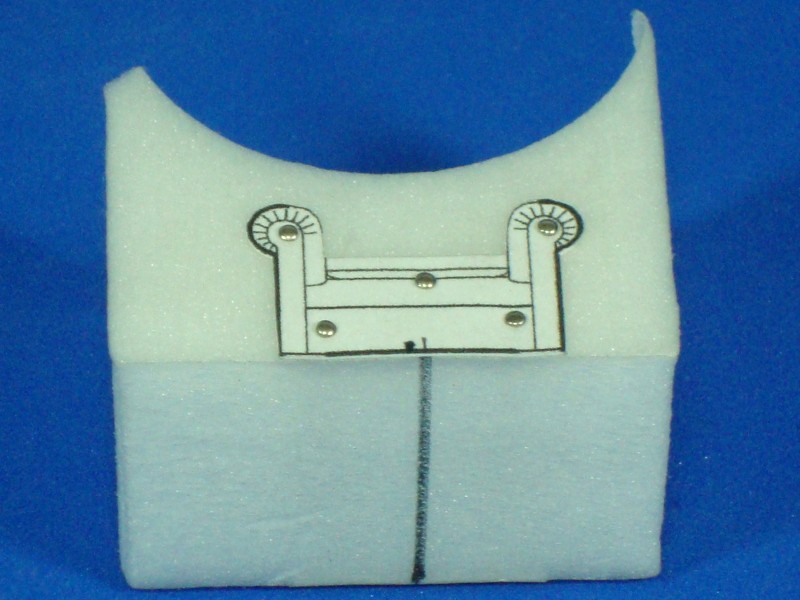
I cut the polystyrene according to the template.
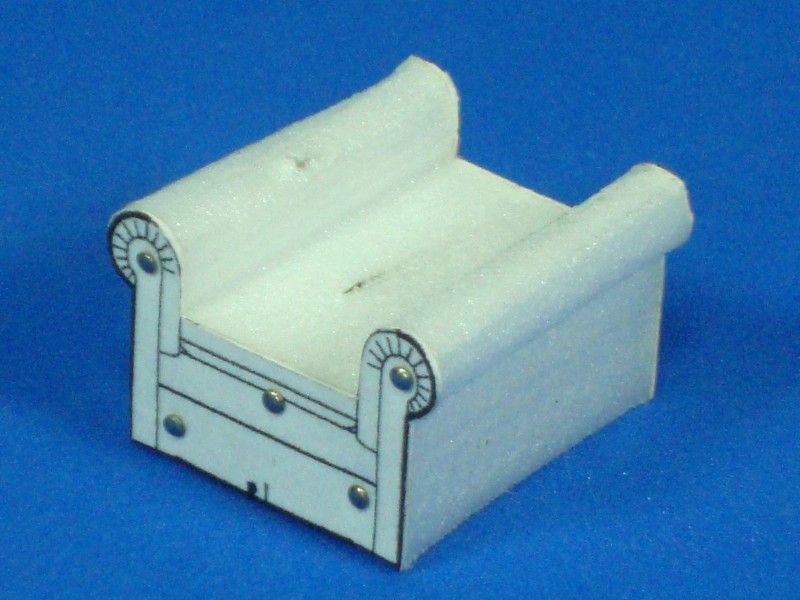
I added a back and I started to cover everything with Tamiya epoxy (Quick type
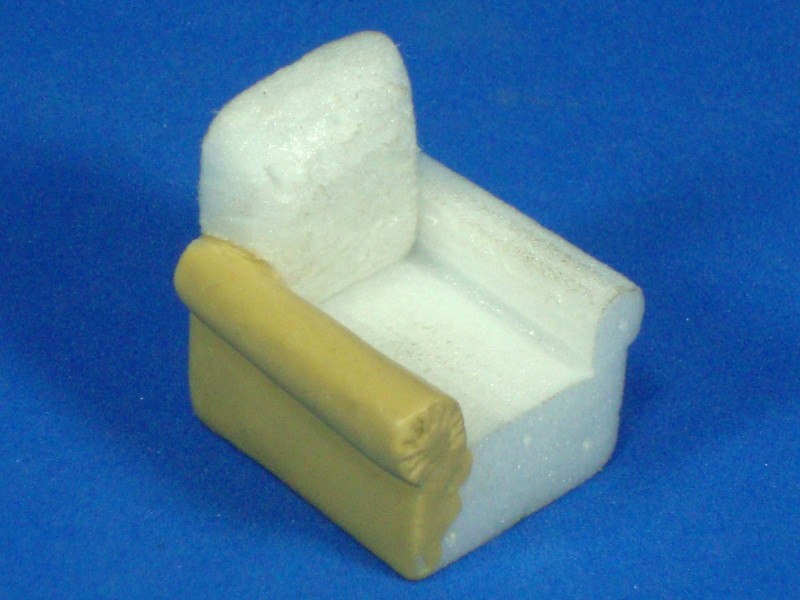
This process took some days because I covered it by sectors.
Something that I recommend about to work with this putty, is to have another thing to do while it dries, between steps.
Start to cover the piece with the putty and do not try to make details, only cover it and let it dry a little bit, about 30-45 min. Then continue giving shape and let dry 20-35 min. again. Repeat this until you finish. You have about 3 hours to work without problems, but with the first two hours is enough.
If you try to make everything at the beginning, the putty is too soft, so you touch something here and move something there, and this can make you crazy, believe me, this happened to me, until I understood how to handle the putty in a better way.
Finally, when everything is dry I sand it and the result is this:
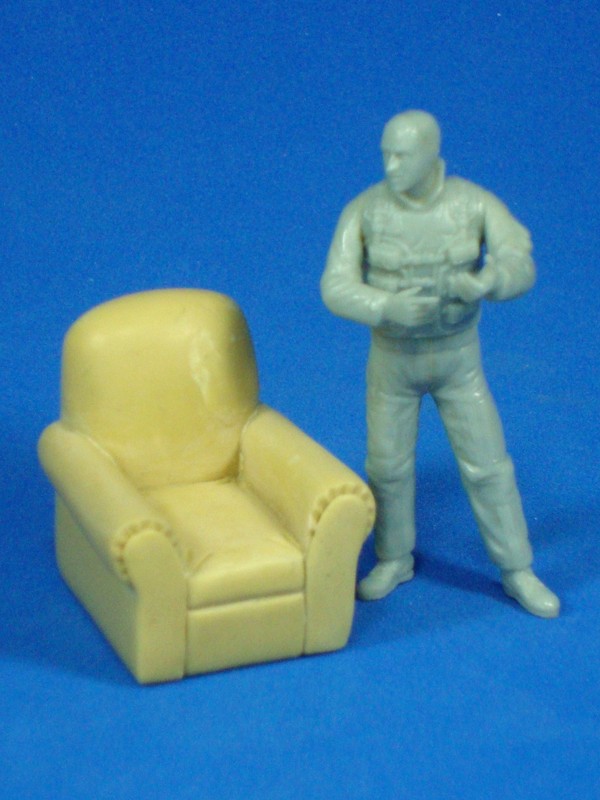
See you soon!
Scott: Thanks for taking the time to see my project. I show the process to help with new ideas. It has helped me a lot to see other modelers' work.
Claude: Thanks for continuing supporting me.
Vladimir: Thanks for following my work from the first day. Yesterday I received some figures from Verlinden, and now with the furniture complete I'm going to start to paint from the top.
Blockhaus: Thank you for your words, and the support. Un abrazo.
Another little project: an armchair, but to be honest, I started this one without too much expectations.
I didn´t know if I had the skill to finish it with the standard of the rest of the furniture, but anyway I decided to finish it.
In the end, I liked, so I kept it.
The process started looking up some drawing of an armchair on the internet, and I found this one.
I scaled it to 1:35 and printed it to make a template.
As in the building, I wanted to make a soul of polystyrene.


I cut the polystyrene according to the template.

I added a back and I started to cover everything with Tamiya epoxy (Quick type

This process took some days because I covered it by sectors.
Something that I recommend about to work with this putty, is to have another thing to do while it dries, between steps.
Start to cover the piece with the putty and do not try to make details, only cover it and let it dry a little bit, about 30-45 min. Then continue giving shape and let dry 20-35 min. again. Repeat this until you finish. You have about 3 hours to work without problems, but with the first two hours is enough.
If you try to make everything at the beginning, the putty is too soft, so you touch something here and move something there, and this can make you crazy, believe me, this happened to me, until I understood how to handle the putty in a better way.
Finally, when everything is dry I sand it and the result is this:

See you soon!
jointhepit

Joined: May 14, 2006
KitMaker: 3,829 posts
Armorama: 881 posts

Posted: Saturday, April 14, 2012 - 06:38 PM UTC
Quoted Text
One of the things that I love about dioramas is to see how this picture you imagined in your mind, becomes a reality, it´s a pleasure
and the hardest part in modelling!!
great, and I mean GREAT post, you really have it to make those add-ons like it's nothing!
never had much succes with the styrofoam, but I'll give it another try seeing what you make of it

having an English teacher in the house also helps a lot,some very good posts of east european or non english modellers tend to get confusing when explaining details
 .
.saludos desde Bélgica

xsoft_ej

Joined: March 21, 2009
KitMaker: 18 posts
Armorama: 17 posts

Posted: Saturday, May 19, 2012 - 07:41 AM UTC
What a great work in the dio Victor, i have now some months away from the modelling for so many reasons but now that i check your build again i'm going to work again in my unfinished models!!! you're are doing a great job and showing some very good tips to work.
Saludos y me encanta tu trabajo!!!!!
Saludos y me encanta tu trabajo!!!!!
ahandykindaguy

Joined: August 20, 2008
KitMaker: 1,295 posts
Armorama: 1,191 posts

Posted: Saturday, May 19, 2012 - 03:57 PM UTC
Victor, I love the Lazy boy chair. I would never have thought to use a piece of styrofoam as a base for the chair like that, although it was the method of choice for hobbyist and model railroaders for decades when I was younger for bases and large railroad mock ups.
Very clever. I probably would have tried balsa wood block or something, but I think styrofoam is way better to cut.
I need to browse some of the posts more frequently as i have been so involved in my own little world of dioramas that I have neglected to look in on the rest of the great works here... yours being one of the ones I have fallen behind on.
Great job,
Dave

SoumiArbs

Joined: April 01, 2012
KitMaker: 90 posts
Armorama: 87 posts

Posted: Saturday, May 19, 2012 - 10:23 PM UTC
Excellant work, and how wonderful of you to share this with us.
bill1

Joined: August 14, 2005
KitMaker: 3,938 posts
Armorama: 520 posts

Posted: Saturday, May 19, 2012 - 11:15 PM UTC
Yo Victor,
Clean and need work!
Nice update with the SBS photos...learn a lot here!
Greetz Nico
Clean and need work!
Nice update with the SBS photos...learn a lot here!
Greetz Nico

 |


