

Victor, mi amigo!
I love the beer (?) bottles and the manhole cover. You're a genius! Would have never thought of that...
Keep going, nice stuff!
Bill B.
Hosted by Darren Baker
An ambitious project

PBR_Streetgang

Joined: February 10, 2008
KitMaker: 62 posts
Armorama: 48 posts
Posted: Friday, November 11, 2011 - 10:38 AM UTC

rodrigo_sartori

Joined: January 16, 2007
KitMaker: 160 posts
Armorama: 159 posts
Posted: Friday, November 11, 2011 - 03:05 PM UTC
Perfect!
Olivato,
I like to keep the trees of models. They are very useful. And also I have always recyclable materials around. It is more enjoyable when we set up all ... is gratifying to see the final result.
Thank you for the tip. It's one I learned.
And my congratulations on creativity and good development in the diorama.
Regards,
Rodrigo

jorge75

Joined: April 17, 2009
KitMaker: 19 posts
Armorama: 18 posts
Posted: Sunday, December 04, 2011 - 12:52 PM UTC
very inspiring.....i learn a lot from your work amigo..... 

HeavyArty

Joined: May 16, 2002
KitMaker: 17,694 posts
Armorama: 13,742 posts
Posted: Monday, December 05, 2011 - 12:45 AM UTC
Quoted Text
Are you selling those by chance?
Really cool!!
I'll second that. I would like a set or two if yo do sell them.

olivato

Joined: August 16, 2005
KitMaker: 127 posts
Armorama: 107 posts
Posted: Monday, December 05, 2011 - 07:07 PM UTC
Hi everyone!
Vladpanzer: Your support is awesome, thanks a lot. Sell... it wasn't my idea, but if you want to buy it, I can do some copies for you.
PBR_Streetgang: I´m not a genius, only a passionate modeler. Thank you for your words.
Rodrigo_Sartori: Thanks for your support. Yes, when you create something from scratch recycling things that you would normally throw away it is very grateful. I´m very happy to know that something from this post is useful for you. That's the idea, share to help with new ideas.
Jorge75: Thanks to take your time to follow my project. I´m glad to hear that this project has helped you in some way.
Heavy Arty: Thanks for having a look at my work. The same as with Vladpanzer, if you are interested in some of the pieces, I can make you a few copies.
Sorry, but this time I don't have any news. Jorge75 made me realize that it has been a moth since my last post, so with all the support you are giving me, you deserve to know what happened with the project.
I was working on the 2nd floor, when I started having a pain in my knee... short story: I had to have surgery on my knee.
My workbench is on a 2nd floor, and when I asked the doctor about the stairs, he told me "the less, the better".
My wife has helped me, bringing some things down to the kitchen to continue the project, but it´s not the same. The rate of work was drastically reduced, but on the other hand it never stopped, and I'm still on it.
I expect to have some news by the end of the weekend.
Thanks a lot for all the support, not only from those who post their impressions, but also from those who follow me watching my work.

HeavyArty
Joined: May 16, 2002
KitMaker: 17,694 posts
Armorama: 13,742 posts
Posted: Monday, December 05, 2011 - 07:31 PM UTC
I feel your pain with the knee surgery, literally. I had to have ankle surgery in OCT. Luckily I have a one-story house though, so no stairs. It has slowed me down and I am still in a big plastic boot. Take your time recovering and let me know when you are ready to make some copies. I will definitely take some.

zontar
Joined: August 27, 2006
KitMaker: 1,646 posts
Armorama: 1,557 posts
Posted: Tuesday, December 06, 2011 - 03:32 AM UTC
Victor: I can't believe it has taken me this long to find your dio!! What great build and many useful tips and techniques. I will follow this more closely. Also, my prayers for your knee and a speedy recovery.
Happy Modelling, -zon
Happy Modelling, -zon

blockhaus

Joined: July 04, 2003
KitMaker: 693 posts
Armorama: 682 posts
Posted: Wednesday, December 07, 2011 - 03:43 PM UTC
I hope you recover soon from your surgery. Your post is one that I follow regularly here.
It´s a pleasure to see the detail and neatness in your work. It's a real tutorial of how to do a modern building on a professional level.
Thanks for sharing
It´s a pleasure to see the detail and neatness in your work. It's a real tutorial of how to do a modern building on a professional level.
Thanks for sharing

ophelia53
Joined: March 10, 2010
KitMaker: 254 posts
Armorama: 226 posts
Posted: Wednesday, December 07, 2011 - 07:22 PM UTC
Sorry to hear about the knee. Hope you recover quickly so you can get back to enjoying the hobby.


dioman13
Joined: August 19, 2007
KitMaker: 2,184 posts
Armorama: 1,468 posts

Posted: Thursday, December 08, 2011 - 12:57 PM UTC
Hey Victor, sorry to hear about the knee. Body damage takes it's toll when it happens. I have one surgery down and two to go. But what the heck, the modeling kills the recovery time except when the pills kick in, then nothing gets done. Your build has been fasinating to say the least. I really like the detail you have done, it's what makes a dio story stand out and yours is looking like a great one. I had been using H.O. scale R/R pipe lines for my dio pipes, but I like your method and will give it a shot next time. The stove, furniture and all are splended eye candy. Hope you get back on your feet again soon.

xsoft_ej

Joined: March 21, 2009
KitMaker: 18 posts
Armorama: 17 posts
Posted: Saturday, December 10, 2011 - 04:39 AM UTC
Victor i hope you get well soon, un fuerte abrazo.....
olivato
Joined: August 16, 2005
KitMaker: 127 posts
Armorama: 107 posts
Posted: Friday, February 17, 2012 - 02:57 PM UTC
Hi everyone, I´m back to the hobby!!!
First of all, I want to say thank you very much to all the people who were worried about my knee. It is much better now, and it lets me continue with the project.
HeavyArty: I´m sorry to hear that you have had a problem with your knee too. I hope you get better soon. About the windows, I´ll explain some problem I am having with the crystal in this post. If I can solve this, I´m ready to make your copies. Thanks for your patience.
Zontar: Welcome aboard and thanks for taking your time to follow this diorama. I am glad to hear that something in this post is useful for you.
Blockhaus: Thanks for your words, they are really very encouraging.
Ophelia53: I know you follow this and really appreciate your support.
Dioman13: I hope you recover soon from this and the other two surgeries, to fully enjoy this hobby. Thank you very much for your time and words.
Xsoft_ej: Thanks you very much for your support, un abrazo.
This is time of vacations in my country, so we take a few couple of weeks in our house in the country side.
This is an update from some things I have done before going on holiday. As I said before, the progress was drastically reduced, but never stopped.
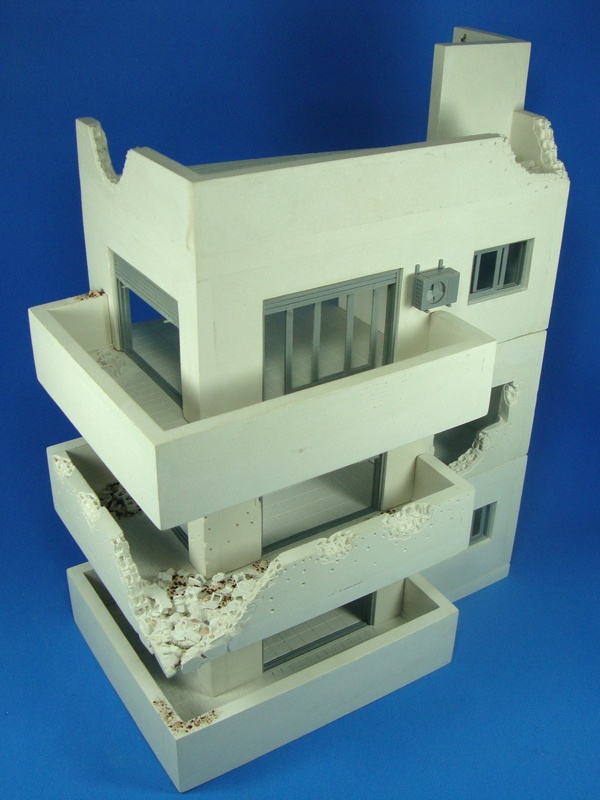
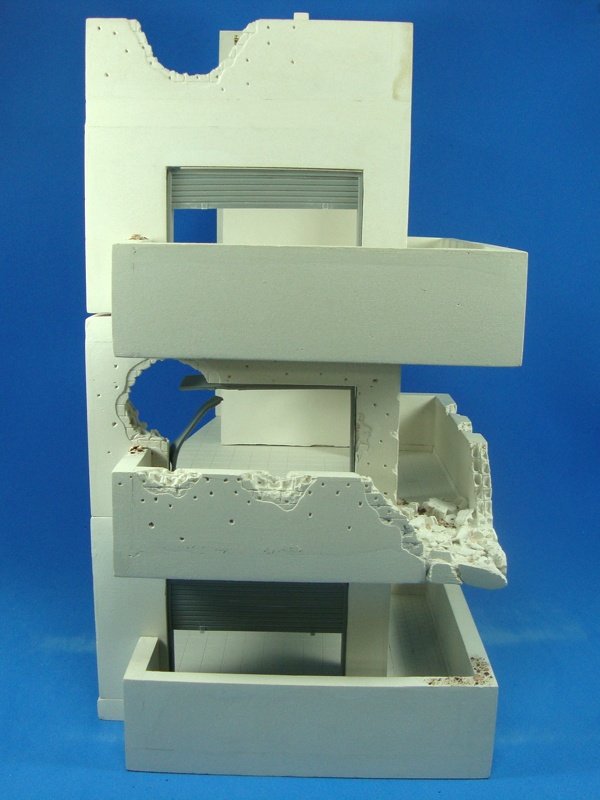
The structure of the flat is almost complete. As you can see the tree floors and the terrace are complete, and now I´m working on the ground floor.
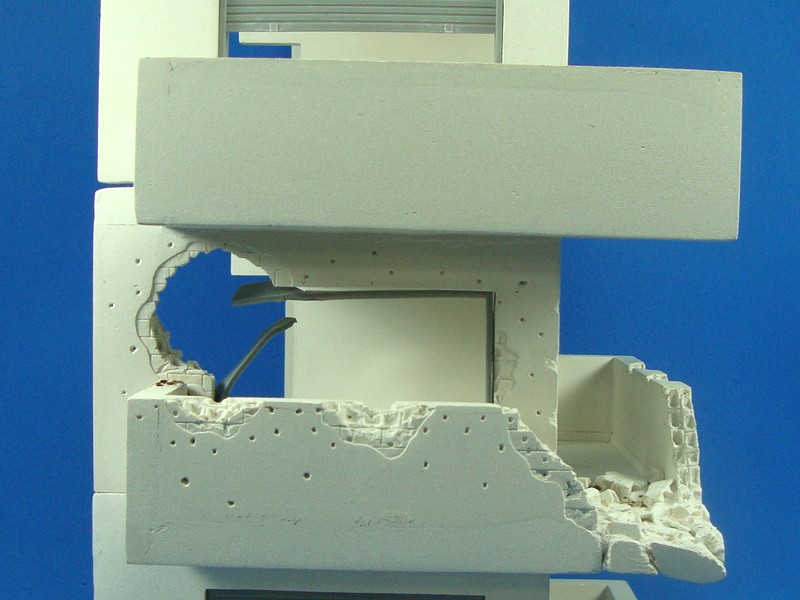
The curved frame on the 2nd floor was made by heating the resin with a heat gun.
In general I´m happy with how the things are going, but nothing is definite, so maybe, something can change, especially the collapsed walls.
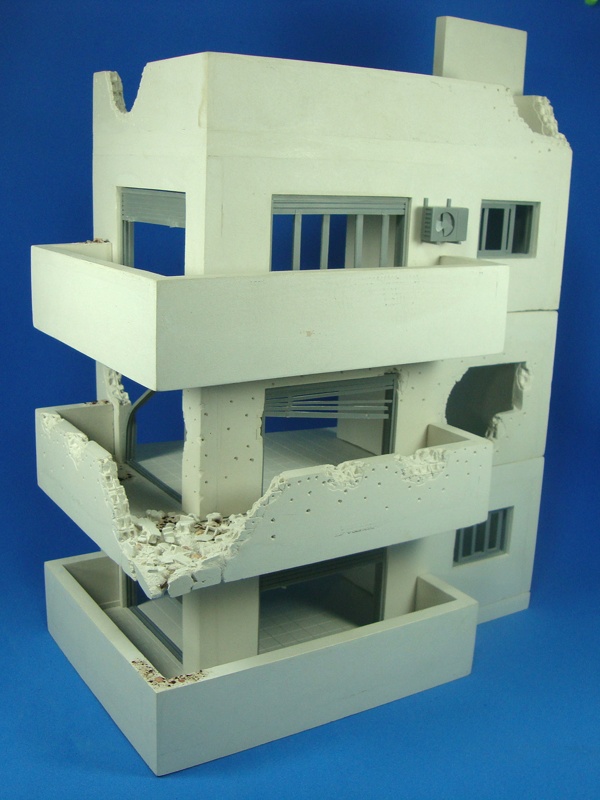
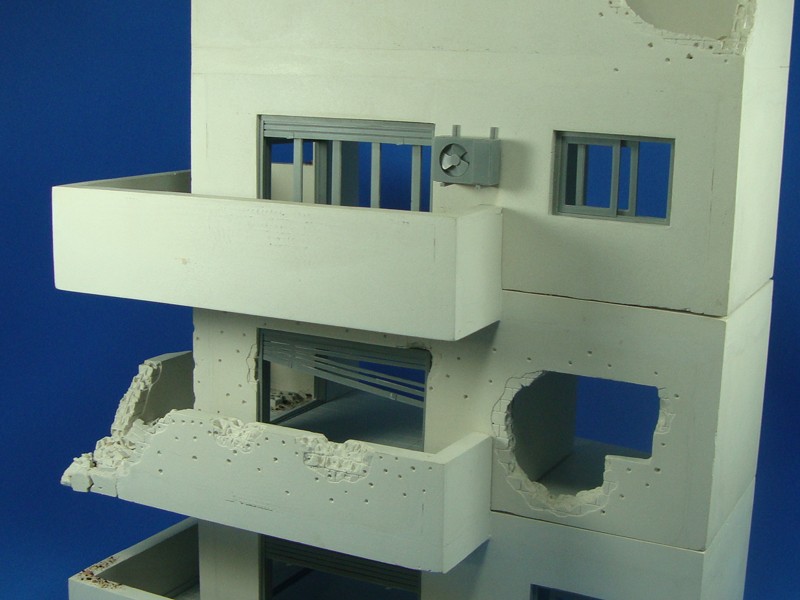
I have made some copies of the air conditioner.
Ive make a support to put the air conditioner on the wall. As you can see in the pictures, the master of the windows was broken when I extracted it from the mold, so I recycled them to make the support.
When I made the windows, I wanted to make it with the crystals, but when I did the first copy, it wasn't so transparent.
My first idea was that the resin is not transparent enough, but when I looked at the master carefully, I saw a lot of little scratches on the crystal surface.
I decided to polish the surface with the Tamiya Polishing Compound, and the result is much clearer windows, so now I am going to polish the masters and make a new mold.
In case it doesn't work I have already made some copies in gray to replace the crystal part with some transparent plasticard.

Some people say that they can learn from this post, and this makes me really happy. So, this time I will tell you something that you shouldnt do.
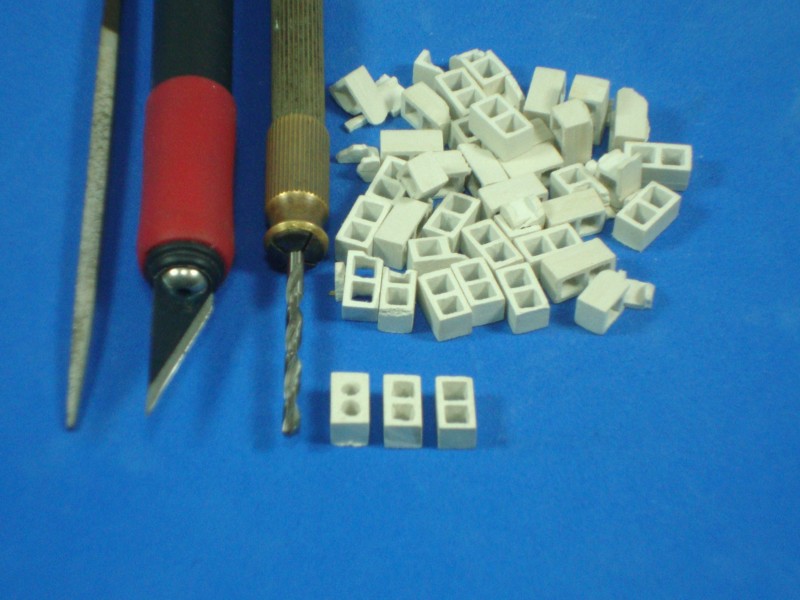
The first time I made the loose hollow bricks, it was fun because that time I just needed a few, so I made each of them one by one.
With the action on the 2nd floor, I am going to need many more bricks, so I started to make them. This time it wasn't fun. When I was close to finish them, I started to ask myself, why didn´t I make only five or ten pieces and repeat the rest in plaster with a mold? I dont have an answer for that So, this is something that you definitely shouldnt do. Make a mold and repeat it in plaster, it´s much easier.
By the way, the hollow bricks were made with DAS and sculpted one by one... first I make the holes, later with a X-acto blade I turn the holes into squares and finally with a square metal file I finish the shape. I repeat, it wasn´t fun.
Now I´m back to my house, with my knee much better and expect to recover the lost time and speed up with my diorama.
First of all, I want to say thank you very much to all the people who were worried about my knee. It is much better now, and it lets me continue with the project.
HeavyArty: I´m sorry to hear that you have had a problem with your knee too. I hope you get better soon. About the windows, I´ll explain some problem I am having with the crystal in this post. If I can solve this, I´m ready to make your copies. Thanks for your patience.
Zontar: Welcome aboard and thanks for taking your time to follow this diorama. I am glad to hear that something in this post is useful for you.
Blockhaus: Thanks for your words, they are really very encouraging.
Ophelia53: I know you follow this and really appreciate your support.
Dioman13: I hope you recover soon from this and the other two surgeries, to fully enjoy this hobby. Thank you very much for your time and words.
Xsoft_ej: Thanks you very much for your support, un abrazo.
This is time of vacations in my country, so we take a few couple of weeks in our house in the country side.
This is an update from some things I have done before going on holiday. As I said before, the progress was drastically reduced, but never stopped.
The structure of the flat is almost complete. As you can see the tree floors and the terrace are complete, and now I´m working on the ground floor.
The curved frame on the 2nd floor was made by heating the resin with a heat gun.
In general I´m happy with how the things are going, but nothing is definite, so maybe, something can change, especially the collapsed walls.
I have made some copies of the air conditioner.
Ive make a support to put the air conditioner on the wall. As you can see in the pictures, the master of the windows was broken when I extracted it from the mold, so I recycled them to make the support.
When I made the windows, I wanted to make it with the crystals, but when I did the first copy, it wasn't so transparent.
My first idea was that the resin is not transparent enough, but when I looked at the master carefully, I saw a lot of little scratches on the crystal surface.
I decided to polish the surface with the Tamiya Polishing Compound, and the result is much clearer windows, so now I am going to polish the masters and make a new mold.
In case it doesn't work I have already made some copies in gray to replace the crystal part with some transparent plasticard.
Some people say that they can learn from this post, and this makes me really happy. So, this time I will tell you something that you shouldnt do.
The first time I made the loose hollow bricks, it was fun because that time I just needed a few, so I made each of them one by one.
With the action on the 2nd floor, I am going to need many more bricks, so I started to make them. This time it wasn't fun. When I was close to finish them, I started to ask myself, why didn´t I make only five or ten pieces and repeat the rest in plaster with a mold? I dont have an answer for that So, this is something that you definitely shouldnt do. Make a mold and repeat it in plaster, it´s much easier.
By the way, the hollow bricks were made with DAS and sculpted one by one... first I make the holes, later with a X-acto blade I turn the holes into squares and finally with a square metal file I finish the shape. I repeat, it wasn´t fun.
Now I´m back to my house, with my knee much better and expect to recover the lost time and speed up with my diorama.

jargonking

Joined: May 08, 2006
KitMaker: 269 posts
Armorama: 247 posts
Posted: Friday, February 17, 2012 - 10:23 PM UTC
That looks amazing.
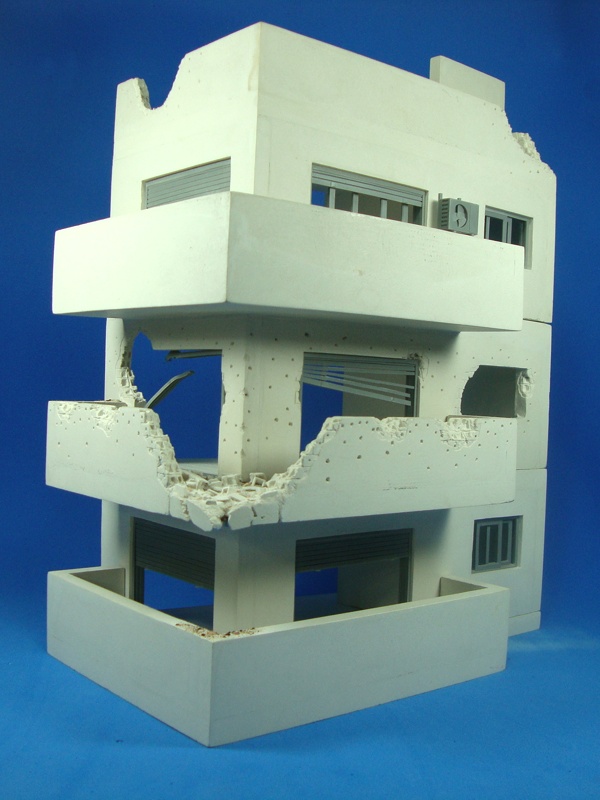
My only observation would be that all the bullet holes are concentrated around the middle floor. In reality, even if the target was on the middle floor, shells would still stray above and below that area.
Otherwise the whole thing looks fantastic...I'm in awe at your dedication.
My only observation would be that all the bullet holes are concentrated around the middle floor. In reality, even if the target was on the middle floor, shells would still stray above and below that area.
Otherwise the whole thing looks fantastic...I'm in awe at your dedication.

Spiderfrommars

Joined: July 13, 2010
KitMaker: 3,845 posts
Armorama: 3,543 posts
Posted: Friday, February 17, 2012 - 10:44 PM UTC
That's awesome!
ahandykindaguy

Joined: August 20, 2008
KitMaker: 1,295 posts
Armorama: 1,191 posts

Posted: Saturday, February 18, 2012 - 04:19 AM UTC
Victor this is truly a massive undertaking! Your description and photos are a really good tutorial of how you have come up with an awesome diorama in the making. Is the whole thing fairly heavy? I would imagine that much Das would be quite a considerable weight? Have you ever done something this big and how do you support the weight of the building parts? Are the pegged to each other or just glued? I have used the method of Foamcore & cork for the building in my diorama, and styrofoam covered by drywall paste for the base and it is probably close to five or six pounds with the wood frame border. Your build must weigh a scale ton! I am mostly just curious for curiosity's sake, but I am thoroughly enjoying your work & am glad you are up and at it again, pain free. Looking forward to more updates.
Thanks, Dave
Thanks, Dave
roudeleiw

Joined: January 19, 2004
KitMaker: 2,406 posts
Armorama: 2,224 posts
Posted: Sunday, February 19, 2012 - 05:51 AM UTC
Quoted Text
The first time I made the loose hollow bricks, it was fun because that time I just needed a few, so I made each of them one by one.
With the action on the 2nd floor, I am going to need many more bricks, so I started to make them. This time it wasn't fun. When I was close to finish them, I started to ask myself, why didn´t I make only five or ten pieces and repeat the rest in plaster with a mold? I dont have an answer for that So, this is something that you definitely shouldnt do. Make a mold and repeat it in plaster, it´s much easier.
By the way, the hollow bricks were made with DAS and sculpted one by one... first I make the holes, later with a X-acto blade I turn the holes into squares and finally with a square metal file I finish the shape. I repeat, it wasn´t fun.
I am very glad to hear that i am not the only crazy guy in this hobby :-)
Good work, the effort was worth it!
Claude

olivato
Joined: August 16, 2005
KitMaker: 127 posts
Armorama: 107 posts
Posted: Monday, February 20, 2012 - 10:26 AM UTC
Hi!
Iain: Thanks for taking the time to see my project. I found some pictures about the bullet impact, and apparently there is not much dispersion around the target, but I'm going to research more about that, thanks for the advice.
Mauro: You are always there, supporting me and I really appreciate that. Thank you very much.
Claude: Sorry but I think there are different levels of craziness, and yours is much worse than mine... your Clervaux diorama confirms that.
You are one of the greatest modelers I've seen, thanks for seeing my project.
Dave: Thank you very much for your words. I never thought about the weight so I looked for a scale and I started to weight. The weight of the flat is around 2,8 pounds. The piece of wood I use as a base is around 7,7 pounds and the house is about 2,2 pounds...I think the whole diorama is going to be around 15-17 pounds. At the moment I'm finishing the eighth package of Das, but much of the Das is lost when sanding the pieces, and in fact the walls are 80% polystyrene and only the rest is Das and gauze.
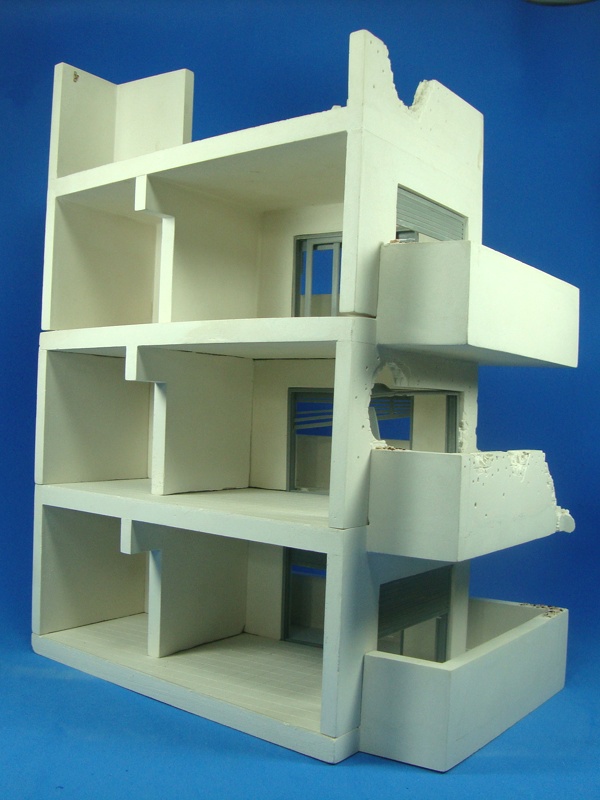
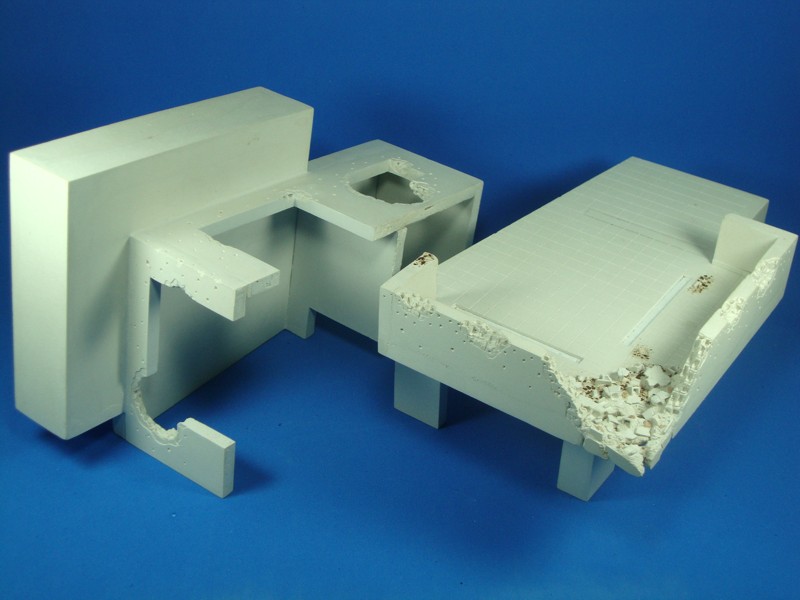
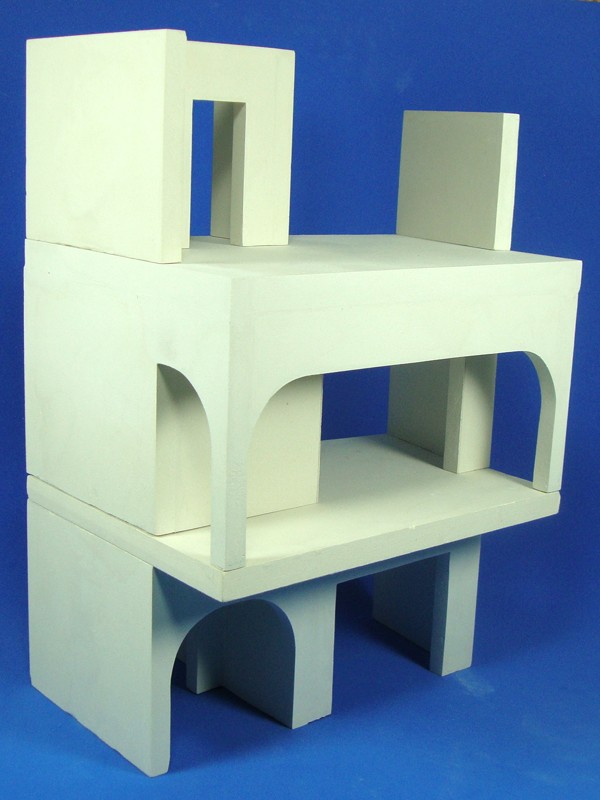
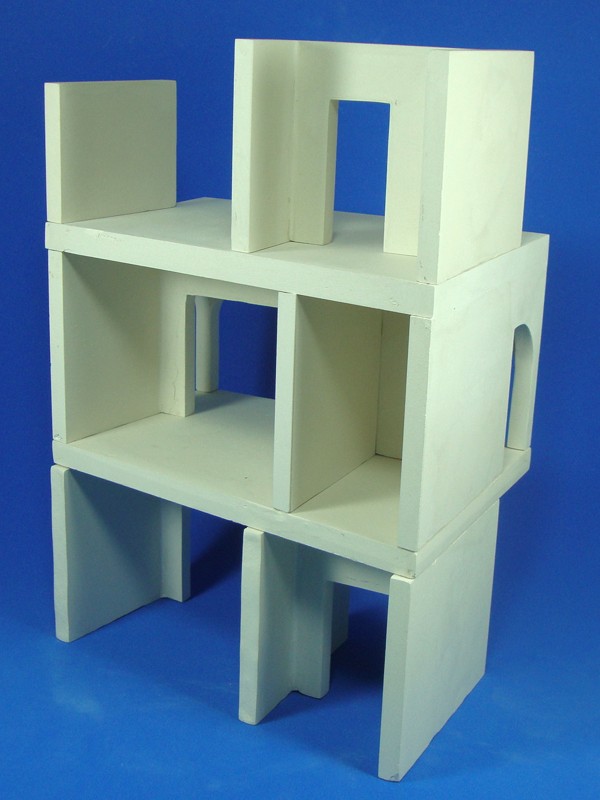
I've never made something so big, this is the first time I make a block of flats. I built the flat thinking that the walls of each floor would be supported by the floor of the next. I glued the parts with epoxy and refilled with Das. The epoxy works fine with the Das and the polystyrene. Here is a picture of one of the floors of the building. Anything you want to know, ask, no problem. Thank you.
Iain: Thanks for taking the time to see my project. I found some pictures about the bullet impact, and apparently there is not much dispersion around the target, but I'm going to research more about that, thanks for the advice.
Mauro: You are always there, supporting me and I really appreciate that. Thank you very much.
Claude: Sorry but I think there are different levels of craziness, and yours is much worse than mine... your Clervaux diorama confirms that.
You are one of the greatest modelers I've seen, thanks for seeing my project.
Dave: Thank you very much for your words. I never thought about the weight so I looked for a scale and I started to weight. The weight of the flat is around 2,8 pounds. The piece of wood I use as a base is around 7,7 pounds and the house is about 2,2 pounds...I think the whole diorama is going to be around 15-17 pounds. At the moment I'm finishing the eighth package of Das, but much of the Das is lost when sanding the pieces, and in fact the walls are 80% polystyrene and only the rest is Das and gauze.
I've never made something so big, this is the first time I make a block of flats. I built the flat thinking that the walls of each floor would be supported by the floor of the next. I glued the parts with epoxy and refilled with Das. The epoxy works fine with the Das and the polystyrene. Here is a picture of one of the floors of the building. Anything you want to know, ask, no problem. Thank you.
callmehobbes

Joined: April 17, 2005
KitMaker: 751 posts
Armorama: 740 posts
Posted: Monday, February 20, 2012 - 08:08 PM UTC
I'm loving this thread. This is one of the best modern buildings I've seen. Excellent job so far.

hofpig

Joined: March 04, 2007
KitMaker: 1,330 posts
Armorama: 1,017 posts
Posted: Monday, February 20, 2012 - 11:05 PM UTC
Still one of the best I've seen on here, you have a real talent.
paul
paul


AlanL

Joined: August 12, 2005
KitMaker: 14,499 posts
Armorama: 11,675 posts
Posted: Monday, February 20, 2012 - 11:29 PM UTC
Hi Victor,
A really interesting project with lots of great work going on. Very informative and the pieces you have made for the dio look excellent.
Look forward to developments and thanks for sharing.
Al
A really interesting project with lots of great work going on. Very informative and the pieces you have made for the dio look excellent.
Look forward to developments and thanks for sharing.
Al

tomapaul

Joined: September 17, 2007
KitMaker: 425 posts
Armorama: 304 posts
Posted: Tuesday, February 21, 2012 - 12:34 AM UTC
This looks very impressive. I like all those hollow bricks. I scrolled down and there was something that blew me with every post.

Lagumiles
Joined: December 30, 2003
KitMaker: 156 posts
Armorama: 135 posts
KitMaker: 156 posts
Armorama: 135 posts
Posted: Tuesday, February 21, 2012 - 01:30 AM UTC
Hi Olivato,
I am really impressed about your amazing job I can only say First Class!!
I will appreciate if you can send me your drawings I also use Corel for my projects in detail corel 10 or 13
I am also impressed how precise you are in sanding and file to keep the DAS so smooth I know it is not so easy, also keep the resin so squared. It is not clear to me
how you did the two round roof tanks, if you can explain better...
Cant wait to see progress
Moreno

chukw1
Joined: November 28, 2007
KitMaker: 817 posts
Armorama: 75 posts
Posted: Tuesday, February 21, 2012 - 04:25 AM UTC
Amazing work, Victor- cheers!
For your windows, try dipping them in Johnson's Kleer (or Future- or whatever the stuff is called in you town). It will add a tremendous level of clarity- we use it in the airplane hobby all the time!
chuk
For your windows, try dipping them in Johnson's Kleer (or Future- or whatever the stuff is called in you town). It will add a tremendous level of clarity- we use it in the airplane hobby all the time!
chuk

Lagumiles
Joined: December 30, 2003
KitMaker: 156 posts
Armorama: 135 posts
KitMaker: 156 posts
Armorama: 135 posts
Posted: Tuesday, February 21, 2012 - 06:47 PM UTC
Hi Victor,
I have also another question..
How you drill out so a perfect flat base hole into the air conditioner?
I mean the vent housing.
Thanks Moreno
I have also another question..
How you drill out so a perfect flat base hole into the air conditioner?
I mean the vent housing.
Thanks Moreno
olivato
Joined: August 16, 2005
KitMaker: 127 posts
Armorama: 107 posts
Posted: Wednesday, February 22, 2012 - 12:19 PM UTC
Hi everyone!!!
Callmehobbes: Thank you very much for continuing supporting me, from the first day, I really appreciate that.
Paul (Hofpig): Thanks for your words, and the time to see my project.
Alan: Thank you. I learn a lot from others modeler that share their tips and techniques, so this is my time to share my experiences.
Paul (Tomapaul): Thanks for your words and time, but please, don´t remind me of the hollow bricks...
Chuck: Thank you very much for the tip and your words. I will try to find this product, and be sure, if I find it, I will try this technique.
Moreno: Thanks for your words. Some people mentioned how neat my work looks, and this makes me really happy. Basically I use sandpaper, metal files, and the minidrill. I always keep my sandpaper between two pieces of wood to maintain it as straight as I can. (you can see the pieces of wood in one of the pictures, because, I used it to dry the pieces of the buildings)
About how smooth the Das looks, it is only sanding with sandpaper, starting with 80, then 120, 180, and finally 320, no more because I like it a little bit rough, so when I paint I can give shadows and lights.
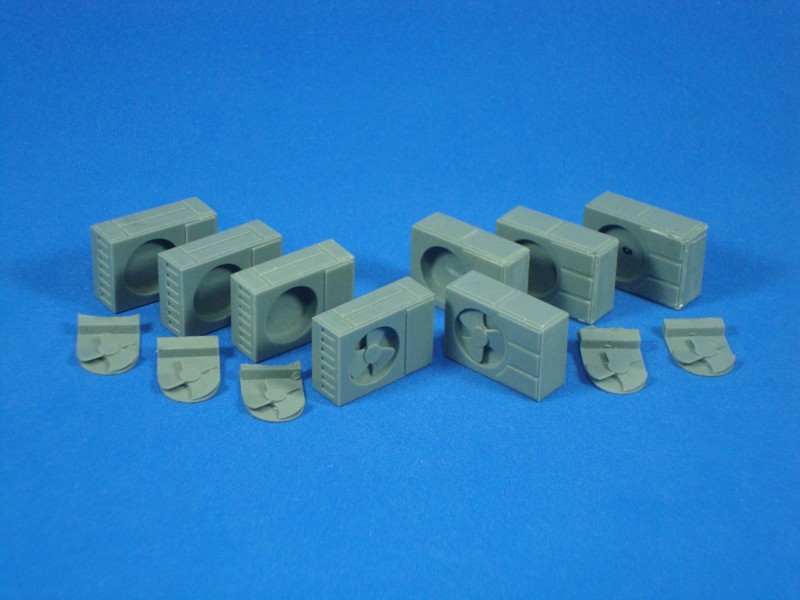
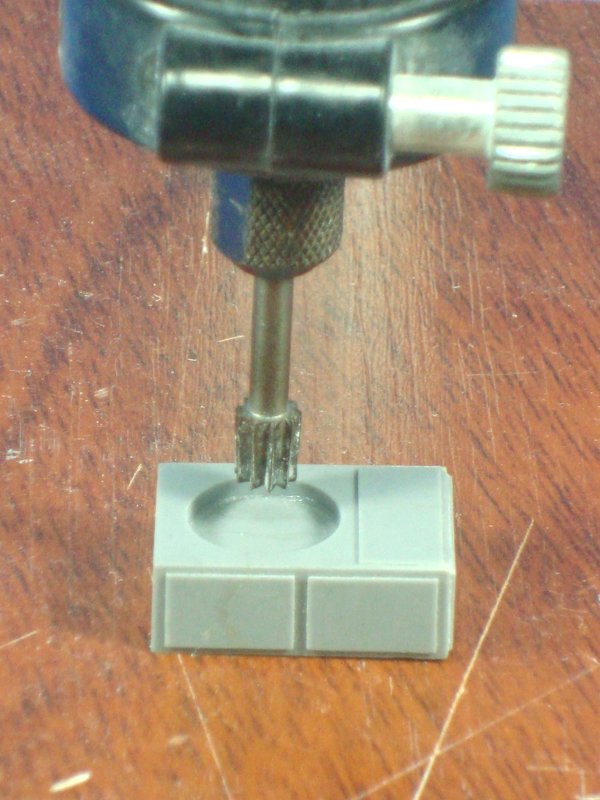
About the hole, I used the minidrill with its base and the tool I show in the picture. First I mark the circle on the surface and then I start to drill very slowly not to overheat the resin.
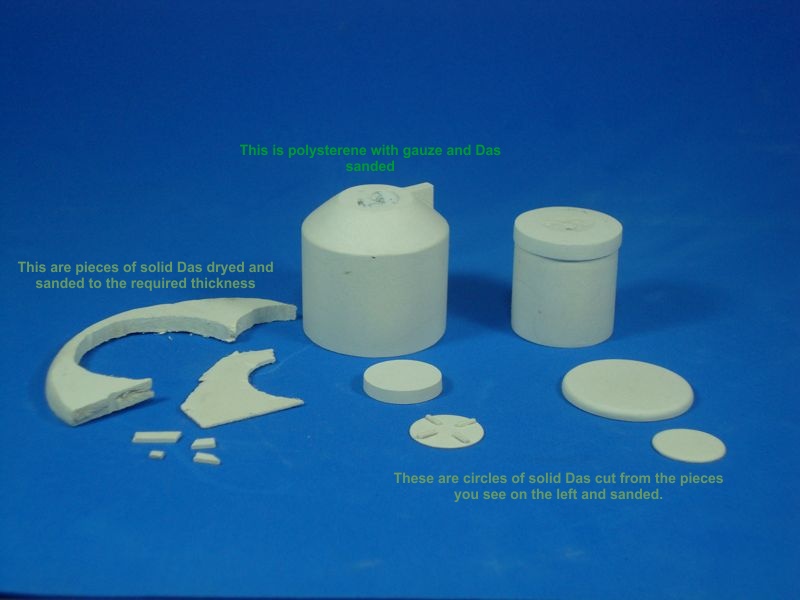
The construction of the tanks of water is similar to the rest. I start with a "soul" from polystyrene, then I glue the gauze, and when it's dry, I cover it with Das. When it's dry I start to sand. This is the base. Then I prepare I pieces of solid Das with different thickness, from I cut the different disc you see in the picture. Then I sand the disc to get the shape as I want.
I hope this answers what you want to know, but if not, let me know exactly what step is not so clear and I will try a better explanation.
Time for an update!!!
Here you have the first impression of how the house looks. Still need a lot of work with textures and details, but when I finish the ground floor of the block of flats, I can put everything together on the base to know if everything is going as I planned... Big moment!!!.
I'll see you soon!
Callmehobbes: Thank you very much for continuing supporting me, from the first day, I really appreciate that.
Paul (Hofpig): Thanks for your words, and the time to see my project.
Alan: Thank you. I learn a lot from others modeler that share their tips and techniques, so this is my time to share my experiences.
Paul (Tomapaul): Thanks for your words and time, but please, don´t remind me of the hollow bricks...
Chuck: Thank you very much for the tip and your words. I will try to find this product, and be sure, if I find it, I will try this technique.
Moreno: Thanks for your words. Some people mentioned how neat my work looks, and this makes me really happy. Basically I use sandpaper, metal files, and the minidrill. I always keep my sandpaper between two pieces of wood to maintain it as straight as I can. (you can see the pieces of wood in one of the pictures, because, I used it to dry the pieces of the buildings)
About how smooth the Das looks, it is only sanding with sandpaper, starting with 80, then 120, 180, and finally 320, no more because I like it a little bit rough, so when I paint I can give shadows and lights.
About the hole, I used the minidrill with its base and the tool I show in the picture. First I mark the circle on the surface and then I start to drill very slowly not to overheat the resin.
The construction of the tanks of water is similar to the rest. I start with a "soul" from polystyrene, then I glue the gauze, and when it's dry, I cover it with Das. When it's dry I start to sand. This is the base. Then I prepare I pieces of solid Das with different thickness, from I cut the different disc you see in the picture. Then I sand the disc to get the shape as I want.
I hope this answers what you want to know, but if not, let me know exactly what step is not so clear and I will try a better explanation.
Time for an update!!!
Here you have the first impression of how the house looks. Still need a lot of work with textures and details, but when I finish the ground floor of the block of flats, I can put everything together on the base to know if everything is going as I planned... Big moment!!!.
I'll see you soon!
 |

WEB HOSTING BY


Copyright ©2021 Armorama and Kitmaker Network, a subsidiary of Silver Star Enterprises
All Rights Reserved. Please read our Conditions of Use and Privacy Policy.
All Rights Reserved. Please read our Conditions of Use and Privacy Policy.