

Hosted by Darren Baker
An ambitious project

HeavyArty


Joined: May 16, 2002
KitMaker: 17,694 posts
Armorama: 13,742 posts
Posted: Saturday, October 27, 2012 - 12:51 PM UTC
Good deal. I am glad you worked out the molds. I can't wait to see how they come out and get my hands on them.

bronzey

Joined: January 06, 2012
KitMaker: 300 posts
Armorama: 256 posts

Posted: Saturday, October 27, 2012 - 07:41 PM UTC
Dude,
This is amazing, I have been watching this for months now and im always excited when I see you have a new post. As I have said before you are a talented guy and I think that you are onto something, to create products for a market that you know so well and products that us modellers want. I can see you going far with this.
This is amazing, I have been watching this for months now and im always excited when I see you have a new post. As I have said before you are a talented guy and I think that you are onto something, to create products for a market that you know so well and products that us modellers want. I can see you going far with this.
jrutman
Joined: April 10, 2011
KitMaker: 7,941 posts
Armorama: 7,934 posts
Posted: Sunday, October 28, 2012 - 01:42 AM UTC
Dude!!
This keeps getting better and better. Love your updates and how you go about scratchbuilding.
I have to say though,that curtain is over the top!! VERY nice idea. I felt the same way when I saw Niks' suit of clothing made out of cig. paper and Claudes' groundwork and buildings. Top modelers are on this website.
J
roudeleiw

Joined: January 19, 2004
KitMaker: 2,406 posts
Armorama: 2,224 posts

Posted: Sunday, October 28, 2012 - 08:37 PM UTC
Victor,
this is a highly interesting post as i already encountered some of the same problems you had.
I may be wrong, but isn't it because of this kind of problems that others do two-part moulds for this type of products?
Anyway, your copies are great and i will keep the chunk size in mind for future moulding
Claude


pdelsoglio

Joined: November 13, 2005
KitMaker: 561 posts
Armorama: 553 posts
Posted: Monday, October 29, 2012 - 10:20 AM UTC
Hi Víctor,
what can I say, this is simply a superb job, the level of detail is awesome!
It deserves to be be published as a Feature here, to say the least.
Keep amazing us with your remarkable skills!
Saludos!
Pablo
what can I say, this is simply a superb job, the level of detail is awesome!
It deserves to be be published as a Feature here, to say the least.
Keep amazing us with your remarkable skills!
Saludos!
Pablo

zontar
Joined: August 27, 2006
KitMaker: 1,646 posts
Armorama: 1,557 posts
Posted: Monday, October 29, 2012 - 11:24 AM UTC
Victor: impressive!! I'm really loving your pieces. I would very likely purchase a set of for the living room and the kitchen from you, as long as I can scrounge the money. You, sir, are truely a master!
Happy Modeling, -zon
Happy Modeling, -zon

olivato
Joined: August 16, 2005
KitMaker: 127 posts
Armorama: 107 posts
Posted: Monday, October 29, 2012 - 03:32 PM UTC
Hi everyone!!!
Gino: When the sets are ready I can send you an reminder if you like. Thanks for the patience and the interest.
Alex: Your words are an incredible encouragement to keep going. If the things go well, this is going to be an important change in my life. Even in my best dreams I've never imagined anything like that. Thank you very much.
Jerry: When I first made the curtain, I didn´t imagine that people would liked it so much. Thanks for the compliments, they keep me focused and don´t let me give it up with my work.
Pablo: Thank you very much for still following my work. I remember you were one of the first to give me your support, and I really appreciate you still being there. Un fuerte abrazo.
Zon: Thanks for praising my work, and the interest in the pieces. I expect the kitchen to be ready by the first days of December, so if you wait a little bit more you can save money on the shipment.
Claude: I don´t think you are wrong, probably I would have avoided a lot of headaches with your advice, but personally I don´t like the line between the two mold. If all the copies go wrong, I would probably change the system, but sometimes the copies are right and sometimes wrong, so I try to discover how to correct the problem to make the copies right all the times.
On the other hand, for this type of masters (the chunk is bigger or the same as the rest of the piece, and the piece can be extracted without cutting the mold) this system is the right one, at least this is what the people that sell me the resin and the silicon rubber explained to me.
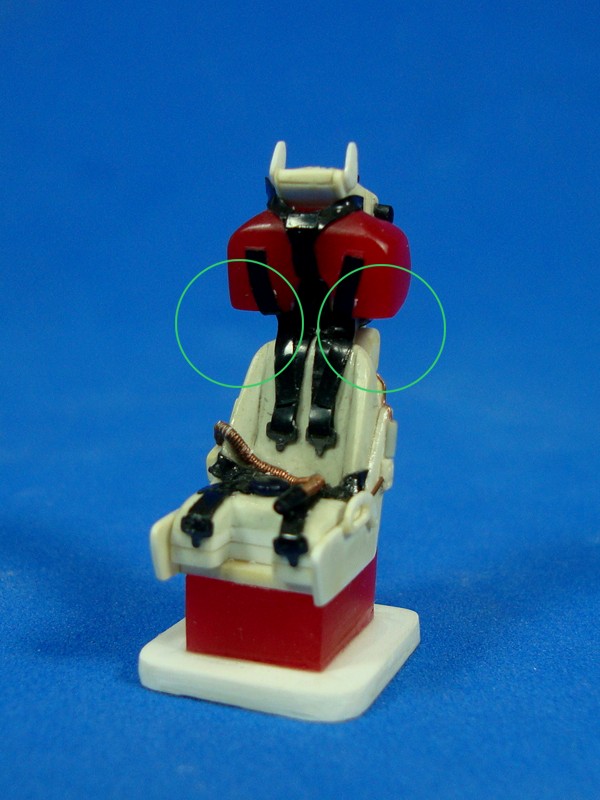
Here you can see an example of a mold I had to make with the cut-mold system (an aircraft seat I made some years ago). In the area I mark in the picture you can see how difficult it is to extract the copy without breaking the mold or the piece, that´s why I cut it.
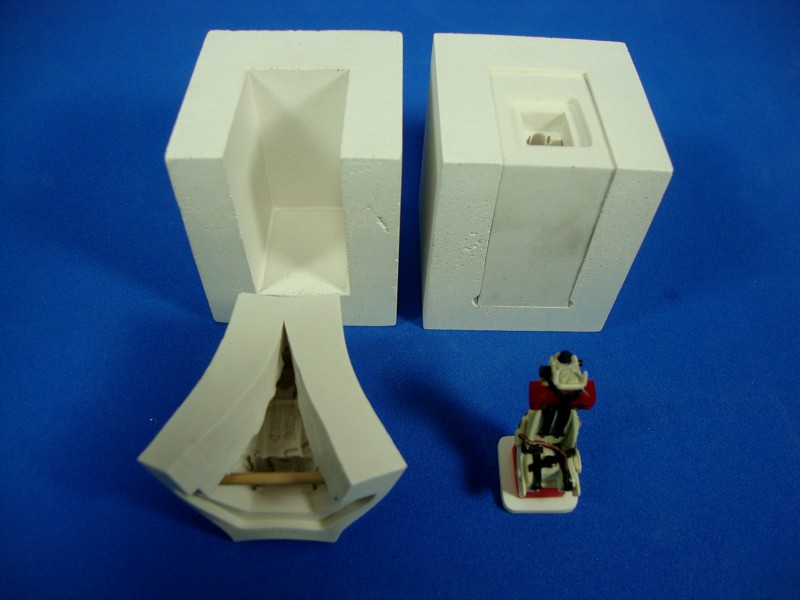
I made a box of plaster to keep the mold closed when I filled it.
So far, I have been able to solve most of the problems without cutting the molds and have these ugly lines in my furniture.
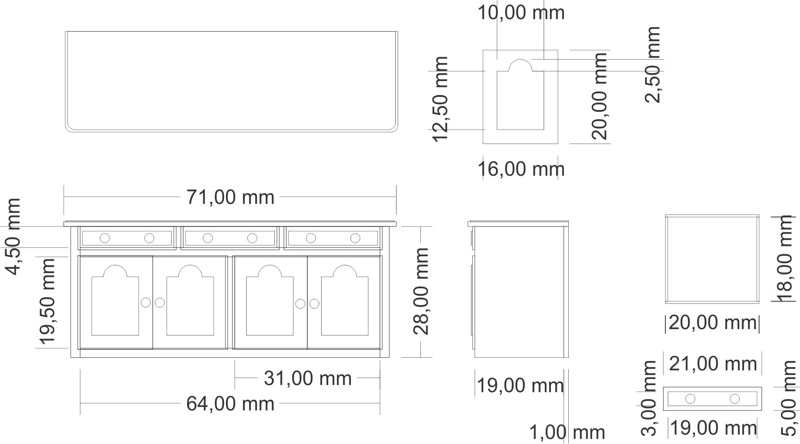
Now, back to the project, I started a cupboard for the 2nd floor, here is the design.
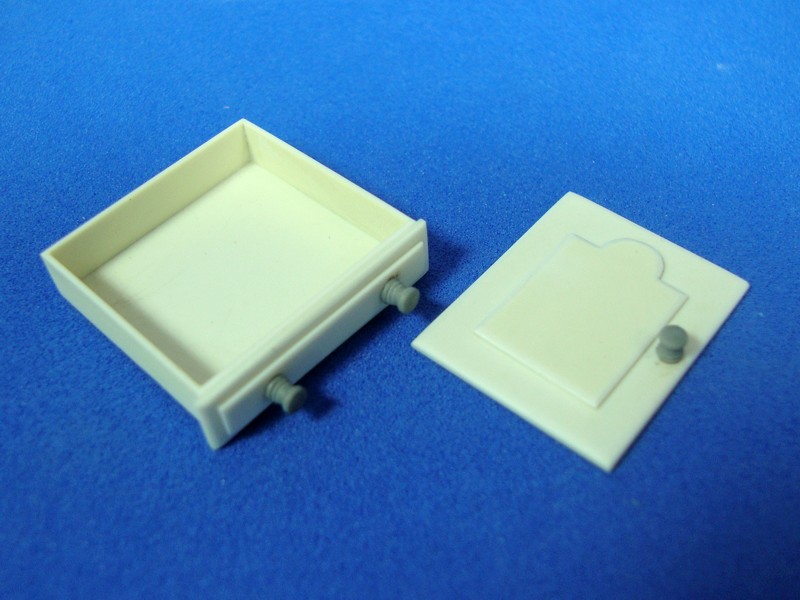
As usual, I start with the parts to make copies: the door (my brain is dry, I don´t have any more ideas for door designs...) and the drawer.
Tomorrow I expect to finish the rest. See you tomorrow!
Gino: When the sets are ready I can send you an reminder if you like. Thanks for the patience and the interest.
Alex: Your words are an incredible encouragement to keep going. If the things go well, this is going to be an important change in my life. Even in my best dreams I've never imagined anything like that. Thank you very much.
Jerry: When I first made the curtain, I didn´t imagine that people would liked it so much. Thanks for the compliments, they keep me focused and don´t let me give it up with my work.
Pablo: Thank you very much for still following my work. I remember you were one of the first to give me your support, and I really appreciate you still being there. Un fuerte abrazo.
Zon: Thanks for praising my work, and the interest in the pieces. I expect the kitchen to be ready by the first days of December, so if you wait a little bit more you can save money on the shipment.
Claude: I don´t think you are wrong, probably I would have avoided a lot of headaches with your advice, but personally I don´t like the line between the two mold. If all the copies go wrong, I would probably change the system, but sometimes the copies are right and sometimes wrong, so I try to discover how to correct the problem to make the copies right all the times.
On the other hand, for this type of masters (the chunk is bigger or the same as the rest of the piece, and the piece can be extracted without cutting the mold) this system is the right one, at least this is what the people that sell me the resin and the silicon rubber explained to me.
Here you can see an example of a mold I had to make with the cut-mold system (an aircraft seat I made some years ago). In the area I mark in the picture you can see how difficult it is to extract the copy without breaking the mold or the piece, that´s why I cut it.
I made a box of plaster to keep the mold closed when I filled it.
So far, I have been able to solve most of the problems without cutting the molds and have these ugly lines in my furniture.
Now, back to the project, I started a cupboard for the 2nd floor, here is the design.
As usual, I start with the parts to make copies: the door (my brain is dry, I don´t have any more ideas for door designs...) and the drawer.
Tomorrow I expect to finish the rest. See you tomorrow!


bill1

Joined: August 14, 2005
KitMaker: 3,938 posts
Armorama: 520 posts
Posted: Tuesday, October 30, 2012 - 11:11 PM UTC
Yo Olivato,
I'am still following this one with great respect!
Cant wait to see the hole shot!
Greetz Nico
I'am still following this one with great respect!
Cant wait to see the hole shot!
Greetz Nico

olivato
Joined: August 16, 2005
KitMaker: 127 posts
Armorama: 107 posts
Posted: Wednesday, October 31, 2012 - 02:41 PM UTC
Hi!!!
Nico: Thank you very much for your patience, and the support since I start with this project, it means a lot to me. Thanks again.
Sometimes, "tomorrow" is not exactly tomorrow, it´s more a desire expression than a deadline...
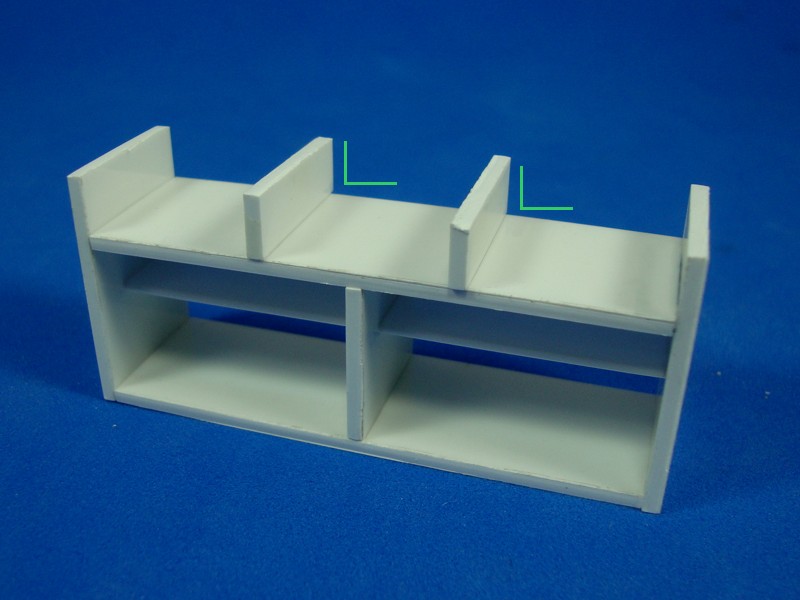
I showed previously how I made the doors, so this time I´m going to show how I made the furniture.
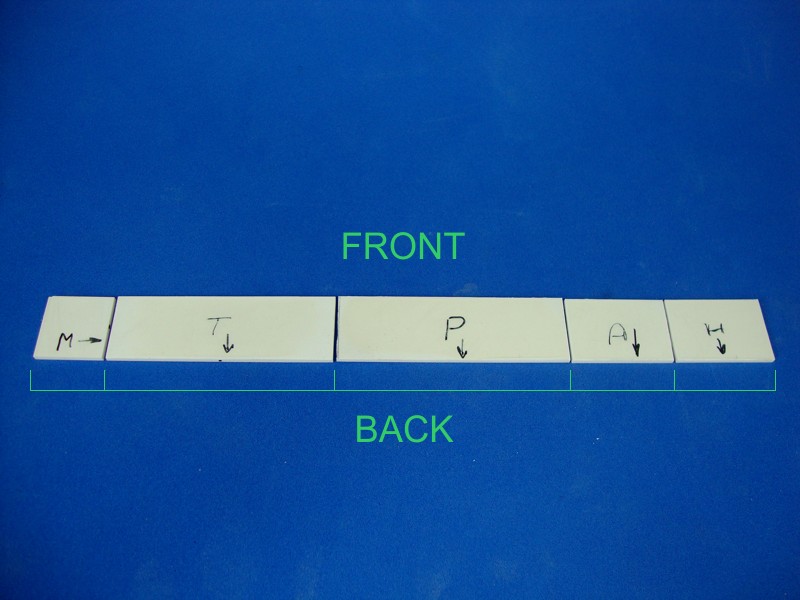
First I cut a band of the design´s depth and then I cut the different parts: M (middle), T (top), P (floor), D (right) and I (left). The arrow mark the back of the furniture.
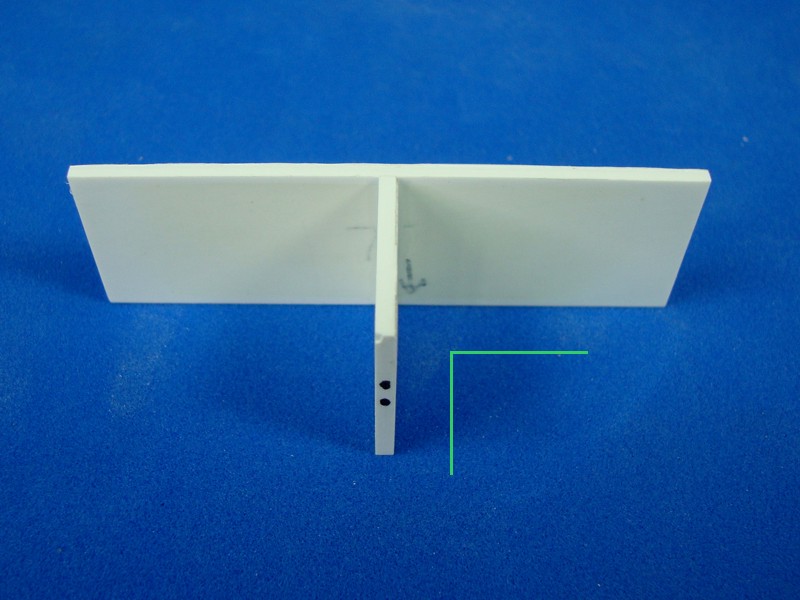
At this point I am careful only with the 90° angles in the areas I mark in the picture and the size of the top and floor. The rest can be adjusted later.
I start to glue the top with the middle. Again I am careful with the angle I show in the picture.
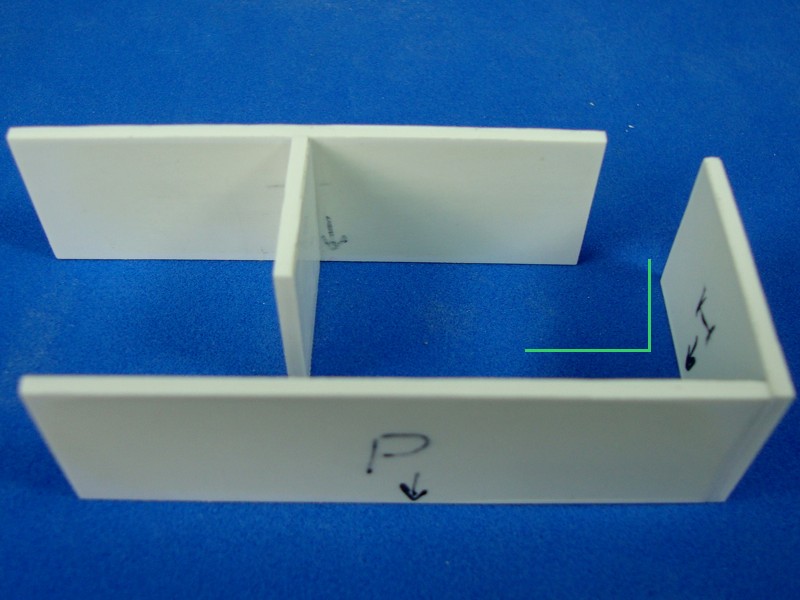
Then I glue the floor with the both sides. Again, I check the angle.
After this, I glue these two parts, I check the size of the middle piece with the doors. If it´s too big I sand until I reach the right size.
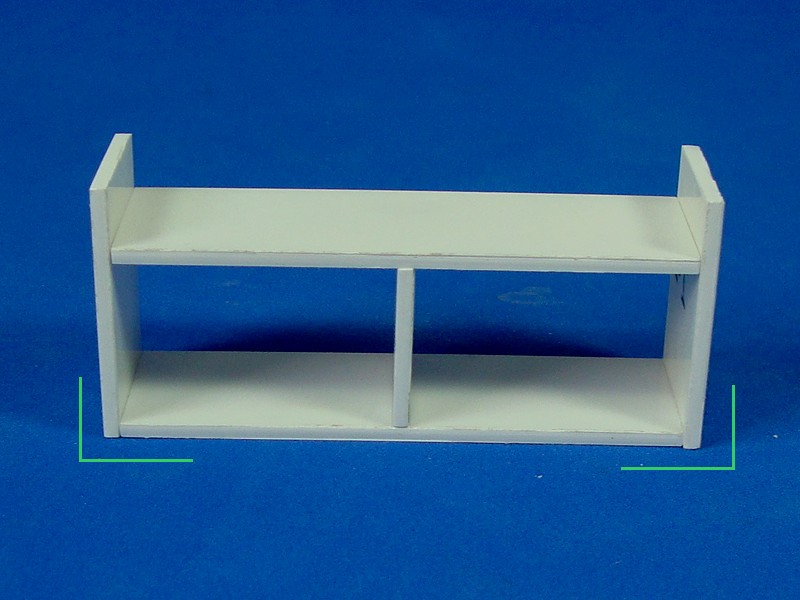
Now I glue the separators of the drawers, much higher than I need. Again I only check the angle. Note I align everything to the back of the furniture, the front is very irregular, but I have about 1mm more to adjust.
I add some shelves because the boxes are too big, and didn´t like how it looked.
When everything is glued and dry, I start to adjust sanding everything.
First I align the back by sanding and then I glue the back of the furniture.
Then, I put the drawers and adjust the height.
Later I sand the front to the desired depth while I check the drawers don't touch the back.
Finally I round the sides.
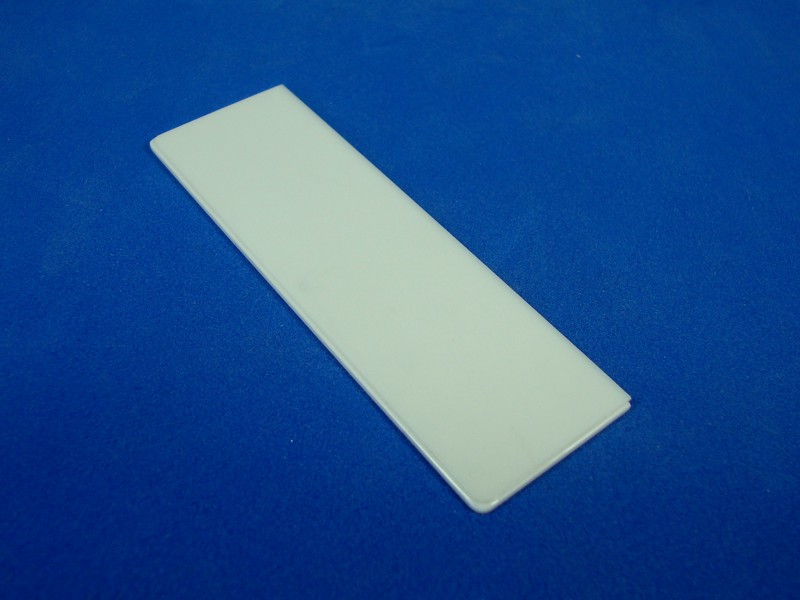
For the top I cut two pieces of plasticard, one of 1mm and another of 0.25mm.
For the first one I check the angles and round the front borders. For the second one, I check the angles so that the length is 0.5mm smaller than the other one, no matter the depth. Afterwards, I round the front border again.
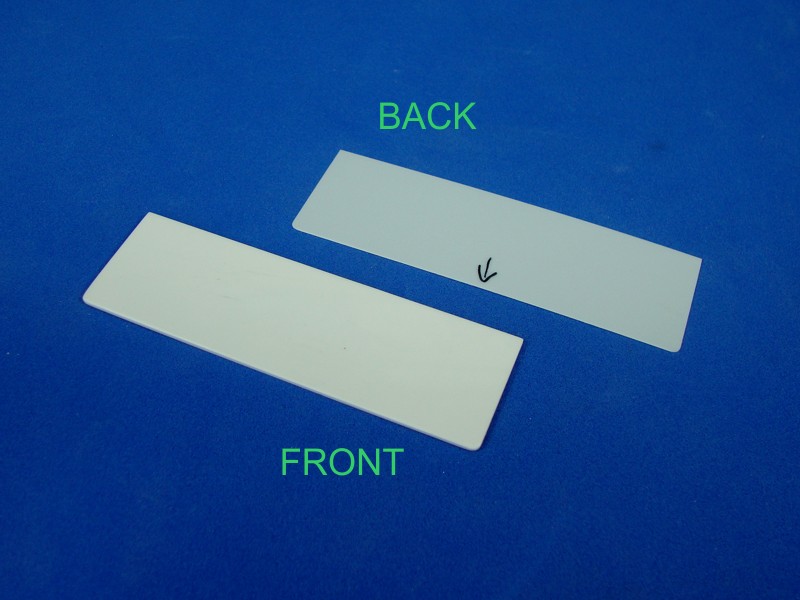
I glue the thinner piece over the other one aligning it by the front and sides, and when it is dry, adjust the back.
I put everything together and it looks like this.
The secret is to make the pieces a little bigger when you cut them, so that you can adjust them at the end of each process.
Now you know all the steps, so think of your own design and make it, it´s great fun, believe me.
See you soon!!!
Nico: Thank you very much for your patience, and the support since I start with this project, it means a lot to me. Thanks again.
Sometimes, "tomorrow" is not exactly tomorrow, it´s more a desire expression than a deadline...
I showed previously how I made the doors, so this time I´m going to show how I made the furniture.
First I cut a band of the design´s depth and then I cut the different parts: M (middle), T (top), P (floor), D (right) and I (left). The arrow mark the back of the furniture.
At this point I am careful only with the 90° angles in the areas I mark in the picture and the size of the top and floor. The rest can be adjusted later.
I start to glue the top with the middle. Again I am careful with the angle I show in the picture.
Then I glue the floor with the both sides. Again, I check the angle.
After this, I glue these two parts, I check the size of the middle piece with the doors. If it´s too big I sand until I reach the right size.
Now I glue the separators of the drawers, much higher than I need. Again I only check the angle. Note I align everything to the back of the furniture, the front is very irregular, but I have about 1mm more to adjust.
I add some shelves because the boxes are too big, and didn´t like how it looked.
When everything is glued and dry, I start to adjust sanding everything.
First I align the back by sanding and then I glue the back of the furniture.
Then, I put the drawers and adjust the height.
Later I sand the front to the desired depth while I check the drawers don't touch the back.
Finally I round the sides.
For the top I cut two pieces of plasticard, one of 1mm and another of 0.25mm.
For the first one I check the angles and round the front borders. For the second one, I check the angles so that the length is 0.5mm smaller than the other one, no matter the depth. Afterwards, I round the front border again.
I glue the thinner piece over the other one aligning it by the front and sides, and when it is dry, adjust the back.
I put everything together and it looks like this.
The secret is to make the pieces a little bigger when you cut them, so that you can adjust them at the end of each process.
Now you know all the steps, so think of your own design and make it, it´s great fun, believe me.
See you soon!!!
crokreso

Joined: July 28, 2011
KitMaker: 2 posts
Armorama: 1 posts
Posted: Saturday, November 03, 2012 - 12:30 AM UTC
Wow man that looks great!

Lagumiles
Joined: December 30, 2003
KitMaker: 156 posts
Armorama: 135 posts
KitMaker: 156 posts
Armorama: 135 posts
Posted: Sunday, November 04, 2012 - 09:45 PM UTC
Furnitures fit perfectly inside the appartment really a great job. Waiting to see next.
Bravo
Moreno
Bravo
Moreno


shellshock

Joined: November 07, 2012
KitMaker: 3 posts
Armorama: 3 posts
Posted: Wednesday, November 07, 2012 - 05:30 PM UTC
Amazing talent and patience you have. I am just getting back into building kits after a break of some 20 years. Always wanted to display them as dioramas but never had the courage to take the plunge. After seeing your dedication and amazing work, you have inspired me to build my own dioramas. If they look half as good as yours I will be a happy man. Keep up the fantastic work!!!
Mytola

Joined: September 09, 2012
KitMaker: 6 posts
Armorama: 6 posts
Posted: Friday, November 09, 2012 - 08:37 PM UTC
It certainly is an ambitious project. But boy, do you deliver! I've learned a lot from this thread thanks to your detailed explanations and step-by-step pictures. Your work is very inspiring, and I can't wait to see how it will turn out when finished! 
alexanderb

Joined: February 23, 2011
KitMaker: 2 posts
Armorama: 2 posts
Posted: Sunday, November 11, 2012 - 01:18 AM UTC
Hello..Fantastic work and in progress photos..It is indeed very ispiring and helpful for us the beginners.. Because i' m interested in this buildings could you please sent me the corel files as you said?
olivato
Joined: August 16, 2005
KitMaker: 127 posts
Armorama: 107 posts
Posted: Sunday, November 11, 2012 - 03:14 PM UTC
Hi!
Kreso: Thank you very much for taking your time to see my work.
Moreno: This is the good part of making your own furniture, you can adjust them to the place you have, and to me, to design and to make them was terribly fun!!! Thanks for the support.
Jason: Thank you for the compliments!!! A diorama is a hard test for the patience, it requires a couple of months at least and a lot of attention to the details, but when you finish it and see how this picture you imagined in your mind, becomes a reality, it's a pleasure. Here in Armorama there are a lot of modelers ready to give you good advice and encouraging word, so I recommend you publish it here as a way of keeping you motivated. I hope to see your work soon!
Henrik: As I always say, if this post helps you in any way, that makes me happy and that´s why I do it, to share. Thank you for seeing my work and the kind words!
Alexander: Welcome to the Armorama community!!! I have no problem to send you the files but I don't have your e-mail. I've already sent you a private message in case you don´t want to make it public. Thank you very much for your words about my work!!!
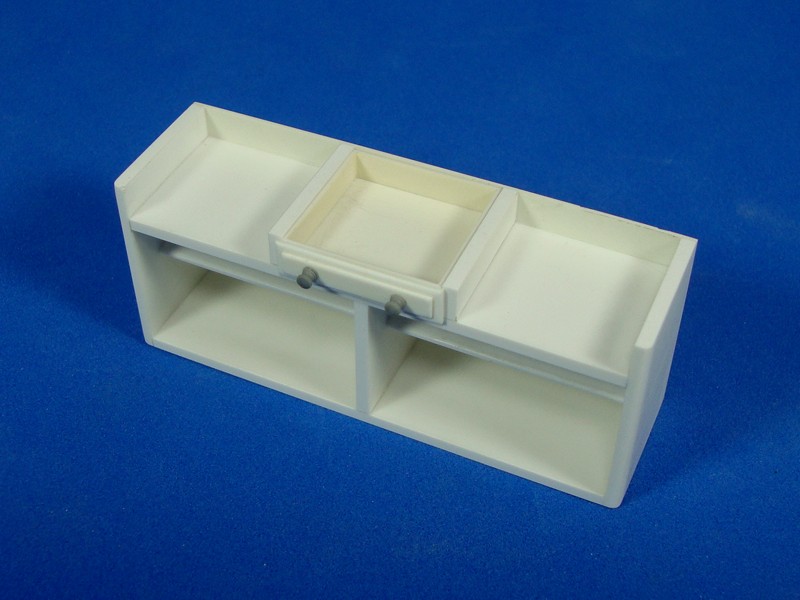
Unfortunately, I don't have much to show you right now, 'cause I'm still working on the 2nd floor pieces. As soon as I finish them, I will update the post.
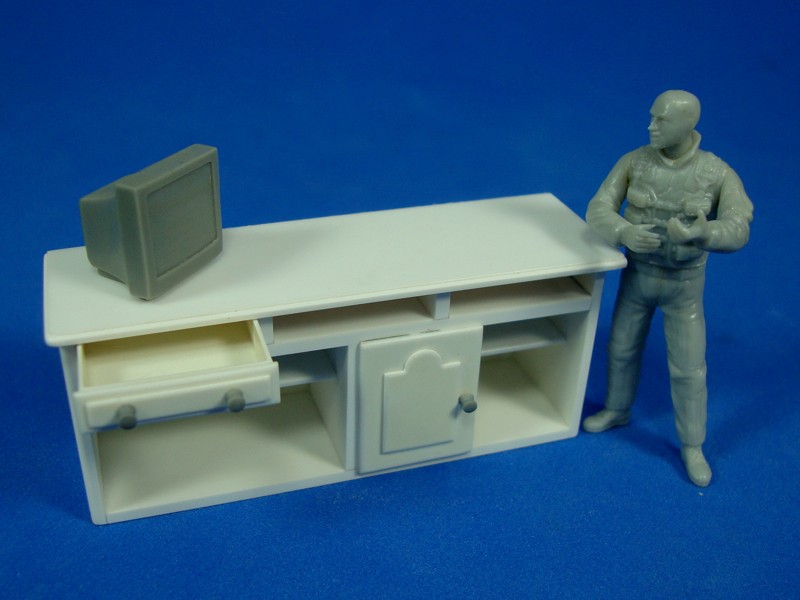
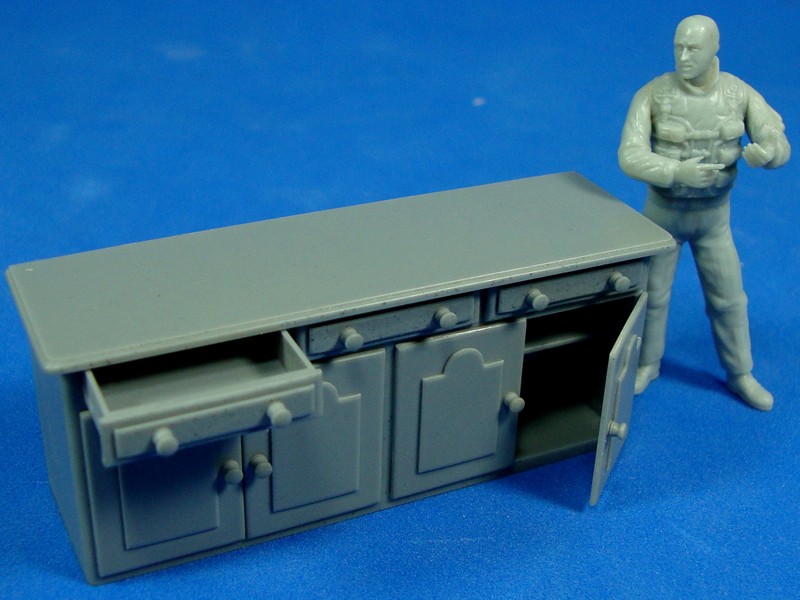
What I can show you is the cupboard I showed you in the previous post, complete with all the drawers and doors. Hope you like it!
See you soon!
Kreso: Thank you very much for taking your time to see my work.
Moreno: This is the good part of making your own furniture, you can adjust them to the place you have, and to me, to design and to make them was terribly fun!!! Thanks for the support.
Jason: Thank you for the compliments!!! A diorama is a hard test for the patience, it requires a couple of months at least and a lot of attention to the details, but when you finish it and see how this picture you imagined in your mind, becomes a reality, it's a pleasure. Here in Armorama there are a lot of modelers ready to give you good advice and encouraging word, so I recommend you publish it here as a way of keeping you motivated. I hope to see your work soon!
Henrik: As I always say, if this post helps you in any way, that makes me happy and that´s why I do it, to share. Thank you for seeing my work and the kind words!
Alexander: Welcome to the Armorama community!!! I have no problem to send you the files but I don't have your e-mail. I've already sent you a private message in case you don´t want to make it public. Thank you very much for your words about my work!!!
Unfortunately, I don't have much to show you right now, 'cause I'm still working on the 2nd floor pieces. As soon as I finish them, I will update the post.
What I can show you is the cupboard I showed you in the previous post, complete with all the drawers and doors. Hope you like it!
See you soon!

PantherF
Joined: June 10, 2005
KitMaker: 6,188 posts
Armorama: 5,960 posts

Posted: Monday, November 12, 2012 - 01:23 AM UTC
Really neat!
You are truly a talented modeler.
~ Jeff
You are truly a talented modeler.
~ Jeff


Snorri23

Joined: March 25, 2010
KitMaker: 514 posts
Armorama: 261 posts
Posted: Monday, November 12, 2012 - 02:20 AM UTC
This project is mind blowing, enjoy your description of your thought process. The sharing of ideas what I appreciate the most, thanks.
battlefield

Joined: January 02, 2012
KitMaker: 10 posts
Armorama: 9 posts
Posted: Monday, November 12, 2012 - 08:05 AM UTC
Hello,
I would just like to say " unbelievable "
Keep up the good work !!
I would just like to say " unbelievable "
Keep up the good work !!

sharpshooter

Joined: December 12, 2003
KitMaker: 22 posts
Armorama: 1 posts
Posted: Monday, November 12, 2012 - 06:39 PM UTC
Absolutely stunning.
This topic is fixed in favourites, I check it every morning to see updates....
sharpshooter
This topic is fixed in favourites, I check it every morning to see updates....
sharpshooter
olivato
Joined: August 16, 2005
KitMaker: 127 posts
Armorama: 107 posts
Posted: Wednesday, November 14, 2012 - 02:52 PM UTC
Hi everyone!!!
Jeff: Thank you very much for taking your time to see my work and for your compliments.
Trevor: And that´s the most important thing, to share. People may like the diorama or not, it´s a matter of taste, but at least I can give you something useful. Thanks for seeing my project!!!
Simon: As I said before, you give me a tremendous encouragement to keep going. Really thanks.
Sharpshooter: Unfortunately I can´t update so fast... to be honest, if I could update once a week with something new, I would be more than happy. Thanks for seeing my work!!!
Another electronic device: Mp3/Cd player.
The last time I made electronic devices, I didn´t feel totally happy. As I said before, the buttons and the lines didn't look ok. Taking this into account, I was particularly careful when making this cd player.
I started by making the handle and the lid. Also, I built a piece that has a hole to place the cds and where the lid will fit. I stuck the first two pieces to a bigger one -that will become the base of the cdplayer- with a little bit of cyanocrylate. Later, I will remove these pieces again, so you can have the lid open and the handler in upright position.
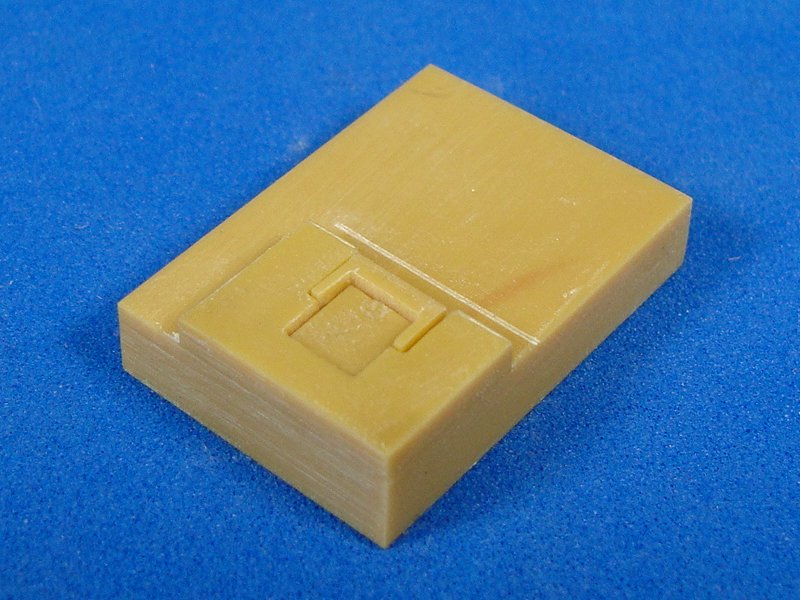
I made a little template with the general shape that the Mp3/Cd player will have.
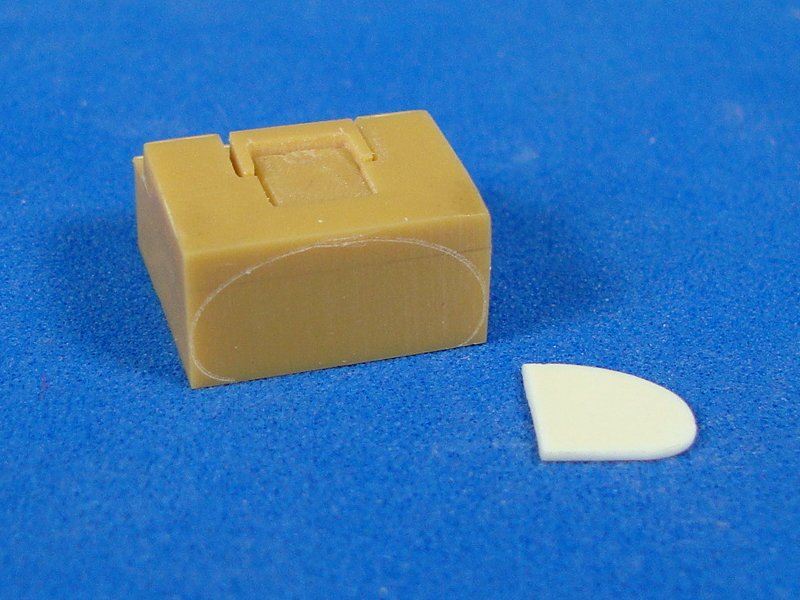
Once everything is sanded, I can remove the lid and the handler, as they already have the shape of the device.
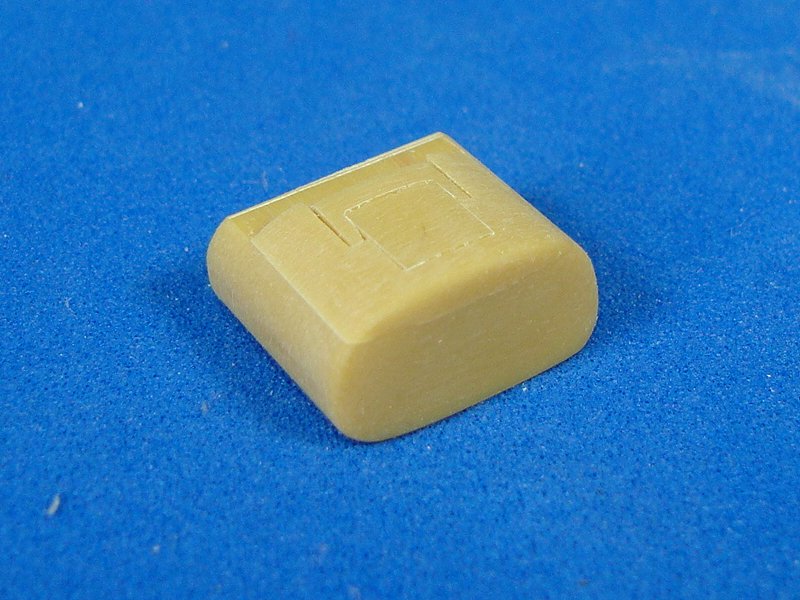
This is the stage that required the most care and attention, as I had to make the lines neater and the buttons smaller than in the other appliances I built. I added details such as the inner part of the cd player and the aerial. I checked the whole process by taking photos, because the last time it was with the photos that I realized that the buttons were out of proportion.
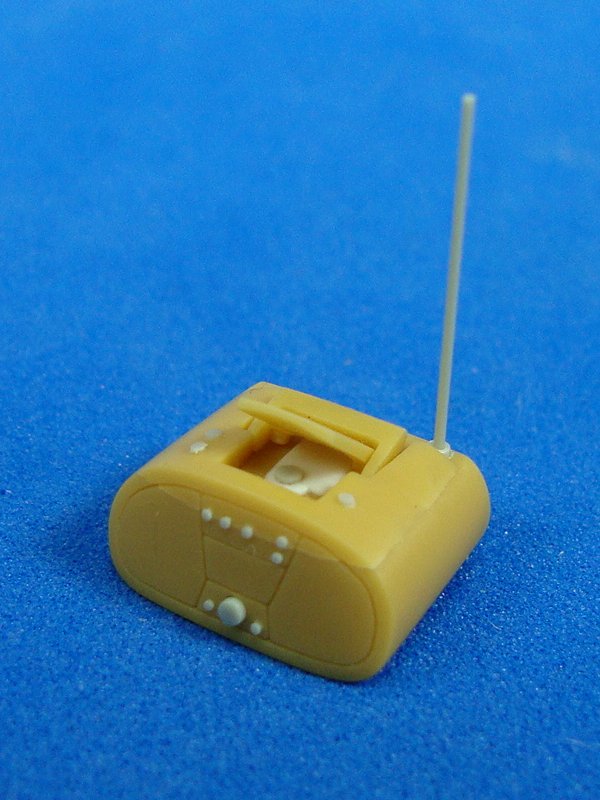
Now that it's finished and I can see the final product, I feel more satisfied with the result, as it looks much better proportioned.
Now I can see I can do better, I´m going to sand the lines and buttons on the others electronic devices, and make them right, specially the phone base.
Sometimes it takes to go wrong to really see where to improve.
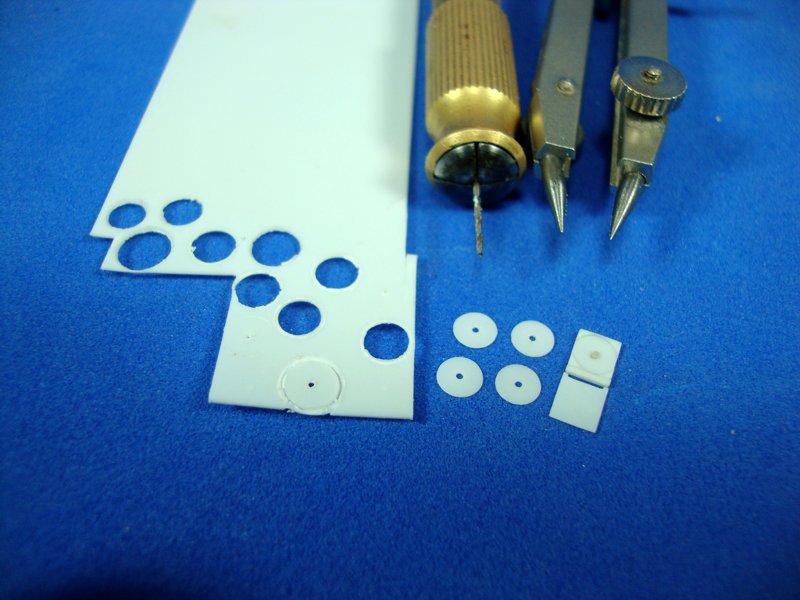
As I made the cd player, I also had to make some cds and cd boxes. They are all made of 0.25 plasticard and, in the case of the cd, I sanded it until I reached 0.05. As regards the box, I sanded three 0.1 sheets and then pasted them together.
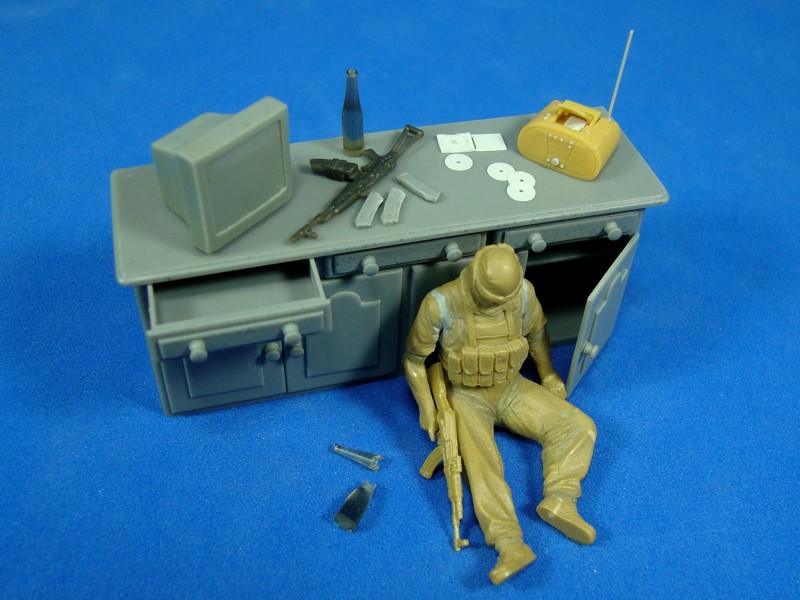
Finally, a reference picture with some of the things that will go on the 2nd floor, and this time I thought it more appropriate to use a revel rather than Mr. Reference - I gave him the day off.
Hope you like it!
See you soon!
Jeff: Thank you very much for taking your time to see my work and for your compliments.
Trevor: And that´s the most important thing, to share. People may like the diorama or not, it´s a matter of taste, but at least I can give you something useful. Thanks for seeing my project!!!
Simon: As I said before, you give me a tremendous encouragement to keep going. Really thanks.
Sharpshooter: Unfortunately I can´t update so fast... to be honest, if I could update once a week with something new, I would be more than happy. Thanks for seeing my work!!!
Another electronic device: Mp3/Cd player.
The last time I made electronic devices, I didn´t feel totally happy. As I said before, the buttons and the lines didn't look ok. Taking this into account, I was particularly careful when making this cd player.
I started by making the handle and the lid. Also, I built a piece that has a hole to place the cds and where the lid will fit. I stuck the first two pieces to a bigger one -that will become the base of the cdplayer- with a little bit of cyanocrylate. Later, I will remove these pieces again, so you can have the lid open and the handler in upright position.
I made a little template with the general shape that the Mp3/Cd player will have.
Once everything is sanded, I can remove the lid and the handler, as they already have the shape of the device.
This is the stage that required the most care and attention, as I had to make the lines neater and the buttons smaller than in the other appliances I built. I added details such as the inner part of the cd player and the aerial. I checked the whole process by taking photos, because the last time it was with the photos that I realized that the buttons were out of proportion.
Now that it's finished and I can see the final product, I feel more satisfied with the result, as it looks much better proportioned.
Now I can see I can do better, I´m going to sand the lines and buttons on the others electronic devices, and make them right, specially the phone base.
Sometimes it takes to go wrong to really see where to improve.
As I made the cd player, I also had to make some cds and cd boxes. They are all made of 0.25 plasticard and, in the case of the cd, I sanded it until I reached 0.05. As regards the box, I sanded three 0.1 sheets and then pasted them together.
Finally, a reference picture with some of the things that will go on the 2nd floor, and this time I thought it more appropriate to use a revel rather than Mr. Reference - I gave him the day off.
Hope you like it!
See you soon!
zontar
Joined: August 27, 2006
KitMaker: 1,646 posts
Armorama: 1,557 posts
Posted: Friday, November 16, 2012 - 03:36 PM UTC
Nice!! Are you going to label the music too? This is awesome Victor. Keep it up.
Happy Modeling, -zon
Happy Modeling, -zon
1stjaeger

Joined: May 20, 2011
KitMaker: 1,744 posts
Armorama: 1,727 posts

Posted: Wednesday, November 21, 2012 - 10:17 AM UTC
it's hard to stop once you're fully into it, isn't it!!
Fantastic!! Never seen anything like it!!
Keep posting....please!!!!!!!!!
Cheers
Romain
Fantastic!! Never seen anything like it!!
Keep posting....please!!!!!!!!!
Cheers
Romain

JeepLC
Joined: June 20, 2007
KitMaker: 510 posts
Armorama: 469 posts

Posted: Wednesday, November 21, 2012 - 10:51 AM UTC
This is amazing still. Your attention to detail and craftsmanship is unreal.
One suggestion though, I know you probably have a million other tasks before thinking of this, but don't forget trash. One thing that always gets me on dioramas is the cleanliness and organization of everything. Trash, especially in warzones/third world, is everywhere. Just a thought that I am sure you haven't overlooked.
-Mike
jrutman
Joined: April 10, 2011
KitMaker: 7,941 posts
Armorama: 7,934 posts
Posted: Thursday, November 22, 2012 - 04:13 AM UTC
Brilliant detail!! OK,fire up that boombox and put on some Coldplay!
J
J
callmehobbes

Joined: April 17, 2005
KitMaker: 751 posts
Armorama: 740 posts
Posted: Thursday, November 22, 2012 - 08:44 PM UTC
The CD box has to be the best bit of diorama detailing I've seen. Great stuff!
 |

WEB HOSTING BY


Copyright ©2021 Armorama and Kitmaker Network, a subsidiary of Silver Star Enterprises
All Rights Reserved. Please read our Conditions of Use and Privacy Policy.
All Rights Reserved. Please read our Conditions of Use and Privacy Policy.