

I'm new to modelling but I've 'wasted' countless hours looking at stuff like this online, this my friend is single handedly the most impressive work I have seen!!!!
You are a god of the modelling world in my eyes, you have put put more thought and work into a small RPG box than some put into a full completed tank. You are a extremely talented guy and I can not wait to see this finished. In fact just watching this come together is interesting enough! You have inspired me with my modelling, thank you.
Hosted by Darren Baker
An ambitious project

bronzey

Joined: January 06, 2012
KitMaker: 300 posts
Armorama: 256 posts

Posted: Monday, August 06, 2012 - 10:03 AM UTC

Plasticbattle

#003

Joined: May 14, 2002
KitMaker: 9,763 posts
Armorama: 7,444 posts

Posted: Monday, August 06, 2012 - 10:32 AM UTC
Hi Victor. Its been some time since I was in on your thread and Ive thouroughly enjoyed reading this from the start tonight. Not only is your scratchbuilding good, its also very inventive. The building looks awesome, and I can only imagine how good it will be when completed. 


olivato

Joined: August 16, 2005
KitMaker: 127 posts
Armorama: 107 posts
Posted: Tuesday, August 07, 2012 - 02:03 PM UTC
Hi everyone!
Jeremy: Yes, this post started with the intension of sharing my work and it has become something much bigger than I ever imagined, and I´m deeply thankful for that. Thank you for still following my work.
Edson: Thanks for this incredible support. Every feedback I receive encourages me to keep working on and on, until I finish it. Un fuerte abrazo y gracias por tus palabras!
John: Thanks for the advice and the link, I will follow this huge project, it´s very interesting.
However, it is a much more ambitious project than mine, and with a bigger budget...
I think he was very inspired by the master work of Adam Lehmann "That Aussie's in Iraq Diorama, 2006".
Thanks again and I appreciate your interest in my work.
Alex: Thank you very much for your kind and encouraging words, this means a lot to me. Here in Armorama there are a lot of brilliant modelers, with incredible works, and if you want to see something really unbelievable (and I think most, not to say all, the modelers agree) look for the work of Claude Joachim and his Clervaux Castle. Thanks again and if this post has helped or inspired you in some way, that makes me really happy.
Frank: Thank you very much for taking your time to follow my project. Not all the solutions come from my head, some come from the head of others that share their work, and that´s why I want to share this, to help others with new ideas as well.
I took a little break. In my country it was time for winter holidays, and my elder daughter (she is seven years old) one day told me "Daddy, you spend all your time with your little soldiers!!!", and this was a warning signal...
So, we spent some days in a house we have in the countryside, where we spend our summers too, and share time in family.
Now we are back and I can continue with my project but still spending time with my daughters, before they tell me off again.
These are two more little project I have finished.
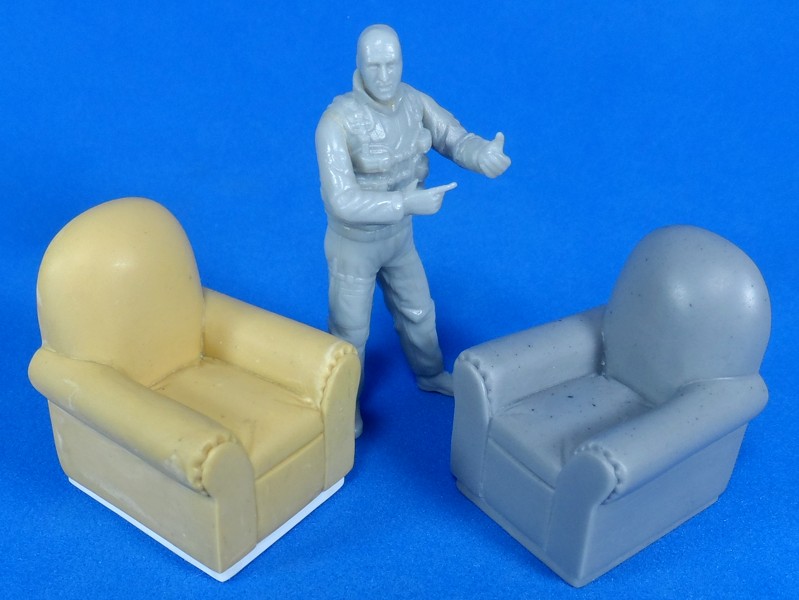
This is the same piece of furniture you have already seen, but this is the copy in resin, an lucky for me, everything fits ok.
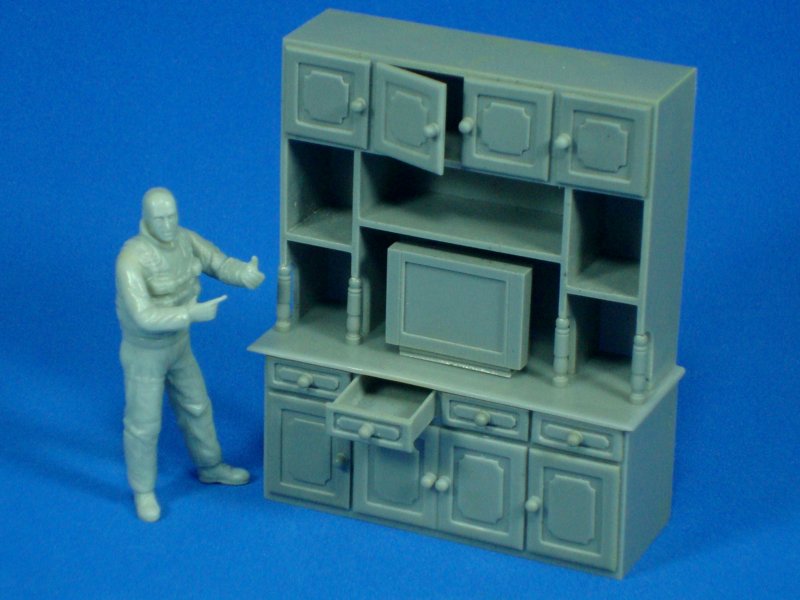
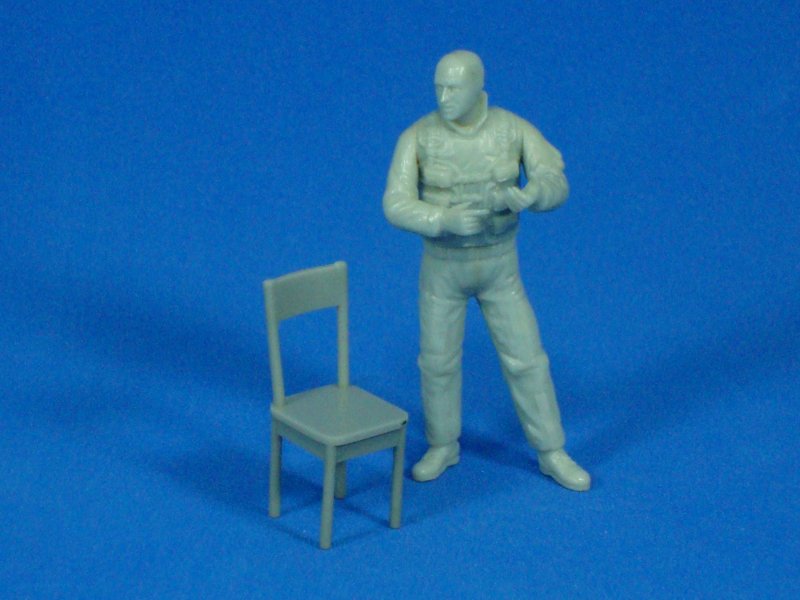
The chair is simple, but it´s good for my rebels. I has to make the seat again because the first one was very small.
I´m making other things I´m going to show in the future post.
See you soon!!!
Jeremy: Yes, this post started with the intension of sharing my work and it has become something much bigger than I ever imagined, and I´m deeply thankful for that. Thank you for still following my work.
Edson: Thanks for this incredible support. Every feedback I receive encourages me to keep working on and on, until I finish it. Un fuerte abrazo y gracias por tus palabras!
John: Thanks for the advice and the link, I will follow this huge project, it´s very interesting.
However, it is a much more ambitious project than mine, and with a bigger budget...
I think he was very inspired by the master work of Adam Lehmann "That Aussie's in Iraq Diorama, 2006".
Thanks again and I appreciate your interest in my work.
Alex: Thank you very much for your kind and encouraging words, this means a lot to me. Here in Armorama there are a lot of brilliant modelers, with incredible works, and if you want to see something really unbelievable (and I think most, not to say all, the modelers agree) look for the work of Claude Joachim and his Clervaux Castle. Thanks again and if this post has helped or inspired you in some way, that makes me really happy.
Frank: Thank you very much for taking your time to follow my project. Not all the solutions come from my head, some come from the head of others that share their work, and that´s why I want to share this, to help others with new ideas as well.
I took a little break. In my country it was time for winter holidays, and my elder daughter (she is seven years old) one day told me "Daddy, you spend all your time with your little soldiers!!!", and this was a warning signal...
So, we spent some days in a house we have in the countryside, where we spend our summers too, and share time in family.
Now we are back and I can continue with my project but still spending time with my daughters, before they tell me off again.
These are two more little project I have finished.
This is the same piece of furniture you have already seen, but this is the copy in resin, an lucky for me, everything fits ok.
The chair is simple, but it´s good for my rebels. I has to make the seat again because the first one was very small.
I´m making other things I´m going to show in the future post.
See you soon!!!

olivato
Joined: August 16, 2005
KitMaker: 127 posts
Armorama: 107 posts
Posted: Wednesday, August 08, 2012 - 11:11 AM UTC
Hi everyone!!!
Another thing has come to its end.
Let´s have a little game... scroll down, look at the pictures, and try to guess what this is...
If you have reached this point and still don´t know what it is... I can only give you my sincere apologies for such a bad construction...
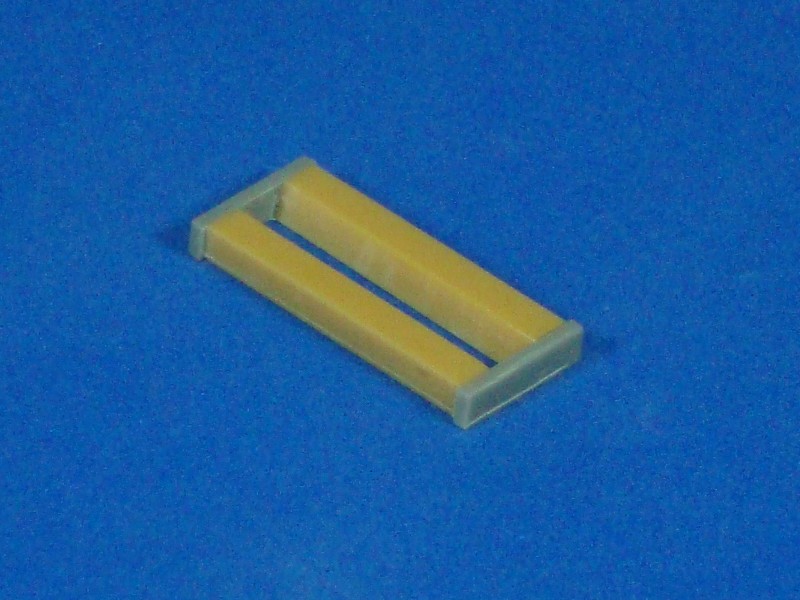
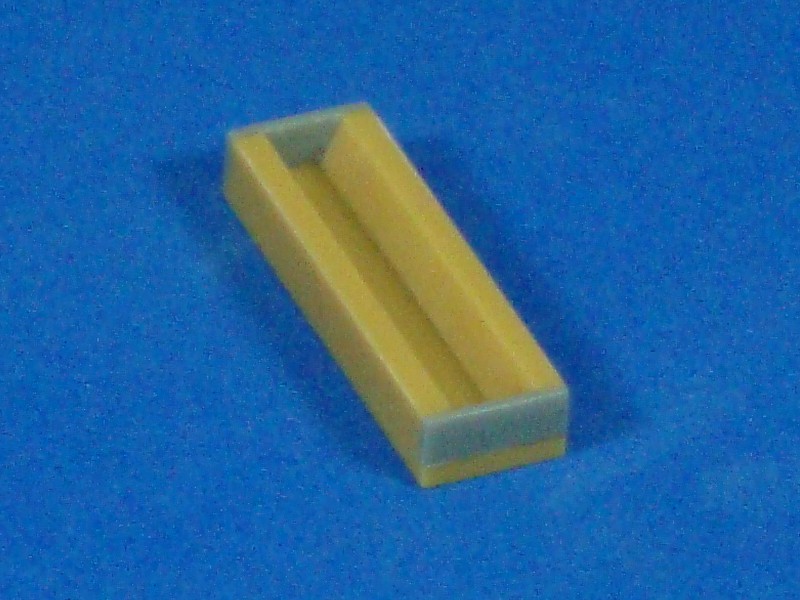
Sorry, jokes aside, from this one, I'm going to make other fluorescent ceiling light (is it the right word?) with two and tree fluorescent tubes. (I'm going to make copies and glue them side by side)
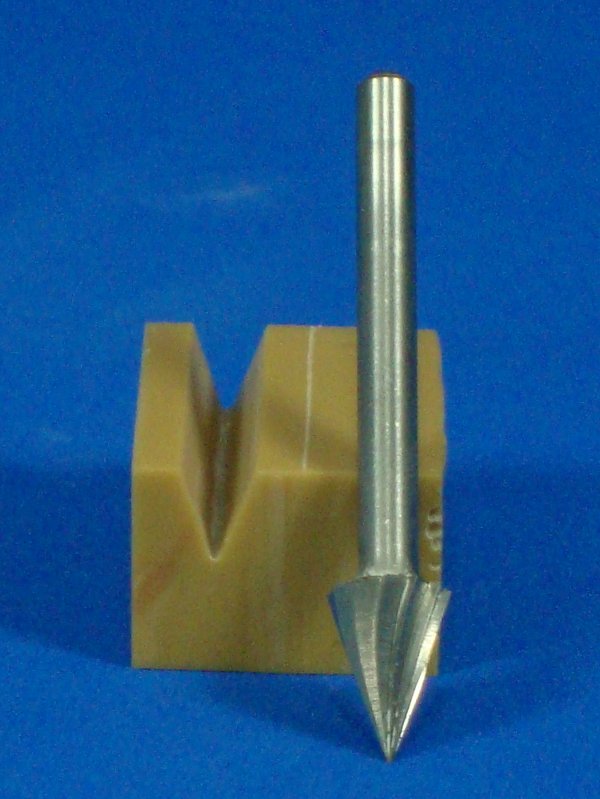
For this construction I have only used the Dremel tool I showed in the first picture and the rest was with the cut disc and sandpaper.
The little details are from plasticard and some resin leftovers.
The fluorescent tube comes from the same piece of resin I used for the RPG head, but I had to make it larger.
Sometimes, out of some things I make many more copies than I actually need because I think they can be useful for other projects.
See you soon!!!
Another thing has come to its end.
Let´s have a little game... scroll down, look at the pictures, and try to guess what this is...
If you have reached this point and still don´t know what it is... I can only give you my sincere apologies for such a bad construction...
Sorry, jokes aside, from this one, I'm going to make other fluorescent ceiling light (is it the right word?) with two and tree fluorescent tubes. (I'm going to make copies and glue them side by side)
For this construction I have only used the Dremel tool I showed in the first picture and the rest was with the cut disc and sandpaper.
The little details are from plasticard and some resin leftovers.
The fluorescent tube comes from the same piece of resin I used for the RPG head, but I had to make it larger.
Sometimes, out of some things I make many more copies than I actually need because I think they can be useful for other projects.
See you soon!!!
olivato
Joined: August 16, 2005
KitMaker: 127 posts
Armorama: 107 posts
Posted: Tuesday, August 28, 2012 - 03:19 PM UTC
Hi everyone!!!
In these days I'm going to show some of the things I have been working on.
Some of the things are in the final stage (sanding, adjusting, etc) and others are finished.
When I finished the terrace, I told you about a parabolic antenna, but with the soldiers, the RPG box, and the debris, the scene is going to be stuffy, so I changed my original idea for an individual parabolic antenna on each floor.
The parabolic antenna became another fun project. Searching photos on internet, scaling, and finally seeing the result, was really fun.
The antenna was made with the bench late as the feed and the pole.
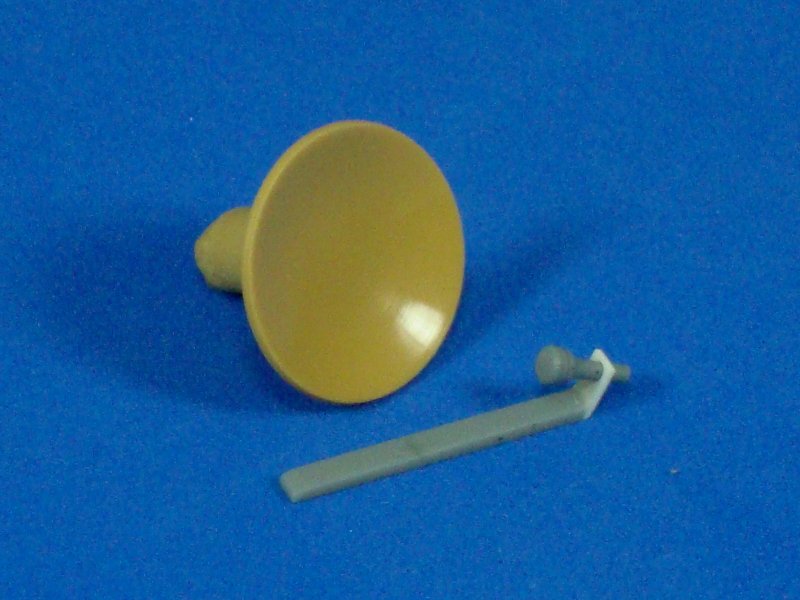
I have to made two supports, one to support the antenna and another to attach it to the wall.
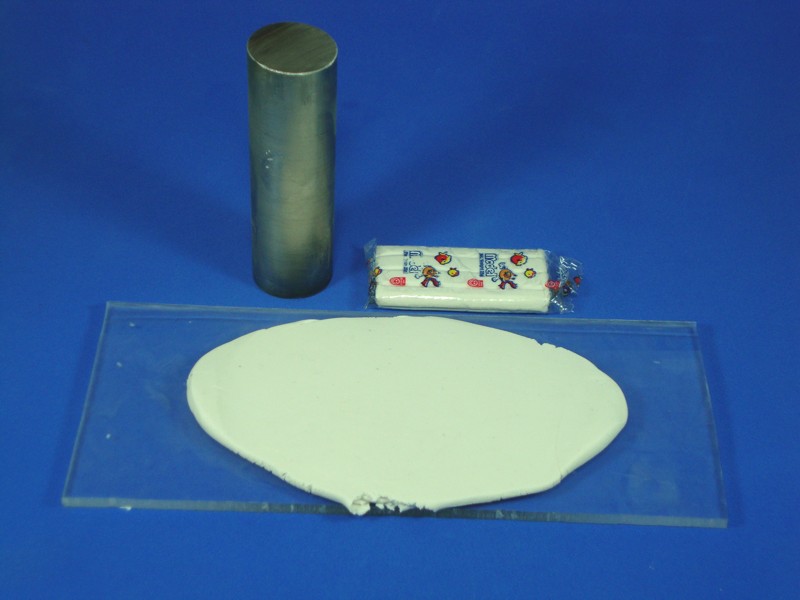
The method to make this support was the same. I started with a piece of resin.
I made a stencil of plastic to transfer the shape on both sides of the piece.
I sanded it to reach the shape, and in the end, with Dremel´s cute disk I made the groove. Finally, I glued the plasticard and sanded everything.
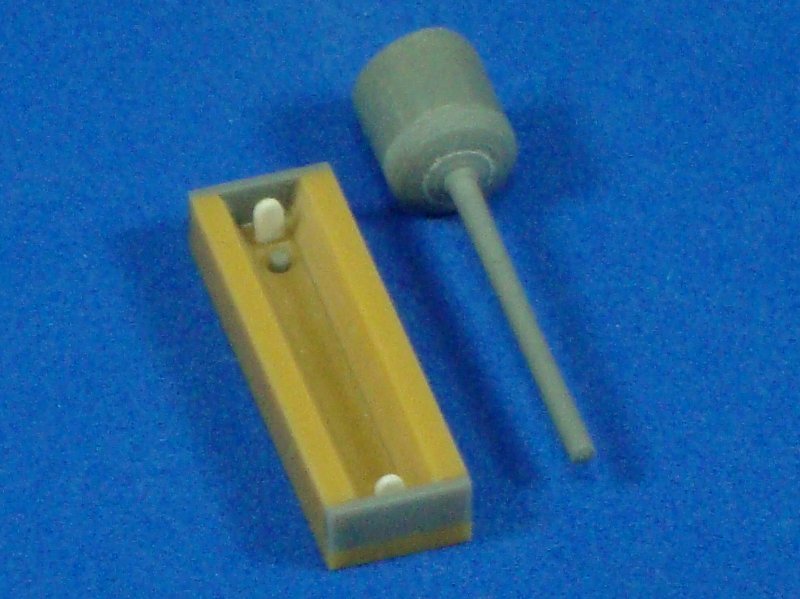
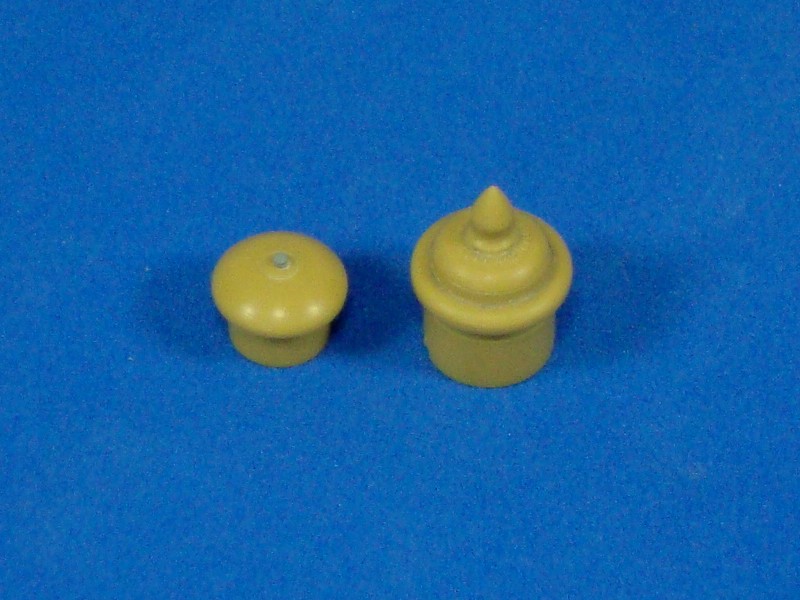
On the first picture you can see the chunk of resin I used to sculpt the parabolic.
In the end, I cut this chunk but I need to hold the parabolic from somewhere to give this part its shape.
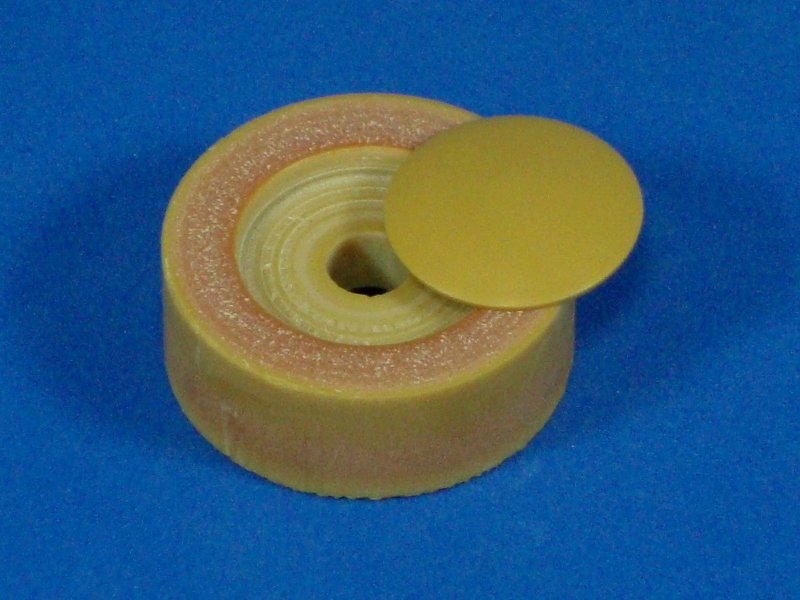
So, I made this cylinder with a hole to put the parabolic inside and sanded this final part. The hole in the middle was in case the antenna got stuck, so I could put a stick and push it to unstuck it.
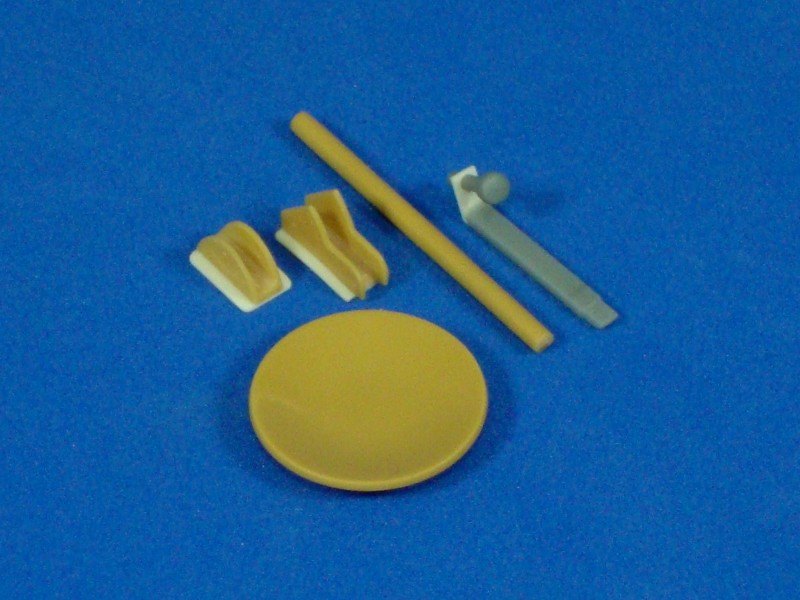
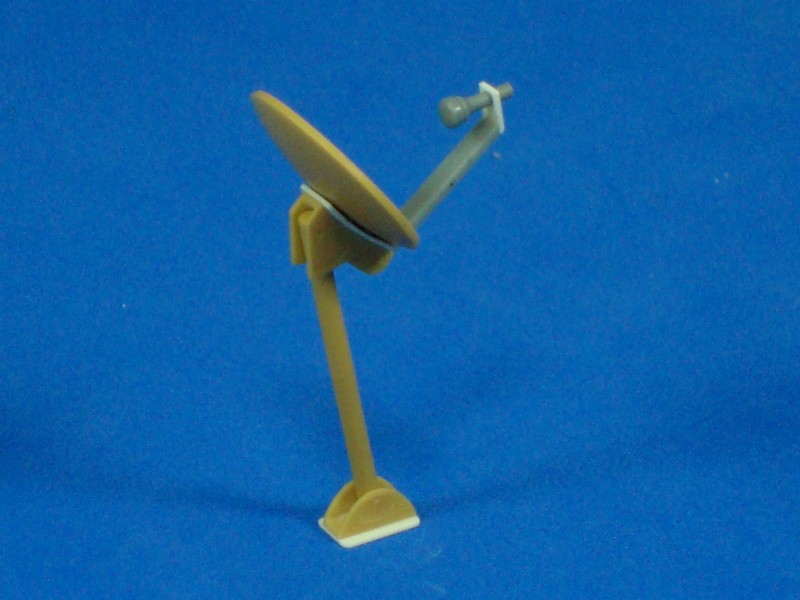
I still have to bend the pole a little on one end, but first I am going to make a mold of this piece, as I think it may be useful for future projects, such as the RPG head.
I made these two lamps (for the ceiling) for the 3th floor, a more sophisticated one for the living-room, and another for the kitchen, much more simple.
A picture with Mr. reference.
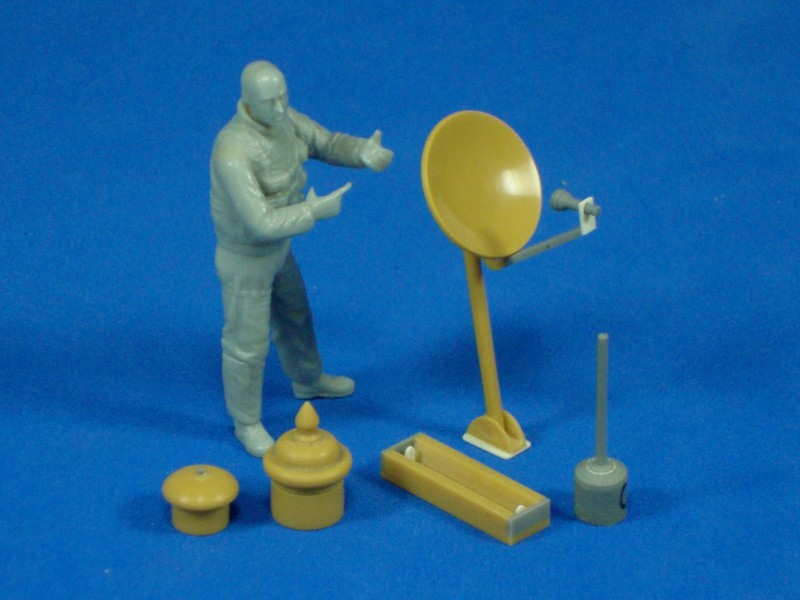
More to come, so... see you soon!!!
In these days I'm going to show some of the things I have been working on.
Some of the things are in the final stage (sanding, adjusting, etc) and others are finished.
When I finished the terrace, I told you about a parabolic antenna, but with the soldiers, the RPG box, and the debris, the scene is going to be stuffy, so I changed my original idea for an individual parabolic antenna on each floor.
The parabolic antenna became another fun project. Searching photos on internet, scaling, and finally seeing the result, was really fun.
The antenna was made with the bench late as the feed and the pole.
I have to made two supports, one to support the antenna and another to attach it to the wall.
The method to make this support was the same. I started with a piece of resin.
I made a stencil of plastic to transfer the shape on both sides of the piece.
I sanded it to reach the shape, and in the end, with Dremel´s cute disk I made the groove. Finally, I glued the plasticard and sanded everything.
On the first picture you can see the chunk of resin I used to sculpt the parabolic.
In the end, I cut this chunk but I need to hold the parabolic from somewhere to give this part its shape.
So, I made this cylinder with a hole to put the parabolic inside and sanded this final part. The hole in the middle was in case the antenna got stuck, so I could put a stick and push it to unstuck it.
I still have to bend the pole a little on one end, but first I am going to make a mold of this piece, as I think it may be useful for future projects, such as the RPG head.
I made these two lamps (for the ceiling) for the 3th floor, a more sophisticated one for the living-room, and another for the kitchen, much more simple.
A picture with Mr. reference.
More to come, so... see you soon!!!
jrutman

Joined: April 10, 2011
KitMaker: 7,941 posts
Armorama: 7,934 posts
Posted: Wednesday, August 29, 2012 - 02:57 AM UTC
I really love all of the little details that you are scratchbuilding here.
J
J
olivato
Joined: August 16, 2005
KitMaker: 127 posts
Armorama: 107 posts
Posted: Sunday, September 02, 2012 - 01:14 PM UTC
Hi everyone!!!
Jerry: Thank you very much for your words. I have great fan scratchbuilding things. I'm sure there are much better things in resin aftermarket, but I enjoy every minute I spend in the process to make a piece. Thanks for seeing my work.
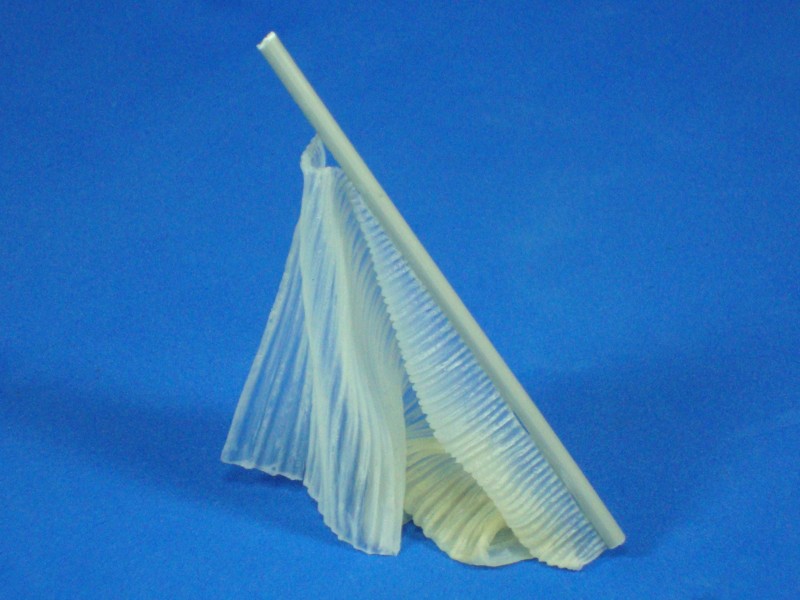
I wanted to make a curtain, so I came up with this method...
I thought of sculpting a curtain over plasticine, and then making it with white glue.
First I marked the window frame over the plasticine, so as to know the size of the curtain.
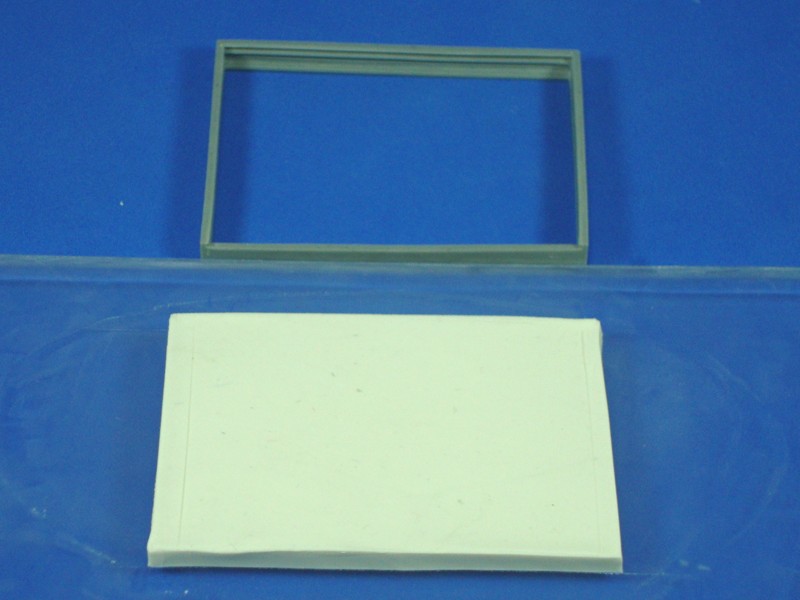
Then, with these two simple elements (a toothpick and an awl) I sculpted the fabric over the plasticine.
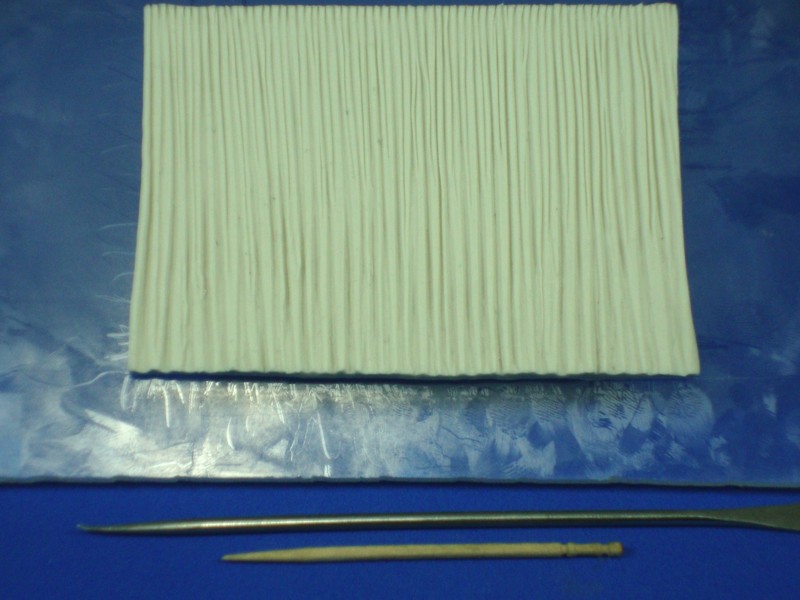
Finally I brushed some unmolding over the plasticine and then I started to put layers of white glue.
I used about 8 layers of white glue to make the curtain hard enough and the result is this.
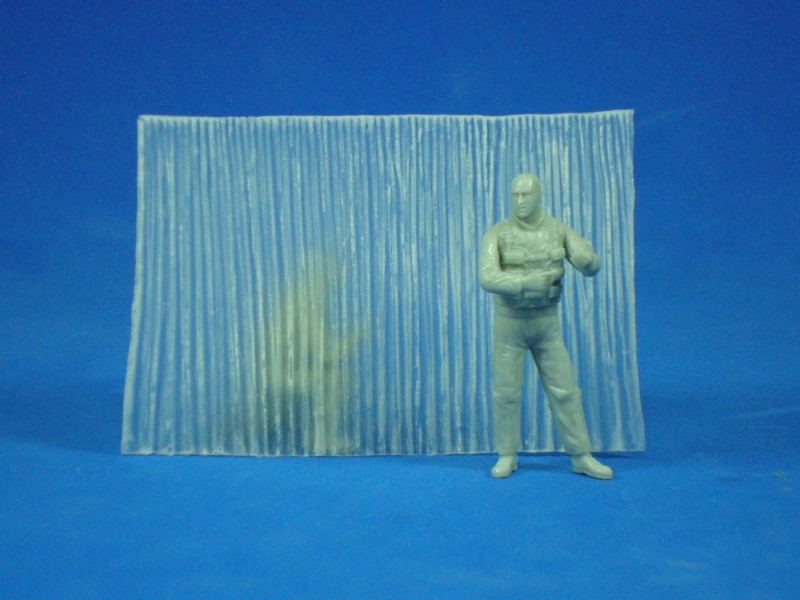
It´s ok for me. I think I can reproduce the movement of the fabric and the transparency of a curtain.
In the picture you can see I put another soldier behind the curtain to show the characteristic transparency.
This is another door for my kitchen furniture. I made the groove with the Dremel´s cut disk, and the two little lines with this compass.
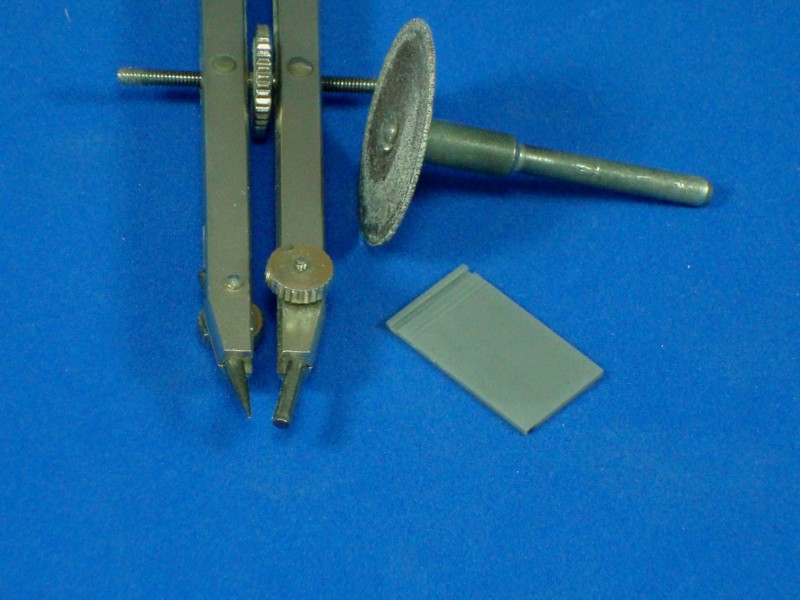
Another door too.
I marked an internal frame with the compass.
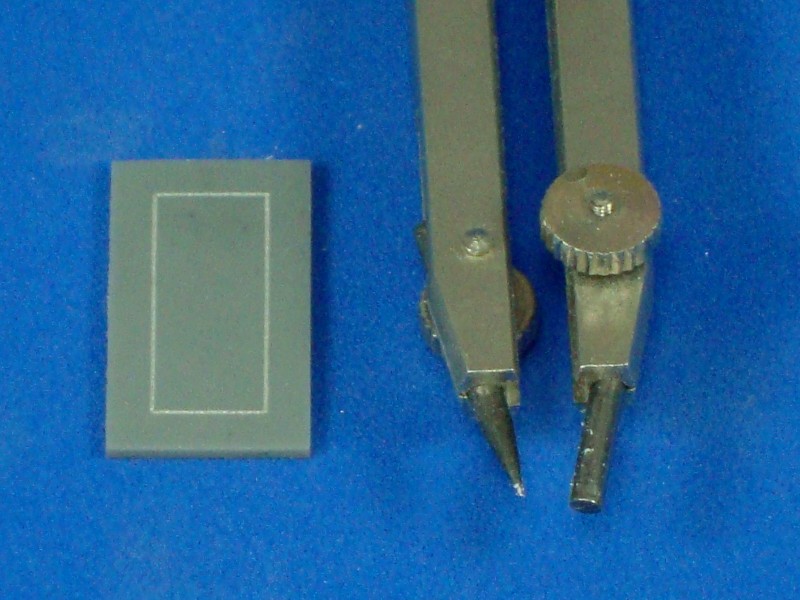
Then I made it deeper and wider with these blades I show in the pictures.
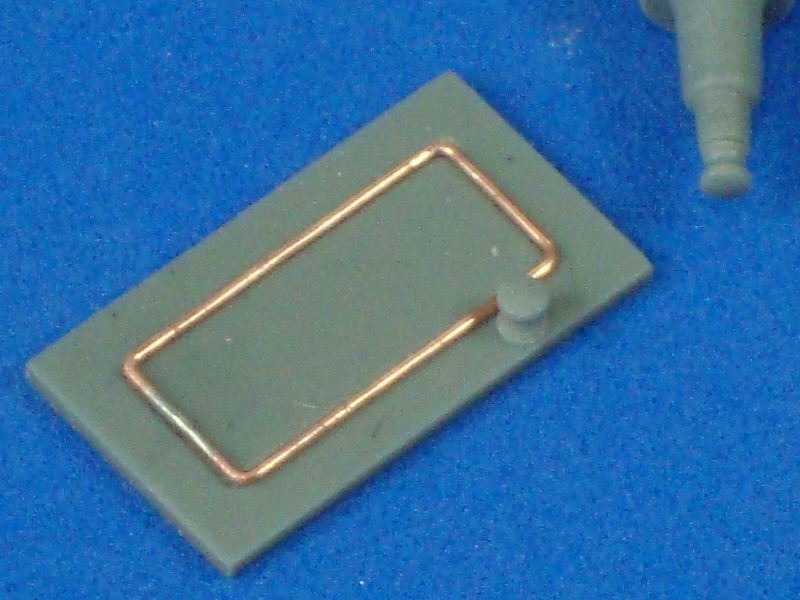
I made a frame of wire to put half inside the groove.
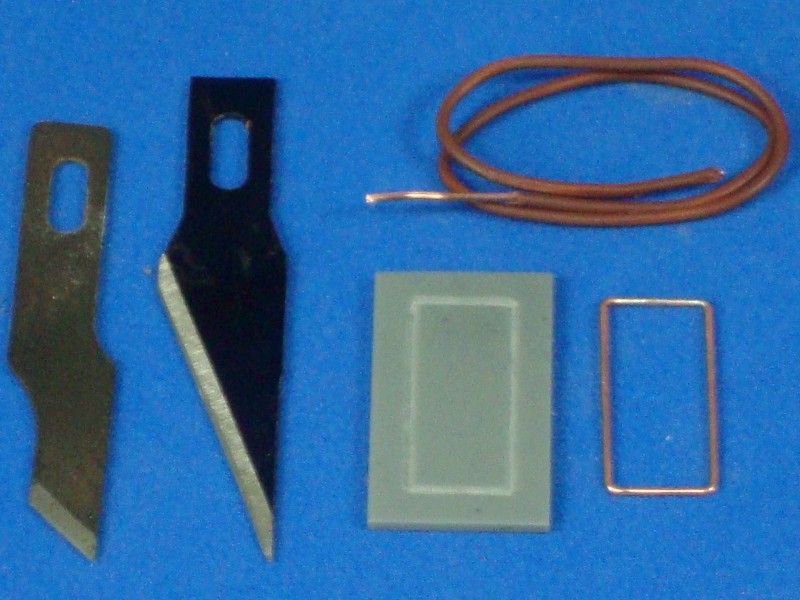
Finally I glued the wire frame and the handler I made in a previous post.
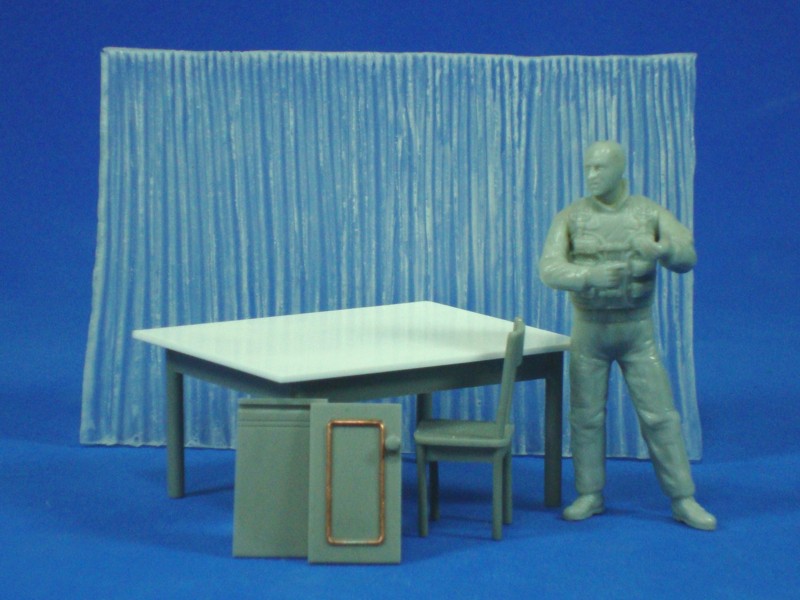
As the method to make a chair was good, I repeated it to make a simple table.
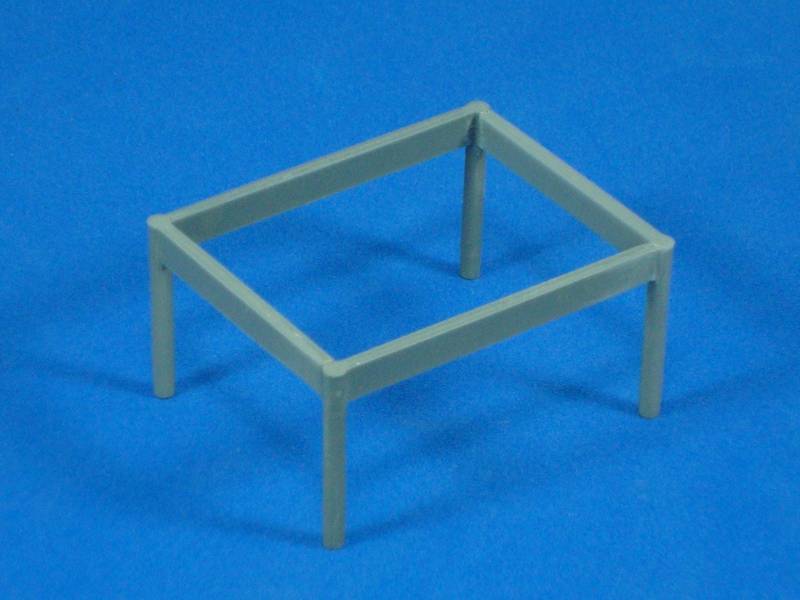
Finally a picture for reference.
More to come... see you soon!!!
Jerry: Thank you very much for your words. I have great fan scratchbuilding things. I'm sure there are much better things in resin aftermarket, but I enjoy every minute I spend in the process to make a piece. Thanks for seeing my work.
I wanted to make a curtain, so I came up with this method...
I thought of sculpting a curtain over plasticine, and then making it with white glue.
First I marked the window frame over the plasticine, so as to know the size of the curtain.
Then, with these two simple elements (a toothpick and an awl) I sculpted the fabric over the plasticine.
Finally I brushed some unmolding over the plasticine and then I started to put layers of white glue.
I used about 8 layers of white glue to make the curtain hard enough and the result is this.
It´s ok for me. I think I can reproduce the movement of the fabric and the transparency of a curtain.
In the picture you can see I put another soldier behind the curtain to show the characteristic transparency.
This is another door for my kitchen furniture. I made the groove with the Dremel´s cut disk, and the two little lines with this compass.
Another door too.
I marked an internal frame with the compass.
Then I made it deeper and wider with these blades I show in the pictures.
I made a frame of wire to put half inside the groove.
Finally I glued the wire frame and the handler I made in a previous post.
As the method to make a chair was good, I repeated it to make a simple table.
Finally a picture for reference.
More to come... see you soon!!!
Jester_ops
Joined: September 06, 2011
KitMaker: 12 posts
Armorama: 11 posts
Posted: Sunday, September 02, 2012 - 01:55 PM UTC
Hello,
Looking great so far. Can't wait to see the end results.
Looking great so far. Can't wait to see the end results.
Pops53
Joined: November 05, 2011
KitMaker: 100 posts
Armorama: 98 posts
Posted: Sunday, September 02, 2012 - 04:05 PM UTC
Seeing several of the photos above, all I can think of is:
"Gee, Wayne --- I'll take what's behind curtain Number 2!"
"Well, Mrs. Peterson, you've won yourself a new CROUCHING I.E.D.-EMPLACEMENT TERRORIST!"

"Gee, Wayne --- I'll take what's behind curtain Number 2!"
"Well, Mrs. Peterson, you've won yourself a new CROUCHING I.E.D.-EMPLACEMENT TERRORIST!"
eldestina

Joined: September 03, 2012
KitMaker: 1 posts
Armorama: 1 posts

Posted: Sunday, September 02, 2012 - 06:28 PM UTC
Great work. =)

1967er

Joined: March 12, 2012
KitMaker: 224 posts
Armorama: 201 posts
Posted: Sunday, September 02, 2012 - 06:40 PM UTC
Man, your work is awesome.
The idea for the curtain - amazing.
I am really curious for the completed and painted artwork.
(naming it a simple diorama does not come up with what you are doing here)
best regards
Thomas
The idea for the curtain - amazing.
I am really curious for the completed and painted artwork.
(naming it a simple diorama does not come up with what you are doing here)
best regards
Thomas
olivato
Joined: August 16, 2005
KitMaker: 127 posts
Armorama: 107 posts
Posted: Monday, September 03, 2012 - 12:33 PM UTC
Hi!!!
Robert: Thank you very much for taking your time to see my work.
Fred: You always add a nice sense of humor to this thread, thanks for that and the support.
Dmitry: Thank you for making your first post on my work, and welcome to the Armorama community.
Thomas: Thanks for following my project, and your kind words about my work. This is a long time project, even more than imagined with the scratchbuild things I'm making... please by patient. I expect to finish all the things I've projected for the 3rd floor by the weekend.
One more thing about the curtain.
If you heat it with a heating gun or whatever you have, you can give it the shape you want, and when it goes cold it gets hard but be carefully, don´t heat it too much because you may burn it or make it yellowish.
See you soon!!!

Lagumiles
Joined: December 30, 2003
KitMaker: 156 posts
Armorama: 135 posts
KitMaker: 156 posts
Armorama: 135 posts
Posted: Tuesday, September 04, 2012 - 08:43 PM UTC
Awsome what else to say. You are great!
p.s. Maybe you can achieve a better transparency of the curtain putting it into the Future wax
Moreno
p.s. Maybe you can achieve a better transparency of the curtain putting it into the Future wax
Moreno


Hisham

Joined: July 23, 2004
KitMaker: 6,856 posts
Armorama: 6,363 posts
Posted: Wednesday, September 05, 2012 - 01:14 AM UTC
Hey, Victor.. nice to see you at it again!
I love everything you're making.. and still hoping you start casting some for sale
The way you did that curtain is ingenious.. and it really looks good... what do you do for a living.. are you an idea man?
Looking forward to seeing more installments.
Hisham
I love everything you're making.. and still hoping you start casting some for sale
The way you did that curtain is ingenious.. and it really looks good... what do you do for a living.. are you an idea man?
Looking forward to seeing more installments.
Hisham
olivato
Joined: August 16, 2005
KitMaker: 127 posts
Armorama: 107 posts
Posted: Saturday, October 20, 2012 - 02:43 PM UTC
Hi everyone!!!
Moreno: Thanks for the compliments. I remember when you and Chuck gave me this tip, but I like this level of transparency. Anyway I can try and compare what works better for the curtain. Thanks.
Hisham: "Idea man"? I don´t know what that is, but every time I say to my wife "I have an idea!" she runs away saying "Nooooo"... does it count for this concept? Sincerely thank you for the support.
Unfortunally, a couple of things out of the modelism world have kept me busy and I can´t go so fast as I want.
I have been focused on a couple of details for the 3rd floor, and some of them are really tiny.
I don´t have much techniques for this thing, only lots of patience and liters of chamomile and if you have some techniques for relax or yoga, it would surely help
Of course, a huge magnifier helps a lot.
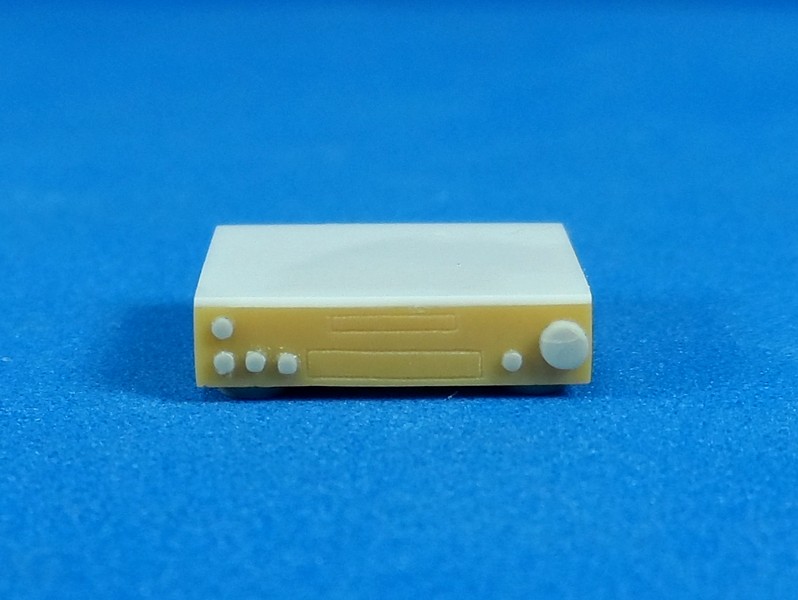
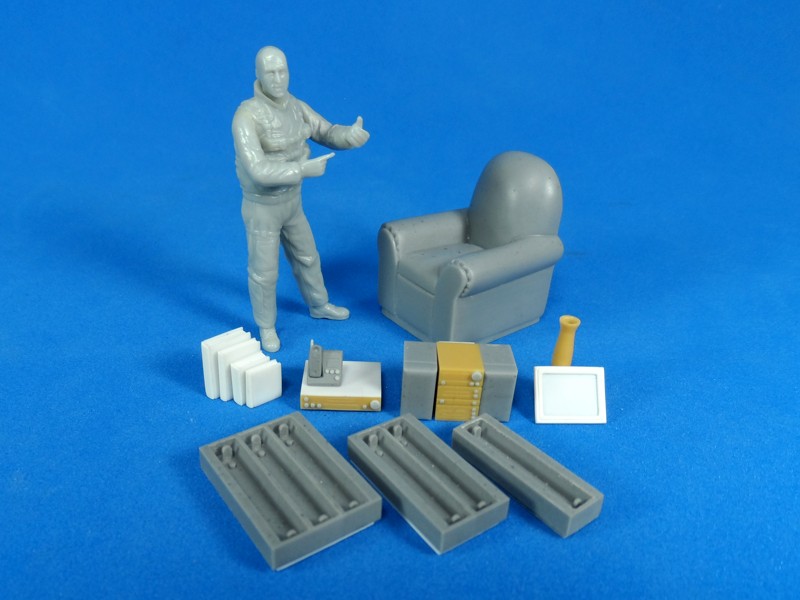
First I want to show a music equipment... It has a radio, a double deck and a CD player... yes, it´s all there, believe me.
Second, a DVD/VCR player
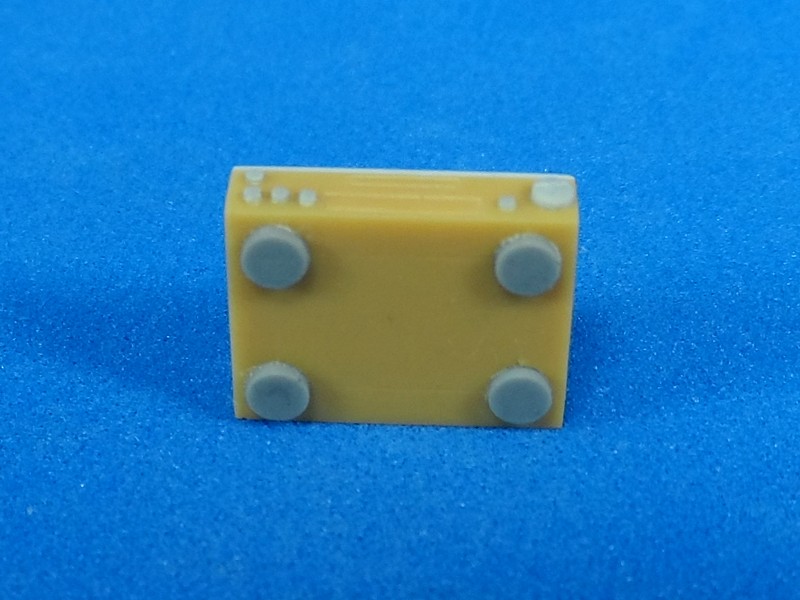
The plasticard on the top is only there because when I made the supporting "legs" I made a mistake when I drilled the holes, so I turned the piece upside down and made it again. To hide the wrong holes I glued this piece of plasticard on.
A vase made, again, with the mini bench late.
A photo frame, in a similar way as I made the doors for the furniture, but in a small scale.
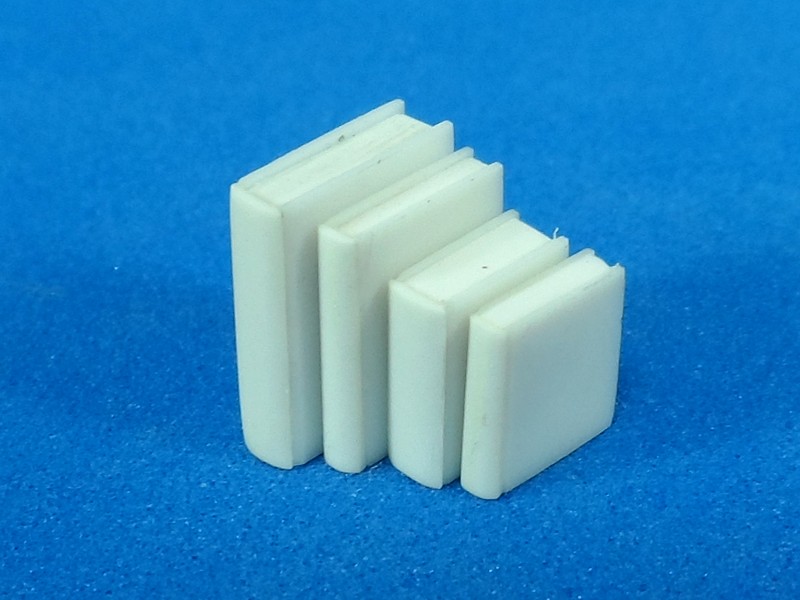
Some books, and here I'll show the step by step.
I use plasticard of 2 and 1 mm for the pages.
The covers are made from a plasticard of 0.25 mm
The spine from a 0.5 mm
The rest is only sand and some lines with a scriber.
Finally I have the copies of the fluorescent light and can make more of them with 2 and 3 fluorescent tubes.

I have been able to make the armchair again, I used the same method as before and this time it looks more normal than the last time...
To make this mold (and not destroy everything again!!!) I made some changes in my compressor pod and converted it in a vacuum chamber. So, now I have the two systems in the same pod.
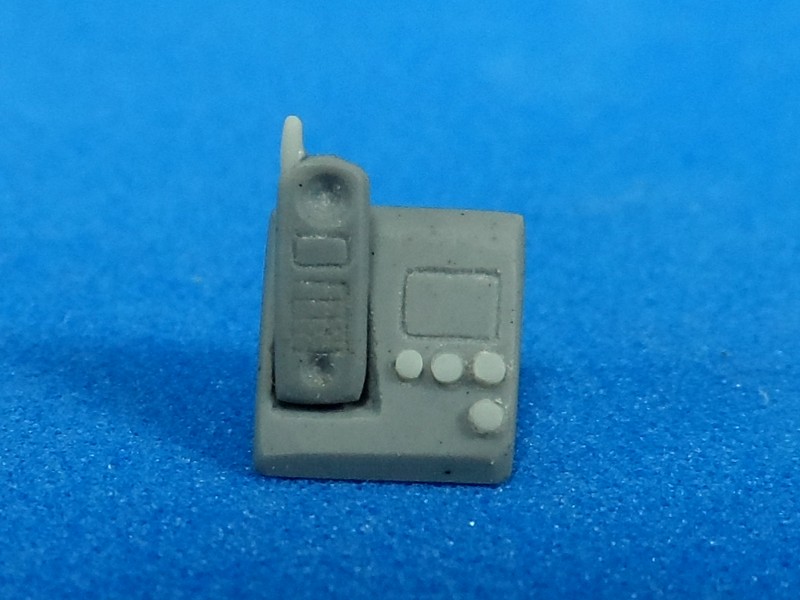
And last, but not least... the tinniest thing I've ever made... a telephone.
To put everything in perspective, a picture with Mr. Reference.
While I was working on these little things I felt the buttons on the electronic devices were fine, but when I took the pictures I realized they are a little bit out of proportions...
I have been thinking about a solution for that, so I've thought if putting up some billboard saying "Problems with those little buttons, Victor Electronic Line, right for your big fat fingers!"...
Ok, jokes aside, the solution was to make the mold and on the copy sand these buttons and make a new one, smaller, about 0.3mm... let's see if it works.
What I'm going to do now is to place all these pieces where I originally planned to in my sketches and check whether this layout works well or if I need to make some changes.
See you soon!
Moreno: Thanks for the compliments. I remember when you and Chuck gave me this tip, but I like this level of transparency. Anyway I can try and compare what works better for the curtain. Thanks.
Hisham: "Idea man"? I don´t know what that is, but every time I say to my wife "I have an idea!" she runs away saying "Nooooo"... does it count for this concept?
Sincerely thank you for the support.Unfortunally, a couple of things out of the modelism world have kept me busy and I can´t go so fast as I want.
I have been focused on a couple of details for the 3rd floor, and some of them are really tiny.
I don´t have much techniques for this thing, only lots of patience and liters of chamomile and if you have some techniques for relax or yoga, it would surely help
Of course, a huge magnifier helps a lot.
First I want to show a music equipment... It has a radio, a double deck and a CD player... yes, it´s all there, believe me.
Second, a DVD/VCR player
The plasticard on the top is only there because when I made the supporting "legs" I made a mistake when I drilled the holes, so I turned the piece upside down and made it again. To hide the wrong holes I glued this piece of plasticard on.
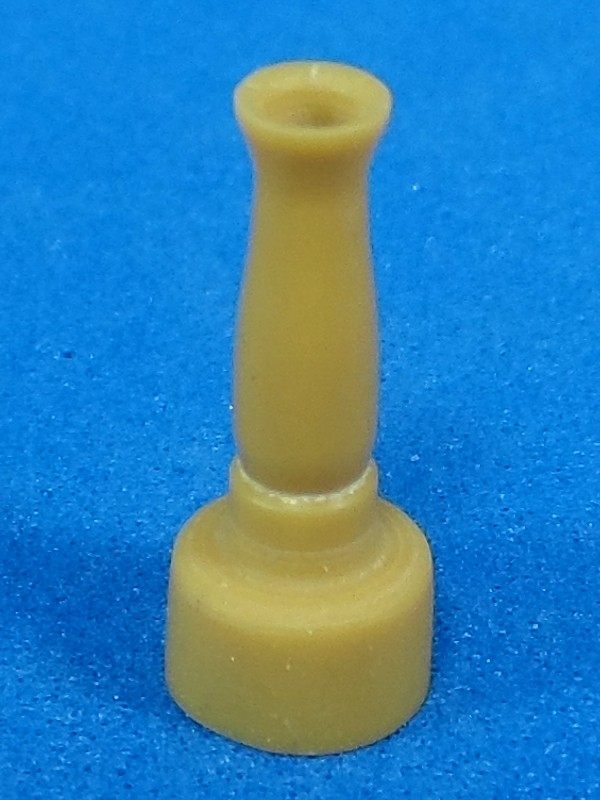
A vase made, again, with the mini bench late.
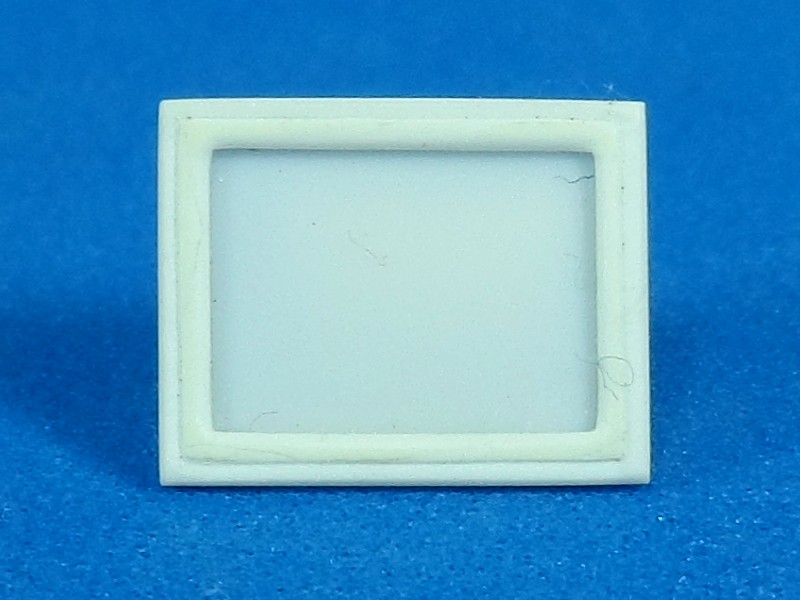
A photo frame, in a similar way as I made the doors for the furniture, but in a small scale.
Some books, and here I'll show the step by step.
I use plasticard of 2 and 1 mm for the pages.
The covers are made from a plasticard of 0.25 mm
The spine from a 0.5 mm
The rest is only sand and some lines with a scriber.
Finally I have the copies of the fluorescent light and can make more of them with 2 and 3 fluorescent tubes.
I have been able to make the armchair again, I used the same method as before and this time it looks more normal than the last time...
To make this mold (and not destroy everything again!!!) I made some changes in my compressor pod and converted it in a vacuum chamber. So, now I have the two systems in the same pod.
And last, but not least... the tinniest thing I've ever made... a telephone.
To put everything in perspective, a picture with Mr. Reference.
While I was working on these little things I felt the buttons on the electronic devices were fine, but when I took the pictures I realized they are a little bit out of proportions...
I have been thinking about a solution for that, so I've thought if putting up some billboard saying "Problems with those little buttons, Victor Electronic Line, right for your big fat fingers!"...
Ok, jokes aside, the solution was to make the mold and on the copy sand these buttons and make a new one, smaller, about 0.3mm... let's see if it works.
What I'm going to do now is to place all these pieces where I originally planned to in my sketches and check whether this layout works well or if I need to make some changes.
See you soon!

xsoft_ej

Joined: March 21, 2009
KitMaker: 18 posts
Armorama: 17 posts
Posted: Saturday, October 20, 2012 - 04:42 PM UTC
as usual a nice job, and glad to see you still doing it....
Plasticbattle
#003
Joined: May 14, 2002
KitMaker: 9,763 posts
Armorama: 7,444 posts
Posted: Saturday, October 20, 2012 - 08:49 PM UTC
Love the curtain .... very smart method ... Im sure this idea will be used for many things in the future, especailly as it can be shaped and hardened again!! Another great tip.
olivato
Joined: August 16, 2005
KitMaker: 127 posts
Armorama: 107 posts
Posted: Thursday, October 25, 2012 - 02:17 PM UTC
Hi!
Edson: Yes, I am determined to finish this project no matter what. Thank you for your constant support.
Frank: I'm glad you like the idea of the curtain. It is actually a very versatile technique. I think it can be used for anything made of fabric. Thanks for following my work.
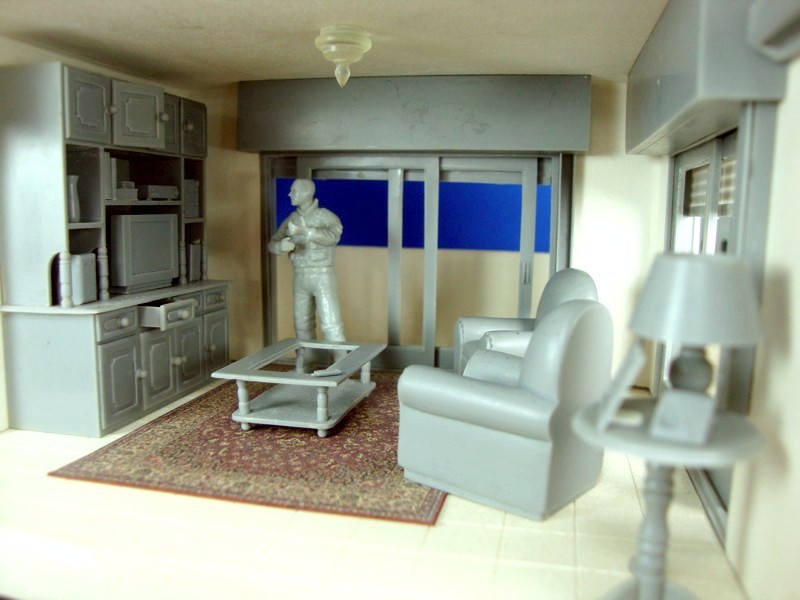
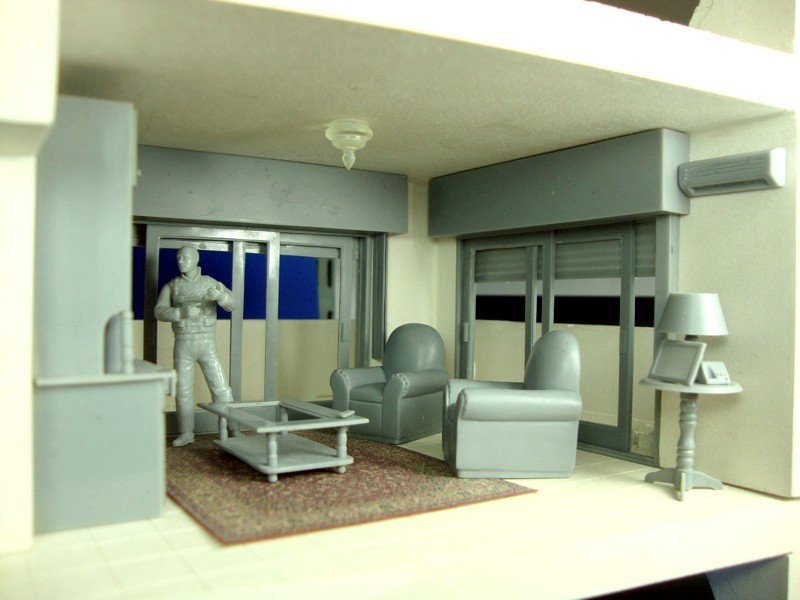
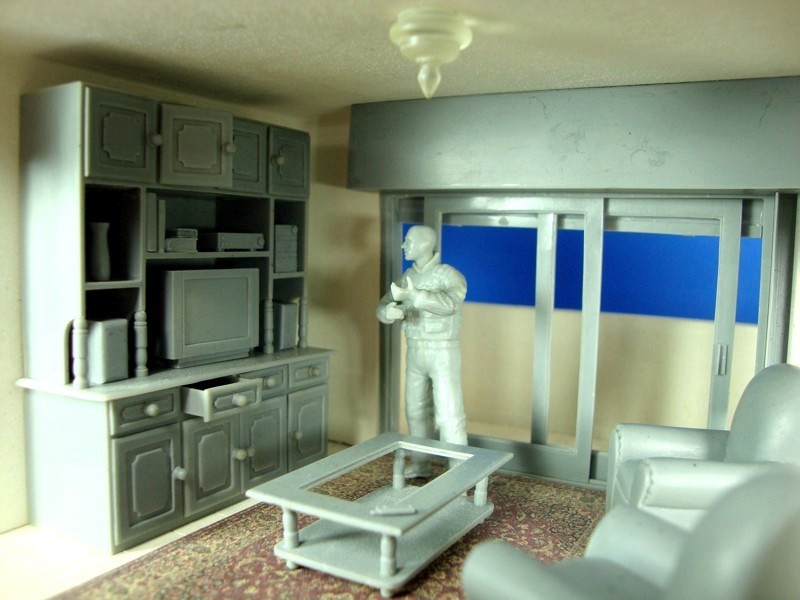
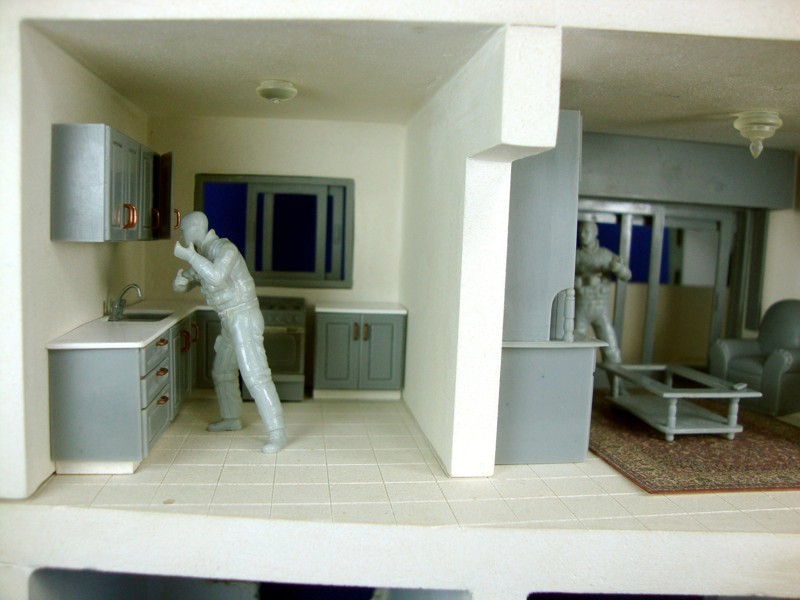
I have been showing you all the individual pieces in isolation, but today I finally have all the pieces that I had imagined for the third floor. Please, let me show how it looks when you put everything together.
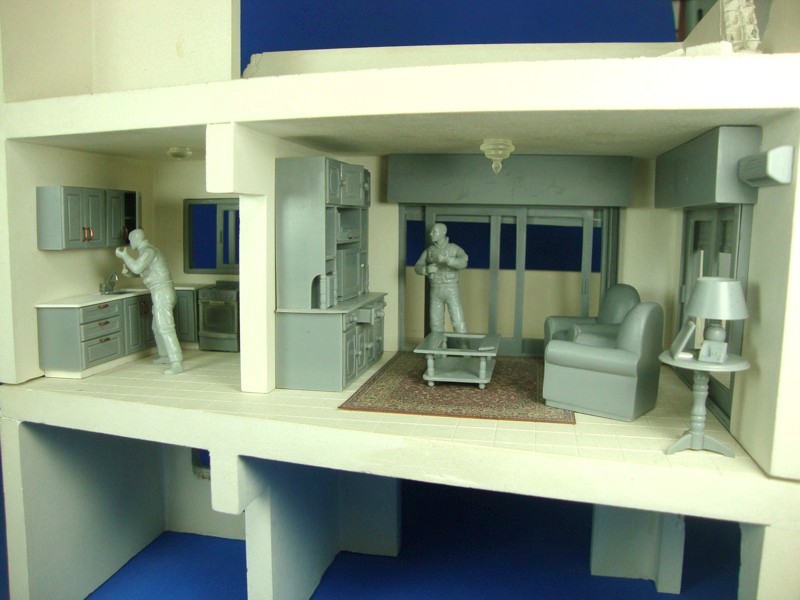

I still need to add some debris from the ceiling in the areas where there were explosions on the rooftop.
I will now focus on the second floor, but many of the pieces I need are already done. I just need another cupboard and a refrigerator.
I hope you like the third floor!
See you soon!
Edson: Yes, I am determined to finish this project no matter what. Thank you for your constant support.
Frank: I'm glad you like the idea of the curtain. It is actually a very versatile technique. I think it can be used for anything made of fabric. Thanks for following my work.
I have been showing you all the individual pieces in isolation, but today I finally have all the pieces that I had imagined for the third floor. Please, let me show how it looks when you put everything together.
I still need to add some debris from the ceiling in the areas where there were explosions on the rooftop.
I will now focus on the second floor, but many of the pieces I need are already done. I just need another cupboard and a refrigerator.
I hope you like the third floor!
See you soon!

dioman13
Joined: August 19, 2007
KitMaker: 2,184 posts
Armorama: 1,468 posts

Posted: Thursday, October 25, 2012 - 04:55 PM UTC
Hey Victor,I just spent the evening re-reading your build here and I must say that your worst is better than my best. You are very articulate and exacting in your work here. Your attention to detail and comitment leads to superbly done mini projects within the big picture. All the little things of everyday life that you have included are great. Alot of modelers forget these things. The only thing you are missing is the empty McDonalds bag with some french fries that your rebles didn't get a chance to toss in the trash, .This will end up being one of my all time favorites when you complete it. Looking forward to the rest of your build. Thanks for sharing it with us and the detailed how to's.
.This will end up being one of my all time favorites when you complete it. Looking forward to the rest of your build. Thanks for sharing it with us and the detailed how to's.roudeleiw

Joined: January 19, 2004
KitMaker: 2,406 posts
Armorama: 2,224 posts
Posted: Thursday, October 25, 2012 - 06:32 PM UTC
Hi Victor,
I am just back from a weekend on an expo with my diorama where i got so high praise that my head still turns.
Then i come back and i see your scratchbuilding here and i say WOW, i have still a lot to practice to get such nice pieces. Your post was great to put my ego back to earth and questioning some of the things i did lately. (for example very nice food cans with my own decals, but the bottom is bulged and they are not sitting flat but i left it like that , figuring that in the mass of y dio nobody will notice). Bad thing!
I used the wood glue method already to make a small diameter tower's stone pattern. To use it for the curtain is a superb idea!
Hey , i bought a Micro lathe from Proxxon (i think i asked you about a lathe moths ago) on the expo so i can finally also start to put my feet in the world of wood turning.
Ther lathe is very basic, but probably good enough to get an idea and start practicing.
You made also a superb cast of the furniture! Well done
Claude
PS.: Sorry, it does not really belong here, but could you advise me what turning tool i should be for "our " needs.
The "8-piece HSS Micro Tool Bit Set " or the "10-piece Micro Turning Tool Set " all from micromark.com
The later costs nearly as much as the Proxxon lathe but i have no idea how fine the tools should be for us.
Should i try first with Xacto blades or other improvisations? Thanks

1stjaeger

Joined: May 20, 2011
KitMaker: 1,744 posts
Armorama: 1,727 posts

Posted: Friday, October 26, 2012 - 06:10 AM UTC
Wow!! Simply unbelievable!!
So impressive and so inspirational!!
This is "real" modelling, not just assembling commercial kits!
Congratulations Sir!!
Cheers
Romain
So impressive and so inspirational!!
This is "real" modelling, not just assembling commercial kits!
Congratulations Sir!!
Cheers
Romain
olivato
Joined: August 16, 2005
KitMaker: 127 posts
Armorama: 107 posts
Posted: Friday, October 26, 2012 - 02:17 PM UTC
Hi everyone!!!
Bob: First of all, I hope you are ok now (the last time we talked more about surgery and health problems than a modelism )Thank you for your compliments! I really like the McDonald's idea. I had some ideas about food in the kitchen, but I will leave that for the end.
Romain: Thank you for looking at my work and for such nice and encouraging words!
Claude: Thanks for praising my work. I really appreciate it. As for the curtain, some people found the idea interesting. It makes me happy when I can share something useful for others.
About the mini bench lathe, good for you! Under Proxxon mini lathe, I found two, one for wood and another one similar to the one I have. If you have the one for wood, I think you should get 10-piece Micro Turning Tool Set . If you have the other one, definitely the 8-piece HSS Micro Tool Bit Set.
Anyway, these tools will help you a lot in the first stages. To really give shape to a piece you will need to work with sandpaper and metal files; otherwise, if the pieces are too small, the others will break them.
Sometimes the tool gets stuck with the piece and with the RPM they may fly away, so the Xacto is really dangerous to work with, I don´t recommend that.
A tip that worked for me: make a mold of cylinders of different diameters to make resin cylinders to work with the lathe. In the picture of my lathe, on the lathe (on the left) you can see mine.
Any other thing you or anyone want to know, please feel free to ask, no problem, that´s why I do this post, to share.
roudeleiw
Joined: January 19, 2004
KitMaker: 2,406 posts
Armorama: 2,224 posts
Posted: Friday, October 26, 2012 - 07:58 PM UTC
Thanks Victor
I have the small lathe from Proxxon, the wood and plastic one (i think soft metal may certainly work also).
I will order the tool set asap because it takes week shipping it to Europe.
My country, Luxembourg, is a desert for buying modeling tools.
Thanks for the tips
Claude
I have the small lathe from Proxxon, the wood and plastic one (i think soft metal may certainly work also).
I will order the tool set asap because it takes week shipping it to Europe.
My country, Luxembourg, is a desert for buying modeling tools.
Thanks for the tips
Claude

HeavyArty

Joined: May 16, 2002
KitMaker: 17,694 posts
Armorama: 13,742 posts
Posted: Saturday, October 27, 2012 - 12:39 AM UTC
All your pieces came out looking great. I really like all the common household items that are often missing from dioramas, especially modern ones.
Do you plan to make and sell any of these? I bet they would sell really well. I know I want some.
Do you plan to make and sell any of these? I bet they would sell really well. I know I want some.
olivato
Joined: August 16, 2005
KitMaker: 127 posts
Armorama: 107 posts
Posted: Saturday, October 27, 2012 - 12:42 PM UTC
Hi!
Claude: Now is only a matter of practice, good luck!!!
Gino: Thank you very much for still being interested in my resin pieces and for the patience, you were one of the first to want them and I really appreciate your support and encouragement.
The answer to your question is: yes, I already have 90% of the problem solved, and by mid-November I'm going to offer the first set to make a living-room as the one I show in the picture, but when I offer it I'm going to explain exactly what items are included and what the price is. At present I'm making the new molds.
To be honest with you and the other people who have shown interest in my pieces, I want to explain some of the problems I faced, and now solved.
This post started with the idea of showing who I am as a modeler, make my own pieces, transform some things, etc.
Some people showed some interest in my pieces (you were one of the first), so I thought, Ok I can make two or three more copies from my molds.
But then more people showed interest and I realized my molds didn't work well for so many copies.
First, the resin I normally use attacks the molds and I can only make 7 or 8 copies, but it is really accurate when copying the master.
Now, I am using another type of resin for production, which has a contraction of 0,15 mm but you can have 150 to 200 copies from one mold.
When I made a mold for me, the chunk used to be little and my wife helped me open it with her fingers, to help the resin to reach all the place. The open window to work with resin is about 7 min, so with these little chunks, the time was not enough to fill in more than 6 or 7 pieces before the resin stared to harden (just to give you an idea, the living-room set will have over 30 pieces)
On the other hand, I wanted to offer sets grouping things, as a living-room or a kitchen, to save money, as there is no sense in spending more in shipping costs than in goods.
So, with all these things in my head, I tried to solve the problem of filling quickly a couple of molds ( a complete set), as fast as I can, and to make sure that every time I do it, I will obtain a set ready to send to the customer, with the same quality I show in my work.
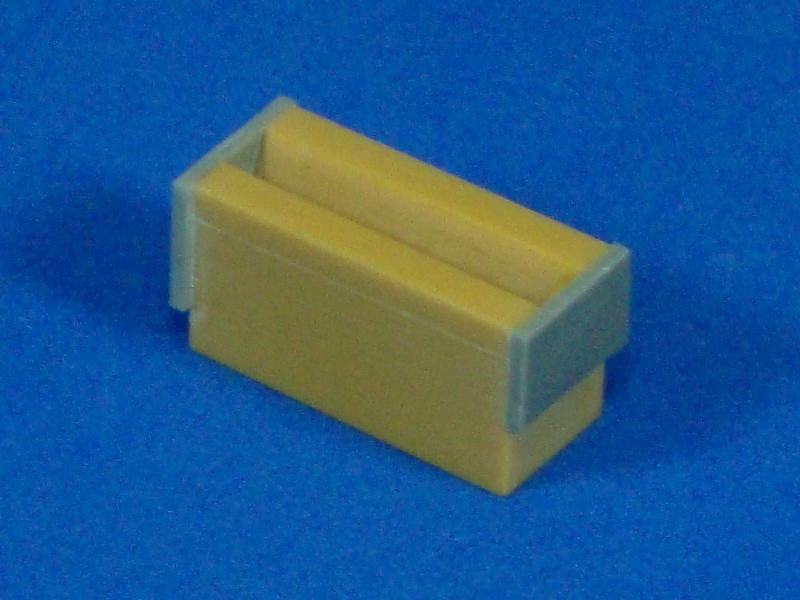
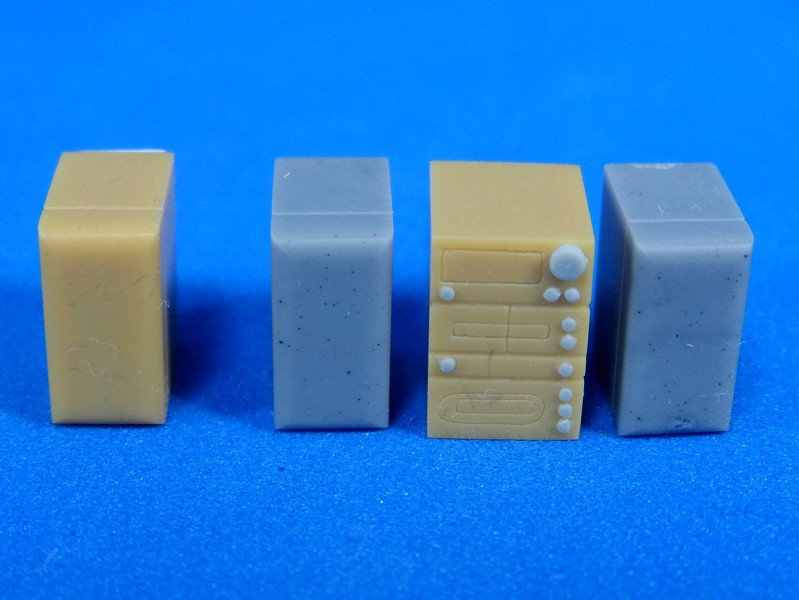
Here I post some of the pictures of the problems you don´t see (because I think they are not so important for the blog), but I have to face.
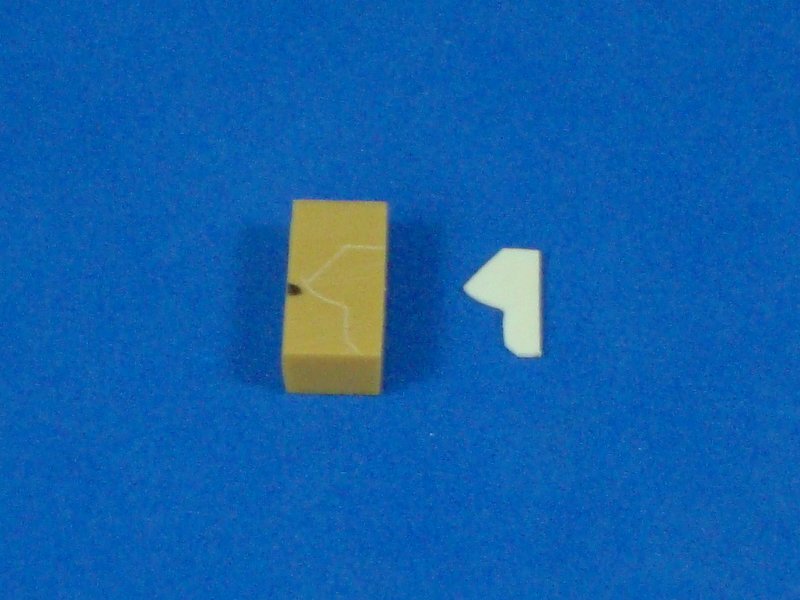
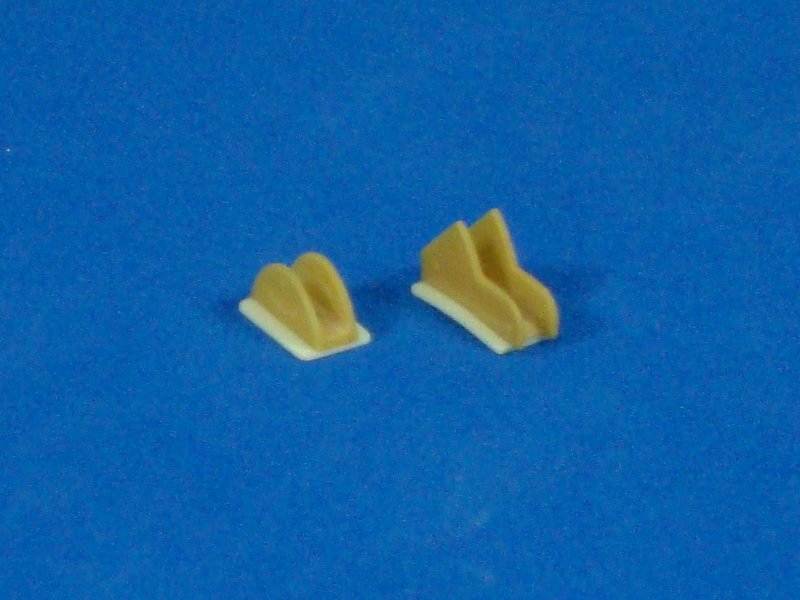
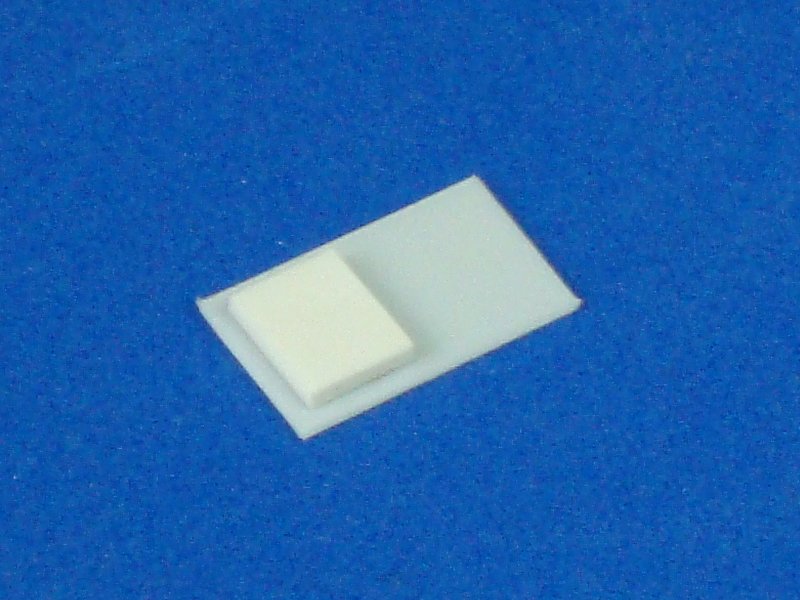
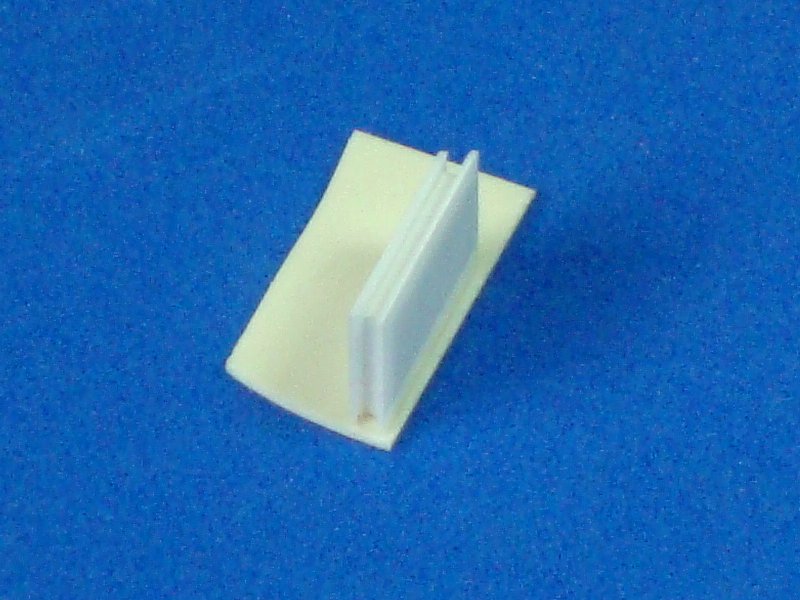
Here you can see the first chunk, really little and difficult to fill. Note the one for the complete chair, how big it is in comparison. In the big piece, you can see that when the air inside the mold can't get out, because the area in common between the piece and the chunk is too thin.
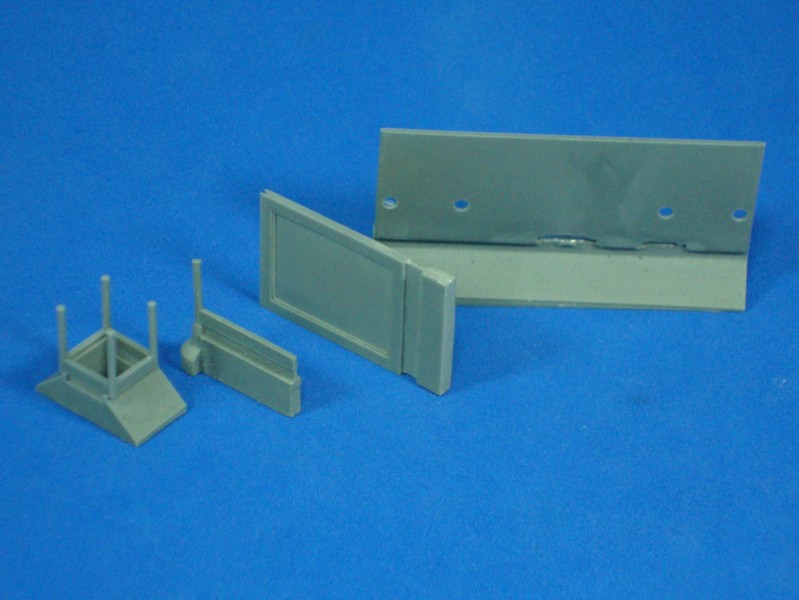
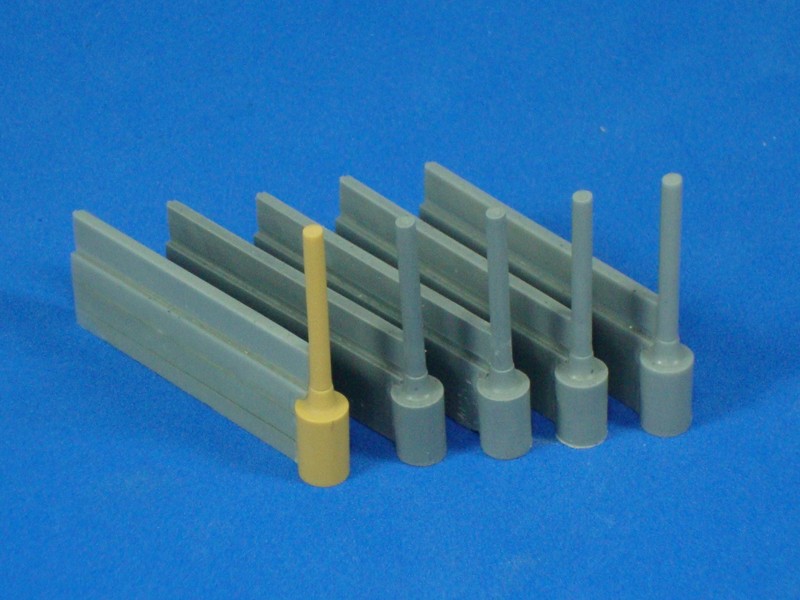
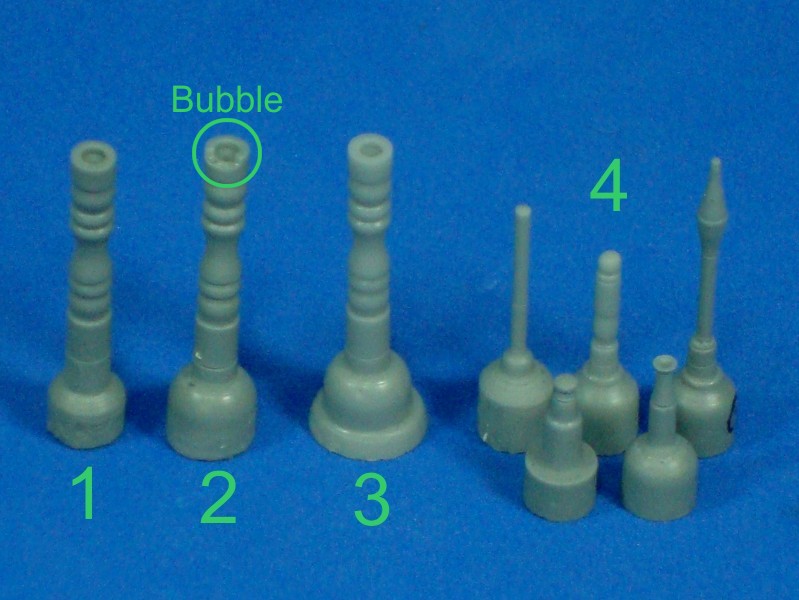
This is another example:
1- The chunk is too small and the diameter of the piece too small, so with the pressure the piece is only half-filled and I need two times to obtain one piece.
2- I made the chunk taller, but now the pressure is not enough and there were always bubbles on the top.
3-I made the chunk wider but shorter and the problem was solved.
4- Learning from this experience, since then, the chunk has always been much wider than the piece.
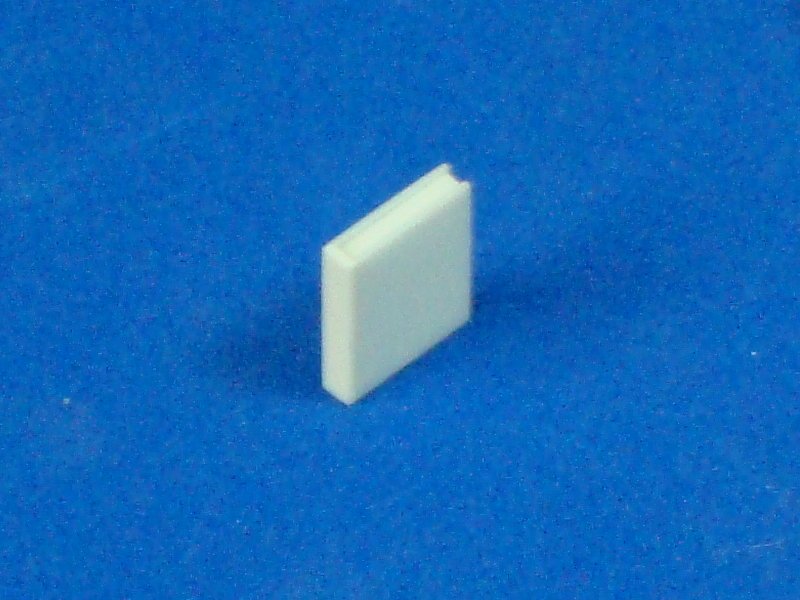
As a result of all this experience I've made a new and much bigger chunk for the pieces (here you can see the master to make copies for the new pieces) but easier to fill in quickly and with enough resin to fill the mold completely when they go to the pressure pot.
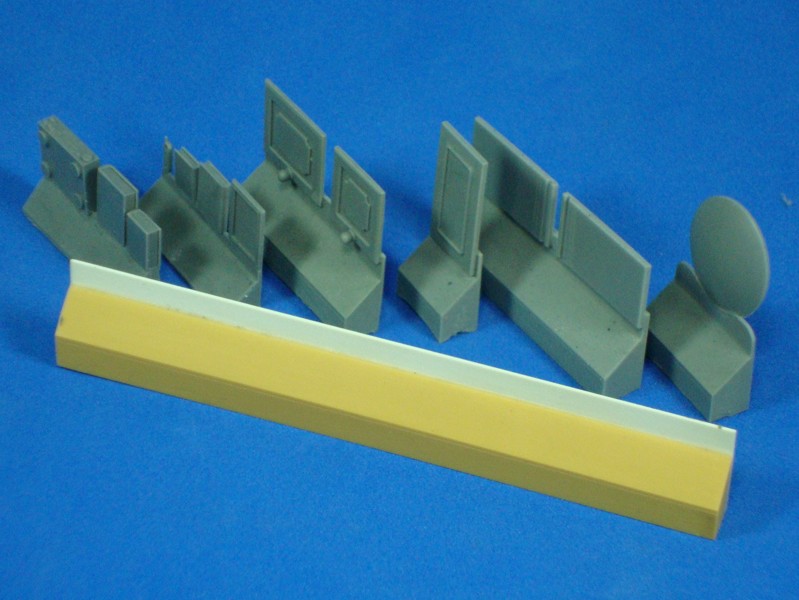
At present, I am putting the old pieces in the new chunk and making sure it works perfectly.
Now I know the living-room set will work exactly as I want and you can see it in the final product.
Claude: Now is only a matter of practice, good luck!!!
Gino: Thank you very much for still being interested in my resin pieces and for the patience, you were one of the first to want them and I really appreciate your support and encouragement.
The answer to your question is: yes, I already have 90% of the problem solved, and by mid-November I'm going to offer the first set to make a living-room as the one I show in the picture, but when I offer it I'm going to explain exactly what items are included and what the price is. At present I'm making the new molds.
To be honest with you and the other people who have shown interest in my pieces, I want to explain some of the problems I faced, and now solved.
This post started with the idea of showing who I am as a modeler, make my own pieces, transform some things, etc.
Some people showed some interest in my pieces (you were one of the first), so I thought, Ok I can make two or three more copies from my molds.
But then more people showed interest and I realized my molds didn't work well for so many copies.
First, the resin I normally use attacks the molds and I can only make 7 or 8 copies, but it is really accurate when copying the master.
Now, I am using another type of resin for production, which has a contraction of 0,15 mm but you can have 150 to 200 copies from one mold.
When I made a mold for me, the chunk used to be little and my wife helped me open it with her fingers, to help the resin to reach all the place. The open window to work with resin is about 7 min, so with these little chunks, the time was not enough to fill in more than 6 or 7 pieces before the resin stared to harden (just to give you an idea, the living-room set will have over 30 pieces)
On the other hand, I wanted to offer sets grouping things, as a living-room or a kitchen, to save money, as there is no sense in spending more in shipping costs than in goods.
So, with all these things in my head, I tried to solve the problem of filling quickly a couple of molds ( a complete set), as fast as I can, and to make sure that every time I do it, I will obtain a set ready to send to the customer, with the same quality I show in my work.
Here I post some of the pictures of the problems you don´t see (because I think they are not so important for the blog), but I have to face.
Here you can see the first chunk, really little and difficult to fill. Note the one for the complete chair, how big it is in comparison. In the big piece, you can see that when the air inside the mold can't get out, because the area in common between the piece and the chunk is too thin.
This is another example:
1- The chunk is too small and the diameter of the piece too small, so with the pressure the piece is only half-filled and I need two times to obtain one piece.
2- I made the chunk taller, but now the pressure is not enough and there were always bubbles on the top.
3-I made the chunk wider but shorter and the problem was solved.
4- Learning from this experience, since then, the chunk has always been much wider than the piece.
As a result of all this experience I've made a new and much bigger chunk for the pieces (here you can see the master to make copies for the new pieces) but easier to fill in quickly and with enough resin to fill the mold completely when they go to the pressure pot.
At present, I am putting the old pieces in the new chunk and making sure it works perfectly.
Now I know the living-room set will work exactly as I want and you can see it in the final product.
 |

WEB HOSTING BY


Copyright ©2021 Armorama and Kitmaker Network, a subsidiary of Silver Star Enterprises
All Rights Reserved. Please read our Conditions of Use and Privacy Policy.
All Rights Reserved. Please read our Conditions of Use and Privacy Policy.