

Greg -
Once again, an excellent model taking shape. I really like the 'old paintbrush ferrule' trick for cobblestones. I will have to remember that one! The placement of the models and the added drama of the Soviet CO shooting back at the ambusher really makes it - almost a 'Dirty Harry - Make my day' moment!
Stephen
Campaigns
Where Armorama group builds can be discussed, organized, and updates posted.
Where Armorama group builds can be discussed, organized, and updates posted.
Hosted by Darren Baker, Richard S.
48th Scale 2 campaign
minas-ithil

#110

Joined: September 20, 2005
KitMaker: 248 posts
Armorama: 224 posts

Posted: Monday, March 19, 2012 - 12:04 AM UTC

GregCloseCombat
Joined: June 30, 2008
KitMaker: 2,408 posts
Armorama: 2,394 posts

Posted: Monday, March 19, 2012 - 03:25 AM UTC
Or Luke Skywalker in Star Wars, "I used to bullseye womp rats in my T-16 back home, they're not much bigger than two meters"


Ibuild148
Joined: May 25, 2009
KitMaker: 177 posts
Armorama: 153 posts

Posted: Monday, March 19, 2012 - 06:18 AM UTC
Hu Greg,
Been paying attention to your build and that is really looking awesome!
Been paying attention to your build and that is really looking awesome!

zontar
Joined: August 27, 2006
KitMaker: 1,646 posts
Armorama: 1,557 posts
Posted: Monday, March 19, 2012 - 07:15 AM UTC
JT: what are you going to do with all that warmth? The Puma is looking good though. My only suggestion, if it's not too late, is some more blending of the dark wash on the interior.
Greg: nice progress and a much better layout than the original.
Happy Modeling, -zon
Greg: nice progress and a much better layout than the original.
Happy Modeling, -zon

imatanker
Joined: February 11, 2011
KitMaker: 1,654 posts
Armorama: 1,565 posts
Posted: Monday, March 19, 2012 - 09:00 AM UTC
Quoted Text
JT: what are you going to do with all that warmth? The Puma is looking good though. My only suggestion, if it's not too late, is some more blending of the dark wash on the interior.
Greg: nice progress and a much better layout than the original.
Happy Modeling, -zon
Zon...I'm basking,I'm basking.
 So what you're saying is to lighten it up some by removing some of the wash?Jeff T.
zontar
Joined: August 27, 2006
KitMaker: 1,646 posts
Armorama: 1,557 posts
Posted: Monday, March 19, 2012 - 11:43 AM UTC
Quoted Text
Quoted TextJT: what are you going to do with all that warmth? The Puma is looking good though. My only suggestion, if it's not too late, is some more blending of the dark wash on the interior.
Greg: nice progress and a much better layout than the original.
Happy Modeling, -zon
Zon...I'm basking,I'm basking.
Jeff: I was thinking just to run a brush over it to blend (smooth out) more. It looks like brush marks in some areas, rather than streaking or blotching. Not sure if this makes sense?
Also, at 72 we button our shirts 'cause it's getting cold!!
Happy Modeling, -zon
imatanker
Joined: February 11, 2011
KitMaker: 1,654 posts
Armorama: 1,565 posts
Posted: Monday, March 19, 2012 - 12:30 PM UTC
Like This? 
I ended up taking the center section out.The more I worked on it ,the worse it got I need to re-do it.It is diamond plate,so I'm thinking maybe just light grey.J.T.
And by the way,at 72,We have unbuttoned almost everything within the bounds of modesty of course.
The more I look at it the less I like it.To heck with it,I'm going to start over.
I ended up taking the center section out.The more I worked on it ,the worse it got
I need to re-do it.It is diamond plate,so I'm thinking maybe just light grey.J.T.And by the way,at 72,We have unbuttoned almost everything within the bounds of modesty of course.
The more I look at it the less I like it.To heck with it,I'm going to start over.
zontar
Joined: August 27, 2006
KitMaker: 1,646 posts
Armorama: 1,557 posts
Posted: Monday, March 19, 2012 - 02:30 PM UTC
JT: Yes, that was what I was talking about.
Before you start over, how much will actually be seen? Don't beat yourself up too much for something that gets covered up. Use it as practice!
Happy Modeling, -zon
Before you start over, how much will actually be seen? Don't beat yourself up too much for something that gets covered up. Use it as practice!
Happy Modeling, -zon
luftwaffebirdman
Joined: January 26, 2008
KitMaker: 17 posts
Armorama: 13 posts
Posted: Monday, March 19, 2012 - 02:31 PM UTC
Greg,
Really impressive work on your sewer and street. I can't believe how fast everyone is building and progressing along. I haven't even cracked the box open yet, and with wife coming to visit next week I probably won't be even going near my kit for a couple of weeks.
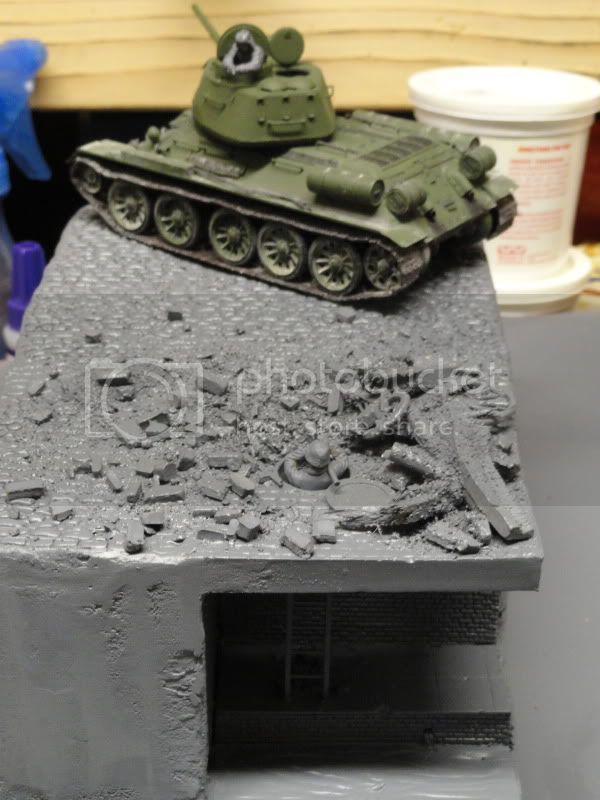
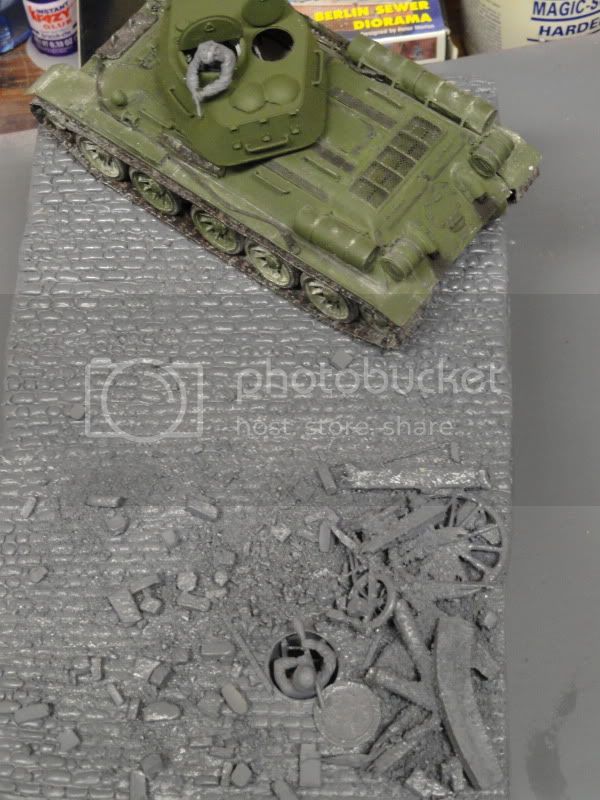
One thing I was looking at on yours though, your debris field seems pretty confined. As much stuff as there is around the manhole, I am thinking the rest of the street would have more stuff on it? Just an observation.
Really impressive work on your sewer and street. I can't believe how fast everyone is building and progressing along. I haven't even cracked the box open yet, and with wife coming to visit next week I probably won't be even going near my kit for a couple of weeks.
One thing I was looking at on yours though, your debris field seems pretty confined. As much stuff as there is around the manhole, I am thinking the rest of the street would have more stuff on it? Just an observation.
Quoted Text
Jeff - nice to see more progress. I'm no expert on red primer.
I'm going to add a destroyed kubelwagen on the left side too. Everything is getting nearer to the painting stage.

GregCloseCombat
Joined: June 30, 2008
KitMaker: 2,408 posts
Armorama: 2,394 posts
Posted: Monday, March 19, 2012 - 02:54 PM UTC
'Before you start over, how much will actually be seen? Don't beat yourself up too much for something that gets covered up. Use it as practice!
Happy Modeling, -zon'
- I gotta agree with Zon. You could also try fine art store markers for chipping too as a suggestion.
@Walt - Thanks for the suggestion. Once I get the Kubelwagen and tank finalized where they will sit, I can fill in more blank areas and blend. I didn't want to fix down too much yet and risk the tank & car not sitting flat where I might need them Keep checking me though ok
p.s. wives before models - play safe!!!
Happy Modeling, -zon'
- I gotta agree with Zon. You could also try fine art store markers for chipping too as a suggestion.
@Walt - Thanks for the suggestion. Once I get the Kubelwagen and tank finalized where they will sit, I can fill in more blank areas and blend. I didn't want to fix down too much yet and risk the tank & car not sitting flat where I might need them
Keep checking me though okp.s. wives before models - play safe!!!
imatanker
Joined: February 11, 2011
KitMaker: 1,654 posts
Armorama: 1,565 posts
Posted: Tuesday, March 20, 2012 - 12:04 PM UTC
Zon and Greg...After seeing the detail on the inside of this kit,I thought that I would leave the turret and it's mounting plate unglued so it could be removed.So the interior needs to be better than it is.It's not the fact that it does not look all that bad,it's more that I'm just not happy with it.Won't take much to re-do it,and even if it turns out to be not that accurate,at least I'll be happy with it.Thanks for the support and help.Pics of the "new and improved"interior to follow some time this week.J.T.

Buckeye198
Joined: May 02, 2010
KitMaker: 596 posts
Armorama: 265 posts

Posted: Tuesday, March 20, 2012 - 08:22 PM UTC
Hello everyone! I'm jumping in on this campaign kinda late, but I'm not planning on doing anything remarkable or outstanding (I'm looking at you Greg...you dio is coming along superbly!). I won Revell-Monogram's 1/48 A-10 Thunderbolt II in an online contest, and since I have a few days off and I finished my other two WIP's, I figured I might as well try a speed-run and maybe even collect a ribbon in the process.  Here's the unbuilt picture, and here's to a successful and enjoyable campaign!

Here's the unbuilt picture, and here's to a successful and enjoyable campaign!
pxpxpx

Joined: March 21, 2012
KitMaker: 26 posts
Armorama: 24 posts

Posted: Wednesday, March 21, 2012 - 03:07 AM UTC
Jumping in kinda late as well. I ordered a Sdkfz 222 (ICM) that I decided to build and paint while waiting for other things to arrive.
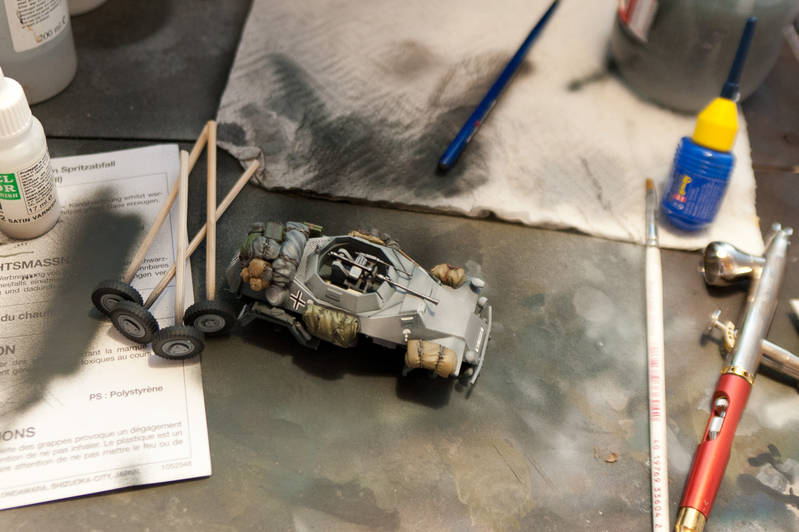
Modulated and waiting for some Future to be added. Stowage is from Black Dog.
Modulated and waiting for some Future to be added. Stowage is from Black Dog.
Buckeye198
Joined: May 02, 2010
KitMaker: 596 posts
Armorama: 265 posts
Posted: Wednesday, March 21, 2012 - 03:24 AM UTC
I started work on the warthog last night, and maybe it won't go as quickly as I'd hoped. The plastic is typical of Revell-Monogram; thick, dark green plastic with stocky details, plenty of flash, and large connecting points to the sprues. So while there are relatively few steps, each piece will take considerably longer to prepare for assembly. And the lack of detailed painting instructions means I get to do more research and look at plenty of walk-arounds. It'll be a much bigger task than I had anticipated, but in the end, I'm hoping for a nice display piece.
Here's how much I got done last night. The cockpit tub isn't prepared yet, but it slides into place very easily (unfortunately, this is due to a poor fit between the the tub and both fuselage halves...) so I'll work on it later.
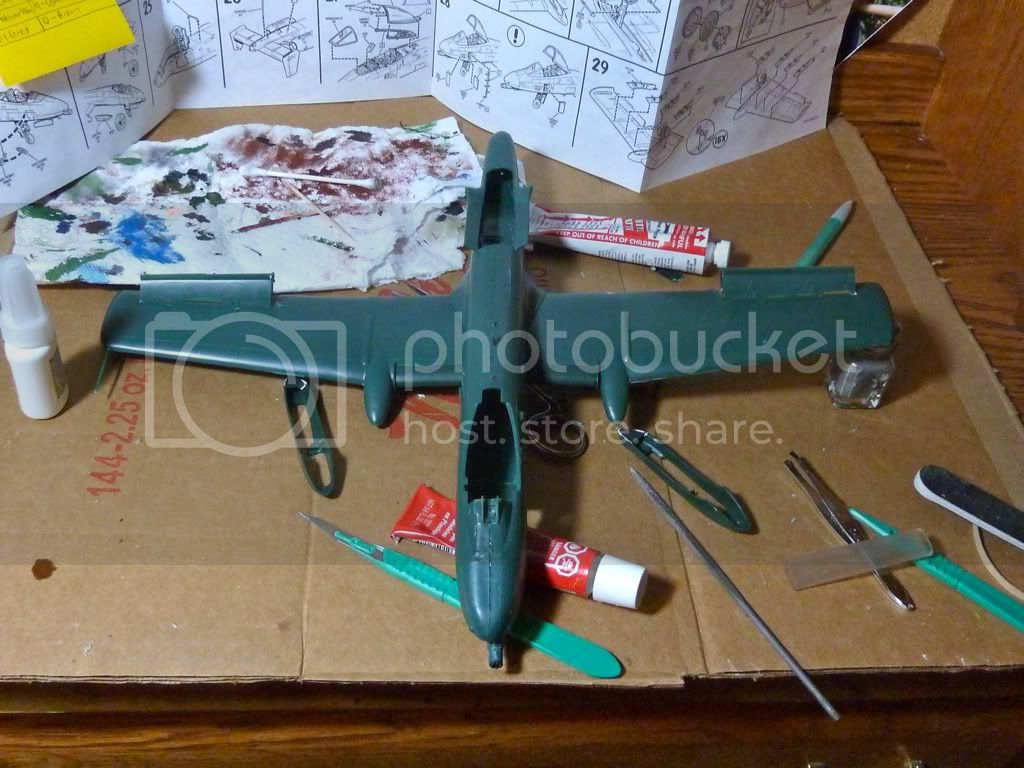
Here's how much I got done last night. The cockpit tub isn't prepared yet, but it slides into place very easily (unfortunately, this is due to a poor fit between the the tub and both fuselage halves...) so I'll work on it later.
markchis

Joined: February 09, 2009
KitMaker: 467 posts
Armorama: 392 posts

Posted: Wednesday, March 21, 2012 - 08:03 AM UTC
nice work - cool a-10
better get moving !
I decided on Mig-21 MF kit from academy. with some corrections and additional details.
heres my entry picture

cheers
Mark
better get moving !
I decided on Mig-21 MF kit from academy. with some corrections and additional details.
heres my entry picture
cheers
Mark
GregCloseCombat
Joined: June 30, 2008
KitMaker: 2,408 posts
Armorama: 2,394 posts
Posted: Wednesday, March 21, 2012 - 12:29 PM UTC
Robby - Thanks Welcome to the campaign and the A10 is an awesome addition here
Sandell - Welcome, that 222 looks excellent so far. Do you have a pre-build 'in-the-box' pick you can post too by chance?
Mark - Welcome and look forward to more of your build!
Welcome to the campaign and the A10 is an awesome addition hereSandell - Welcome, that 222 looks excellent so far. Do you have a pre-build 'in-the-box' pick you can post too by chance?
Mark - Welcome and look forward to more of your build!
imatanker
Joined: February 11, 2011
KitMaker: 1,654 posts
Armorama: 1,565 posts
Posted: Wednesday, March 21, 2012 - 01:31 PM UTC
After a short trip into the land of most ugly interiors,I am back in the game 
Onward and upward from here.Jeff T.
Onward and upward from here.Jeff T.
GregCloseCombat
Joined: June 30, 2008
KitMaker: 2,408 posts
Armorama: 2,394 posts
Posted: Wednesday, March 21, 2012 - 03:52 PM UTC
Jeff - I look forward to seeing how you like the interior to look. Have fun with the challenge 
Buckeye198
Joined: May 02, 2010
KitMaker: 596 posts
Armorama: 265 posts
Posted: Wednesday, March 21, 2012 - 08:04 PM UTC
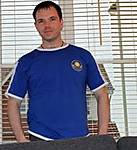
I only have until Saturday morning to work on this kit for now, so I'm really burning the midnight oil (make that 4AM oil...) to at least get to priming before then. Construction is moving along quite smoothly...aside from the cockpit, the entire kit is made of giant parts. Bad for overall detail, but good for a quick build While there aren't any enormous gaps, lots of filler is needed to get the fit looking just right.
I decided to display the warthog with a pilot. The supplied figure is looking--I think a tad awkwardly--off to the side, so to make the scene more believable, I did some orthopedic surgery to have him giving a thumbs-up. I'll most likely leave the canopy open, just because I've never done that before. And that can also lend credence to the thumbs-up and look off to the side (ie, signaling to the ground crew). We'll just see how that works out though.
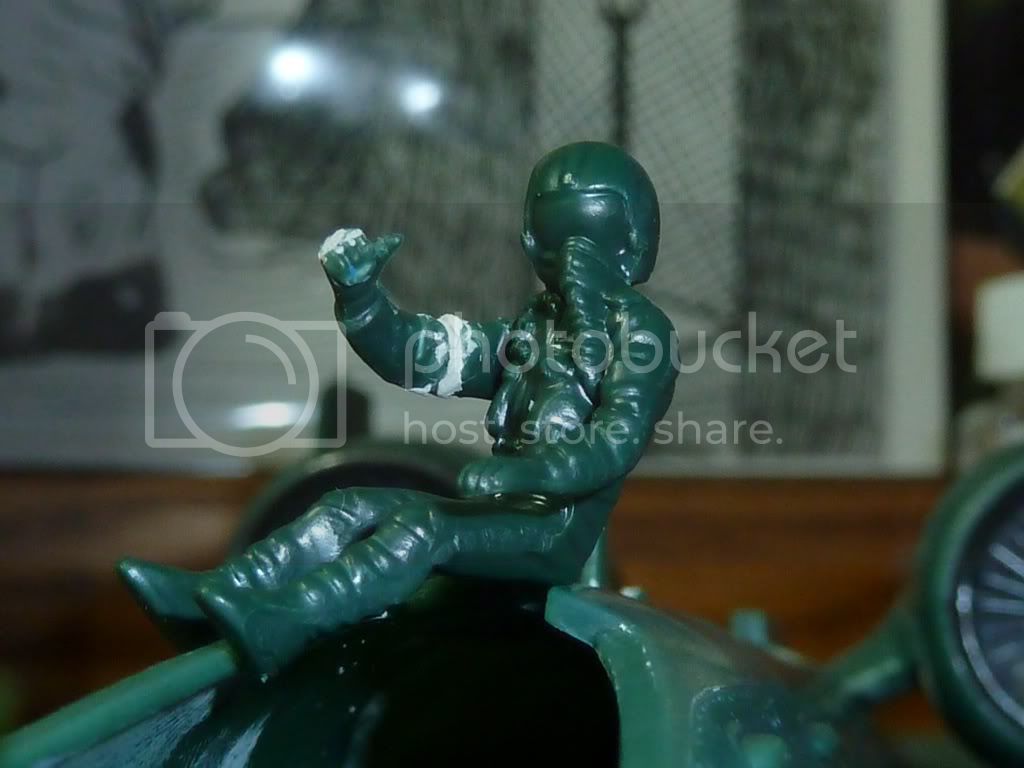
While there aren't any enormous gaps, lots of filler is needed to get the fit looking just right.I decided to display the warthog with a pilot. The supplied figure is looking--I think a tad awkwardly--off to the side, so to make the scene more believable, I did some orthopedic surgery to have him giving a thumbs-up. I'll most likely leave the canopy open, just because I've never done that before. And that can also lend credence to the thumbs-up and look off to the side (ie, signaling to the ground crew). We'll just see how that works out though.

JediWookie

Joined: November 26, 2011
KitMaker: 113 posts
Armorama: 79 posts
Posted: Wednesday, March 21, 2012 - 10:41 PM UTC
Have made a bit progress with my Spitfire.
I did have a minor problem with the Tamiya masking tape pulling of some primer. I washed the plastic first and after priming it I left if for 3 days before I put the masking on it so I could paint the underside.


I just bought a new airbrush, cant wait to use it in the next couple days. There was nothing wrong with the $12 airbrush I bought on eBay 8 months ago but I am now hooked on modelling so I thought I can now start buying some better tools.

I did have a minor problem with the Tamiya masking tape pulling of some primer. I washed the plastic first and after priming it I left if for 3 days before I put the masking on it so I could paint the underside.
I just bought a new airbrush, cant wait to use it in the next couple days. There was nothing wrong with the $12 airbrush I bought on eBay 8 months ago but I am now hooked on modelling so I thought I can now start buying some better tools.
pxpxpx
Joined: March 21, 2012
KitMaker: 26 posts
Armorama: 24 posts
Posted: Thursday, March 22, 2012 - 01:50 AM UTC
Quoted Text
Sandell - Welcome, that 222 looks excellent so far. Do you have a pre-build 'in-the-box' pick you can post too by chance?
Thanks.
Here's a "what goes where?" picture.
GregCloseCombat
Joined: June 30, 2008
KitMaker: 2,408 posts
Armorama: 2,394 posts
Posted: Thursday, March 22, 2012 - 02:46 AM UTC
awesome guys!
koschrei
Joined: September 21, 2004
KitMaker: 147 posts
Armorama: 134 posts
Posted: Thursday, March 22, 2012 - 04:13 AM UTC
Jumbo Update:
Although the TW conversion comes with an upper hull, the appliqués are overly thick and it has some draft angle as well, so I wanted to try making my own. The Hobby Boss parts have some shape problems first pointed out on the Perth Military Modeling Site - great reviews there - and among them the rear side panels are too narrow and the kink in the side plates is in the wrong place. I decided to have a go at fixing that.
Basically you have to remove the rear surfaces of the upper hull and replace them with styrene panels (1mm thick sheet used here) of the correct width. The final width should match the side panels on the Tamiya M4 hull.
After that the upper edges of the side plates and seams are carefully scraped back and then wet sanded with some wet-or-dry glued to a popsicle stick for a hard flat sanding board. It sounds hard, but this part of the project is about three hours work so far.
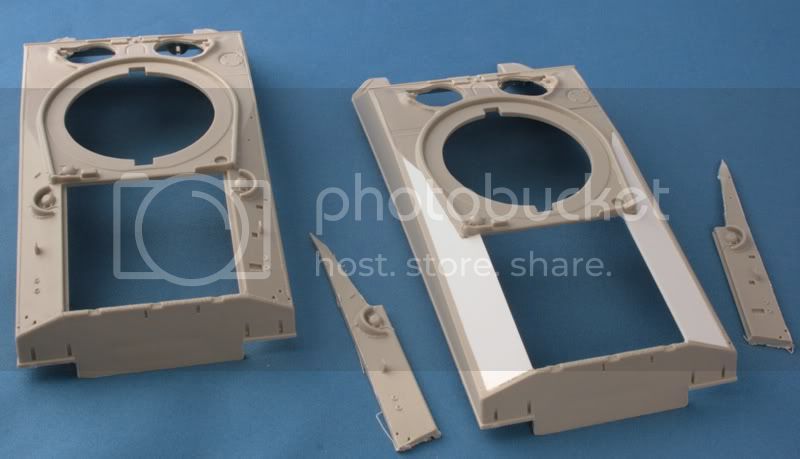
At this point the details are still attached to the severed kit parts, they will be carefully trimmed out, sanded to the correct thickness and 'scabbed' back onto the new parts. Welds in the Sherman are raised, so they will be recreated with stretched sprue. Up front the welds and antenna cover plate will be relocated to the correct locations. Although some may not want to do this, for those who do, it is really not that hard.
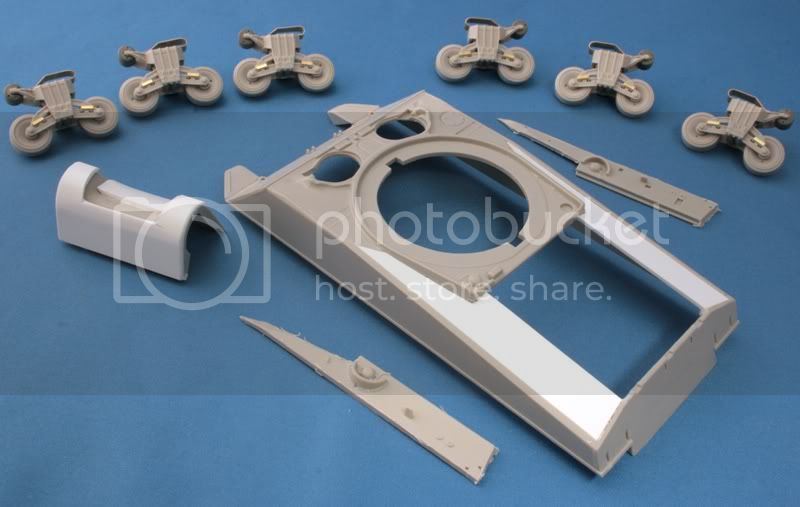
I have also been working on a new drive housing and suspension towers, flattening the front pair a bit, although you can hardly see that. Turned correct size return rollers from sprue and made the other details from brass sheet.
The fun continues,
Konrad
Although the TW conversion comes with an upper hull, the appliqués are overly thick and it has some draft angle as well, so I wanted to try making my own. The Hobby Boss parts have some shape problems first pointed out on the Perth Military Modeling Site - great reviews there - and among them the rear side panels are too narrow and the kink in the side plates is in the wrong place. I decided to have a go at fixing that.
Basically you have to remove the rear surfaces of the upper hull and replace them with styrene panels (1mm thick sheet used here) of the correct width. The final width should match the side panels on the Tamiya M4 hull.
After that the upper edges of the side plates and seams are carefully scraped back and then wet sanded with some wet-or-dry glued to a popsicle stick for a hard flat sanding board. It sounds hard, but this part of the project is about three hours work so far.
At this point the details are still attached to the severed kit parts, they will be carefully trimmed out, sanded to the correct thickness and 'scabbed' back onto the new parts. Welds in the Sherman are raised, so they will be recreated with stretched sprue. Up front the welds and antenna cover plate will be relocated to the correct locations. Although some may not want to do this, for those who do, it is really not that hard.
I have also been working on a new drive housing and suspension towers, flattening the front pair a bit, although you can hardly see that. Turned correct size return rollers from sprue and made the other details from brass sheet.
The fun continues,
Konrad
imatanker
Joined: February 11, 2011
KitMaker: 1,654 posts
Armorama: 1,565 posts
Posted: Thursday, March 22, 2012 - 12:44 PM UTC
I see that everyone has been very busy Great work by all.
I am pleased to announce that all pictures of the truly ugly Puma interior have been removed from this thread.
They have been replaced by the "new and improved",cleaner,and more pleasing to the eye,IMHO, interior
Now I am happyJeff T.
Great work by all.I am pleased to announce that all pictures of the truly ugly Puma interior have been removed from this thread.
They have been replaced by the "new and improved",cleaner,and more pleasing to the eye,IMHO, interior
Now I am happy
Jeff T. Buckeye198
Joined: May 02, 2010
KitMaker: 596 posts
Armorama: 265 posts
Posted: Thursday, March 22, 2012 - 07:05 PM UTC
Tonight I got some paint work done in the cockpit. Just need to drybrush the dials and add a few yellow and red accents...I found a great walkaround for the cockpit and much of the exterior. If anyone should ever need an A-10 walkaround, you can find it here. Aside from that, Tonight was all about filler. I used up maybe an eighth of my putty on the seams. Some were good enough to ignore, others needed a quick touchup, and still others needed entire segments created out of putty. There were some nasty fits with this kit, and I think I got them all. I'll tell for sure tomorrow though...


 |

WEB HOSTING BY


Copyright ©2021 Armorama and Kitmaker Network, a subsidiary of Silver Star Enterprises
All Rights Reserved. Please read our Conditions of Use and Privacy Policy.
All Rights Reserved. Please read our Conditions of Use and Privacy Policy.