update,my first time doing winterwash with hairspray.
Campaigns
Where Armorama group builds can be discussed, organized, and updates posted.
Hosted by Darren Baker, Richard S.
48th Scale 2 campaign
baconcro
Croatia Hrvatska
Joined: October 18, 2011
KitMaker: 35 posts
Armorama: 34 posts
Joined: October 18, 2011
KitMaker: 35 posts
Armorama: 34 posts
Posted: Thursday, March 15, 2012 - 01:47 AM UTC
imatanker
Maine, United States
Joined: February 11, 2011
KitMaker: 1,654 posts
Armorama: 1,565 posts
Joined: February 11, 2011
KitMaker: 1,654 posts
Armorama: 1,565 posts
Posted: Thursday, March 15, 2012 - 02:29 AM UTC
Jason...So do the Jagdtiger first,then if you have time,do the Gigant
Just got some time to open things up and take a look at stuff.This kit is supposed to be a Tamiya/Italeri cross,and it was stated as such in the discription of the kit.Here are some pics.
The box,you can see the Italeri logo in the lower right hand corner
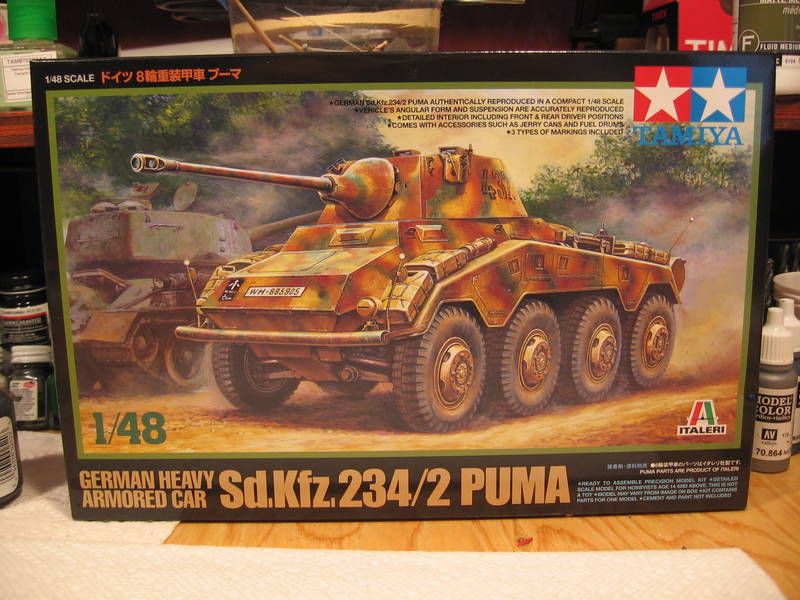
Here you can see the disclaimer.
The instructions look to be Tamiya,and included a seperate and a pretty cool, I must say, background info booklette.All kinds of facts and stats.
Kit came with 5 sprues.4 light grey marked with the Italeri tri angle logo which are all vec. parts
And 1 darker grey sprue which is the stowage,marked Tamiya
The kit looks pretty clean with out a lot of flash or mold marks.I do have two minor complaints,It does not come with rubber tires,and there is no PE included,but you get the stowage though,so I guess it's a wash.
I'm off to do some tire assembly.Model on,Jeff T.
Tomislav...Great work Man,I was thinking of doing a white wash also,as I have never done one.
GregCloseCombat
California, United States
Joined: June 30, 2008
KitMaker: 2,408 posts
Armorama: 2,394 posts
Joined: June 30, 2008
KitMaker: 2,408 posts
Armorama: 2,394 posts
Posted: Thursday, March 15, 2012 - 02:43 AM UTC
@Jason - I forgot you did the KV2 already, I think you should do something different. The KV2 would be easier the second go around though
Tomislav - that's a great looking whitewash and I like the dirty chip effects! Keep going buddy, and save one of those beers from the bucket
Jeff - go for the whitewash but have in mind how white you want the finished look. The hairspray method I found you need to start scrubbing sooner then later (like within a few seconds). Have fun
zontar
Hawaii, United States
Joined: August 27, 2006
KitMaker: 1,646 posts
Armorama: 1,557 posts
Joined: August 27, 2006
KitMaker: 1,646 posts
Armorama: 1,557 posts
Posted: Thursday, March 15, 2012 - 06:26 AM UTC
Tomislav: That's a great looking Stug. Very well done and I love the weathering and white wash. And you still have time for another one
Jeff: Should be a good build. The Tamiya / Italeri intergration seems to be the same as the Tamiya / ICM for my 222, except I got an ICM PE fret with a big thumbprint on it!!
As Greg said, let the hairspray dry compleletly, but start scrubbing the white off right after spraying it. It also helps to wet the area you are going to scrub a little before you scrub. You might experiment on some scrap first.
Happy Modelling, -zon
imatanker
Maine, United States
Joined: February 11, 2011
KitMaker: 1,654 posts
Armorama: 1,565 posts
Joined: February 11, 2011
KitMaker: 1,654 posts
Armorama: 1,565 posts
Posted: Thursday, March 15, 2012 - 11:25 AM UTC
Thanks for the info Gents,although I have not fully comitted to the white wash.Tomislav's paint job will be hard to follow.
Here's a question,the instructions for the inside of the Puma call for white.Is that right I was thinking a light grey or ivory color would be closer.I have besided to leave the turret mounting plate loose so it can be removed to show some of the int.and I would like to be close.Jeff T.
baconcro
Croatia Hrvatska
Joined: October 18, 2011
KitMaker: 35 posts
Armorama: 34 posts
Joined: October 18, 2011
KitMaker: 35 posts
Armorama: 34 posts
Posted: Friday, March 16, 2012 - 01:03 AM UTC
finished
Posted: Friday, March 16, 2012 - 01:16 AM UTC
Tomislav, lovely Stug, winter white schemes gotta be my favourite, it's a balance to get it just right, add you've found that balance, top work.
I'm still a bit undecided as to what to build, might do the Jagdtiger and if I get time the KV, we'll see.
Jason
Marc
Joined: December 01, 2001
KitMaker: 27 posts
Armorama: 26 posts
KitMaker: 27 posts
Armorama: 26 posts
Posted: Friday, March 16, 2012 - 01:54 AM UTC
Hi
my project
Yes..., a T54
@+
Marc
my project
Yes..., a T54
@+
Marc
GregCloseCombat
California, United States
Joined: June 30, 2008
KitMaker: 2,408 posts
Armorama: 2,394 posts
Joined: June 30, 2008
KitMaker: 2,408 posts
Armorama: 2,394 posts
Posted: Friday, March 16, 2012 - 02:55 AM UTC
Excellent Job Tomislav! The first one finished too
Be sure to upload (1 to 4) pics to the campaign gallery to receive your ribbon and be in the campaign feature article. Pics smaller then 800x600 and you need to be logged in with your Armorama password
http://gallery.kitmaker.net/showgallery.php/cat/27349
@Marc - sweet!
Be sure to upload (1 to 4) pics to the campaign gallery to receive your ribbon and be in the campaign feature article. Pics smaller then 800x600 and you need to be logged in with your Armorama password
http://gallery.kitmaker.net/showgallery.php/cat/27349
@Marc - sweet!
baconcro
Croatia Hrvatska
Joined: October 18, 2011
KitMaker: 35 posts
Armorama: 34 posts
Joined: October 18, 2011
KitMaker: 35 posts
Armorama: 34 posts
Posted: Friday, March 16, 2012 - 04:07 AM UTC
sure do soon as i come home,glad you like stug.
Next one is Bronco's Staghound III
Tojo72
North Carolina, United States
Joined: June 06, 2006
KitMaker: 4,691 posts
Armorama: 3,509 posts
Joined: June 06, 2006
KitMaker: 4,691 posts
Armorama: 3,509 posts
Posted: Friday, March 16, 2012 - 11:52 AM UTC
Tomislav,that is fantastic work for any scale !!! just great technique
ltb073
New York, United States
Joined: March 08, 2010
KitMaker: 3,662 posts
Armorama: 3,078 posts
Joined: March 08, 2010
KitMaker: 3,662 posts
Armorama: 3,078 posts
Posted: Friday, March 16, 2012 - 02:41 PM UTC
I will have to agree with everyone else Tomislav, great job and the weathering looks super
After 3 days of applying decals I think I'm ready to call my Shooting Star finished as well
This is only my 3rd bird since coming back to the hobby so if you jet heads think I missed something or need to add something give me a shout
If not I'll try and get some pictures outside for the Gallery
After 3 days of applying decals I think I'm ready to call my Shooting Star finished as well
This is only my 3rd bird since coming back to the hobby so if you jet heads think I missed something or need to add something give me a shout
If not I'll try and get some pictures outside for the Gallery
zontar
Hawaii, United States
Joined: August 27, 2006
KitMaker: 1,646 posts
Armorama: 1,557 posts
Joined: August 27, 2006
KitMaker: 1,646 posts
Armorama: 1,557 posts
Posted: Friday, March 16, 2012 - 03:01 PM UTC
Sal: looks great and congrats on finishing. Now, I expect you to complete another campaign this weekend!!
I ordered a metal barrel for the Jadgtiger. The gun is just too prominant on this vehicle to be unjustly represented by my crappy putty skills at the barrel seam of the kit parts.
Happy Modelling, -zon
I ordered a metal barrel for the Jadgtiger. The gun is just too prominant on this vehicle to be unjustly represented by my crappy putty skills at the barrel seam of the kit parts.
Happy Modelling, -zon
Ibuild148
California, United States
Joined: May 25, 2009
KitMaker: 177 posts
Armorama: 153 posts
Joined: May 25, 2009
KitMaker: 177 posts
Armorama: 153 posts
Posted: Friday, March 16, 2012 - 03:50 PM UTC
Tomislav - Your Stug looks stellar! One day I must try the "hairspray" technique. By the way whats in the pale?
Sal - Props on the Shooting Star. For your 3rd build on returning to the hobby I think it turned out great. I have one started and must finish.
I'm off to paint the 8 ton road wheels and the rims to my tank trailer Sd.Ah.115. German gray. That will take an hour and I will have accomplished something meaningful.
GregCloseCombat
California, United States
Joined: June 30, 2008
KitMaker: 2,408 posts
Armorama: 2,394 posts
Joined: June 30, 2008
KitMaker: 2,408 posts
Armorama: 2,394 posts
Posted: Friday, March 16, 2012 - 06:40 PM UTC
Sal - looks great. I don't know how you survived all those decals (one of my kryptonite) but it all looks the part. Congrats!
Zon - I look forward to the Jagdtiger. Glad you decided on the metal barrel, it being the most prominent feature sticking out.
ltb073
New York, United States
Joined: March 08, 2010
KitMaker: 3,662 posts
Armorama: 3,078 posts
Joined: March 08, 2010
KitMaker: 3,662 posts
Armorama: 3,078 posts
Posted: Saturday, March 17, 2012 - 01:44 AM UTC
Quoted Text
Sal: looks great and congrats on finishing. Now, I expect you to complete another campaign this
Happy Modelling, -zon
Hey guys thanks for all the complements
But sorry to let you down on your deal lines Zon But I will definitely not be completing another campaign by the end of the weekend, still have too much paint to throw at my SAS Pink Panther
imatanker
Maine, United States
Joined: February 11, 2011
KitMaker: 1,654 posts
Armorama: 1,565 posts
Joined: February 11, 2011
KitMaker: 1,654 posts
Armorama: 1,565 posts
Posted: Saturday, March 17, 2012 - 01:53 AM UTC
Sal,I know I'm a bit behind on the props,and I'm really not a wingy thingy kind of guy,but that sure looks sweeeeet! Nice work dude.Jeff T.
raypalmer
Ontario, Canada
Joined: March 29, 2010
KitMaker: 1,151 posts
Armorama: 51 posts
Joined: March 29, 2010
KitMaker: 1,151 posts
Armorama: 51 posts
Posted: Saturday, March 17, 2012 - 03:25 PM UTC
Ten bucks!
GregCloseCombat
California, United States
Joined: June 30, 2008
KitMaker: 2,408 posts
Armorama: 2,394 posts
Joined: June 30, 2008
KitMaker: 2,408 posts
Armorama: 2,394 posts
Posted: Saturday, March 17, 2012 - 03:50 PM UTC
Nice kit Richard - nothing better then a Sale price
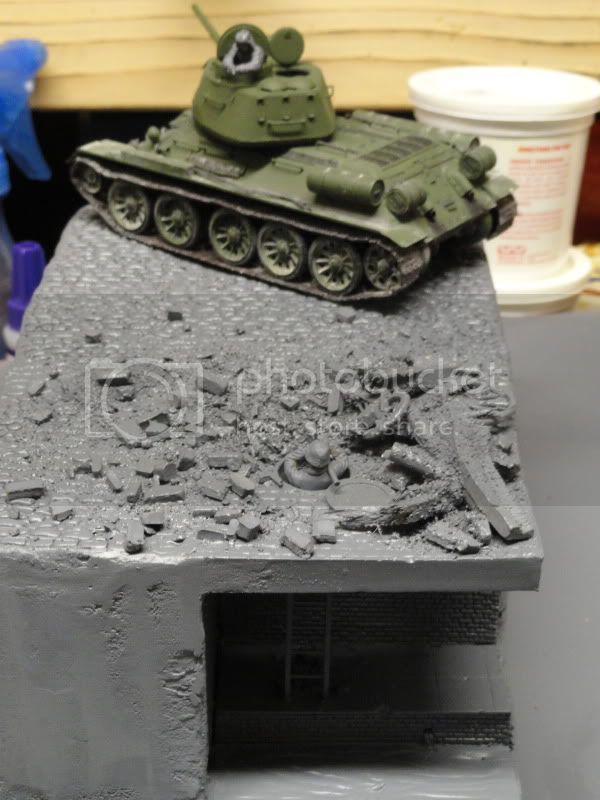
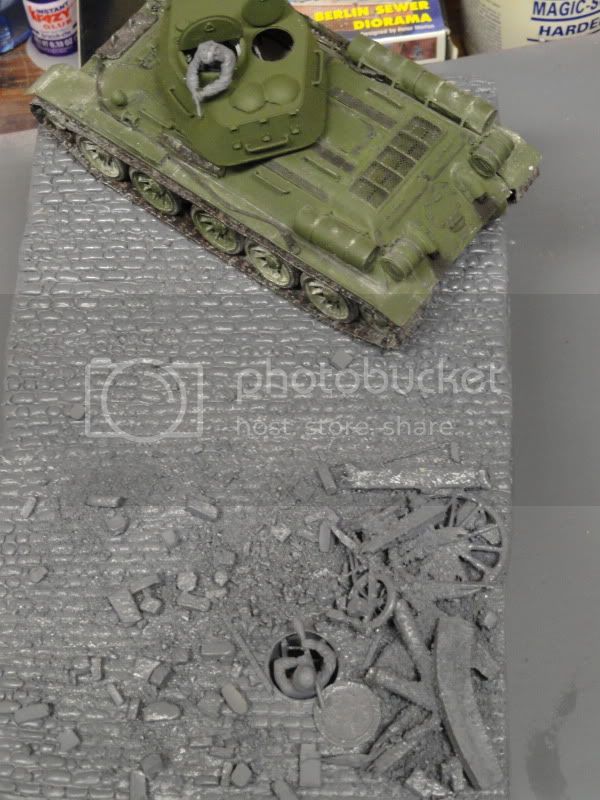
Here's some progress. I added some plastistruct brick wall to the side and will add some bars to the drain. I was thinking of doing a name plate on the front empty area saying 'Berlin Duel 1945' or something catchy.
I used 3 different old paint brushes and bent them to stone making shape then varied the directions (ie upside down, angles) to press into the TAP plastics to make the street. I'll smooth out the sides once this dries. Tips / ideas always welcomed
imatanker
Maine, United States
Joined: February 11, 2011
KitMaker: 1,654 posts
Armorama: 1,565 posts
Joined: February 11, 2011
KitMaker: 1,654 posts
Armorama: 1,565 posts
Posted: Saturday, March 17, 2012 - 09:40 PM UTC
Richard,Nice score!The markings look very interesting.
Greg,Have you used that trick with the paint brushs before,or was it a stroke(so to speak) of genius? Either way it's a great idea and looks fantastic.Jeff T.
GregCloseCombat
California, United States
Joined: June 30, 2008
KitMaker: 2,408 posts
Armorama: 2,394 posts
Joined: June 30, 2008
KitMaker: 2,408 posts
Armorama: 2,394 posts
Posted: Sunday, March 18, 2012 - 04:31 AM UTC
I remembered reading about it somewhere but this was the first time I tried it. I was going to use clay but I'm always afraid what happens when it shrinks - which reminds me I should go check outside what happened to this!
imatanker
Maine, United States
Joined: February 11, 2011
KitMaker: 1,654 posts
Armorama: 1,565 posts
Joined: February 11, 2011
KitMaker: 1,654 posts
Armorama: 1,565 posts
Posted: Sunday, March 18, 2012 - 09:07 AM UTC
Greg...Hope all is well with the roadway.
I finished the int. of the Puma today,will post pics tonight.Jeff T.
zontar
Hawaii, United States
Joined: August 27, 2006
KitMaker: 1,646 posts
Armorama: 1,557 posts
Joined: August 27, 2006
KitMaker: 1,646 posts
Armorama: 1,557 posts
Posted: Sunday, March 18, 2012 - 11:18 AM UTC
Greg: Nice expansion on the roadway and a good solution to the sewer.
Happy Modelling, -zon
imatanker
Maine, United States
Joined: February 11, 2011
KitMaker: 1,654 posts
Armorama: 1,565 posts
Joined: February 11, 2011
KitMaker: 1,654 posts
Armorama: 1,565 posts
Posted: Sunday, March 18, 2012 - 12:24 PM UTC
Yo Zon...It was 72 degrees here today!
Got the inside of the Puma done today.Not sure if I'm happy with it.
Primed
Painted
Weathered
Comments,suggestions welcomed.Jeff T.
Got the inside of the Puma done today.Not sure if I'm happy with it.
Primed
Painted
Weathered
Comments,suggestions welcomed.Jeff T.
GregCloseCombat
California, United States
Joined: June 30, 2008
KitMaker: 2,408 posts
Armorama: 2,394 posts
Joined: June 30, 2008
KitMaker: 2,408 posts
Armorama: 2,394 posts
Posted: Sunday, March 18, 2012 - 04:03 PM UTC
Jeff - nice to see more progress. I'm no expert on red primer.
I'm going to add a destroyed kubelwagen on the left side too. Everything is getting nearer to the painting stage.